EUC Weekly Digest – June 3, 2017

Last Modified: Nov 7, 2020 @ 6:34 am

Here are some EUC items I found interesting last week. For more immediate updates, follow me at http://twitter.com/cstalhood.

For a list of updates at carlstalhood.com, see the Detailed Change Log.


Citrix

XenApp/XenDesktop

Director/Monitoring

WEM/Profile Management

NetScaler MAS

XenMobile

XenServer

Citrix Cloud

Microsoft

Other

Site Updates – May 2017

Last Modified: Nov 7, 2020 @ 6:35 am

To trigger RSS Feed, Mailing List, etc., here is the May 2017 excerpt from the Detailed Change Log.

Session Recording 2402

Last Modified: Apr 19, 2024 @ 6:45 am

Navigation

This article applies to Session Recording 2402, 2203 LTSR CU4, 1912 LTSR CU8, and 7.15.9000 LTSR CU9.

💡 = Recently Updated

Change Log

Planning

Citrix links:

Licensing – Citrix Virtual Apps and Desktops Premium Edition licensing is required.

Farms – There is no relation between Session Recording farms and Citrix Virtual Apps and Desktops farms. You can have Agents from multiple Citrix Virtual Apps and Desktops farms recording to a common Session Recording server. Or you can split a Citrix Virtual Apps and Desktops farm so that different Agents point to different Session Recording servers.

  • Load balancing – Session Recording 7.14 and newer can be load balanced. Build two Session Recording servers pointing to the same SQL database. Configure both of them to store recordings on the same UNC path. More details at Configure Session Recording with load balancing at Citrix Docs.
    • Note: Load Balancing was removed from Session Recording 7.15 LTSR. In Session Recording 7.16 and newer, Load Balancing is fully supported.
  • Scaling – To scale Session Recording to 20,000 users, see Hal Lange and Ryan Revord at Scaling and Load Balancing Session Recording at CUGC.

Disk space – The Session Recording server will need a hard drive to store the recordings. Disk access is primarily writes. You can also store recordings on a UNC path (this is required if load balancing).

Offloaded content (e.g. Teams, Browser Content Redirection) is not recorded.

Certificate – Session Recording server needs a certificate. The certificate must be trusted by Agents and Players. Internal Certificate Authority recommended.

  • If load balancing, on the Citrix ADC, install a certificate that matches the load balanced name.
  • On each Session Recording server, install a certificate that matches the Session Recording server name.

SQL:

  • Supported Versions = SQL 2008 R2 Service Pack 3 through SQL 2019. See Citrix Docs for the list.
    • Azure SQL Database is supported as detailed at Citrix Docs.
  • The SQL database is very small.
  • The database name defaults to CitrixSessionRecording and can be changed.
  • A separate database is created for CitrixSessionRecordingLogging.
  • Temporary sysadmin (or dbcreator and securityadmin) permissions are needed to create the database, and sysadmin can be revoked after installation.
  • SQL Browser Service must be running.
  • SQL Server High Availability (AlwaysOn Availability Groups, Clustering, Mirroring) is supported. See Install Session Recording with database high availability at Citrix Docs. And see Citrix Blog Post Session Recording 7.13 – New HA and Database Options

Session Recording Versions

Session Recording is located on the Citrix Virtual Apps and Desktops (CVAD) or XenApp/XenDesktop ISO.

Session Recording security vulnerability fixed in version 2311, version 2203 LTSR CU4, and version 1912 LTSR CU8 hotfix 19.12.8100.4 and later.

The most recent Current Release version of Session Recording is 2402.

For LTSR versions of Citrix Virtual Apps and Desktops (CVAD), deploy the version of Session Recording that came with your version of CVAD. The installation instructions for Session Recording 2311, Session Recording 2203, Session Recording 1912 and Session Recording 7.15 are essentially the same.

Session Recording Server Upgrade

You can upgrade from Session Recording 7.6 and newer.

  1. If this is a new installation, skip to Install.
  2. Session Recording 2203 and newer do not support Windows Server 2012 R2.
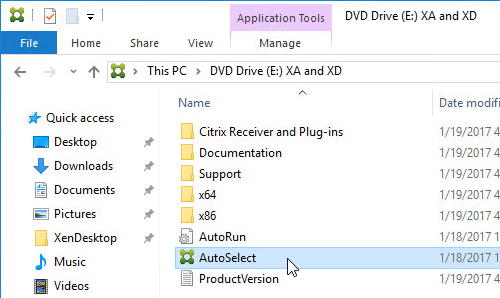
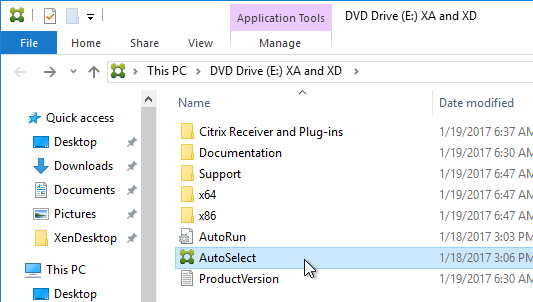
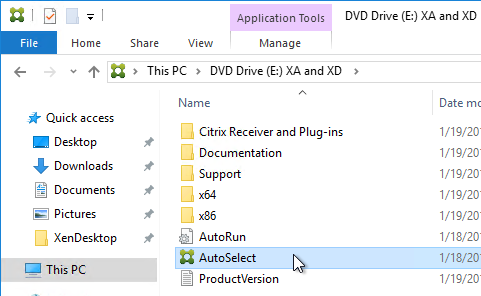
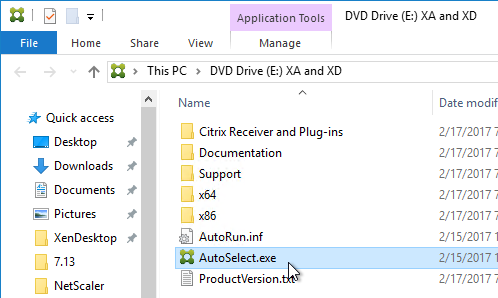
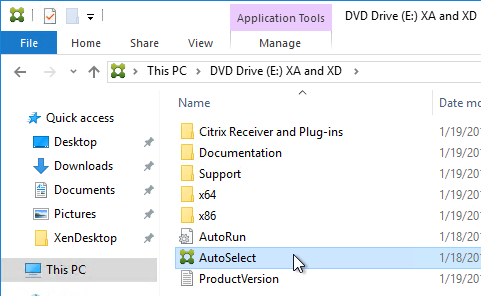
  3. Go to the downloaded Citrix Virtual Apps and Desktops (CVAD) ISO and run AutoSelect.exe.
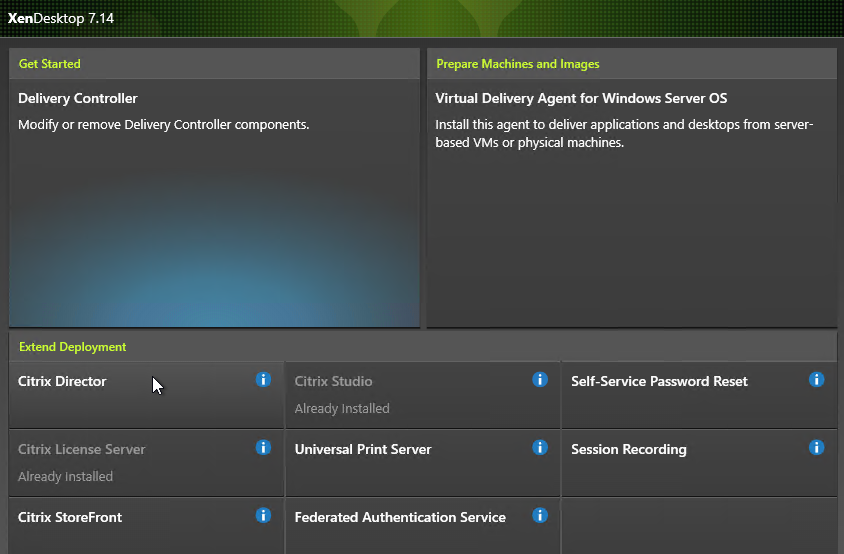
  4. On the bottom right, click the Session Recording box.
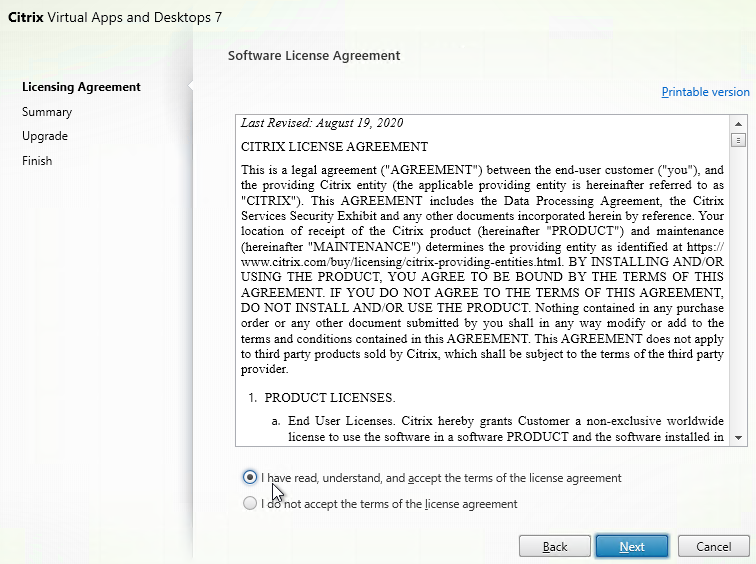
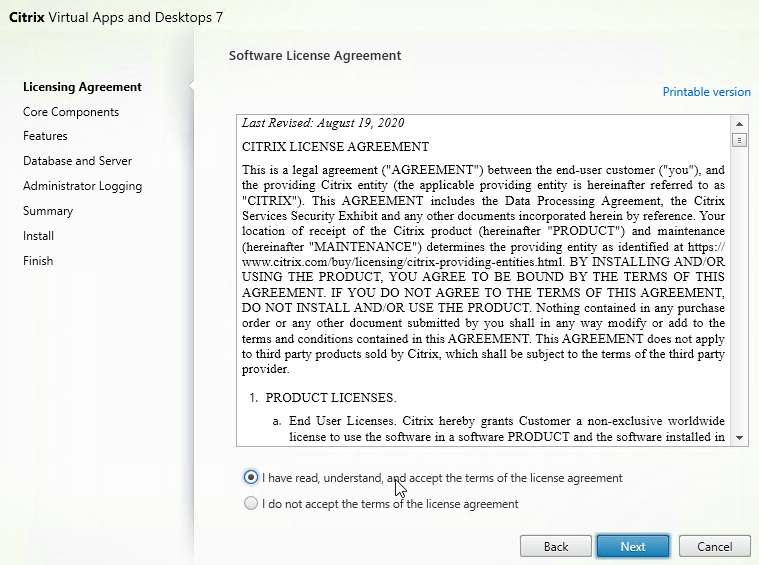
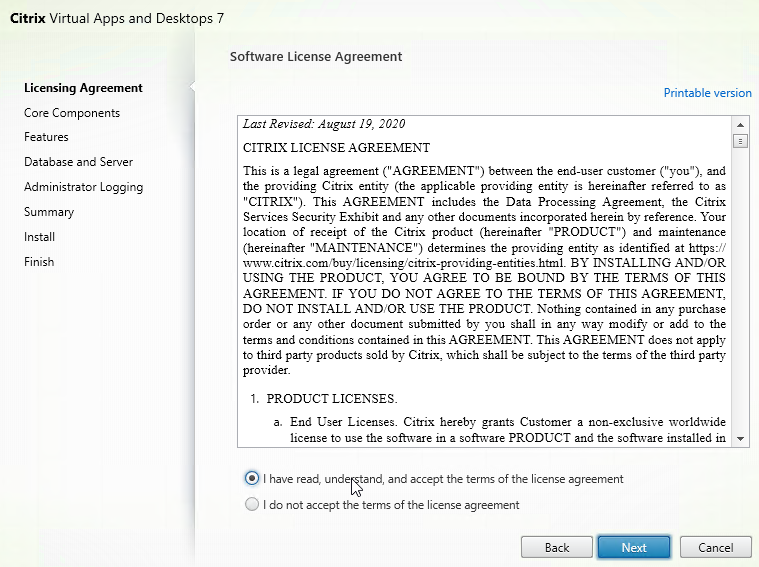
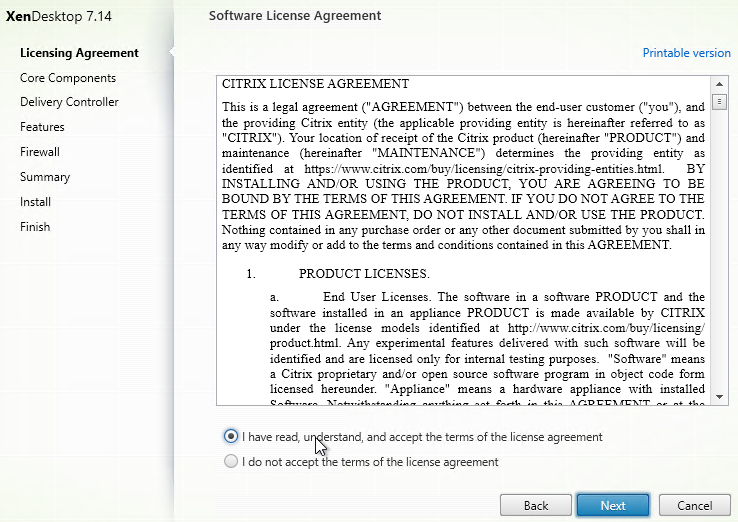
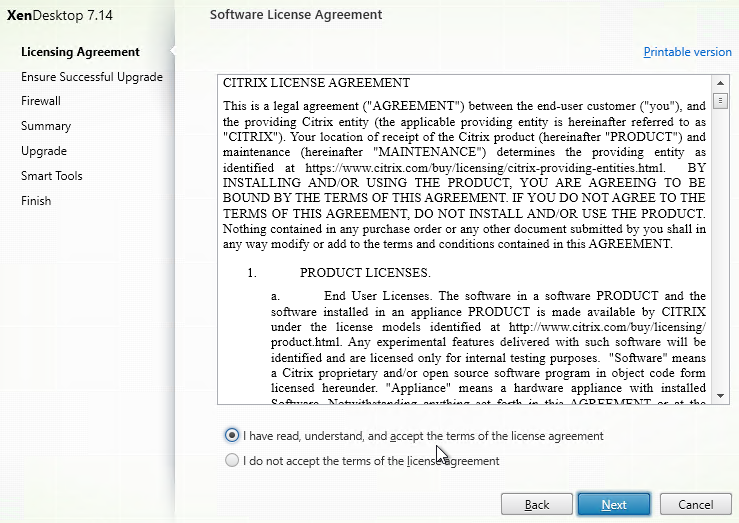
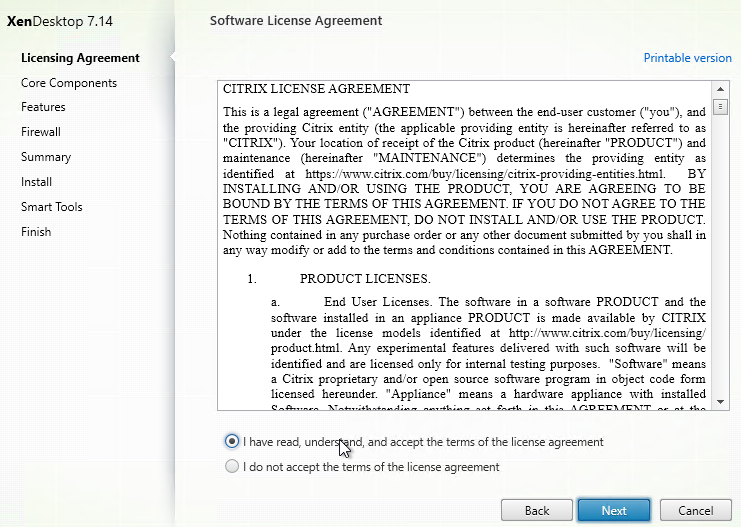
  5. In the Licensing Agreement page, change the selection to I have read, understand, and accept the terms, and click Next.
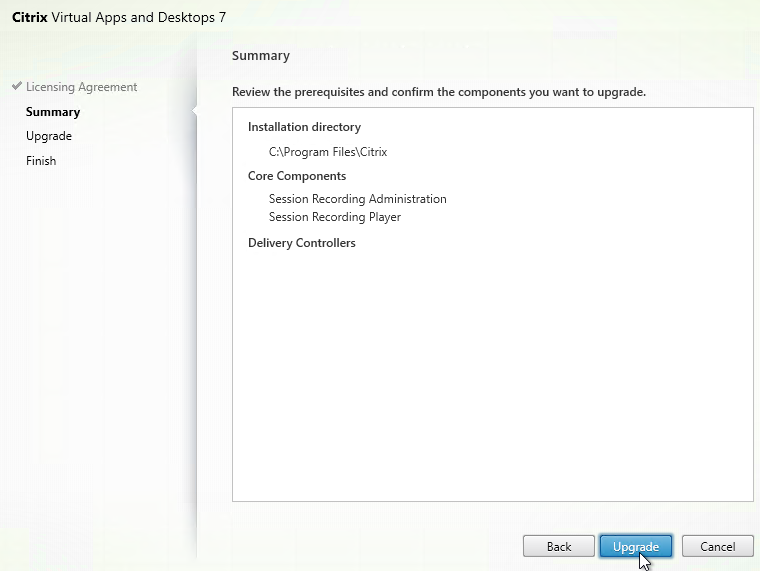
  6. In the Summary page, click Upgrade.
  7. Click OK to acknowledge that the upgrade cannot be cancelled.
  8. The machine will probably require a restart.

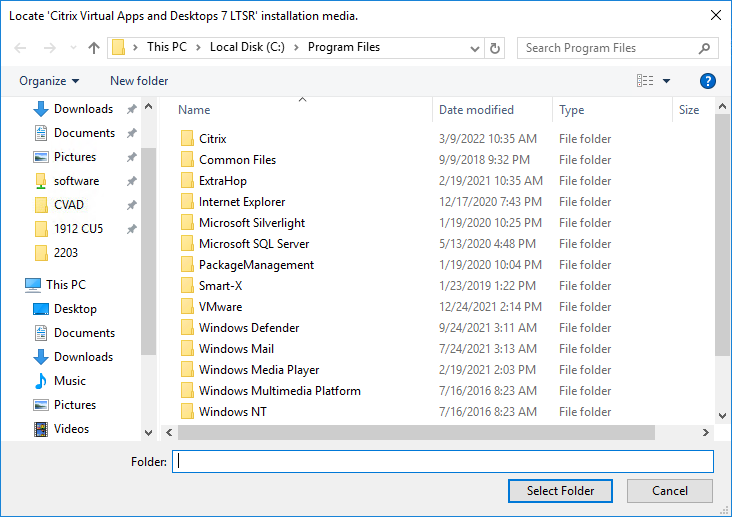
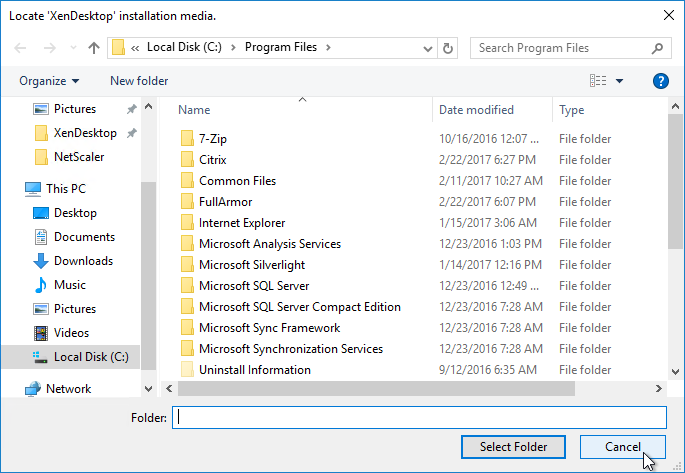
    1. After the reboot, and after logging in again, you might see a Locate ‘Citrix Virtual Apps and Desktops 7’ installation media window. Don’t click anything yet.
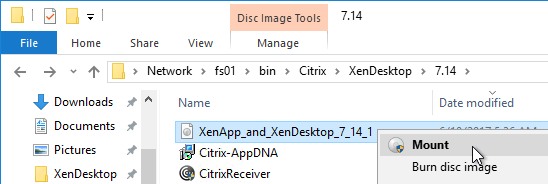
    2. Go to the Citrix_Virtual_Apps_and_Desktops_7_2402_LTSR.iso file and mount it.
    3. Go back to the Locate ‘Citrix Virtual Apps and Desktops 7’ installation media window.
    4. On the left, expand This PC, and click the DVD Drive.
    5. Click Select Folder.
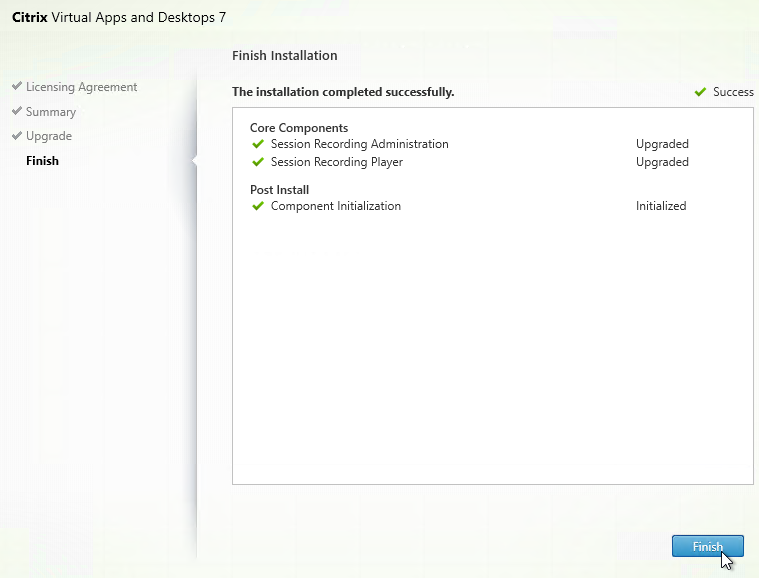
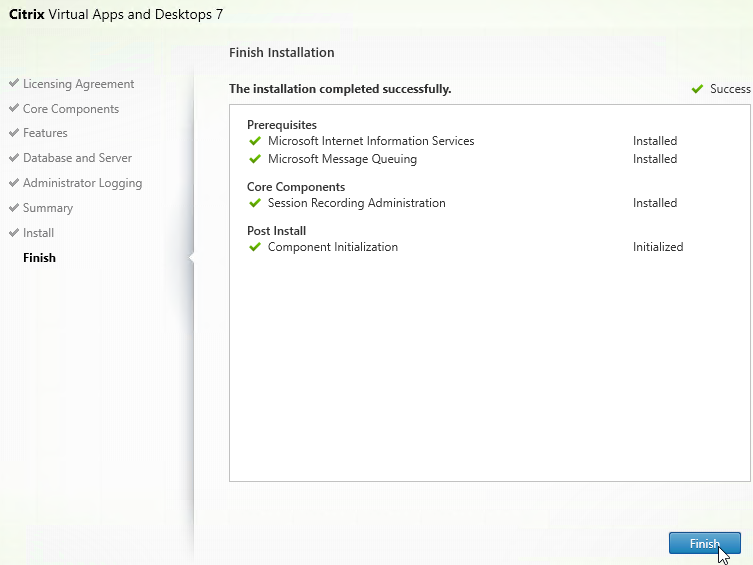
  9. In the Finish page, click Finish.
  10. Also upgrade Broker_PowerShellSnapIn_x64.msi from \x64\Citrix Desktop Delivery Controller on the CVAD ISO.

  11. Upgrade the Session Recording Agents.

Session Recording Server New Installs

Install

  1. Session Recording 2203 and newer no longer support Windows Server 2012.
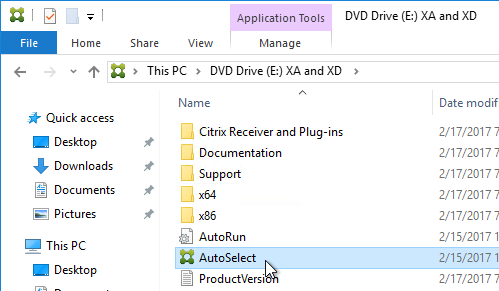
  2. Go to the downloaded Citrix Virtual Apps and Desktops (CVAD) ISO and run AutoSelect.exe.
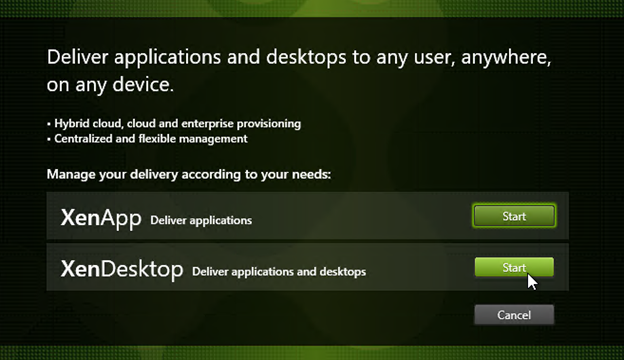
  3. If you see the Deliver applications and desktops screen, click either Virtual Apps or Virtual Apps and Desktops. The only difference is the product name shown in the installers.
  4. On the bottom right, click the Session Recording box.
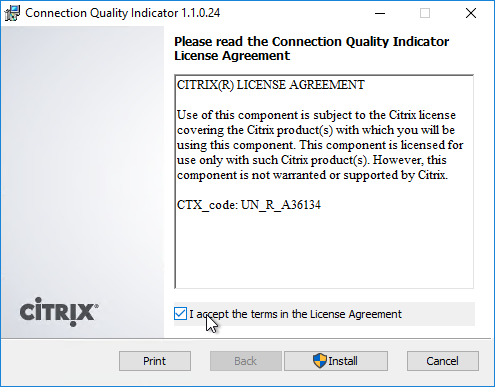
  5. In the Licensing Agreement page, change the selection to I have read, understand, and accept the terms, and click Next.
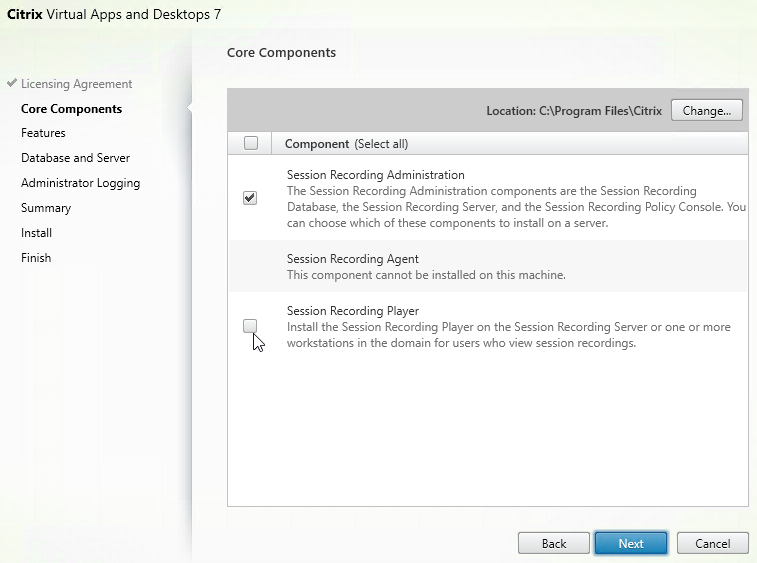
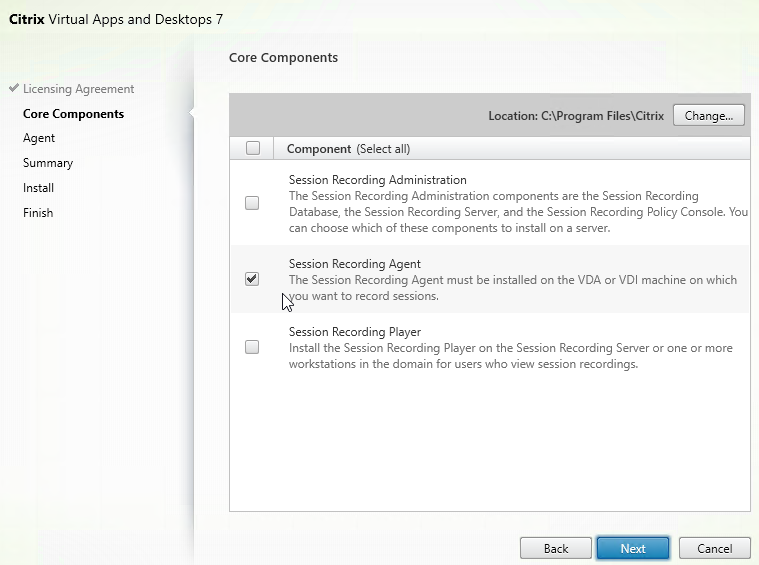
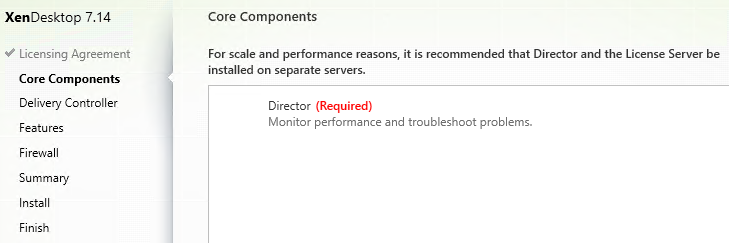
  6. In the Core Components page, uncheck the box next to Session Recording Player. The Player is typically installed on physical workstations, but not on the Session Recording server. Click Next.
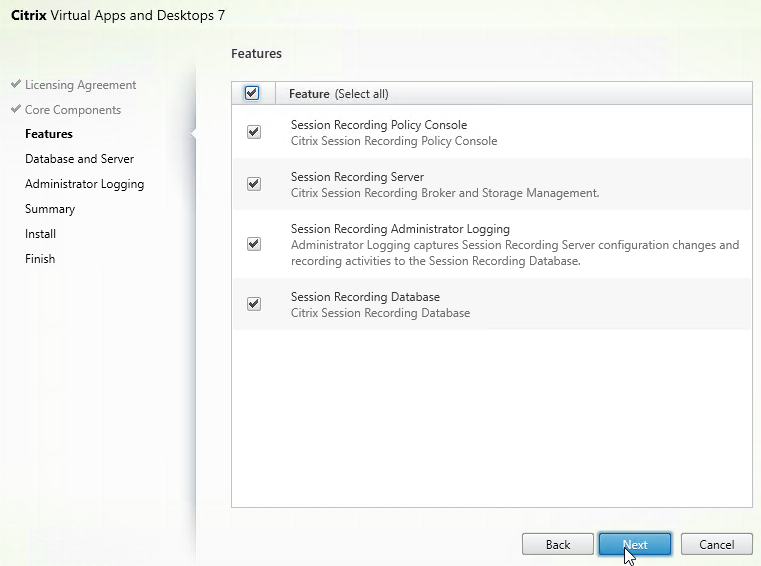
  7. In the Features page, on the first Session Recording server, install everything.
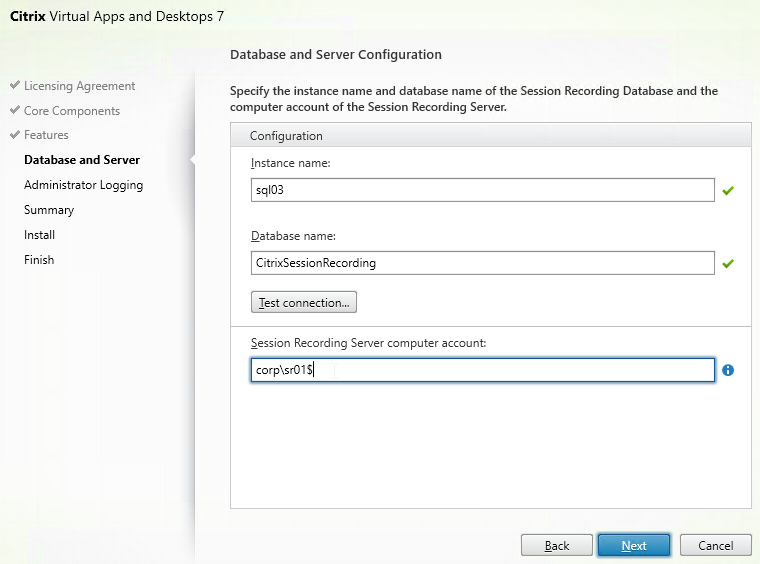
  8. In the Database and Server page, fill out the fields. Enter the SQL server name. Azure SQL Database is supported as detailed at Citrix Docs. Enter the database name. Click Test connection. Each load balanced Session Recording server must point to the same database.
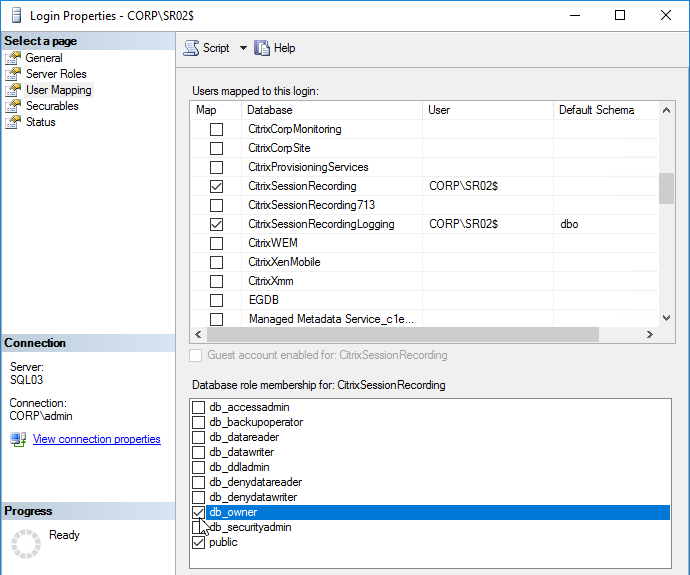
  9. Session Recording 2402 and newer automatically assign the local machine’s computer account as db_owner to the new database. In older Session Recording, enter the domain\computer_account$ for the Session Recording server. Click Next.

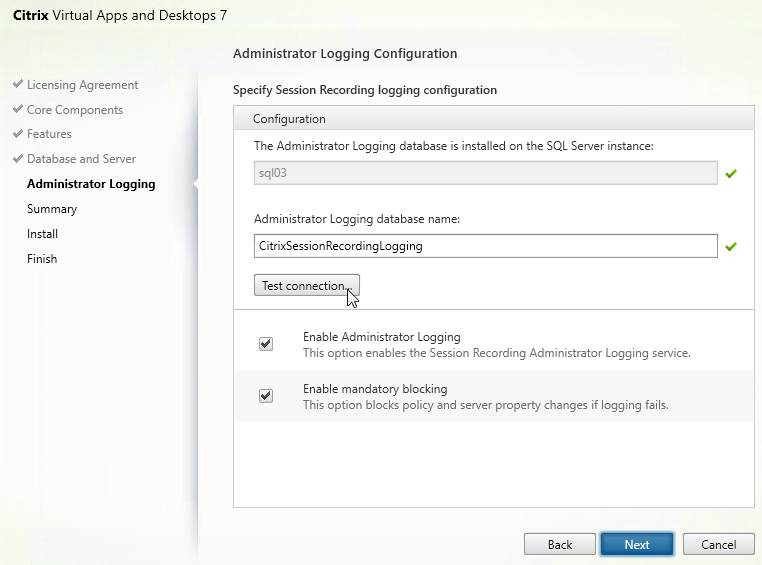
  10. In the Administrator Logging Configuration page, enter the name of the SQL database, click Test connection, and then click Next.
  11. In the Summary page, click Install.
  12. The installer might require a restart. Let it restart, and login again.

    1. After the reboot, and after logging in again, you might see a Locate ‘Citrix Virtual Apps and Desktops 7’ installation media window. Don’t click anything yet.
    2. Go to the Citrix_Virtual_Apps_and_Desktops_7_2402_LTSR.iso file and mount it.
    3. Go back to the Locate ‘Citrix Virtual Apps and Desktops 7’ installation media window.
    4. On the left, expand This PC, and click the DVD Drive.
    5. Click Select Folder.
  13. In the Finish page, click Finish.

Antivirus Exclusions

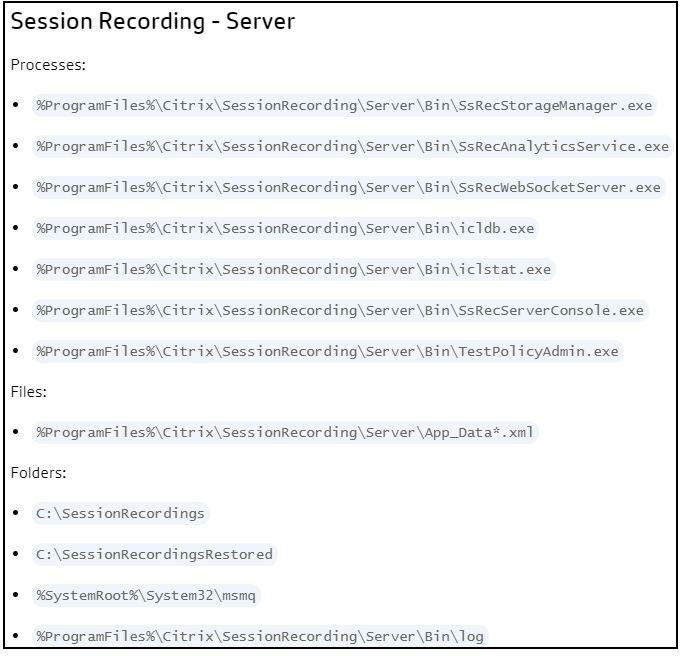
See Endpoint Security and Antivirus Best Practices at Citrix Tech Zone

IIS Certificate

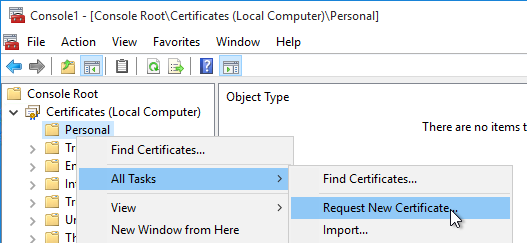
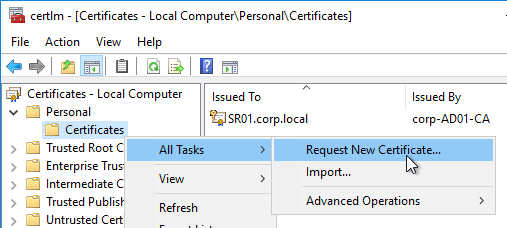
  1. Use MMC Certificates snap-in (certlm.msc), or IIS, or similar, to request a machine certificate.
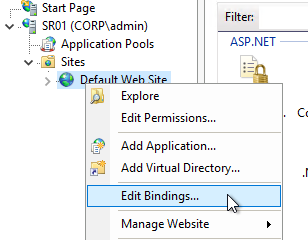
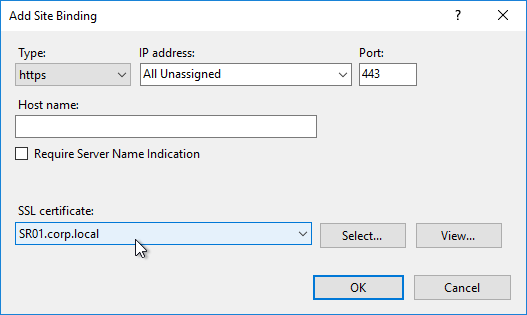
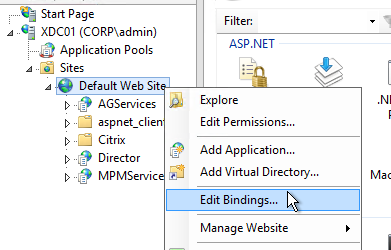
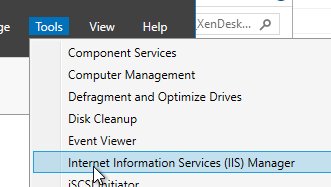
  2. In IIS Manager, right-click the Default Web Site, and click Edit Bindings.
  3. On the right, click Add.
  4. Change the Type to https.
  5. Select the certificate, and click OK.

Session Recording Server Configuration

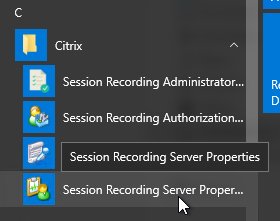
  1. From Start Menu, run Session Recording Server Properties.
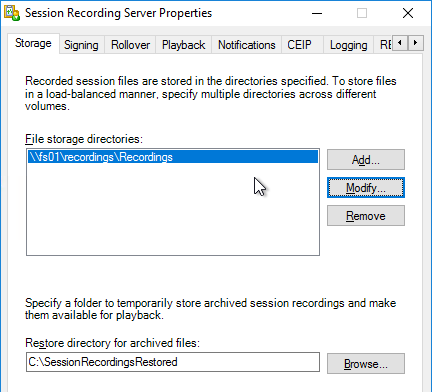
  2. In the Storage tab, specify a path that has disk space to hold the recordings. UNC is supported. If load balancing, UNC is required. Azure Files is an option in Session Recording 2103 and newer.

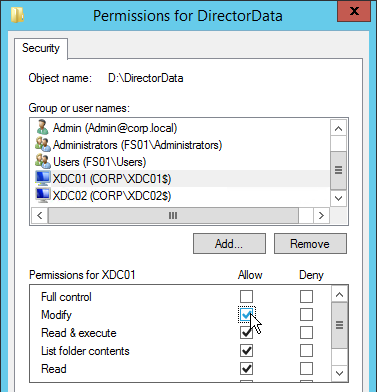
    1. When using a UNC path, all Session Recording servers (AD computer objects) need modify access.
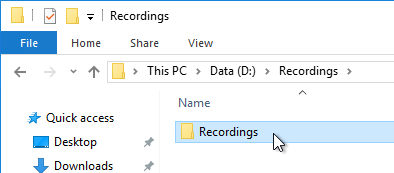
    2. The share must have a subfolder. The recordings will be saved to the subfolder.
    3. In the Session Recording Server Properties tool, add the UNC path with subdirectory to the Storage tab.
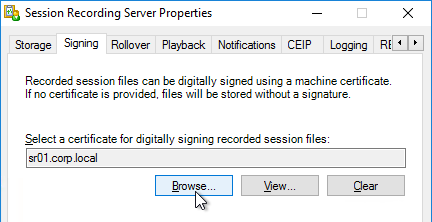
  3. In the Signing page, select (Browse) a certificate to sign the recordings.
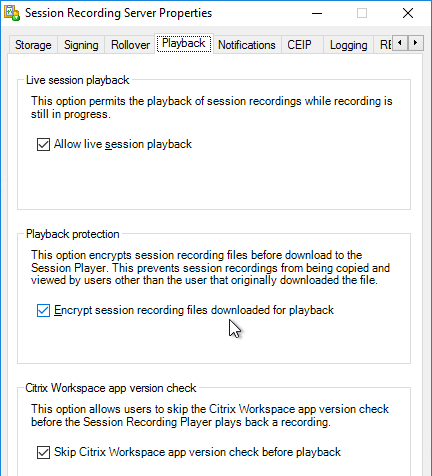
  4. In the Playback tab, notice that Session Recording files are encrypted before transmit. Also, it’s possible to view live sessions but live sessions are not encrypted.
  5. In the Notifications tab, you can change the message displayed to users before recording begins. Session Recording 2311 and newer have an option to Allow end user to deny recording of their session.

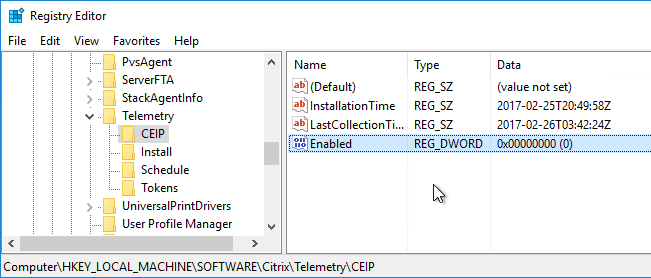
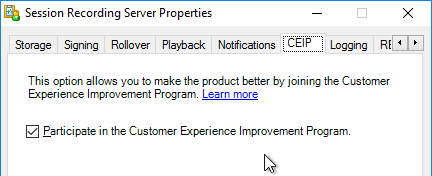
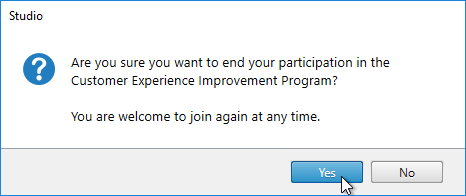
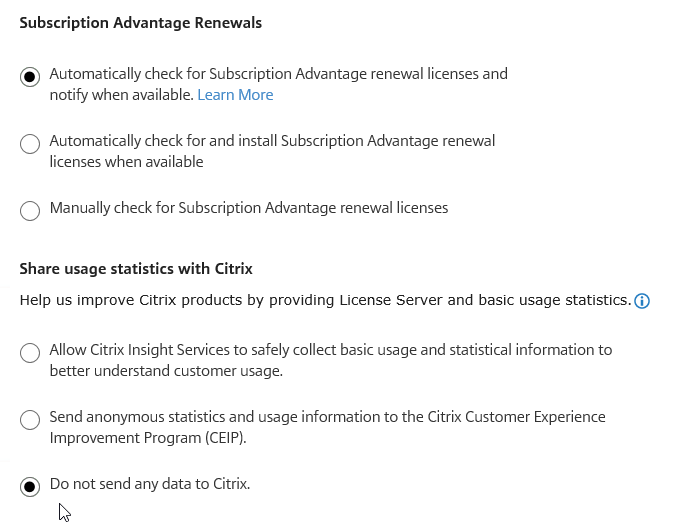
  6. The CEIP tab lets you enable or disable the Customer Experience Improvement Program.
  7. See https://www.carlstalhood.com/delivery-controller-cr-and-licensing/#ceip for additional places where CEIP is enabled.
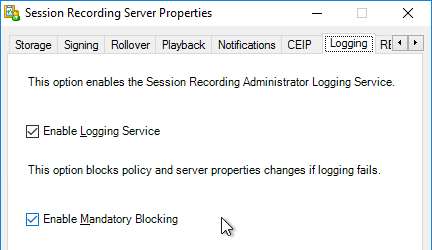
  8. The Logging tab lets you configure Logging.
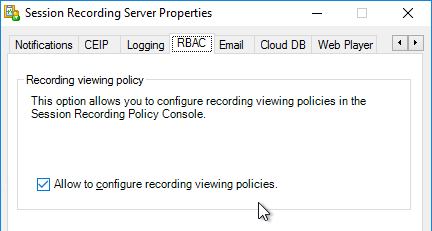
  9. The RBAC tab lets you enable Recording Viewing Policies.
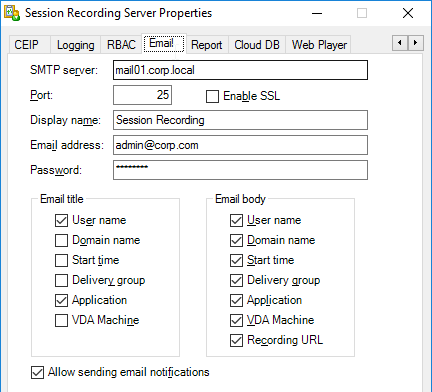
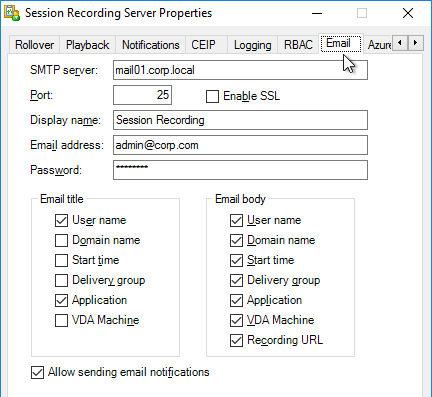
  10. The Email tab is for Email Alert Policies.
  11. Session Recording 2206 adds the Report tab, which lets you schedule weekly reports with statistics on screen recordings: Total size of all recordings; Storage Usage per day; and number of sessions recorded per day. Session Recording 2311 can Send event response reports by email.
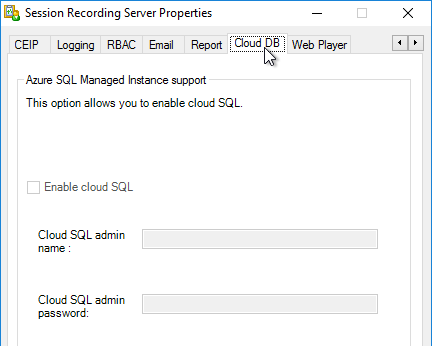
  12. The Cloud DB tab lets you store the Recording database in Azure SQL.
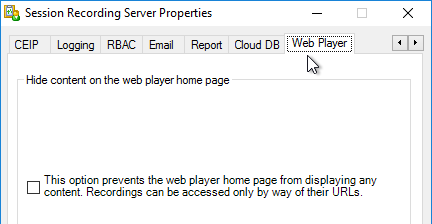
  13. Web Player tab lets you hide recordings in Web Player unless the user received a URL in an Email Alert Policy.
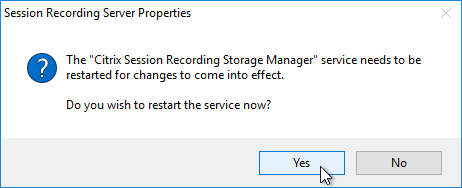
  14. When you click OK, you’ll be prompted to restart the service.
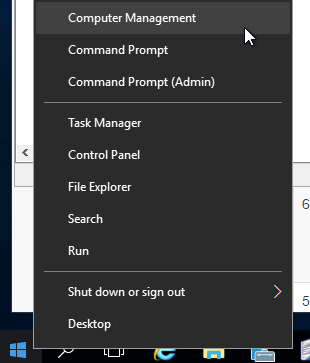
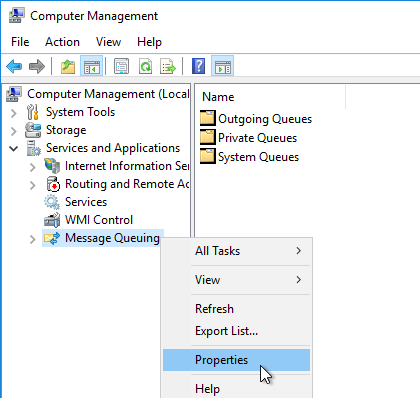
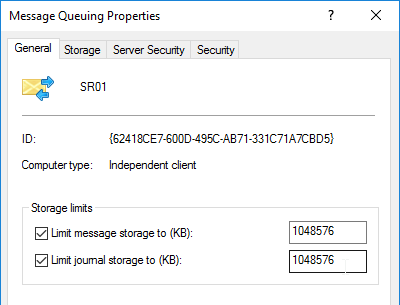
  15. Session Recording relies on Message Queuing. In busy environments, it might be necessary to increase the Message Queuing storage limits. See CTX209252 Error: “Data lost while recording file…” on Citrix SmartAuditor.


David Ott Session Recording Cleanup Script: You may notice that the session recording entries/files don’t go away on their own. Here is how to clean them up. Just create a scheduled task to run the code below once per day (as system – elevated). See David’s blog post for details.

C:\Program Files\Citrix\SessionRecording\Server\Bin\icldb.exe remove /RETENTION:7 /DELETEFILES /F /S /L

Session Recording 2303 and newer support the RELOCATE parameter to the IMPORT command and the FILTER parameter to the ARCHIVE and REMOVE commands of the ICLDB utility. See CTX134777 How To Remove Old Session Recording Files From File Server And Database and Citrix Docs Manage Recordings.

Load Balancing

Note: Session Recording load balancing was removed from 7.15 LTSR but added back in 7.16 and newer.

  1. In SQL Server Management Studio, make sure each load balanced Session Recording server (AD computer account) is granted db_owner role in the Session Recording databases.
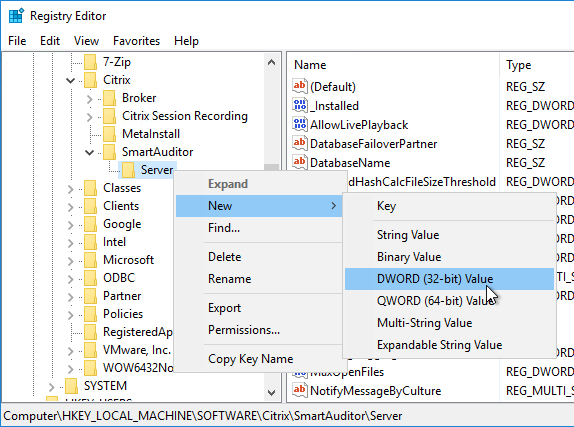
  2. On each Session Recording server, open regedit.
  3. Navigate to HKLM\Software\Citrix\SmartAuditor\Server.
  4. Create a new DWORD value named EnableLB and set it to 1. Repeat on both Session Recording servers.
  5. Configure Citrix ADC load balancing as detailed at Citrix Docs. Load balance ports 80, 1801, 22334, and 443.
    • The 443 vServer Load Balancing Method should be set to LEASTBANDWIDTH (or LEASTPACKETS).
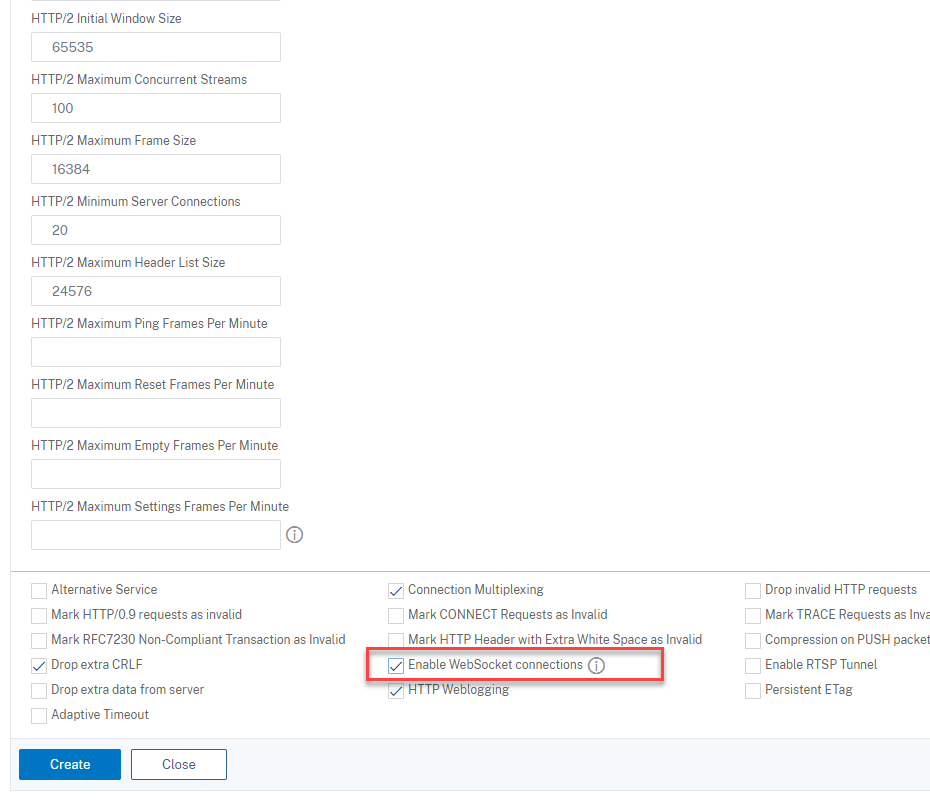
    • The 22334 vServer needs WebSockets enabled in an HTTP profile.
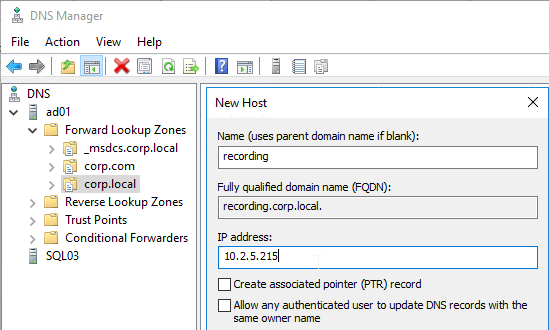
  6. Create a DNS host record that resolves to the Load Balancing VIP and matches the certificate bound to the vServer.
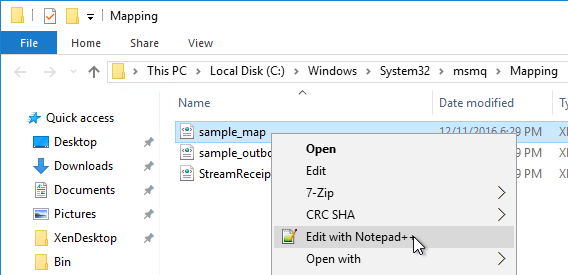
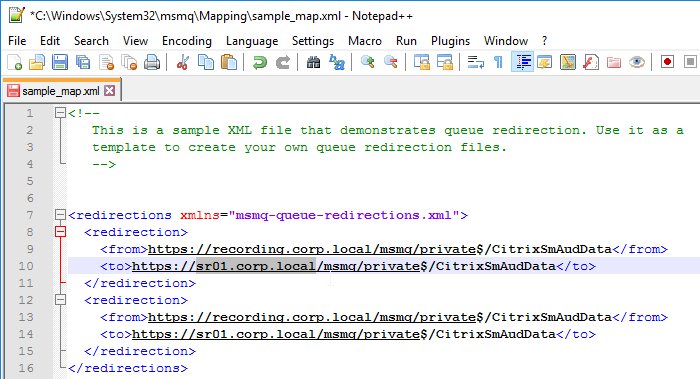
  7. Go to C:\Windows\System32\msmq\Mapping and edit the file sample_map.xml.
  8. Follow the instructions at Configure Session Recording with load balancing at Citrix Docs. Each Session Recording server has a unique configuration for this file since the <to> element points to the local server name.
  9. When saving the file, you might have to save it to a writable folder, and then move it to C:\Windows\System32\msmq\Mapping.
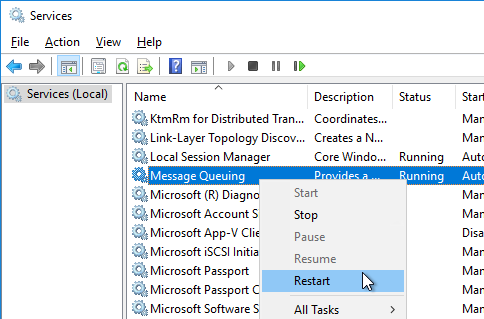
  10. Then restart the Message Queuing service on each Session Recording server.
  11. C:\Program Files\Citrix\SessionRecording\Scripts\SrServerConfigurationSync.ps1 can export configurations from this Server registry and import the registry to the other Session Recording Server registries. You can also use the SrServerConfigurationSync.ps1 script to add redirection mapping for message queuing. See Citrix Docs for details.

Authorization

Authorization is configured separately on each load balanced Session Recording server.

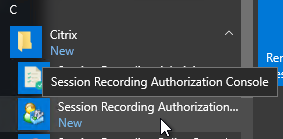
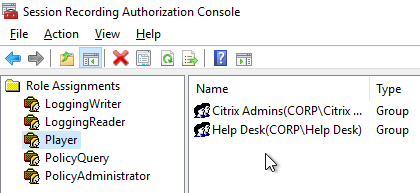
  1. From the Start Menu, run Session Recording Authorization Console.
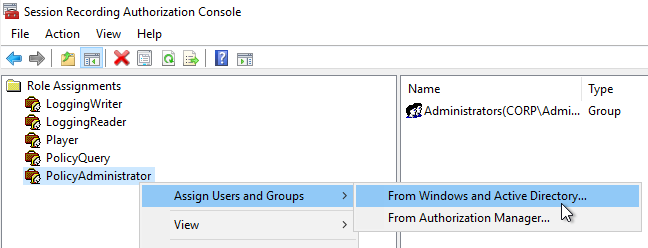
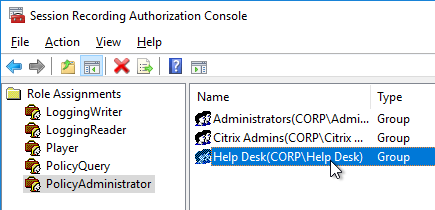
  2. Right-click the PolicyAdministrator role, expand Assign Users and Groups, click From Windows and Active Directory and then add your Citrix Admins group.
  3. If you use Director to configure Session Recording, add the Director users to the PolicyAdministrator role.
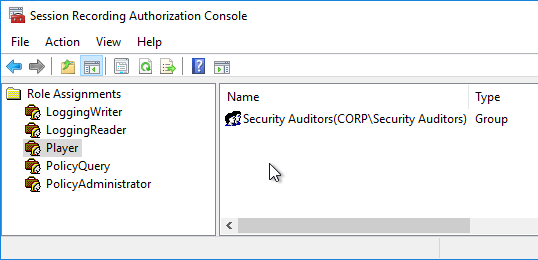
  4. In the Player role, add users that can view the recordings.
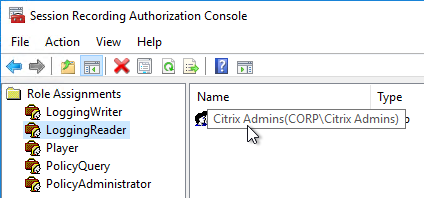
  5. By default, nobody can see the Administration Log. Add auditing users to the LoggingReader role.
  6. Repeat the authorization configuration on additional load balanced Session Recording servers.
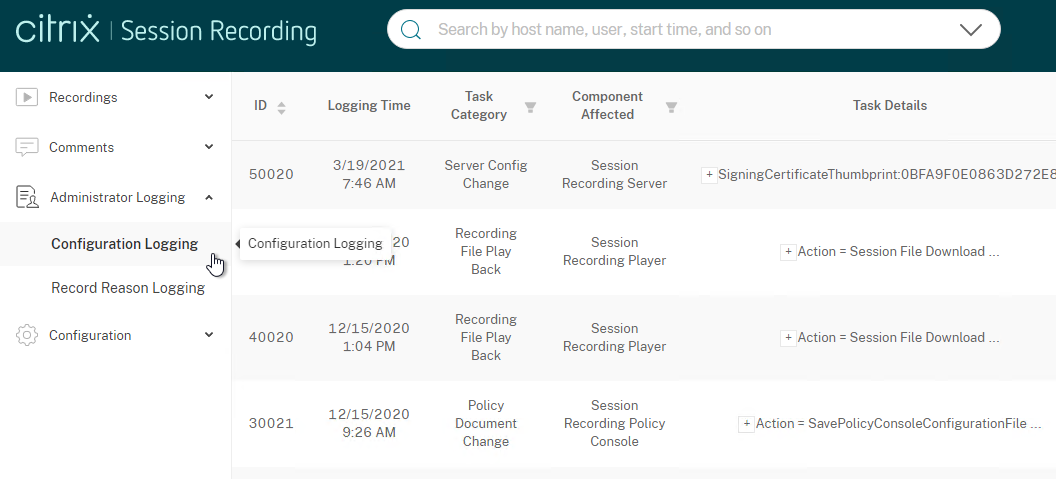
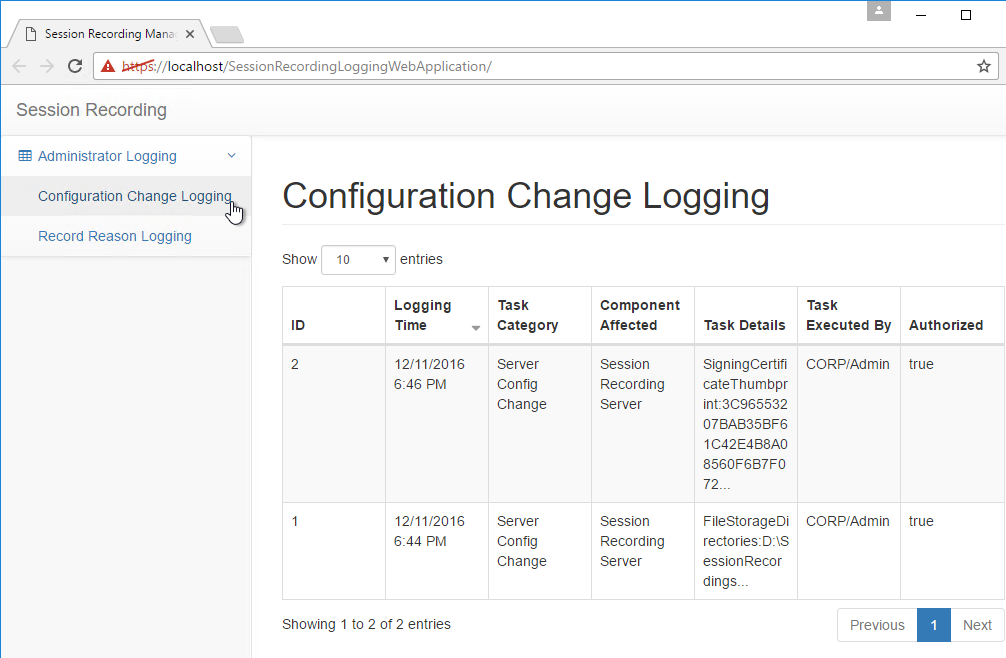
  7. In Session Recording 2009 and newer, if you open WebPlayer (https://SRFQDN/WebPlayer), you can see the Administrator Logging. Only members of the LoggingReader role can see the data.

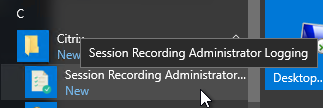
    • In older versions of Session Recording, opens the webpage https://SR01.corp.local/SessionRecordingLoggingWebApplication/. Only members of the LoggingReader role can see the data.

Recording Policies

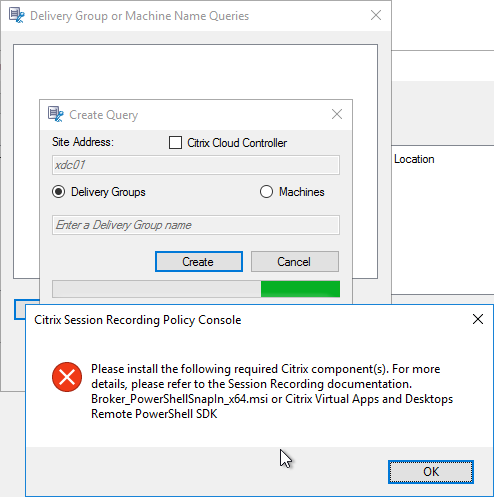
  1. Recording Policies can be configured to apply only specific Delivery Groups. To enumerate the Delivery Groups, on your Session Recording server, install Broker_PowerShellSnapIn_x64.msi, which is located under \x64\Citrix Desktop Delivery Controller on the CVAD ISO (e.g., CVAD 2402).

    • You’ll need to update this snap-in whenever you update CVAD.

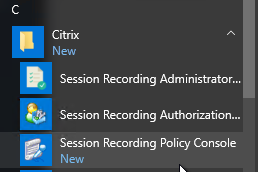
  2. From the Start Menu, run Session Recording Policy Console.
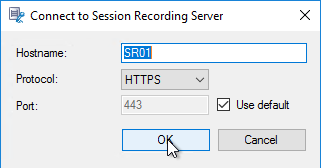
  3. Enter the hostname of the Session Recording server, and click OK.
  4. Under Recording Policies, only one policy can be enabled at a time. By default, no recording occurs. To enable recording, right-click one of the built-in policies and click Activate Policy. Session Recording 2308 and newer have built-in policies to record audio.
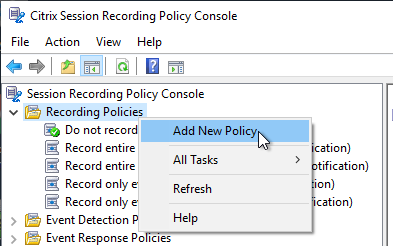
  5. Or you can create your own policy by right-clicking Recording Policies and clicking Add New Policy.
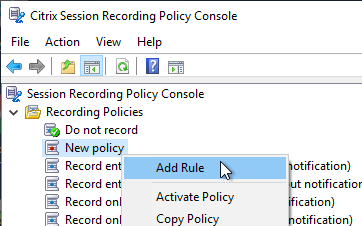
  6. After the policy is created, right-click it, and click Add Rule.
  7. Decide if you want notification or not. Decide if you want to record only events. Session Recording 2308 and newer have options to record audio and/or lossy screen recording. Session Recording 2311 and newer let you Hide specific applications during screen recording. Click Next

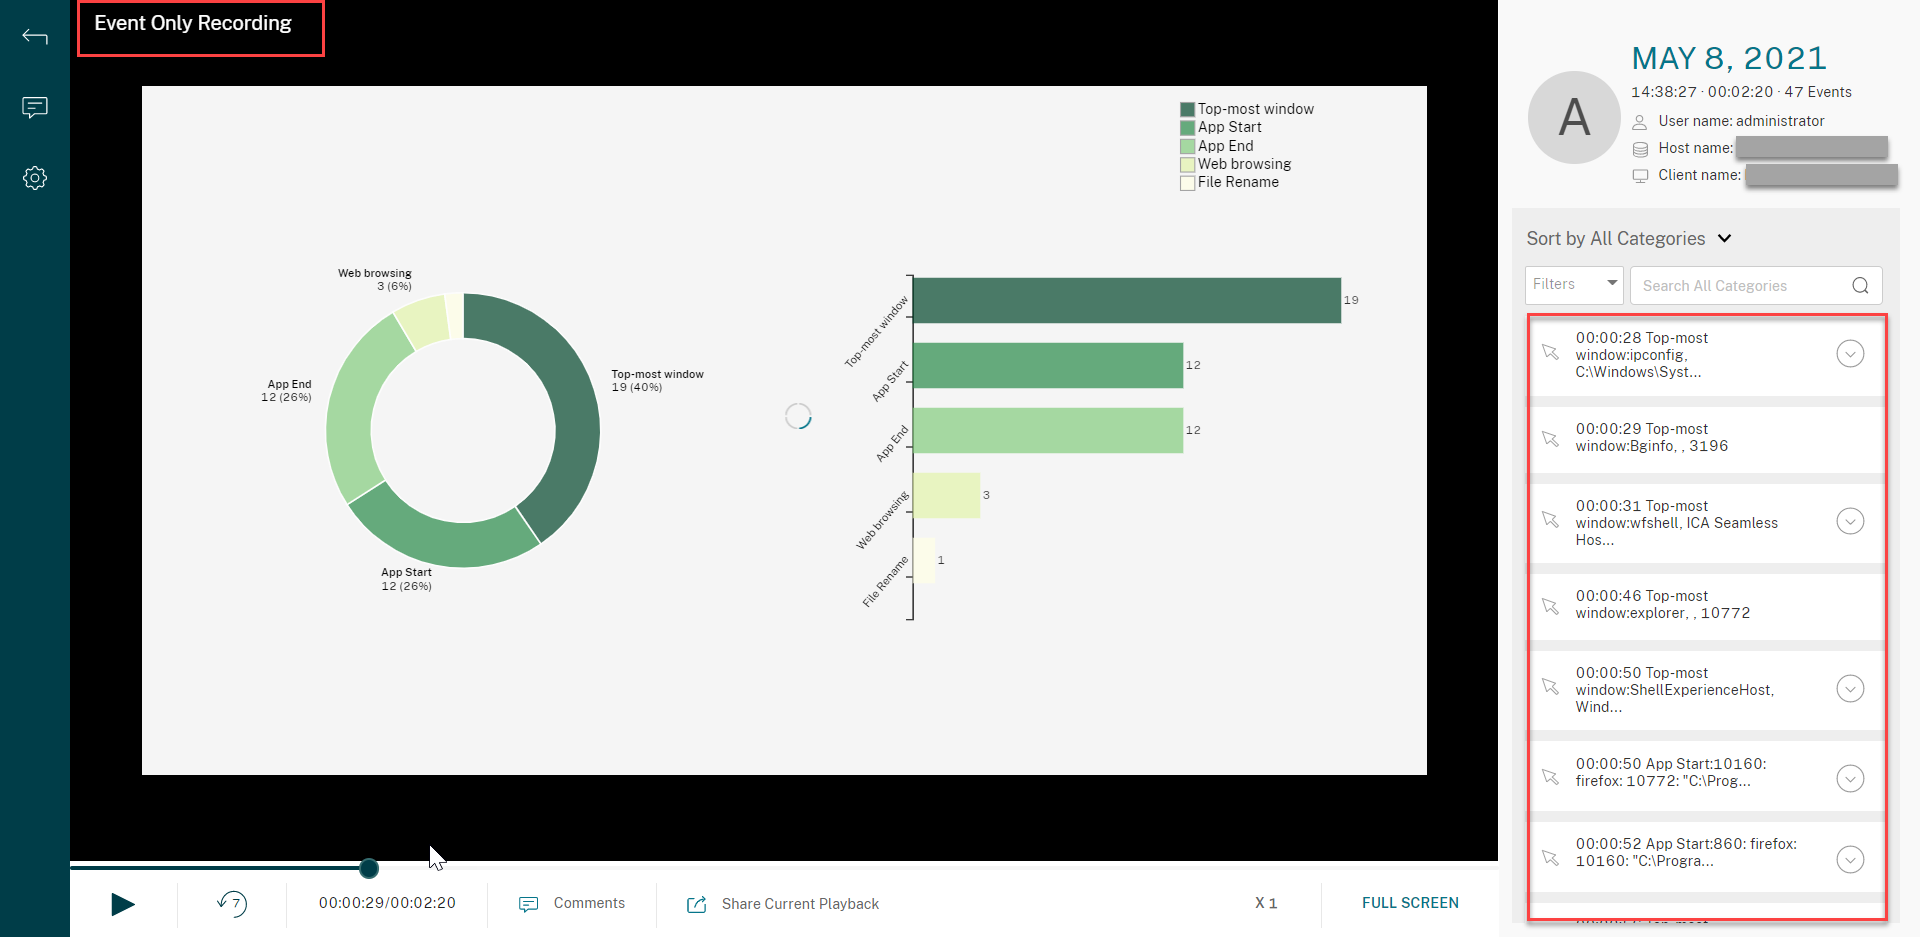
    1. Event only recording is available in Session Recording 2106 and newer. In the Web Player, it looks something like this:
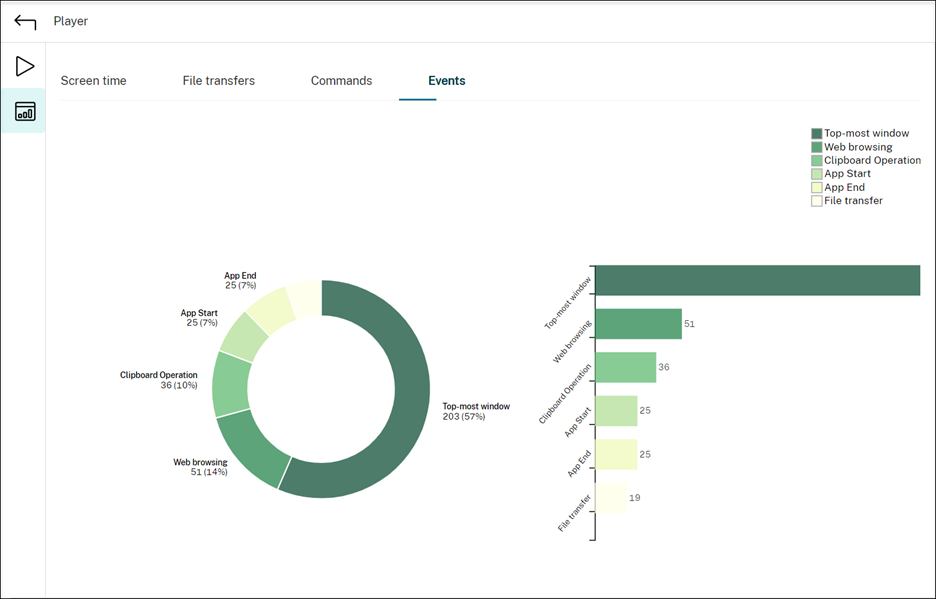
  8. Session Recording 2109 adds statistics to the Web Player. See View graphical event statistics at Citrix Docs.
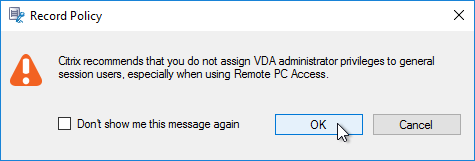
  9. Click OK to acknowledge this message.
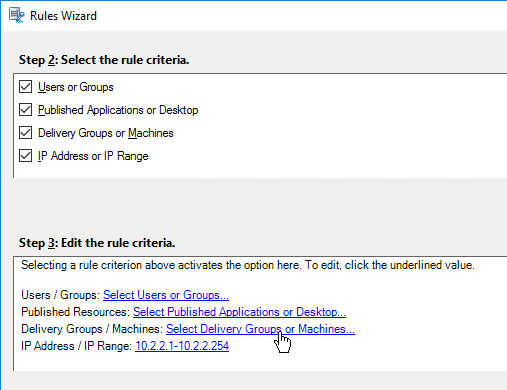
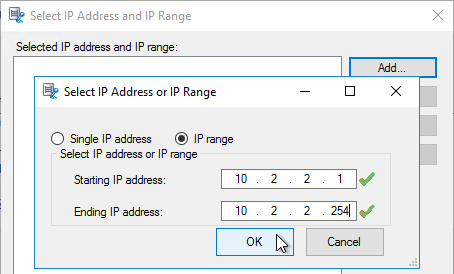
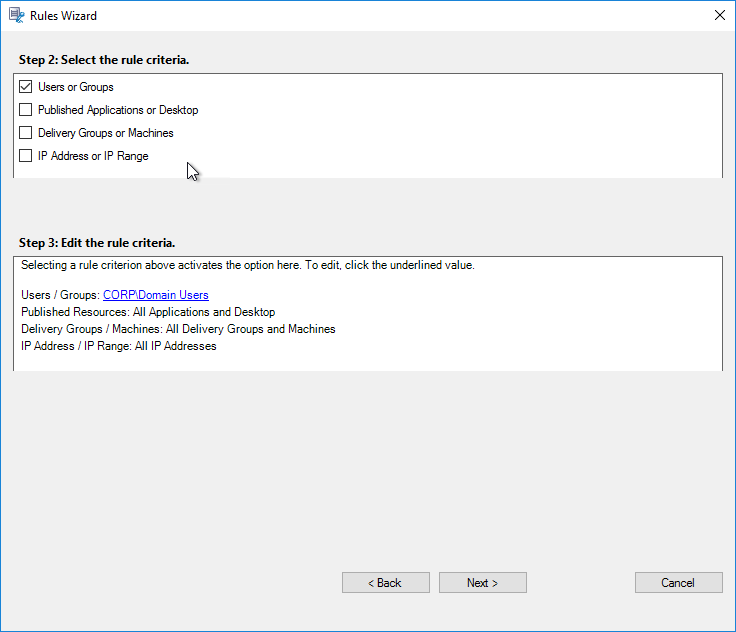
  10. Choose the rule criteria. You can select more than one. Session Recording has an IP Address or IP Range rule.
  11. Then click the links on the bottom specify the groups, applications, servers, and/or IP range for the rule.

  12. Session Recording 2402 and newer have a Filter option where you can enter SmartAccess tags.
  13. Click Next.
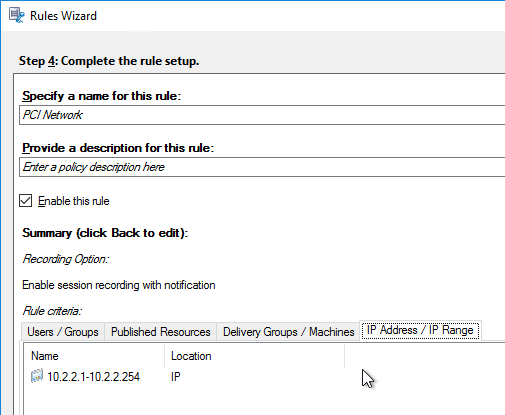
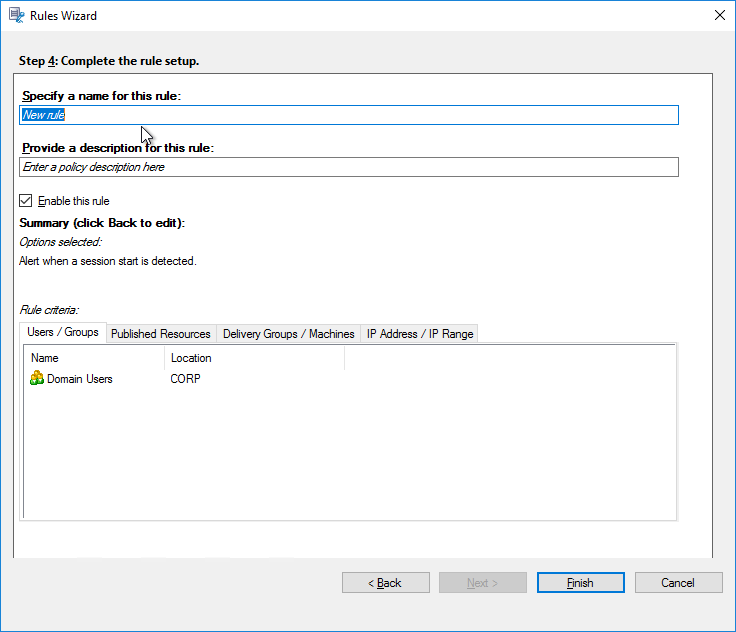
  14. Give the rule a name and click Finish.
  15.  Continue adding rules.
  16. When done creating rules, right-click the policy, and click Activate Policy.
  17. You can also rename the policy you created.

Recording Viewing Policies

Session Recording 1906 and newer support creating policies to limit whose recordings a viewer can see.

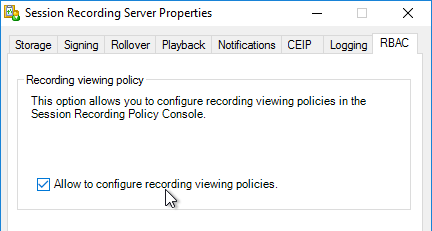
  1. On Session Recording servers 1909 and newer, open Session Recording Server Properties, switch to the tab named RBAC, and check the box next to Allow to configure recording viewing policies.

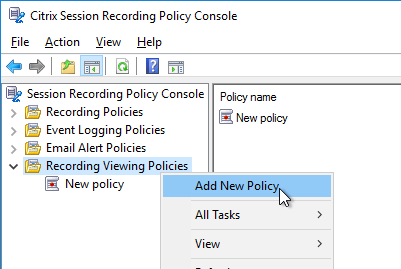
  2. When you re-open the Citrix Session Recording Policy Console, you’ll see a new node named Recording Viewing Policies.
  3. Right-click Recording Viewing Policies and click Add New Policy.
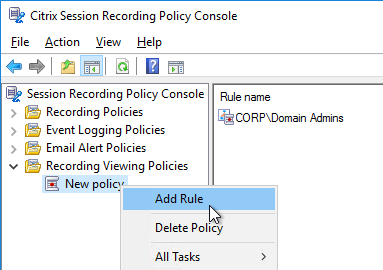
  4. Right-click the new policy and click Add Rule.
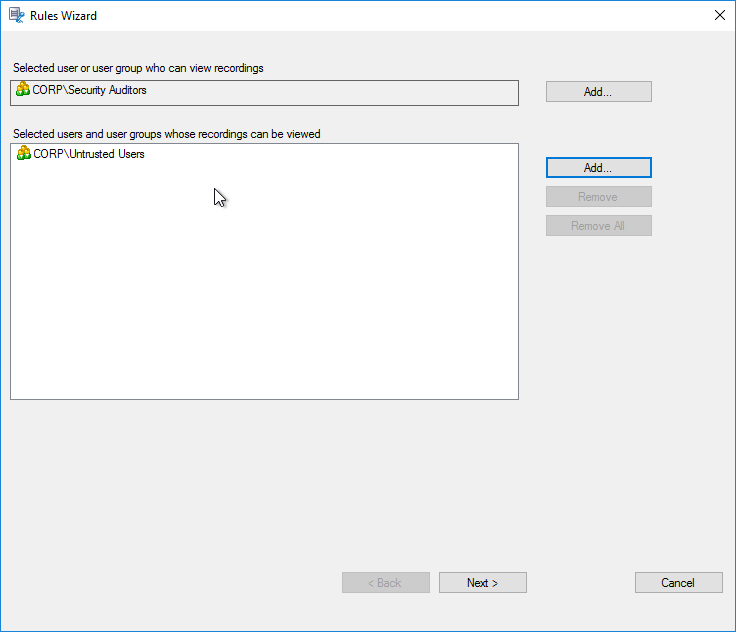
  5. In the Rules Wizard, specify a user group that can view recordings, specify user groups whose recordings can be viewed, and then click Next.

    • Make sure the “view recordings” group is also added to the Player role in the Authorization Console.
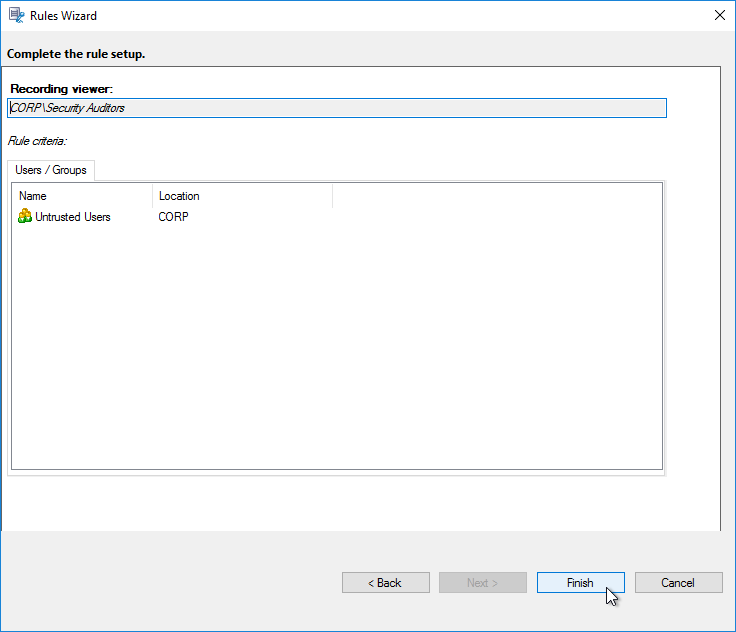
  6. Click Finish to close the wizard.
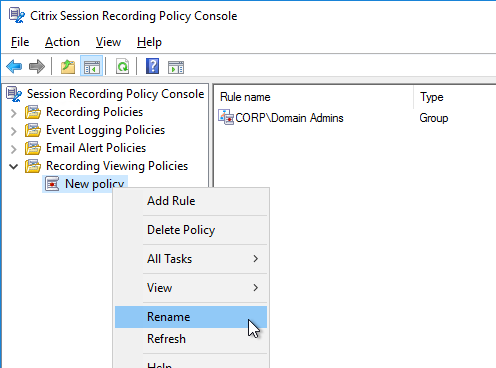
  7. You can right-click the Viewing Policy to rename it.
  8. Recording Viewing Policies do not need to be activated.
  9. You can create more than one Recording Viewing Policy.

Event Response Policies

Session Recording 2009 and newer support creating policies to send emails when a user’s session starts. Session Recording 2012 and newer can send email notifications when an event occurs. Session Recording 2109 and newer can trigger session recording after events occur.

  1. On Session Recording servers 2009 and newer, open Session Recording Server Properties, switch to the tab named Email, and complete the fields. Make sure you check the box to Allow sending email notifications.

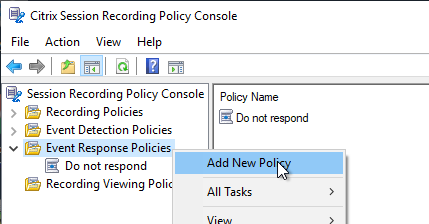
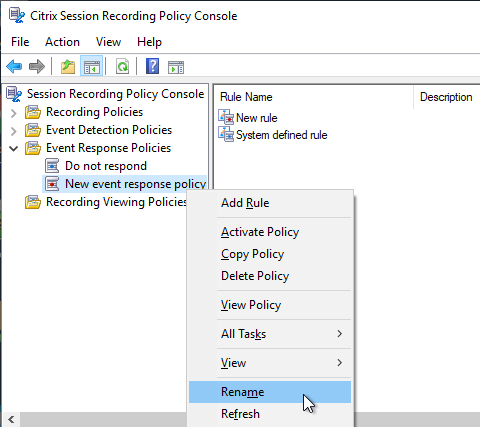
  2. In Citrix Session Recording Policy Console, right-click Event Response Policies and click Add New Policy.
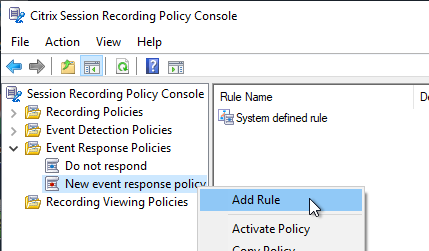
  3. Right-click the new policy and click Add Rule.
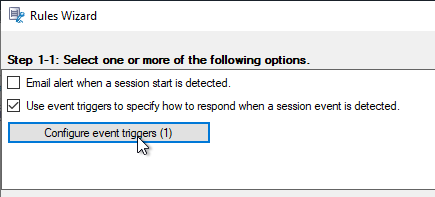
  4. In the Rules Wizard, check the desired boxes.

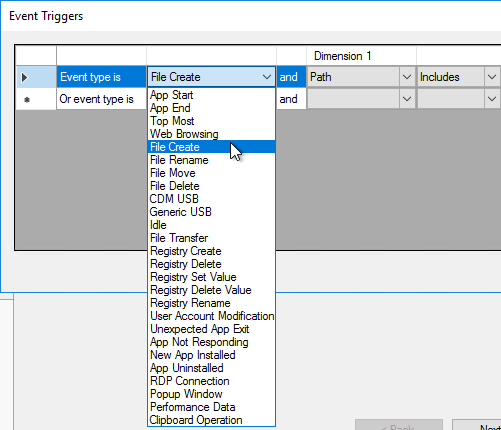
    • For “event triggers”, click the button labelled Configure Event Triggers and select the events you want a response for. Session Recording 2203 and newer have more options for Event type.
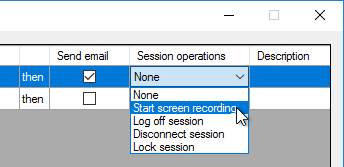
    • On the far right, check boxes if you want Send email, Start screen recording, or both. Session Recording 2206 adds Log off session, Disconnect session, and Lock session.
  5. In Step 1-2, enter Email recipients and Time span for dynamic screen recording. Click Next.
  6. In Step 2, enter criteria for when this rule should trigger, and then click Next.
  7. In Step 4, you can name the rule. Click Finish to close the wizard.
  8. You can right-click the Event Response Policy to rename it.
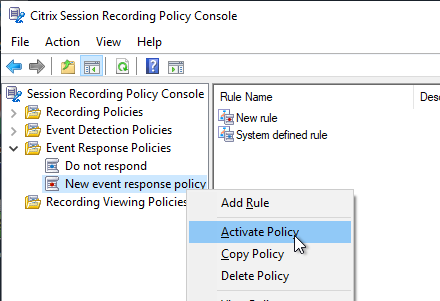
  9. Then Activate the new policy. Only one policy can be activated.
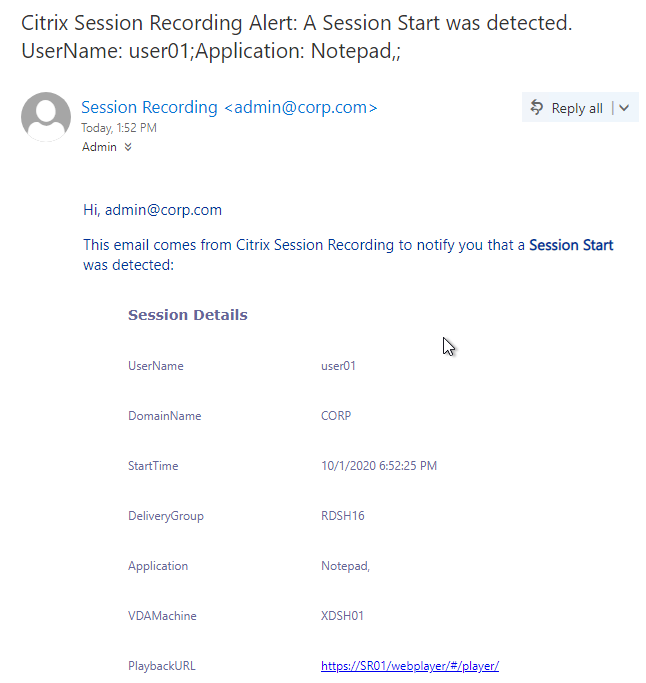
  10. The email notification looks something like this. Notice that the Playback URL is not a FQDN.

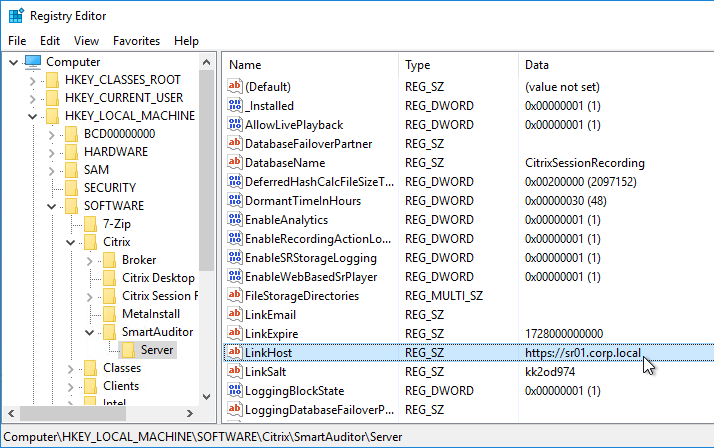
    • To fix it, go to HKLM\Software\Citrix\SmartAuditor\Server and configure the LinkHost value.

Session Recording Agent

Agent Installation

Install the Agent on the VDAs. Platinum Licensing is required.

  1. Session Recording 2203 and newer no longer support Windows Server 2012.
  2. On the Master VDA, go to the downloaded Citrix Virtual Apps and Desktops (CVAD) ISO, and run AutoSelect.exe.
  3. On the bottom right, click the Session Recording box.
  4. In the Licensing Agreement page, change the selection to I have read, understand, and accept the terms, and click Next.
  5. In the Core Components page, uncheck everything except Session Recording Agent. Click Next.
  6. In the Agent page, enter the FQDN of the Session Recording server (or load balanced FQDN), click Test connection, and click Next.
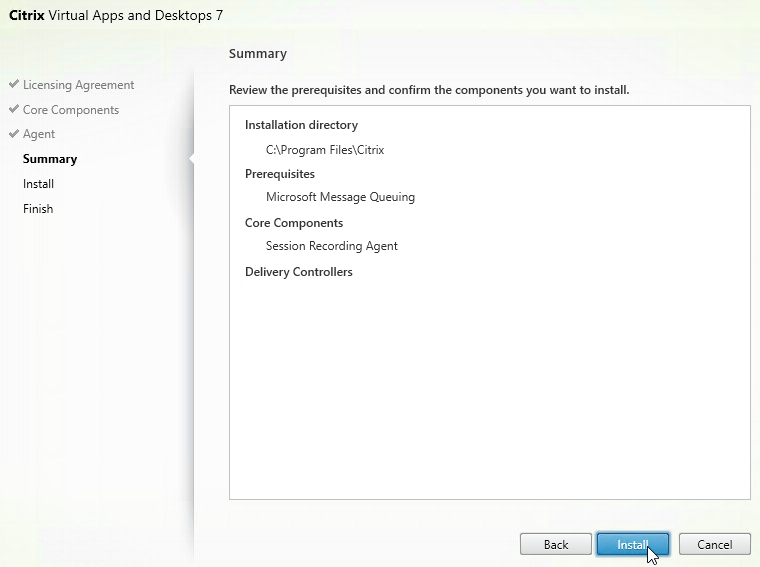
  7. In the Summary page, click Install.
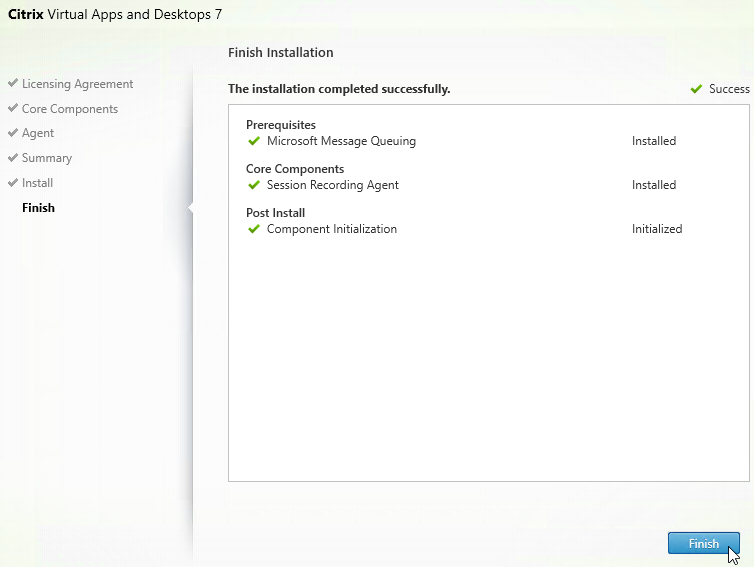
  8. In the Finish page, click Finish.
  9. Agent Installation can also be automated. See Automating installations at Citrix Docs.
  10. For antivirus exclusions, see Endpoint Security and Antivirus Best Practices at Citrix Tech Zone

Agent Configuration

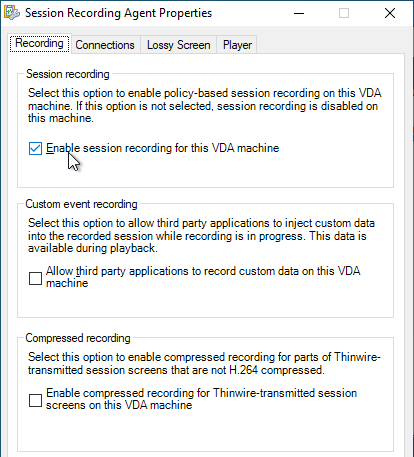
  1. In the Agent’s Start Menu is Session Recording Agent Properties.
  2. You can enable or disable session recording on this Agent.
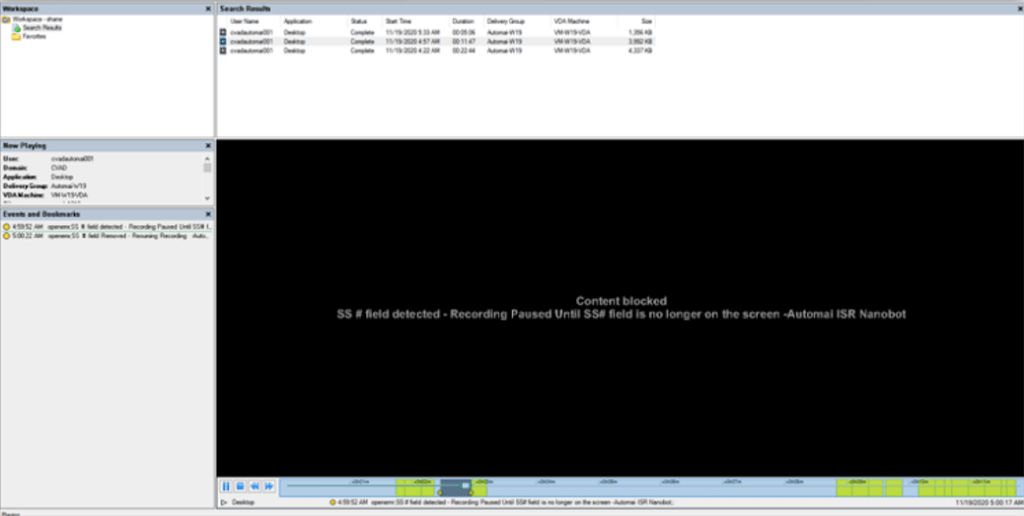
  3. For Custom event recording, notice the option for third party applications like Intelligent Session Recording (ISR) Nanobot for regulatory compliance from automai that prevents sensitive fields (e.g., Social Security Numbers and Credit Card numbers) from being captured. (h/t CTP Shane Kleinert)
  4. Compressed recording: Session Recording 2303 and newer let you compress parts of recordings that are not already H.264 compressed.
  5. Session Recording 2308 and newer, on the Player tab, support fast seeking.

    • In Web Player, at Configuration > Preferences, make sure Enable fast seeking is checked.
  6. For MCS and PVS VDAs, see the GenRandomQMID.ps1 script at Install, upgrade, and uninstall Session Recording at Citrix Docs.
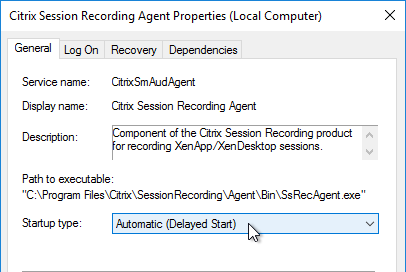
  7. Session Recording Agent might cause MCS Image Prep to fail. To work around this, set the Citrix Session Recording Agent service to Automatic (Delayed Start). Source = Todd Dunwoodie at Session Recording causes Image preparation finalization Failed error at Citrix Discussions.

Event Detection Policies

Session Recording 7.17 and newer can automatically mark events in recordings when certain actions occur inside the session. An example event is when USB client drives are connected. Newer versions of Session Recording can record more events than older versions of Session Recording.

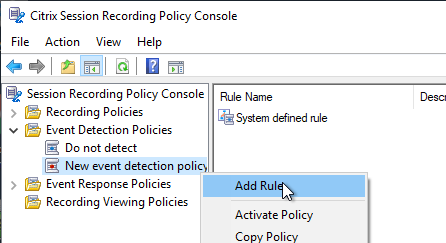
In Session Recording 1811 and newer, the Citrix Session Recording Policy Console has a new node named Event Detection Policies. Just like Recording Policies, you can add an Event Detection Policy, add a rule to the policy, and then activate the policy. Event detection settings can be enabled in this console instead of in the registry of each Session Recording Agent. Event Detection is disabled by default.

  1. Session Recording 1903 has more rules than Session Recording 1811. More details at Configure event detection policies at Citrix Docs and Citrix Blog Post Session Recording 1903 available for Citrix Virtual Apps and Desktops.
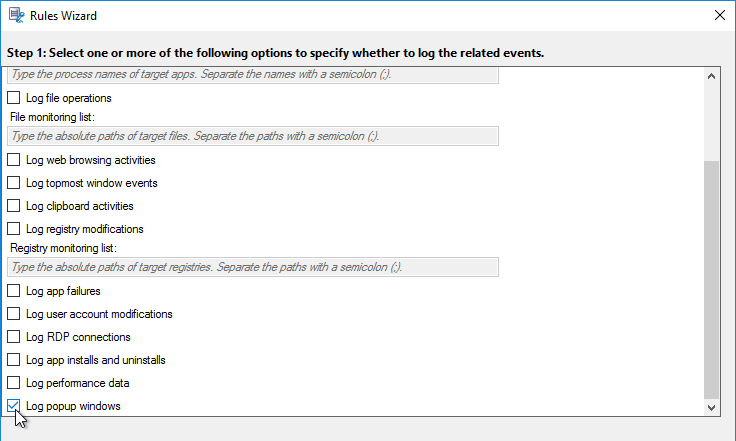
  2. Session Recording 2203 and newer can Log popup windows events. Notice the scroll bar on the far right. Popup windows in web browsers are not monitored.
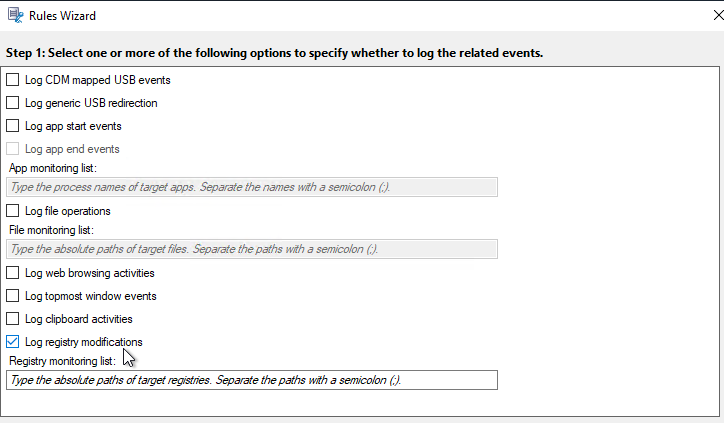
  3. Session Recording 2109 and newer can log registry modifications.
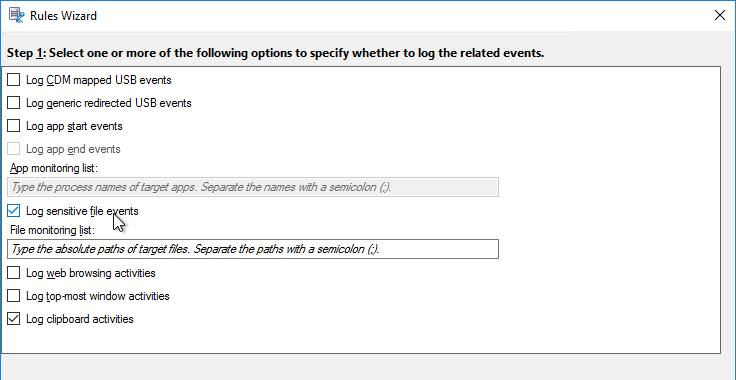
  4. Session Recording 2012 and newer can log clipboard activities.
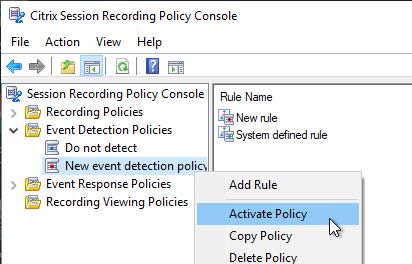
  5. After adding rules to an Event Detection Policy, make sure you Activate Policy.

In older versions of Session Recording, you enable Event recording by modifying the registry of each Session Recording Agent:

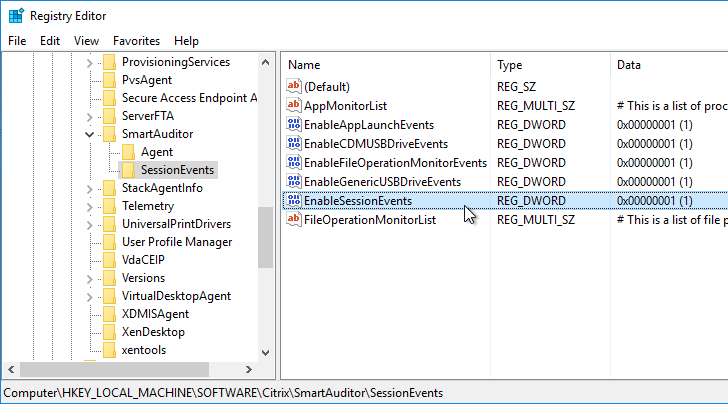
  1. Configure the following registry values at HKEY_LOCAL_MACHINE\SOFTWARE\Citrix\SmartAuditor\SessionEvents on the Session Recording Agent machine:
    • EnableAppLaunchEvents (DWORD) = 1
    • EnableCDMUSBDriveEvents (DWORD) = 1
    • EnableFileOperationMonitorEvents (DWORD) = 1
    • EnableGenericUSBDriveEvents (DWORD) = 1
    • EnableSessionEvents (DWORD) = 1
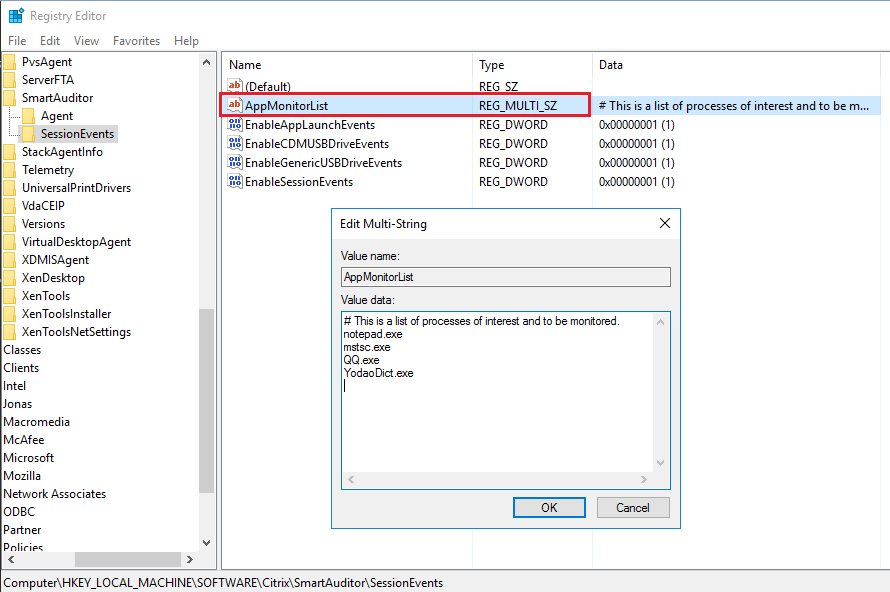
  2. Session Recording 7.18 and newer can mark recording events when specific processes are launched. This feature is disabled by default. To enable, set EnableAppLaunchEvents at the same key. And put the list of processes in AppMonitorList. More details at Log application starts at Citrix Docs and Citrix Blog Post Session Recording 1808 Product Update – Log application activities and more!.
    • EnableAppLaunchEvents (DWORD) = 1
    • AppMonitorList (REG_MULTISZ) = list of process names
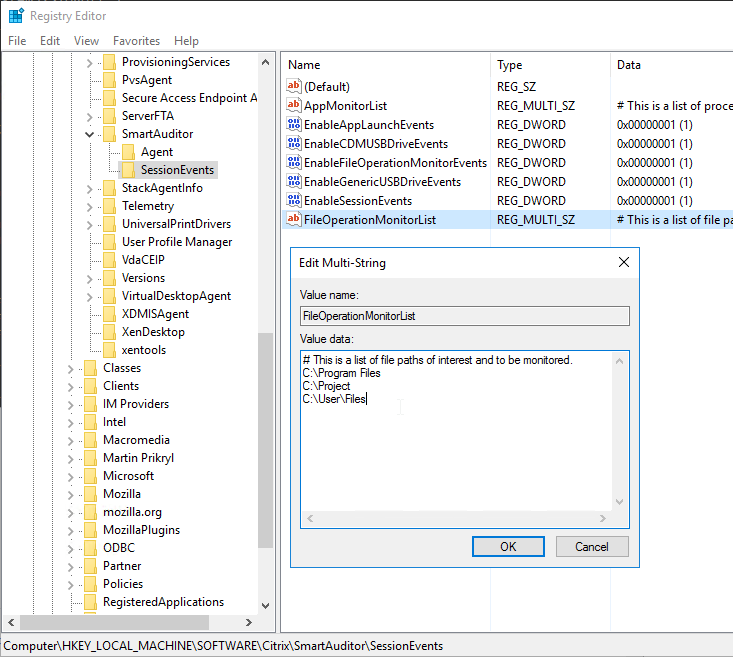
  3. Session Recording 1811 and later can mark recording events when files in a folder are renamed, created, deleted, and moved. Add the path strings of target folders into the FileOperationMonitorList registry value. More details at Citrix Blog Post Session Recording 1811 is here for Citrix Virtual Apps and Desktops.

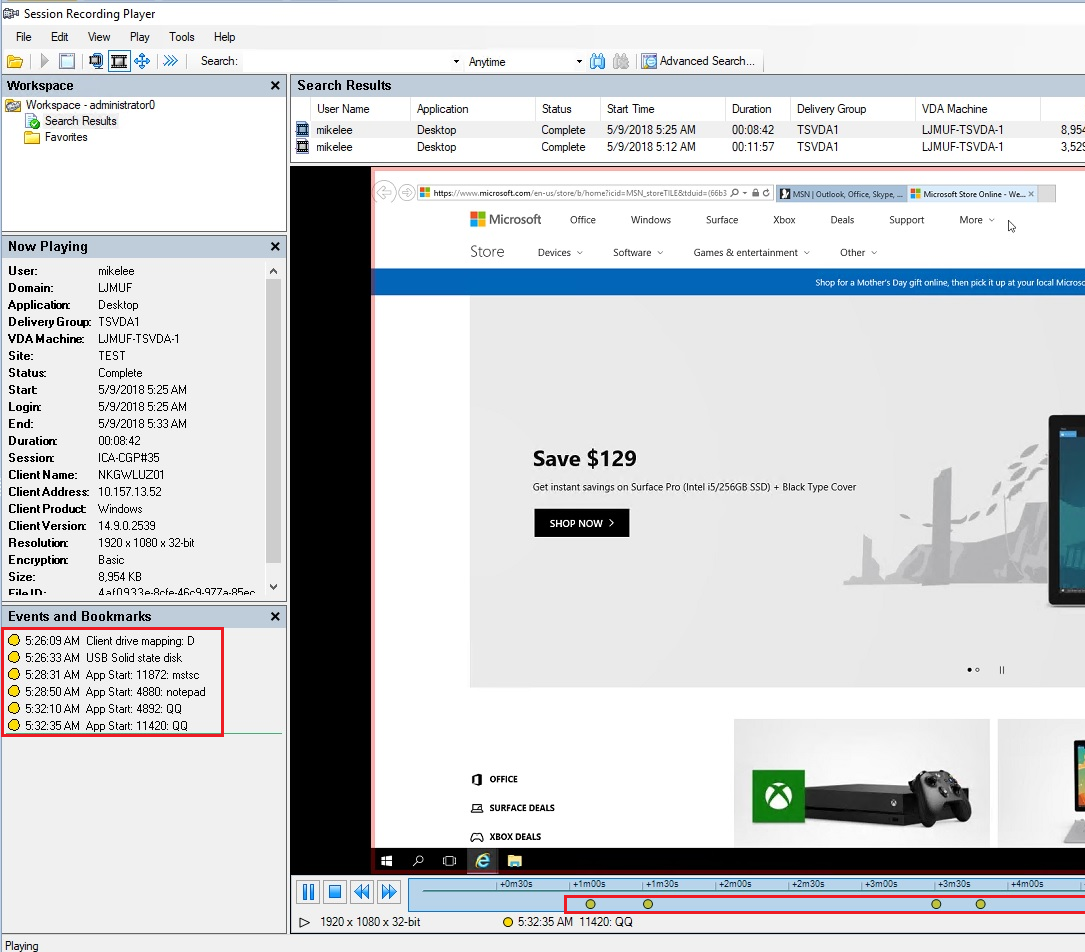
When you later playback the recording, the events are shown on the bottom left.

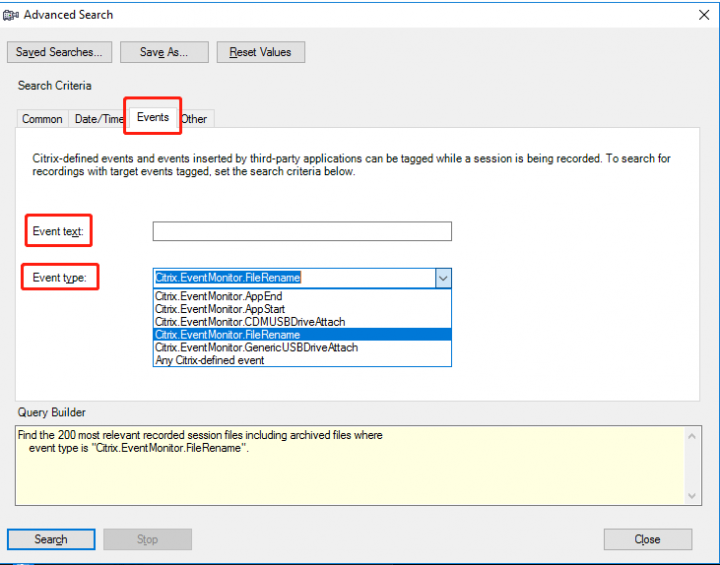
  • Or you can perform an Advanced Search for recordings with specific event types.

Session Recording Web Player

Session Recording 1912 and newer include a Web Player.

Web Player has some features that the standard Player does not.

Web Player is enabled by default in Session Recording 2003 and newer. To enable it in Session Recording 1912:

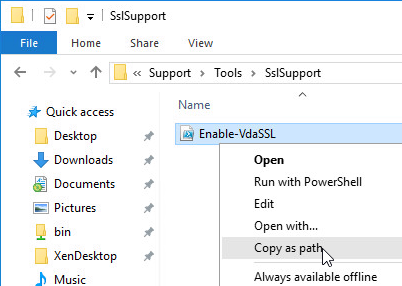
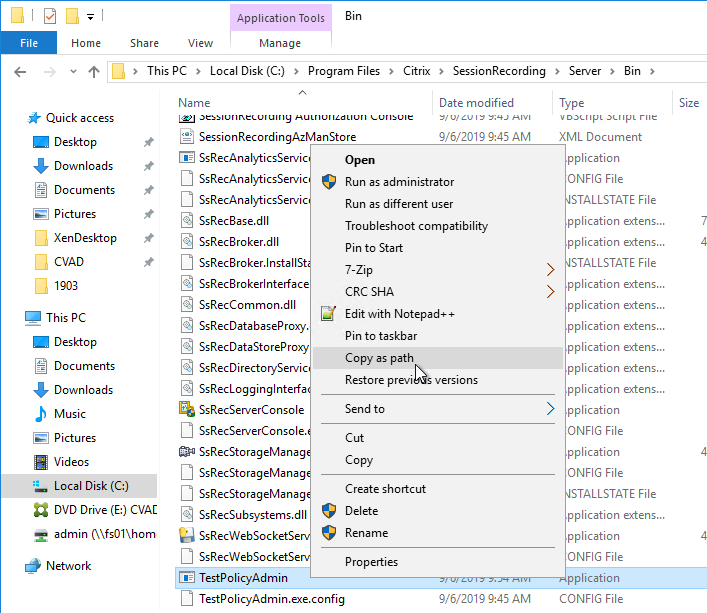
  1. Go to C:\Program Files\Citrix\SessionRecording\Server\Bin, right-click TestPolicyAdmin.exe and click Copy as path.
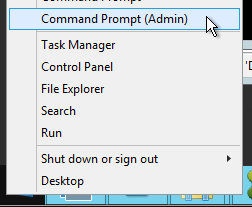
  2. Open Command Prompt as administrator, paste the path, add “-enablewebplayer” to the end, and press Enter.

Bind a certificate to the Web Player:

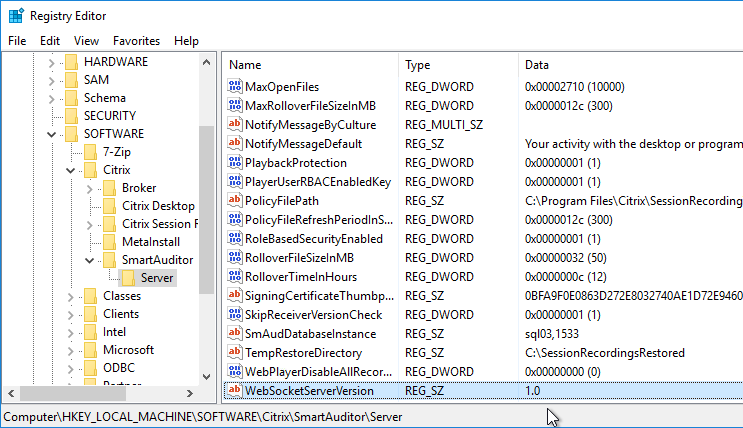
  1. After upgrading to Session Recording 2103 or newer, check HKEY_LOCAL_MACHINE\SOFTWARE\Citrix\SmartAuditor\Server\WebSocketServerVersion.

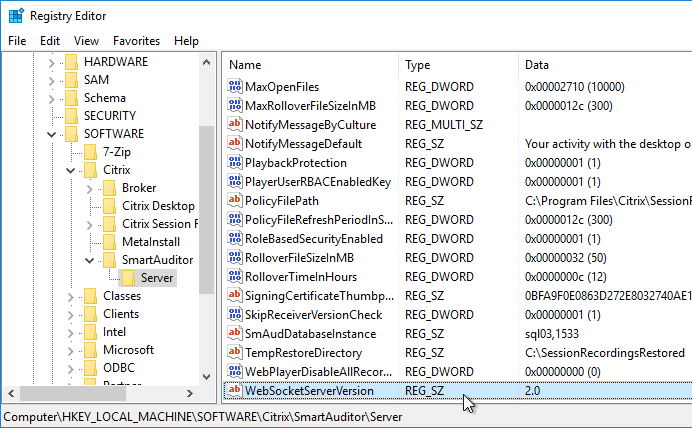
    1. If it is set to 1.0, then we can change it to IIS instead of Python by running "C:\Program Files\Citrix\SessionRecording\Server\Bin\SsRecUtils.exe" -enablestreamingservice.
    2. The registry value then changes to 2.0.
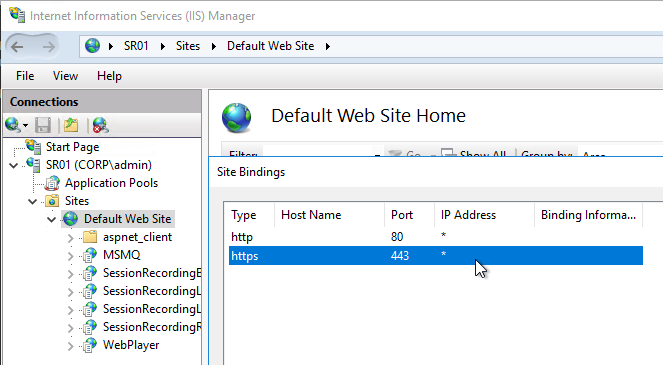
  2. In IIS Manager, edit the bindings for the Default Web Site and ensure there’s an https binding.
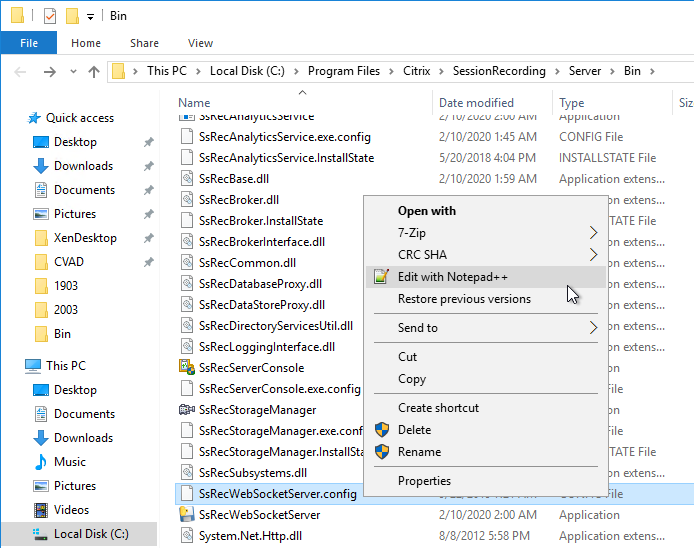
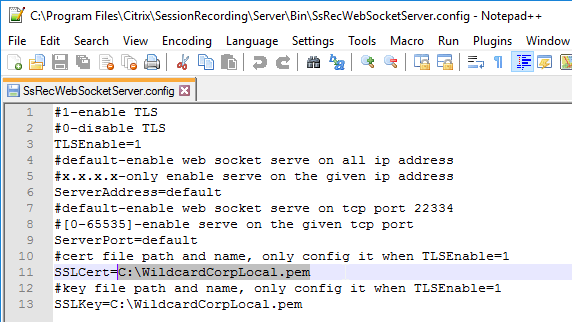
  3. Go back to C:\Program Files\Citrix\SessionRecording\Server\Bin and edit the file SsRecWebSocketServer.config (2003 and newer) or SsRecWebSocketServer.exe.config (1912 and older).
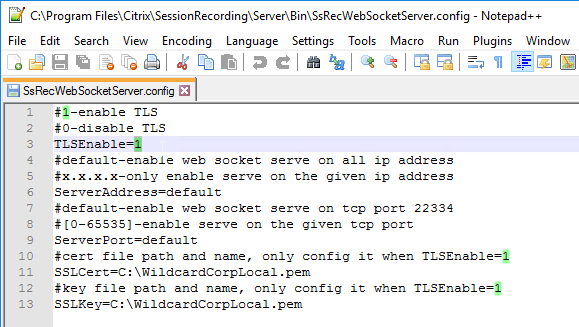
  4. In line 3, set TLSEnable to 1.
  5. If your Session Recording is 2103 and later and hosts the WebSocket server in IIS (i.e.WebSocketServerVersion = 2.0)
    1. In Administrator Command Prompt, run the following command.
      "C:\Program Files\Citrix\SessionRecording\Server\Bin\SsRecUtils.exe" -stopwebsocketserver
    2. From any machine, launch a browser and point it to https://myrecordingserver.corp.com/WebPlayer or something like that. Internet Explorer is not supported.
    3. Skip the rest of this section.
  6. For Session Recording 2012 and older, or if your WebSocketServer is not integrated with IIS, continue the steps in this section.
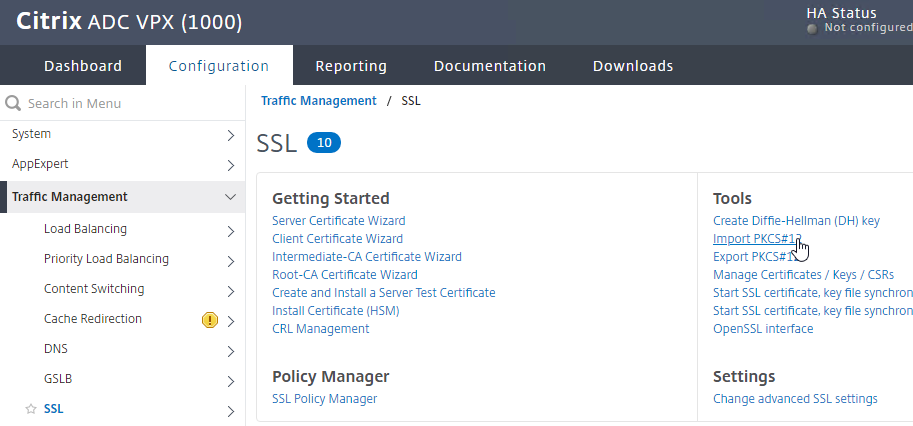
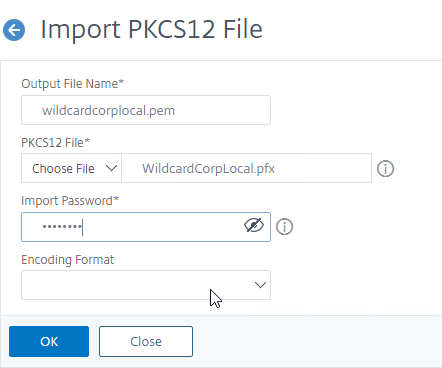
  7. You need the Session Recording certificate in PEM format. One option is to use the openssl commands listed at Citrix Docs. Or you can use an ADC appliance’s Import PKCS#12 feature to convert PFX to PEM.
  8. Make sure you don’t encrypt the private key (don’t select Encoding Format).
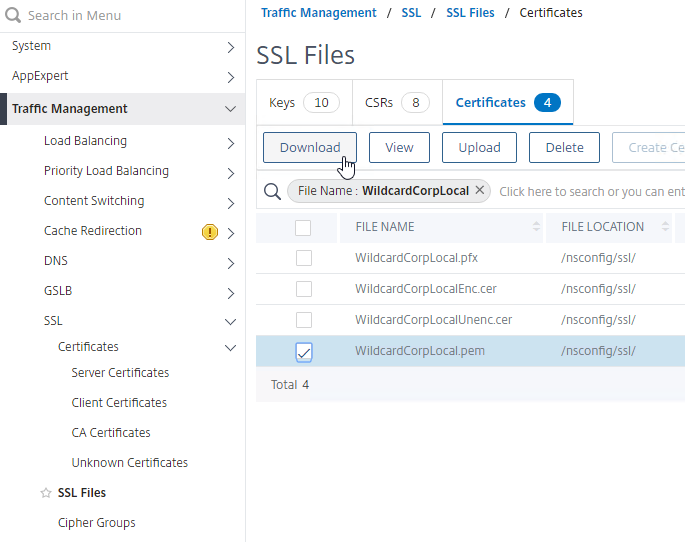
  9. After conversion (aka import), go to Traffic Management > SSL > SSL Files, switch to the tab named Certificates, and download the .pem file.
  10. Put the unencrypted .pem file somewhere on the Session Recording server.
  11. In the SsRecWebSocketServer.config file, set line 11 and line 13 to the full path to the .pem file.
  12. In Administrator Command Prompt, run the following command:
    "C:\Program Files\Citrix\SessionRecording\Server\Bin\SsRecUtils.exe" -stopwebsocketserver

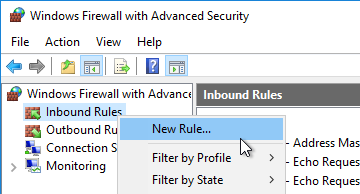
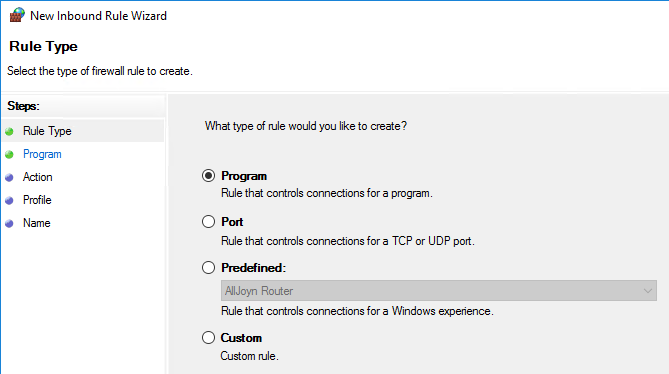
  13. The Web Player WebSockets listens on port 22334 by default. Open the port on the firewall.

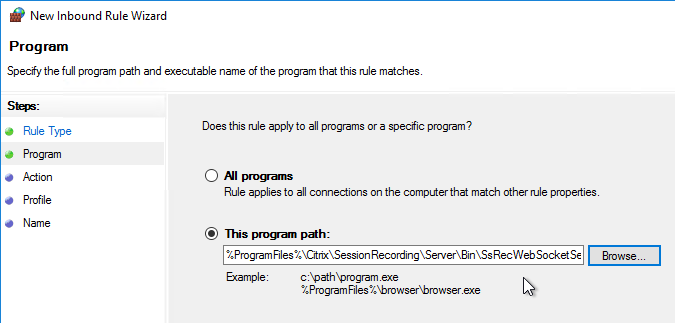
    1. Create an Inbound Rule. You can either create a Program rule, or a Port rule.
    2. The program path is %ProgramFiles%\Citrix\SessionRecording\Server\Bin\SsRecWebSocketServer.exe.
  14. From any machine, launch a browser and point it to https://myrecordingserver.corp.com/WebPlayer or something like that. Internet Explorer is not supported.
  15. Web Player lets you share recordings as links. These links can be Restricted, or in Session Recording 2305 or newer can be Unrestricted. More details at Citrix Docs.

Session Recording Player

Install the Player on any Windows 7 through Windows 10 desktop machine. 32-bit color depth is required. Because of the graphics requirements, don’t run the Player as a published application.

  1. Go to the downloaded Citrix Virtual Apps and Desktops (CVAD) ISO and run AutoSelect.exe.
  2. On the bottom right, click the Session Recording box.
  3. In the Licensing Agreement page, change the selection to I have read, understand, and accept the terms, and click Next.
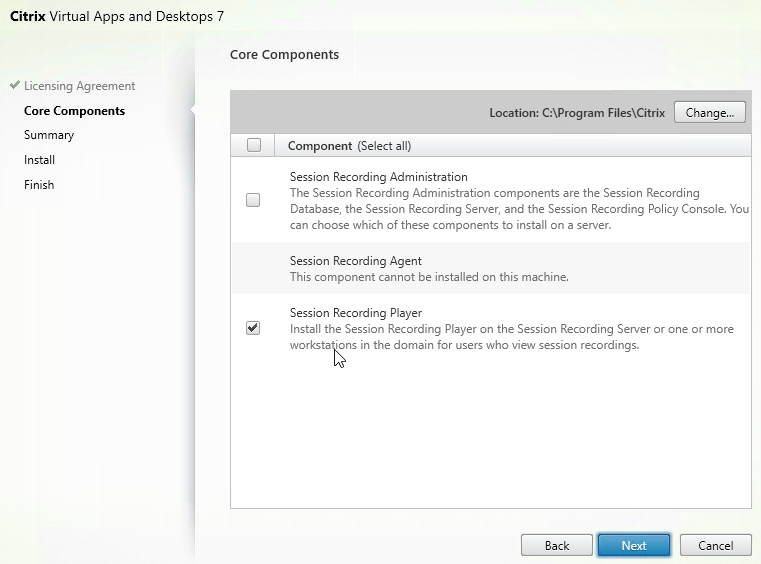
  4. In the Core Components page, uncheck everything except Session Recording Player. Click Next.
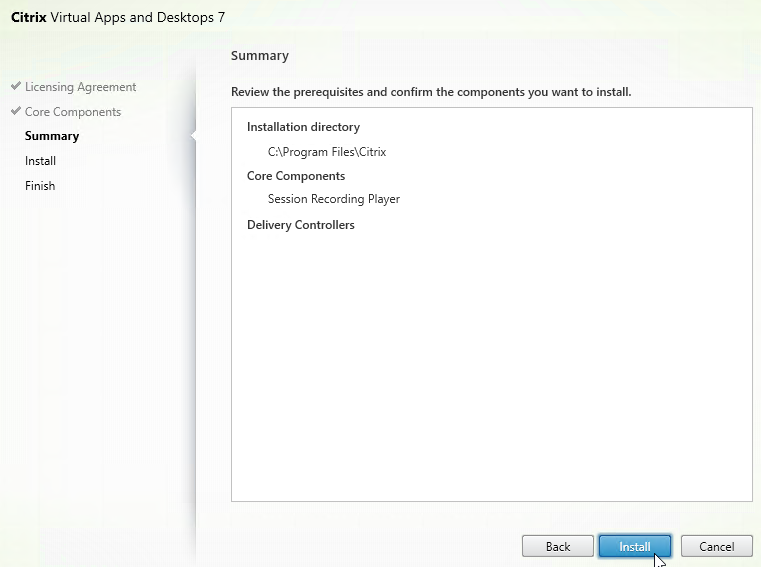
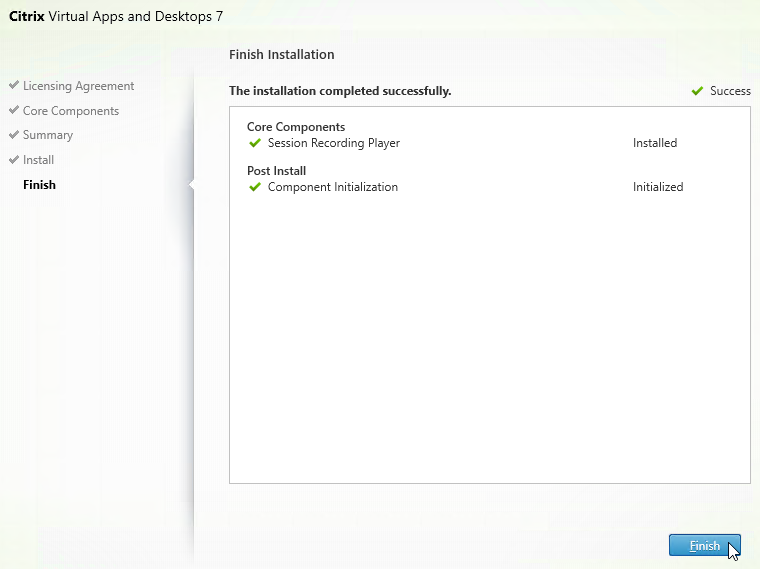
  5. In the Summary page, click Install.
  6. The installer might require a restart. Let it restart, and login again.

    1. After the reboot, and after logging in again, you might see a Locate ‘Citrix Virtual Apps and Desktops 7’ installation media window. Don’t click anything yet.
    2. Go to the Citrix_Virtual_Apps_and_Desktops_7_2402_LTSR.iso file and mount it.
    3. Go back to the Locate ‘Citrix Virtual Apps and Desktops 7’ installation media window.
    4. On the left, expand This PC, and click the DVD Drive.
    5. Click Select Folder.
  7. In the Finish page, click Finish.
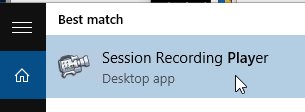
  8. From the Start Menu, run the Session Recording Player.
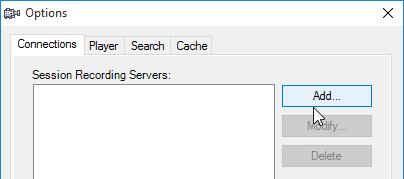
  9. Open the Tools menu and click Options.
  10. On the Connections tab, click Add.
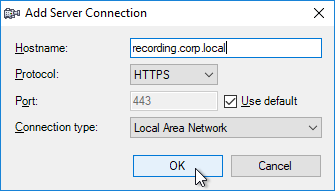
  11. Enter the FQDN of the Session Recording server (or load balanced FQDN).
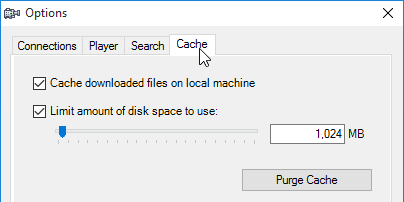
  12. On the Cache tab you can adjust the client-side cache size. Click OK.
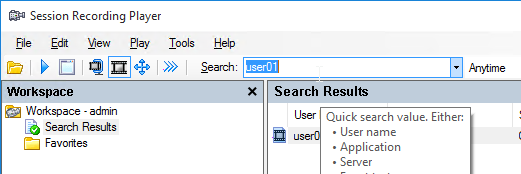
  13. Use the Search box to find recordings.
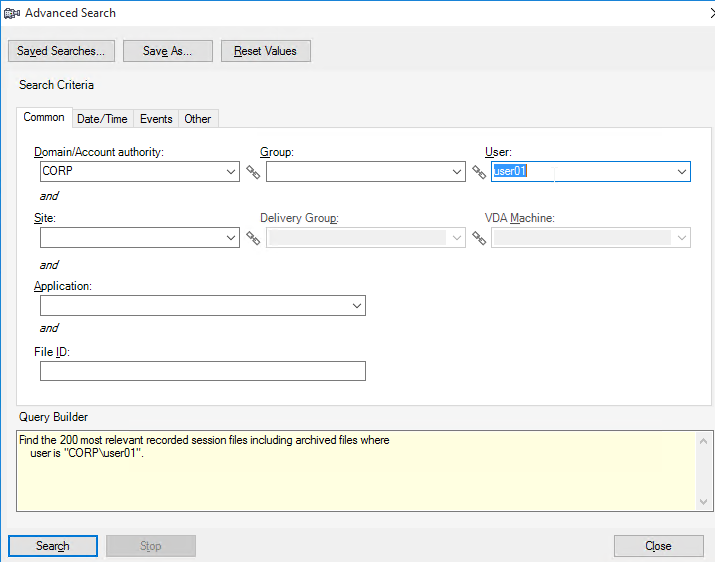
  14. Or you can go to Tools > Advanced Search.

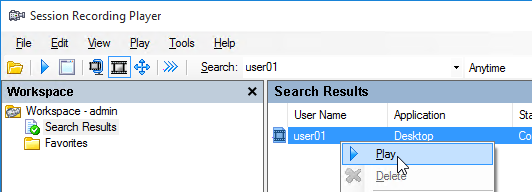
  15. Once you find a recording, double-click it to play it.
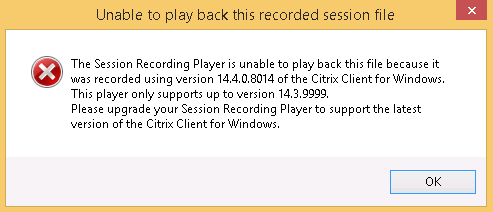
  16. If you see a message about Citrix Client version incompatibility, see CTX206145 Error: “The Session Recording Player Cannot Play Back This File” to edit the Player’s SsRecPlayer.exe.config file to accept the newer version. Note: Session Recording 2012 no longer complains about this.
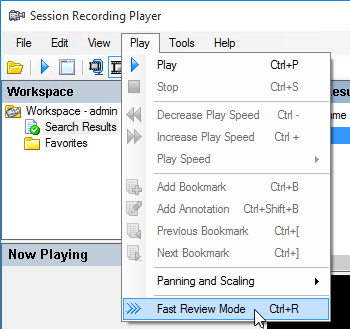
  17. To skip spaces where no action occurred, open the Play menu, and click Fast Review Mode.
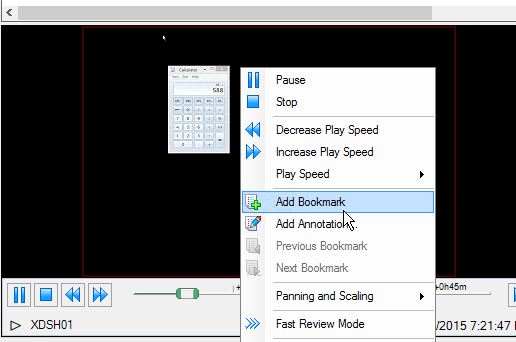
  18. You can add bookmarks by right-clicking in the viewer pane. Then you can skip to a bookmark by clicking the bookmark in the Events and Bookmarks pane.

Director Integration

  1. On the Director server, run command prompt elevated (as Administrator).
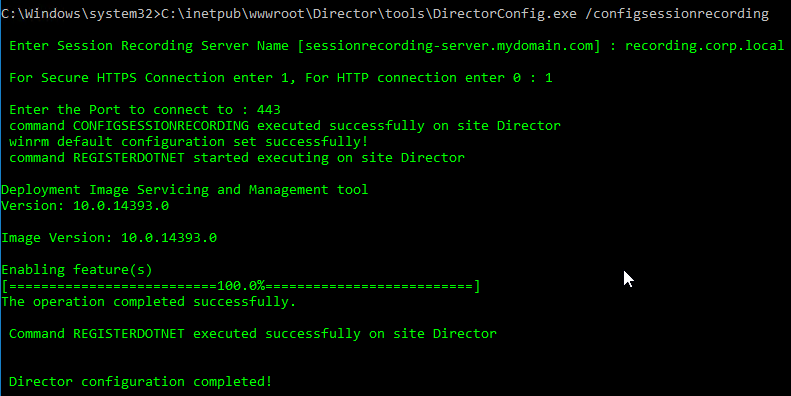
  2. Run C:\inetpub\wwwroot\Director\tools\DirectorConfig.exe /configsessionrecording
  3. Enter the Session Recording FQDN (or load balanced FQDN) when prompted.
  4. Enter 1 for HTTPS.
  5. Enter 443 as the port.
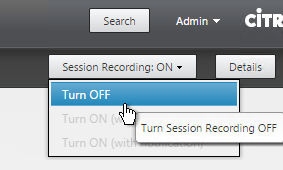
  6. In Director, when you view users or machines, you can change the Session Recording policy. These policy changes don’t apply until a new session is launched.
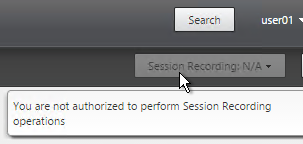
  7. If the Session Recording menu says N/A, then the Director user needs to be authorized in the Session Recording Authorization Console.

  8. If you use Director to enable or disable recording for a user or machine, rules are added to the active policy on the Session Recording server. They only take effect at next logon.

Dynamic Session Recording

Session Recording 7.18, along with Delivery Controller 7.18, and VDA 7.18, allows you to start recording, even in the middle of a session.

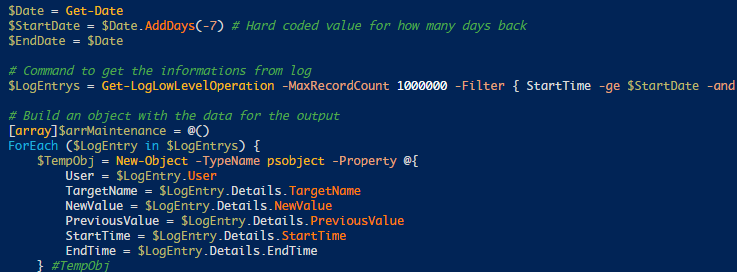
Unfortunately, Director has not been enabled to take advantage of this feature. Instead, you use PowerShell to start recording. The command is Start-BrokerSessionRecording, and is detailed at Dynamically start or stop recording by using PowerShell commands in the Citrix Broker SDK at Citrix Docs. For example:

Start-BrokerSessionRecording -User DomainA \ UserA -NotifyUser $false

Use the Stop-BrokerSessionRecording command to stop recording when the reported issue has been triaged or resolved. For example:

Stop-BrokerSessionRecording -User DomainA \ UserA

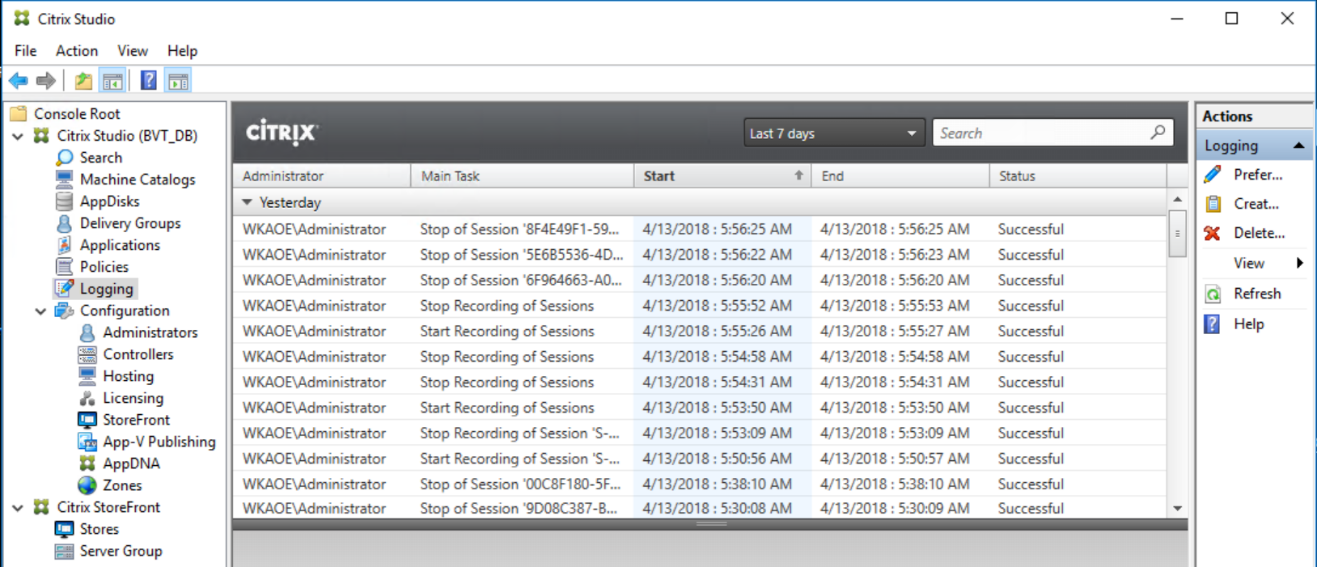
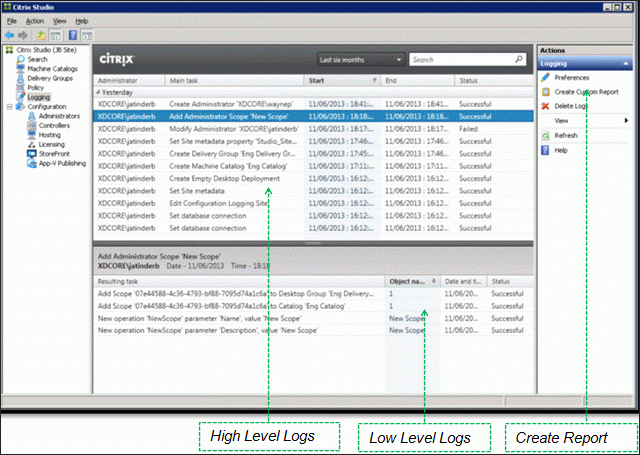
The commands are logged to Citrix Studio Logging.

EUC Weekly Digest – May 27, 2017

Last Modified: Nov 7, 2020 @ 6:34 am

Here are some EUC items I found interesting last week. For more immediate updates, follow me at http://twitter.com/cstalhood.

For a list of updates at carlstalhood.com, see the Detailed Change Log.


Citrix

XenApp/XenDesktop

VDA

App Layering (Unidesk)

Director/Monitoring

WEM/Profile Management

StoreFront

Receiver

XenApp 6.5

NetScaler

NetScaler Gateway

XenServer

Citrix Cloud

VMware

EUC Weekly Digest – May 20, 2017

Last Modified: Nov 7, 2020 @ 6:34 am

Here are some EUC items I found interesting last week. For more immediate updates, follow me at http://twitter.com/cstalhood.

For a list of updates at carlstalhood.com, see the Detailed Change Log.


Citrix

XenApp/XenDesktop

App Layering / Unidesk

HDX

Provisioning Services

StoreFront

NetScaler

NetScaler Gateway

XenMobile

VMware

Microsoft

Other

nFactor Authentication – NetScaler Gateway 12 / Citrix Gateway 12.1

Last Modified: Apr 16, 2021 @ 2:32 pm

Navigation

💡 = Recently Updated

Change Log

nFactor Overview

nFactor lets you configure an unlimited number of authentication factors. You are no longer limited to just two factors.

Each authentication factor performs the following tasks:

  1. Collect credentials from the user. These credentials can be anything supported by Citrix ADC, including:
    • SAML assertion
    • Client Certificate
    • OAuth OpenID Connect
    • Kerberos ticket
    • StoreFrontAuth – authentication is delegated to Citrix StoreFront
    • Forms-based authentication (traditional web-based logon page) for LDAP, RADIUS, etc.
      • Multiple passwords can be collected with one form.
      • Or prompt the user multiple times throughout the authentication chain.
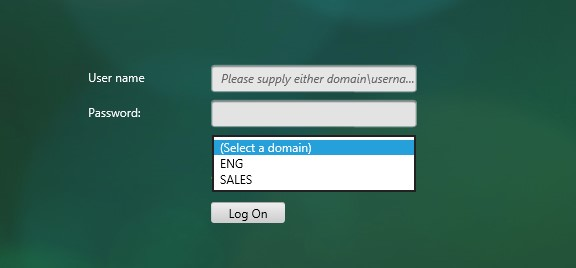
      • The logon page can contain a domain drop-down.
    • Endpoint Analysis Scan – either pre-authentication, or post-authentication.
    • EULA
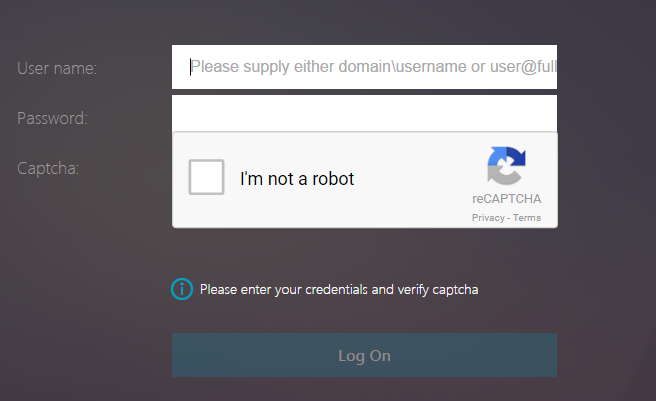
    • Google reCAPTCHA
    • Swivel
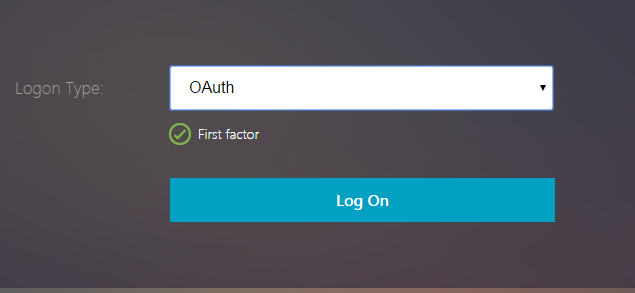
    • Use a drop-down to select an authentication method
  2. This factor’s credentials are evaluated. The results can be:
    • Authentication success
    • Authentication failure
    • Group extraction
    • Attribute extraction from SAML, Certificate, etc.
  3. Based on the evaluation results, do one of the following:
    • Allow access
    • Select next factor
    • Deny access
  4. If there’s a Next Factor, repeat these steps, until there are no more Next Factors to evaluate.
  5. The Next Factor can also do one of the following:
    • Prompt the user for more credentials
    • If the Login Schema asked for multiple passwords, evaluate the already entered next set of credentials.
    • Use a policy expression to select another Next Factor (no authentication). This is typically used with group extraction so that groups determine the Next Factor.

Here are some nFactor use cases, but the combinations are almost limitless:

  • Choose Authentication method based on Active Directory group: Logon screen asks for user name only. Extract user’s groups from Active Directory. Based on user’s Active Directory groups, either ask user for client certificate, or ask user for LDAP password. If LDAP, the username doesn’t need to be entered again.
  • Ask for Certificate first:
    • If client certificate is valid, perform LDAP only.
    • If no client certificate, perform LDAP + RADIUS
  • Two-factor with passwords checked in specific order: Display logon screen with two password fields. Check the first password. If the first password succeeds, then check the second password. This lets you check RADIUS before LDAP.
  • Run Endpoint Analysis first:
    • If passes, perform LDAP only.
    • If fails, perform LDAP + RADIUS
  • See Sample Configurations later for many more combinations.

All new authentication methods added to Citrix ADC require nFactor configuration and are not supported on native Citrix Gateway. These new authentication methods include:

nFactor is a AAA feature, which means you need Citrix ADC Advanced Edition (aka NetScaler Enterprise Edition) or Citrix ADC Premium Edition (aka NetScaler Platinum Edition). Citrix ADC Standard Edition and Citrix Gateway VPX are not entitled for nFactor.

Citrix ADC supports two types of authentication policies – Classic, and Advanced (aka Default). You can bind Classic Authentication Policies directly to Citrix Gateway Virtual Servers, but today you cannot bind Advanced Authentication Policies to Citrix Gateway. The only way to use Advanced Authentication Policies with Citrix Gateway is to configure nFactor on a AAA Virtual Server and then link the AAA Virtual Server to the Gateway Virtual Server.

  • Workspace app 1809 and newer with Citrix Gateway (NetScaler) 12.1 build 49 and newer support nFactor authentication. Older Receivers and older NetScalers don’t support nFactor, so you’ll instead have to use a web browser.

nFactor configuration summary (detailed instructions below):

  • Each factor is a combination of Advanced Authentication Policies and Login Schema.
    • Advanced policy means it uses an Advanced (Default Syntax) expression as opposed to the classic syntax expression traditionally used in Citrix Gateway authentication policies.
    • Login Schema is a custom HTML form where users enter credentials.
  • The first factor (Advanced Authentication Policies and Login Schema) is bound directly to a AAA Virtual Server.
  • Next factors are bound to Authentication Policy Labels. These Labels are then chained to Advanced Authentication Policies in prior factors.
    • AAA vServer > Advanced Authentication Policy > Next Factor > Authentication Policy Label > Advanced Authentication Policy > Next Factor > Authentication Policy Label > … until there are no more Next Factors configured.
  • Authentication Profile links AAA vServer with Citrix Gateway.

Also see:

This article will detail how to configure nFactor from top to bottom.:

  1. Create AAA vServer
  2. Create Login Schema Profiles
  3. Create Login Schema Policy – select Login Schema Profile, bind Login Schema Policy to AAA vServer
  4. Create Authentication Actions – LDAP, RADIUS, etc.
  5. Create Advanced Authentication Policies – select Authentication Action, bind Advanced Authentication Policy to AAA vServer
  6. Create Authentication Policy Labels – bind Login Schema, bind Advanced Authentication Policies
  7. Edit Advanced Authentication Policy binding and select Next Factor Authentication Policy Label.
  8. Create Citrix Gateway Traffic Policy for Single Sign-on to StoreFront.
  9. Create Authentication Profile
  10. Edit Citrix Gateway – bind Authentication Profile, bind Traffic Policy

Once you are familiar with nFactor, due to the way the objects are linked together, it’s probably easier to configure it from bottom up:

  1. Create Authentication Actions – LDAP, RADIUS, etc.
  2. Create Advanced Authentication Policies – select Authentication Action
  3. Create Login Schema Profiles
  4. Create Authentication Policy Labels – bind Login Schema, bind Advanced Authentication Policies
  5. Create Login Schema Policy – select Login Schema Profile
  6. Create AAA vServer – bind Login Schema, bind Advanced Authentication Policies, select Next Factor Authentication Policy Label
  7. Create Citrix Gateway Traffic Policy for Single Sign-on to StoreFront.
  8. Create Authentication Profile
  9. Edit Citrix Gateway – bind Authentication Profile, bind Traffic Policy

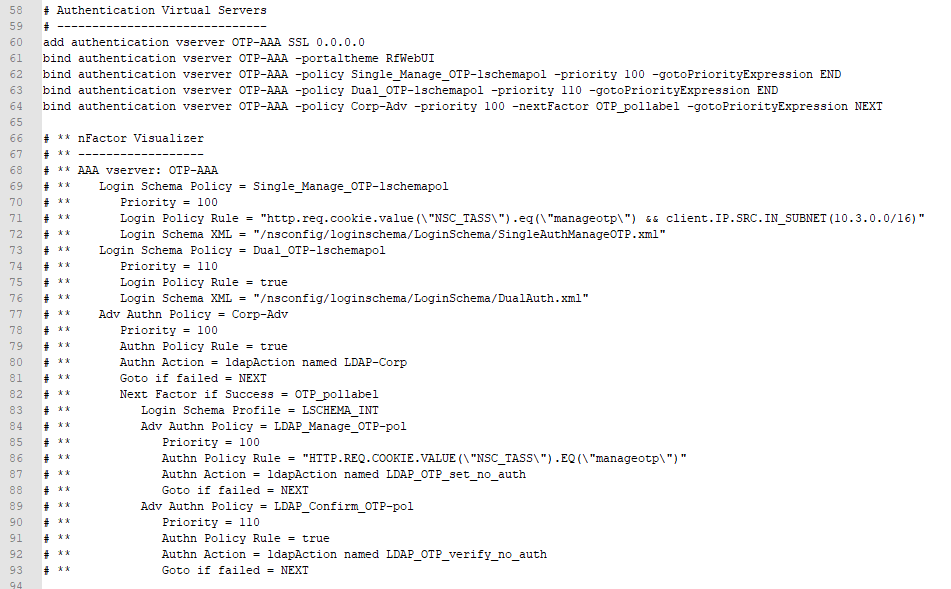
It can be difficult to visualize a nFactor configuration so my ADC Virtual Server Configuration Extractor script now includes a nFactor visualizer. Here’s an example for a Native OTP configuration.

AAA Virtual Server

Create AAA Virtual Server

To use nFactor with Citrix Gateway, you first configure it on a AAA Virtual Server. Then you later link the AAA Virtual Server to the Citrix Gateway Virtual Server.

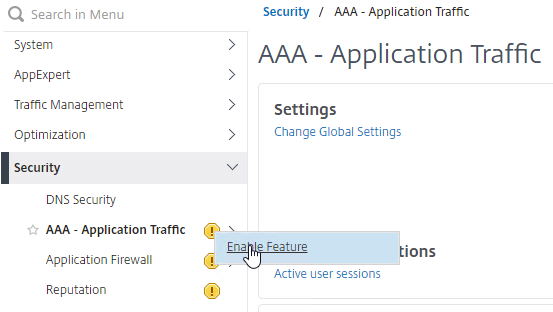
  1. If AAA feature is not already enabled, on the left menu, expand Security, right-click AAA – Application Traffic, and click Enable Feature.
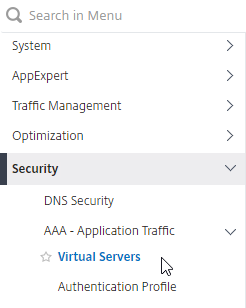
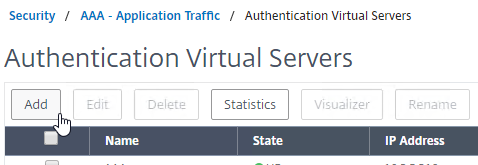
  2. Go to Security > AAA > Virtual Servers.
  3. On the right, click Add.
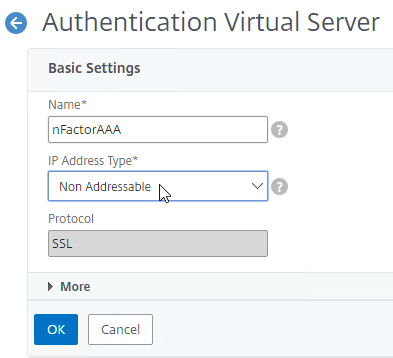
  4. Give the Virtual Server a name.
  5. If you are only using this AAA Virtual Server for Citrix Gateway, then you can change the IP address Type to Non Addressable. It’s also possible to content switch to AAA (Citrix CTX201949 One Public IP for AAA-TM Deployments on NetScaler).
  6. Click OK.
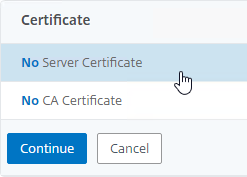
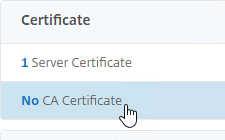
  7. In the Certificates section, click where it says No Server Certificate.

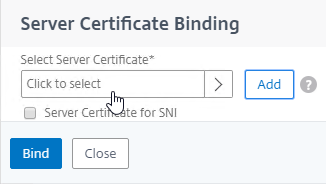
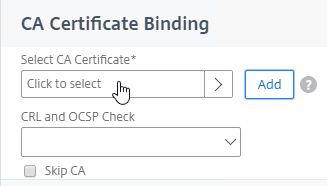
    1. Click where it says Click to select.
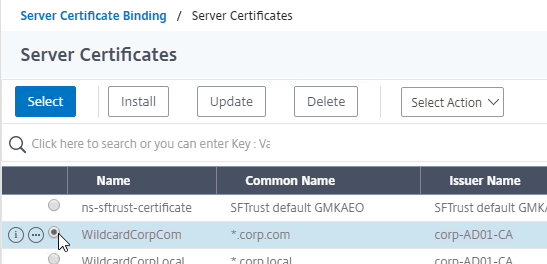
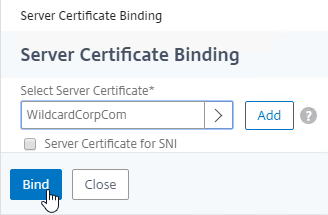
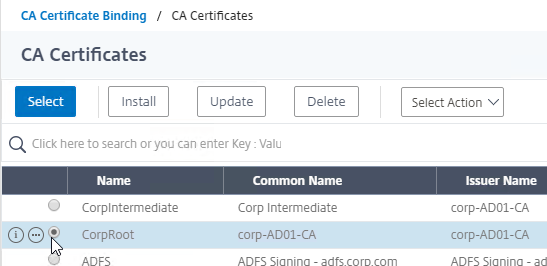
    2. Click the radio button next to a certificate for the AAA Virtual Server, and click Select. Since this AAA Virtual Server is not directly addressable, the chosen certificate doesn’t matter.
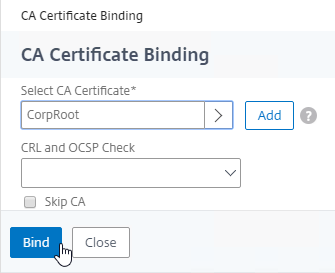
    3. Click Bind.
  8. Click Continue to close the Certificate section.
  9. You probably don’t have any Advanced Authentication Policies yet, so just click Continue.

Bind Portal Theme to AAA Virtual Server

If this AAA Virtual Server is used not just for Citrix Gateway but also directly addressable for traffic management (Load Balancing, Content Switching), then you might want to change the AAA Portal theme.

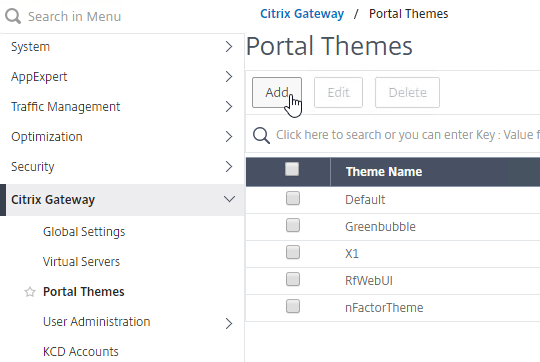
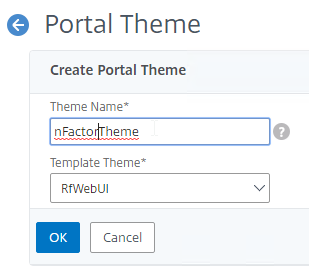
  1. Go to Citrix Gateway > Portal Themes, and add a theme. You create the theme under Citrix Gateway, and then later bind it to the AAA Virtual Server.
  2. Create a theme based on the RfWebUI Template Theme.
  3. After adjusting the theme as desired, at the top of the portal theme editing page, Click to Bind and View Configured Theme.
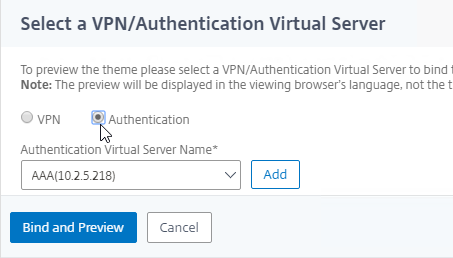
  4. Change the selection to Authentication.
  5. Use the Authentication Virtual Server Name drop-down to select the AAA Virtual Server, and click Bind and Preview. You can close the preview window.

Client Certificate Authentication

If one of your authentication Factors is client certificate, then you must perform some SSL configuration on the AAA Virtual Server:

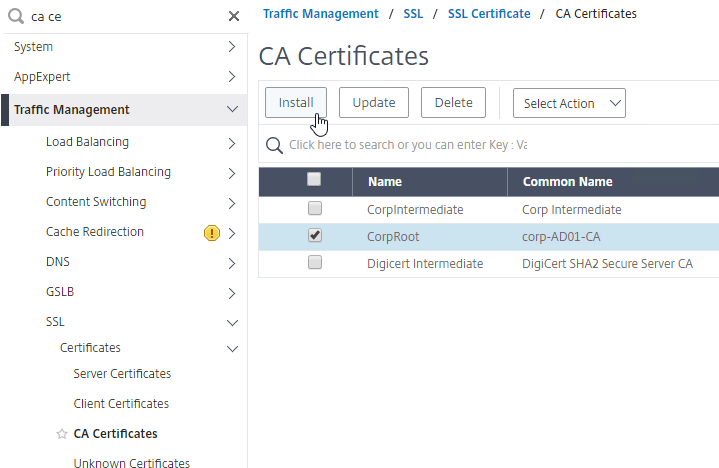
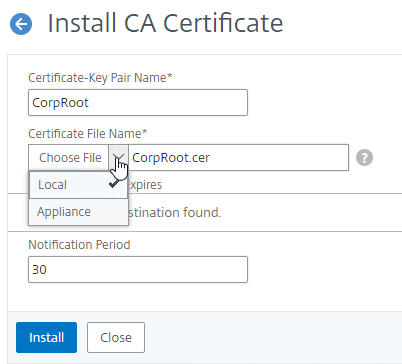
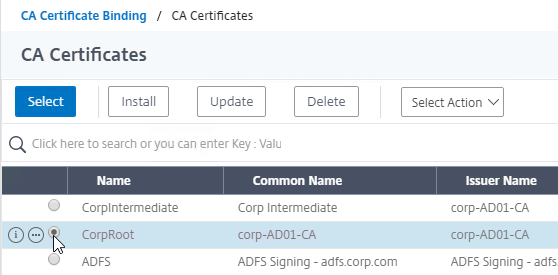
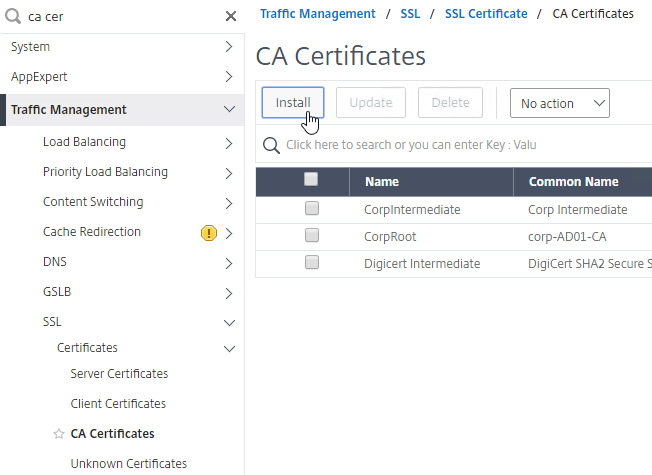
  1. Go to Traffic Management > SSL > Certificates > CA Certificates, and install the root certificate for the issuer of the client certificates. Root certificates do not have a key file.

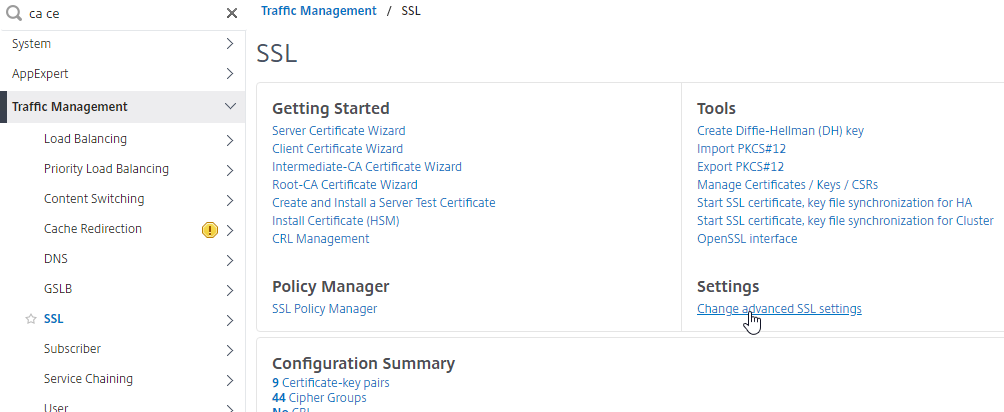
  2. Go to Traffic Management >SSL > Change advanced SSL settings.

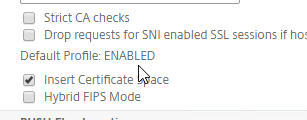
    1. Scroll down. If you see Default Profile: ENABLED, then you must use an SSL Profile to enable Client Certificate Authentication. Otherwise, you can enable Client Certificate Authentication directly on the AAA Virtual Server in the SSL Parameters section.
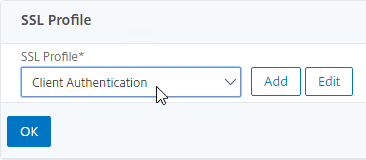
  3. If Default SSL Profiles are enabled, then create a new SSL Profile with Client Authentication enabled:
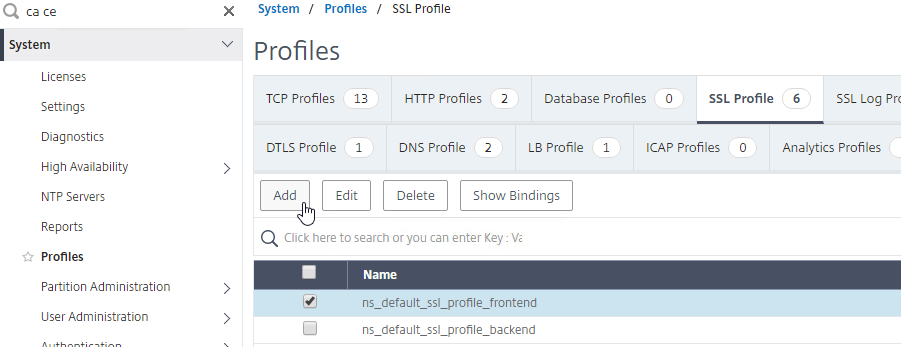
    1. On the left menu, expand System, and click Profiles.
    2. On the top right, switch to the SSL Profile tab.
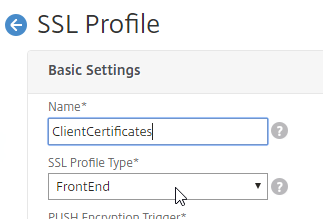
    3. Right-click the ns_default_ssl_profile_frontend profile, and click Add. This copies settings from the default profile.
    4. Give the Profile a name. The purpose of this profile is to enable Client Certificates.
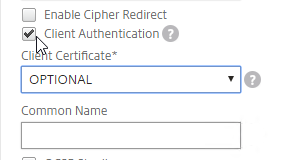
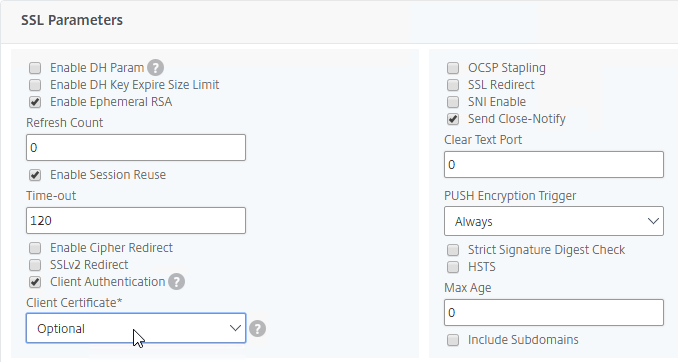
    5. Scroll down and find the Client Authentication checkbox. Check the box.
    6. Change the Client Certificate drop-down to OPTIONAL.
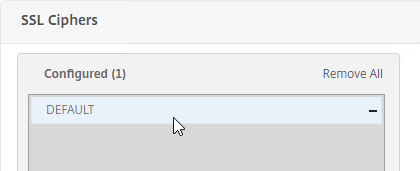
    7. Copying the default SSL Profile does not copy the SSL Ciphers so you’ll have to redo them.
    8. Click Done when done creating the SSL Profile.
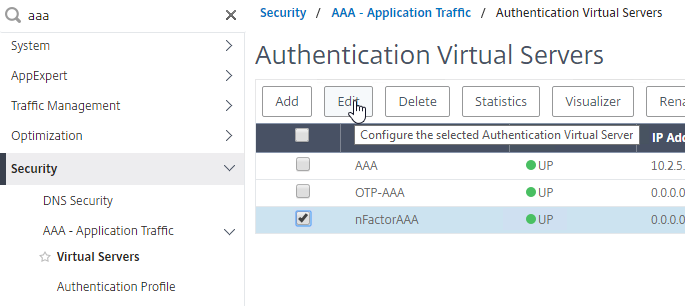
    9. Go to Security > AAA – Application Traffic > Virtual Servers, and edit a AAA vServer.
    10. Scroll down to the SSL Profile section and click the pencil.
    11. Change the SSL Profile drop-down to the profile that has Client Certificates enabled. Click OK.
    12. Scroll down this article until you reach the instructions to bind the CA certificate.
  4. If default SSL Profiles are not enabled:
    1. Go to Security > AAA > Virtual Servers, and edit an existing AAA Virtual Server.
    2. On the left, in the SSL Parameters section, click the pencil icon.
    3. Check the box next to Client Authentication.
    4. Make sure Client Certificate drop-down is set to Optional, and click OK.
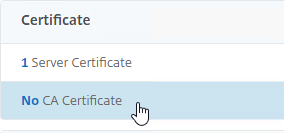
  5. On the left, in the Certificates section, click where it says No CA Certificate.
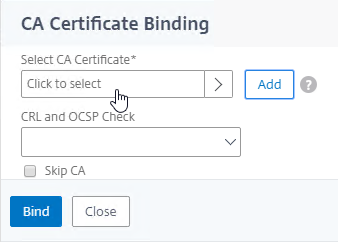
  6. Click to select.
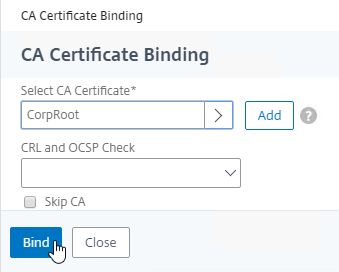
  7. Click the radio button next to the root certificate for the issuer of the client certificates, and click Select.
  8. Click Bind.

Login Schema

Login Schema XML File

Login Schema is an XML file providing the structure of forms-based authentication logon pages.

nFactor implies multiple authentication Factors that are chained together. Each Factor can have different Login Schema pages/files. In some authentication scenarios, users could be presented with multiple logon screens.

Or you can have one Login Schema gather information that can be passed on to multiple Factors, so that the later Factors don’t need to display another Login Schema. This is particularly useful for traditional two-password logon screens (LDAP + RADIUS), since each password is evaluated in a separate Factor:

  • The first password is evaluated in the first factor (e.g. LDAP). If successful, then proceed to the second factor.
  • The second factor (e.g. RADIUS) evaluates the second password. However, the second password has already been entered, so there’s no need to ask the user for it again. To prevent a Login Schema from being shown to the user, select noschema (LSCHEMA_INT) in the Authentication Policy Label.

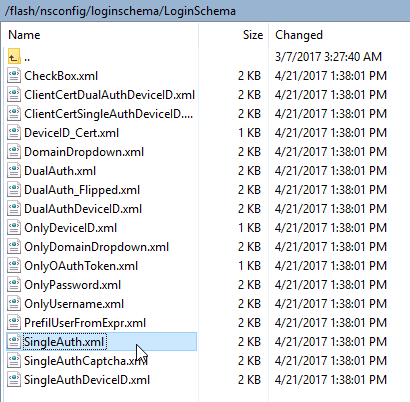
Several Login Schema .xml files are included with Citrix ADC under /nsconfig/loginschema/LoginSchema.

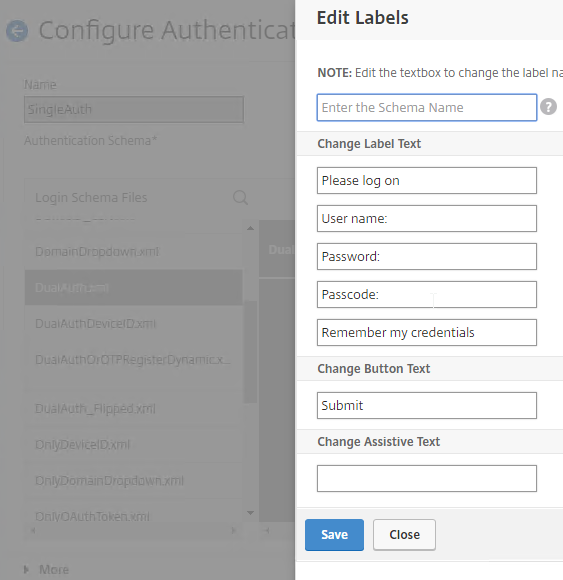
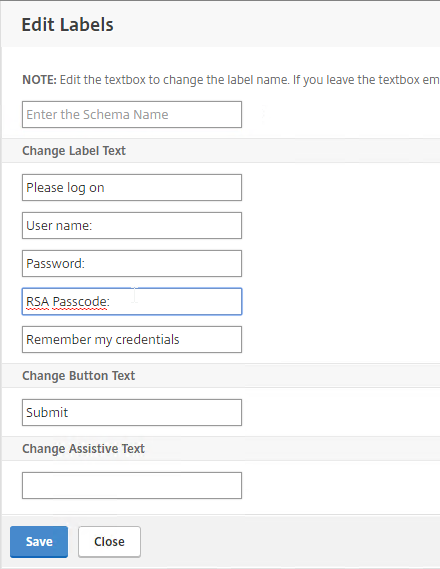
You can edit the Login Schema labels from within the Citrix ADC management GUI. When the labels are changed, Citrix ADC copies the Login Schema to a new .xml file based on the Schema Name entered in this widow, or based on the original file name.

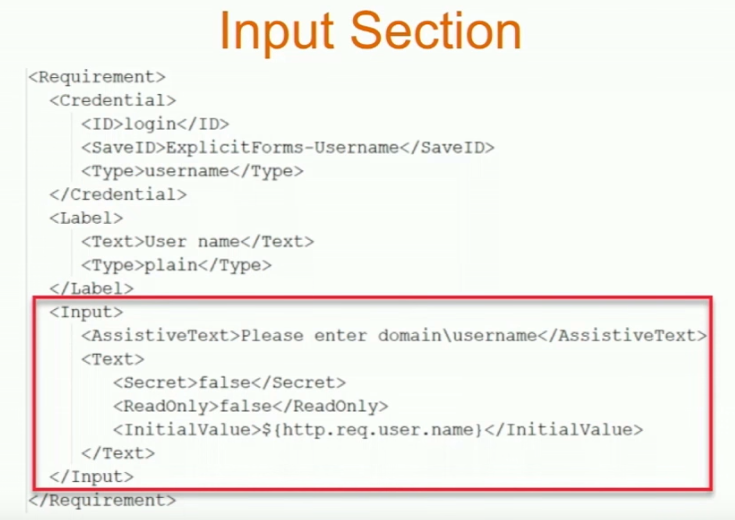
Or you can use WinSCP to connect to the appliance, duplicate one of the existing .xml files, and edit it as desired. For example, you can configure fields (InitialValue tag) to pre-fill information from previous Factors, as shown below:

The structure of the Login Schema is documented at Citrix Common Authentication Forms Language Citrix Developer Documentation.

CTP Sam Jacobs at SYN229 – nFactor and Login Schemas explains how to customize the .xml file.

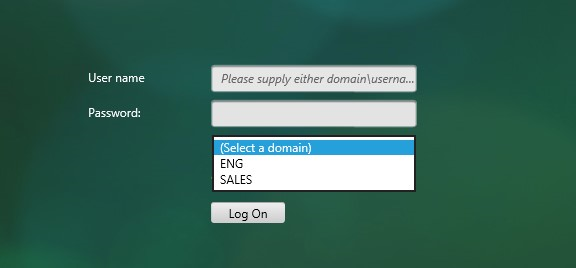
The login schema can also contain a domain drop-down. See CTX201760 nFactor – Domain Drop-Down in First Factor then Different Policy Evaluations Based on Groups for a sample configuration.

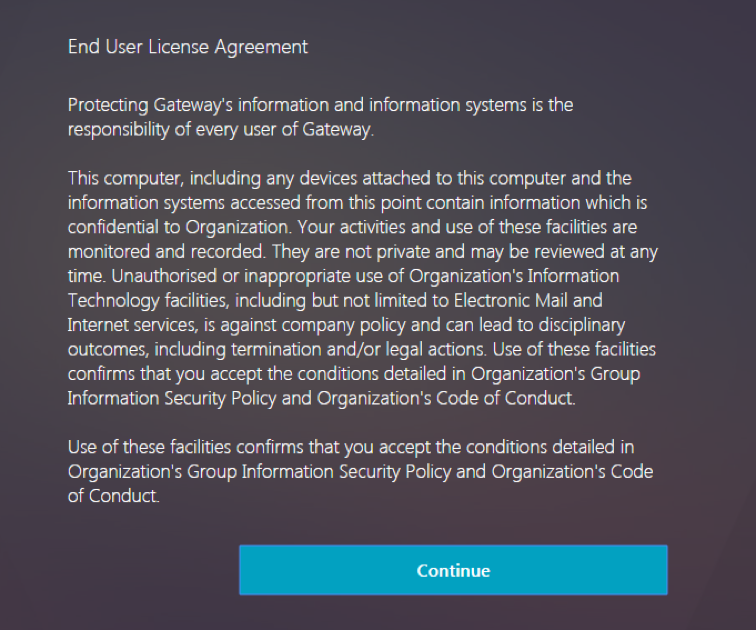
Login Schema and Authentication Factor can be a EULA. See Citrix CTX226488 How to Configure EULA as an Authentication Factor in NetScaler nFactor.

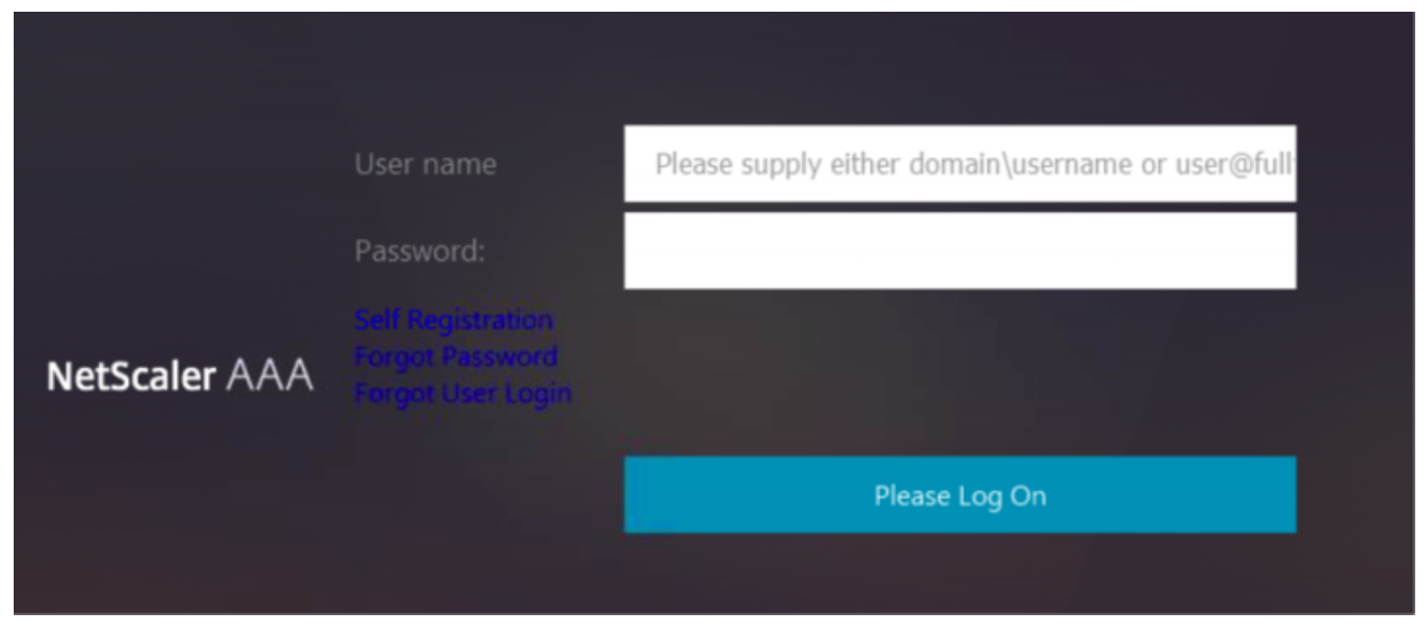
Citrix CTX219545 Custom Login Labels in NetScaler nFactor Authentication: add a Requirement element with a Label sub-element to the Login Schema .xml file. Then use JavaScript to populate the label with any desired HTML. Another example is Morten Kallesoee nFactor – adding custom links.

Several more samples can be found later.

Login Schema Profile

To configure a Login Schema Profile:

  1. Create or Edit a Login Schema .XML file based on your nFactor design.
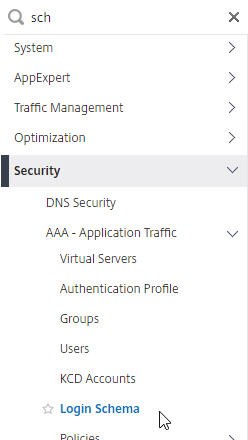
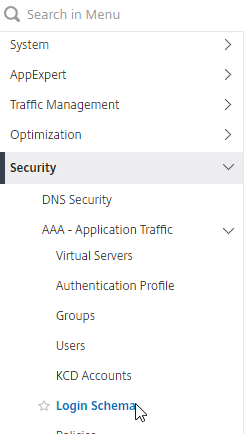
  2. Go to Security > AAA > Login Schema.
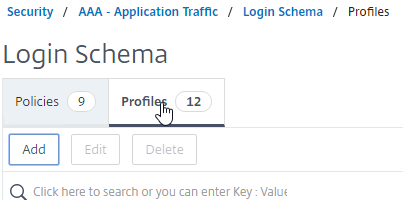
  3. On the right, switch to the Profiles tab, and click Add.
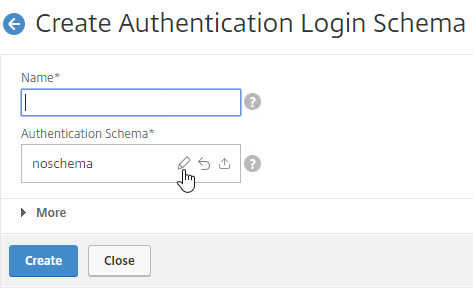
  4. In the Authentication Schema field, click the pencil icon.
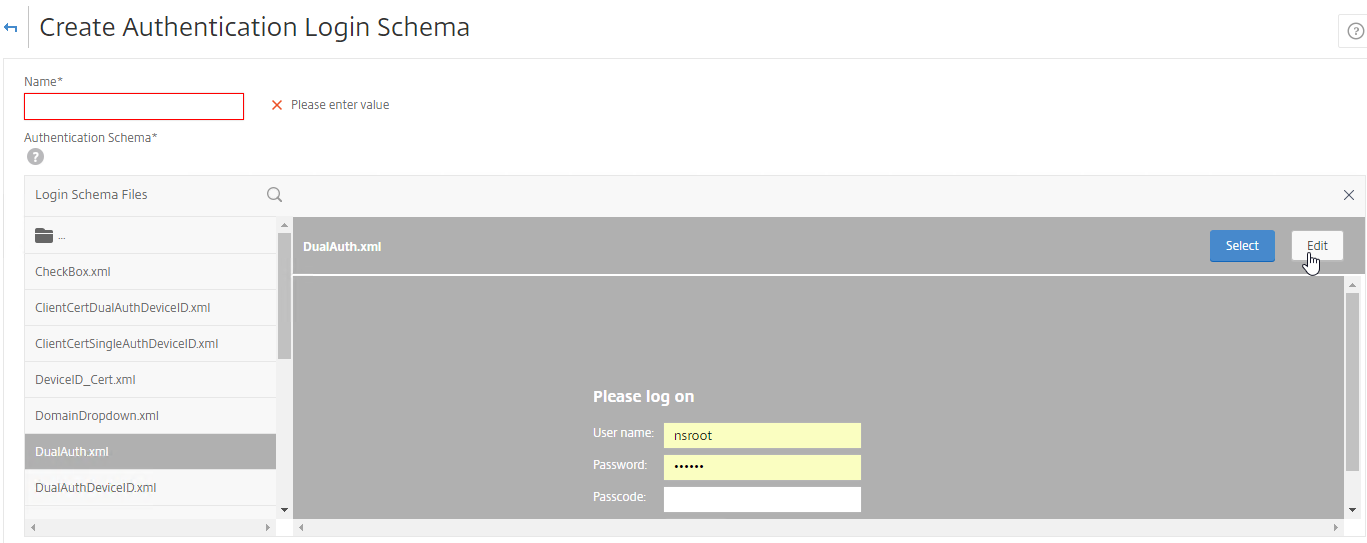
  5. Click the LoginSchema folder to see the files in it.
  6. Select one of the files. You can see a preview on the right. The labels can be changed by clicking the Edit button on the top right.
  7. When you Save the changes, a new file is created under /nsconfig/LoginSchema.
  8. On the top right, click Select.
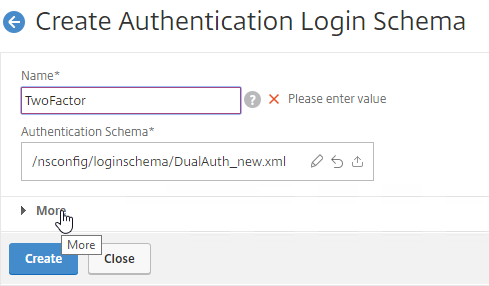
  9. Give the Login Schema a name, and click More.
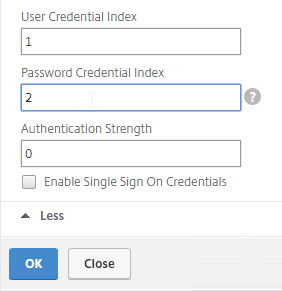
  10. You typically need to use the entered credentials elsewhere. For example, you might need to use the username and one of the passwords to later Single Sign-on to StoreFront. Near the bottom of the Login Schema Profile, click More, and enter unique values for the indexes. These values can be between 1 and 16.

    1. Later you reference these index values in a Traffic Policy/Profile by using the expression HTTP.REQ.USER.ATTRIBUTE(#).
  11. Click Create to create the Login Schema profile.

Note: if you later edit the Login Schema .xml file, the changes might not be reflected until you edit the Login Schema Profile, and Select the .xml file again.

Login Schema Policy

To bind a Login Schema Profile to a AAA vServer, you must first create a Login Schema Policy. Login Schema Policies are not required when binding the Login Schema Profile to an Authentication Policy Label, as detailed later.

To create and bind a Login Schema Policy:

  1. On the left, go to Security > AAA > Login Schema.
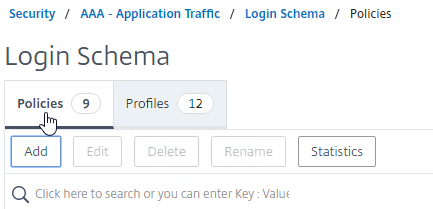
  2. On the right, switch to the Policies tab, and click Add.
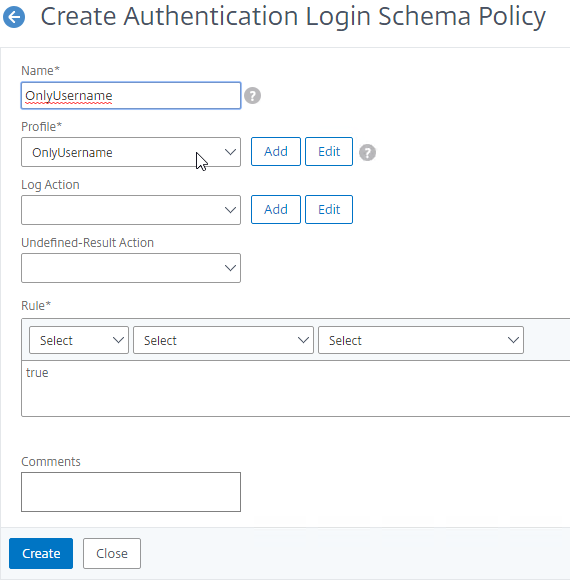
  3. Use the Profile drop-down to select the Login Schema Profile you already created.
  4. Enter a Default Syntax expression (e.g. true) in the Rule box, and click Create.
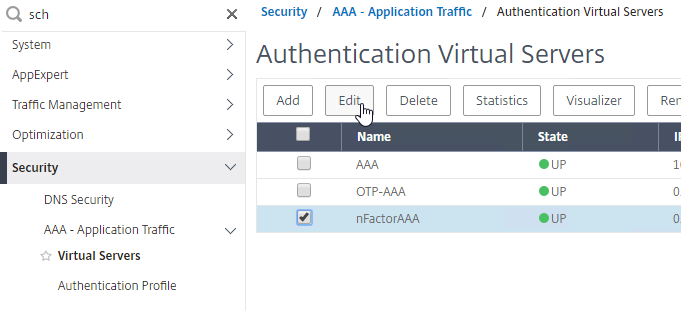
  5. On the left, go to Security > AAA > Virtual Servers, and edit an existing AAA Virtual Server.
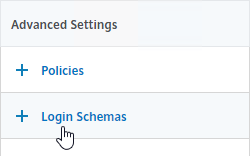
  6. On the right, in the Advanced Settings column, click Login Schemas.
  7. On the left, in the Login Schemas section, click where it says No Login Schema.
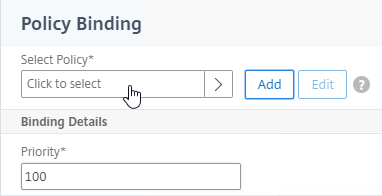
  8. Click where it says Click to select.
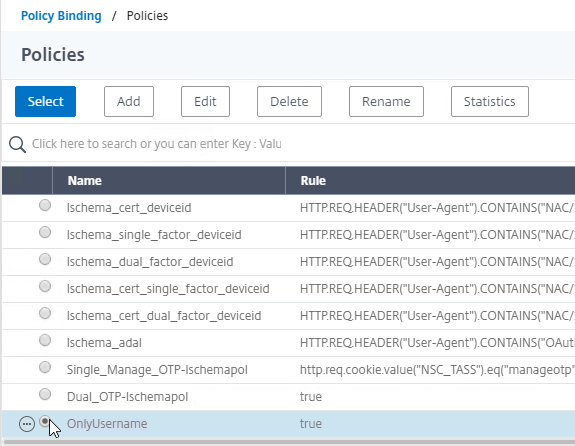
  9. Click the radio button next to the Login Schema policy, and click Select. Only Login Schema Policies appear in this list. Login Schema Profiles (without a policy) do not appear.
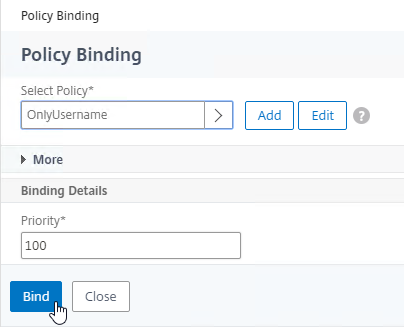
  10. Click Bind.

Advanced Authentication Policies

Authentication policies are a combination of policy expression, and policy action. If the expression is true, then evaluate the authentication action.

The Action is always an authentication server (LDAP, RADIUS, etc.).

The policy expression can be either in classic syntax, or in the newer default syntax.

The policy type is either Basic or Advanced. Basic policies can only use classic syntax. Advanced policies only use the newer default syntax. Both types of policies use the same Actions (authentication servers).

nFactor requires Advanced Authentication Policies; Basic policies won’t work.

Note: Citrix Gateway 12.0 and newer have deprecated Basic Authentication Policies (Classic Syntax). The only way to bind an Advanced Authentication Policy (Default Syntax) to Gateway is through nFactor and AAA.

Create Advanced Authentication Policy

You will need Authentication Actions/Servers (e.g. LDAP, RADIUS, CERT, SAML, etc.)

  • When creating an Advanced Authentication Policy, there’s a plus (Add) icon that lets you create Authentication Actions/Servers.
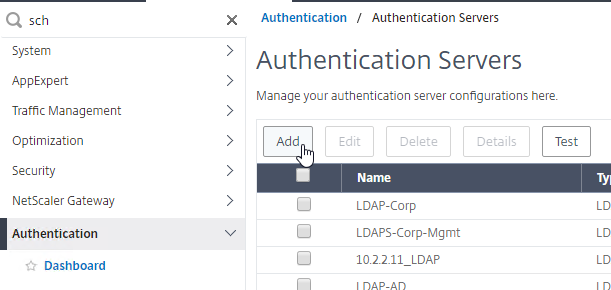
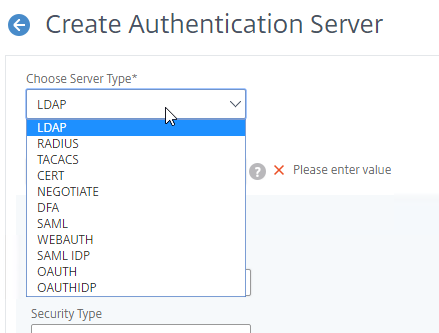
  • Or you can create Authentication Actions (Servers) prior to creating the Advanced Authentication Policy. The Authentication Servers are located under Authentication > Dashboard. On the right, click Add and select a Server Type. The instructions for creating these Authentication Servers is not detailed here. See the Authentication – NetScaler 12 / Citrix ADC 12.1 procedures.

To create an Advanced Authentication Policy:

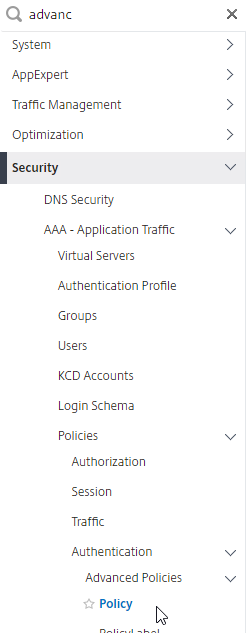
  1. Go to Security > AAA > Policies > Authentication > Advanced Policies > Policy.
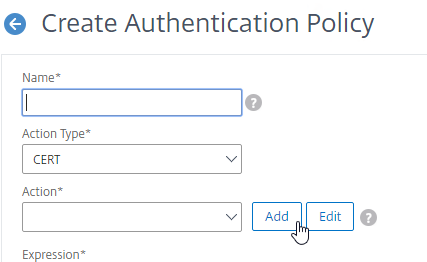
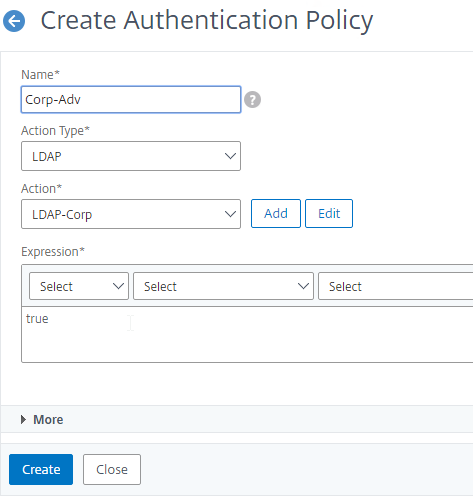
  2. On the right, click Add. You typically create at least one Authentication Policy for each Factor. When you create multiple Authentication Policies for one Factor, Citrix ADC checks each authentication policy in priority order until one of them succeeds.
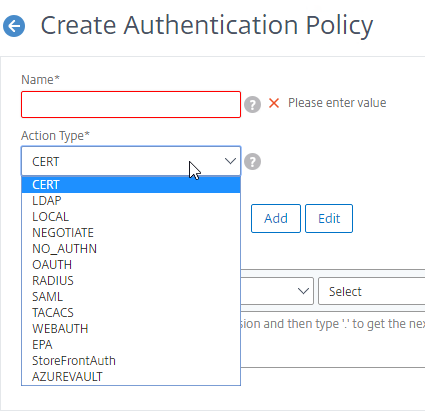
  3. Use the Action Type drop-down to select the Action Type (e.g. LDAP). Typically each Factor is a different type of Authentication Action.
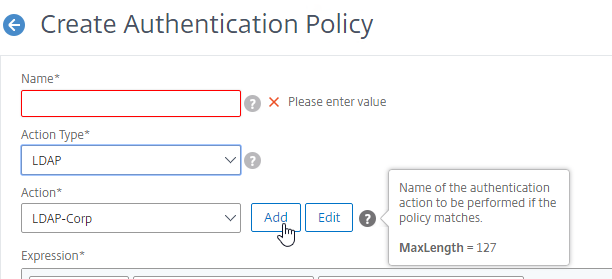
  4. If you don’t currently have any Actions configured, or if you want to create a new one, click the plus icon (Add button) next to the Action drop-down. The Actions/Servers are created in the normal fashion (not detailed here).
  5. In the Expression box, enter an expression using the Default Syntax. ns_true won’t work because that’s Classic syntax. There’s an Expression Editor link on the right. Or hit Ctrl+Space to see your options. true is a valid Default expression. Click Create when done.
  6. Create more Advanced Authentication Policies as needed for your nFactor design.

Bind First Factor Advanced Authentication Policy to AAA

Only the Advanced Authentication Policies for the first Factor are bound directly to the AAA Virtual Server. The Advanced Authentication Policies for the Next Factors are bound to Authentication Policy Labels as detailed in the next section.

  1. Go to Security > AAA > Virtual Servers.
  2. Edit an existing AAA Virtual Server.
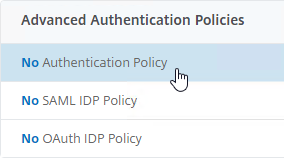
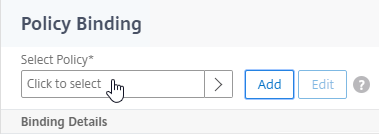
  3. On the left, in the Advanced Authentication Policies section, click where it says No Authentication Policy.
  4. Click where it says Click to select.
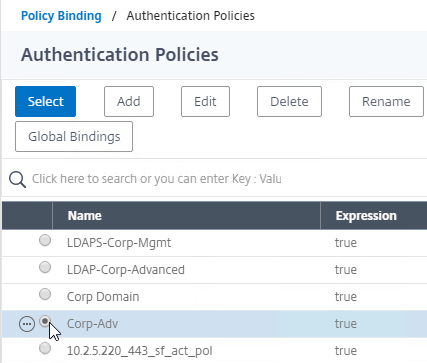
  5. Click the radio button next to the Advanced Authentication Policy, and click Select.
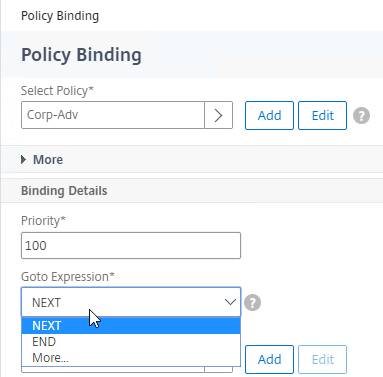
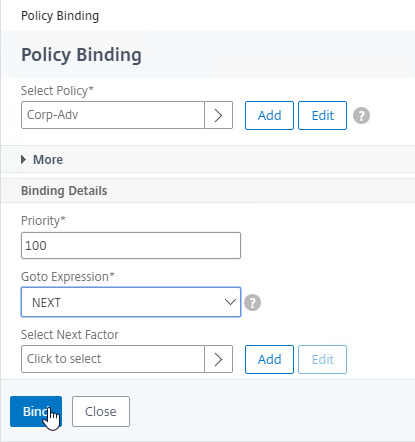
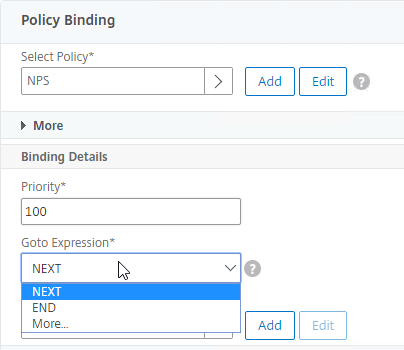
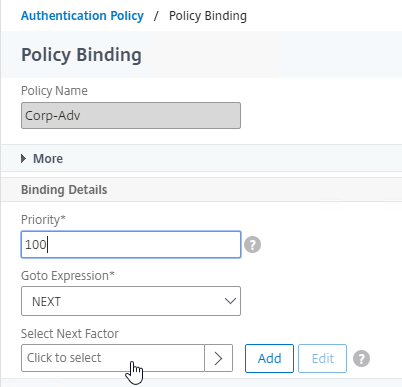
  6. In the Binding Details section, if this Advanced Authentication Policy fails, then the Goto Expression determines what happens next. If it is set to NEXT, then the next Advanced Authentication Policy bound to this AAA Virtual Server is evaluated. If it is set to END, or if there are no more Advanced Authentication Policies bound to this AAA Virtual Server, then authentication is finished and marked as failed.
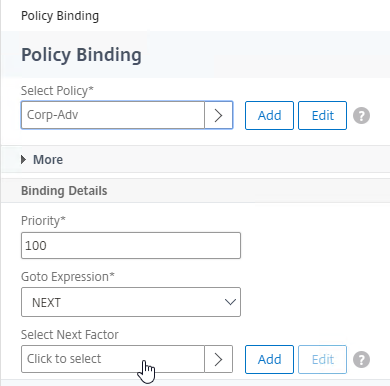
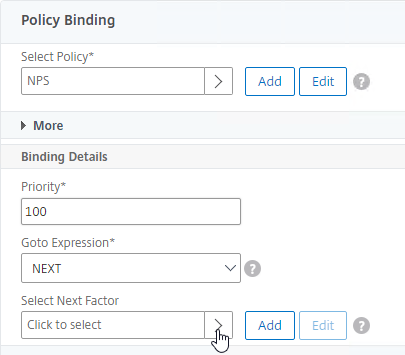
  7. The Select Next Factor field can optionally point to an Authentication Policy Label as detailed in the next section. The Next Factor is only evaluated if this Advanced Authentication Policy succeeds.
  8. Click Bind.

LDAP Group Extraction

Sometimes you only want to extract a user’s groups from Active Directory, but you don’t actually want to authenticate with LDAP. These extracted groups can then be used to select the next authentication Factor.

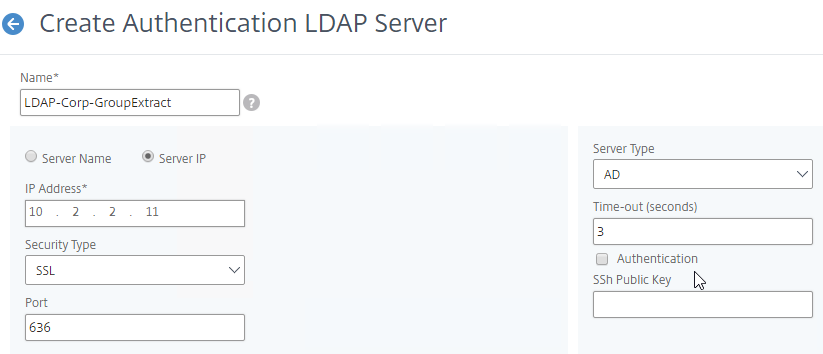
To configure an LDAP Action/Server for only group extraction:

  1. When creating or editing an LDAP Server/Action, make sure Authentication is unchecked.
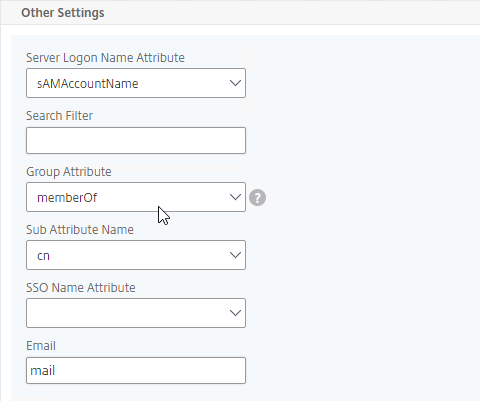
  2. In the Other Settings section, make sure Group Attribute and Sub Attribute Name are filled in.

Authentication Policy Label

When configuring the first Factor, you bind two objects directly to the AAA Virtual Server:

  • Login schema – for forms-based authentication
  • Advanced Authentication Policy

When binding the Advanced Authentication Policy to the AAA Virtual Server, there’s a field to Select Next Factor. If the Advanced Authentication Policy succeeds, then the Next Factor is evaluated.

The Next Factor is actually an Authentication Policy Label.

Authentication Policy Labels contain three objects:

  • Login Schema
  • Advanced Authentication Policies
  • Next Factor – the next Authentication Policy Label

Here’s the flow:

  1. User connects to AAA or Citrix Gateway Virtual Server.
  2. If forms-based authentication, the Login Schema bound to the AAA Virtual Server is displayed.
  3. Advanced Authentication Policies bound to the AAA Virtual Server are evaluated.
    1. If the Advanced Authentication Policy succeeds, go to the configured Next Factor, which is an Authentication Policy Label.
      1. If Next Factor is not configured, then authentication is complete and successful.
    2. If the Advanced Authentication Policy fails, and if Goto Expression is Next, then evaluate the next bound Advanced Authentication Policy.
    3. If none of the Advanced Authentication Policies succeed, then authentication failed.
  4. If the Next Factor Authentication Policy Label has a Login Schema bound to it, display it to the user.
  5. Evaluate the Advanced Authentication Policies bound to the Next Factor Authentication Policy Label.
    1. If the Advanced Authentication Policy succeeds, go to the configured Next Factor, which is an Authentication Policy Label.
      1. If Next Factor is not configured, then authentication is complete and successful.
    2. If the Advanced Authentication Policy fails, and if Goto Expression is Next, then evaluate the next bound Advanced Authentication Policy.
    3. If none of the Advanced Authentication Policies succeeds, then authentication failed.
  6. Continue evaluating the Next Factor Authentication Policy Label until authentication succeeds or fails. You can chain together an unlimited number of Authentication Policy Labels.

If you are binding a Login Schema to an Authentication Policy Label, then you only need the Login Schema Profile. There’s no need to create a Login Schema Policy.

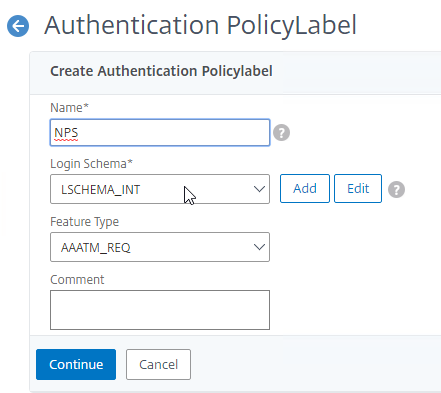
Not every Factor needs a Login Schema (logon web page). It’s possible for a prior Factor to gather all of the credential information, and simply pass it on to the next Factor. If you don’t need a Login Schema for a particular Authentication Policy Label, simply select LSCHEMA_INT, which is mapped to noschema. Or create a new Login Schema Profile based on noschema.

Create Authentication Policy Label

To create an Authentication Policy Label:

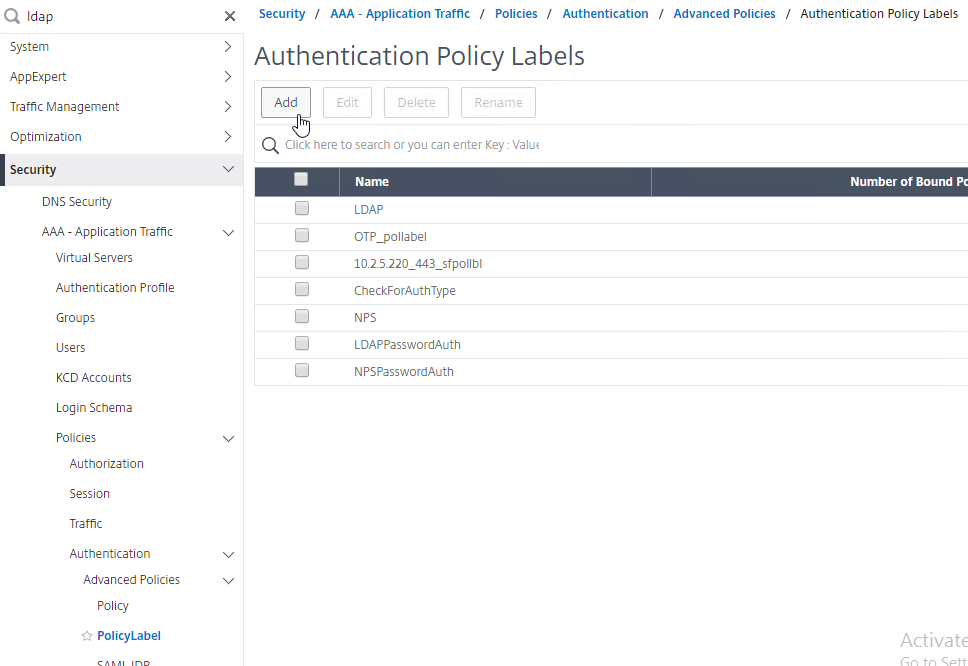
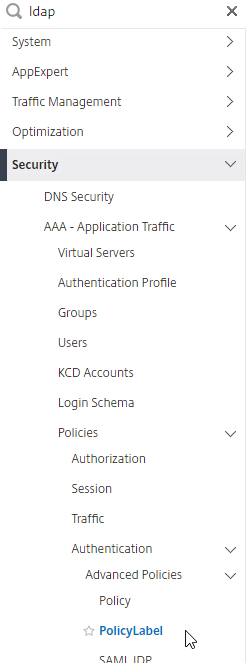
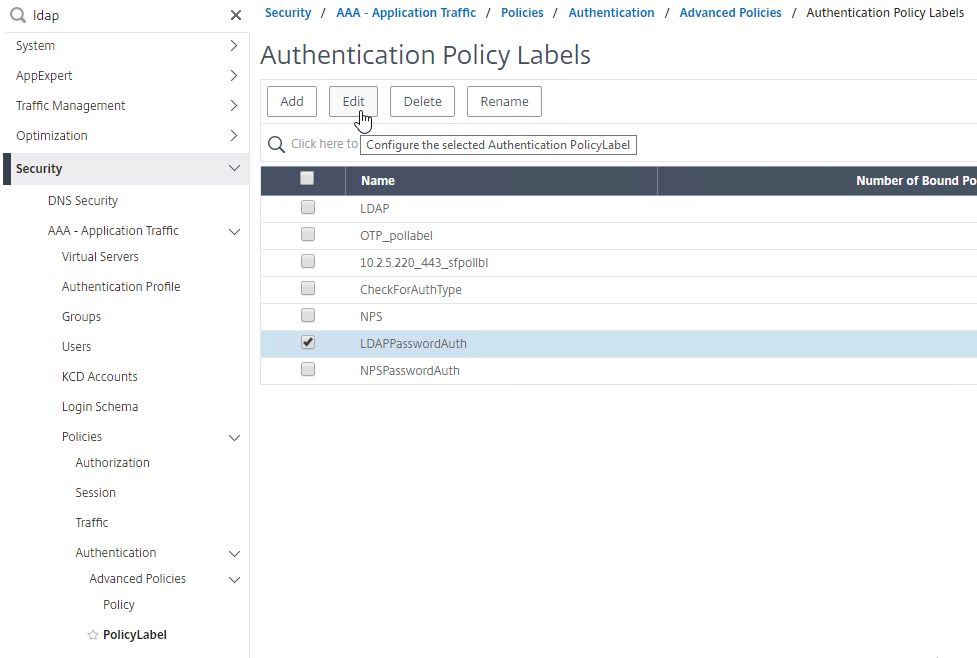
  1. Authentication Policy Labels are configured at Security > AAA > Policies > Authentication > Advanced Policies > PolicyLabel.
  2. On the right, click Add.
  3. Give the Policy Label a name.
  4. Select a Login Schema Profile. This can be a Login Schema Profile that is set to noschema (LSCHEMA_INT) if you don’t actually want to display anything to the user. Then click Continue.
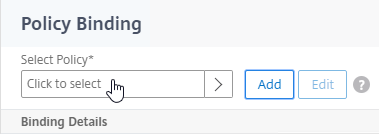
  5. In the Policy Binding section, click where it says Click to select.
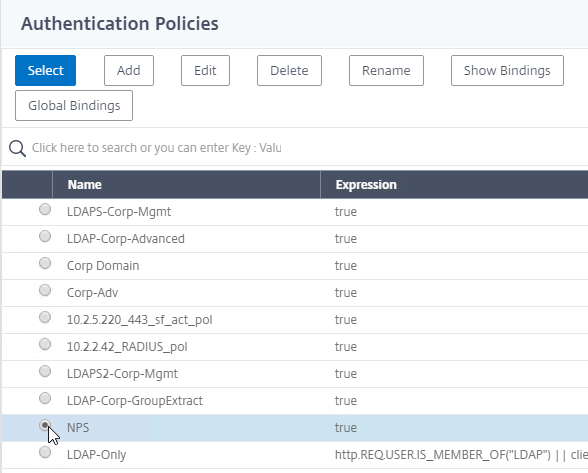
  6. Click the radio button next to an Advanced Authentication Policy that evaluates this Factor. Click Select.
  7. Use the Goto Expression drop-down to select NEXT or END. If you want to bind more Advanced Authentication Policies to this Factor, then select NEXT.
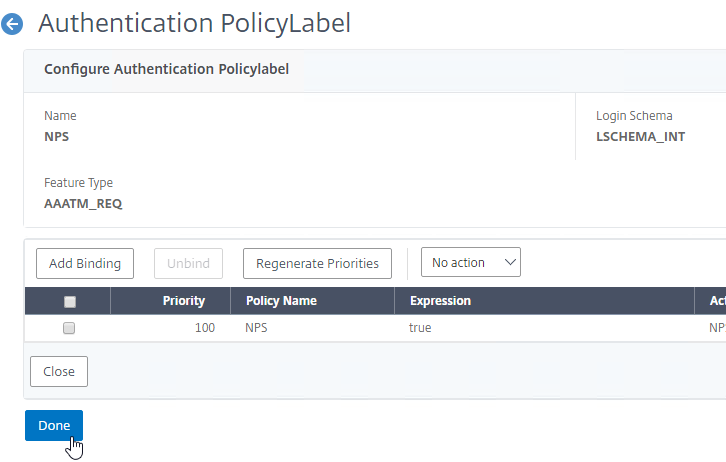
  8. In the Select Next Factor field, if you want to chain another Factor, click where it says Click to select, and bind the next Authentication Policy Label (Next Factor). You can click the Add button to create another Policy Label.
  9. Or don’t select anything, and if this Advanced Authentication Policy succeeds, then authentication is successful and complete. This ends the chaining.
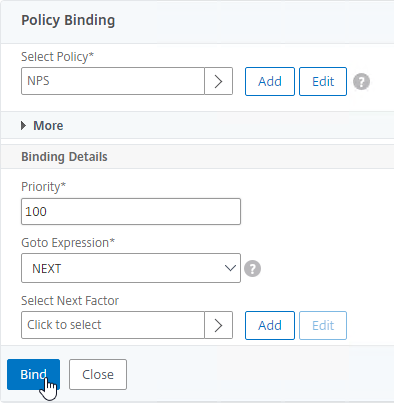
  10. Click Bind when done.
  11. You can click Add Binding to add more Advanced Authentication Policies to this Policy Label (Factor). Note: each Label is a separate factor. If your intent is multi-factor, then create a separate Label for the next factor.
  12. When done, click Done.

Bind Authentication Policy Label

Once the Policy Label (Factor) is created, you bind it to an existing Advanced Authentication Policy binding. This is how you chain Factors together. You can select a Next Factor (Policy Label) in two places:

  • Edit an existing AAA Virtual Server that has an Advanced Authentication Policy already bound to it and edit the binding to include the Next Factor.
  • Edit a different Policy Label, and edit an Advanced Authentication Policy binding to include the Next Factor.

To add a Policy Label Next Factor to a AAA Virtual Server:

  1. Edit an existing AAA Virtual Server that has an Advanced Authentication Policy already bound to it.
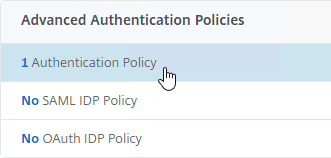
  2. On the left, in the Advanced Authentication Policies section, click the existing Authentication Policy bindings.
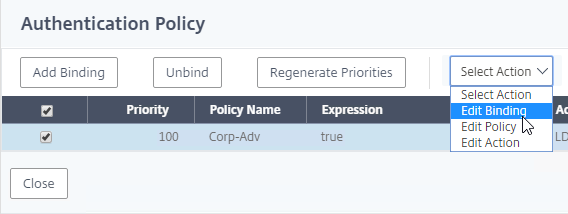
  3. Right-click an existing binding, and click Edit Binding.
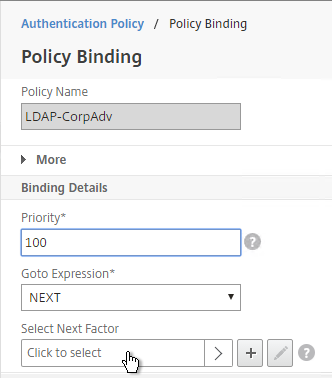
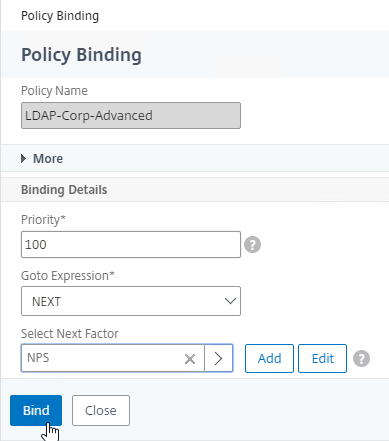
  4. In the Select Next Factor field, click where it says Click to select.
  5. Click the radio button next to the Policy Label for the Next Factor, and click Select.
  6. Click Bind.
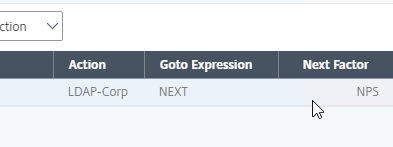
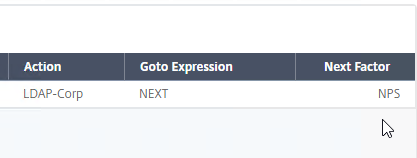
  7. The far right shows the Next Factor.
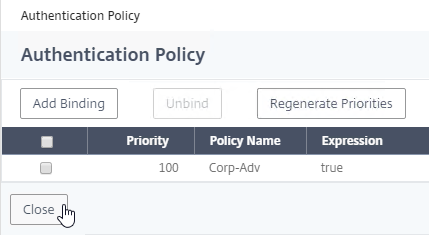
  8. Click Close.

To add a Policy Label Next Factor to a different Policy Label:

  1. Go to Security > AAA – Application Traffic > Policies > Authentication > Advanced Policies > PolicyLabel.
  2. On the right, edit a different Policy Label.
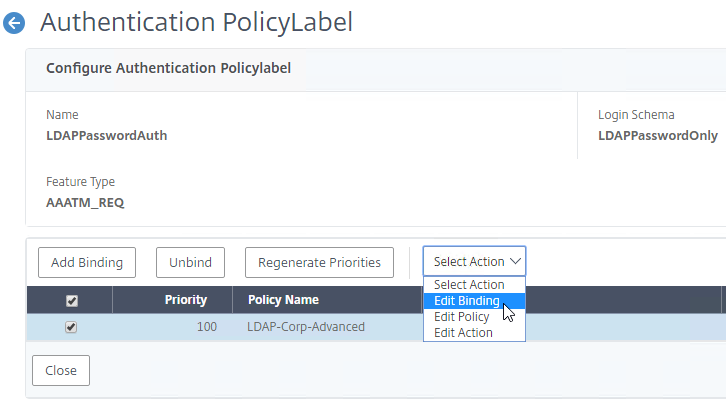
  3. Highlight an existing Advanced Authentication Policy binding, open the Action menu, and click Edit Binding.
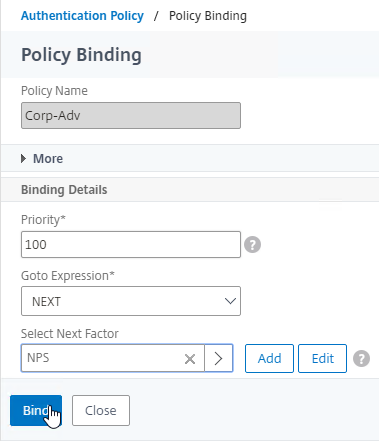
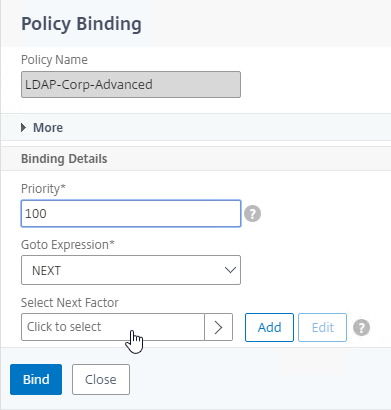
  4. In the Binding Details section, next to Select Next Factor, click Click to select.
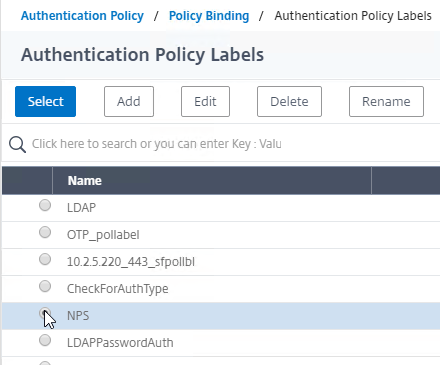
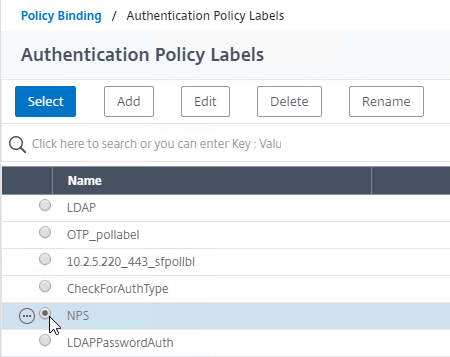
  5. Click the radio button next to a Policy Label for the next factor, and then click the blue Select button on the top of the window.
  6. Click Bind.
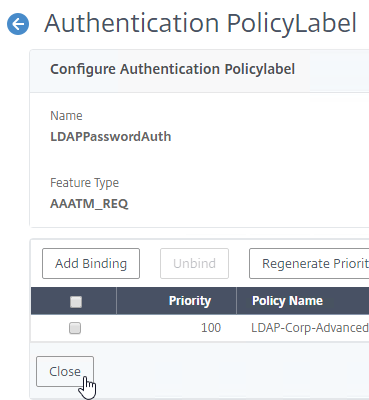
  7. On the far right, you can see the configured Next Factor.
  8. Click Close to close the PolicyLabel.

nFactor for Citrix Gateway

AAA Authentication Profile

Authentication Profile links a AAA Virtual Server to Citrix Gateway and enables nFactor on Citrix Gateway.

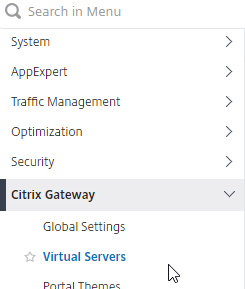
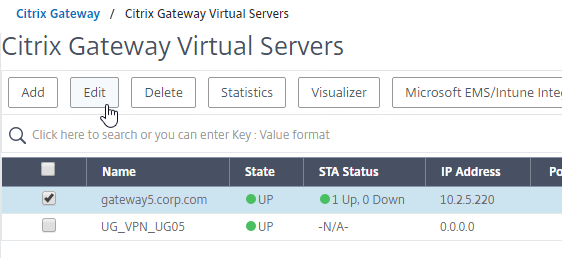
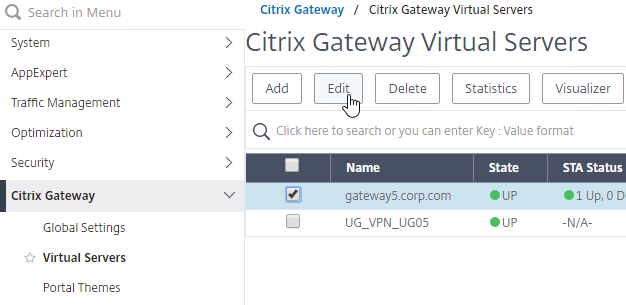
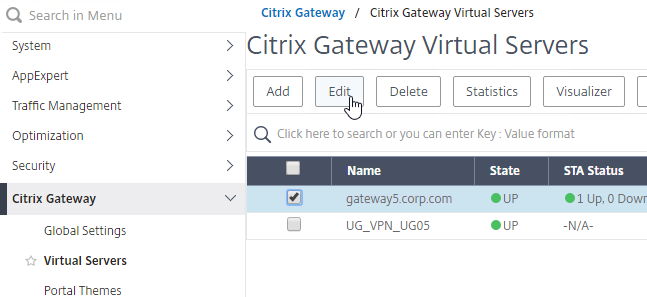
  1. Go to Citrix Gateway > Virtual Servers.
  2. On the right, edit an existing Gateway Virtual Server.
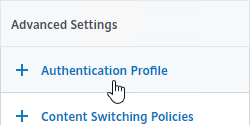
  3. On the right, in the Advanced Settings column, click Authentication Profile.
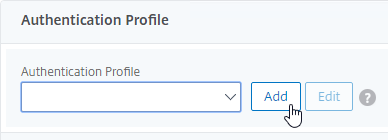
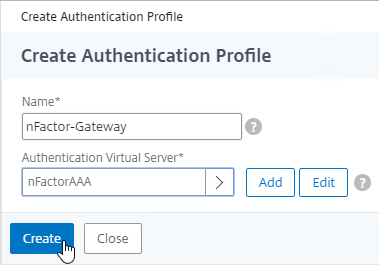
  4. On the left, click the plus icon (Add button) next to the Authentication Profile drop-down.
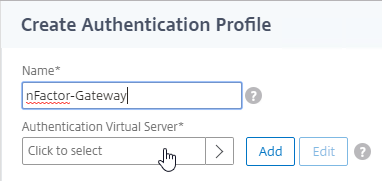
  5. Give the Authentication Profile a name.
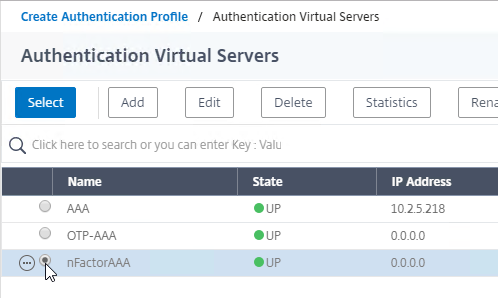
  6. In the Authentication Virtual Server field, click where it says Click to select.
  7. Click the radio button next to the AAA Virtual Server that has Login Schema, Advanced Authentication Policy, and Authentication Policy Labels configured. The AAA Virtual Server does not need an IP address. Click Select.
  8. Then click Create.
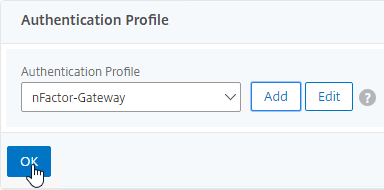
  9. And click OK to close the Authentication Profile section.
  10. If one of your Factors is client certificates, then you’ll need to configure SSL Parameters and CA certificate as detailed in the next section.
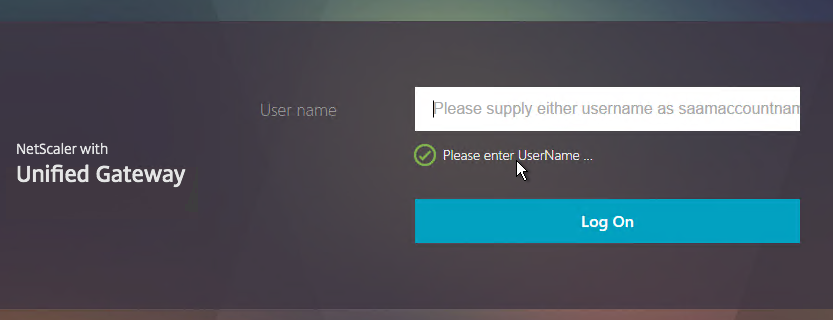
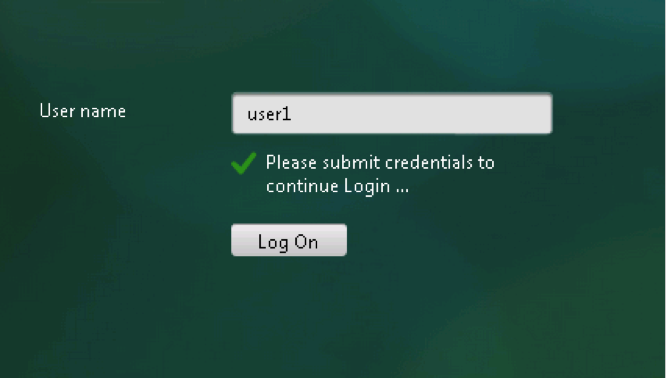
  11. When you browse to your Gateway, you’ll see the nFactor authentication screens.
  12. Workspace app 1809 and newer with Gateway/ADC 12.1 build 49 and newer should support nFactor authentication. Older clients with older builds do not support nFactor, so those users will have to use a web browser.
    1. CTX223386 nFactor Authentication with Native Clients from NetScaler 11.1: Although Native Receiver Clients can now leverage advanced authentication policies, they still interact using legacy Gateway protocol. That is, Native Clients do not yet support nFactor wire protocol. Gateway acts intelligently based on the clients that are interfacing with it. That is, for Browser client, Gateway redirects to advanced login page with all customizations. For a Native Receiver client, Gateway responds according to the legacy protocol. Since Native clients do not process LoginSchema (even if it is sent), Gateway processes the configured LoginSchema, learns the configured factors, and sends hint to the clients in response to /vpn/index.html.

Gateway Client Certificate Authentication

If one of your authentication Factors is certificate, then you must perform some SSL configuration on the Citrix Gateway Virtual Server:

  1. Go to Traffic Management > SSL > Certificates > CA Certificates, and install the root certificate for the issuer of the client certificates. Certificate Authority certificates do not need key files.
  2. If default SSL Profiles are enabled, then you should have already created an SSL Profile that has Client Authentication enabled.
  3. Go to Citrix Gateway > Virtual Servers, and edit an existing Citrix Gateway Virtual Server that is enabled for nFactor.
  4. If default SSL Profiles are enabled:
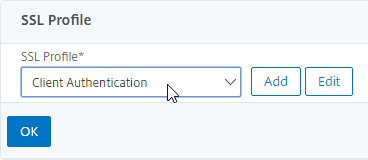
    1. Scroll down to the SSL Profile section, and click the pencil icon.
    2. In the SSL Profile drop-down, select the SSL Profile that has Client Authentication enabled and set to OPTIONAL.
  5. If default SSL Profiles are not enabled:
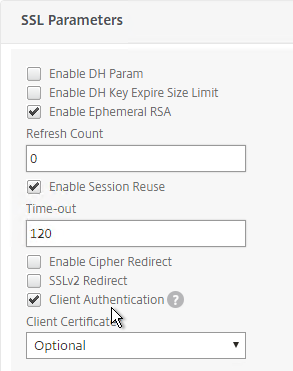
    1. On the left, in the SSL Parameters section, click the pencil icon.
    2. Check the box next to Client Authentication.
    3. Make sure Client Certificate drop-down is set to Optional, and click OK.
  6. On the left, in the Certificates section, click where it says No CA Certificate.
  7. Click where it says Click to select.
  8. Click the radio button next to the root certificate for the issuer of the client certificates, and click Select.
  9. Click Bind.
  10. You might have to also bind any Intermediate CA Certificates that issued the client certificates.

Traffic Policy for nFactor Single Sign-on to StoreFront

When performing Single Sign-on to StoreFront, nFactor defaults to using the last entered password. If LDAP is not the last entered password, then you need to create a Traffic Policy/Profile to override the default nFactor behavior.

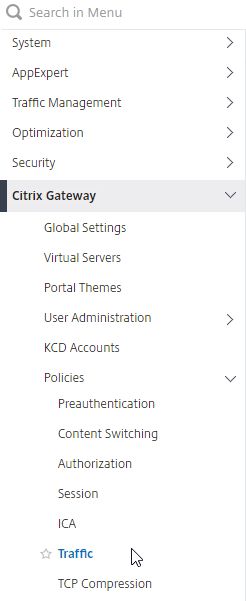
  1. Go to Citrix Gateway > Policies > Traffic.
  2. On the right, switch to the Traffic Profiles tab.
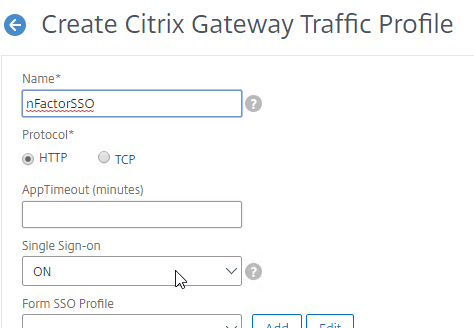
  3. Click Add.
  4. Give the Traffic Profile a name.
  5. In the Protocol section, select HTTP.
  6. Set Single Sign-on to ON. Scroll down.
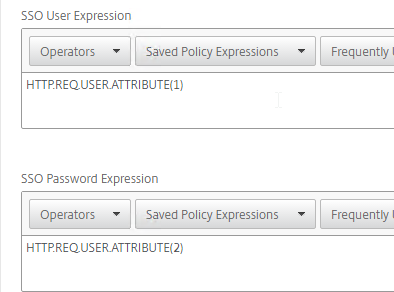
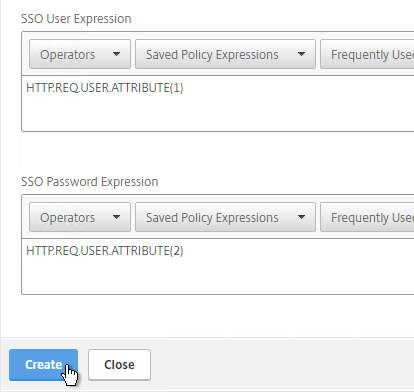
  7. In the SSO Expression fields, enter an HTTP.REQ.USER.ATTRIBUTE(#) expression that matches the indexes specified in the Login Schema.
  8. Click Create.
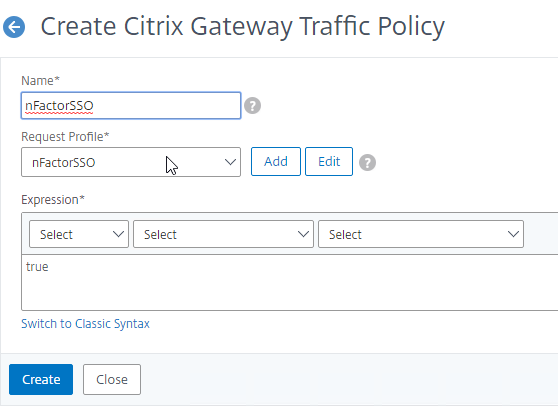
  9. On the right, switch to the Traffic Policies tab, and click Add.
  10. Give the policy a name.
  11. Select the previously created Traffic Profile.
  12. Enter an Advanced Expression (e.g. true), and click Create.
  13. Edit an existing Citrix Gateway Virtual Server.
  14. Scroll down to the Policies section and click the plus icon.
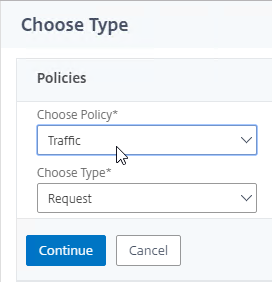
  15. Select Traffic > Request, and click Continue.
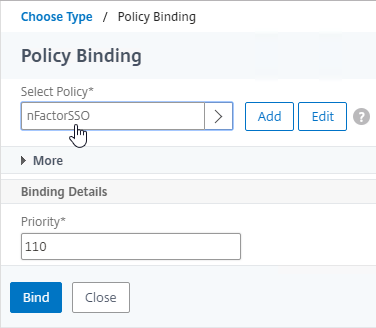
  16. Select the previously created Traffic Policy, and click Bind.

Sample Configurations

From Citrix Docs: Sample deployments using nFactor authentication:

  • Get two passwords up-front, pass-through in next factor. Read
  • Username and 2 passwords with group extraction in third factor. Read
  • Configure nFactor to process the second password before the first password, Read
  • Modify first factor username for second factor. Read
    • NO_AUTHN authentication policy expression checks first factor POST Body login value for UPN format. If true, Next Factor is noschema Login Schema with User Expression that transforms the HTTP.REQ.USER.NAME to DOMAIN\Username before passing to second factor authentication policy.
  • Group extraction followed by certificate or LDAP authentication, based on group membership. Read

  • SAML followed by LDAP or certificate authentication, based on attributes extracted during SAML. Read
  • SAML in first factor, followed by group extraction, and then LDAP or certificate authentication, based on groups extracted. Read
  • Capture email address in first factor, and then choose one of multiple SAML iDP based on email address suffix. Read (Manuel Kolloff)

  • Prefill user name from certificate. Read
  • Certificate authentication followed by group extraction for 401 enabled traffic management virtual servers. Read
  • Certificate fallback to LDAP in same cascade; one virtual server for both certificate and LDAP authentication. Read
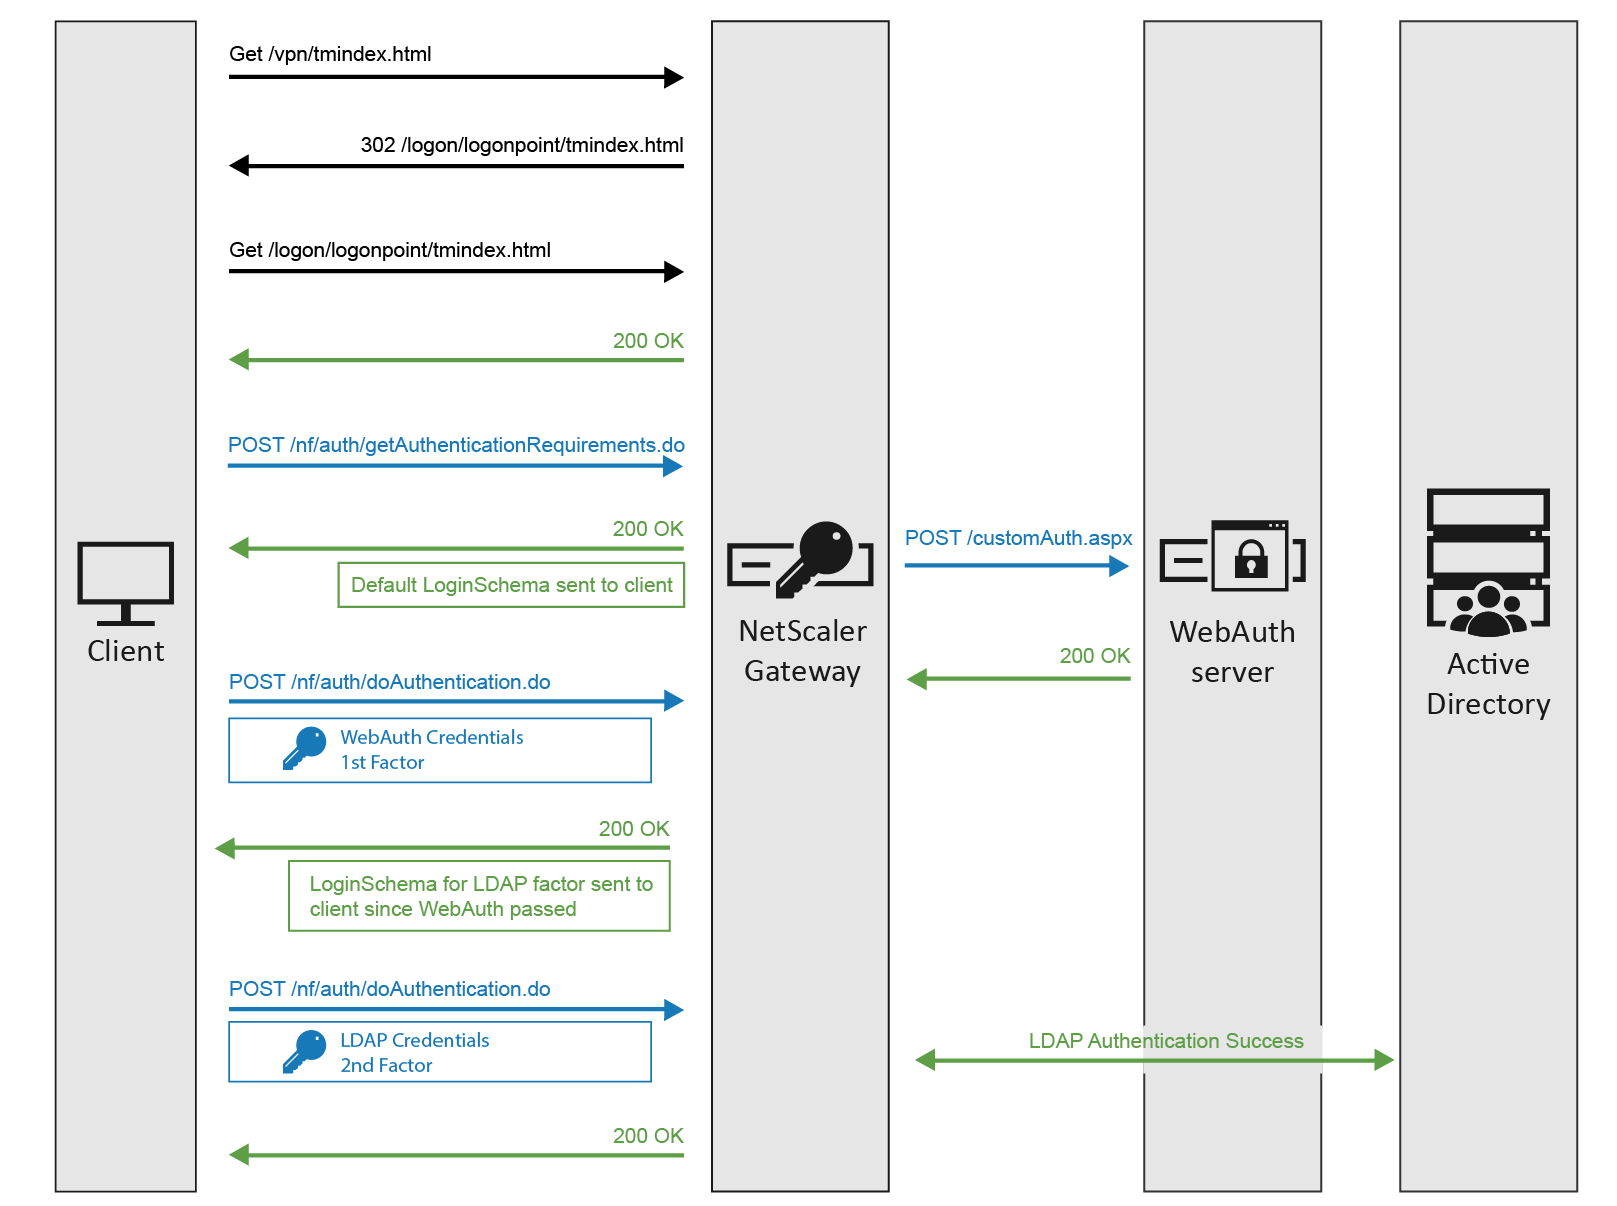
  • LDAP in first factor and WebAuth in second factor. Read
  • WebAuth in first factor, LDAP in second factor. Read
  • Domain drop down in first factor, then different policy evaluations based on selected domain. Read

    • Domain drop-down, then send Domain\Username to RADIUS.  Read
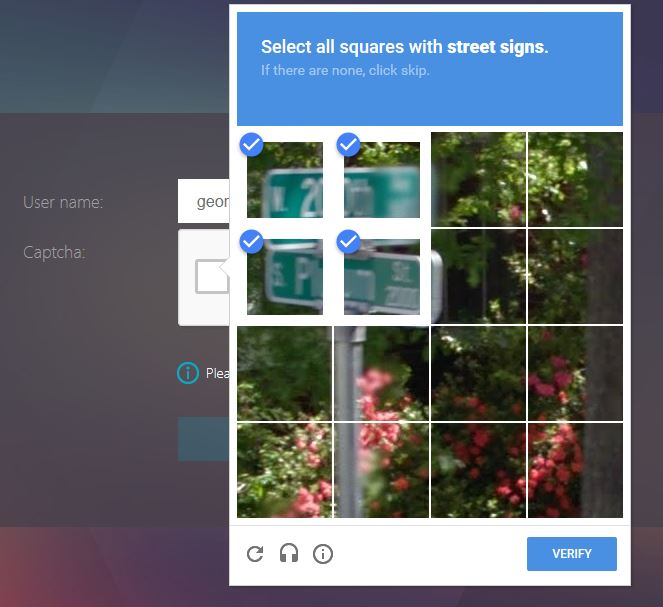
  • Google reCAPTCHA first factor, LDAP second. Read (George Spiers)
  • Supporting reCaptcha with NetScaler nFactor. Read
  • CTX225938 nFactor – Customizing UI to Display Images – e.g. Swivel
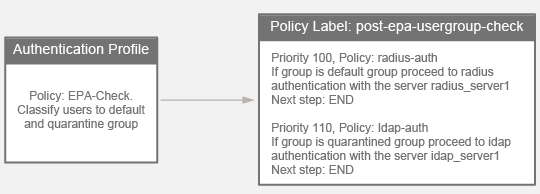
  • With 12.0 version of NetScaler, EPA is blended into the authentication framework thereby making EPA a conditional or on-demand feature. This reduces the need for multiple virtual servers by allowing for all the clients to gain access to a single virtual server. See CTX223597 Concepts and Entities Used for EPA in nFactor Authentication Through NetScaler.
  • Configure Post-Authentication EPA (Endpoint Analysis) Scan as a Factor. Read
  • Configure Pre-Authentication EPA (Endpoint Analysis) Scan as a Factor. Read
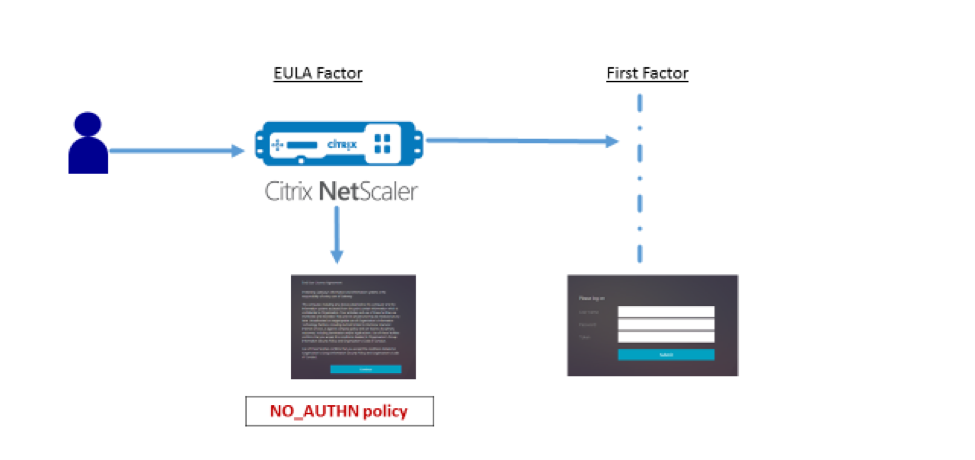
  • Configure EULA (End User License Agreement) as an Authentication Factor. Read
  • Show a drop-down box in the logon form and automatically hide or show certain fields based on drop-down selection. Read

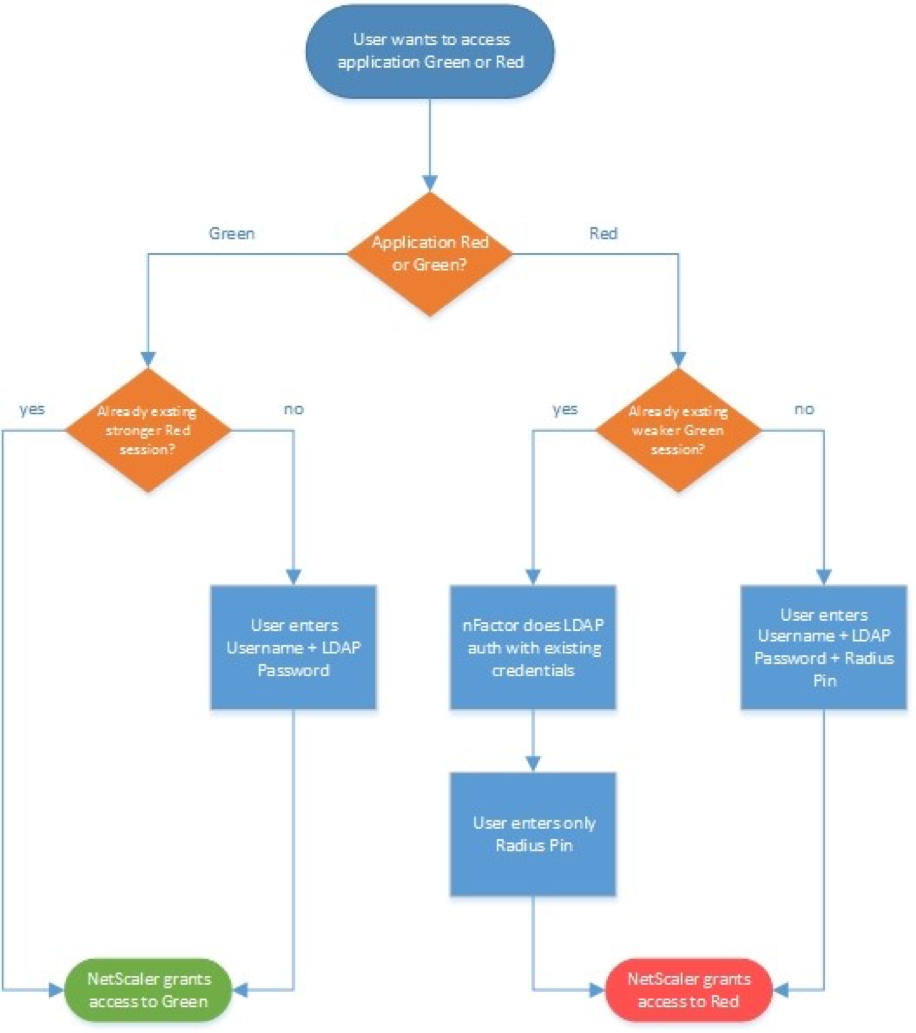
  • Step-up authentication – i.e. one Unified Gateway website needs single factor, while other website needs multi-factor. Read
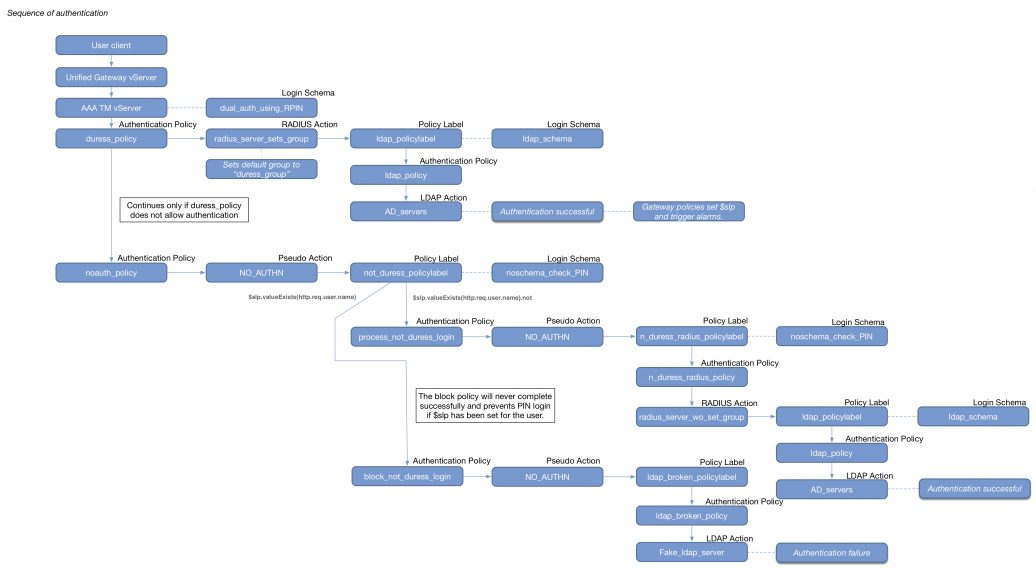
  • RADIUS authentication with reversed PIN – if user enters reversed PIN, then user is under duress. This sample configuration has some interesting components:  Read  💡
    • Policy Extension Function using the Lua language
      • Usage = HTTP.REQ.BODY(1000).TYPECAST_NVLIST_T(’=’,’&’).VALUE(”passwd1”).RPIN
    • NetScaler Variable of type Map with Expiration timer
      • Responder to set the variable
      • Variable identifies duress state for four hours
    • Custom syslog message (audit messageaction) triggered by a Responder
    • Default Authentication Group to put duressed user on site/farm with Session Recording enabled
    • nFactor sequence:

Certificate auth: If Successful, LDAP only. If Failure, LDAP+RADIUS

This scenario is described in Citrix Blog Post Configuration Notes on nFactor

The authentication process flows like this:

  1. User connects to NetScaler Gateway.
  2. NetScaler Gateway asks user for certificate.
  3. If user selects a certificate, NetScaler Gateway compares certificate signature to the CA certificate that is bound to the NetScaler Gateway. If it doesn’t match, then user certificate is ignored.
  4. Bound to the NetScaler Gateway Virtual Server is an Authentication Profile, which links NetScaler Gateway to AAA nFactor.
  5. Certificate authentication: The lowest priority number authentication policy on the AAA Virtual Server is Certificate. If there’s a valid user certificate:
    1. Extract the user’s userPrincipalName from the certificate.
    2. Next Factor = policy label that displays a logon screen (Single-factor Login Schema)
    3. The username field is pre-populated with the userPrincipalName attribute extracted from the certificate.
    4. User is prompted to enter the LDAP password only.
    5. LDAP policy/server is configured to use userPrincipalName to login to LDAP.
    6. If successful, NetScaler Gateway authentication is complete. Next step is to Single Sign-on to StoreFront.
    7. If LDAP authentication fails, then NetScaler Gateway authentication fails, and the user is prompted to try LDAP-only authentication again.
  6. LDAP authentication: If certificate authentication fails, try next authentication policy bound to the AAA Virtual Server, which is a different LDAP Policy.
    1. Bound to the AAA Virtual Server is a Dual Factor Login Schema that asks for username, LDAP password, and RADIUS password.
    2. LDAP policy/server is configured to use sAMAccountName to login to LDAP. SAMAccountName means users don’t have to enter full userPrincipalName.
    3. If LDAP authentication is successful:
      1. Put username in Credential Index 1 and put password in Credential Index 2. These will later be used by a Traffic Policy to Single Sign-on to StoreFront.
      2. Proceed to next factor (Policy Label), which is RADIUS.
    4. If LDAP authentication fails, NetScaler Gateway login fails, and the user is prompted to try two-factor authentication again.
  7. RADIUS authentication: the second factor Policy Label is configured with Noschema. This means no additional logon form is displayed because the RADIUS password was already collected in the previous factor.
    1. When multiple passwords are collected, they are tried in order. The first password was used by the previous factor. The second password is tried by this factor (Policy Label).
    2. RADIUS policy/profile attempts authentication.
    3. If RADIUS authentication is successful, NetScaler Gateway authentication is complete. Next step is Single Sign-on to StoreFront.
    4. If RADIUS authentication fails, NetScaler Gateway login fails, and the user is prompted to try two-factor authentication again.
  8. Single Sign-on to StoreFront: NetScaler Gateway uses the last password collected by nFactor to Single Sign-on with StoreFront. If the last password is LDAP, then no additional configuration is needed. If the last password is not LDAP, then a Traffic Policy/Profile is needed.
    1. Bound to the NetScaler Gateway Virtual Server is a Traffic Policy.
    2. The Traffic Policy/Profile users Credential Index 1 for username and Credential Index 2 for Password. These are the same indexes configured in the Dual Factor Login Schema.

The order of configuration doesn’t match the authentication flow because some objects have to be created before others.

# Create Auth vServer, bind server cert, bind CA cert for client certificates
# Enable Optional client certificates
add authentication vserver nFactorAAA SSL 0.0.0.0 443
bind ssl vserver nFactorAAA -certkeyName WildCorpCom
bind ssl vserver nFactorAAA -certkeyName CorpRoot -CA -ocspCheck Optional
set ssl vserver nFactorAAA -clientAuth ENABLED -clientCert Optional -ssl3 DISABLED

# Create auth policy for LDAP-UPN. UPN is extracted from certificate.
add authentication ldapAction Corp-UserPrincipalName -serverIP 10.2.2.220 -serverPort 636 -ldapBase "dc=corp,dc=local" -ldapBindDn "corp\\ctxsvc" -ldapBindDnPassword "MyPassword" -ldapLoginName userPrincipalName -groupAttrName memberOf -subAttributeName CN -secType SSL -passwdChange ENABLED
add authentication Policy Corp-UserPrincipalName -rule true -action Corp-UserPrincipalName

# Create PolicyLabel LDAPPasswordOnly with Single-factor Login Schema
# Login Schema has InitialValue with username from certificate.
add authentication loginSchema SingleAuth -authenticationSchema "/nsconfig/loginschema/LoginSchema/SingleAuth-Corp.xml"
add authentication policylabel LDAPPasswordOnly -loginSchema SingleAuth
bind authentication policylabel LDAPPasswordOnly -policyName Corp-UserPrincipalName -priority 100 -gotoPriorityExpression NEXT

# Create Cert policy and bind to AAA vServer with LDAPPasswordOnly PolicyLabel as Next Factor
# Cert policy must have lower priority number (higher priority) than LDAP-SAM policy
# Cert is evaluated first. If succeed, ask for LDAP password. If fails, ask for two factor.
add authentication certAction Cert_Auth_Profile -userNameField SubjectAltName:PrincipalName
add authentication Policy Cert_Auth_Policy -rule true -action Cert_Auth_Profile
bind authentication vserver nFactorAAA -policy Cert_Auth_Policy -priority 100 -nextFactor LDAPPasswordOnly -gotoPriorityExpression NEXT

# Create LDAP-SAM Auth Policy for two-factor
# Only evaluated if cert auth fails. Login Schema asks for user, password, and passcode.
add authentication ldapAction Corp-Gateway -serverIP 10.2.2.220 -serverPort 636 -ldapBase "dc=corp,dc=local" -ldapBindDn "corp\\ctxsvc" -ldapBindDnPassword "MyPassword" -ldapLoginName samaccountname -groupAttrName memberOf -subAttributeName CN -secType SSL -passwdChange ENABLED
add authentication Policy Corp-SAMAccountName -rule true -action Corp-Gateway

# Create RADIUS Auth Policy for two-factor
add authentication radiusAction RADIUS-Action -serverIP 10.2.2.42 -serverPort 1812 -radKey MyKey
add authentication Policy RADIUS-Policy -rule true -action RADIUS-Action

# Create Dual-factor Login Schema and bind directly to AAA vServer
# This Login Schema is only shown if Cert auth fails
add authentication loginSchema DualAuth -authenticationSchema "/nsconfig/loginschema/LoginSchema/DualAuth.xml" -userCredentialIndex 1 -passwordCredentialIndex 2
add authentication loginSchemaPolicy DualAuth -rule true -action DualAuth
bind authentication vserver nFactorAAA -policy DualAuth -priority 100 -gotoPriorityExpression END

# Create RADIUS Policy Label with noschema and RADIUS Auth Policy
# Already got passcode from previous factor so don't show Login Schema again
add authentication loginSchema Noschema -authenticationSchema noschema
add authentication policylabel NoSchema-RADIUS -loginSchema Noschema
bind authentication policylabel NoSchema-RADIUS -policyName RADIUS-Policy -priority 100 -gotoPriorityExpression NEXT

# Bind LDAP-SAM Auth Policy to AAA vServer with RADIUS as next factor
# LDAP-SAM Auth Policy must have higher priority number (lower priority) than Cert Policy
bind authentication vserver nFactorAAA -policy Corp-SAMAccountName -priority 110 -nextFactor NoSchema-RADIUS -gotoPriorityExpression NEXT

# Create Authentication Profile to link AAA with Gateway. Bind to Gateway.
add authentication authnProfile nFactor -authnVsName nFactorAAA -AuthenticationHost aaa.corp.com
add vpn vserver gateway.corp.com SSL 10.2.2.220 443 -icaOnly ON -dtls ON -Listenpolicy NONE -tcpProfileName nstcp_default_XA_XD_profile -appflowLog ENABLED -authnProfile nFactor

# Enable Optional Client certs on Gateway
set ssl vserver gateway.corp.com -clientAuth ENABLED -clientCert Optional -ssl3 DISABLED
bind ssl vserver gateway.corp.com -certkeyName CorpRoot -CA -ocspCheck Optional

# Create Traffic Policy to SSON to StoreFront. Bind to Gateway.
add vpn trafficAction nFactorSSO http -kcdAccount NONE -userExpression "http.req.user.attribute(1)" -passwdExpression "http.req.user.attribute(2)"
add vpn trafficPolicy nFactorSSO ns_true nFactorSSO
bind vpn vserver gateway.corp.com -policy nFactorSSO -priority 100

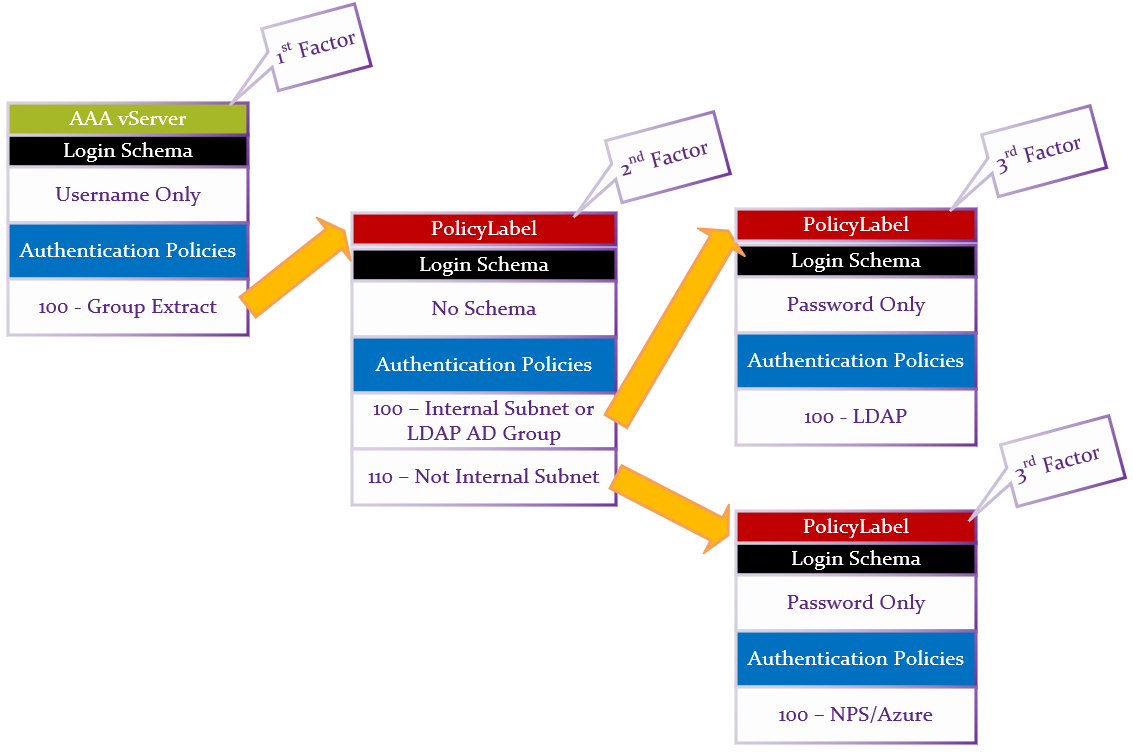
Group Extraction, followed by LDAP (Active Directory), or Azure MFA (NPS)

Azure MFA is available as a plug-in for Microsoft Network Policy Server (NPS), which is a Microsoft RADIUS server and built-in Windows Server Role.

NPS performs both AD authentication, and Azure MFA authentication. NetScaler sends the user’s AD password to NPS. NPS verifies AD, and then the NPS Azure MFA plug-in calls the user (or push notification to the user). If both AD and MFA are successful, then NPS sends back RADIUS-Accept.

Summary:

  1. First factor Login Schema asks for Username only.
    1. LDAP Group Extraction (with Authentication disabled) reads the user’s groups from AD.
  2. Second factor checks for group membership and sends to one of two different third factors.
  3. If user is in LDAP Group, or Client IP is on internal network, then perform LDAP-only authentication.
    1. Login schema asks for AD password.
    2. LDAP Policy authenticates with LDAP Server (Active Directory).
  4. Otherwise, perform RADIUS (two-factor) authentication.
    1. Login schema asks for AD password.
      • Note: NPS with MFA plugin only needs the AD password. Alternatively, you could use a Login Schema that asks for both LDAP password and RADIUS password.
    2. RADIUS Policy uses the entered AD password to authenticate to Microsoft NPS and Azure MFA.

CLI Commands. Note, these objects are created in the required order, which is backwards from how you would want to configure them.

  1. Add cert for AAA vServer. Link the cert to Intermediate.
    add ssl certKey WildcardCorpCom -cert WildcardCorpCom.pfx -key WildcardCorpCom.pfx -inform PFX -passcrypt "myPassword"
    
    link ssl certKey WildcardCorpCom Intermediate
  2. Enable AAA feature if not already enabled.
    enable ns feature AAA
  3. Create first factor LDAP Action (LDAP Server) and LDAP Policy (expression) for Group Extraction. Authentication is disabled. This is the first factor that is bound directly to the AAA vServer.
    add authentication ldapAction LDAP-Corp-GroupExtract -serverIP 10.2.2.11 -serverPort 636 -ldapBase "dc=corp,dc=local" -ldapBindDn ctxsvc@corp.local -ldapBindDnPassword MyPassword -ldapLoginName sAMAccountName -groupAttrName memberOf -subAttributeName cn -secType SSL -authentication DISABLED
    
    add authentication Policy LDAP-Corp-GroupExtract -rule true -action LDAP-Corp-GroupExtract
  4. Create a third-factor LDAP Action (LDAP Server) and Authentication Policy (expression) for Active Directory Authentication. This is the authentication factor if user is in the LDAP Users group.
    add authentication ldapAction LDAP-Corp -serverIP 10.2.2.11 -serverPort 636 -ldapBase "dc=corp,dc=local" -ldapBindDn ctxsvc@corp.local -ldapBindDnPassword MyPassword -ldapLoginName sAMAccountName -groupAttrName memberOf -subAttributeName cn -secType SSL -passwdChange ENABLED
    
    add authentication Policy LDAP-Corp -rule true -action LDAP-Corp
  5. Create a third-factor RADIUS Action (RADIUS Server) and Authentication Policy (expression) for NPS.
    add authentication radiusAction NPS -serverIP 10.2.2.42 -serverPort 1812 -radKey MySecret
    
    add authentication Policy NPS -rule true -action NPS
  6. Create the second factor NO_AUTHN authentication policies to determine the next factor based on the user’s group membership. NO_AUTHN means don’t authenticate. Instead, these policies will have a Next Factor that points to the Authentication Policies that we created earlier. If the policy expression is true, then go to Next Factor. Next Factor is configured later when binding these policies to the second factor PolicyLabel. Note: the group name is case sensitive and must match the Active Directory group name.
    add authentication Policy LDAP-Only -rule "http.REQ.USER.IS_MEMBER_OF(\"LDAP\") || client.IP.SRC.IN_SUBNET(10.2.2.0/24)" -action NO_AUTHN
    
    add authentication Policy TwoFactor -rule "client.IP.SRC.IN_SUBNET(10.2.2.0/24).NOT" -action NO_AUTHN
  7. Create first factor Login Schema Profile for username-only group extraction. You can copy the built-in OnlyUsername.xml and modify it with your desired labels. Since this Login Schema Profile is bound to the AAA vServer, it needs a Login Schema Policy (expression). The other two Login Schema Profiles are bound to PolicyLabels and thus don’t need Login Schema Policies.
    add authentication loginSchema OnlyUsername -authenticationSchema "/nsconfig/loginschema/LoginSchema/OnlyUsername.xml"
    
    add authentication loginSchemaPolicy OnlyUsername -rule true -action OnlyUsername
  8. Create third factor Login Schema Profile for AD Authentication. The .xml file is copied from the built-in PrefillUserFromExpr.xml but with modified labels for AD authentication. The username is pre-filled in from the first factor.
    add authentication loginSchema LDAPPasswordOnly -authenticationSchema "/nsconfig/loginschema/LDAPPassword.xml"
  9. Create third factor Login Schema Profile for NPS Authentication. The .xml file is copied from the built-in PrefillUserFromExpr.xml but with modified labels for NPS authentication. The username is pre-filled in from the first factor.
    add authentication loginSchema NPSPasswordOnly -authenticationSchema "/nsconfig/loginschema/NPSPassword.xml"
  10. Create third factor PolicyLabel for Active Directory authentication with Active Directory Login Schema and Active Directory Authentication Policy.
    add authentication policylabel LDAPPasswordAuth -loginSchema LDAPPasswordOnly
    
    bind authentication policylabel LDAPPasswordAuth -policyName LDAP-Corp -priority 100 -gotoPriorityExpression NEXT
  11. Create third factor PolicyLabel for NPS authentication with NPS Login Schema and NPS Authentication Policy.
    add authentication policylabel NPSPasswordAuth -loginSchema NPSPasswordOnly
    
    bind authentication policylabel NPSPasswordAuth -policyName NPS -priority 100 -gotoPriorityExpression NEXT
  12. Create second factor PolicyLabel with Policies that choose Next Factor. This PolicyLabel is processed before the two we just created.
    add authentication policylabel CheckForAuthType -loginSchema LSCHEMA_INT
    
    bind authentication policylabel CheckForAuthType -policyName TwoFactor -priority 90 -gotoPriorityExpression NEXT -nextFactor NPSPasswordAuth
    
    bind authentication policylabel CheckForAuthType -policyName LDAP-Only -priority 100 -gotoPriorityExpression NEXT -nextFactor LDAPPasswordAuth
  13. Create AAA vServer. Bind Login Schema Policy (username only) and Group Extraction Policy.
    add authentication vserver AAA SSL 10.x.x.218 443
    bind authentication vserver AAA -policy OnlyUsername -priority 100 -gotoPriorityExpression END
    bind authentication vserver AAA -policy LDAP-Corp-GroupExtract -priority 100 -nextFactor CheckForAuthType -gotoPriorityExpression NEXT
  14. Perform additional steps not detailed here:
    1. For Traffic Management:
      1. Create a Session Policy and bind it to the AAA vServer.
      2. Enable authentication on the Load Balancing or Content Switching vServer.
    2. For NetScaler Gateway, create an Authentication Profile, and bind it to the Gateway vServer.

Virtual Delivery Agent (VDA) 7.14.1

Last Modified: Nov 7, 2020 @ 6:35 am

Navigation

💡 = Recently Updated

Hardware

Hypervisor Host Hardware

  • Citrix Blog Post Citrix Scalability — The Rule of 5 and 10: Simply take the number of physical cores in a hypervisor host, multiply it by 5 or 10, and the result will be your Single Server Scalability. Use 5 if you’re looking for the number of XenDesktop VMs you can host on a box, and use 10 if you’re looking for the number of XenApp user sessions you can host on a box.

Virtual Machine Hardware

  1. For virtual desktops, give the virtual machine: 2+ vCPU and 2+ GB of RAM
  2. For Windows 2008 R2 RDSH, give the virtual machine 4 vCPU and 12-24 GB of RAM
  3. For Windows 2012 R2 RDSH, give the virtual machine 8 vCPU, and 24-48 GB of RAM
  4. If using RAM caching (MCSIO or PvS), add more RAM for the cache
  5. Remove the floppy drive
  6. Remove any serial or LPT ports
  7. If vSphere:
    1. To reduce disk space, reserve memory. Memory reservations reduce or eliminate the virtual machine .vswp file.
    2. The NIC should be VMXNET3.
  8. If this VDA will boot from Provisioning Services:
    1. For vSphere, the NIC must be VMXNET3.
    2. For vSphere, configure the CD-ROM to boot from IDE instead of SATA. SATA comes with VM hardware version 10. SATA won’t work with PvS.
  9. For Windows 10:
    1. CTX224843 Windows 10 compatibility with Citrix XenDesktop: Current Branch (CB) is not supported.
    2. Visual Studio 2017 is not supported on LTSB. See Visual Studio 2017 Product Family System Requirements.
  10. Install the latest version of drivers (e.g. VMware Tools).
    1. If Windows 7 on vSphere, don’t install the VMware SVGA driver. For more details, see Citrix CTX201804 Intermittent Connection Failures/Black Screen Issues When Connecting from Multi-Monitor Client Machines to Windows 7 VDA with VDA 7.x on vSphere/ESXi.
  11. The vSphere Activity Monitoring Feature with NSX Guest Introspection feature uses a TDI driver (vnetflt.sys), which might cause a “Connection Interrupted” message when users log off of Citrix. See VMware 2121307 Windows virtual machines using the vShield Endpoint TDI Manager or NSX Network Introspection Driver (vnetflt.sys) driver fails with a blue diagnostic screen and XenDesktop 7.12 logoff: Connection interrupted at Citrix Discussions.

If vSphere, disable NIC Hotplug

  1. Users could use the systray icon to Eject the Ethernet Controller. Obviously this is bad.
  2. To disable this functionality, power off the virtual machine.
  3. Once powered off, right-click the virtual machine, and click Edit Settings.
  4. On the VM Options tab, expand Advanced, and then click Edit Configuration.
  5. Click Add Row.
  6. On the left, enter devices.hotplug. On the right, enter false.
  7. Then click OK a couple times to close the windows.
  8. The VM can then be powered on.

Windows Preparation

  1. Computer Group Policy – Make sure the Master VM is in the same OU as the Linked Clones so the Master VM will get the computer-level GPO settings in its registry. Run gpupdate on the master after moving the VM to the correct OU. When Clones are created from the Master, the computer-level GPO settings will already be applied, thus eliminating a timing issue.
  2. If RDSH (Server OS), disable IE Enhanced Security Configuration in Server Manager > Local Server.
  3. Optionally, go to Action Center (Windows 8.1 or 2012 R2) or Control Panel > Security and Maintenance (Windows 10/2016) to disable User Account Control, and enable SmartScreen.
    1. In Windows 10 1703 and newer, search the Settings app for Change User Account Control settings.
    2. SmartScreen is configured in Windows Defender Security Center > App & browser control.
  4. Run Windows Update.

  5. Add your Citrix Administrators group to the local Administrators group on the VDA. Computer Management.
  6. The Remote Desktop Services “Prompt for Password” policy prevents Single Sign-on to the Virtual Delivery Agent. Check registry key HKEY_LOCAL_MACHINE\SOFTWARE\Policies\Microsoft\Windows NT\Terminal Services. If fPromptForPassword = 1 then you need to fix group policy. The following GPO setting will prevent Single Sign-on from working.
    Computer Configuration | Policies | Administrative Templates | Windows Components | Remote Desktop Services | Remote Desktop Session Host | Security | Always prompt for password upon connection
    Or set the registry value HKEY_LOCAL_MACHINE\SOFTWARE\Citrix\PorticaAutoLogon (DWORD) = 0x10.
  7. For Windows 7/2008 R2 VDAs that will use Personal vDisk, or AppDisk, or any other layering technology, install Microsoft hotfix 2614892 A computer stops responding because of a deadlock situation in the Mountmgr.sys driver. This hotfix solved a Personal vDisk Image update issue detailed at Citrix Discussions.
  8. If this VDA is Windows Server 2008 R2, see https://www.carlstalhood.com/windows-server-2008-r2-post-sp1-hotfixes/.
  9. To remove the built-in apps in Windows 10, see Robin Hobo How to remove built-in apps in Windows 10 Enterprise.
  10. For Remote Assistance in Citrix Director, configure the GPO setting Computer Configuration | Policies | Administrative Templates | System | Remote Assistance | Offer Remote Assistance. See Jason Samuel – How to setup Citrix Director Shadowing with Remote Assistance using Group Policy for more details.
  11. If you intend to use Citrix’s SCOM Management Packs for XenApp/XenDesktop, make sure WinRM is enabled on the VDA by running winrm quickconfig. Or you can enable WinRM using Group Policy.
Install Virtual Delivery Agent 7.14.1

  1. For virtual desktops, make sure you are logged into the console. The VDA won’t install if you are connected using RDP.
  2. Make sure .NET Framework 4.5.2 or newer is installed.

CLI Install:

Command Line Install Options are detailed at Install using the command line at Citrix Docs.

The Citrix Telemetry Service seems to cause problems. You can use the Command Line Installer to exclude Telemetry Service as detailed at VDA upgrade cmdlet at Citrix Discussions.

XenDesktopVDASetup.exe /quiet /noreboot /masterimage /Enable_HDX_PORTS /enable_framehawk_port /Enable_REAL_TIME_TRANSPORT /optimize /controllers "xdc01.corp.local xdc02.corp.local" /Exclude "Citrix Telemetry Service"

GUI Install:

  1. Go to the downloaded XenDesktop 7.14.1 iso file and extract it. If Windows 8 or newer, you can instead mount it, but be aware that with mounting, the install won’t resume correctly after a reboot.
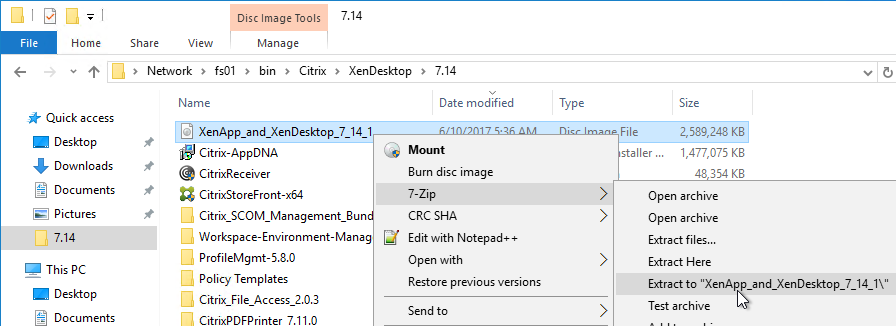
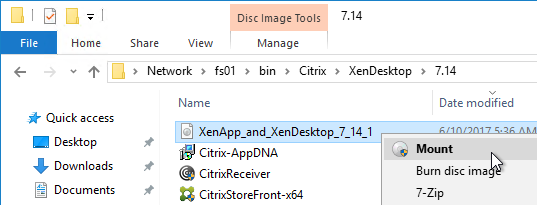
  2. Run AutoSelect.exe.
  3. Alternatively, you can download the standalone VDA package and run that instead. Go the main XenDesktop 7.14.1 download page. Expand the section labelled Components that are on the product ISO but also packaged separately to download the Standalone VDA installers. 7.14.1 has a VDA installer called Desktop OS Core Services that is designed for Remote PC deployments.
  4. Click Start next to either XenApp or XenDesktop. The only difference is the product name displayed in the installation wizard.
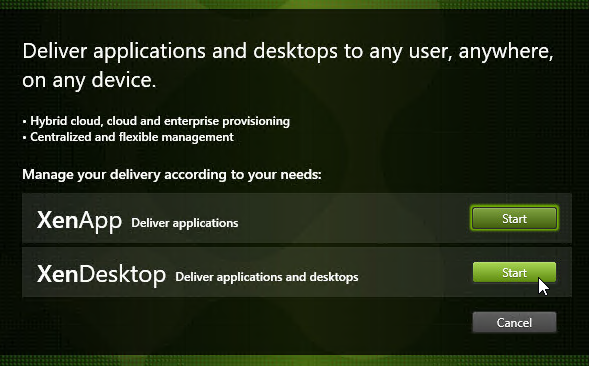
  5. Click Virtual Delivery Agent for Windows Desktop OS, or Windows Server OS, depending on which type of VDA you are building.

  6. In the Environment page, select Create a Master Image, and click Next.
  7. For virtual desktops, in the HDX 3D Pro page, click Next.
  8. In the Core Components page, if you don’t need Citrix Receiver installed on your VDA, then uncheck the box. Receiver is usually only needed for double-hop connections (connect to first VDA, and then from there, connect to second VDA). Click Next.
  9. In the Additional Components page, uncheck Citrix AppDisk/Personal vDisk. This feature has been deprecated and is being replaced by Citrix App Layering (Unidesk). Click Next.
  10. In the Delivery Controller page, select Do it manually. Enter the FQDN of each Controller. Click Test connection. And then make sure you click Add. Click Next when done.
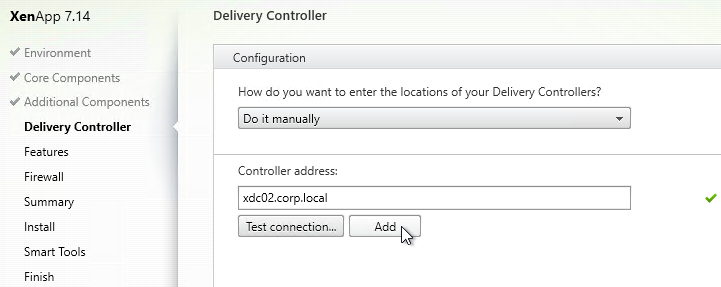
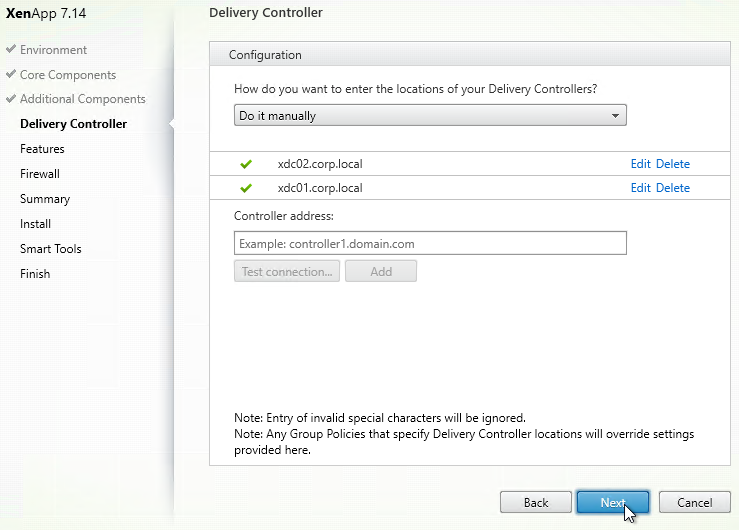
  11. In the Features page, check boxes. In 7.12 and newer, only the top box is checked by default. If you want to use the other features, check the boxes. If this is a virtual desktop, you can leave Personal vDisk unchecked now and enable it later. Then click Next.
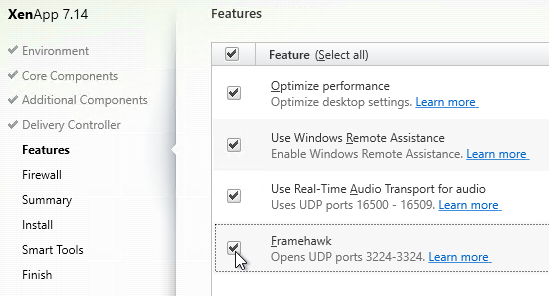
  12. In the Firewall page, click Next.
  13. In the Summary page, click Install.

  14. If RDSH, click Close when you are prompted to restart.
  15. After the machine reboots twice, login and installation should continue.
  16. If you see a Locate ‘XenApp’ installation media window, click Cancel.
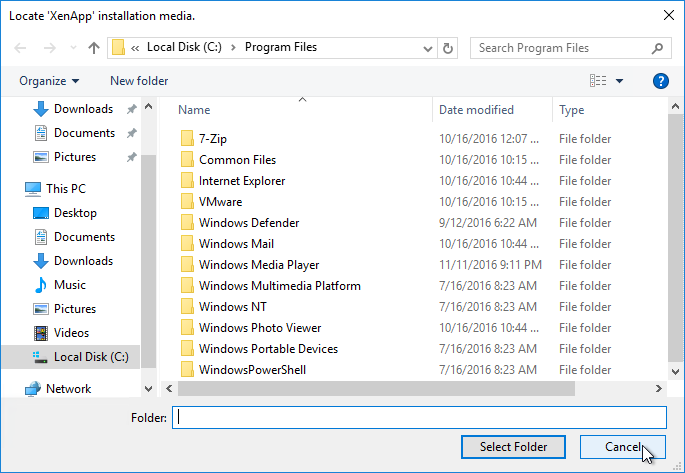
    1. Mount the XenApp_and_XenDesktop_7_14_1.iso.
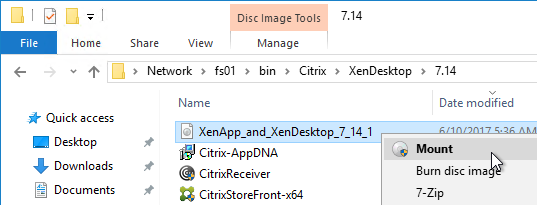
    2. Run AutoSelect.exe.
    3. Click the Virtual Desktop Agent box to resume installation.
  17. Installation will continue automatically.
  18. Note: NT SERVICE\CitrixTelemetryService needs permission to login as a service.
  19. In the Smart Tools page, click Connect, enter your MyCitrix.com credentials, and then click Next.
  20. In the Finish page, click Finish to restart the machine again.
  21. Programs and Features shows Citrix Virtual Delivery Agent 7.14.1 as version 7.14.1.14098.

Citrix Desktop Helper Service  💡

Citrix Blog Post Augment Your XenDesktop Deployment with the Desktop Helper Service: this installable service adds the following functionality to your VDAs:

  • The “Shutdown Inactive Desktops” feature allows Citrix administrators to enable a timer that shuts down a virtual desktop after it has been registered for a configured amount of minutes without a user connection.
  • Delaying the Citrix Desktop Service start by a configurable amount of time allows the desktop to finish performing on-boot tasks before a user is brokered to it.
  • The “Force Group Policy Update” feature give administrators the ability to force a group policy update after a configured amount of time.

If these features are desirable, download the tool from the blog post and install it.

Configurable Registry keys are located at HKEY_LOCAL_MACHINE\SOFTWARE\Citrix\DesktopHelper. Each value is detailed in the accompanying Word document.

Customer Experience Improvement Program (CEIP)

VDA 7.12 and newer enable Customer Experience Improvement Program (CEIP) by default. To disable it, create the registry value HKEY_LOCAL_MACHINE\SOFTWARE\Citrix\Telemetry\CEIP\Enabled (DWORD) and set it to 0 (zero). Also see CEIP at Citrix Insight Services at Citrix Docs.

See https://www.carlstalhood.com/delivery-controller-7-14-and-licensing/#ceip for additional places where CEIP is enabled.

Connection Quality Indicator

The Connection Quality Indicator tells the user the quality of the connection. For example:

Position of the indicator is configurable by the user. Thresholds are configurable through group policy.

Download it from CTX220774 Connection Quality Indicator and install it. The article is very detailed.

Group Policy templates are located at C:\Program Files (x86)\Citrix\Connection Quality Indicator\Configuration. Copy the files and folder to <Sysvol>\Policies\PolicyDefinitions, or C:\Windows\PolicyDefinitions.

Find the settings under Computer Config | Policies | Administrative Templates | Citrix Components | Virtual Desktop Agent | CQI

Notification display settings lets you customize the user notifications, or disable them.

Connection Threshold Settings lets you set the notification thresholds.

Adaptive Transport

XenApp/XenDesktop 7.13 and newer include Adaptive Transport, which uses EDT protocol, which uses UDP Ports 1494/2598 for HDX connections to the VDA. The UDP ports should already be open in the Windows Firewall.

Adaptive Transport is disabled by default, but can be enabled in the Citrix Policy setting HDX Adaptive Transport.

Slow Logons

Citrix Discussions Xenapp 7.9: Wait for local session manager: “I have a Xenapp 7.9 environment on Windows 2012 R2. When logging in through Citrix I got message “Wait for local session manager” for 20-30 seconds. When logging in to the server with RDS, I do not have to wait for this.”

“Add the following 2 registry keys to your 7.9 VDA server – then try connecting to it using ICA to see if the issue still occurs:

Add reg keys in “HKLM\SOFTWARE\Citrix\GroupPolicy”
Dword: “CacheGpoExpireInHours” – Value = 5-24 (# of Hours) ***start with value of 5***
Dword: “GpoCacheEnabled” – Value = 1

Restart the machine after adding these registry keys and attempt an ICA connection (at least twice) to see if that helps the Login delay.”


Mark DePalma at XenApp slow logon times, user get black screen for 20 seconds at Citrix Discussions says that pushing Tile Refresh to a background task speeds up logons.

  1. Regedit:
    Windows Registry Editor Version 5.00
     
    [HKEY_LOCAL_MACHINE\SOFTWARE\Microsoft\Active Setup\Installed Components\DisableUPMResetCache]
    @="DisableUPMResetCache"
    "Version"="1,1,1,1"
    "StubPath"="REG ADD HKCU\\Software\\Microsoft\\Windows\\CurrentVersion\\ImmersiveShell\\StateStore /v ResetCache /t REG_DWORD /d 0 /f"
    "Locale"="*"
  2. UPM Exclusions:
    Directory - '!ctx_localappdata!\Microsoft\Windows\Caches'
    Registry - 'SOFTWARE\Microsoft\Active Setup\Installed Components\DisableUPMResetCache'


Marvin Neys at XenApp slow logon times, user get black screen for 20 seconds at Citrix Discussions says that deleting HKCU\Software\Microsoft\Windows\CurrentVersion\UFH\SHC at logoff reduces logon times from 40 seconds to 6 seconds.

Remove-Item HKCU:\Software\Microsoft\Windows\CurrentVersion\UFH\SHC


For additional logon delay troubleshooting, see Alexander Ollischer XenApp/XenDesktop – “Please Wait For Local Session Manager” message when logging into RDS. He found some Windows Updates that caused a logon delay.


XenApp recalculates WMI filters on every reconnect. CTX212610 Session Reconnect 30 sec Delay – DisableGPCalculation – WMI Filters indicates that recalculation can be disabled by setting HKEY_LOCAL_MACHINE\SOFTWARE\Citrix\Reconnect\DisableGPCalculation (DWORD) to 1.


CTX212439 Desktop Session Stuck in Pre-Logon State with Message “Please wait for the Local Session Manager”:

  • HKEY_LOCAL_MACHINE\SYSTEM\CurrentControlSet\Control\Lsa\Kerberos\Parameters\MaxTokenSize (DWORD) = 48000
  • Delete HKEY_LOCAL_MACHINE\SYSTEM\CurrentControlSet\Control\Terminal Server\RCM\GracePeriod\L$RTMTIMEBOMB

Controller Registration Port

Some environments will not accept the default port 80 for Virtual Delivery Agent registration, even though registration is authenticated and encrypted on port 80. To change the port, do the following on the Virtual Delivery Agent:

  1. Open Programs and Features. If Windows 10 1703 or newer, open Apps and Features.
  2. Find Citrix Virtual Delivery Agent, and click Change or Modify (Windows 10 1703 and newer).

  3. Click Customize Virtual Delivery Agent Settings.
  4. Edit the Delivery Controllers, and click Next.
  5. On the Protocol and Port page, change the port number, and click Next.
  6. In the Summary page, click Reconfigure.
  7. In the Finish Reconfiguration page, click Finish to restart the machine.
  8. You must also change the VDA registration port on the Delivery Controllers by running BrokerService.exe /VDAPort.

Controller Registration – Verify

  1. If you restart the Virtual Delivery Agent machine, or restart the Citrix Desktop Service
  2. In Windows Logs Application log, you should see an event 1012 from Citrix Desktop Service saying that it successfully registered with a controller. If you don’t see this then you’ll need to fix the ListOfDDCs registry key. See VDA registration with Controllers at Citrix Docs.
  3. You can also run Citrix’s Health Assistant on the VDA.
  4. See CTX220772 Technical Primer: VDA Registration for a very detailed explanation of the VDA Registration process.

Citrix PDF Printer 7.11.0 for Receiver for HTML5/Chrome

  1. To allow printing from Receiver for HTML5/Chrome, install Citrix PDF Printer. Get it from the Receiver for HTML5 download page in the Additional Components section. Note: this PDF Printer is only used by Receiver for HTML5 and Receiver for Chrome.
  2. Go to the extracted CitrixPDFPrinter_7.11.0 and run CitrixPDFPrinter64.msi.
  3. In the Please read the Citrix PDF printer License Agreement page, check the box next to I accept the terms, and click Install.
  4. In the Completed the Citrix PDF Universal Driver Setup Wizard page, click Finish.
  5. In Programs and Features, it is shown as version 7.11.0.11.
  6. Configure a Citrix Policy to enable the PDF printer. The setting is called Auto-create PDF Universal Printer in the user half of a Citrix Policy GPO.

Citrix File Access 2.0.3 for Receiver for Chrome

  1. If you support Receiver for Chrome (Chromebook) and want to open files on Google Drive using published applications, install Citrix File Access on the VDAs. Get it from the Receiver for Chrome download page, in the Additional Components section.
  2. Go to the extracted Citrix_File_Access_2.0.3, and run FileAccess.msi.
  3. In the Please read the File Access License Agreement page, check the box next to I accept the terms, and click Install.
  4. In the Completed the File Access Setup Wizard page, click Finish.
  5. File Access is listed in Programs and Features as version 2.0.3.33.
  6. File Access has a default list of supported file extensions. The list can be expanded by editing the registry on the VDA. See CTX219983 Receiver for Chrome Error: Invalid command line arguments: Unable to open the file as it has an unsupported extension.
  7. To open a file from Google Drive, right-click and and open the file using Citrix Receiver.

Framehawk Configuration

To enable Framehawk, see https://www.carlstalhood.com/citrix-policy-settings/#framehawkconfig

Remote Desktop Licensing Configuration

On 2012 R2 and newer RDSH, the only way to configure Remote Desktop Licensing is using group policy (local or domain). This procedure also works for 2008 R2 RDSH. This procedure is not needed on virtual desktops.

  1. For local group policy, run gpedit.msc. Alternatively, you can configure this in a domain GPO.
  2. Go to Computer Configuration > Administrative Templates > Windows Components > Remote Desktop Services > Remote Desktop Session Host > Licensing.
  3. Double-click Use the specified Remote Desktop license servers. Change it to Enabled, and enter the names of the RDS Licensing Servers (typically installed on XenDesktop Controllers). Click OK.
  4. Double-click Set the Remote Desktop licensing mode. Change it to Enabled and select Per User. Click OK.
  5. Optionally, you can install the Remote Desktop Licensing Diagnoser Tool. In the Server Manager > Add Roles and Features Wizard, on the Features page, expand Remote Server Administration Tools, expand Role Administration Tools, expand Remote Desktop Services Tools, and select Remote Desktop Licensing Diagnoser Tool. Then Finish the wizard.
  6. If it won’t install from Server Manager, you can install it from PowerShell by running Install-WindowsFeature rsat-rds-licensing-diagnosis-ui.
  7. In Server Manager, open the Tools menu, expand Remote Desktop Services (or Terminal Services), and click Remote Desktop Licensing Diagnoser.

  8. The Diagnoser should find the license server, and indicate the licensing mode. If you’re configured for Per User licenses, then it’s OK if there are no licenses installed on the Remote Desktop License Server.

Several people in Citrix Discussions reported the following issue: If you see a message about RD Licensing Grace Period has expired even though RD Licensing is properly configured, see Eric Verdumen No remote Desktop Licence Server availible on RD Session Host server 2012. The solution was to delete the REG_BINARY in HKEY_LOCAL_MACHINE\SYSTEM\CurrentControlSet\Control\Terminal Server\RCM\GracePeriod only leaving the default. You must take ownership and give admin users full control to be able to delete this value.

C: Drive Permissions

This section is more important for shared VDAs like RDSH (Windows Server 2008 R2, Windows Server 2012 R2, and Windows Server 2016).

The default permissions allow users to store files on the C: drive in places other than their profile.

  1. Open the Properties dialog box for C:.
  2. On the Security tab, click Advanced.
  3. If UAC is enabled, click Change permissions.
  4. Highlight the line containing Users and Create Folders, and click Remove.
  5. Highlight the line containing Users and Create files (or Special), and click Remove. Click OK.
  6. Click Yes to confirm the permissions change.
  7. If you see any of these Error Applying Security windows, click Continue. This window should appear multiple times.
  8. Click OK to close the C: drive properties.

Pagefile

If this image will be converted to a Provisioning Services vDisk, then you must ensure the pagefile is smaller than the cache disk. For example, if you allocate 20 GB of RAM to your Remote Desktop Session Host, and if the cache disk is only 15 GB, then Windows will have a default pagefile size of 20 GB, and Provisioning Services will be unable to move it to the cache disk. This causes Provisioning Services to cache to server instead of caching to your local cache disk (or RAM).

  1. Open System. In 2012 R2 and newer, you can right-click the Start button, and click System. Note: in Windows 10 1703 and newer, this method no longer opens the correct tool.
  2. Another option is to open File Explorer, right-click This PC, and click Properties. This works in Windows 10 1703.
  3. Click Advanced system settings.
  4. On the Advanced tab, click the top Settings button.
  5. On the Advanced tab, click Change.
  6. Uncheck the box next to Automatically manage paging file size for all drives. Then either turn off the pagefile, or set the pagefile to be smaller than the cache disk. Don’t leave it set to System managed size. Click OK several times.

Direct Access Users

When Citrix Virtual Delivery Agent is installed on a machine, non-administrators can no longer RDP to the machine. A new local group called Direct Access Users is created on each Virtual Delivery Agent. Add your non-administrator RDP users to this local group so they can RDP directly to the machine.

Windows Profiles v3/v4/v5/v6

Roaming Profiles are compatible only between the following client and server operating system pairs. The profile version is also listed.

  • v6 = Windows 10 (1607 and 1703) and Windows Server 2016
  • v5 = Windows 10 (1511 and older)
  • v4 = Windows 8.1 and Windows Server 2012 R2
  • v3 = Windows 8 and Windows Server 2012
  • v2 = Windows 7 and Windows Server 2008 R2
  • v2 = Windows Vista and Windows Server 2008

For Windows 2012 R2, install Microsoft hotfix 2890783, and set the UseProfilePathExtensionVersion registry value to 1.

Registry

Published Explorer

From Citrix CTX128009 Explorer.exe Fails to Launch: When publishing the seamless explorer.exe application, the session initially begins to connect as expected. After the loading, the dialog box disappears, and the Explorer application fails to appear. On the VDA, use the following registry change to set the length of time a client session waits before disconnecting the session:

  • Key = HKLM\SYSTEM\CurrentControlSet\Control\Citrix\wfshell\TWI
    • Value = LogoffCheckerStartupDelayInSeconds (DWORD) = 10 (Hexadecimal)

Screen Saver

From Citrix CTX205214 Screensaver Not Working in XenDesktop: By default, Screen Saver doesn’t work on Desktop OS. To enable it, on the VDA, configure the following registry value:

  • Key = HKEY_LOCAL_MACHINE\SOFTWARE\Citrix\Graphics
    • Value = SetDisplayRequiredMode (DWORD) = 0

Logon Disclaimer Window Size

From XenApp 7.8 – Session Launch Security/Warning Login Banner at Citrix Discussions: If your logon disclaimer window has scroll bars, set the following registry values:

  • Key = HKEY_LOCAL_MACHINE\Software\Wow6432node\Citrix\CtxHook\AppInit_DLLS\Multiple Monitor Hook
    • Value = LogonUIWidth (DWORD) = 300
    • Value = LogonUIHeight (DWORD) = 200

Login Timeout

From Citrix CTX203760 VDI Session Launches Then Disappears: XenDesktop, by default, only allows 180 seconds to complete a logon operation. The timeout can be increased by setting the following:

  • Key = HKLM\SOFTWARE\Citrix\PortICA
    • Value = AutoLogonTimeout ( DWORD) = decimal 240 or higher (up to 3600).

Also see Citrix Discussions Machines in “Registered” State, but VM closes after “Welcome” screen.

HDX Flash

From Citrix Knowledgebase article CTX139939 – Microsoft Internet Explorer 11 – Citrix Known Issues: The registry key value IEBrowserMaximumMajorVersion is queried by the HDX Flash service to check for maximum Internet Explorer version that HDX Flash supports. For Flash Redirection to work with Internet Explorer 11 set the registry key value IEBrowserMaximumMajorVersion to 11 on the machine where HDX flash service is running. In case of XenDesktop it would be the machine where VDA is installed.

  • Key = HKLM\SOFTWARE\Wow6432Node\Citrix\HdxMediaStreamForFlash\Server\PseudoServer
    • Value = IEBrowserMaximumMajorVersion (DWORD) = 11 (Decimal)

From Citrix Discussions: Add the DWORD FlashPlayerVersionComparisonMask=0 on the VDA under HKLM\Software\Wow6432Node\Citrix\HdxMediaStreamForFlash\Server\PseudoServer.  This disables the Flash major version checking between the VDA and Client Device.

Receiver for HTML5/Chrome Enhanced Clipboard

From About Citrix Receiver for Chrome 1.9 at Citrix Docs: To enable enhanced clipboard support, create a REG_SZ registry value HKEY_LOCAL_MACHINE\SYSTEM\CurrentControlSet\Control\Citrix\wfshell\Virtual Clipboard\Additional Formats\HTML Format\Name=”HTML Format”. Create any missing registry keys. This applies to both virtual desktops and Remote Desktop Session Hosts.

Receiver for HTML5/Chrome Upload Folder

The Receiver for HTML5 (or Chrome) lets upload files.

By default, the user is prompted to select a upload location. If you use the Upload feature multiple times, the last selected folder is not remembered.

Citrix CTX217351 How to Customize File Upload and Download Using Receiver for HTML5 and Receiver for Chrome. You can specify a default uploads location by editing HKLM\Software\Citrix\FileTransfer\UploadFolderLocation on the VDA. Environment variables are supported. When this value is configured, users are no longer prompted to select an upload location. The change takes effect at next logon.

Note: HTML5/Chrome Receiver also adds a Save to My Device location to facilitate downloads.

4K Monitors

From Citrix Knowledgebase article CTX218217 Unable to span across multiple monitors after upgrade to 7.11 VDA, Black/Blank screen appears on the monitors while connecting to ICA session: .

  1. For VDA 7.11 and newer, calculate the video memory that is required for monitors using the following formula:
    SumOfAllMons (Width * Height) * 4 / 0.3, where width and height are resolution of the monitor. Note: There is no hard and fast rule that will work for all cases.
    Example: Consider the resolution of monitor 1 is 1920*1200 and monitor 2 is 1366*768. Then SumOfAllMons will be (1920*1200 + 1366*768)
  2. CTX115637 Citrix Session Graphics Memory Reference describes how multi-monitor resolution is determined.
  3. Open the registry (regedit) and navigate to: HKEY_LOCAL_MACHINE\SYSTEM\CurrentControlSet\services\vbdenum
  4. Increase the value of “MaxVideoMemoryBytes” REG_DWORD value to the above calculated memory.
  5. Reboot the VDA.

Citrix Policies also control graphics performance.

COM Port Threads

CTX212090 COM Port Intermittently Inaccessible During ICA Sessions: increase the default value of “MaxThreads” under the registry key HKEY_LOCAL_MACHINE\SYSTEM\CurrentControlSet\services\picaser\Parameters from 20 to a value greater than the number of COM port connections you want to support. For example, if a XenApp server supports 100 sessions and each session opens two COM ports, the value of “MaxThreads” should be greater than 200.

Legacy Client Drive Mapping

Citrix CTX127968 How to Enable Legacy Client Drive Mapping Format on XenApp: Citrix Client Drive Mapping no longer uses drive letters and instead they appear as local disks. This is similar to RDP drive mapping.

The old drive letter method can be enabled by setting the registry value:

  • Key = HKEY_LOCAL_MACHINE\SOFTWARE\Citrix\UncLinks (create the key)
    • Value = UNCEnabled (DWORD) = 0

When you reconnect, the client drives will be mapped as drive letters (starts with V: and goes backwards).

Print Driver for Non-Windows Clients

This section applies to Windows 8.1/2012 and newer VDAs.

From CTX139020 Configuring Virtual Machines for Mac Client Printer Mapping with Windows 8.x. By default, Non-Windows clients cannot map printers due to a missing print driver on the VDA machine.

  1. Requirements:
    • Internet Access
    • Windows Update service enabled
  2. Click Start, and run Devices and Printers.
  3. In Windows 10 1703, open Printers & scanners, then scroll down, and click Devices and printers.

  4. In the Printers section, highlight a local printer (e.g. Microsoft XPS Document Writer). Then in the toolbar, click Print server properties.

  5. Switch to the Drivers tab. Click Change Driver Settings.
  6. Then click Add.
  7. In the Welcome to the Add Printer Driver Wizard page, click Next.
  8. In the Processor Selection page, click Next.
  9. In the Printer Driver Selection page, click Windows Update. The driver we need won’t be in the list until you click this button. Internet access is required.
  10. Once Windows Update is complete, highlight HP on the left, and then select HP Color LaserJet 2800 Series PS (Microsoft) on the right. Click Next.
  11. In the Completing the Add Printer Driver Wizard page, click Finish.
  12. Repeat these instructions to install the following additional drivers:
    • HP LaserJet Series II
    • HP Color LaserJet 4500 PCL 5

SSL for VDA

If you intend to use HTML5 Receiver internally, install certificates on the VDAs so the WebSockets (and ICA) connection will be encrypted. Internal HTML5 Receivers will not accept clear text WebSockets. External users don’t have this problem since they are SSL-proxied through NetScaler Gateway. Notes:

  • Each Virtual Delivery Agent needs a machine certificate that matches the machine name. This is feasible for a small number of persistent VDAs. For non-persistent VDAs, you’ll need some automatic means for creating machine certificates every time they reboot.
  • As detailed in the following procedure, use PowerShell on the Controller to enable SSL for the Delivery Group. This forces SSL for every VDA in the Delivery Group, which means every VDA in the Delivery Group must have SSL certificates installed.

The following instructions for manually enabling SSL on VDA can be found at Configure SSL on a VDA using the PowerShell script at Citrix Docs.

  1. On the VDA machine, run mmc.exe.
  2. Add the Certificates snap-in.
  3. Point it to Local Computer.
  4. Request a certificate from your internal Certificate Authority. You can use either the Computer template or the Web Server template.

    1. You can also use group policy to enable Certificate Auto-Enrollment for the VDA computers.
  5. Browse to the XenApp/XenDesktop 7.14.1 ISO. In the Support\Tools\SslSupport folder, shift+right-click the Enable-VdaSSL.ps1 script and click Copy as path.
  6. Run PowerShell as administrator (elevated).
  7. Run the command Set-ExecutionPolicy unrestricted. Enter Y to approve.
  8. In the PowerShell prompt, type in an ampersand (&), and a space.
  9. Right-click the PowerShell prompt to paste in the path copied earlier.
  10. At the end of the path, type in -Enable
  11. If there’s only one certificate on this machine, press Enter.
  12. If there are multiple certificates, you’ll need to specify the thumbprint of the certificate you want to use. Open the Certificates snap-in, open the properties of the machine certificate you want to use, and copy the Thumbprint from the Details tab.

    In the PowerShell prompt, at the end of the command, enter ‑CertificateThumbPrint, add a space, and type quotes (").
    Right-click the PowerShell prompt to paste the thumbprint.
    Type quotes (") at the end of the thumbprint. Then remove all spaces from the thumbprint. The thumbprint needs to be wrapped in quotes.
  13. If this VDA machine has a different service already listening on 443 (e.g. IIS), then the VDA needs to use a different port for SSL connections. At the end of the command in the PowerShell prompt, enter -SSLPort 444 or any other unused port.
  14. Press <Enter> to run the Enable-VdaSSL.ps1 script.
  15. Press <Y> twice to configure the ACLs and Firewall.
  16. You might have to reboot before the settings take effect.
  17. Login to a Controller, and run PowerShell as Administrator (elevated).
  18. Run the command asnp Citrix.*
  19. Enter the command:
    Get-BrokerAccessPolicyRule -DesktopGroupName '<delivery-group-name>' | Set-BrokerAccessPolicyRule ‑HdxSslEnabled $true

    where <delivery-group-name> is the name of the Delivery Group containing the VDAs.

  20. You can run Get-BrokerAccessPolicyRule -DesktopGroupName '<delivery-group-name>' to verify that HDX SSL is enabled.
  21. Also run the following command:
    Set-BrokerSite –DnsResolutionEnabled $true

You should now be able to connect to the VDA using the HTML5 Receiver from internal machines.

The Citrix blog post How To Secure ICA Connections in XenApp and XenDesktop 7.6 using SSL has a method for automatically provisioning certificates for pooled virtual desktops by enabling certificate auto-enrollment and setting up a task that runs after the certificate has been enrolled.

  • From Russ Hargrove at A note on VDA certificates in 7.14 at Citrix Discussions: Citrix installs a new “Citrix XenApp/XenDesktop HDX Service” certificate in the Personal store which breaks the automation of the Enable-VdaSSL.ps1 script. To fix the problem, modify the task scheduler powershell script to:  💡
    Enable-VdaSSL.ps1 -Enable -CertificateThumbPrint (Get-ChildItem -path cert:\LocalMachine\My | Where-Object -FilterScript {$_.Subject -eq ""} | Select-Object -ExpandProperty Thumbprint) -Confirm:$False
  • For certificate auto-enrollment on non-persistent Remote Desktop Session Hosts (aka Server OS VDAs), see Non-Persistent Server SSL to VDA by Alfredo Magallon Arbizu at CUGC.

Anonymous Accounts

If you intend to publish apps anonymously then follow this section.

  1. Anonymous accounts are created locally on the VDAs. When XenDesktop creates Anon accounts it gives them an idle time as specified at HKEY_LOCAL_MACHINE\SYSTEM\CurrentControlSet\Control\Citrix\AnonymousUserIdleTime. The default is 10 minutes. Adjust as desired.
  2. You can pre-create the Anon accounts on the VDA by running “C:\Program Files\Citrix\ICAConfigTool\CreateAnonymousUsersApp.exe”. If you don’t run this tool then Virtual Delivery Agent will create them automatically when users log in.
  3. You can see the local Anon accounts by opening Computer Management, expanding System Tools, expanding Local Users and Groups and clicking Users.
  4. If you open one of the accounts, on the Sessions tab, notice that idle timeout defaults to 10 minutes. Feel free to change it.

Group Policy for Anonymous Users

Since Anonymous users are local accounts on each Virtual Delivery Agent, domain-based GPOs will not apply. To work around this limitation, you’ll need to edit the local group policy on each Virtual Delivery Agent.

  1. On the Virtual Delivery Agent, run mmc.exe.
  2. Open the File menu, and click Add/Remove Snap-in.
  3. Highlight Group Policy Object Editor, and click Add to move it to the right.
  4. In the Welcome to the Group Policy Wizard page, click Browse.
  5. On the Users tab, select Non-Administrators.
  6. Click Finish.
  7. Now you can configure group policy to lockdown sessions for anonymous users. Since this is a local group policy, you’ll need to repeat the group policy configuration on every Virtual Delivery Agent image. Also, Group Policy Preferences is not available in local group policy.

Antivirus

Install antivirus using your normal procedure. Instructions vary for each Antivirus product.

Microsoft’s virus scanning recommendations (e.g. exclude group policy files) – http://support.microsoft.com/kb/822158.

Citrix’s Recommended Antivirus Exclusions

Citrix Blog Post Citrix Recommended Antivirus Exclusions: the goal here is to provide you with a consolidated list of recommended antivirus exclusions for your Citrix virtualization environment focused on the key processes, folders, and files that we have seen cause issues in the field:

  • Set real-time scanning to scan local drives only and not network drives
  • Disable scan on boot
  • Remove any unnecessary antivirus related entries from the Run key
  • Exclude the pagefile(s) from being scanned
  • Exclude Windows event logs from being scanned
  • Exclude IIS log files from being scanned

See the Blog Post for exclusions for each Citrix component/product including: StoreFront, VDA, Controller, and Provisioning Services. The Blog Post also has links to additional KB articles on antivirus.

Symantec

Symantec links:

Trend Micro

Trend Micro Slow login on Citrix environment after installing OfficeScan (OSCE): The following registries can be used to troubleshoot the issue. These registries will allow a delay on the startup procedure of OSCE until the system has launched successfully. This avoids deadlock situations during login.

Citrix CTX136680 – Slow Server Performance After Trend Micro Installation. Citrix session hosts experience slow response and performance more noticeable while users try to log in to the servers. At some point the performance of the servers is affected, resulting in issues with users logging on and requiring the server to be restarted. This issue is more noticeable on mid to large session host infrastructures.

Trend Micro has provided a registry fix for this type of issue. Create the following registry on all the affected servers. Add new DWORD Value as:

[HKEY_LOCAL_MACHINE\SYSTEM\CurrentControlSet\Services\TmFilterParameters] “DisableCtProcCheck”=dword:00000001

Trend Micro Links:

Sophos

Best Practice for running Sophos on virtual systems: we’ve amassed the following practical information about how you can optimize our software to work with this technology.

Sophos Anti-Virus for Windows XP+: Installation and configuration considerations for Sophos Anti-Virus on a Remote Desktop Services server: It maybe desirable to disable the Sophos AutoUpdate shield icon

Sophos Anti-Virus for Windows 2000+: incorporating current versions in a disk image, including for use with cloned virtual machines: This procedure will make sure that the produced target/cloned computers:

  • Get their distinct identity with Enterprise Console, under which they can be subsequently managed.
  • Have the desired version of Sophos Anti-Virus already installed and configured on the created image.

Windows Defender Antivirus

Deployment guide for Windows Defender Antivirus in a virtual desktop infrastructure (VDI) environment

Optimize Performance

VDA Optimizer

Installation of the VDA might have already done this but there’s no harm in doing it again. This tool is only available if you installed VDA in Master Image mode.

  1. On the master VDA, go to C:\Program Files\Citrix\PvsVm\TargetOSOptimizer, and run TargetOSOptimizer.exe.
  2. Then click OK. Notice that it disables Windows Update.

Windows 10 / Windows 2012 R2 / Windows 2016 and newer

Optimization Notes:

RDSH 2008 R2

Citrix CTX131577 XenApp 6.x (Windows 2008 R2) – Optimization Guide is a document with several registry modifications that are supposed to improve server performance. Ignore the XenApp 6 content and instead focus on the Windows content.

Norskale has Windows 2008 R2 Remote Desktop and XenApp 6 Tuning Tips Update.

Windows 7

Microsoft has compiled a list of links to various optimization guides. It’s a common practice to optimize a Windows 7 virtual machine (VM) template (or image) specifically for VDI use. Usually such customizations include the following.

  • Minimize the footprint, e.g. disable some features and services that are not required when the OS is used in “stateless” or “non-persistent” fashion. This is especially true for disk-intensive workloads since disk I/O is a common bottleneck for VDI deployment. (Especially if there are multiple VMs with the same I/O patterns that are timely aligned).
  • Lock down user interface (e.g. optimize for specific task workers).

With that said the certain practices are quite debatable and vary between actual real-world deployments. Exact choices whether to disable this or that particular component depend on customer requirements and VDI usage patterns. E.g. in personalized virtual desktop scenario there’s much less things to disable since the machine is not completely “stateless”. Some customers rely heavily on particular UI functions and other can relatively easily trade them off for the sake of performance or standardization (thus enhance supportability and potentially security). This is one of the primary reasons why Microsoft doesn’t publish any “VDI Tuning” guide officially.

Though there are a number of such papers and even tools published either by the community or third parties. This Wiki page is aimed to serve as a consolidated and comprehensive list of such resources.

Daniel Ruiz XenDesktop Windows 7 Optimization and GPO’s Settings

Microsoft Whitepaper Performance Optimization Guidelines for Windows 7 Desktop Virtualization

Seal and Shut Down

If this VDA will be a master image in a Machine Creation Services or Provisioning Services catalog, after the master is fully prepared (including applications), do the following:

  1. Go to the properties of the C: drive, and run Disk Cleanup.
  2. If Disk Cleanup is missing, you can run cleanmgr.exe instead.
  3. Windows 10 1703 and newer has a new method for cleaning up temporary files.
    1. Right-click the Start button, and click System.
    2. Click Storage on the left, and click This PC (C:) on the right.
    3. Click Temporary Files.
    4. Check boxes, and click Remove files.
  4. On the Tools tab, click Optimize to defrag the drive.
    `
  5. Run slmgr.vbs /dlv and make sure it is licensed with KMS and has at least one rearm remaining. It is not necessary to manually rearm licensing. XenDesktop will do it automatically.
  6. Run Delprof2 to clean up local profiles. Get it from http://helgeklein.com/download/.
  7. Machine Creation Services and Provisioning Services require DHCP.
  8. Session hosts (RDSH) commonly have DHCP reservations.
  9. Base Image Script Framework (BIS-F) automates many sealing tasks. The script is configurable using Group Policy.
  10. Shut down the master image. You can now use Studio (Machine Creation Services) or Provisioning Services to create a catalog of linked clones.

Troubleshooting – Graphics

If Windows 7 on vSphere, don’t install the VMware SVGA driver. For more details, see CTX201804 Intermittent Connection Failures/Black Screen Issues When Connecting from Multi-Monitor Client Machines to Windows 7 VDA with VDA 7.x on vSphere/ESXi.

For Citrix Policies that control graphics codecs, see https://www.carlstalhood.com/citrix-policy-settings/#graphics

Citrix Blog post – Optimising the performance of HDX 3D Pro – Lessons from the field

From Citrix Knowledgebase article CTX218217 Unable to span across multiple monitors after upgrade to 7.11 VDA, Black/Blank screen appears on the monitors while connecting to ICA session:

  1. For VDA 7.11 and newer, calculate the video memory that is required for monitors using the following formula :
    SumOfAllMons (Width * Height) * 4 / 0.3, where width and height are resolution of the monitor. Note: There is no hard and fast rule that will work for all cases.
    Example: Consider the resolution of monitor 1 is 1920*1200 and monitor 2 is 1366*768. Then SumOfAllMons will be (1920*1200 + 1366*768)
  2. CTX115637 Citrix Session Graphics Memory Reference describes how multi-monitor resolution is determined.
  3. Open the registry (regedit) and navigate to:
    HKEY_LOCAL_MACHINE\SYSTEM\CurrentControlSet\services\vbdenum
  4. Increase the value of “MaxVideoMemoryBytes” REG_DWORD value to the above calculated memory.
  5. Reboot the VDA

From Citrix Discussions: To exclude applications from Citrix 3D rendering, create a REG_DWORD registry value “app.exe” with value 0 or a registry value “*” with value 0.

  • XD 7.1 and XD 7.5:
    • x86: reg add hklm\software\citrix\vd3d\compatibility /v * /t REG_DWORD /f /d 0
    • x64: reg add hklm\software\Wow6432Node\citrix\vd3d\compatibility /v * /t REG_DWORD /f /d 0
  • XD 7.6/7.7/7.8/7.9/7.11 both x86 and x64:
    • reg add hklm\software\citrix\vd3d\compatibility /v * /t REG_DWORD /f /d 0

Wildcards are not supported. The asterisk * here has a special meaning “all apps” but is not a traditional wildcard. To blacklist multiple apps e.g. both appa.exe and appb.exe must be done by creating a registry value for each app individually.

This is most problematic in Remote PC since most physical PCs have GPUs. I recently had to blacklist Internet Explorer to prevent lockup issues when switching back to physical.

Uninstall VDA

Uninstall the VDA from Programs and Features.

Then see CTX209255 VDA Cleanup Utility.

To run the VDA Cleanup Tool silently:

  1. Execute VDACleanupUtility.exe /silent /noreboot to suppress reboot.
  2. Once the VDACleanupUtility has finished executing, setup Auto logon for the current user.
  3. Reboot.
  4. After reboot, tool will launch automatically to continue Cleanup.

Another option is to delete CitrixVdaCleanup value under HKLM\Software\Microsoft\Windows\CurrentVersion\RunOnce. Then after reboot, run VDACleanupUtility.exe /silent /reboot to indicate that it’s running after the reboot.

Related Pages

Director 7.14

Last Modified: Sep 2, 2018 @ 7:53 am

Navigation

💡 = Recently Updated

Director Licensing – Platinum Edition

See the XenApp and XenDesktop Feature Matrix. Scroll down to Director Platinum Edition for the list of Director features that require Platinum Edition licensing.

  • Up to a year’s worth of performance data that provides a comprehensive view of capacity trends
  • Proactive notification and alerting including SNMP integration
  • SCOM alerts
  • Desktop and server OS usage reporting
  • Create customized reports
  • Reboot warnings
  • Octoblu integration
  • NetScaler MAS integration
  • Override control over roaming sessions

See CTX224793 Director Version Matrix – Install or Upgrade compatibility of Director with Delivery Controller, VDA for a list of which Director feature came with each version, and the licensing Edition needed for each feature.  💡 

Director 7.14 on Standalone Server

If you are installing Director 7.14 on a standalone server, see Citrix CTX142260 Installing or Upgrading to Citrix Director 7.6.200.

To install and configure Director using a script, see Dennis Span Citrix Director unattended installation with PowerShell.  💡

To install Director manually:

  1. If you intend to install Director on a standalone server, start with running AutoSelect.exe from the XenApp/XenDesktop 7.14 media.
  2. In the Extend Deployment section, on the bottom left, click Citrix Director.
  3. In the Licensing Agreement page, select I have read, understand, and accept the terms, and click Next.
  4. In the Core Components page, click Next.
  5. In the Delivery Controller page, it will ask you for the location of one Controller in the farm. Only enter one Controller per farm. If you have multiple Director servers, each Director server can point to a different Controller in the farm. From Citrix Docs: Director automatically discovers all other Controllers in the same Site and falls back to those other Controllers if the Controller you specified fails. Click Test Connection, and then click Add.

  6. In the Features page, click Next.
  7. In the Firewall page, click Next.
  8. In the Summary page, click Install.
  9. In the Finish page, click Finish.
  10. In IIS Manager, go to Default Web Site > Director > Application Settings, find Service.AutoDiscoveryAddresses, and make sure it points to one Controller in the farm, and not to localhost. From Citrix Docs: Director automatically discovers all other Controllers in the same Site and falls back to those other Controllers if the Controller you specified fails.

  11. If you built multiple Director servers, use NetScaler to load balance them.
  12. If you are upgrading Director, run C:\inetpub\wwwroot\Director\tools\DirectorConfig.exe /upgrade to complete the upgrade process.
  13. For info on the new monitoring features in Director 7.14 and older, see Use Director below.

Director Default Webpage

From CTX223907 How to Make Director the Default Page within IIS: If Director is installed on a standalone server, do the following to set /Director as the default path.

  1. Open Notepad elevated (as administrator) and paste the following text:
    <script type="text/javascript">
    <!--
    window.location="https://director.corp.com/Director";
    // -->
    </script>
  2. Adjust the window.location line to match your FQDN.
  3. Select File > Save As and browse to the IIS folder, by default C:\inetpub\wwwroot is the IIS folder.
  4. Select the Save as type to All types.
  5. Type a file name with an html extension, and select Save.
  6. Open IIS Manager.
  7. Select the SERVERNAME node (top-level) and double-click Default Document, as shown in the following screen shot:
  8. On the right, click Add…,
  9. Enter the file name of the .html file provided in Step 5.
  10. Ensure the .html file is located at the top of the list, as shown in the following screen shot:

Director Spinning Circle

If after login to Director the spinning circle doesn’t go away:

Do the following to fix it:

  1. Edit the file C:\inetpub\wwwroot\Director\web.config using an elevated text editor.
  2. Search for <serviceHostingEnvironment (line 273).
  3. Add the following attribute:
    multipleSiteBindingsEnabled="true"

Also see CTX202564 Citrix Director Becomes Unresponsive after Submitting the Credentials when IIS X-Frame-Options is enabled

Director Tweaks

Prepopulate the domain field

From http://www.xenblog.dk/?p=33: On the Controllers having the Director role installed, locate and edit the ‘LogOn.aspx’ file. By default you can find it at C:\inetpub\wwwroot\Director\Logon.aspx

In line 450 you will have the following. To find the line, search for ID=”Domain”. Note: onblur and onfocus attributes were added in newer versions of Director.

<asp:TextBox ID="Domain" runat="server" CssClass="text-box" onfocus="showIndicator(this);" onblur="hideIndicator(this);"></asp:TextBox>

In the ID=”Domain” element, insert a Text attribute and set it to your domain name. Don’t change or add any other attributes. Save the file.

<asp:TextBox ID="Domain" runat="server" Text="Corp" CssClass="text-box" onfocus="showIndicator(this);" onblur="hideIndicator(this);"></asp:TextBox>

This will prepopulate the domain field text box with your domain name and still allow the user to change it, if that should be required. Note: this only seems to work if Single Sign-on is disabled.

Session timeout

By default the idle time session limit of the Director is 245 min. If you wish to change the timeout, here is how to do it.

  1. Log on to the Director Server as an administrator
  2. Open the ‘IIS Manager’
  3. Browse to ‘SitesDefault Web SiteDirector’ in the left hand pane.
  4. Open ‘Session State’ in the right hand pane
  5. Change the ‘Time-out (in minutes)’ value under ‘Cookie Settings’
  6. Click ‘Apply’ in the Actions list

SSL Check

From http://euc.consulting/blog/citrix-desktop-director-2-1: If you are not securing Director with an SSL certificate you will get this error at the logon screen.

To stop this:

  1. Log on to the Director Server as an administrator
  2. Open the ‘IIS Manager’
  3. Browse to ‘SitesDefault Web SiteDirector’ in the left hand pane.
  4. Open ‘Application Settings’ in the right hand pane
  5. Set UI.EnableSslCheck to false.

Disable Activity Manager

From Disable the visibility of running applications in the Activity Manager in Advanced Configuration at Citrix Docs: By default, the Activity Manager in Director displays a list of all the running applications and the Windows description in the title bars of any open applications for the user’s session. This information can be viewed by all administrators that have access to the Activity Manager feature in Director. For Delegated Administrator roles, this includes Full administrator, Delivery Group administrator, and Help Desk Administrator.

To protect the privacy of users and the applications they are running, you can disable the Applications tab from listing running applications.

  • On the VDA, modify the registry key located at HKLM\Software\Citrix\Director\TaskManagerDataDisplayed. By default, the key is set to 1. Change the value to 0, which means the information will not be displayed in the Activity Manager.
  • On the server with Director installed, modify the setting that controls the visibility of running applications. By default, the value is true, which allows visibility of running applications in the Applications Change the value to false, which disables visibility. This option affects only the Activity Manager in Director, not the VDA. Modify the value of the following setting:
    UI.TaskManager.EnableApplications = false

Large Active Directory / Multiple Forests

From CTX133013 Desktop Director User Account Search Process is Slow or Fails: By default, all the Global Catalogs for the Active Directory Forest are searched using Lightweight Directory Access Protocol (LDAP). In a large Active Directory environment, this query can take some time or even time out.

If multiple forests, see Citrix Blog Post Using Citrix Director in a MultiForest Environment.

  1. In Information Server (IIS) Management, under the Desktop Director site, select Application Settings and add a new value called Connector.ActiveDirectory.ForestSearch. Set it to False. This disables searching any domain except the user’s domain and the server’s domain.
  2. To search more domains, add the searchable domain or domains in the Connector.ActiveDirectory.Domains field.

Site Groups

From Citrix Blog Post Citrix Director 7.6 Deep-Dive Part 4: Troubleshooting Machines:

If there are a large number of machines, the Director administrator can now configure site groups to perform machine search so that they can narrow down searching for the machine inside a site group. The site groups can be created on the Director server by running the configuration tool via command line by running the command:

C:\inetpub\wwwroot\Director\tools\DirectorConfig.exe /createsitegroups

Then provide a site group name and IP address of the delivery controller of the site to create the site group.

Director Configuration Script

Johan Greefkes at Script for configuring Director at Citrix Discussions was kind enough to provide a script that does the following:

  • Sets the XenDesktop Controllers that Director communicates with
  • Disables SSL Check
  • Sets Logon.aspx file to default to a domain name
  • Adds a footer that displays the name of the Director server

Director – Saved Filters

From Scott Osborne and Jarian Gibson at Citrix Discussions: In Director, you can create a filter and save it.

The saved filter is then accessible from the Filters menu structure.

The saved filters are stored on each Director server at C:\Inetpub\wwwroot\Director\UserData. Each user has their own saved filters. The saved filters are not replicated across Director servers.

You can instead configure multiple Director servers to store the filters on a shared UNC path: (h/t CTP Jarian Gibson)

  1. Create and share a folder (e.g. DirectorData).
  2. The Director server computer accounts need Modify permission to the share.
  3. On each Director server, run IIS Manager.
  4. Go to Sites > Default Web Site > Director. In the middle, double-click Application Settings.
  5. Change the Service.UserSettingsPath setting to the UNC path of the new share.
  6. Repeat this on other load balanced Director servers.

Director and HDX Insight

You can connect Director to NetScaler Management & Analytics System (NetScaler MAS) or Citrix Insight Center to add Network tabs to Director’s Trends and Machine Details views. Citrix Blog Post Configure Director with NetScaler Management & Analytics System (MAS).

Director and Self-Service Password Reset (SSPR)

If you have XenApp/XenDesktop Platinum Edition, it’s possible to install SSPR on the Director server. See George Spiers Citrix Self-Service Password Reset for a detailed implementation guide.

However this might break Director, and all you will see is a spinning circle.

To fix it, in IIS Manager (inetmgr), edit the bindings of the Default Web Site, and Remove the HTTP 8080 binding. Or implement the multisitebinding fix.

More info at Citrix Discussions Installing SSPR 1.0 appears to have broken Director 7.11 on same server.

Director Grooming

If XenDesktop is not Platinum Edition, then all historical Director data is groomed at 30 days.

For XenDesktop/XenApp Platinum Edition, by default, most of the historical Director data is groomed at 90 days. This can be adjusted up to 367 days by running a PowerShell cmdlet.

  1. On a XenDesktop Delivery Controller, run PowerShell and run asnp Citrix.*

  2. Run Get-MonitorConfiguration to see the current grooming settings.
  3. Run Set-MonitorConfiguration to change the grooming settings.

Director Single Sign-on

You can configure Director to support Integrated Windows Authentication (Single Sign-on). Note: there seem to be issues when not connecting from the local machine or when connecting through a load balancer.

  1. Run IIS Manager. You can launch it from Server Manager (Tools menu), or from the Start Menu, or by running inetmgr.
  2. On the left, expand Sites, expand Default Web Site, and click Director.
  3. In the middle, double-click Authentication in the IIS section.
  4. Right-click Windows Authentication, and Enable it.
  5. Right-click Anonymous Authentication, and Disable it.
  6. Pass-through auth won’t work from another computer until you set the http SPN for the Director server. See Director 7.7 Windows Authentication not working with NS LB at Citrix Discussions.
  7. If Director is not installed on a Controller then you’ll need to configure Kerberos delegation.
  8. If you are load balancing Director then additional config is required. See Director 7.7 Windows Authentication not working with NS LB at Citrix Discussions for more info.
    1. Create an AD service account that will be used as the Director’s ApplicationPoolIdentity.
    2. Create SPN and link it to the service account.
      setspn -S http/loadbalanced_URL domain\user
    3. Trust the user account for delegation to any service (Kerberos only) (trust the Director servers for delegation is not necessary in this case). You have to create the SPN before you can do this step.
    4. In IIS manager, on the Application Pools (Director), specify the Identity as user we have created in step 1.
    5. In IIS manager, select Default Web Site and open the Configuration Editor.
    6. Use the drop-down to navigate to the following section:

      system.webServer/security/authentication/windowsAuthentication
    7. Set useAppPoolCredentials = True and useKernelMode = False. Click Apply on the top right.

  9. When you connect to Director you will be automatically logged in. You can change the login account by first logging off.
  10. Then change the drop-down to User credentials.

Director – Multiple XenDesktop Sites

  1. Run IIS Manager. You can launch it from Server Manager (Tools menu) or from the Start Menu, or by running inetmgr.
  2. On the left, expand Sites, expand Default Web Site, and click Director.
  3. In the middle pane, double-click Application Settings.
  4. Find the entry for Service.AutoDiscoveryAddresses, and double-click it.
  5. If Director is installed on a Controller, localhost should already be entered.
  6. Add a comma, and the NetBIOS name of one of the controllers in the 2nd XenDesktop Site (farm). Only enter one Controller name. If you have multiple Director servers, you can point each Director server to a different Controller in the 2nd XenDesktop Site (farm). From Citrix Docs: Director automatically discovers all other Controllers in the same Site and falls back to those other Controllers if the Controller you specified fails.

Director Process Monitoring

Director 7.11 and newer have Process Monitoring, which is detailed in Citrix Blog Post Citrix Director: CPU, Memory Usage and Process Information.

Process Monitoring is disabled by default. To enable it, configure the Enable process monitoring setting in a Citrix Policy. For Citrix Policies in a GPO, find this setting in the computer half of the GPO. Note: this setting could significantly increase the size of the Monitoring database.

Director Alerts and Notifications

Director supports alert conditions and email notifications. This feature requires XenApp/XenDesktop to be licensed with Platinum Edition. See Citrix Blog Post Configuring & Managing Alerts and Notifications Using Director for more information.

Director 7.11 and newer have CPU, Memory, and ICT RTT alerts. Citrix Blog Post 7 New Categories in Director for Proactive Notifications & Alerts

To configure alerts:

  1. While logged into Director, at the top of the page, click the Alerts button.
  2. Switch to the Email Server Configuration tab.
  3. Enter your SMTP information, and click Send Test Message. Then click Save.

  4. Switch to the Citrix Alerts Policy tab.
  5. There are four high-level categories of alerts: Site Policy, Delivery Group Policy, Server OS Policy, and User Policy. Click whichever one you want to configure.
  6. Then click Create.
  7. Give the alert a name.
  8. On the bottom left, select a condition, and enter thresholds.
  9. On the bottom right, in the Notifications preferences section, click Add.
  10. Enter an email address, and click Add.
  11. Click Save when done. Feel free to create more alerts and notifications.
  12. For Server OS and User Policy, there are new ICA RTT alerts. See Citrix Blog Post 7 New Categories in Director for Proactive Notifications & Alerts for details on the new alerts in 7.11 and newer.
  13. In Director 7.12 and newer, you can configure alerts to generate an SNMP trap. This is configured in PowerShell as described at Configure alerts policies with SNMP traps at Citrix Docs.
    Set-MonitorNotificationSnmpServerConfiguration        #see Docs for parameter details
    Set-MonitorNotificationPolicy -IsSnmpEnabled $true -Uid <Policy ID>
  14. Citrix has an experimental Desktop Notification Tool. See Citrix Blog Post Desktop Notification Tool For Citrix XenDesktop.
    ablogpic2

Director Alerts can be configured with a WebHook that allows Octoblu to perform actions when a Director Alert occurs. See Configure alerts policies with Octoblu webhooks at Citrix Docs for details.

Set-MonitorNotificationPolicy –Uid 5 –Webhook <Webhook URL>

Director – SCOM Integration

Director 7.8 and newer can display alerts from System Center Operations Manager 2012 R2. This feature requires XenApp/XenDesktop Platinum Edition.

  1. See Configure SCOM integration at Citrix Docs for detailed configuration instructions. Also see Marius Sandbu Integrating Citrix XenDesktop 7.7 and System Center Operations Manager.
  2. If Director server or System Center Operations Manager server is 2008 R2, then login to the 2008 R2 server, open PowerShell and run Enable-PSRemoting. Yes to everything. This is not needed on Windows Server 2012 R2 servers.
  3. On Director server, run C:\inetpub\wwwroot\Director\tools\DirectorConfig.exe /configscom
  4. FYI, the DirectorConfig.exe /configscom command enables the following features on the Director server: /FeatureName:IIS-NetFxExtensibility45 /FeatureName:IIS-ASPNET45 /FeatureName:WCF-HTTP-Activation45
  5. FYI, the System Center Operations Manager server is listed in IIS Manager at Default Web Site > Director > Application Settings (middle pane) > Connector.SCOM.ManagementServer.
  6. On the System Center Operations Manager server, edit Remote Management Users local group, and add Citrix Admins, and other Director users.
  7. In System Center Operations Manager Console, go to Administration > User Roles, and edit Operations Manager Operators. Add the Citrix Admins, and other Director users.
  8. See Citrix Blog Post SCOM Alerts in Citrix Director for information on how to view System Center Operations Manager alerts in Director.

Director – Custom Reports

In Director 7.12 and newer, in the Trends view, there’s a Custom Reports tab that guides you through creating a custom OData Query. This tab only appears if you have XenApp/XenDesktop Platinum Edition.

The Monitoring database contains more data than is exposed in Director. To view this data, the Monitoring service has an OData Data Feed that can be queried.

Use Director

The newer Director features usually require Delivery Controllers and VDAs to be at the same version or newer than Director. Director depends on the Monitoring Service that is built into the Delivery Controller. The Monitoring Service gathers data from the VDAs.

See Monitor deployments at Citrix Docs.

See the various Troubleshoot topics at Citrix Docs.

In Director 7.14 and newer, see CTX223928 How to use Director to monitor storage performance.

Citrix Blog Post Citrix Director Now Provides Disk Usage Information!:  💡

  • IOPS and disk latency data is enabled by default.
  • IOPS and disk latency is pushed to the database from each VDA at 1 hour interval.
  • Approximately 276 KB of disk space is required to store the CPU, memory, IOPS and disk latency data for one VDA over a period of one year.

In Director 7.14 and newer, see CTX223925 How to use Director to monitor NVIDIA GPU usage.

In Director 7.14 and newer, see CTX223927 How to use Director to troubleshoot application launch errors. This feature is configured in Citrix Policy Settings located in the Computer half at Virtual Delivery Agent Settings > Monitoring.

Citrix Director 7.13 and newer have an Application Instances tab on the Filters page that lets you filter published application sessions based on Session Idle Time (RDS sessions only), Application Name, and all other existing fields, like machine name, and so on. Requires Director 7.13, Controller 7.13, VDA 7.13, and Platinum Edition licensing. See Citrix Blog Post Monitoring Idle Applications and Sessions in Citrix Director. See Troubleshoot applications at Citrix Docs.

If idle time column shows n/a, then you need to wait 10-15 minutes.

In Director 7.13 and newer, the Session Details panel can show if Enlightened Data Transport (EDT, aka HDX on UDP) is enabled in the user’s session. See Citrix Blog Post HDX Adaptive Transport Protocol Monitoring via Director.

George Spiers has a comprehensive guide of all Director 7.12 features at http://www.jgspiers.com/citrix-director/.

Director 7.12 and newer have Connection Failure Details, which is detailed in Citrix Blog Post Director 7.12: Easier Troubleshooting of Machine & Connection Failures. Also see CTX223812 Citrix Director Failure Codes.  💡

Director 7.11 and newer have Process Monitoring, which is detailed in Citrix Blog Post Citrix Director: CPU, Memory Usage and Process Information.

Director 7.9 and newer have Logon Duration improvements.

Citrix Blog Post Interactive Session of Logon Duration in Citrix Director – Explained: Interactive Session Duration = Desktop Ready Event Timestamp (EventId 1000 on VDA) – User Profile Loaded Event Timestamp (EventId 2 on VDA). More details in the Blog Post.

Citrix Blog Post Director 7.6 Failure Reasons Demystified lists possible failure reasons behind an Unregistered alert, and the true meaning of failure reasons such as Connection Refused and Communication Error. It details each failure reason, defines the meanings of these failures, and lists action items that serve as a starting point for troubleshooting the specific scenario. The list is based on Director 7.6.300.

Delivery Controller 7.14.1 and Licensing

Last Modified: Aug 18, 2021 @ 7:35 am

Navigation

💡 = Recently Updated

Upgrade

If you are performing a new install of XenApp/XenDesktop Controller, then skip to the next section.

You can upgrade directly from any Delivery Controller version 5.6 or newer.

Before upgrading, if you have a standalone Citrix Licensing Server, upgrade it to 11.14.1.1 build 20104.

During the upgrade of Delivery Controller, be aware that a database upgrade is required. Either get a DBA to grant you temporary sysadmin permission, or use Citrix Studio to generate SQL scripts that a DBA must then run in SQL Studio.

  1. Frequent upgrades – XenApp and XenDesktop 7.14.1 is a Current Release (CR). It is only supported for 6 months from the date it was released by Citrix. You are expected to in-place upgrade to the next Current Release the next time it becomes available. If you’re not willing to perform frequent upgrades, then the Long Term Service Release (LTSR) might be more appropriate for you.
  2. SCOM Agent – If StoreFront is installed on the Controller, and if the Citrix SCOM Agent for StoreFront is installed, stop the Citrix MPSF Agent service. See CTX220935 Cannot Perform a StoreFront Upgrade if Citrix SCOM Management Pack Agent Service is Running.
  3. Close PowerShell and Consoles. Make sure all Citrix Consoles and PowerShell consoles are closed. StoreFront won’t upgrade if any are running. If StoreFront fails, then the StoreFront configuration is wiped out.
  4. Other Users – Use Task Manager > Users tab to logoff any other user currently logged into the machine.
  5. Snapshot. If StoreFront is on the Controller, take a snapshot before attempting the upgrade.
  6. Another option is to export the StoreFront configuration so you can restore it later if something goes wrong.
  7. Download the XenApp/XenDesktop 7.14.1 ISO.  💡
  8. Before upgrading, open PowerShell and run the following.
    asnp citrix*
    Get-TrustDBConnection

  9. If you don’t see a returned value, then you’ll need to run additional commands to fix the Trust Database Connection as detailed at Known Issues at Citrix Docs.  💡
    $cs = Get-ConfigDBConnection
    Set-TrustDBConnection –DBConnection $cs
  10. Run AutoSelect.exe from the 7.14.1 ISO. Make sure it’s 7.14.1, and not 7.14.0.

  11. On the top left, click Studio and Server Components.
  12. In the Licensing Agreement page, select I have read, understand, and accept the terms, and click Next.
  13. In the Ensure Successful Upgrade page, read the steps, check the box next to I’m ready to continue, and click Next.
  14. In the Firewall page, click Next.
  15. In the Summary page, click Upgrade.
  16. If you see a Running Processes window, close the listed programs, and click Continue.
  17. Click Close if prompted to restart.
  18. If you see a window asking you to Locate ‘XenDesktop’ installation media, click Cancel.
  19. Mount the XenApp_and_XenDesktop_7_14_1.iso.
  20. Run AutoSelect.exe.
  21. Click Delivery Controller, and installation will resume.
  22. In the Smart Tools page, make a selection. If participating, click Connect, login with Citrix Cloud or mycitrix.com credentials, and then click Next. See Citrix Insight Services at Citrix Docs for more information on these options.
  23. In the Finish page, check the box next to Launch Studio, and click Finish.
  24. Programs and Features should show Citrix XenDesktop 7.14.1 as version 7.14.1.14098.
  25. After Citrix Studio launches, if you have sysadmin permissions on SQL, then click Start the automatic Site upgrade. If you don’t have full permission, then get a DBA to help you, click Manually upgrade this site, and follow the instructions.

  26. If you choose to Manually upgrade this site, then note that there might not be an upgrade for the Logging Database schema, depending on what version you are upgrading from.

  27. After all Controllers and VDAs are upgraded, right-click the Catalogs, and click Upgrade Catalog. Note: 7.9 is the newest minimum functional level. You won’t see an option for 7.14. If your Catalogs are already set to VDA version 7.9, then there’s no need to upgrade the Catalogs or Delivery Groups.


  28. Then do the same for the Delivery Groups. Note: 7.9 is the newest minimum functional level. You won’t see an option for 7.14. If your Delivery Groups are already set to VDA version 7.9, then no upgrade is needed.


Other XenApp/XenDesktop components can also be in-place upgraded:

New Install Preparation

Frequent upgrades – XenApp and XenDesktop 7.14.1 is a Current Release (CR). It is only supported for 6 months from the date it was released by Citrix. You are expected to in-place upgrade to the next Current Release the next time it becomes available. If you’re not willing to perform frequent upgrades, then the Long Term Service Release (LTSR) might be more appropriate for you.

Automation – If you want to automate the install of Delivery Controllers, see Dennis Span Citrix Delivery Controller unattended installation with PowerShell and SCCM.

Citrix Licensing – If you are going to use an existing Citrix Licensing Server, upgrade it to 11.14.1.1 build 20104.

Note: 7.14  and newer supports multiple license types in a single farm. See CTX223926 How to Configure Multiple License Types within a Single XenApp and XenDesktop Site.

SQL Databases

  • Citrix CTX209080 Database Sizing Tool for XenDesktop 7
  • Citrix article CTX114501 – Supported Databases for XenApp and XenDesktop Components
  • There are typically three databases: one for the Site (aka farm), one for Logging (audit log) and one for Monitoring (Director).
    • The name of the monitoring database must not have any spaces in it. See CTX200325 Database Naming Limitation when Citrix Director Accesses Monitoring Data Using OData APIs
    • If you want Citrix Studio to create the SQL databases automatically, then the person running Studio must be a sysadmin on the SQL instances. No lesser role will work. sysadmin permissions can be granted temporarily and revoked after installation.
    • As an alternative, you can use Citrix Studio to create SQL scripts and then run those scripts on the SQL server. In that case, the person running the scripts only needs the dbcreator and securityadmin roles.
    • It is possible to create the databases in advance. However, you must use the non-default Latin1_General_100_CI_AS_KS collation. Citrix Studio will configure the database tables in the pre-created database.
  • If SQL 2016 or newer, create a Basic Availability Group.
  • If SQL 2014 or older, Citrix recommends SQL Mirroring because it has the fastest failover.
    • SQL Mirroring requires two SQL Standard Edition servers and one SQL Express for the witness server.
    • You can setup SQL Mirroring either before installing XenDesktop or after installing XenDesktop. If after, then see Citrix CTX140319 to manually change XenDesktop’s database connection strings How to Migrate XenDesktop Database to New SQL Server.
    • To setup SQL Mirroring, see Rob Cartwright: Configure SQL Mirroring For Use With XenDesktop, XenApp, and PVS Databases.
    • If you try to stretch the mirror across datacenters, the SQL witness must be placed in a third datacenter that has connectivity to the other two datacenters. However, stretching a single XenApp/XenDesktop site/farm and corresponding SQL mirror across datacenters is not recommended.
  • AlwaysOn Availability Groups and SQL Clustering are also supported. However, these features require the much more expensive SQL Enterprise Edition.

Windows Features

  • Installing Group Policy Management on the Delivery Controller lets you edit GPOs and have access to the Citrix Policies node in the GPO Editor. Or you can install Citrix Studio on a different machine that has GPMC installed.

vSphere

  • Create a role in vSphere Client. Assign a service account to the role at the Datacenter or higher level.

Delivery Controller Install

  1. A typical size for the Controller VMs is 2-4 vCPU and 8+ GB of RAM. If all components (Delivery Controller, StoreFront, Licensing, Director, SQL Express) are installed on one server, then you might want to bump up memory to 10 GB or 12 GB.
  2. From Local Host Cache sizing and scaling at Citrix Docs:
    1. For LHC LocalDB, assign the Controller VMs a single socket with multiple cores.
    2. Add two cores for LHC.
    3. Add at least three more Gigs of RAM and watch the memory consumption.
    4. Since there’s no control over LHC election, ensure all Controllers have the same specs.
  3. Make sure the User Right Log on as a service includes NT SERVICE\ALL SERVICES or add NT SERVICE\CitrixTelemetryService to the User Right.
  4. Download the XenApp/XenDesktop 7.14.1 ISO.  💡
  5. On two Delivery Controllers, install the Delivery Controller software. Run AutoSelect.exe from the 7.14.1 ISO. Make sure it’s 7.14.1, and not 7.14.0.

  6. Click Start next to either XenApp or XenDesktop. The only difference is the product name displayed in the installation wizard.
  7. On the left, click Delivery Controller.
  8. In the Licensing Agreement page, select I have read, understand, and accept the terms, and click Next.
  9. In the Core Components page, you can install all components on one server, or on separate servers. Splitting them out is only necessary in large environments, or if you have multiple farms and want to share the Licensing, StoreFront, and Director components across those farms.
  10. In the Features page, uncheck the box next to Install Microsoft SQL Server 2014 SP2 Express, and click Next.
  11. In the Firewall page, click Next.
  12. In the Summary page, click Install.
  13. In the Call Home page, make a selection, click Connect, enter your Citrix Cloud or MyCitrix.com credentials, and then click Next.


  14. In the Finish page, click Finish. Studio will automatically launch.
  15. Programs and Features should show Citrix XenDesktop 7.14.1 as version 7.14.1.14098.
  16. Ensure the two Controller VMs do not run on the same hypervisor host. Create an anti-affinity rule.

Create Site

There are several methods of creating the databases for XenApp/XenDesktop:

  • If you have sysadmin permissions to SQL, let Citrix Studio create the databases automatically.
  • If you don’t have sysadmin permissions to SQL, then use Citrix Studio to generate SQL scripts, and send them to a DBA.

Use Studio to Create Database Scripts

  1. Launch Citrix Studio. After it loads, click Deliver applications and desktops to your users.
  2. In the Introduction page, select An empty, unconfigured site. This reduces the number of pages in this Setup wizard. The other pages will be configured later.
  3. Enter a Site Name (aka farm name), and click Next. Only administrators see the farm name.
  4. In the Databases page, if you are building two Controllers, click Select near the bottom of the same page.
  5. Click Add.
  6. Enter the FQDN of the second Controller, and click OK. Note: the Delivery Controller software must already be installed on that second machine.
  7. Then click Save.
  8. If you don’t have sysadmin permissions, change the selection to Generate scripts to manually set up databases on the database server. Change the database names if desired, and click Next.
  9. In the Summary page, click Generate scripts.
  10. A folder will open with six scripts. Edit each of the scripts.
  11. Near the top of each script are two lines to create the database. Uncomment both lines (including the go line). Then save and close the file.

  12. Once all of the scripts are edited, you can send them to your DBA.
  13. On the Principal SQL Server, open the file Site_Principal.sql.

  14. Open the Query menu, and click SQLCMD Mode.
  15. Then execute the script.
  16. If SQLCMD mode was enabled properly, then the output should look something like this:
  17. If you have a mirrored database, run the second script on the mirror SQL instance. Make sure SQLCMD mode is enabled.
  18. Repeat for the Logging_Principal.sql script.
  19. You’ll have to enable SQLCMD Mode for each script you open.


  20. Repeat for the Monitoring_Principal.sql script.
  21. Once again enable SQLCMD Mode.


  22. The person running Citrix Studio must be added to the SQL Server as a SQL Login, and granted the public server role, so that account can enumerate the databases.

  23. Back in Citrix Studio, click the Continue database configuration and Site setup button.
  24. In the Databases page, enter the SQL server name, and instance name, and click Next.

  25. On the Licensing page, enter the name of the Citrix License Server, and click Connect. If you installed Licensing with your Delivery Controller, then simply enter localhost. See CTX223926 How to Configure Multiple License Types within a Single XenApp and XenDesktop Site.
  26. XenApp/XenDesktop 7.14 requires the newest Licensing Server. If your server isn’t compatible, leave it set to localhost and fix it later.
  27. If the Certificate Authentication appears, select Connect me, and click Confirm.T
  28. Then select your license, and click Next.
  29. In the Summary page, if your databases are mirrored, each database will show high availability servers, and the name of the Mirror server. Click Finish.

  30. It will take some time for the site to be created.

Verify Database Mirroring

If your database is mirrored, when you run asnp citrix.* and then run get-brokerdbconnection, you’ll see the Failover Partner in the database connection string.

Second Controller

When building the first Delivery Controller, the scripts might have already included the second Delivery Controller. Thus no special SQL permissions are needed. If the second Delivery Controller has not already been added to the SQL databases, then there are several methods of adding a second Controller to the databases for XenApp/XenDesktop:

  • If you have sysadmin permissions to SQL, let Citrix Studio modify the databases automatically.
  • If you don’t have sysadmin permissions to SQL then use Citrix Studio to generate SQL scripts and send them to a DBA.

To use Citrix Studio to create the SQL Scripts:

  1. On the first Delivery Controller, if StoreFront is installed, delete the default StoreFront store (/Citrix/Store) and recreate it with your desired Store name (e.g. /Citrix/CompanyStore).
  2. On the 2nd Delivery Controller, install XenDesktop as detailed earlier.
  3. After running Studio, click Connect this Delivery Controller to an existing Site.
  4. Enter the name of the first Delivery Controller, and click OK.
  5. If you don’t have full SQL permissions (sysadmin), click No when asked if you want to update the database automatically.
  6. Click Generate scripts.
  7. A folder will open with six scripts. If not mirroring, then the top three scripts need to be sent to a DBA. If mirroring, send all six.
  8. On the SQL Server, open one of the .sql files.

  9. Open the Query menu, and click SQLCMD Mode.
  10. Then execute the XenDesktop script.
  11. If SQLCMD mode was enabled properly, then the output should look something like this:
  12. Repeat for the remaining script files.
  13. Back in Citrix Studio, click OK.
  14. In Citrix Studio, under Configuration > Controllers, you should see both controllers.
  15. You can also test the site again if desired.

Studio – Slow Launch

From B.J.M. Groenhout at Citrix Discussions: The following adjustments can be made if Desktop Studio (and other Citrix management Consoles) will start slowly:

  • Within Internet Explorer, go to Tools – Internet Options – Tab Advanced – Section Security, and uncheck the option Check for publisher’s certificate revocation

After adjustment Desktop Studio (MMC) will be started immediately. Without adjustment it may take some time before Desktop Studio (MMC) is started.

Registry setting (can be deployed using Group Policy Preferences):

  • HKEY_CURRENT_USER\Software\Microsoft\Windows\CurrentVersion\WinTrust\Trust Providers\Software Publishing
    • State“=dword:00023e00

Concurrent Logon Hard Limit

From Samuel Legrand XenApp 7.14 – (Really) Manage a DR! – Citrix Policies has a setting called Concurrent Logon Tolerance. However, it is not a hard limit, meaning once the limits are reached, it continues to let users connect. You can configure the Controllers to make it a hard limit by setting the following registry value:

  • HKLM\Software\Policies\Citrix\DesktopServer
    • LogonToleranceIsHardLimit (DWORD) = 1

Local Host Cache

If you have 10,000 or fewer VDAs per zone (up to 40,000 VDAs per multi-zone site/farm), you can enable Local Host Cache (LHC) instead of Connection Leasing. LHC allows new sessions to be started even if SQL database is unavailable. VDA limits for LHC are higher in 7.14 than previous versions of XenApp/XenDesktop.

From Local Host Cache sizing and scaling at Citrix Docs:

  1. For LHC LocalDB, assign the Controller VMs a single socket with multiple cores.
  2. Add two cores for LHC.
  3. Add at least three more Gigs of RAM and watch the memory consumption.
  4. Since there’s no control over LHC election, ensure all Controllers have the same specs.
  5. The Docs article has scripts for monitoring LHC performance.

From XenApp 7.12, LHC and a reboot at Citrix Discussions:

  • If the rebooted DDC is the elected one, a different DDC will take over (causing registration storm) and when the DDC gets back, it will take over brokering causing second registration storm. Site will sort itself out and all will work.
  • If the rebooted DDC is not the elected one, it will not impact any functionality.
  • If you turn the DDC down when site is working, and start it during outage, LHC will not trigger on that machine. This DDC will not impact the LHC unless it would become the elected one. In that scenario it will take control, however not start LHC and resources would not be available.

For Windows Server 2008 R2 Controllers, PowerShell 3, or newer, is required. See LHC XD 7.12 and W2K8SR2 SP1 at Citrix Discussions.

Local Host Cache can be enabled by running some PowerShell commands.

asnp citrix.*
Set-BrokerSite -ConnectionLeasingEnabled $false
Set-BrokerSite -LocalHostCacheEnabled $true

George Spiers Local Host Cache XenApp & XenDesktop 7.12 shows the Event Log entries when LHC is enabled.

Database Maintenance

Enable Read-Committed Snapshot

The XenDesktop Database can become heavily utilized under load in a large environment. Therefore Citrix recommends enabling the Read_Committed_Snapshot option on the XenDesktop databases to remove contention on the database from read queries. This can improve the interactivity of Studio and Director. It should be noted that this option may increase the load on the tempdb files. See Citrix article CTX137161 How to Enable Read-Committed Snapshot in XenDesktop for configuration instructions.

Change Database Connection Strings

Sometimes the database connection strings need to be modified:

  • When moving the SQL databases to a different SQL server
  • For AlwaysOn Availability Groups, to add MultiSubnetFailover to the SQL connection strings
  • For SQL mirroring, to add Failover Partner to the SQL connection strings

From Citrix Docs Update database connection strings when using SQL Server high availability solutions: Citrix offers several PowerShell scripts that update XenApp and XenDesktop database connection strings when you are using SQL Server high availability database solutions such as AlwaysOn and mirroring. The scripts, which use the XenApp and XenDesktop PowerShell API, are:

  • DBConnectionStringFuncs.ps1: The core script that does the actual work. This script contains common functions that the other scripts use.
  • Change_XD_Failover_Partner_v1.ps1: Updates (adds, changes, or removes) the failover partner. This script prompts for the failover partner location (FQDN) for each database. (Providing a blank failover partner removes the failover partner. You can also use the ClearPartner option to remove a partner.) Do not set the failover partner to the same location as the principal database server.
  • Change_XD_To_ConnectionString.ps1: Uses the provided connection strings to update the connection strings to the databases. This script ensures that certain Citrix services are up and running, and then updates those services in the correct order on all Controllers in the site. Enclose connection string information for each database in quotes.
  • Change_XD_To_MultiSubnetFailover.ps1: Toggles the addition and removal of MultiSubnetFailover=true. If you use AlwaysOn Availability Groups, Microsoft recommends that the connection string include MultiSubnetFailover=true. This option speeds up recovery when a high availability event occurs, and is recommended for both single and multi-subnet environments. Run this script once to add the option. Run the script again to remove it.
  • Change_XD_To_Null.ps1: Resets all the connection strings on the localhost because something has gone wrong. By resetting the connection strings to null, this script places the Controller into an “initial” state. If you run Studio after running this script, you’ll be asked if you want to create a site or join an existing site. This is useful if something has gone wrong and a reset is needed. After the reset, you can try again to set the connection strings.

CTX140319 How to Migrate XenDesktop Database to New SQL Server has the correctly ordered list of PowerShell commands to change the database connection strings. Make sure PowerShell is running as administrator before running these commands.

Here are the DB Connections that must be changed. This list might be longer than the article. When using the article, make sure you include all of the DB Connections shown below. You can get the full list of database commands by running Get-Command Set-*DBConnection. When changing the DB connections, AdminDBConnection must be the last to be set to NULL, and the first to be configured with the new connection string.

Set-ConfigDBConnection -DBConnection $null
Set-AppLibDBConnection –DBConnection $null    #7.8 and newer
Set-OrchDBConnection –DBConnection $null      #7.11 and newer
Set-TrustDBConnection –DBConnection $null     #7.11 and newer
Set-AcctDBConnection -DBConnection $null
Set-AnalyticsDBConnection -DBConnection $null
Set-HypDBConnection -DBConnection $null
Set-ProvDBConnection -DBConnection $null
Set-BrokerDBConnection -DBConnection $null
Set-EnvTestDBConnection -DBConnection $null
Set-SfDBConnection -DBConnection $null
Set-MonitorDBConnection -DataStore Monitor -DBConnection $null   #Monitoring Database
Set-MonitorDBConnection -DBConnection $null                      #Site Database
Set-LogDBConnection -DataStore Logging -DBConnection $null       #Logging Database
Set-LogDBConnection -DBConnection $null                          #Site Database
Set-AdminDBConnection -DBConnection $null -force

Citrix CTX221389 Scripts For Updating Connection Strings in XenApp/XenDesktop 7.x was recently updated for 7.13.

  • Change_XD_Failover_Partner_v1.ps1 – is used to update the mirroring failover partner.
  • Change_XD_To_ConnectionString.ps1 – this takes passed in connection strings and uses them, so a very generic version.
  • Change_XD_To_MultiSubnetFailover.ps1 – this toggles the MultiSubnetFailover. If it doesn’t exist or is false, it sets it to true. If it’s set to true, the script sets it back to false. If you need to remove the option then you’ll need to use Change_XD_To_ConnectionString.ps1 and provide strings without the setting.
  • Change_XD_To_Null.ps1 – this is a reset of all the connection strings on the localhost as something has gone wrong. Note because this resets the connection strings to null, it will actually place the ddc into a “initial” state. I.E. if you run Studio, it’ll ask if you want to create a site, or join to another DDC. This is useful if something has gone wrong, as you can reset a Controller’s settings, and then attempt to set the connection strings again using Change_XD_To_ConnectionString.ps1.

Director Grooming

If XenDesktop is not Platinum Edition, then all historical Director data is groomed at 30 days.

For XenDesktop/XenApp Platinum Edition, by default, most of the historical Director data is groomed at 90 days. This can be adjusted up to 367 days by running a PowerShell cmdlet.

  1. On a Delivery Controller, run PowerShell elevated (as administrator), and run asnp Citrix.*
  2. Run Get-MonitorConfiguration to see the current grooming settings.
  3. Run Set-MonitorConfiguration to change the grooming settings.

View Logging Database

To view the contents of the Logging Database, in Studio, click the Logging node. On the right is Create Custom Report. See Citrix article CTX138132 Viewing Configuration Logging Data Not Shown for more info.

The Logging Database can be queried using Get-LogLowLevelOperation. See Stefan Beckmann Get user who set maintenance mode for a server or client for an example script that uses this PowerShell cmdlet.

Maintain Logging Database

Citrix CTX215069 Troubleshooting and managing Oversized Configuration Logging database: The article’s queries can be used to determine the number of configuration operation types performed by XenDesktop Administrator, and to analyze the content of the Configuration Logging database when it is considered oversized. A grooming query is also provided to delete data older than a specified date.

Export/Import Configuration

Ryan Butler has a PowerShell script that can export configuration from one XenDesktop farm and import it to another.

Studio Administrators

Full Administrators

  1. In the Studio, under Configuration, click the Administrators node. The first time you access the node you’ll see a Welcome page. Feel free to check the box to Don’t show this again, and then click Close.
  2. On the Administrators tab, right-click, and click Create Administrator.
  3. In the Administrator and Scope page, Browse to a group (e.g. Citrix Admins) that will have permissions to Studio and Director. These groups typically have access to all objects, so select the All scope. Alternatively, you can create a Scope to limit the objects. Click Next.
  4. On the Role page, select a role, and then click Next. For example:
    • Full Administrator for the Citrix Admins group
    • Help Desk Administrator for the Help Desk group
    • Machine Catalog Administrator for the desktop team
  5. In the Summary page, click Finish.

Help Desk

  1. In the Studio, under Configuration, click the Administrators node. On the Administrators tab, right-click, and click Create Administrator.
  2. In the Administrator and Scope page, Browse to a Help Desk group that will have permissions to Studio and Director. Select the All scope. And click Next.
  3. On the Role page, select the Help Desk Administrator role, and then click Next.
  4. In the Summary page, click Finish.
  5. When administrators in the Help Desk role log into Director, all they see is this.

    To jazz it up a little, add the Help Desk group to the read-only role.
  6. Right-click the Help Desk Administrator, and click Edit Administrator.
  7. Click Add.
  8. In the Scope page, select a scope, and click Next.
  9. In the Role page, select Read Only Administrator, and click Next.
  10. In the Summary page, click Finish.
  11. Then click OK. Now Director will display the dashboard.

Provisioning Services w/Personal vDisk

From Considerations: Provisioning Services at Configure and manage Personal vDisk at Citrix Docs: The Provisioning Services Soap Service account must be added to the Administrator node of Studio and must have the Machine Administrator or higher role. This ensures that the PvD desktops are put into the Preparing state when the Provisioning Services (PVS) vDisk is promoted to production.

Customer Experience Improvement Program

XenApp/XenDesktop 7.14 enables CEIP by default. If desired, you can disable it in Citrix Studio:

  1. On the left, go to the Configuration node.
  2. On the right, switch to the Product Support tab.
  3. Click End.
  4. Click Yes.

Each XenApp/XenDesktop component has a separate configuration for disabling Customer Experience Improvement Program:

vCenter Connection

XenDesktop uses an Active Directory service account to log into vCenter. This account needs specific permissions in vCenter. To facilitate assigning these permissions, create a new vCenter role and assign it to the XenDesktop service account. The permissions should be applied at the datacenter or higher level.

Hosting Resources

A Hosting Resource = vCenter + Cluster (Resource Pool) + Storage + Network. When you create a machine catalog, you select a previously defined Hosting Resource, and the Cluster, Storage, and Network defined in the Hosting Resource object are automatically selected. If you need some desktops on a different Cluster+Storage+Network then you’ll need to define more Hosting Resources in Studio.

  1. In Studio, expand Configuration and click Hosting. Right-click it, and click Add Connection and Resources.
  2. In the Connection page, for Connection type, select VMware vSphere.
  3. Notice there’s a Learn about user permissions blue link to an article that describes the necessary permissions.
  4. Enter https://vcenter01.corp.local/sdk as the vCenter URL. The URL must contain the FQDN of the vCenter server.
  5. Enter credentials of a service account that can log into vCenter.
  6. In the Connection name field, give the connection a name. Typically, this matches the name of the vCenter server.
  7. If you are not using Machine Creation Services, and instead only need the vCenter connection for machine power management, change the Create virtual machines using selection to Other Tools. If you intend to use MCS, leave it set to Studio Tools.
  8. Click Next.
  9. If you see a message about the vCenter certificate, check the box next to Trust certificate, and click OK.
  10. Note: this vCenter certificate thumbprint is stored in the XenDesktop database, and is not updated when the vCenter certificate changes. See CTX217415 Cannot connect to the VCenter server due to a certificate error for instructions on manually updating the database with the new certificate thumbprint.

  11. In the Storage Management page, click Browse, and select a vSphere cluster. Note: as detailed at CTX223662, make sure there’s no comma in the datacenter name.
  12. Select Use storage shared by hypervisors.
  13. If you have sufficient disk space on each ESXi host, also select Optimize temporary data on available local storage. From Mark Syms at XA 7.9 MCS with RAM Caching at Citrix Discussions: “If you use just MCS caching to local storage then the VM is not agile at all and cannot be moved even when powered off as it has a virtual disk permanently associated with a single host.”
  14. From Martin Rowan at XA 7.9 MCS with RAM Caching at Citrix Discussions: for the temporary cache disk, “Don’t format it, the raw disk is what MCS caching uses.”
  15. Click Next.
  16. In the Storage Selection page, OS and Personal vDisk must be selected on at least one datastore. For maximum flexibility, only select one datastore. To select additional datastores, run this wizard again to create a separate Hosting Resource.
  17. If you selected the temporary data on local storage option, on the bottom, click Select, and choose the datastores you want to use for disk caching. By default, all local datastores are selected. Click Next when done.
  18. In the Network page, enter a name for the hosting resource. Since each hosting resource is a combination of vCenter, Cluster, Network, and Datastores, include those names in this field (e.g. vCenter01-Cluster01-Network01-Datastore01).
  19. Select a network and click Next.
  20. In the Summary page, click Finish.
  21. If you have multiple datastores for your VDAs, run the wizard again.
  22. You can use the existing vCenter connection.
  23. This time, select a different datastore.
  24. Give it a name that indicates the chosen datastore.
  25. When you create a Catalog, select the Hosting Resource for the datastore where you want the VDAs to be placed. Create additional Catalogs for each datastore. You can then combine the Catalogs into a single Delivery Group.
  26. Later in the Catalog wizard, you’re given an option to enable caching and select a cache size. This is similar to Provisioning Services option “Cache in RAM with overflow to disk”.
  27. If you rename Storage, Network, or Datacenters, see Citrix CTX225019 XA/XD 7.13: Renaming Storage, Network or Datacenters When Used With MCS or PVS. Either run Update-HypHypervisorConnection -LiteralPath "XDHyp:\Connections\MyConnection", or right-click the Hosting Resource and click Edit Storage. You can cancel the wizard.  💡

Citrix Licensing Server

Upgrade

XenApp/XenDesktop 7.14 comes with 11.14.1.1 build 20104

If you have a standalone Licensing Server, upgrade it to Citrix Licensing 11.14.1.1 build 20104 if it isn’t already.

  1. Go to the downloaded Citrix Licensing 11.14.1.1 build 20104, and run CitrixLicensing.exe.
  2. If you see the Subscription Advantage Renewal page, make a selection, and click Next.
  3. In the Upgrade page, click Upgrade.
  4. Click Finish.
  5. If you go to Programs and Features, it should now show version 14.0.0.20104.
  6. If you login to the license server web console, on the Administration tab, it shows it as version 11.14.1.1 build 120104.
  7. You can also view the version in the registry at HKLM\Software\Wow6432Node\Citrix\LicenseServer\Install.

License Server CEIP

11.14.1.1 build 19005 and newer enables CEIP by default. This can be disabled in the Citrix Licensing Manager (https://localhost:8083) by clicking the gear icon.

Scroll down to Share usage statistics with Citrix and make a selection.

Citrix License Management Service

Version 11.14.0.1 and newer include the Citrix License Management Service. This service helps you avoid prohibited practices:

  • Duplication of licenses outside a Disaster Recovery (DR) environment
  • Use of legacy licenses for new product versions
  • Use of rescinded licenses

Licensing Server HA using GSLB

From Dane Young – Creating a Bulletproof Citrix Licensing Server Infrastructure using NetScaler Global Server Load Balancing (GSLB) and CtxLicChk.ps1 PowerShell Scripts. Here is a summary of the configuration steps. See the blog post for detailed configuration instructions.

  1. Build two License Servers in each datacenter with identical server names. Since server names are identical, they can’t be domain-joined.
  2. Install identical licenses on all License Servers.
  3. Set the DisableStrictNameChecking registry key on all Citrix Licensing servers.
  4. Synchronize the certificate files located at C:\Program Files (x86)\Citrix\Licensing\WebServicesForLicensing\Apache\conf. They must be identical on all Licensing Servers.
  5. Download CtxLicChk.exe from http://support.citrix.com/article/CTX123935 and place on all Licensing Servers.
  6. Schedule the PowerShell script CtxLicChk.ps1 on all Licensing Servers. Get this script from the blog post linked above.
  7. Configure NetScaler:
    1. Configure GSLB ADNS services.
    2. Add wildcard Load Balancing service for each Citrix Licensing Server.
    3. Configure service TCP monitoring for ports 27000, 7279, 8082, and 8083.
    4. Create Load Balancing Virtual Server for each Licensing Server.
    5. Set one Load Balancing Virtual Server as backup for the other.
    6. Repeat in second datacenter.
    7. Configure GSLB Services and GSLB Monitoring.
    8. Configure GSLB Virtual Servers. Set one GSLB Virtual Server as backup for the other.
  8. Delegate the Citrix Licensing DNS name to the ADNS services on the NetScaler appliances.
  9. Configure Citrix Studio to point to the GSLB-enabled DNS name for Citrix Licensing.

Citrix License Server Monitoring

Citrix Licensing 11.13.1 and newer has historical usage reporting:

  1. Run Citrix Licensing Manager from the Start Menu. Or use a browser to connect to https://MyLicenseServer:8083
  2. Use the drop-down menus to select a license type, select dates, and export to a .csv file.
  3. The Update Licenses tab lets you check for renewals and download them.
  4. On the top right is a gear icon where you can set the historical retention period and configure SA license auto-renewal.

Jonathan Medd Monitor Citrix License Usage With PowerShell.

Lal Mohan – Citrix License Usage Monitoring Using Powershell

Jaroslaw Sobel – Monitoring Citrix Licenses usage – Graphs using WMI, Powershell and RRDtool. This script generates a graph similar to the following:

Remote Desktop Licensing Server

Install Remote Desktop Licensing Server

Do the following on your XenDesktop Controllers:

  1. In Server Manager, open the Manage menu, and click Add Roles and Features.
  2. In the Installation Type page, select Role-based or feature-based installation.
  3. Click Next until you get to the Server Roles page. Check the box next to Remote Desktop Services, and click Next.
  4. Click Next until you get to the Role Services page. Check the box next to Remote Desktop Licensing, and click Next.
  5. Click Add Features if prompted.
  6. Then finish the wizard to install the role service.

Activate Remote Desktop Licensing

  1. After RD Licensing is installed, in Server Manager, open the Tool menu, expand Terminal Services (or Remote Desktop Services), and click Remote Desktop Licensing Manager.
  2. The tool should find the local server. If it does not, right-click All servers, click Connect, and type in the name of the local server.
  3. Once the local server can be seen in the list, right-click the server and click Activate Server.
  4. In the Welcome to the Activate Server Wizard page, click Next.
  5. In the Connection Method page, click Next.
  6. In the Company Information page, enter the required information, and click Next.
  7. All of the fields on the Company Information page are optional, so you do not have to enter anything. Click Next.
  8. In the Completing the Activate Server Wizard page, uncheck the box next to Start Install Licenses Wizard now, and click Finish. Since the session hosts will be configured to pull Per User licenses, there is no need to install licenses on the RD Licensing Server.
  9. In RD Licensing Manager, right-click the server, and click Review Configuration.
  10. Ensure you have green check marks. If the person installing Remote Desktop Licensing does not have permissions to add the server to the Terminal Server License Servers group in Active Directory, ask a domain admin to do it manually. If you have the proper permissions, click Add to Group.
  11. Click Continue when prompted that you must have Domain Admins privileges.
  12. Click OK when prompted that the computer account has been added.
  13. Click OK to close the window.

Smart Check

Citrix Cloud offers a Smart Check service that can scan your XenApp/XenDesktop infrastructure for known issues. Soon Smart Check will require Citrix Customer Success Services (Select).

To run Smart Check:

  1. Go to https://citrix.cloud.com, and login.
  2. After logging in, find Smart Tools, and click Manage.
  3. Click Smart Check.
  4. If you enabled Smart Tools during the installation of XenDesktop 7.14, then the site should already be there. Click Complete Setup.
  5. If you didn’t enable Smart Check during XenDesktop installation, then on the top right, click Add Site.

    1. In step 1, click Download Agent.
    2. Step 2 indicates it is waiting for you to install the Agent.
    3. On a Delivery Controller, run the downloaded CitrixLifecycleManagementAgent.exe.
    4. Check the box next to I accept the terms in the License Agreement, and click  Install.
    5. In the Completed the Citrix Smart Tools Agent Setup Wizard page, click Finish.
    6. Step 2 now shows that the Agent was installed successfully. Click Next.
  6. Enter credentials for your XenDesktop farm, and click Add Site.
  7. Eventually you’ll see a Get Started link.
  8. Or, if the site is already added to your list of sites, click View Report next to the site.
  9. At the top right, if you click Perform Check, you can run one of the checks.
  10. If you click Configure.
  11. You can schedule the checks to automatically run periodically.
  12. To view the alerts, click one of the alert badges in the component category. Also see Smart Check alerts reference at Citrix Docs.
  13. Expand a component, and click an alert.
  14. On the right, there’s an option to Hide Alert.

  15. To view the hidden alerts, at the top right, click the menu icon, and click Show Hidden Alerts.
  16. The hidden alert is grayed out. If you click the alert, you can restore it.

Citrix Scout

XenDesktop 7.14 includes a new Citrix Scout that can be launched from the Start Menu.

The tool can run a manual collection, run a trace, or schedule periodic collection. The results are uploaded to Citrix Smart Tools.


Links with more information:

XenApp/XenDesktop Health Check

Sacha Tomet Finally 1.0 – but never finalized!: XenApp & XenDesktop 7.x Health Check script has now Version 1.0.

Andrew Morgan – New Free Tool: Citrix Director Notification Service: The Citrix Director Notification service sits on an edge server as a service (or local to the delivery controller) and periodically checks the health of:

  • Citrix Licensing.
  • Database Connections.
  • Broker Service.
  • Core Services.
  • Hypervisor Connections.

And if any of these items fall out of bounds, an SMTP alert is sent to the mailbox of your choice for action. The tool will also send “All Clear” emails when these items are resolved, ensuring you are aware when the service has resumed a healthy state.

Matt Bodholdt XenDesktop 7.x Controller Service Status Script at CUGC – PowerShell script that checks the following:

  • Lists Controllers with boot time
  • Licensing status
  • Service status on each Controller
  • DB Connections
  • Controller Available Memory
  • Hypervisor Connections Status

Related Pages
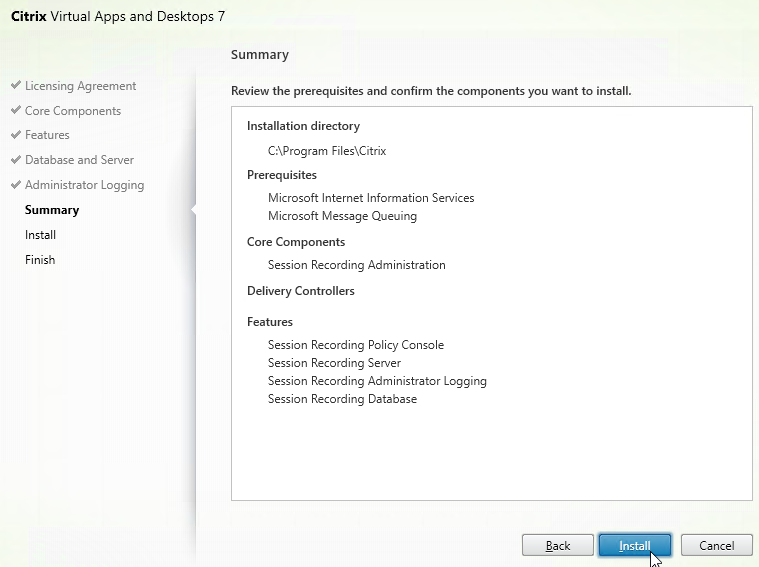
EUC Weekly Digest – May 13, 2017

Last Modified: Nov 7, 2020 @ 6:34 am

Here are some EUC items I found interesting last week. For more immediate updates, follow me at http://twitter.com/cstalhood.


For a list of updates at carlstalhood.com, see the Detailed Change Log.
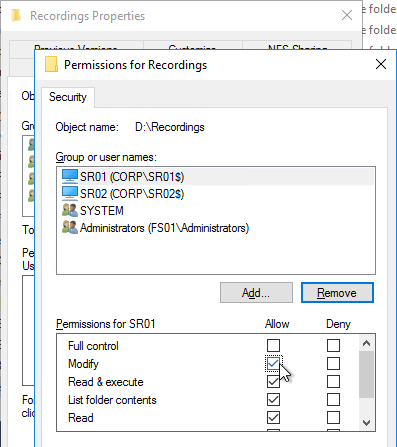
XenApp/XenDesktop VDA

StoreFront

Receiver

NetScaler

NetScaler MAS

NetScaler Gateway

XenMobile

ShareFile