Navigation
- Change Log
- Overview
- PowerShell Deploy Script Method – both upgrade and new
- vSphere Client Deploy OVF method – Upgrade Existing, or Deploy New
- Web-based Admin Interface
- Add UAG to Horizon Console
- Monitor Sessions
- Logs and Troubleshooting
- Load Balancing
- UAG Authentication – SAML, RADIUS
- Other UAG Configurations – High Availability, Network Settings, System Settings
💡 = Recently Updated
Change Log
- 2025 July 29 – updated Import OVF section for UAG 2503
- 2024 Jan 31 – SHA-1 thumbprint no longer supported. Replace with SHA-256 thumbprint (fingerprint).
- 2021 Sep 30 – Horizon Edge configuration – added instructions to disable CORS to fix HTML Access in Horizon 2106 and newer.
Overview
Unified Access Gateway provides remote connectivity to internal Horizon Agent machines. For an explanation of how this works (i.e., traffic flow), see Understand and Troubleshoot Horizon Connections at Omnissa Tech Zone.
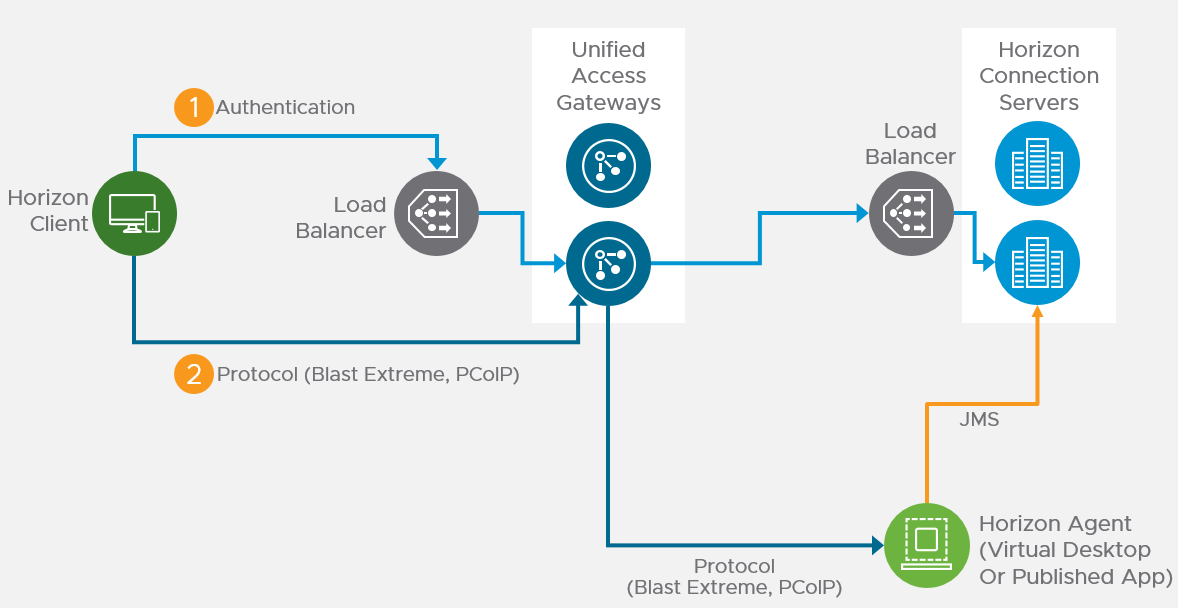
Unified Access Gateway (formerly known as Access Point) is a replacement for Horizon Security Servers. Advantages include:
- You don’t need to build extra Connection Servers just for pairing. However, you might want extra Horizon Connection Servers so you can filter pools based on tags.
- Between Unified Access Gateway and Horizon Connection Servers you only need TCP 443. No need for IPSec or 4001 or the other ports. You still need 4172, 22443, etc. to the View Agents.
- No need to enable Gateway/Tunnel on the internal Horizon Connection Servers.
- Additional security with DMZ authentication. Some of the Authentication methods supported on Unified Access Gateway are RSA SecurID, RADIUS, CAC/certificates, etc.
However:
- It’s Linux. You can deploy and configure the appliance without any Linux skills. But you might need some Linux skills during troubleshooting.
Horizon View Security Server has been removed from Horizon 2006 (aka Horizon 8).
- Some of the newer Blast Extreme functionality only works in Unified Access Gateway. See Configure the Blast Secure Gateway at Omnissa Docs.
More information at VMware Blog Post Technical Introduction to VMware Unified Access Gateway for Horizon Secure Remote Access.
Horizon Compatibility – Refer to the interoperability matrix to determine which version of Unified Access Gateway is compatible with your version of Horizon.
- The latest version of UAG is 2503.
- You usually want the Non-FIPS version.

- Then download the PowerShell deployment scripts on the same UAG download page.

- You usually want the Non-FIPS version.
Firewall
Omnissa Tech Zone Omnissa Horizon Blast Extreme Display Protocol, and Firewall Rules for DMZ-Based Unified Access Gateway Appliances at Omnissa Docs.

Open these ports from any device on the Internet to the Unified Access Gateway Load Balancer VIP:
- TCP and UDP 443
- TCP and UDP 4172. UDP 4172 must be opened in both directions. (PCoIP)
- TCP and UDP 8443 (for HTML Blast)
Open these ports from the Unified Access Gateways to internal:
- TCP 443 to internal Connection Servers (through a load balancer)
- TCP and UDP 4172 (PCoIP) to all internal Horizon View Agents. UDP 4172 must be opened in both directions.
- TCP 32111 (USB Redirection) to all internal Horizon View Agents.
- TCP and UDP 22443 (Blast Extreme) to all internal Horizon View Agents.
- TCP 9427 (MMR and CDR) to all internal Horizon View Agents.
Open these ports from any internal administrator workstations to the Unified Access Gateway appliance IPs:
- TCP 9443 (REST API)
- TCP 80/443 (Edge Gateway)
PowerShell Deploy Script
Omnissa Docs Using PowerShell to Deploy VMware Unified Access Gateway. The script runs OVF Tool to deploy and configure Unified Access Gateway. The PowerShell script is updated as newer versions of Unified Access Gateways are released. This is the recommended method of deploying Unified Access Gateway.
If you prefer to use vSphere Client to Deploy the OVF file, skip ahead to Upgrade or Deploy.
The PowerShell deployment script is downloadable from the UAG download page.

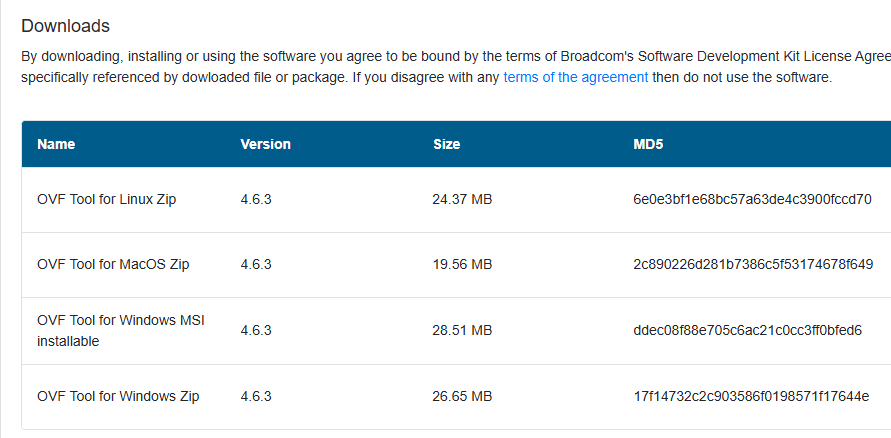
The PowerShell deploy script requires the OVF Tool:
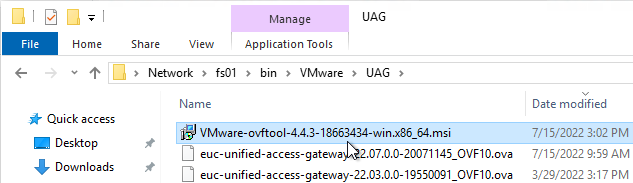
- Download ovftool from Broadcom.
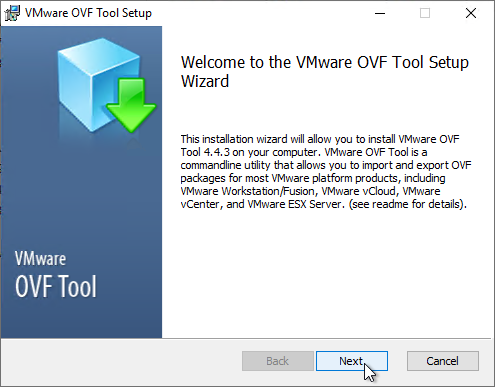
- On the machine where you will run the UAG Deploy script, install VMware-ovftool-…-win.x86_64.msi.
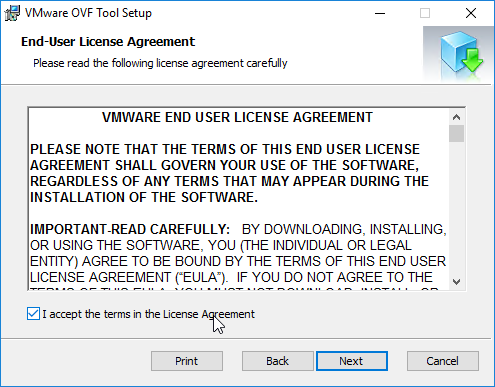
- In the Welcome to the VMware OVF Tool Setup Wizard page, click Next.
- In the End-User License Agreement page, check the box next to I accept the terms and click Next.
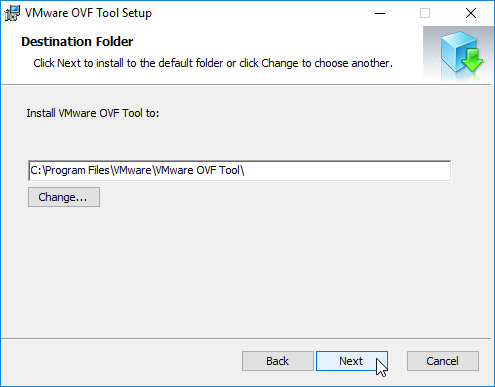
- In the Destination Folder page, click Next.
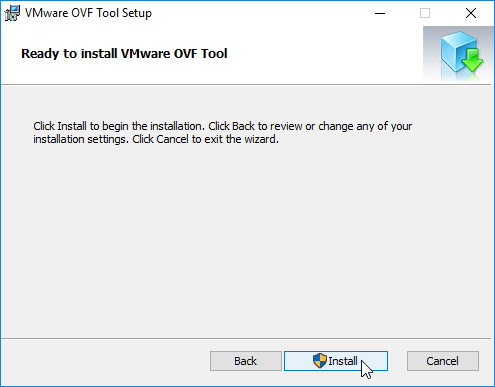
- In the Ready to install VMware OVF Tool page, click Install.
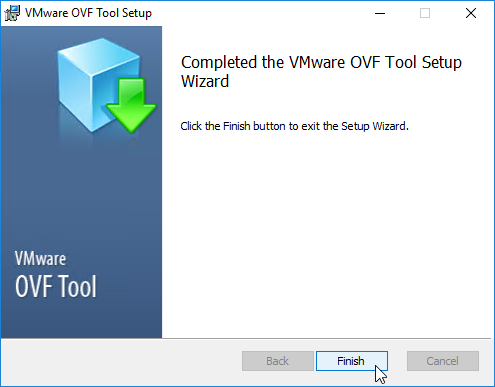
- In the Completed the VMware OVF Tool Setup Wizard page, click Finish.
Create or Edit a UAG .ini configuration file:
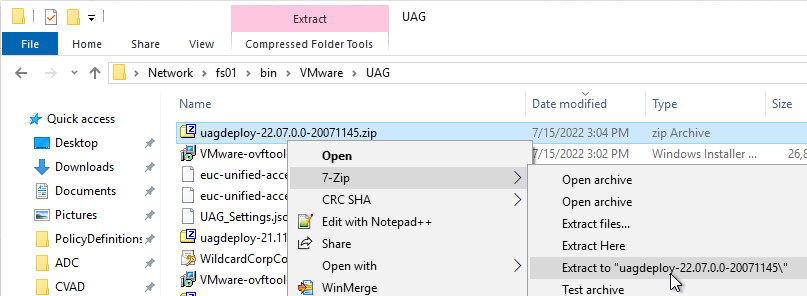
- Extract the downloaded uagdeploy PowerShell scripts for your version of Unified Access Gateway.
- If you have an existing UAG appliance, then you can download an INI of the configuration from the UAG Administrator page.
- Or copy and edit one of the downloaded .ini files, like uag2-advanced.ini.
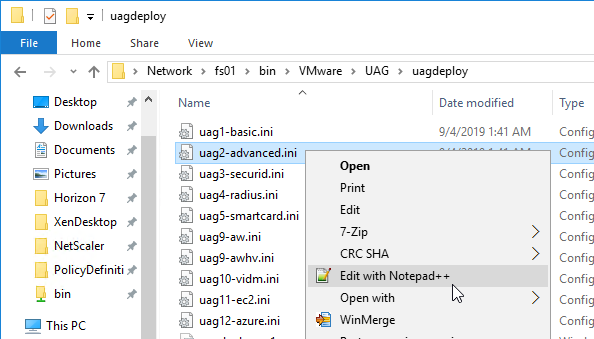
- Or copy and edit one of the downloaded .ini files, like uag2-advanced.ini.
- A full explanation of all configuration settings can be found at Using PowerShell to Deploy Unified Access Gateway at Omnissa Docs.
- For any value that has spaces, do not include quotes in the .ini file. The script adds the quotes automatically.
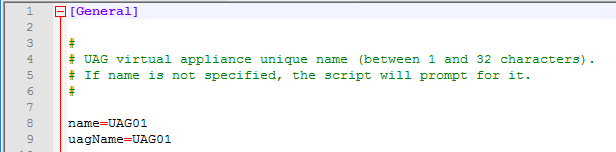
- The name setting specifies the name of the virtual machine in vCenter. If this VM name already exists in vCenter, then OVF Tool will delete the existing VM and replace it.
- Add a uagName setting and specify a friendly name. You’ll later add this name to Horizon Console so you can view the health of the UAG appliance in Horizon Console.
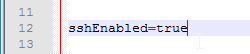
- You can optionally enable SSH on the appliance by adding sshEnabled=true.
- For the source setting, enter the full path to the UAG .ova file.

- For the target setting, leave PASSWORD in upper case. Don’t enter an actual password. OVF Tool will instead prompt you for the password.
- For the target setting, specify a cluster name instead of a host. If spaces, there’s no need for quotes. For example:
target=vi://admin@corp.local:PASSWORD@vcenter02.corp.local/Datacenter/host/Cluster 1
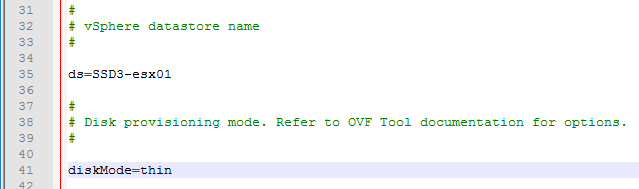
- Specify the exact datastore name for the UAG appliance.
- Optionally uncomment the diskMode setting.
- For a onenic configuration (recommended), set the netInternet, netManagementNetwork, and netBackendNetwork settings to the same port group name.
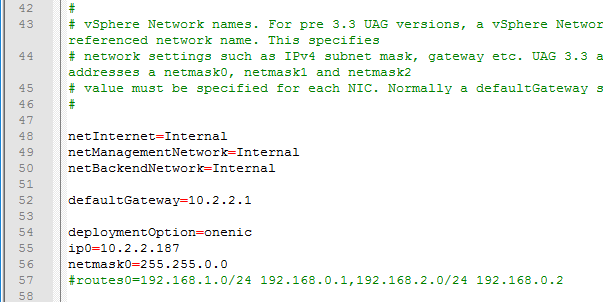
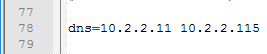
- Multiple dns servers are space delimited.
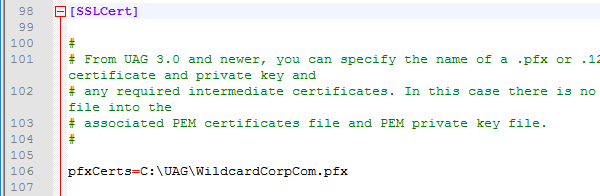
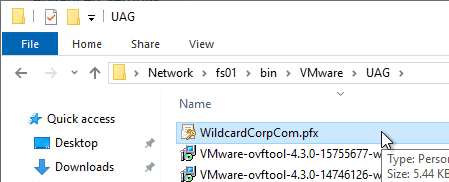
- For pfxCerts, UNC paths don’t work. Make sure you enter a local path (e.g. C:\). OVA Source File can be UNC, but the .pfx file must be local.
- There’s no need to enter the .pfx password in the .ini file since the uagdeploy.ps1 script will prompt you for the password.
- proxyDestinationUrl should point to the internal load balancer for the Horizon Connection Servers.

- For proxyDestinationUrlThumbprints, paste in the sha256 or higher thumbprint of the Horizon Connection Server certificate in the format shown.
- If your Horizon Connection Servers each have different certificates, then you can include multiple thumbprints (comma separated).
- Make sure there’s no hidden character between sha256 and the beginning of the thumbprint. Or you can just paste the thumbprint without specifying sha256. Note: sha1 is no longer supported. Edge and Chrome can show sha256 certificate fingerprint.

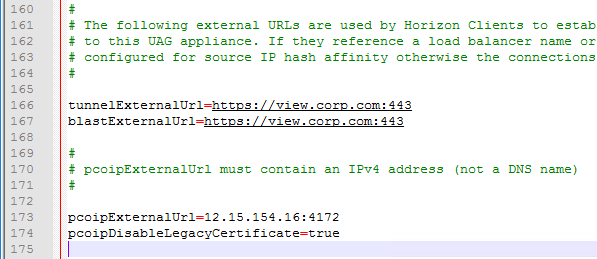
- Change the ExternalUrl entries to an externally-resolvable DNS name and a public IP address. For multiple UAGs, the FQDNs and public IP address should resolve to the load balancer. Note: your load balancer must support persistence across multiple port numbers (443, 8443, 4172).
When you run the PowerShell script, if the UAG appliance already exists, then the PowerShell script will replace the existing appliance. There’s no need to power off the old appliance since the OVF tool will do that for you.
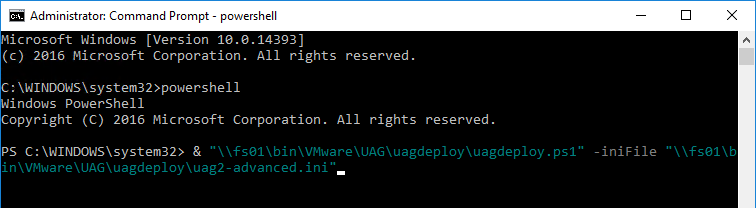
- Open an elevated PowerShell prompt.
- Paste in the path to the uagdeploy.ps1 file. If there are quotes around the path, then add a & to the beginning of the line so PowerShell executes the path instead of just echoing the string.
- Add the -iniFile argument and enter the path to the .ini file that you modified. Press <Enter> to run the script.
- You’ll be prompted to enter the root password for the UAG appliance. Make sure the password meets password complexity requirements.

- You’ll be prompted to enter the admin password for the UAG appliance. Make sure the password meets password complexity requirements.
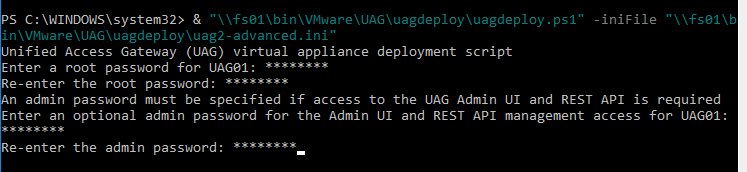
- For CEIP, enter yes or no.

- For .pfx files, you’ll be prompted to enter the password for the .pfx file. Note: the .pfx file must be local, not UNC.

- OVF Tool will prompt you for the vCenter password. Special characters in the vCenter password must be encoded. Use a URL encoder tool (e.g., https://www.urlencoder.org/) to encode the password. Then paste the encoded password when prompted by the ovftool. The UAG passwords do not need encoding, but the vCenter password does.

- The deploy script will display the IP address of the powered on UAG appliance.

- Review settings in the UAG admin interface.
- Add the new UAG appliance to Horizon Console.
Upgrade
To upgrade from an older appliance, you delete the old appliance and import the new one. Before deleting the older appliance, export your settings:
- Login to the UAG at https://<Your_UAG_IP>:9443/admin/index.html.
- In the Configure Manually section, click Select.
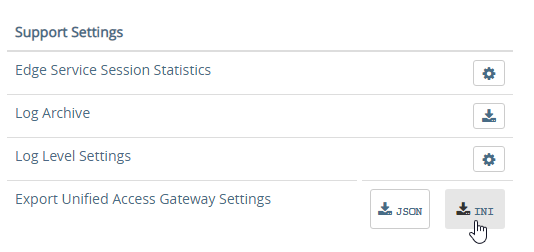
- Scroll down to the Support Settings section, and then click the JSON button next to Export Unified Access Gateway Settings.
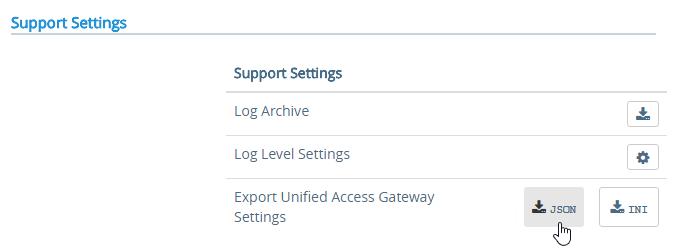
- Note: the exported JSON file does not include the UAG certificate, so you’ll also need the .pfx file. If RADIUS is configured, then during import you’ll be prompted to enter the RADIUS secret.

Deploy New
Horizon Compatibility – Refer to the interoperability matrix to determine which version of Unified Access Gateway is compatible with your version of Horizon.
- The latest version of UAG is 2503.
- You usually want the Non-FIPS version.

- You usually want the Non-FIPS version.
To deploy the Unified Access Gateway using VMware vSphere Client:
- If vSphere Client, right-click a cluster, and click Deploy OVF Template.
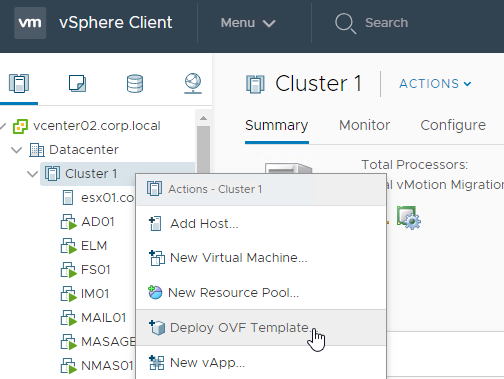
- Select Local File and click Upload Files. In the Open window, browse to the downloaded euc-unified-access-gateway.ova file, and click Next.

- In the Select a name and folder page, give the machine a name, and click Next.

- In the Review Details page, click Next.

- In the Select configuration page, select a Deployment Configuration. See Network Segments at Unified Access Gateway Architecture at Omnissa Tech Zone. Click Next.

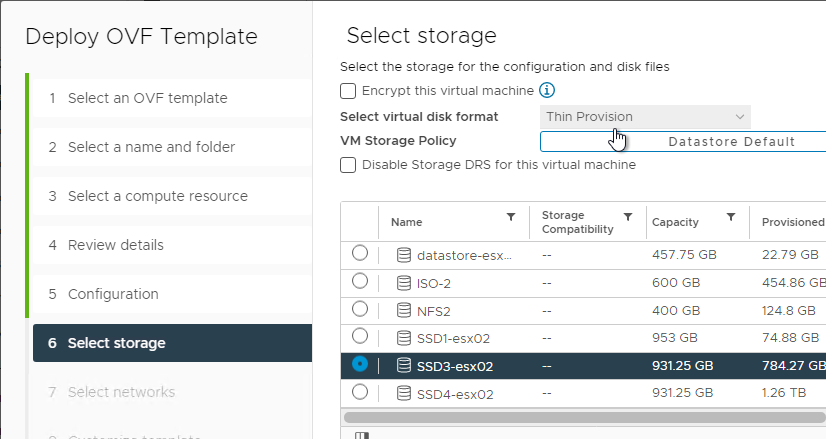
- In the Select storage page, select a datastore, select a disk format, and click Next.
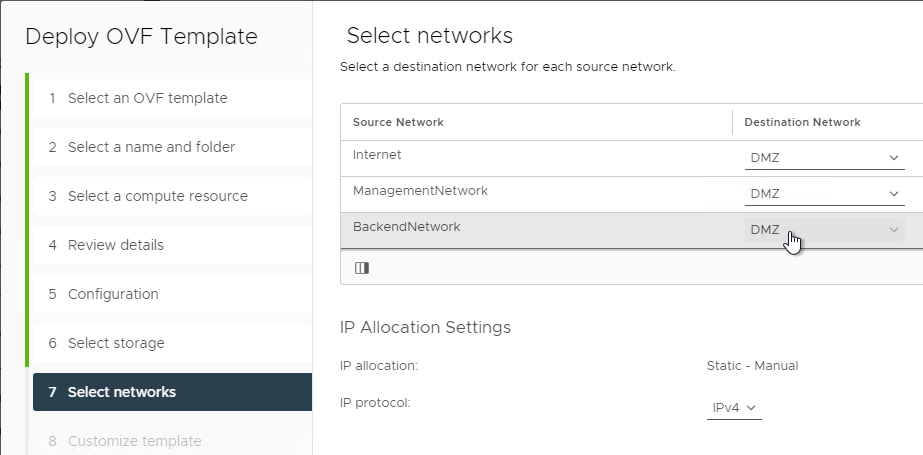
- In the Select networks page, even if you select Single NIC, the OVF deployment wizard asks you for multiple NICs. UAG typically goes in the DMZ.
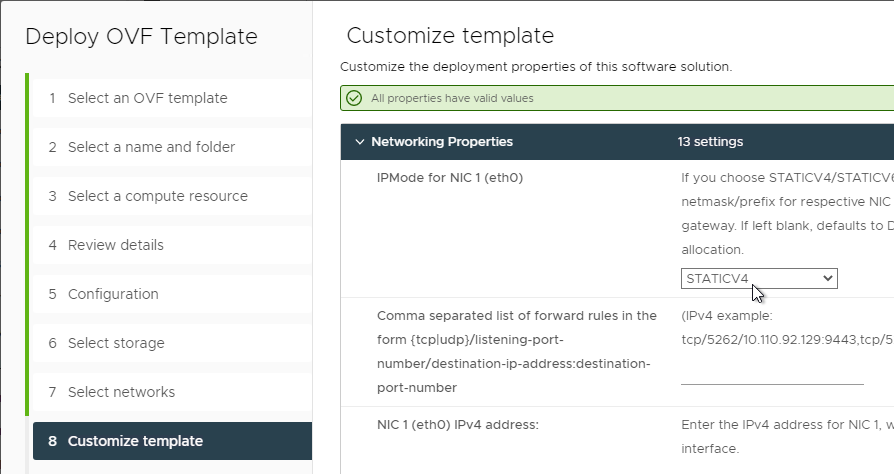
- In the Customize template page, select STATICV4, and scroll down.
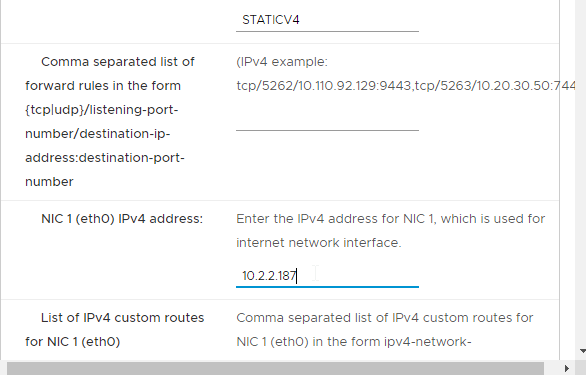
- In the NIC1 (eth0) IPv4 address field, enter the NIC1 (eth0) IPv4 address. Scroll down.
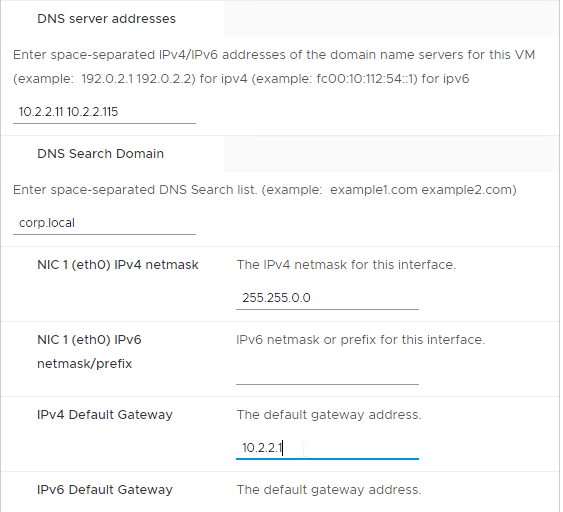
- Enter DNS addresses, Gateway, and Subnet Mask. Scroll down.
- Scroll down and enter more IP info.
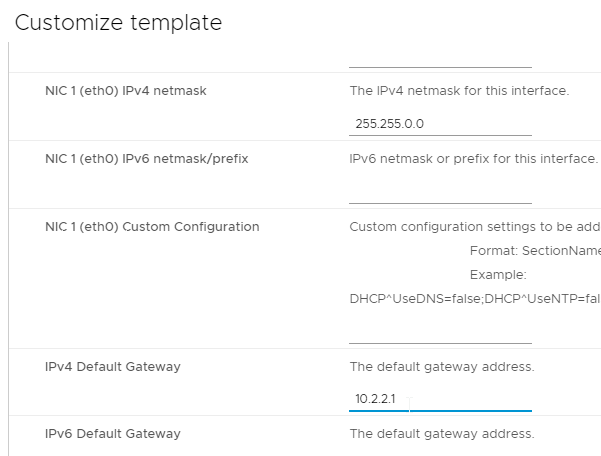
- Scroll down.
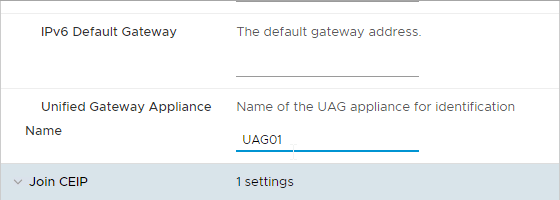
- Enter a Unified Gateway Appliance Name.
- Scroll down.
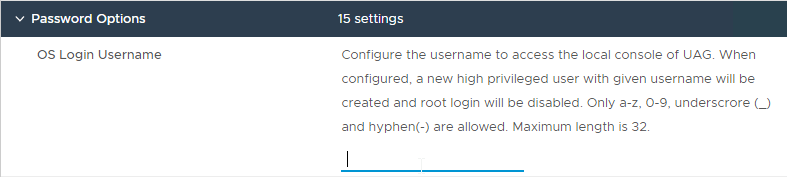
- UAG 2207 and newer let you specify the local root username.
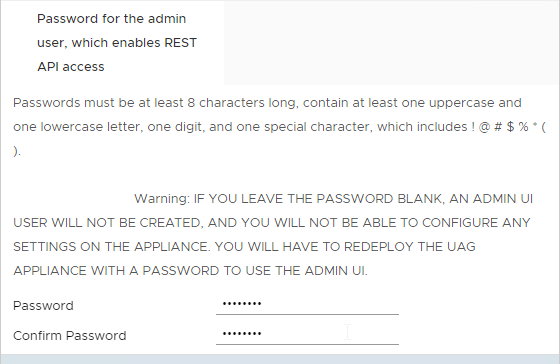
- Enter passwords.

- UAG 20.12 (2012) and newer let you specify Password Policy settings when deploying the OVF.
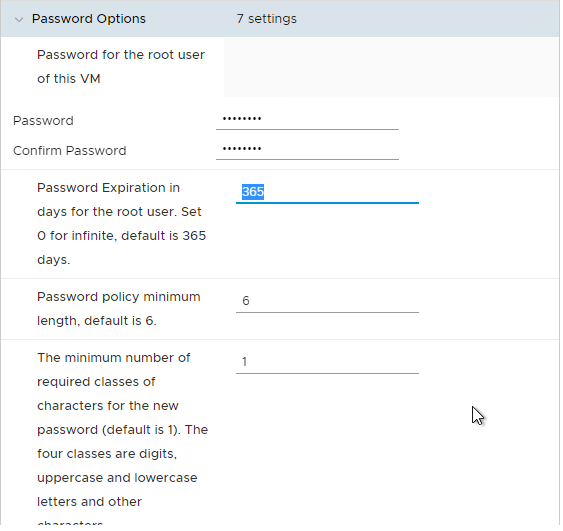
- UAG 20.12 (2012) and newer let you specify Password Policy settings when deploying the OVF.
- Scroll down and enter the password for the admin user.
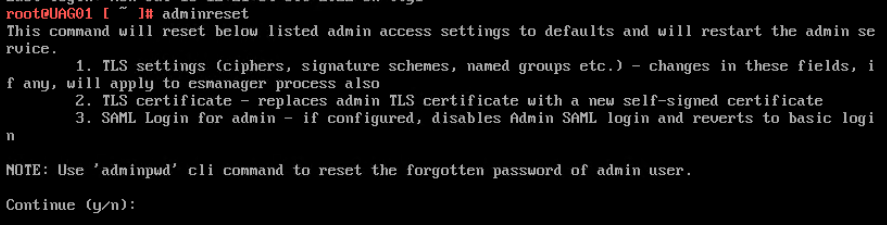
- UAG 2207 and newer have an adminreset command if you mess up the admin interface login. There’s also an adminpwd command to reset the password.
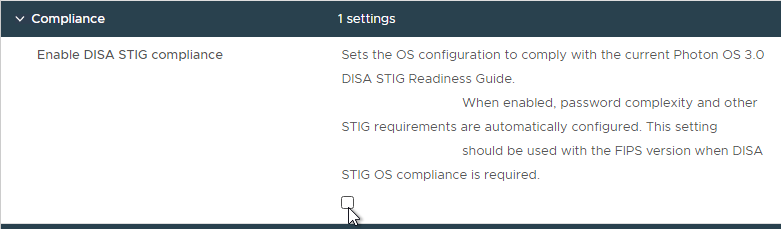
- UAG 2207 and newer have an option to enable DISA STIG compliance, usually on the FIPS version of UAG.
- There’s a checkbox for Enable SSH.
- In UAG 3.9 and newer, there’s an option to login using a SSH key/pair instead of a password.
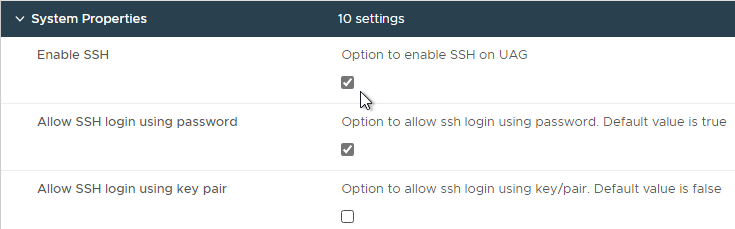
- Newer versions of UAG have more SSH options.
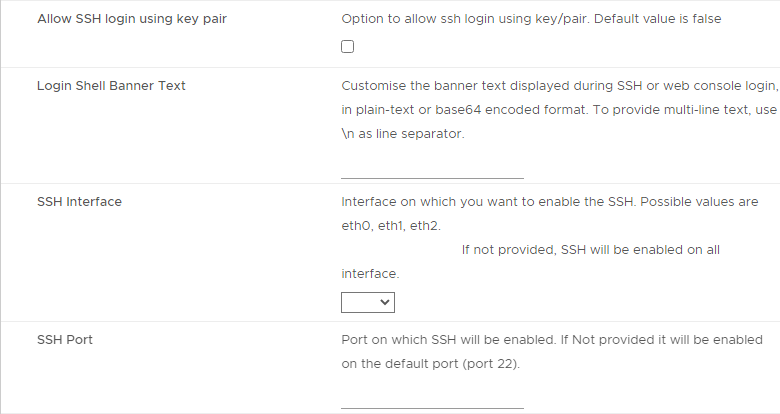
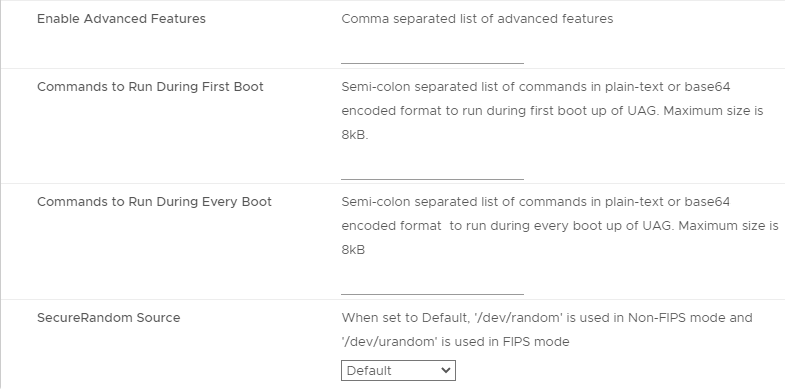
- UAG 2207 adds Commands to Run on First Boot or Every Boot.
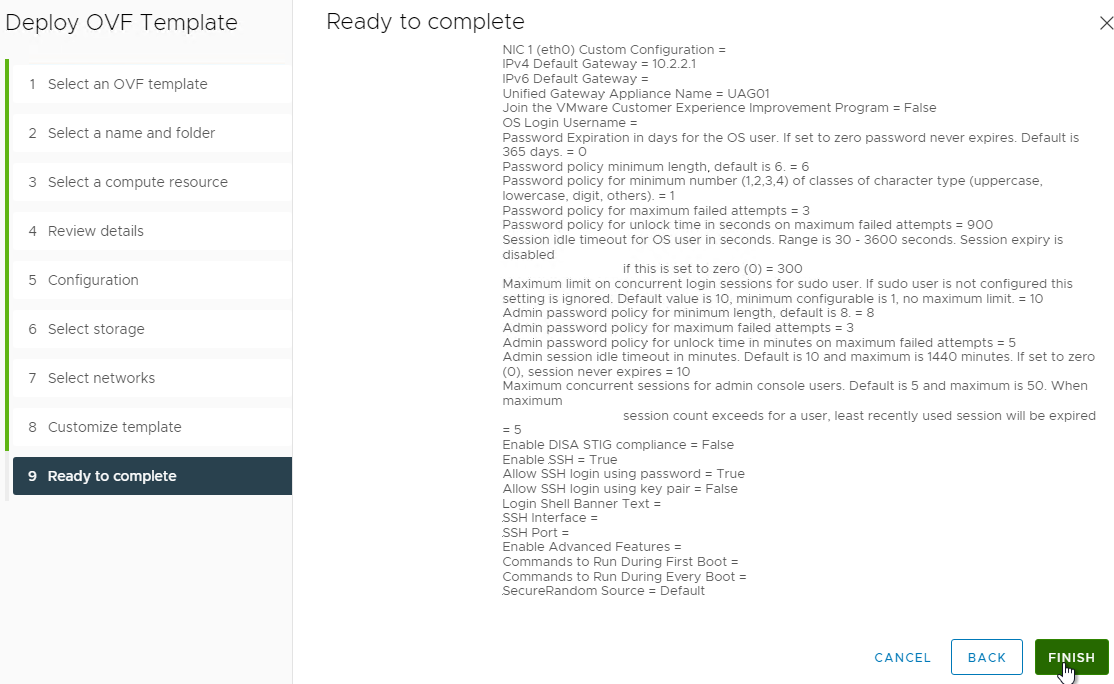
- Click Next.
- In the Ready to complete page, click Finish.
UAG Admin Interface
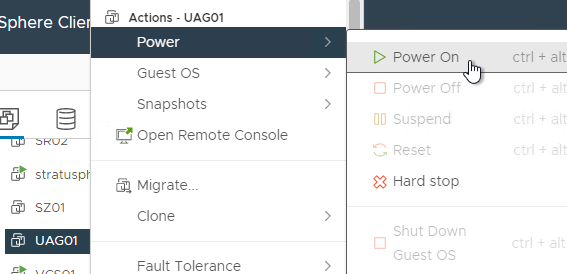
- Power on the Unified Access Gateway appliance.
- Point your browser to https://My_UAG_IP:9443/admin/index.html and login as admin. It might take a few minutes before the admin page is accessible.

- UAG 2207 and newer have an adminreset command if you mess up the admin interface login. There’s also an adminpwd command to reset the password.
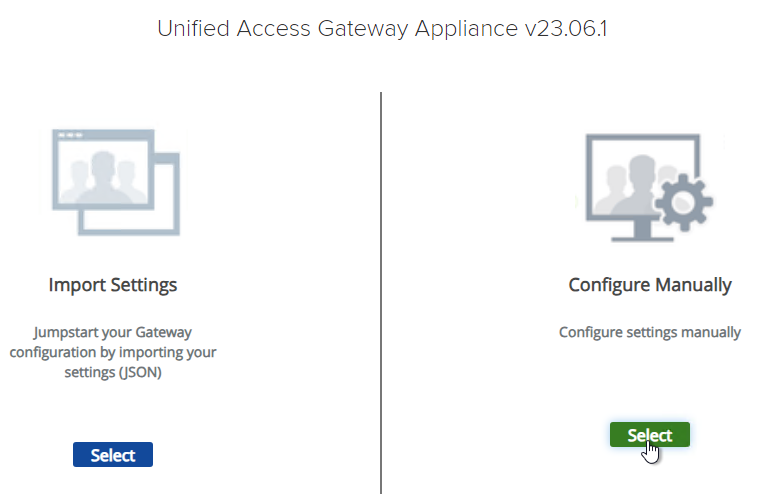
Import Settings
- If you have previously exported settings, you can import it now by clicking Select in the Import Settings section.

- Browse to the previously exported UAG_Settings.json file and then click Import. Note that this json file might have old settings, like old ciphers. Review the file to ensure you’re not importing legacy configurations. If the .json file has a SHA-1 thumbprint, then edit the file and replace it with SHA-256 thumbprint (fingerprint).
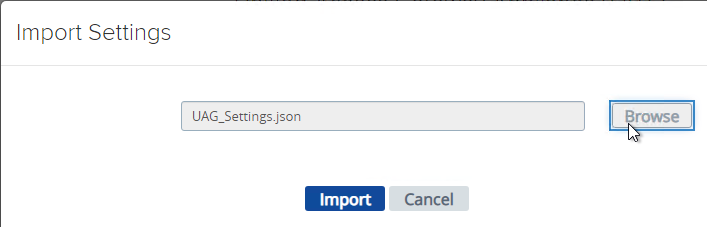
- It should say UAG settings imported successfully. If you don’t see this, then your .json file probably has a SHA-1 thumbprint.
- Press <F5> on your keyboard to refresh the browser.
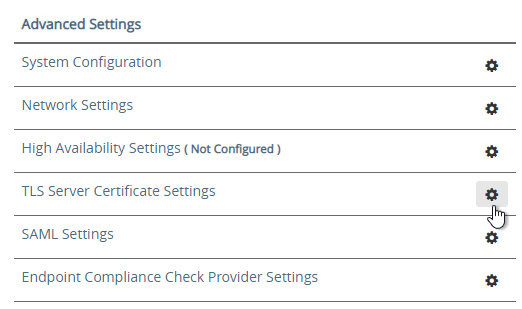
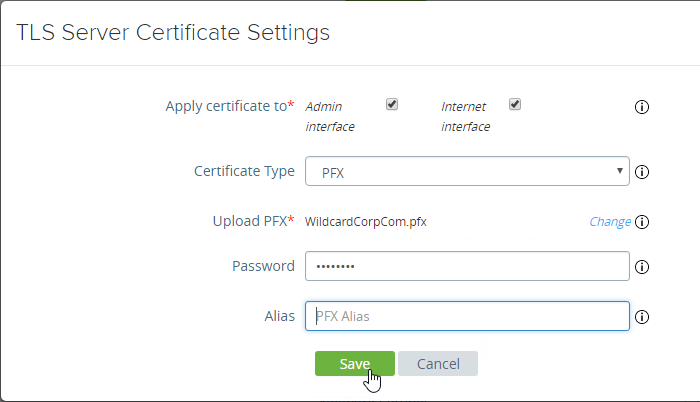
- The .json file does not include the certificate so you’ll have to do that separately. In the Admin console, in the Advanced Settings section, click TLS Server Certificate Settings.
- Check the box next to Internet Interface. Optionally uncheck the box next to Admin Interface.
- Change the drop-down for Certificate Type to PFX.
- In the row Upload PFX, click Select and browse to your PFX file.

- In the Password field, enter the PFX password and then click Save.

Configure Horizon Settings
- To manually configure the appliance, under Configure Manually, click Select.

- Click the slider for Edge Service Settings.

- Click the gear icon for Horizon Settings.

- Click the slider for Enable Horizon.

- As you fill in these fields, hover over the information icon to see the syntax.
- The Connection Server URL should point to the internal load balanced DNS name (URL) for your internal Connection Servers.

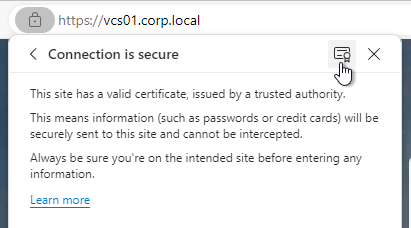
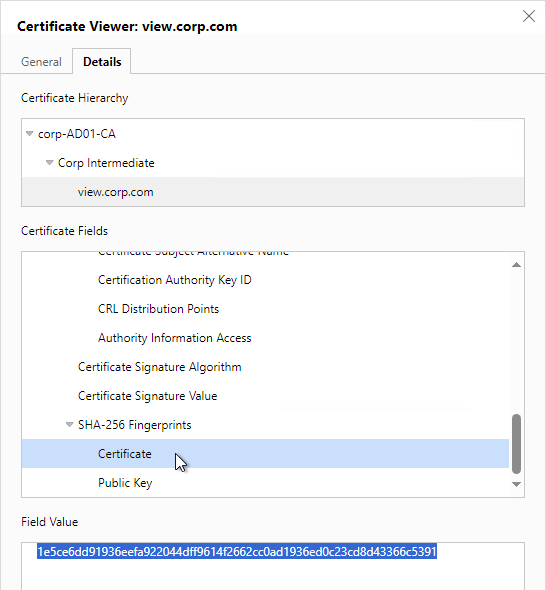
- For the Connection Server URL Thumbprint, get the thumbprint from the internal Horizon certificate. Point your browser to the internal Horizon Connection Server FQDN (load balanced) and click the padlock icon to open the certificate.
- On the Details tab, copy the SHA-256 Fingerprint. Note that SHA-1 thumbprint is no longer supported.
- For the Connection Server URL Thumbprint, get the thumbprint from the internal Horizon certificate. Point your browser to the internal Horizon Connection Server FQDN (load balanced) and click the padlock icon to open the certificate.
- In the Proxy Destination URL Thumb Prints field, type in
sha256=and paste the certificate thumbprint. - At the beginning of the Thumbprint field, immediately after the equals sign, there might be a hidden character. Press the arrow keys on the keyboard to find it. Then delete the hidden character.

- Enable the three PCOIP, Blast, and Tunnel Gateways and perform the following configurations:
- For PCOIP External URL, enter the external IP and
:4172. The IP should point to your external load balancer that’s load balancing UDP 4172 and TCP 4172 to multiple Unified Access Gateways. - For Blast External URL, enter https://<FQDN>:8443 (e.g. https://view.corp.com:8443). This FQDN should resolve to your external load balancer that’s load balancing UDP 8443 and TCP 8443 to multiple Unified Access Gateways.
- You could change the Blast port to 443 but this would increase CPU utilization on UAG. See Omnissa 78419 Unified Access Gateway (UAG) high CPU utilization.
- Link: Troubleshooting Blast at Omnissa Discussions
- For Enable UDP Tunnel Server, enable the setting.
- For Tunnel External URL, enter https://<FQDN>:443 (e.g., https://view.corp.com:443). This FQDN should resolve to your external load balancer that’s load balancing TCP 443 to multiple Unified Access Gateways.
- The external load balancer must be capable of using the same persistence across multiple port numbers. On NetScaler, this feature is called Persistency Group. On F5, the feature is called Match Across.
- For PCOIP External URL, enter the external IP and
- Then click More.

- Unified Access Gateway has a default list of paths it will forward to the Horizon Connection Server. You can edit the Proxy Pattern and add
|/downloads(.*)to the list so that users can also download Horizon Clients that are stored on your Horizon Connection Servers as detailed elsewhere at carlstalhood.com. Make sure you click Save at least once so it saves the default Proxy Pattern. Then go back in and add|/downloads(.*)to the end of the Proxy Pattern but inside the last parentheses. In UAG 2406, the default Proxy Pattern looks something like below:
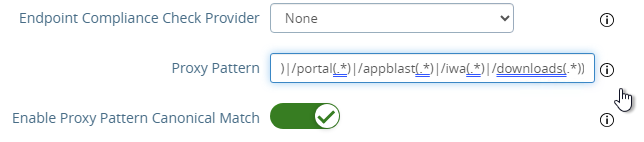
(/|/view-client(.*)|/portal(.*)|/appblast(.*)|/iwa(.*)|/downloads(.*))
- Scroll down and click Save when done.

- If you click the arrow next to Horizon Settings, then it shows you the status of the Edge services. It might take a minute or two to start working.

- In your Horizon Connection Servers, the Secure Gateways (e.g. PCoIP Gateway) should be disabled.
- Go to Horizon Console.
- Expand Settings and click Servers. On the right, switch to the tab named Connection Servers. Highlight your Connection Servers and click Edit.

- Then uncheck or disable all three Tunnels/Gateways.


- HTML Access probably won’t work through Unified Access Gateway. You’ll probably see the message Failed to connect to the Connection Server.
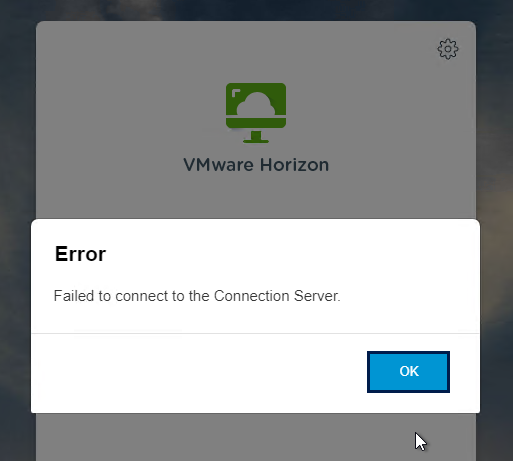
- To fix this, configure on each Connection Server the file C:\Program Files\Omnissa\Horizon\Server\sslgateway\conf\locked.properties (or C:\Program Files\VMware\VMware View\Server\sslgateway\conf\locked.properties) to disable Origin Check (checkOrigin=false) or configure the Connection Server’s locked.properties with the UAG addresses. Also see 2144768 Accessing the Horizon View Administrator page displays a blank error window in Horizon 7.
- Horizon 2106 and newer enable CORS by default so you’ll need to either disable CORS by adding enableCORS=false to C:\Program Files\Omnissa\Horizon\Server\sslgateway\conf\locked.properties (0r C:\Program Files\VMware\VMware View\Server\sslgateway\conf\locked.properties) or configure the portalHost entries in locked.properties as detailed at 85801 Cross-Origin Resource Sharing (CORS) with Horizon 8 and loadbalanced HTML5 access.

- After modifying the locked.properties file, restart the Omnissa Horizon Secure Gateway (or VMware Horizon View Security Gateway Component) service.

Add UAG to Horizon Console
In Horizon 7.7 and newer, you can add UAG 3.4 and newer to Horizon Console so you can check its status in the Dashboard.
- In UAG Admin console, under Advanced Settings, click the gear icon next to System Configuration.

- At the top of the page, change the UAG Name to a friendly name. You’ll use this case-sensitive name later.

- Click Save at the bottom of the page.

- In Horizon Administrator Console, on the left, expand Settings and click Servers. On the right, switch to the tab named Gateways. Click the Register button.

- In the Gateway Name field, enter the case-sensitive friendly name you specified earlier, and then click OK.

See status of UAG appliances:
- Use a Horizon Client to connect through a Unified Access Gateway. Horizon Console only detects the UAG status for active sessions.
- In Horizon Console 7.10 and newer, to see the status of the UAG appliances, on the top left, expand Monitor and click Dashboard.

- In the top-left block named System Health, click VIEW.

- With Components highlighted on the left, on the right, switch to the tab named Gateway Servers.
- This tab shows the status of the UAG appliances, including its version. If you don’t see this info, then make sure you launch a session through the UAG.

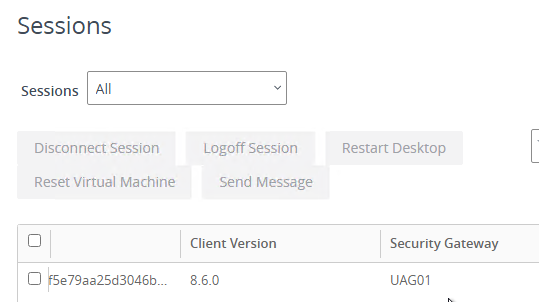
To see the Gateway that users are connected to:
- In Horizon Console 7.10 or newer, go to Monitor > Sessions.

- Search for a session and notice the Security Gateway column. It might take a few minutes for it to fill in.
UAG Authentication
SAML is configured in UAG 3.8 and newer in the Identity Bridging Settings section.
- Upload Identity Provider Metadata.

- Then in UAG Admin > Edge Service Settings > Horizon Settings > More (bottom of page), you can set Auth Methods (near top of page) to SAML only, which requires True SSO implementation, or SAML and Passthrough, which requires two logins: one to IdP, and one to Horizon.

- For complete True SSO instructions, see https://www.carlstalhood.com/vmware-horizon-true-sso-uag-saml/.
- For Okta and True SSO, see Enabling SAML 2.0 Authentication for Horizon with Unified Access Gateway and Okta: VMware Horizon Operational Tutorial at Omnissa Tech Zone.
- For Azure MFA, see Sean Massey Integrating Microsoft Azure MFA with VMware Unified Access Gateway 3.8.
For RADIUS authentication:
- Enable the Authentication Settings section and configure the settings as appropriate for your requirements. See Configuring Authentication in DMZ at VMware Docs.

- When configuring RADIUS, if you click More, there’s a field for Login page passphrase hint.

- When configuring RADIUS, if you click More, there’s a field for Login page passphrase hint.
- Then in Edge Service Settings > Horizon Settings > More (bottom of page), you can set Auth Methods (near top of page) to RADIUS.
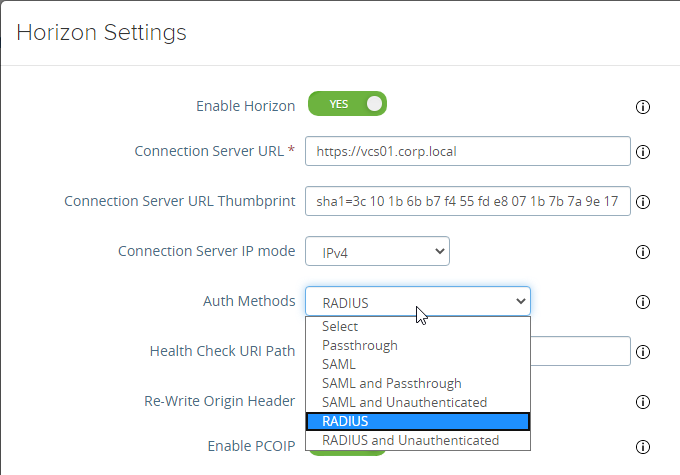
- If you scroll down the Horizon Settings page, you’ll see additional fields for RADIUS.
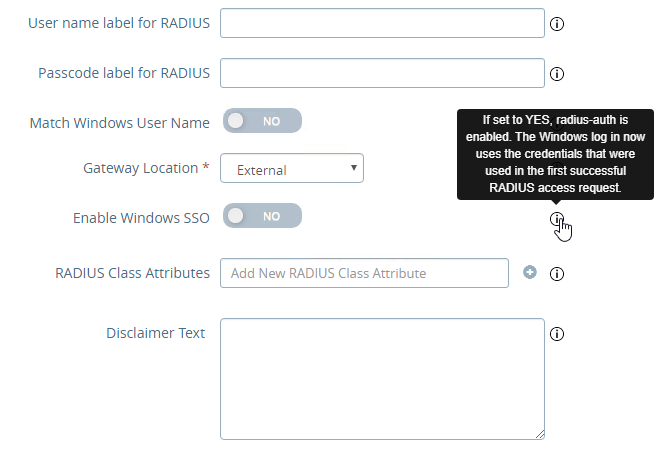
- In UAG 3.8 and newer, Passcode label field can be customized for MFA providers like Duo.
- If your RADIUS is doing Active Directory authentication (e.g. Microsoft Network Policy Server with Azure MFA), then Enable Windows SSO so the user isn’t prompted twice for the password.
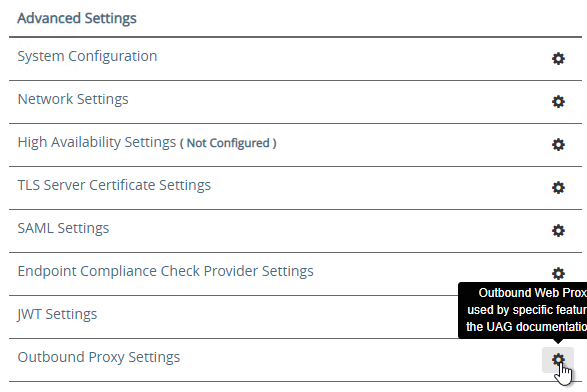
Other UAG Configurations
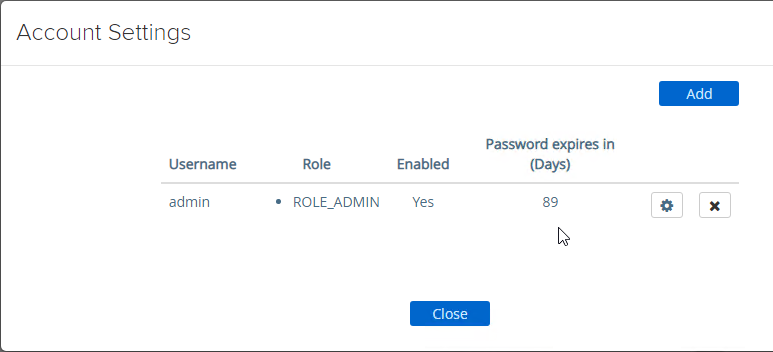
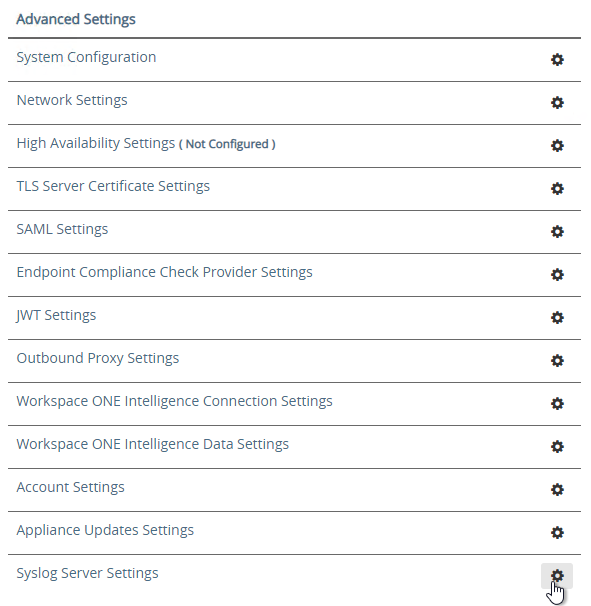
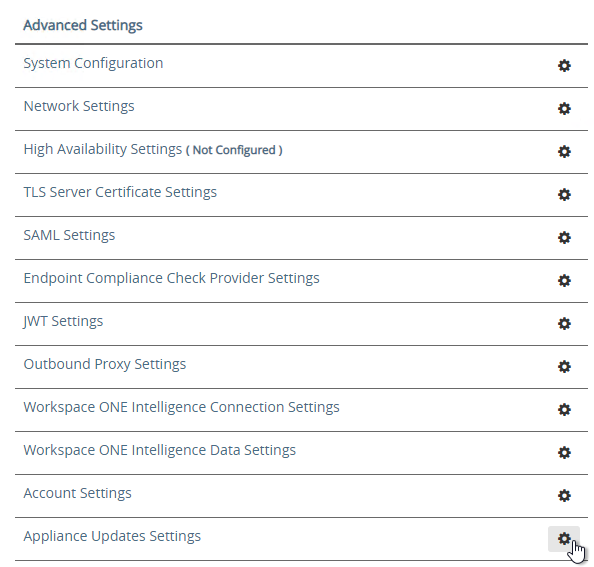
- UAG 3.8 and newer shows when the admin password expires in Account Settings in the Advanced Settings section.
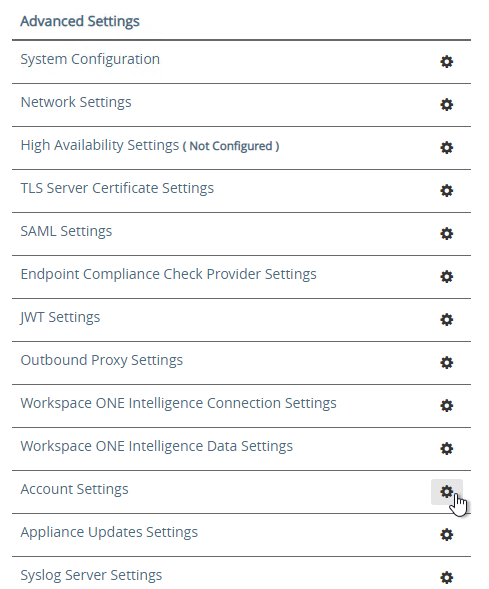
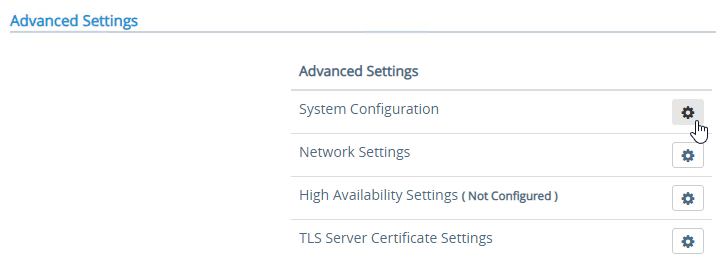
- Ciphers are configured under Advanced Settings > System Configuration.
- The default ciphers in UAG 2412 are the following and include support for TLS 1.3.
TLS_ECDHE_RSA_WITH_AES_128_GCM_SHA256,TLS_ECDHE_RSA_WITH_AES_256_GCM_SHA384,TLS_ECDHE_RSA_WITH_CHACHA20_POLY1305_SHA256,TLS_ECDHE_RSA_WITH_AES_256_CBC_SHA384,TLS_ECDHE_RSA_WITH_AES_128_CBC_SHA256,TLS_AES_128_GCM_SHA256,TLS_AES_256_GCM_SHA384,TLS_CHACHA20_POLY1305_SHA256

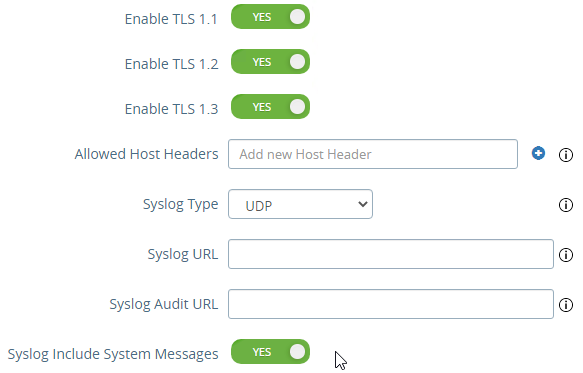
- In UAG older than 2103, Syslog is also configured here. In UAG 2103 and newer, Syslog is in a different menu as described below.
- At the bottom of the System Configuration page are several settings for SNMP, DNS, and NTP.
- UAG 20.12 (2012) and newer support SNMPv3.

- UAG 3.10 and newer have Admin Disclaimer Text.
- You can add NTP Servers.

- The default ciphers in UAG 2412 are the following and include support for TLS 1.3.
- Session Timeout is configured in System Configuration. It defaults to 10 hours.

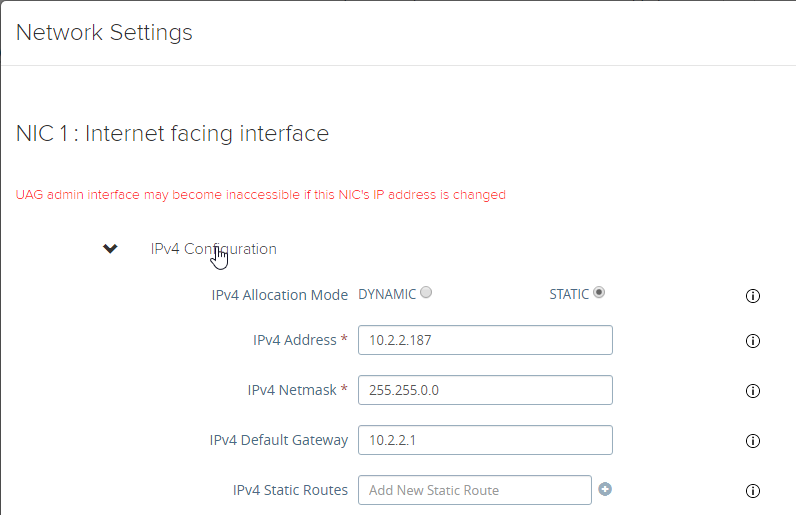
- UAG 3.6 and newer let you add static routes to each NIC.
- Click Network Settings.

- Click the gear icon next to a NIC.
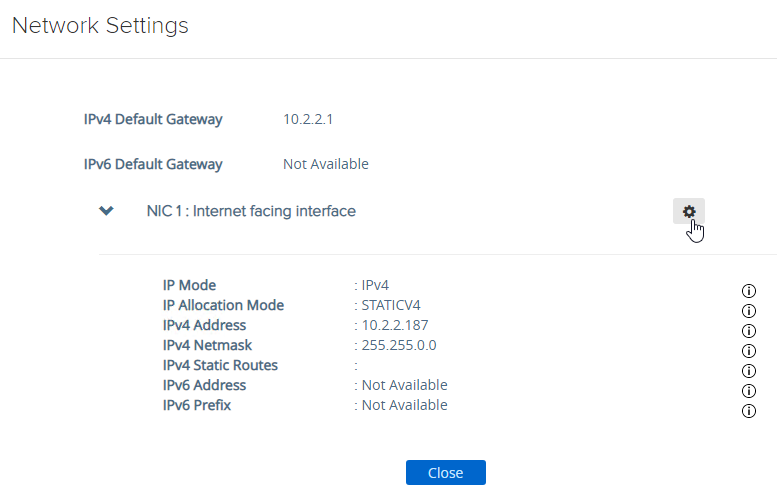
- Click IPv4 Configuration to expand it and then configure IPv4 Static Routes.
- Click Network Settings.
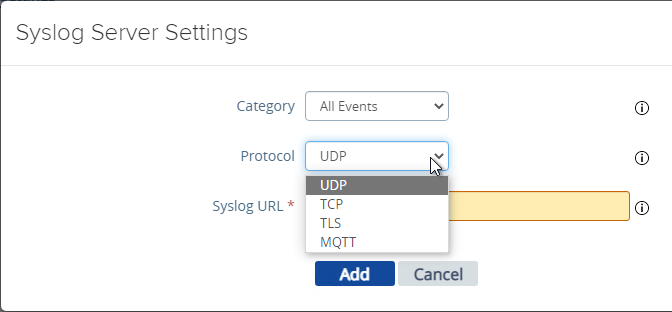
- UAG 2103 and newer have a different menu item for Syslog Server Settings.
- You can specify up to two Syslog servers.
- You can include System Messages.
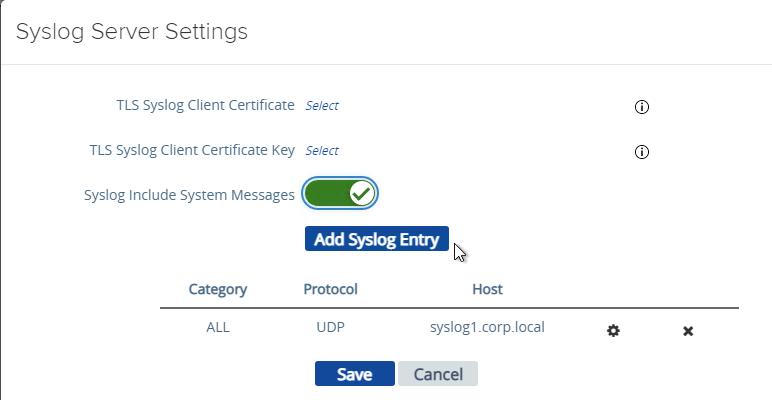
- UAG 2207 supports MQTT when adding Syslog servers.
- UAG 20.09 (2009) and newer can automatically install patches/updates when the appliance reboots.
- In the Advanced Settings section, click Appliance Updates Settings.
- For Apply Updates Scheme, select an option. Click Save.

- In the Advanced Settings section, click Appliance Updates Settings.
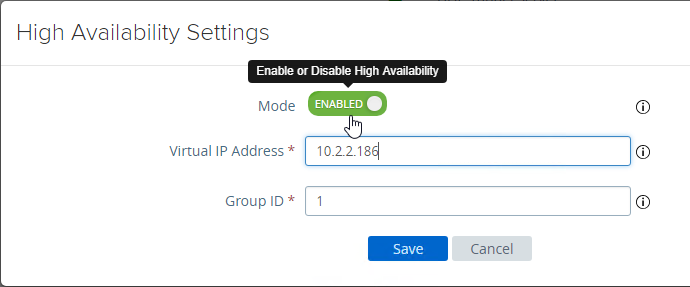
- UAG supports High Availability Settings.

- With the High Availability Virtual IP address, you might not need load balancing of the UAG appliances. See Unified Access Gateway High Availability at Omnissa Docs.
- The High Availability feature requires three IP addresses and three DNS names:
- One IP/FQDN for the High Availability Virtual IP.
- And one IP/FQDN for each appliance/node.
- The Horizon Edge Gateways should be set to node-specific IP addresses and node-specific DNS names. Each appliance is set to a different IP/FQDN.
- The Virtual IP (and its DNS name) is only used for the High Availability configuration.
- The YouTube video High Availability on VMware Unified Access Gateway Feature Walk-through explains the High Availability architecture.
- The High Availability feature requires three IP addresses and three DNS names:
- Set the Mode to ENABLED.
- Enter a new Virtual IP Address which is active on both appliances.
- Enter a unique Group ID between 1 and 255 for the subnet.
- Click Save.
- On the second appliance, configure the exact same High Availability Settings.
- With the High Availability Virtual IP address, you might not need load balancing of the UAG appliances. See Unified Access Gateway High Availability at Omnissa Docs.
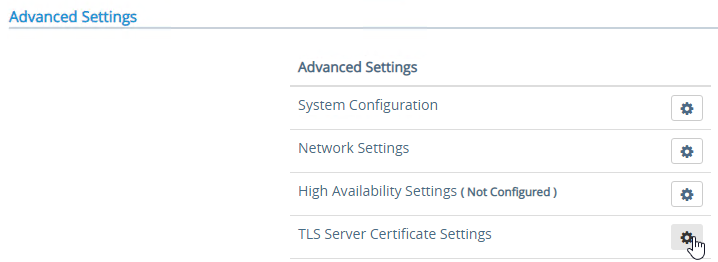
- To upload a valid certificate, scroll down to the Advanced Settings section, and next to TLS Server Certificate Settings, click the gear icon.
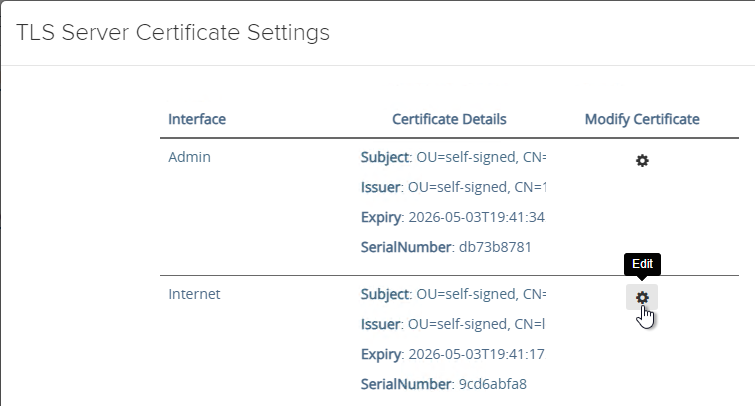
- In Unified Access Gateway 2312 and newer, click Edit in the Internet section.
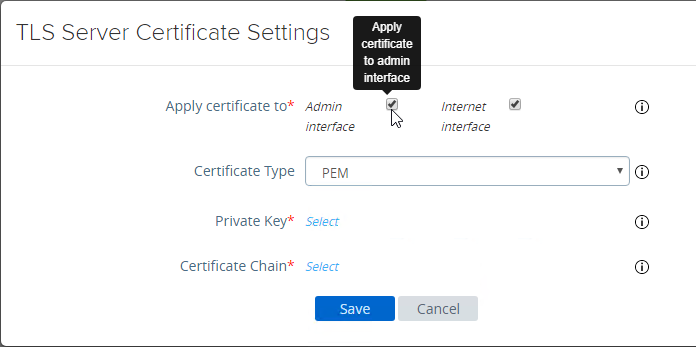
- In Unified Access Gateway 3.2 and newer, you can apply the uploaded certificate to Internet Interface, Admin Interface, or both.
- In Unified Access Gateway 3.0 and newer, change the Certificate Type to PFX, browse to a PFX file, and then enter the password. This PFX file certificate must match the Public FQDN (load balanced) for Unified Access Gateway. If your load balancer is terminating SSL, then the certificate on the UAG must be identical to the certificate on the load balancer.
- Leave the Alias field blank.
- Click Save.
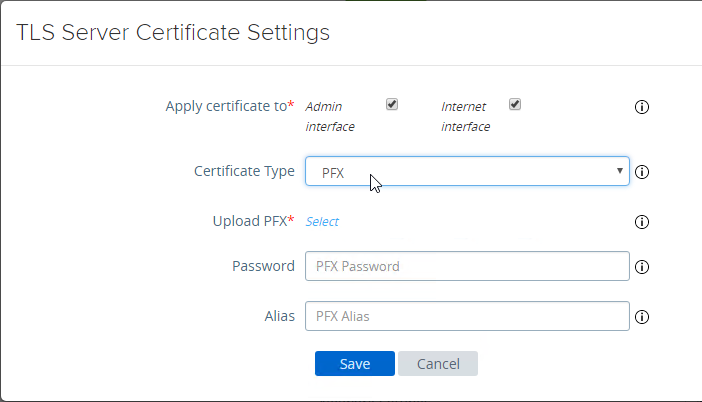
- If you changed the Admin Interface certificate, then you will be prompted to close the browser window and re-open it.

- In Unified Access Gateway 2312 and newer, click Edit in the Internet section.
- Or, you can upload a PEM certificate/key (this is the only option in older UAG). Next to Private Key, click the Select link.
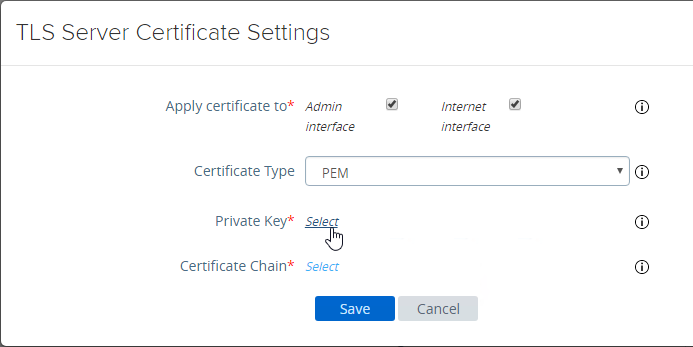
- Browse to a PEM keyfile. If not running Unified Access Gateway 3.0 or newer, then certificates created on Windows (PFX files) must be converted to PEM before they can be used with Unified Access Gateway. You can use openssl commands to perform this conversion. The private key should be unencrypted.
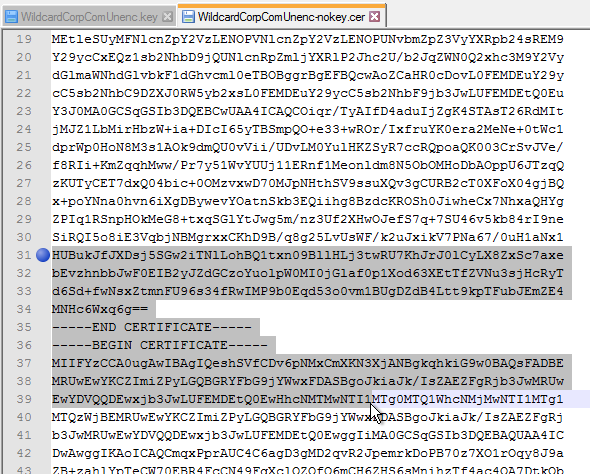
- Browse to a PEM certificate file (Base-64) that contains the server certificate, and any intermediate certificates. The server certificate is on top, the intermediate certificates are below it. The server certificate must match the public FQDN (load balanced) for the Unified Access Gateway.
- Click Save when done.
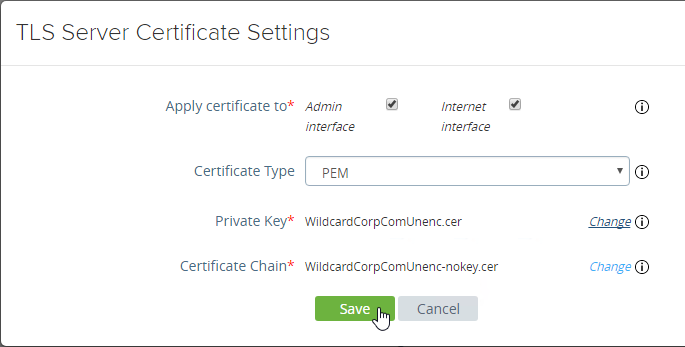
- Browse to a PEM keyfile. If not running Unified Access Gateway 3.0 or newer, then certificates created on Windows (PFX files) must be converted to PEM before they can be used with Unified Access Gateway. You can use openssl commands to perform this conversion. The private key should be unencrypted.
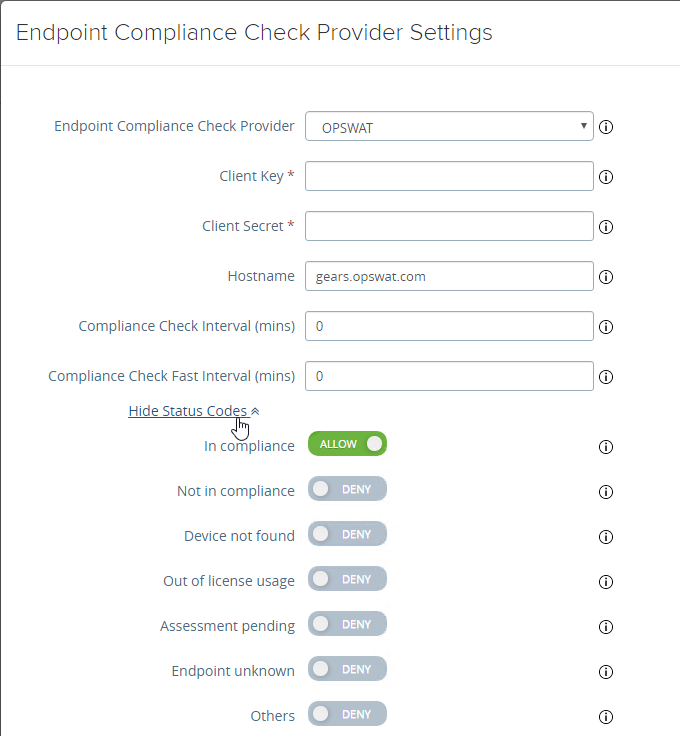
- UAG 3.1 and newer have an Endpoint Compliance Check feature. The feature requires an OPSWAT subscription. Newer versions of UAG can deploy the OPSWAT agent. It’s pass/fail. See Configure OPSWAT as the Endpoint Compliance Check Provider for Horizon at VMware Docs.

- UAG 3.9 and newer let you upload the Opswat Endpoint Compliance on-demand agent executables. Horizon Client downloads the executables from UAG and runs them. See Upload OPSWAT MetaAccess on-demand agent Software on Unified Access Gateway at VMware Docs.
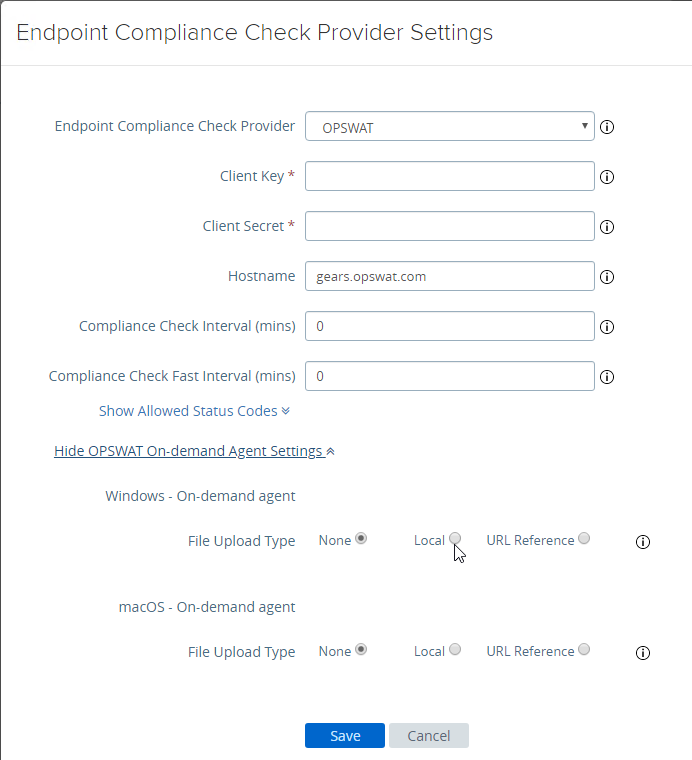
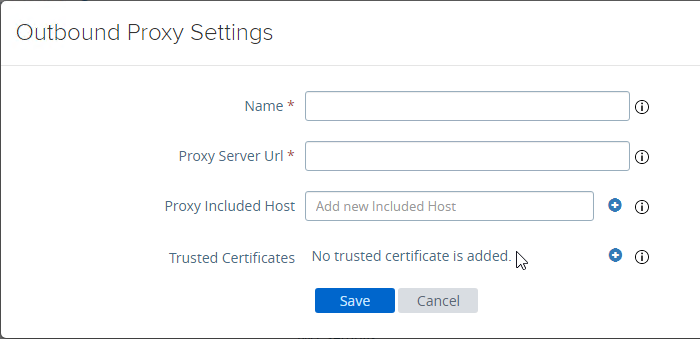
- In UAG 20.09 and newer, Outbound Proxy Settings can be configured to allow UAG to contact the Opswat servers when checking for device compliance.
- UAG 3.9 and newer let you upload the Opswat Endpoint Compliance on-demand agent executables. Horizon Client downloads the executables from UAG and runs them. See Upload OPSWAT MetaAccess on-demand agent Software on Unified Access Gateway at VMware Docs.
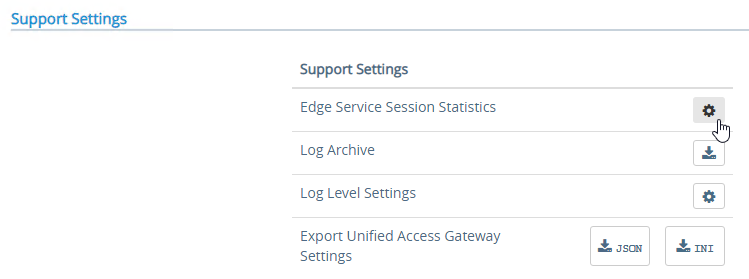
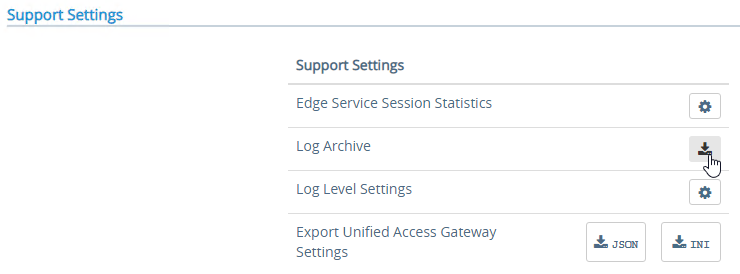
- Scroll down to Support Settings and click the icon next to Export Unified Access Gateway Settings to save the settings to a JSON file. If you need to rebuild your Unified Access Gateway, simply import the the JSON file.
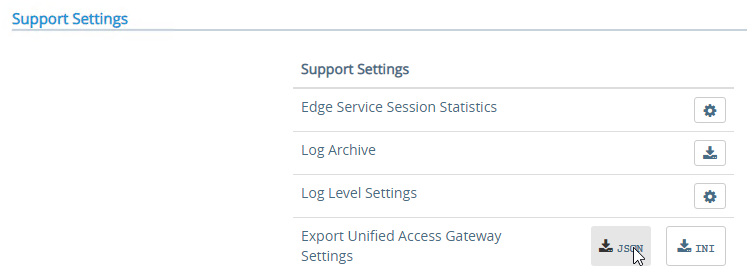
- The exported JSON file does not include the UAG certificate, so you’ll also need the .pfx file.
- The exported JSON file does not include the UAG certificate, so you’ll also need the .pfx file.
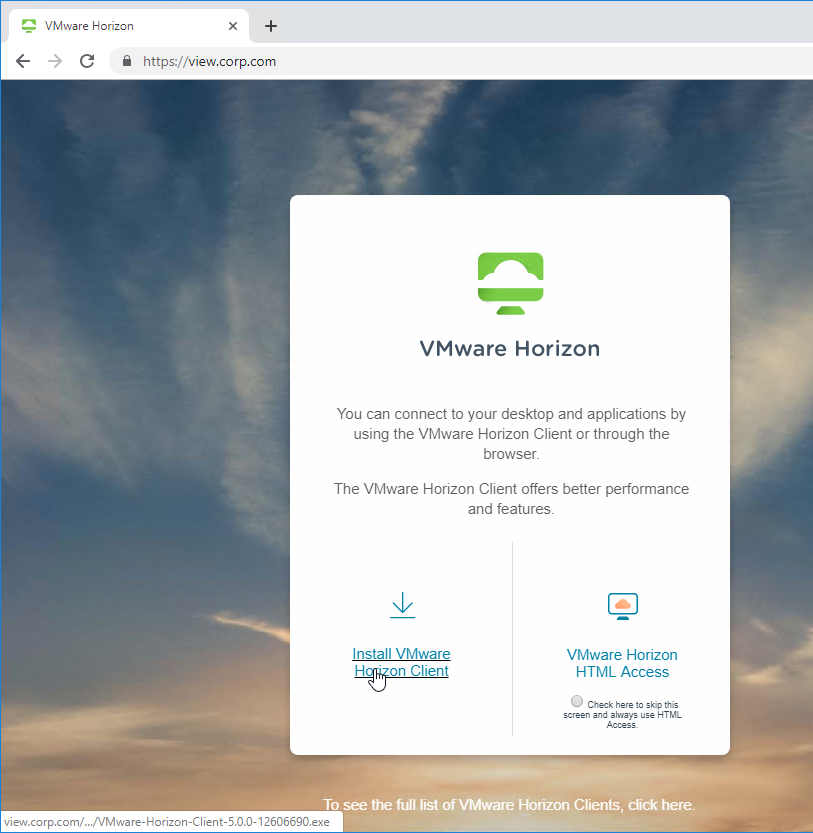
- If you point your browser to the Unified Access Gateway external URL, you should see the Horizon Connection Server portal page. Horizon Clients should also work to the Unified Access Gateway URL.
Monitor Sessions
In UAG 3.4 and newer, in the UAG Admin interface,
- At the top of the page, next to Edge Service Settings, you can see the number of Active Sessions on this appliance.
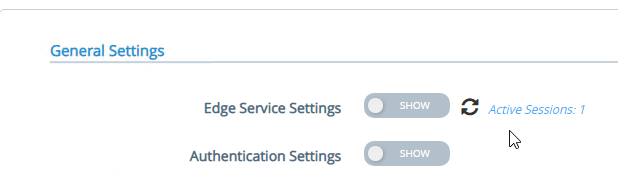
- At the bottom of the page, under Support Settings, click Edge Service Session Statistics to see more details.

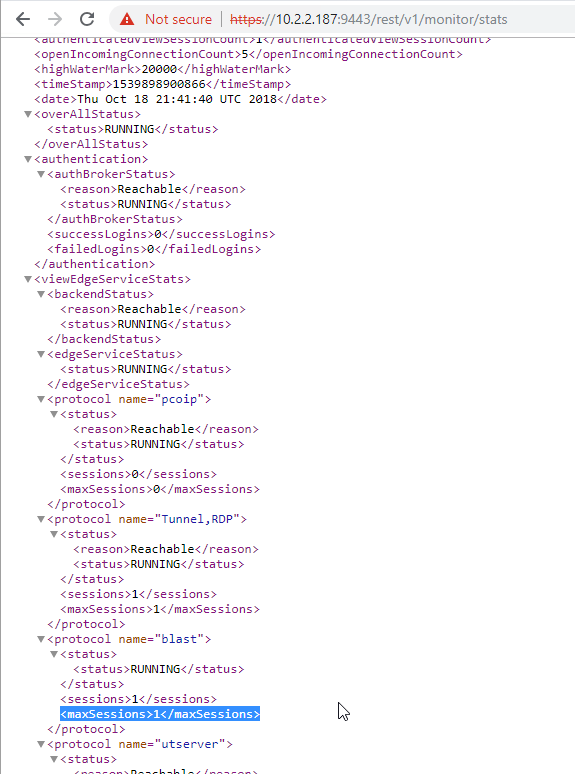
In older versions of UAG, to see existing Horizon connections going through UAG, point your browser to https://uag-hostname-or-ip-addr:9443/rest/v1/monitor/stats.
Logs and Troubleshooting
You can download logs from the Admin Interface by clicking the icon next to Log Archive.
You can also review the logs at /opt/vmware/gateway/logs. You can less these logs from the appliance console.
Or you can point your browser to https://MyApplianceIP:9443/rest/v1/monitor/support-archive. This will download a .zip file with all of the logfiles. Much easier to read in a GUI text editor.
For initial configuration problems, check out admin.log.
For Horizon View brokering problems, check out esmanager.log.
By default, tcpdump is not installed on UAG. To install it, login to the console and run /etc/vmware/gss-support/install.sh
- More info at Justin Johnson Troubleshooting Port Connectivity For Horizon’s Unified Access Gateway 3.2 Using Curl And Tcpdump
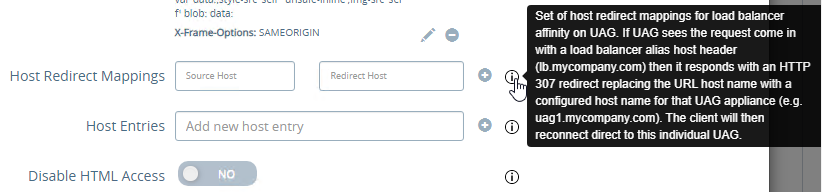
Load Balancing
If NetScaler, see https://www.carlstalhood.com/vmware-horizon-unified-access-gateway-load-balancing-citrix-adc/ load balance Unified Access Gateways.
To help with load balancing affinity, UAG 3.8 and newer can redirect the load balanced DNS name to a node-specific DNS name. This is configured in Edge Service Settings > Horizon Settings > More (bottom of page).
Related Pages
- Back to Omnissa Horizon 8
I currently have UAG 3.3.1 and all is working fine. When I upgrade to UAG 3.9.1 with the same config, the appliances build just fine and connect but none of the Workspace One apps will connect through the tunnel. If I power down the UAG 3.9.1 appliance and power back up the UAG 3.3.1 all the tunnel apps connect successfully. Any thoughts?
I was able to deploy the UAG internally (on a different subnet from the connection server) and can access Horizon inside the network. However, if I try to access it from outside the network (horizon.company.com) it times out. Anybody run into this issue and how did they fix it? I checked the logs on the UAG and did a tcpdump for any traffic going to 443 and it looks like nothing is coming in from the outside even though I have set up the firewall rule to allow connections on the ports listed in the requirements
NAT is configured correctly?
I’m pretty sure. I mapped the A record to one of our public IPs and mapped that to the internal IP of the UAG on the firewall only allowing ports 443, 4172 and 8443. We have a cloud hosted Fortigate firewall (MPLS network) if that helps and we’re using Cloudflare for our DNS hosting.
Question about you Cloudflare config. are you using DSN only or using its proxt config to connect you UAG?
I got it to work, opened up a ticket with our ISP who manages the firewall and it looks like there was some old NAT rules hanging around that were in the way of the one I created for the UAG
in case anybody runs into a problem where Horizon Connection Server is down when using a .local FQDN (connection.comp.local) use this guide https://roderikdeblock.com/vmware-uag-not-using-dns/
Thanks for the link. I just added it to the text.
Hi Carl,
I have two questions in regards to VMware UAG.
Question 1:
When users try to logon to the connection servers via UAG they will get prompted for “Invalid Domain/User Name”. How do I provide information about our AD server to UAG ?
Question 2:
I have setup Radius on my two UAG servers that are on DMZ.
I use smspasscode as 2FA which is on Internal network. I have enabled port 1812 on the firewalls.
When I connect to Horizon environment using UAG, I get the message “Access is denied” after sometime.
Please help me. Thanks,
Naveed
Horizon 7.8 and newer no longer send domain info. You can re-enable it in Horizon Console > Global Settings.
Did you add UAG’s IP address as RADIUS Client? You might have to check logs on the RADIUS server to determine the problem.
Ok I will enable the domain info settings in Horizon console.
Which logs should I look for on the UAGs.
There are two IP addresses in each UAG servers (Internet facing & Management)
The radius server is on the Internal network which is accessible by Management network.
What IP addresses of UAG should I add as the radius client on my NPS server.
Kind Regards,
Naveed Zafar
esmanager.log is the primary log.
Check the logs on the RADIUS server. You might have to do a network trace to see which source IP UAG is using to contact RADIUS.
Check authbroker.log logfile on the appliance at /opt/vmware/gateway/logs. If you’re using .local DNS names, see https://roderikdeblock.com/vmware-uag-not-using-dns/
Hi Carl,
thank you for all you great work, it’s a sort of lighthouse for us!
We would like to try out UAG HA for Horizon Edge service, but I have a doubt about certificates needed.
I read that only XML API traffic to CS uses HA, then Blast https traffic is directed to a single UAG.
We need a certificate matching the VIP address plus n certificates for all single UAGs (can UAG be configured with multiple certificates)?
Or can we use a single certificate with VIP + SANs for all UAGs?
Another question. Do you know if HA master/slave mechanisms switch role also when UAG is in quiesce mode or the service is not working properly (eg: the case an UAG is still alive and reachable via IP but cannot accept http connection because of 100%CPU)? Unfortunately VMware examples are always with powered off UAGs.
Thanks in advance 🙂
It’s only one certificate that should match all of the DNS names, either Subject Alternative Names, or wildcard.
I’m not sure about quiesce mode.
Hi Carl, I have a problem with the vmware verify (2 factor Autentication). With the OLD identity manager 3.1 works without problem, with the other identity manager (3.3 / 19.03 and now 20.01) on the UAG (I try also the 3.1 and the lastest 3.9.1) I have a problem on the UAG ( is behing F5 load balancer).
When I try to autenticate and use the Verify the Identity manger not loading the correct page (the wait for the authorization token) and on the esmanager.log on the UAG I have this error:
05/26 07:59:46,450[nioEventLoopGroup-6-3]INFO wsportal.WsPortalEdgeServiceHelper[getResponseForException: 332][828059ab-0b1e-4c76-b471-52247ca5eb02]:Sending internal server error with message: Response entity too large: DefaultHttpResponse(decodeResult: success, version: HTTP/1.1)
How I resolve this? It’s a problem on the UAG or I have to check on the F5?
Hi Carl,
Thank you for the great article. I am able to setup external; users access to connection servers via UAG but I am having some issues with High Availability section.
I have setup two UAG appliances in DMZ using two NICs deployment option. The eth0 IP is for the internet facing subnet and eth1 iP is for the management subnet. The VIP IP address is also from eth0 IP address range. I am using single VIP option.
I want to setup high availability using VIP (single IP) as per your instructions in this article. I performed the following steps
In both UAG appliances I have enabled high availability and have assigned same VIP on them. I choose the Group ID as 10. Clicked on save and waited for sometime. The status is changed to Not Configured in front high availability instead of Master or Backup..
in vSphere side, I can see VIP assigned to one of the host and am able to access the connection server using VIP. if I shut down the master host then VIP is switched to the second host I see a connection drop in the ping and loss the session as well but can get back to the same session after reconnect.
Is the connection drop out a normal behavior in UAG or can we avoid it ?.
Why I am not seeing the status as Master or Backup in front of High availability option ?
Please tell me what I am missing and help me in fixing this.
I have fixed HA issue. I have used the most up to date version of UAG which is 3.9 at the moment and HA using VIP is working fine now.
I was using version 3.7.1 and now using 3.9.1.
Thanks
Is there any possibilities add additional NIC after deploy UAG with single NIC.
It’s easy to redeploy, especially if you use the PowerShell script. Another option is to save the JSON file, redeploy, and import the JSON, but I’m not sure if this works when you change the NIC count.
Hi Carl,
I want to mention one item that was a “gotcha” to us. Following the directions in the Firewall section of your guide, we tightened things down so that only the ports shown were allowed. This worked pretty well, except that the Connection Server URL was not resolvable. The documentation doesn’t explicitly state it, and maybe it’s a no-brainer, but we hadn’t allowed DNS traffic out of the UAG DMZ. Once DNS traffic was allowed, everything worked correctly.
Hopefully no one else runs in to this, but I thought it might be worth mentioning.
Hello,
We have 2 UAG with HA activated. So, when we connect through the virtual IP all should work fine. Our users connect via html.
If the virtual IP redirects you to the master UAG, you have no problem. If the connection goes through the slave UAG an error appears: “Failed to resolve proxying route for request”
Don’t know whats happening, I’m reading logs without luck. While we try different things the 2nd UAG it’s stopped.
Thanks
In case anyone needs this:
For using UAG with their own HA and Horizon you need 3 Public IPs:
https://docs.vmware.com/en/Unified-Access-Gateway/3.4/com.vmware.uag-34-deploy-config.doc/GUID-910A8B50-77A2-430B-9BF4-CB774001B037.html
Hi Sergi,
VMware doesn’t spell this out clearly.
So what you are saying is that if I have 2 UAG’s in HA, I need 3 public IP’s to use HA.
One nat’d to each UAG and one NAT’d to the HA VIP.
I’m assuming that in the UAG setup I point UAG appliance 1 to it’s NAT’d public IP and vise-versa for UAG 2
-do the UAG then each point to their public name, so i need three public DNS entries, one for each appliance and the vip
should i have
horizon.domai.com – nat’d to UAG HA VIP
horizon1.domain.com – nat’d to UAG 1
horizon2.domain.com – nat’d to UAg 2
And then point the UAG 1/2 to it’s specific dns entry
Exactly!
That’s how we have it now. It works pretty well but the need to have 3 DNS names and 3 Public IP… Depends on your resources or needs I guess.
Hi Carl
Do you know how to add the UAG to an azure availability set when you create it using power shell? I just need to do that in order to get Azure Load Balancing working
Would UAG with Azure MFA work with Zero clients?
With RADIUS (Microsoft NPS), certainly. SAML is browser-based so the client device would need to support web-based authentication.
I am having http:504 error while connecting from external horizon client.
Thanks a lot – I’ve read your Horizon guides and find them more useful than VMware docs.
One thing I am encountering with Certificate authentication is puzzling me: the Horizon client reports an SSL error. Browser logins work from Edge, IE & Chrome (not Firefox). Am I missing something?
I wonder if intermediate certificate is missing. If public, then use ssllabs or similar to scan the FQDN.
Thanks for the reply; there is no intermediate certificate.
I’ve reported it to VMware and they are stumped too.
Web client works – just not Horizon client.
Let’s see what they say and I’ll update this for others
Hello! I have the same staff on my infrastructure and I’m pretty puzzled by this. Have you sorted out this issue?
Hi, Carl!
Can you help me, please?
I have installed and configured the UAG 3.8 and when the active sessions is equal to 2048 connections, no more connections is accepted, then we need to restart de UAG to permit the new connections.
So we need to configure it to accept more than 2048 active connections.
How can I configure it?
Thanks!!
I think Max Connections per UAG is 2048. You might have to build more appliances and load balance them. https://kb.vmware.com/s/article/2150348
Thanks, Carl!
I have setup a new UAG and a new CS.
If I connect directly to the CS all works fine.
If I try via UAG, it asks me for username and pass but as soon I press enter an error apears:
“ssl connection was shut down while reading”
I’ve checked the time on all the VMs and found nothing…
Download the logs from the UAG and check the esmanager log file.
were using UAG 3.2 and we keep getting PCOIP sessions disconnecting
any ideas what to look for on logs?
Maybe this: https://help.teradici.com/s/article/1358
HI Carl,
I am not connecting to the VDI client through a teradici wyse client. I am connecting through HorizonClient installed on remote desktop.
PCoIP comes from Teradici so troubleshooting will be similar. Did you find the pcoip server log on the Horizon Agent machine? And the pcoip client log on the Horizon Client machine?
Thanks would you have your UAG servers moving from host to host in production hours? DRS moves them
Thanks
Hi Carl, I have deployed the UAG 3.9 with Horizon View 7.1. I am able to connect remotely using the Horizon View Client, but when I enter credentials to access the VDI client, I get a “could not establish connection” error. The logs on the UAG state that the “Request router channel became inactive” and then that the “backend channel is closed”. On the Horizon View Connection Server, the logs state that “Missing route token in request” is the error. With a packet capture, I just know that the Connection Server closes the connection. Do you know what would be causing this issue?
The issue is resolved, seemed that the way the load balancer was configured it created an async routing to the subnet where the CS servers was (but this only occured when going through the external virtual IP)
Hi AMD,
I am experiencing the same issue with one of my UAG server. How have you fixed it. We have not made any change in our network. One of the UAG servers stopped working suddenly. Haproxy service is stopped on one of my UAG servers and is not starting by any way.
Can you please share your experience so that I can fix this problem.
Thanks,
Naveed
I followed the guide for connection server deployment and this guide for UAG. On the connection server I have uploaded the horizon client in /downloads/ folder but clients connecting to UAG cannot download the client. Is there a place in the UAG I can place this client to fix the issue?
You might have to add /downloads to the proxy pattern. Go to https://www.carlstalhood.com/vmware-unified-access-gateway/#admininterface and do a Ctrl+F for Proxy Pattern.
It ended up being due to the Azure MFA SAML setup. With SAML+Passthrough enabled I cannot download clients.
Hi, Carl- do you know if I can keep my internal URL access when I put my existing Horizon behind this UAG? Also- when I “uncheck or disable all three Tunnels/Gateways.”, will it kick my existing users?
I’m not sure if turning off the Gateways will drop existing connections or not.
The internal Connection Server address (usually a load balanced FQDN) stays the same. UAG usually connects to the same internal Connection Server address as the internal users.
Ok- so you’re saying that I can keep both my internal and external URLs then, right?
I’ll do the change after all my users are off just in case.
Anyone using UAG with Thin and Zero Clients?
I’m a little confused on the part about not requiring Network Protocol Profile section.
I have a single firewall and doing a two nic configuration in a flat network. Do I create two new switches for each nic?
and then NAT a public ip to the port that is for the external access?
I’m pretty new to this so please be as detailed as you can in your answer. Thank You.
Hello
Thanks for the guide, it helped.
For me things are not working as described, I have multiple issue although I followed exactly the steps exactly as described above.
My main issue is that whatever I try, deployment via the powershell script, via flash or html5 client, with custom routes or without : the “1 nic” configuration simply refuses to work. To me the problem is linked with the internal routing and/or firewalling within UAG. For example when you type the “route” connected to UAG via SSH, the result is empty. What the heck ? I don’t get it. Why is my default route not displayed ?
Now even more crazy : despite of that, as I said, I am able to reach the appliance per SSH and from another VLAN, meaning that the gateway is in fact being taken into account or this would not work which is leading me to think about some software layer restrictions within UAG.
To troubleshoot the issue, I decided to go with the “3 nic” configuration and assigning each nic a different subnet : eth0 > dmz/internet facing network, eth1 > management network, eth2 > production network (where the connection servers are installed). Only doing this and now, the “route” command returns the correct routes. Furthermore, if I add custom routes to eth2 (to my VLANS where the virtual desktops are running), everything works.
However I want the “1 nic” to work, VMware is not a network company, I don’t trust to give this appliance a direct connection within or production LAN (we have only 1 physical firewall). I want all the traffic to being layer3 routed trough the same interface in DMZ.
Hy, on point 9 of “Configuring Horizon Settings” there is a mistake for PCOIP External URL. You cannot enter external FQDN. To save the configuration successfully you have to enter the external IP address of the load balancer or the natted public IP if you don’t have any LB.
Thanks for noticing that. I’m not sure how “FQDN” got into that text.
Hi there would you mind sharing the VMware-ovftool-4.3.0-14746126-win.x86_64.msi installation file please?
It’s at https://code.vmware.com/web/tool/4.3.0/ovf
Wondering if anyone else has seen this behavior. I had a host purple screen today. After checking things out on the host and bringing it back from maintenance mode, the UAG servers would no longer work until they were rebooted. This seems strange to me that I would need to reboot them after a single host failure. Thoughts?
I have had the same exact problem on two different occasions. Easy fix, but it is definitely annoying.
This is the best guide so far for UAG deployment, even VMWare KB also is not detailed as this. Thank you soo much!
after accessing uag. why client still redirect to vmware connection server.!!
UAG is just a proxy to the Connection Server but the address bar should show the UAG’s FQDN, not the Connection Server’s FQDN.
I’m running into issues with the configuration. My horizon destination server still shows that it’s down. How can I troubleshoot this? I have the connection server url, and thumbprint entered. I have PCOIP and BLAST Enabled, but I dont have the external url’s typed in since I have not set that up yet. I also dont have a TLS cert imported, but I dont know where I should be getting that from? Is it just the cert I get from my connection server?
The esmanager.log file should indicate the problem. Usually it’s because the thumbprint you copied has a hidden character that needs to be removed from right after the equals sign. Or maybe your UAG is not doing DNS correctly.
Ok cool, so right now we dont utilize a load balancer so for my connection server URL I have our new connection server’s FQDN. As it stands I can’t ping that connection server from my UAG appliance. Also, should I have an external IP for the connection server?
The external port, is it necessary to use 443 or could I use another port, say if I already have a Citrix AG setup on port 443 and just want to test VMware UAG in my lab.?
As long as firewall is open and UAG is configured with your desired port, I don’t see why not, but I don’t think I’ve tried it.
Hi Carl,
Great write up – I’ve used your blog quite a bit throughout the past few years.
Have you heard of a way to configure a UAG and Horizon CS in a way that you can use certificate authentication (Smart Cards) on your UAG and pass the information through to the Horizon CS for a near seamless login experience?
In the documentation it states that you need to set up the SAML IDP information for your UAG, share that metadata that’s generated with your CS, and then use the CS metadata and create the SAML SP in your UAG. Then configure the Horizon settings to use the SAML SP that was created.
Setting up True SSO seems to be overkill for our implementation.
Any ideas?
The problem is lack of password. Without password, Horizon can’t do the last Single Sign-on to the Horizon Agent machine. But I would think that the final connection would do a separate Smart Card authentication. If you want to skip that, then you’d need True SSO to facilitate Single Sign on to Horizon Agent without a password.
Hi carl,
Thanks for the article.
I am going to deploy UAG as a tunnel with Workspace one for vmware browser per-app tunnel. Is there any possibility through i can redirect my traffic to Proxy server to access internal URL’s and internet based on permissions.
Please suggest.
Hey Carl,
while trying to add the UAG to the Connectiot Server nothing happens, any specific ports we need to open up in the Firewall to have a communication established?
Thanks for your response!
After you add it, go launch a session through the Gateway. The Gateway should be including its name in the request to the Connection Server, which the Connection Server matches with the UAG name you added, and then Connection Server is then able to verify that the Gateway is healthy.
Thanks for you farst respose, but within the COnnection Server only püaste in the “friendly” UAG name right?
Yes. On the UAG Admin Page, go to System Configuration. At the top is where you enter the UAG’s name. It needs to match what you enter in Connection Server. See https://www.carlstalhood.com/vmware-unified-access-gateway/#adduagtohorizon
Thanks!
We did this but status remain “grey”, need to check the logs now very strange for the moment.
I’m experiencing the same issue as Arkadiusz. I’ve added the friendly name to the Dashboard, but the IP and status never updates. Multiple sessions have been initiated on both though. Any other ideas?
Hey Carl – based on my experience UDP-443 does not work for BEAT over UAG, regardless if it’s via HTML or Client. 8443 seems to always get used for UDP, even if you set your blast gateway port for 443. Have you seen that as well?
Hello Carl,
Today we placed a new certificate on our connection server that is used for external connections. I removed the old certificate from the connection server and then gave the new one the friendly name vdm. After that I restarted the connection broker service.
I copied the certificate thumbprint to the uag connection sever url thumbprint. So far so good. What we noticed is that de uag uses the old certificate, but we don’t know why. Everything works and user can also connect to their vdi desktop but the old certificate is used. When i change the hosts file on a computer aand point to the connection server the newly installed certificate is used. Can you please point me in the right direction.
Gr. Edwin
In UAG admin, go to TLS Server Certificate Settings and upload a certificate for the Internet Interface.
Thank you very much! Problem solved!
Thanks for the instructions. What i have experienced is that you cannot configure two or three nics with the ovf deployment if you use the html vsphere client. It just doesn’t show the fields for more than one nic. So i tried to configure the vm with the flash client and voilá – that worked.
Dear Carl Stalhood
how can I solve? the UAG 3.7 temporary failure in name resolution
Dear Mr. Carl Stalhood I always use your posts and they are really great tool.
how could I resolve
uag 3.7 temporary failure in name resolution
the UAG couldn’t resolve my connection server but the DNS is reachable from the UAG
Did you use vSphere Client to import the OVF? If so, try only entering one DNS server.
Hi Carl,
Excellent post as always. I have a single doubt that maybe you can clarify it.
I am trying to configure UAG with RSA SecurID but i cannot configure it only on the UAG for external access also i need to configure it on the Connection Servers.
Is this a requirement or maybe a misconfiguration?
Thanks you!
Are you saying that you configured RSA on UAG but not on the Connection Servers and you’re not able to authenticate?
I installed my first UAG 3.6 last week but I tried to do everything manually via a browser session rather than push out the configuration via the PowerShell script. This is the way I have done all of my UAG install thus far. I was able to get the UAG 3.6 installed but I hit a roadblock when trying to access the REST GUI. When using Chrome, I was able to enter my credentials but when I would click the green Login button, I would see some red text appear that said something about “Server communication error. Please check server logs.” If I used Firefox, I could enter my credentials but when I clicked the green Login button, nothing would happen at all. If I used IE (I was on a Windows 7 box so I didn’t have Edge available to try), the REST GUI login screen would not even load.
Has anyone ran into similar trouble when trying to access the REST GUI on a new UAG 3.6?
Thanks!
Dan
First off, a very big Thank You! to Carl for putting together this page. I have used this page quite a bit from UAG 3.1 up to UAG 3.6 and it has come in handy numerous times!
With all of the UAG’s I’ve set up in the past, I have only used the REST GUI to configure them manually and I have not yet tried the PowerShell method of deploying one. I deployed my first UAG 3.6 last night but unfortunately, when I tried using the REST GUI to configure it, I had varying degrees of non-success. When using Firefox, the REST GUI login page loaded and I was able to enter my credentials but when I would click the green Login button, nothing would happen. When using Chrome, I could enter my credentials and I could click the green Login button but then I would see a red error message that said something like “Server communication error. Check server logs” This red message would appear over the top of my credentials on the REST GUI screen. When using IE, the REST GUI wouldn’t load at all. I was on a Windows 7 box so I didn’t have Edge available to try.
Has anyone seen this type of behavior before when trying to configure a UAG 3.6?
Thank you,
Daniel
When you say REST, are you referring a REST API client, like Postman? Or do you actually mean the GUI administration webpage?
How many NICs did you assign to the UAG? I usually only do one NIC.
Hi Carl,
Do you have any examples on how to configure the content gateway and / or the secure mobile gateway?
Thanks
I just did a write up on setting up the SEG: https://mobile-jon.com/2019/07/12/to-uag-finity-and-beyond/
How to set up to use Unified Access Gateway (UAG) 3.5 with required smartcard?
How do I set up certificates on UAG?
Thanks
There is some documentation at https://docs.vmware.com/en/Unified-Access-Gateway/3.6/com.vmware.uag-36-deploy-config.doc/GUID-A311FD9F-29D2-4FB5-AEFC-1DFDB0E7881E.html
You need to set up SAML trust between the UAG and the CS where the UAG is the IdP. In the Horizon Settings also specify the SAML SP to be the CS SP.
Is it possible to configure the UAG so external users can decide which authentication method to use like Smart card or RSA? Smart card is our primary method but if a user forgets the card we will like to have a backup option.
Thanks for your guidance!
Hi! Can I personalize the page where i select html access? For example the wallpaper
Carl, Can I use Identify manager, user environment manager or UAG to prevent an external user from copying data from a VDI to a local computer. If the user *is* connected to the internal network they should be able to copy from VDI to local machine..
Smart Policies in VMware User Environment Manager can do this. https://www.carlstalhood.com/vmware-user-environment-manager/#horizonsmartpolicies
I have 2 uag server that are up and working properly; however, one servers shows unbearable on the View management console. Is there anyway to correct the false-positive error
Hi Carl,
Is there a way to turn off auto redirect to Horizon view default html website /portal? Want to do this so that users has to type the exact https://horizonview-html-address/portal for security reason. Thanks.
UAG has a default proxy pattern that includes “/”. I wonder if removing “/” from the proxy pattern would accomplish this.
If you have a load balancer in front of UAG and if your load balancer is decrypting the SSL 443 traffic then you might be able to configure your load balancer to block traffic to /.
Should I require enable tunnel?
THANK YOU!! I am not sure how well my UAG deployment would have went without this guidance.
Horizon Client access works fine 🙂
I have an issue I cam stuck at… If I point a browser to the Unified Access Gateway external URL, all I get is a blank white page. not error – no Horizon View Connection Server portal page..?
Any Help is appreciated!
Did you configure checkOrigin on the Connection Servers?
I did configure the checkOrigin=false in the locked.properties file. I verified it does not have .txt extension. I can access the admin page at the URL as well as local host.
This is a small simple POC setup. No load balancers. 1 Connection server, 1 Security server everything working well with these.
The external URL to the Security server as well as the internal URL to the Connection Server reveals the portal page. With the UAG External URL I can connect with the Horizon Client successfully using Blast.
I corrected dns mistakes and redeployed the UAG. That has worked. It was strange situation. Thanks again for the great article!
what do you mean about corrected dns mistakes. i still get forward to connection server