Navigation
Change Log
- 2024-02-29 – added link to Omnissa Tech Zone Deploying Horizon 8 and True SSO in Multi-Forest Environments
Overview
To configure SAML on Unified Access Gateway (UAG) you must have the following versions:
- UAG 3.8 or newer
- Connection Servers 7.11 or newer
- For Windows 10 version 2004, deploy Horizon 2103 (8.2) or newer.
True SSO is optional.
- SAML does not provide the user’s password to Horizon, which means that Horizon cannot perform single sign-on to the Horizon Agent machine and thus the Horizon Agent machine will prompt the user to login again. This usually means the user has to login twice.
- To eliminate the second logon on the Horizon Agent machine, implement True SSO, which generates certificates for each user and then uses those certificates to automatically sign into the Horizon Agent machine.
Horizon Enrollment Servers ask Microsoft Certificate Authority servers to generate the SSO certificates for each user. This is an identity operation and thus the Horizon Enrollment Servers should be treated like Domain Controllers.
- The Horizon Enrollment Server software must be installed on standalone servers (no other Horizon components).
- For High Availability you can build two Horizon Enrollment Servers.
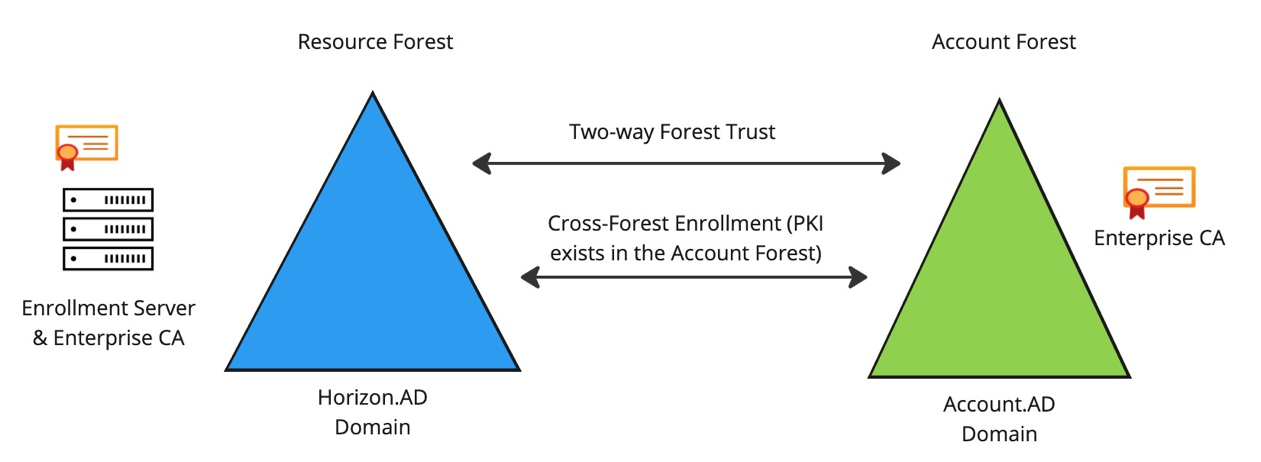
- For multiple forests, see Omnissa Tech Zone Deploying Horizon 8 and True SSO in Multi-Forest Environments
When you use Horizon Client to connect to a UAG that is SAML-enabled:
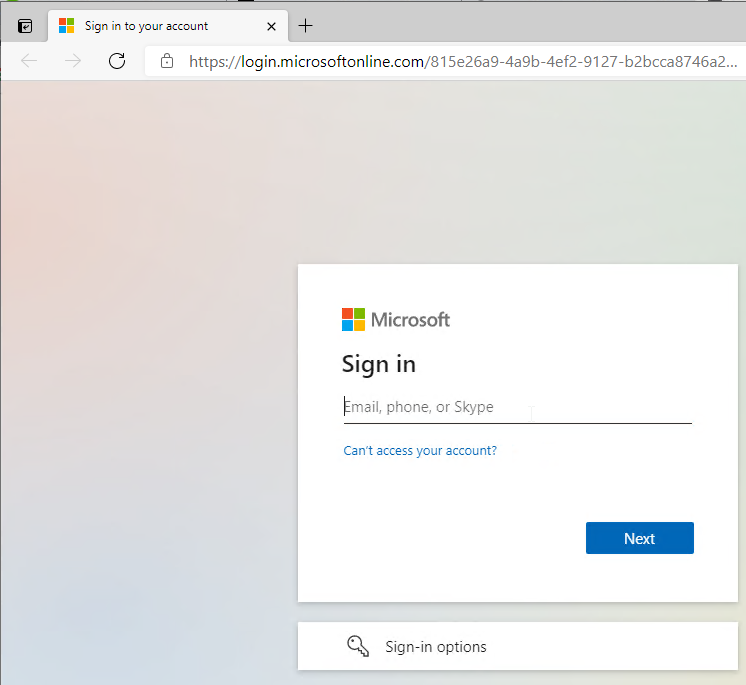
- It opens the default browser and prompts the user to sign into your SAML Identity Provider. If the user is already signed in then the user won’t see any sign-in prompt.
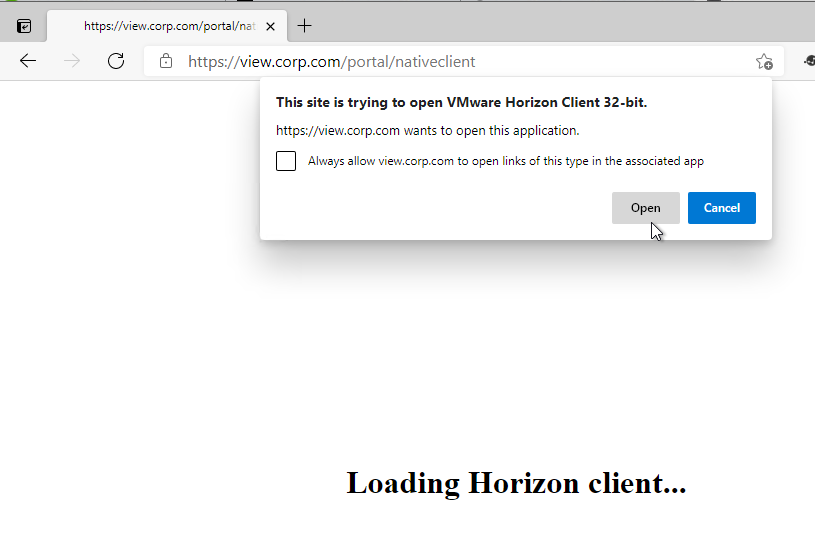
- After sign-in, the browser will then prompt the user to open Horizon Client.
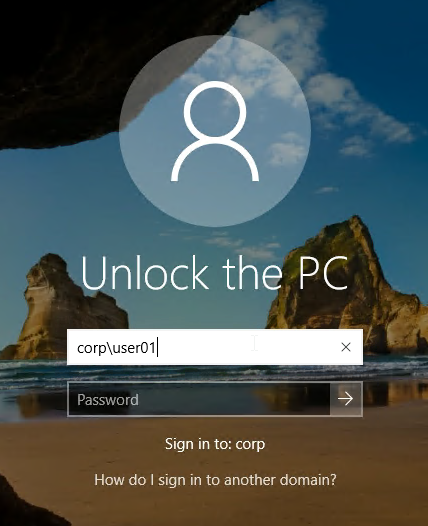
- If the user locks the desktop then the user will need to know the local Active Directory password to unlock it.
Certificate Authority
Horizon Enrollment Servers can use a Microsoft Certificate Authority that already exists. Or you can install Microsoft Certificate Authority on the Horizon Enrollment Servers. If you have two Enrollment Servers, then install Microsoft Certificate Authority on both of the servers.
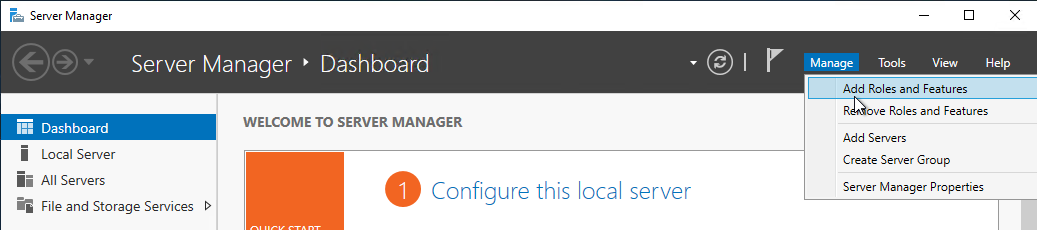
- Install Microsoft Certificate Authority from Server Manager > Manage > Add Roles and Features.
- Select Active Directory Certificate Services.
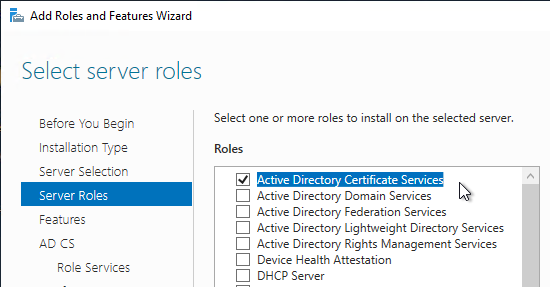
- The only Role Service needed for True SSO is Certification Authority.

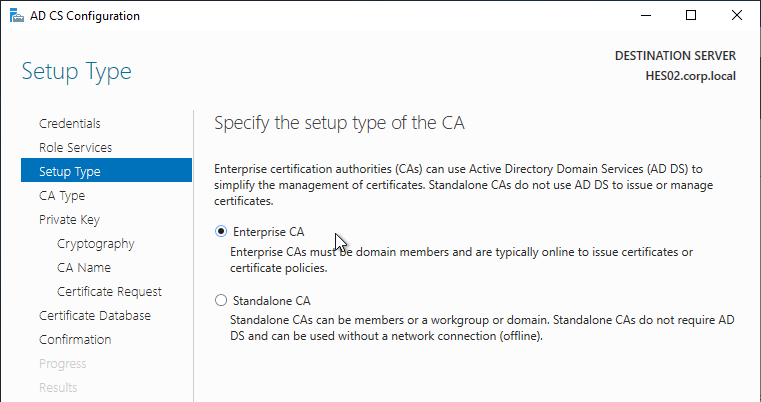
The Microsoft Certificate Authority must be an Enterprise CA.
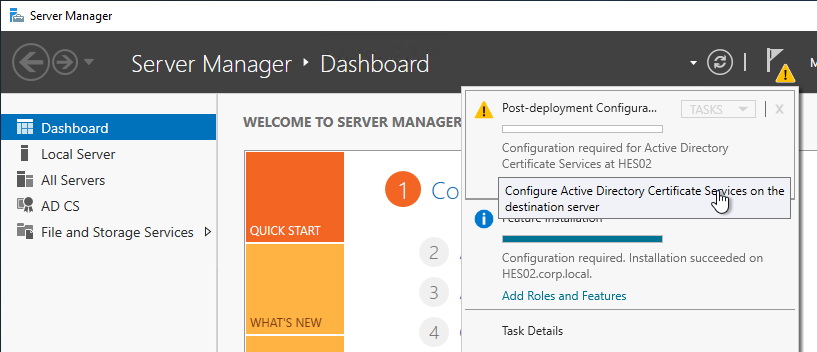
- After role installation, click the flag icon and then click the link to Configure Active Directory Certificate Services.
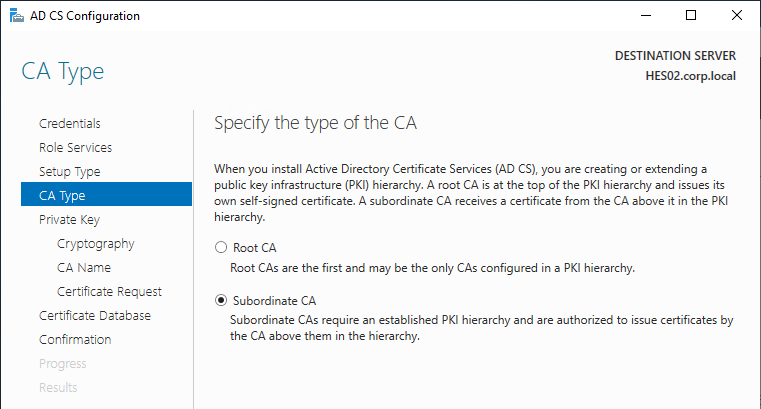
- In the Setup Type page, select Enterprise CA.
- In the CA Type page, if you already have a Root CA, then you can select Subordinate CA. Otherwise, you need at least one Root CA in your environment.
After Microsoft CA is installed, run the following commands:
certutil -setreg DBFlags +DBFLAGS_ENABLEVOLATILEREQUESTS
certutil -setreg ca\CRLFlags +CRLF_REVCHECK_IGNORE_OFFLINE
sc stop certsvc
sc start certsvc
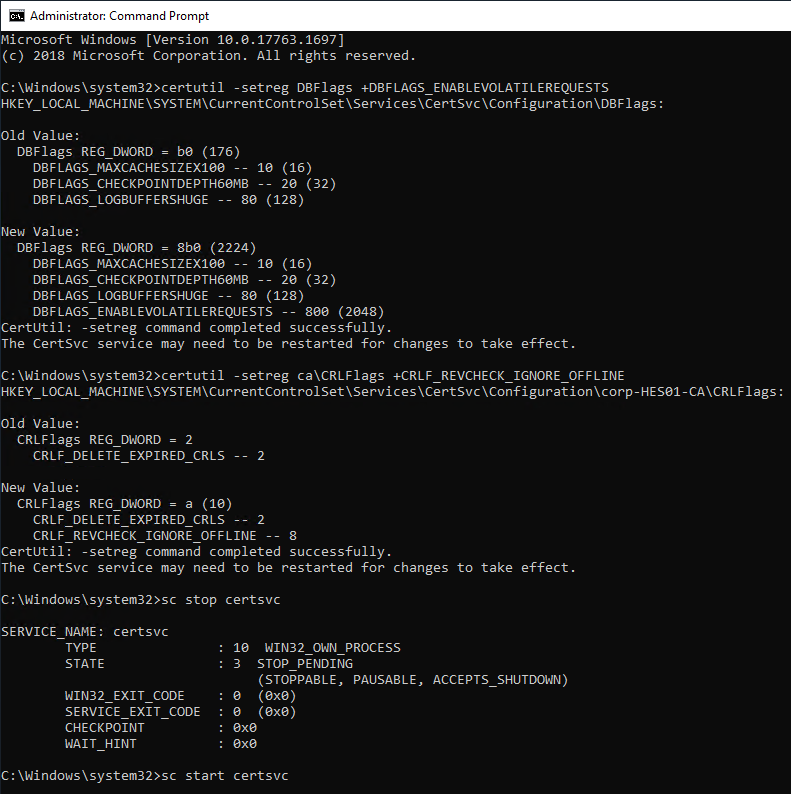
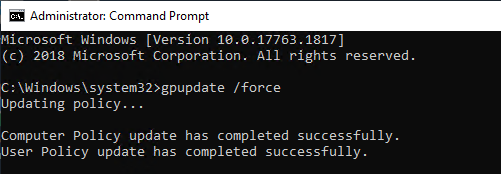
If you just built a new Certificate Authority server then True SSO won’t work until you run gpupdate /force on all of your Domain Controllers and Horizon Agent machines. Or wait several hours for group policy to update.
Certificate Template
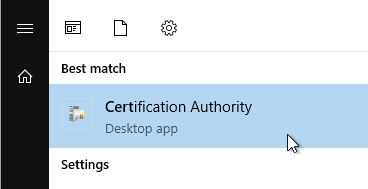
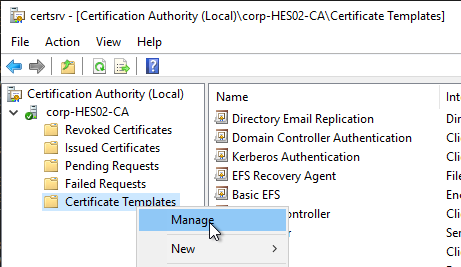
- On the Certificate Authority machine, from Start Menu, run Certification Authority.
- Right-click the Certificate Templates node and click Manage.
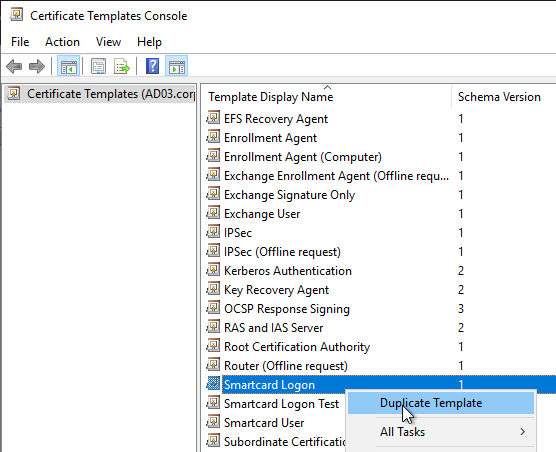
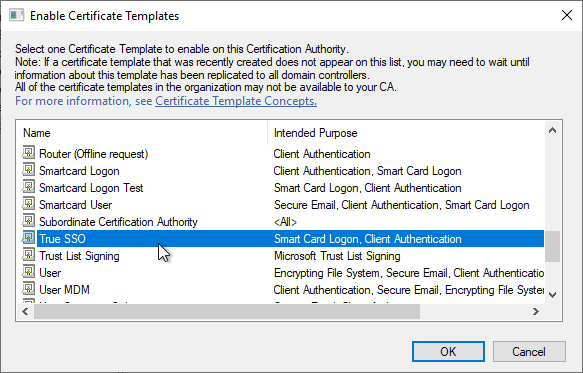
- Right-click the Smartcard Logon template and click Duplicate Template.
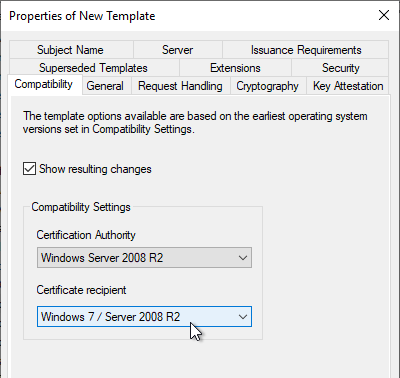
- On the Compatibility tab, change the drop-down for Certification Authority to Windows Server 2008 R2.
- Change the drop-down for Certificate recipient to Windows 7 / Server 2008 R2.
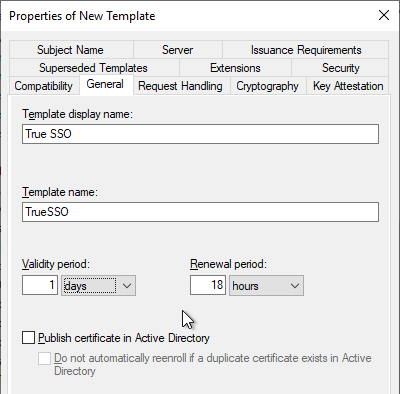
- On the General tab, name it True SSO or similar.
- Change the Validity Period to 1 day or similar.
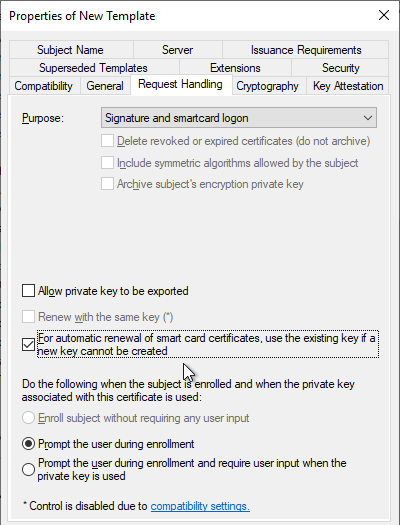
- On the Request Handling tab, change the drop-down for Purpose to Signature and smartcard logon.
- Check the box next to For automatic renewal of smart card certificates, use the existing key if a new key cannot be created.
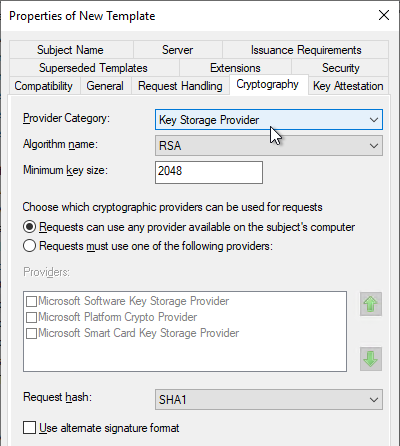
- On the Cryptography tab, change the drop-down for Provider Category to Key Storage Provider.
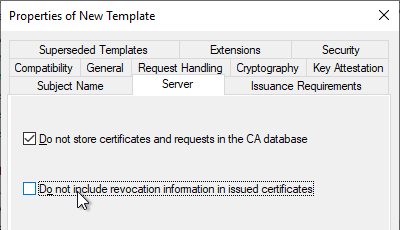
- On the Server tab, check the top box for Do not store certificates and requests in the CA database.
- Uncheck the bottom box for Do not include revocation information in issued certificates.
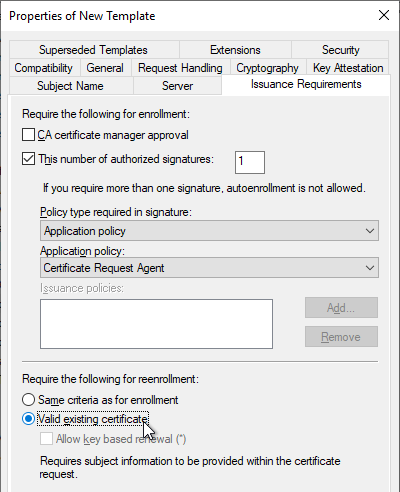
- On the Issuance Requirements tab, check the box next to This number of authorized signatures and enter 1 as the value.
- Change the drop-down for Policy type required in signature to Application policy.
- Change the drop-down for Application policy to Certificate Request Agent.
- At the bottom, change the selection to Valid existing certificate.
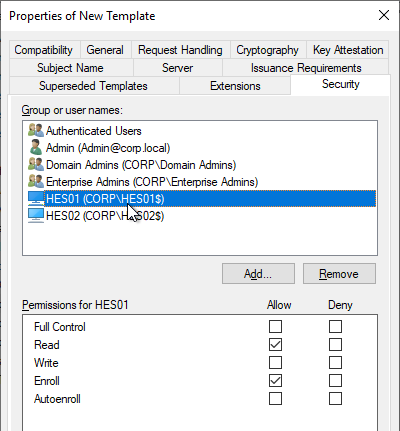
- On the Security tab, add your Horizon Enrollment Servers computer objects. This can be an AD group instead of individual servers.
- For each Enrollment Server computer object, on the bottom, check the Allow box for the Enroll permission. Click OK when done.
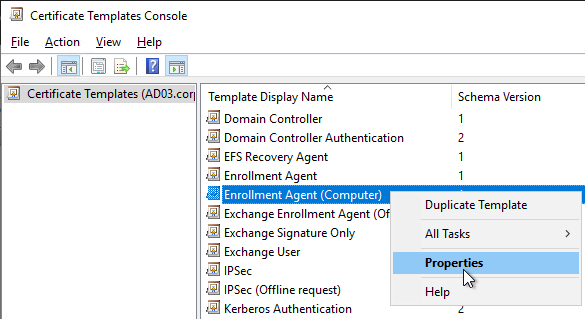
- Back in the Certificate Templates Console, right-click the Enrollment Agent (Computer) template and click Properties.
- On the Security tab, add your Horizon Enrollment Servers computer objects. This can be an AD group instead of individual servers.
- For each Enrollment Server computer object, on the bottom, check the Allow box for the Enroll permission. Click OK when done.

- Close the Certificate Templates Console.
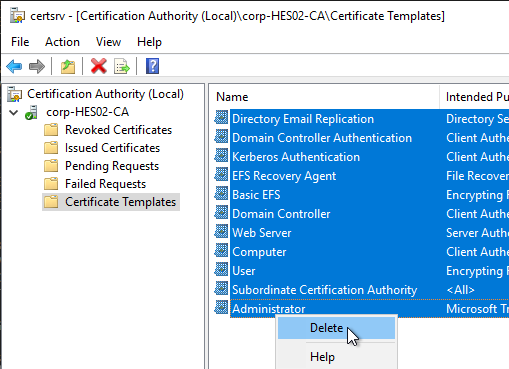
- Back in the Certification Authority Console, with Certificate Templates highlighted on the left, if your environment has multiple CAs but this CA is dedicated to True SSO, then delete all templates from the right. Note: Domain Controllers must have certificates installed so make sure you have at least one other CA that is issuing Domain Controller certificates.
- Right-click Certificate Templates and click New > Certificate Template to Issue.
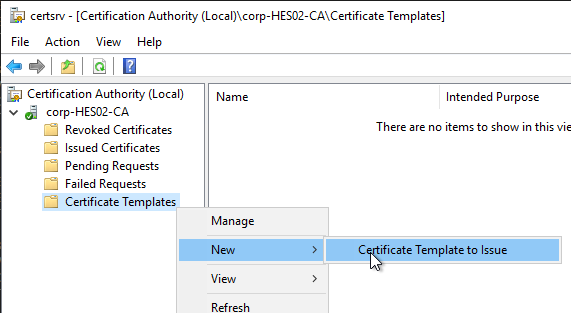
- Select Enrollment Agent (Computer) and click OK.
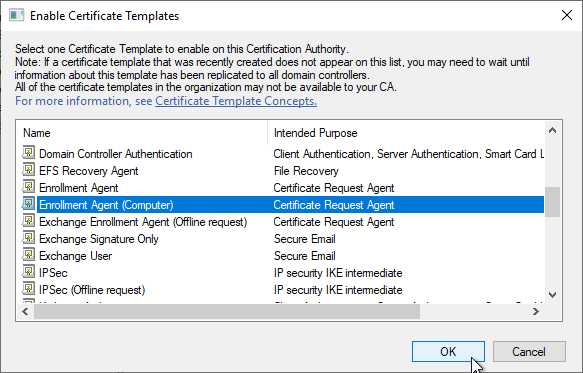
- Issue another certificate template but this time select the True SSO template.
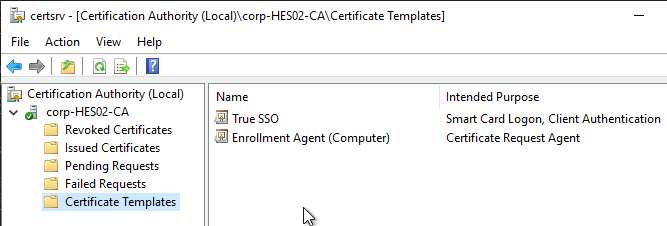
- Your CA should now show the two templates.
- If you have a second CA, and if it is dedicated to True SSO, then delete all templates from that CA. Then configure it to issue the same two templates.
Enrollment Server
Horizon Enrollment Server must be installed on dedicated machine(s) that don’t have any other Horizon components installed.
- Login to the new Horizon Enrollment Server that has at least 4 GB of RAM.
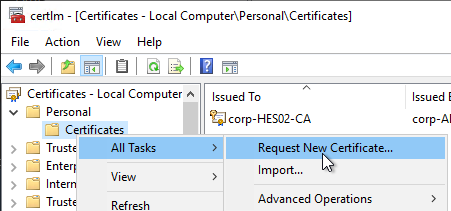
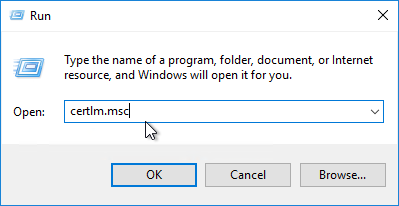
- Run certlm.msc.

- Expand Personal, then right-click Certificates, expand All Tasks, and click Request New Certificate.
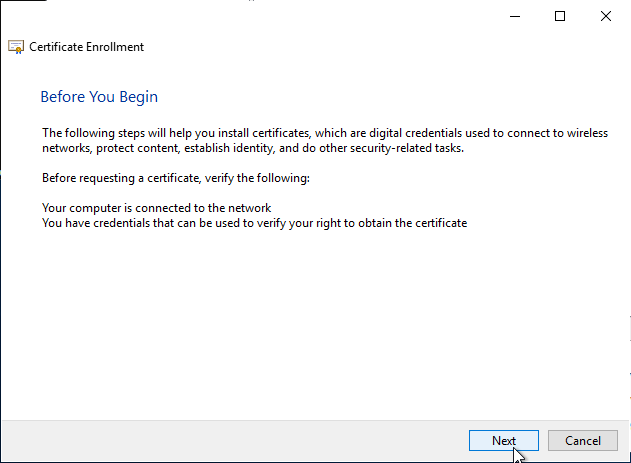
- In the Before You Begin page, click Next.
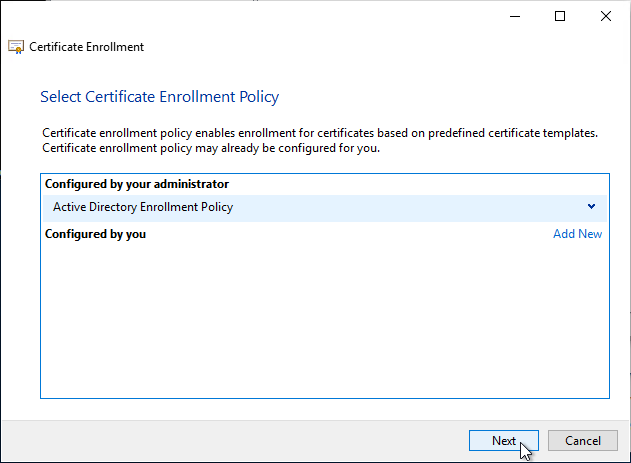
- In the Select Certificate Enrollment Policy page, click Next.
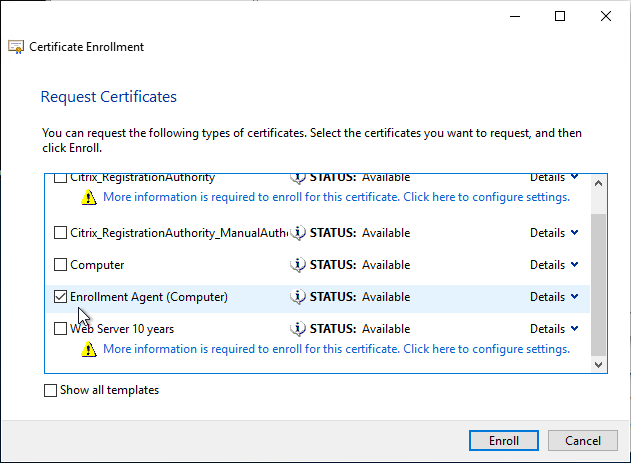
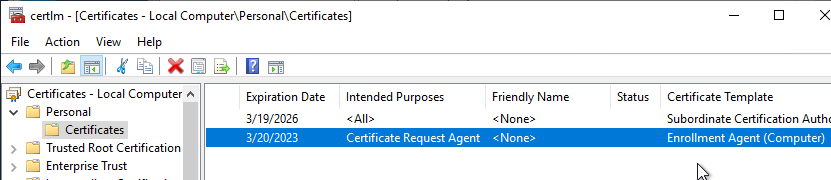
- In the Request Certificates page, check the box next to Enrollment Agent (Computer) and then click Enroll.
- In the Certificate Installation Results page, click Finish.
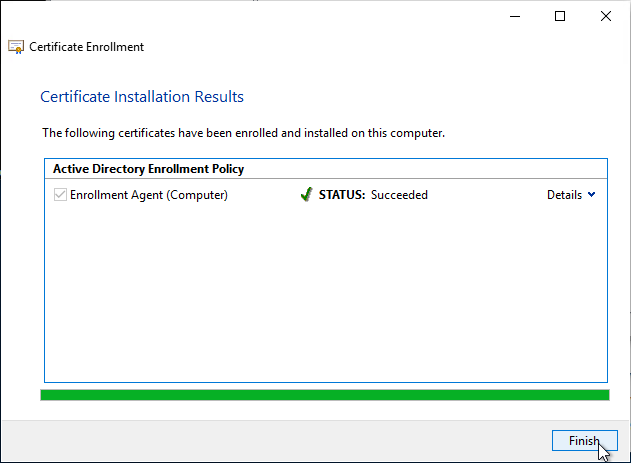
- Notice the expiration date on the Enrollment Agent certificate. Make sure you renew it before it expires.
- In the Before You Begin page, click Next.
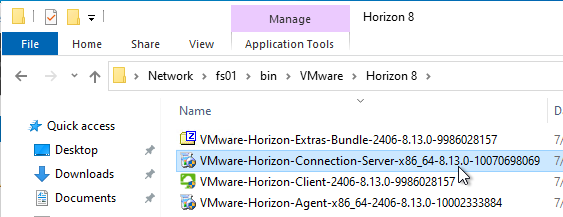
- Go to the downloaded Horizon software and run VMware-Horizon-Connection-Server-x86_x64.exe.
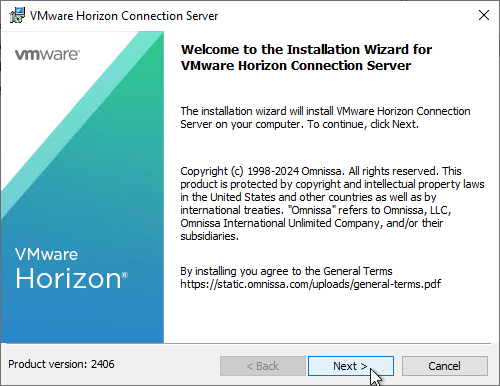
- In the Welcome to the Installation Wizard for VMware Horizon Connection Server page, click Next.
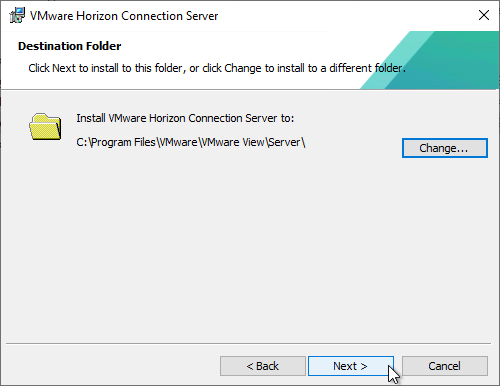
- In the Destination Folder page, click Next.
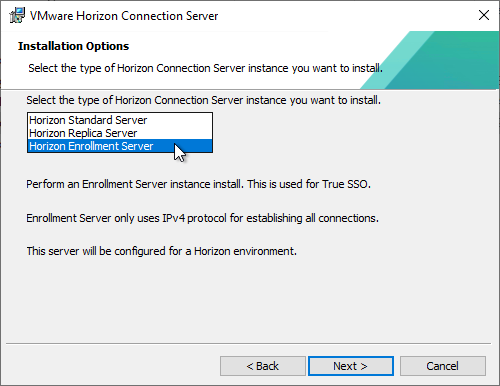
- In the Installation Options page, change the selection to Horizon Enrollment Server and click Next.
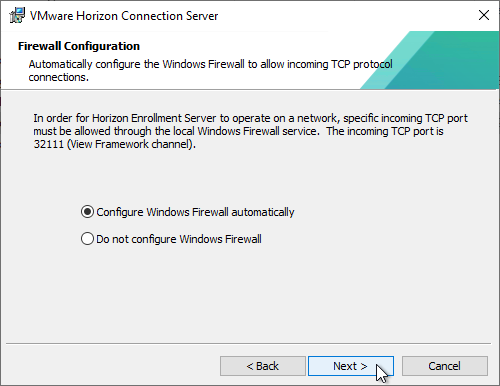
- In the Firewall Configuration page, click Next.
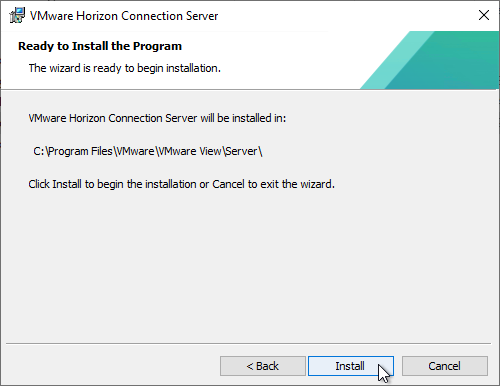
- In the Ready to Install the Program page, click Install.
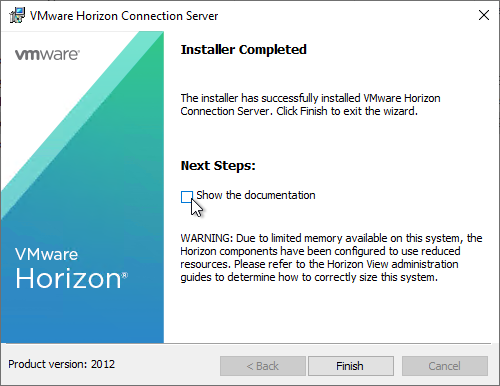
- In the Installer Completed page, click Finish.
- If Microsoft CA is installed on the Enrollment Server, then run regedit.
- Go to HKLM\Software\VMware, Inc.\VMware VDM.
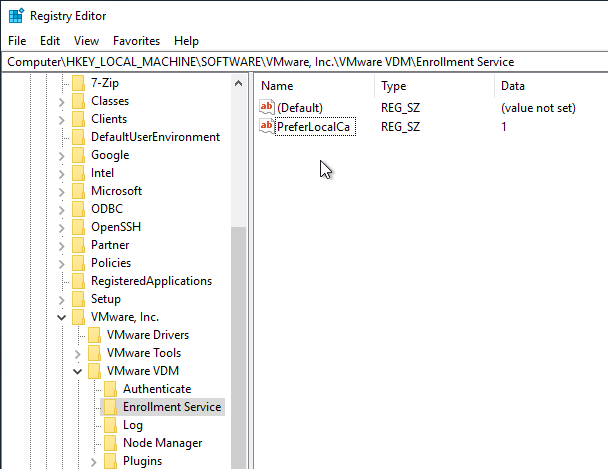
- Create a new Key named Enrollment Service.
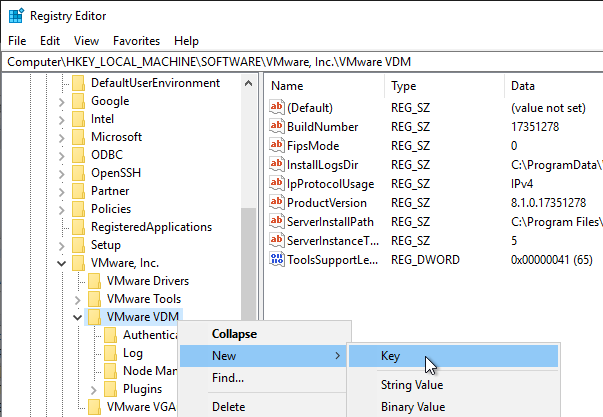
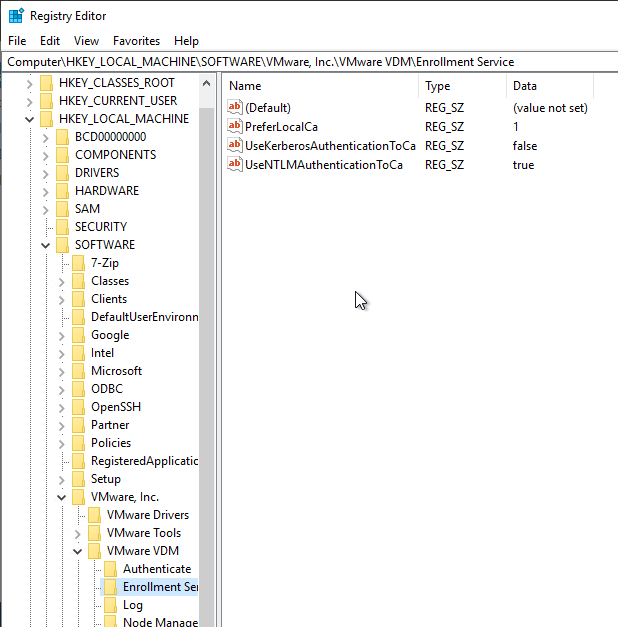
- Under Enrollment Service, create a new String (REG_SZ) value named PreferLocalCa and set it to 1.
- Also add string values for UseKerberosAuthenticationToCa = false and UseNTLMAuthenticationToCa = true
- If you have two Enrollment Servers, then repeat this entire section on the other server. This includes requesting the Enrollment Agent certificate, installing the Enrollment Server software, and setting the PreferLocalCa registry value.
Trust
- Log in to a Connection Server and run certlm.msc.
- On the left, expand VMware Horizon View Certificates and then click Certificates.
- On the right, find the certificate with the Friendly Name vdm.ec, right-click it, expand All Tasks, and then click Export. All Connection Servers have the same certificate so you only need to export from one of the Connection Servers.

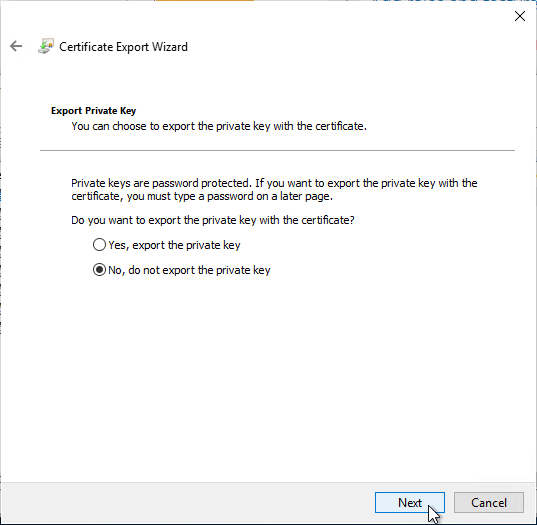
- In the Export Private Key page, select No, do not export the private key, and then click Next.
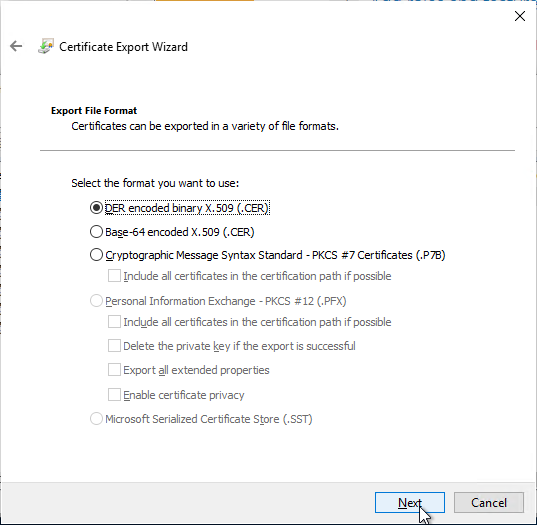
- In the Export File Format page, leave it set to DER, and then click Next.
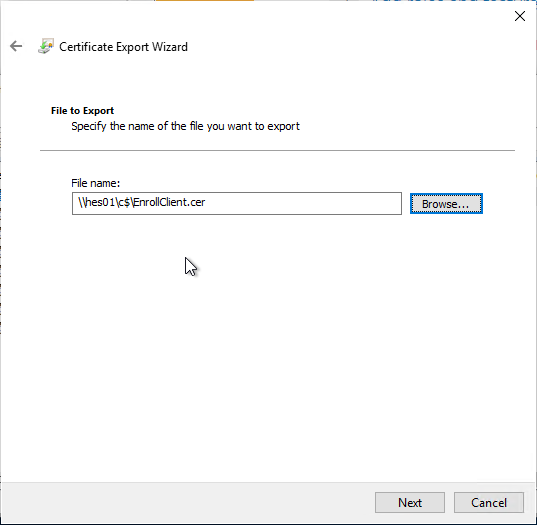
- Save the certificate to a file that you can access from your Enrollment Server(s).
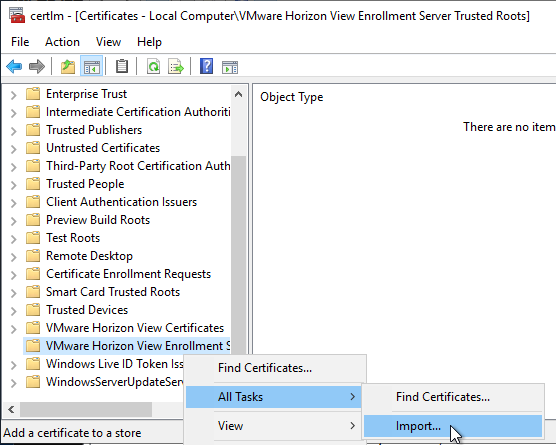
- Log in to an Enrollment Server and run certlm.msc.
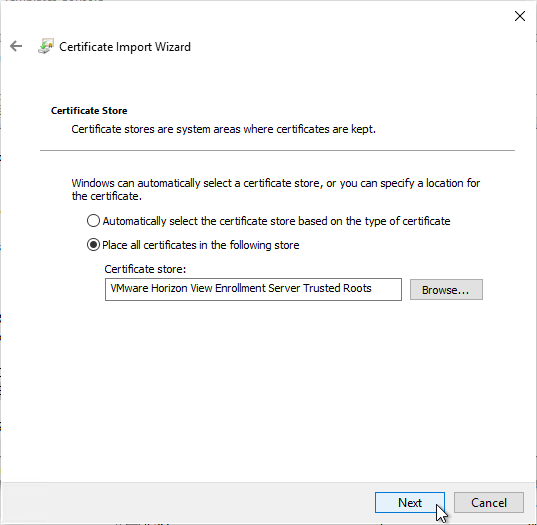
- On the left, right-click VMware Horizon View Enrollment Server Trusted Roots, expand All Tasks, and click Import.
- In the Welcome to the Certificate Import Wizard page, click Next.
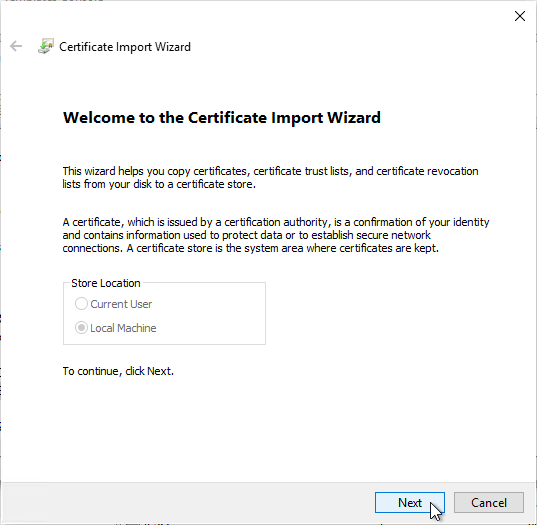
- In the File to Import page, browse to the certificate that you exported from the Connection Server and then click Next.

- In the Certificate Store page, VMware Horizon View Enrollment Server Trusted Roots should already be selected so just click Next.
- In the Completing the Certificate Import Wizard page, click Finish.

- Repeat the certificate import process on the other Horizon Enrollment Server.
SAML to UAG
- Login to your SAML Identity Provider (IdP) and create an application for Unified Access Gateway.
- For Okta, see Omnissa Tech Zone.
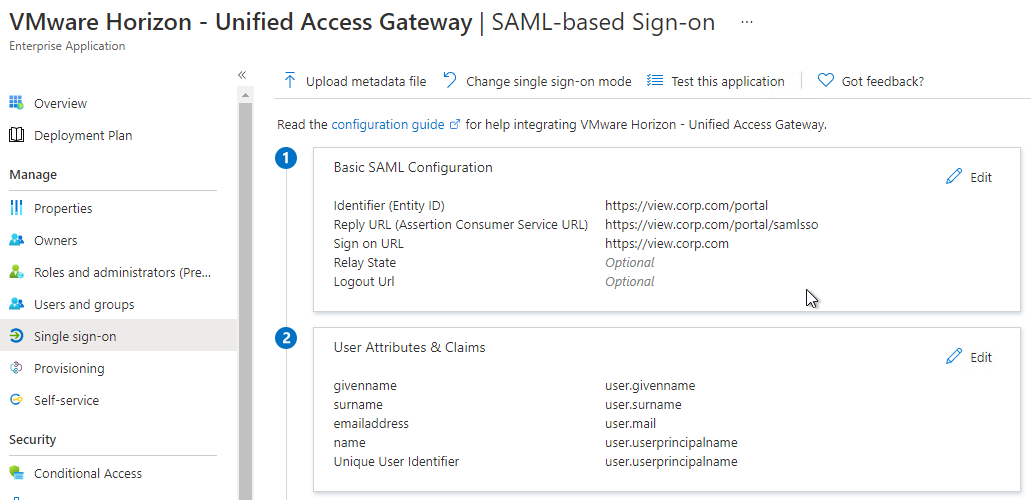
- Azure AD has a gallery application to make configuration easier. Or use the following values:
- Identifier = https://*.HORIZON_UAG_FQDN.com/portal
- Reply URL (Assertion Consume Service URL = https://<HORIZON_UAG_FQDN>/portal/samlsso
- When done, it should look something like this:
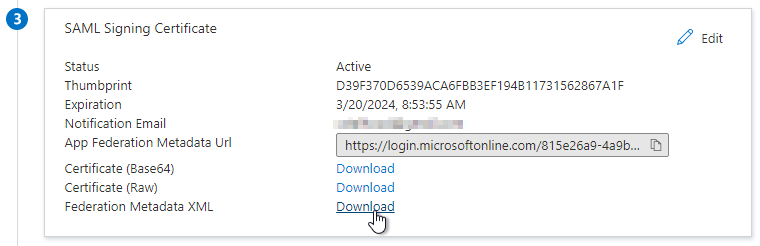
- Download the Federation Metadata XML from your Identity Provider. The Metadata Url doesn’t seem to work.
- Login to your UAG admin page (https://<HORIZON_UAG_FQDN>:9443/admin).
- Select Configure Manually.
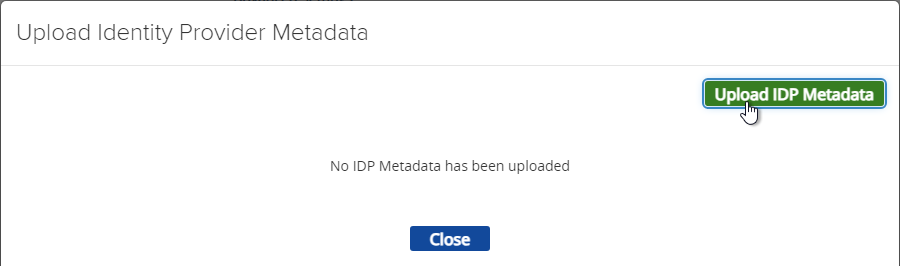
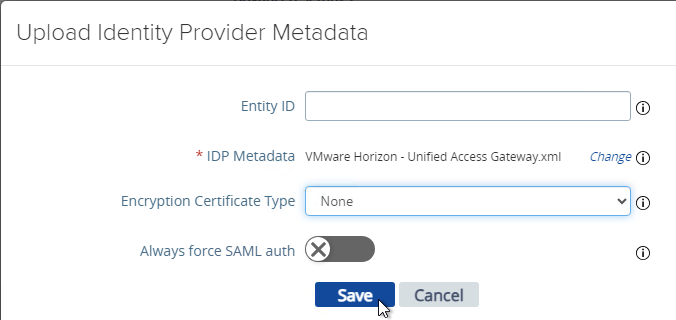
- Scroll down to the section named Identity Bridging Settings and click Upload Identity Provider Metadata.

- In Unified Access Gateway 2312 and newer, click Upload IDP Metadata.
- Click Select in the IDP Metadata row.
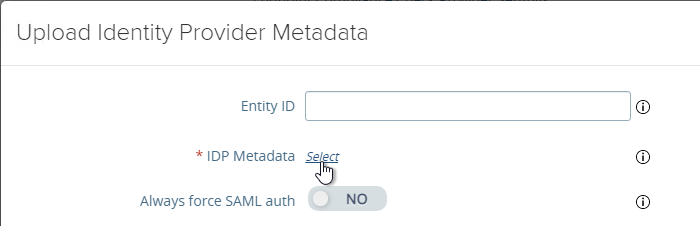
- Browse to the metadata .xml file and then click Save.
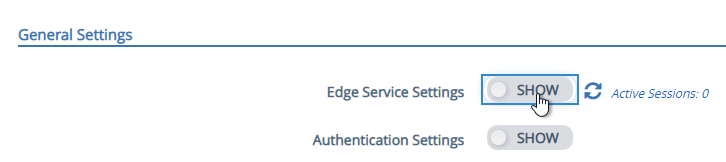
- At the top of the page, next to Edge Service Settings click SHOW.
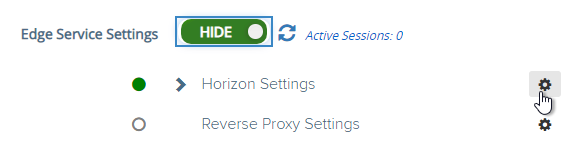
- Next to Horizon Settings click the gear icon.
- At the bottom of the page, click More.
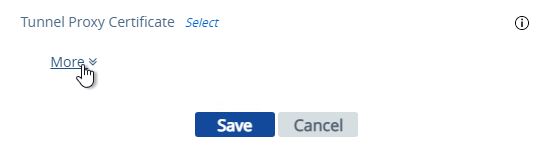
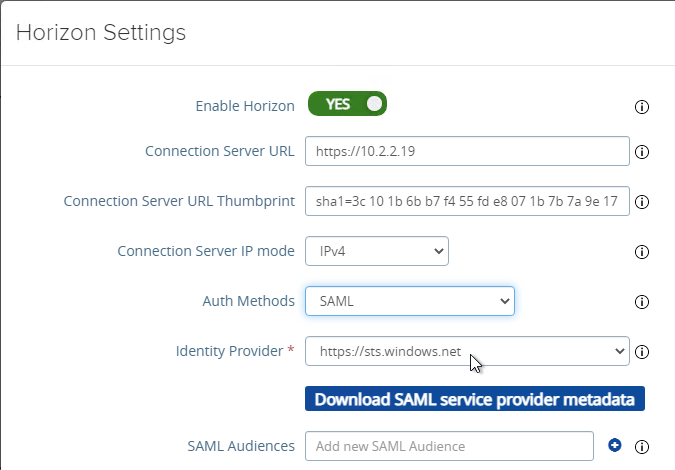
- At the top of the page, change the drop-down for Auth Methods to SAML.
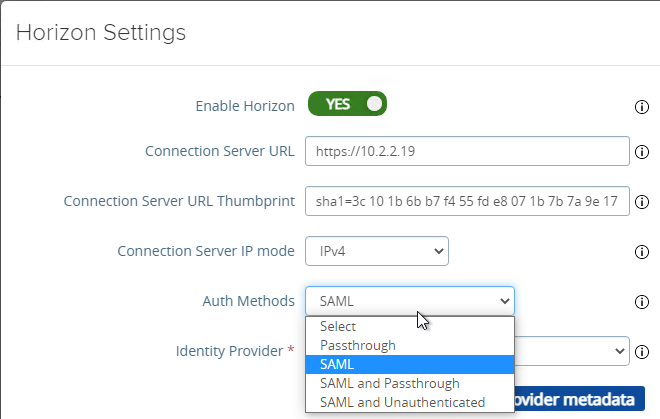
- Change the drop-down for Identity Provider to the SAML Identifier in the Metadata that you just imported.
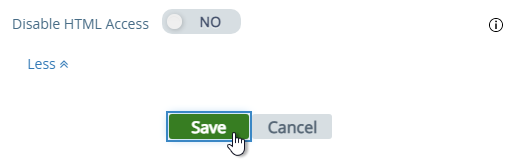
- At the bottom of the page click Save.
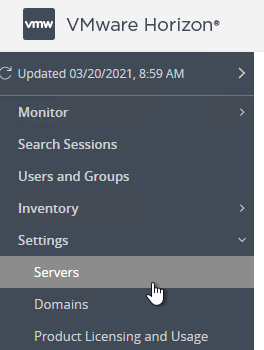
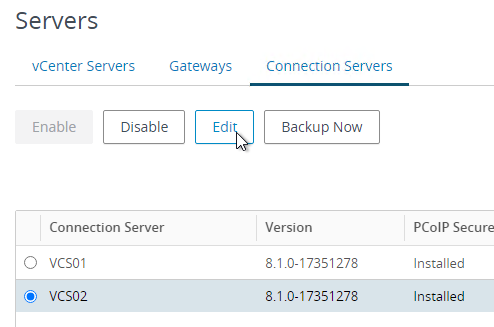
- Login to Horizon Console.
- In the left menu, go to Settings > Servers.
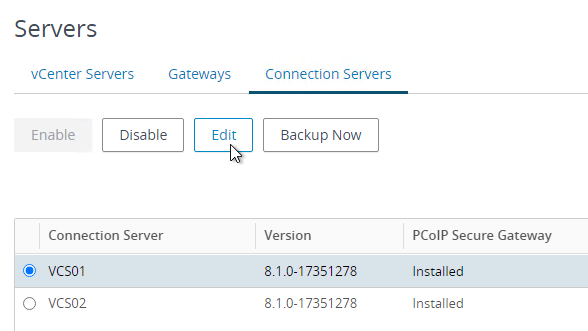
- On the right, click the tab named Connection Servers.
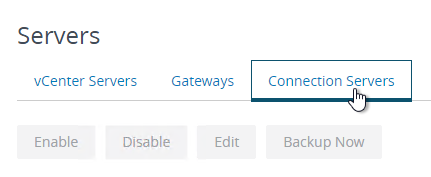
- Highlight a Connection Server that UAG talks to and click Edit.
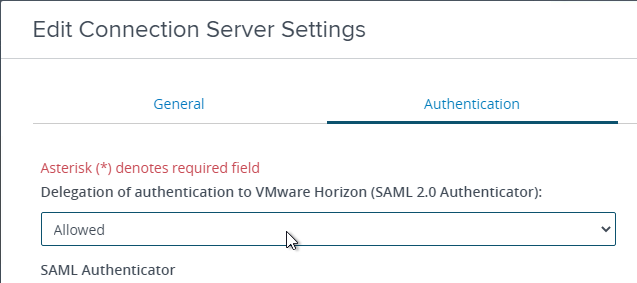
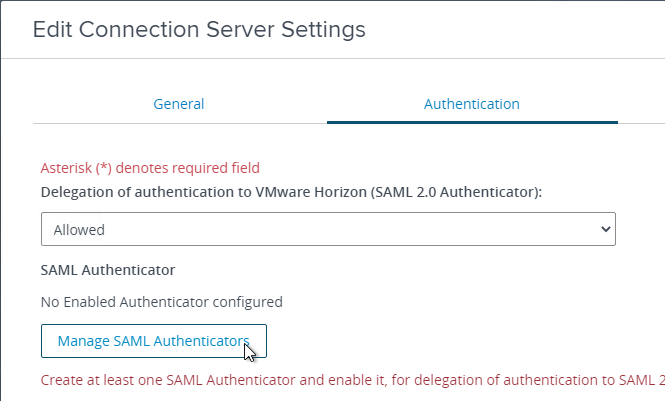
- Switch to the tab named Authentication.

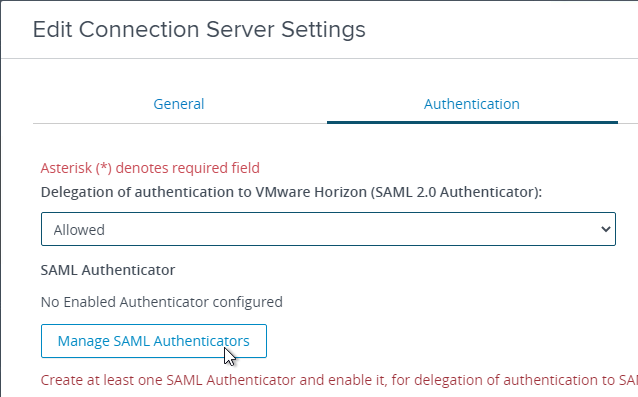
- Change the drop-down for Delegation of Authentication to VMware Horizon (SAML 2.0 Authenticator) to Allowed.
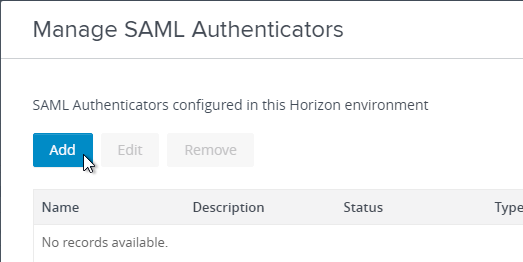
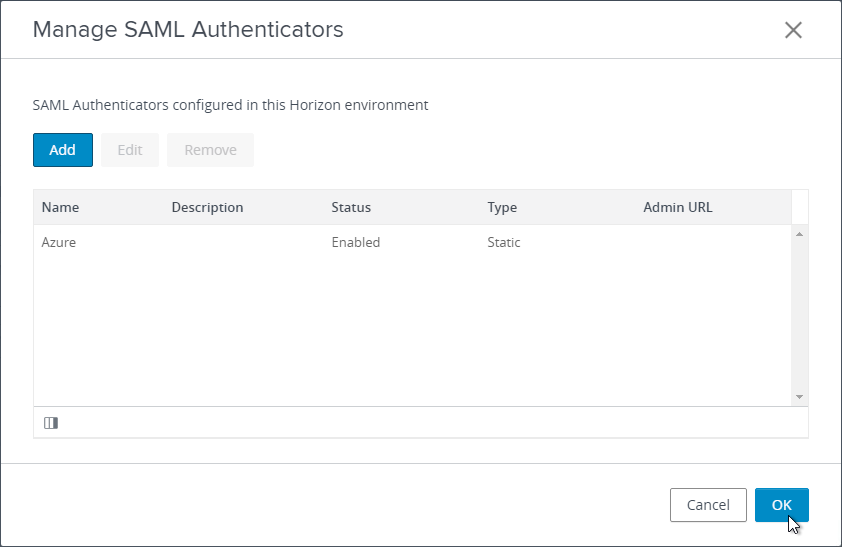
- Click the button named Manage SAML Authenticators.
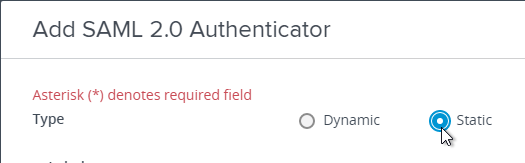
- Click Add.
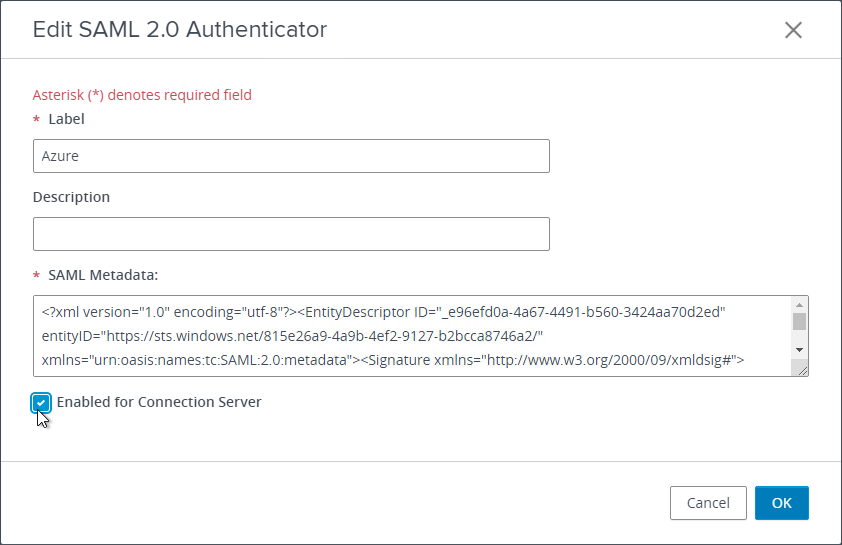
- Change the selection for Type to Static. Dynamic seems to only be valid for Omnissa Access.
- Go to your Metadata .xml file and edit it with a text editor. Then copy its contents to your clipboard.
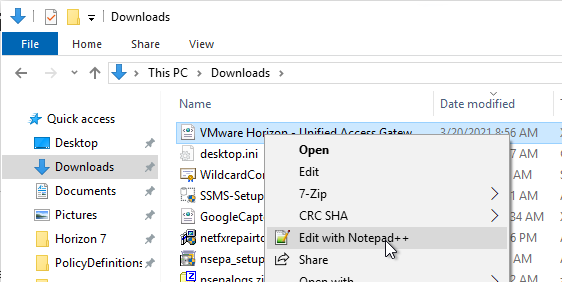
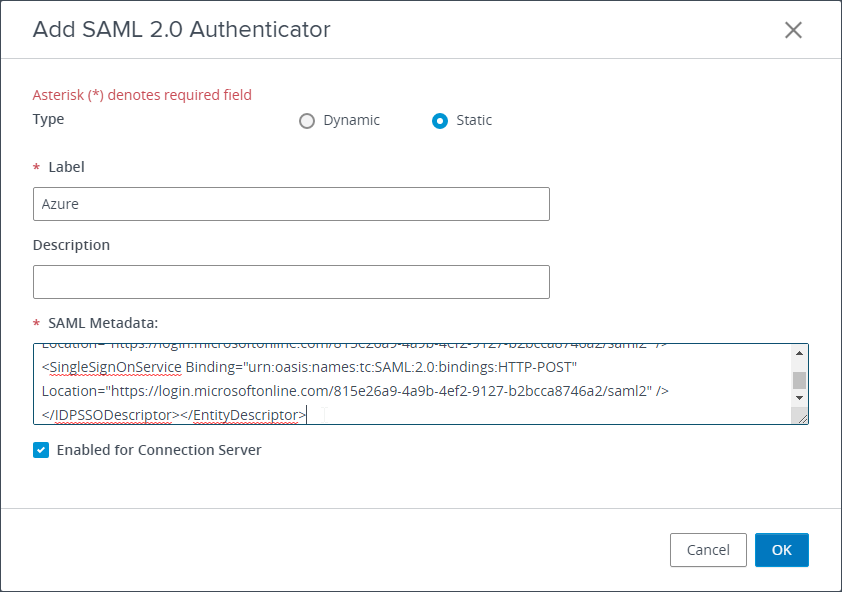
- Back in Horizon Console, in the SAML Metadata field, paste in the contents.
- Give your SAML 2.0 Authenticator a name and click OK.
- Click OK to close the Manage SAML Authenticators window.
- Edit other Connection Servers that UAG talks to and go to the Authentication tab.
- Set SAML 2.0 Authenticator to Allowed and then click the Manage SAML Authenticators button.
- The previously created SAML Authenticator should already be there so just click Edit.

- At the bottom, check the box next to Enabled for Connection Server and then click OK. Repeat on any other Connection Server that UAG talks to.
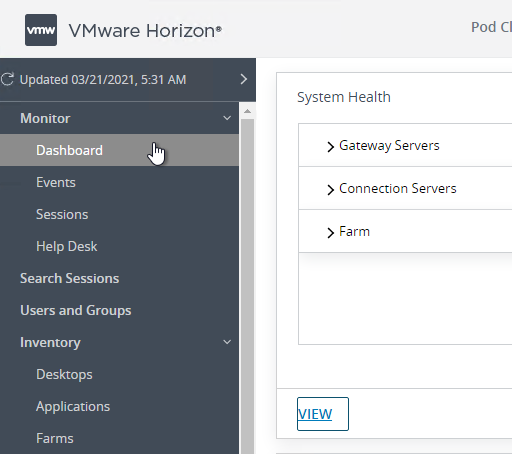
- In Horizon Console, if you go to Monitor > Dashboard and then click VIEW in the System Health section.
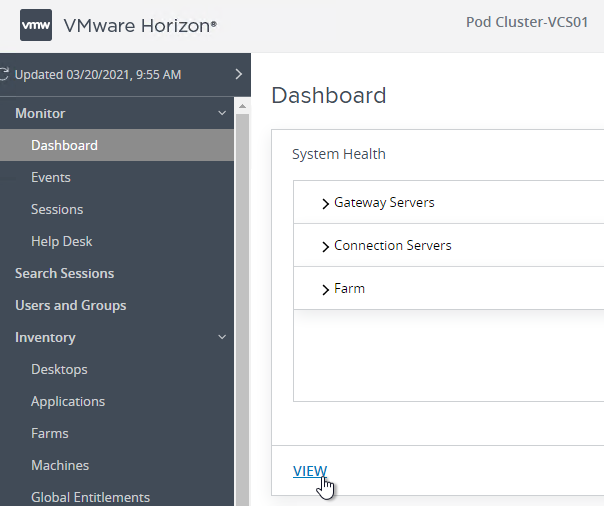
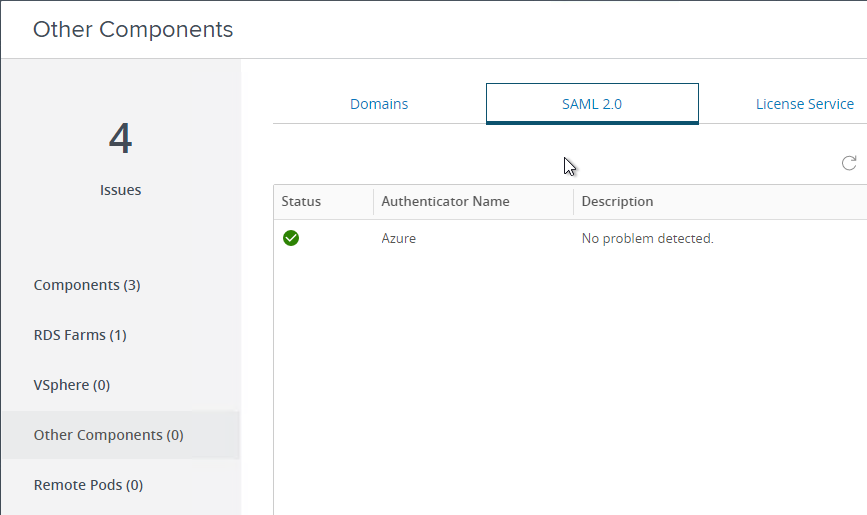
- On the left go to Other Components. On the right go to the tab named SAML 2.0. You should see your SAML Authenticator.
Enable True SSO
Login to one of the Connection Servers and open a Command Prompt as administrator. The commands in this section have case sensitive parameter names. These commands are vdmutil, not vdmadmin.
Run the following command to add each Enrollment Server. Notes:
- For the
--authPasswordfields, you enter"*"(with quotes) to be prompted to enter the password instead of specifying it at the command line. --authAsfields do not include the domain name since domain is a different field.
vdmUtil --authAs admin-username --authDomain domain-name --authPassword admin-user-password --truesso --environment --add --enrollmentServer enroll-server1-fqdn,enroll-server2-fqdn

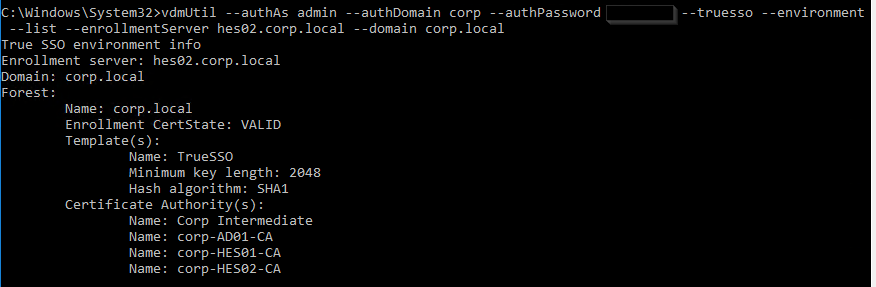
Run the following command to see the available certificate authorities and certificate templates for a particular domain.
vdmUtil --authAs admin-username --authDomain domain-name --authPassword admin-user-password --truesso --environment --list --enrollmentServer enroll-server-fqdn --domain domain-fqdn
Run the following command to enable the Enrollment Servers for a particular domain. This syntax configures the Enrollment Servers as active/passive (failover). Note: certificateServer is the CA name from the previous command and not the server’s FQDN.
vdmUtil --authAs admin-username --authDomain domain-name --authPassword admin-user-password --truesso --create --connector --domain domain-fqdn --template TrueSSO-template-name --primaryEnrollmentServer enroll-server-fqdn --secondaryEnrollmentServer enroll-server-fqdn --certificateServer ca1-common-name1,ca2-common-name --mode enabled

Run the following command to see the SAML Authenticators configured in Horizon Console.
vdmUtil --authAs admin-username --authDomain domain-name --authPassword admin-user-password --truesso --list --authenticator

Run the following command to enable True SSO for a particular SAML Authenticator. Enter either ENALBED or ALWAYS.
vdmUtil --authAs admin-username --authDomain domain-name --authPassword admin-user-password --truesso --authenticator --edit --name authenticator-name --truessoMode {ENABLED|ALWAYS}

For more info, see Command-line Reference for Configuring True SSO at Omnissa Docs.
If you prefer to load balance your Enrollment Servers instead of active/passive, do the following:
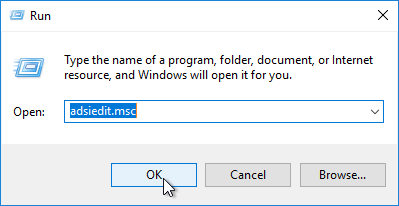
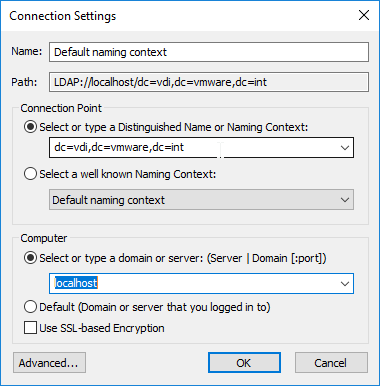
- On a Connection Server, run adsiedit.msc.
- Change the Connection Point to dc=vdi,dc=vmware,dc=int.
- Change the Computer to localhost and then click OK.
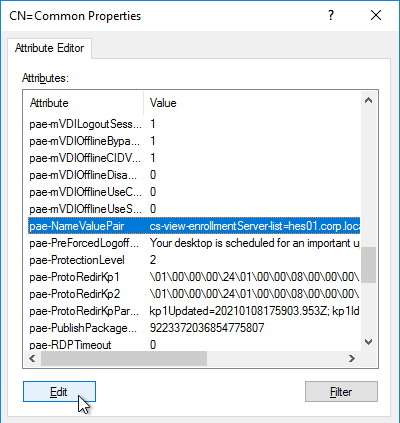
- On the left, expand Properties, and then click Global.
- On the right, double-click Common.

- Find pae-NameValuePair in the list and Edit it.
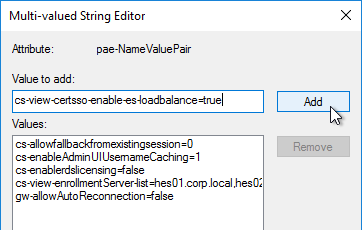
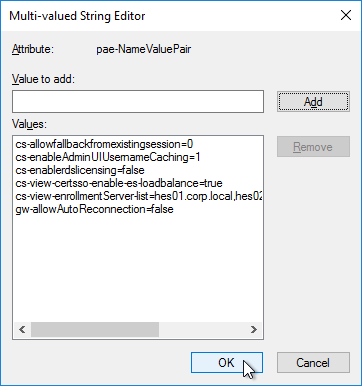
- Enter cs-view-certsso-enable-es-loadbalance=true and then click Add.
- Click OK a couple times to close everything.
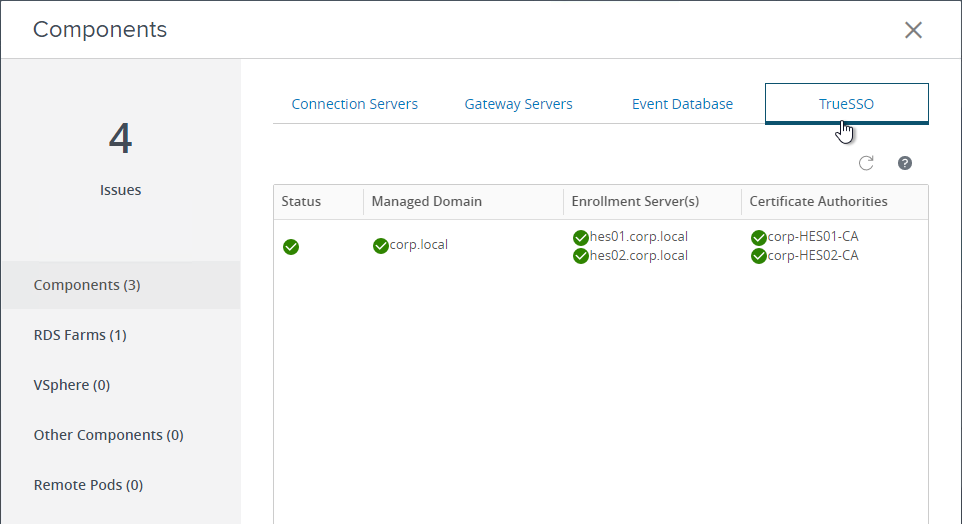
You can view the status of True SSO in Horizon Console.
- In Horizon Console, go to Monitor > Dashboard and on the right, in the System Health section, click VIEW.
- With Components selected on the left, on the right is a tab named TrueSSO.
Hello,
does it possible to configure SAML auth directely on Connection Server from IDP third Party like EntraID,PingId without usage of UAG ?
Hi Karl, I’m using Authentik as the SAML identity provider (IdP). The issue I’m encountering is that after accessing UAG and being redirected to Authentik, when authentication succeeds and it attempts to redirect to the CS interface, an error occurs:This Horizon server expects to get your logon credentials from another application or server, not directly through the client login screen. if you usually access Horizon from another application, please launch that application.
Thank you again for your help.
Dear Carl,
We are facing in issue in Enrollment server SSO not working, as per the logs from Connection server and Enrollment server getting below error. Please suggest.
From connection server side, we see certificate generation is failing:
2025-08-14T13:20:23.955+03:00 ERROR (0D94-21C4) [ESConnectionManager] CertSso: Certificate generation request failed, userName: V00036, domainName: XXXXXXX, domainFqdn: corp.XXXXXXX.com, template: [name:TrueSSO,hashAlgorithm:SHA1,minKenLength:2048] used EnrollmentServerChannel: gamma-es01dr.corp.XXXXXXX.com, Reason: EsChannel: gamma-es01dr.corp.XXXXXXX.com, Error: -2146893819, ErrorText: Error Constructing or Publishing Certificate – 0x0000000080090005 (Bad Data.), EsReason: SubmitFailureMayRetry, pkcs10Req: [MIICdTCCAV
2025-08-14T13:20:23.963+03:00 ERROR (0D94-21C4) [CertificateRequestHandler] CertSso: Failed to process certSso request, userName: V00036, domainName: XXXXXXX, desktop: cn=e97da9bb-0ef1-488d-8b61-c94188cc845c,ou=servers,dc=vdi,dc=vmware,dc=int, desktopCertSsoContextId: 0e566c55-ccff-49c5-afcf-c8cd08e34968, Reason: Certificate generation request failed and not resubmitted, userName: V00036, domainName: XXXXXXX, domainFqdn: corp.XXXXXXX.com, template: [name:TrueSSO,hashAlgorithm:SHA1,minKenLength:2048]
===========================================================================================================
From the enrollment server side, we can see the following failure occurring when publishing certificate:
2025-08-14T13:20:22.837+03:00 DEBUG (1A78-1B2C) [wsnm_certenroll] EnrollmentServices::SubmitRequest(): Requester: XXXXXXX\V00036
2025-08-14T13:20:22.837+03:00 DEBUG (1A78-1B2C) [wsnm_certenroll] RequestQueue::Submit(): Queue Request id=1
2025-08-14T13:20:22.837+03:00 DEBUG (1A78-0DE0) [wsnm_certenroll] RequestQueue::QueueHandler(): Submit id=1 to CA: BBYN-CA22-FB
2025-08-14T13:20:23.938+03:00 DEBUG (1A78-0DE0) [wsnm_certenroll] Certificate Request to BBYN-CA22-FB Failed (retry = 0) hr=0x00000000 – disp=0x80090005 Error Constructing or Publishing Certificate
2025-08-14T13:20:23.938+03:00 ERROR (1A78-1B2C) [wsnm_certenroll] EnrollmentServices::SubmitRequest(): Error Constructing or Publishing Certificate – 0x0000000080090005 (Bad Data.) – ErrorCode = 2148073477 (0x0000000080090005)
2025-08-14T13:20:23.938+03:00 ERROR (1A78-1B2C) [wsnm_certenroll] CertEnrollService::CertEnrollOperation::SubmitRequestHandler(): Error Constructing or Publishing Certificate – 0x0000000080090005 (Bad Data.) – ErrorCode = 2148073477 (0x0000000080090005)
Hi Carl,
We are having Azure PRT issue when we access the VDI session from an external UAG link.
We’ve observed the following behavior:
• When the Horizon Client session is locked and then unlocked, a Primary Refresh Token (PRT) is issued, and Single Sign-On (SSO) to Azure resources starts working as expected.
• This indicates that the PRT is not issued during the initial login when connecting via the external Unified Access Gateway (UAG) using Okta SAML.
The core issue appears to be that the PRT is not being issued at session logon via UAG + Okta SAML, which prevents SSO to Azure AD resources initially. However, locking and unlocking the session triggers the issuance of the PRT and resolves the SSO behavior temporarily.
Hi Dinesh seen this in multiple occasions with Entra federated to 3th party IDP (WS1 Access). You are probably using TrueSSO.
In this case the PRT will fail because it will try to login with WS-Trust certificate mixed (you can see this when looking at dsregcmd /status) the endpoint it tries to login will be the Okta URL since you federated it.
The endpoint probably not supported by Okta (this is the issue I’m having with Access. the endpoint is mainly supported by ADFS) for WS1 Access Omnissa is actively working on it and expect a solution soon.
I don’t know if Okta will support the endpoint it. You could contact Octa or wait till Microsoft will change the default endpoint.
The reason it works when locking and unlocking is you enter a password. A temporary workaround to get it “predictable” is to disable trueSSO. Not the most user friendly workaround but at least predictable for the enduser.
Edwin de Bruin
Solution Architect Digital Workspace @ ITQ
Omnissa Techinsiders
http://www.debruinonline.net
the PRT issue is fixed by Omnissa, I wrote a short blog post about it: https://www.debruinonline.net/post/the-hybrid-join-incident-recovering-the-lost-prt
Hello,
I am on the step enabling True SSO, verifying the cert templates are available after adding the enrollment server, but I get “Enrollment Server Not Found” even though it was added successfully. I get this error after running-
“vdmUtil –authAs admin-username –authDomain domain-name –authPassword admin-user-password –truesso –environment –list –enrollmentServer enroll-server-fqdn –domain domain-fqdn”
My connection and enrollment servers are on the same subnet, but my PKI server isn’t. I am thinking it might be a firewall block, but am unsure what ports are needed from the connection/enrollment servers to the pki server.
Thanks!
Getting a “Retry View SSO” error after clicking on the desktop. Event logs show Event ID 39 “The Key Distribution Center (KDC) encountered a user certificate that was valid but could not be mapped to a user in a strong way (such as via explicit mapping, key trust mapping, or a SID). Such certificates should either be replaced or mapped directly to the user through explicit mapping. See https://go.microsoft.com/fwlink/?linkid=2189925 to learn more.”
https://support.microsoft.com/en-us/topic/kb5014754-certificate-based-authentication-changes-on-windows-domain-controllers-ad2c23b0-15d8-4340-a468-4d4f3b188f16
Anyone else have this issue?
Were you able to resolve this? If so, how? We’re receiving the same error.
Hi Carl,
We are using Entra MFA as the SAML provider. We stitched all the pieces(Entra to UAG to CS to Enrollment Servers) well and user login works fine. But some of the Windows Apps like Teams, Outlook doesn’t launch automatically. We have an internal policy (unrelated to my above setup) for users to authenticate with Entra for Office apps. So, it prompts users Entra Auth some times. its not regular though. I am feeling that Windows Client is not passing the credentials to apps and that’s why they are not auto launching. It works fine with our current RADIUS based MFA that is integrated with Connection Servers. What do you think could be the issue?
Hello,
I work in an organization using Entra. From there, I reach the F5, then to the Connection Server, and from there, I’m exposed to the pools and directed to the Enrollment Server, which is also the CA. I choose to connect to a workstation, but it requires a password during login, meaning True SSO isn’t working. Everything seems properly configured, and in the View CS, I see that True SSO is enabled.
I ran Wireshark and I can see that during the connection attempt, there’s traffic from the Connection Server to the Enrollment Server on port 32111.
What could be the reason that the CS is not able to request a certificate from the Enrollment Server CA?
Hi Carl,
thanks for your greate write ups/tutorials. really appreciating…
does truesso only work with uag or also direct to the connection server?
my setup and truesso works if i come through the uag. but if i conntect directly to the connection server the horizon client asks for username/password.
thanks!
Hi Carl, we are having an issue with the TrueSSO portion of this setup. During testing with the client and also running the diag tool provided by Omnissa we are getting failures with the cert. In both instances we see a generic “Parameter is incorrect” error. Below is the output. Any ideas what the issue might be? We have open cases with Microsoft and Omnissa and no luck so far. Thanks!
D:\Diag\True_SSO_Diagnostic_Utility>es_diag.exe /enrollmenttest /domain:our domain name /requester:corp\myusername /template:SCMTrueSSO /caserver:corp-BRD03W216-CA /debug
Execute EnrollmentDiags::EnrollmentTest:
Connect to the Enrollment Service: localhost
Connected to the Enrollment Service
GetAPIVersion Successful
Open the Enrollment Context
OpenConnection Successful
Successfully connected to the Enrollment Server
Configure the enrollment service for the selected domain
Wait up to 30 seconds for the Active Directory to be read
Wait for up to 30 sec for the ES to Sync with the domain
Use CAServer: corp-BRD03W216-CA
SetConfiguration Successful
Get Enrollment Properties
GetEnrollmentStatus Successful
Successfully Retrieved the Enrollment Status
Generate a PKCS10 Certificate Request
Send Cert-Request(s) to the enrollment service:
Call to CertEnroll failed: Submit Failed – 0x0000000080070057 (The parameter is incorrect.) – ErrorCode = 2147942487 (0x0000000080070057), 1
SubmitRequest Failed
Response ErrorCode = “-2147024809”
ErrorText = “Submit Failed – 0x0000000080070057 (The parameter is incorrect.)”
FailureReason = “SubmitFailureMayRetry”
If you run certlm.msc and manually try to request a certificate using your True SSO template, does it work?
Yes it successful when manually requesting it with certlm.msc from the enrollment server
Hi Carl,
“The SAML Assertion from 3th party IdP needs to send a userPrincipalName that matches the userPrincipalName in your local Active Directory.”
Is there a way to make this work when the IdP doesn’t have the UPN’s but only a user attribute (employee number) that corresponds to a custom user attribute in our AD?
Can the connection server do some attribute mapping to a UPN based on the particular attribute or would we need an additional component to do so?
We are migrating to EntraID from Secure Auth and we were successfully able to enable True SSO and users are able to login successfully using SAML. But the problem we noticed was the VDI’s which are hybrid azure ad joined dont get PRT and breaks the seamless SSO within the VDI and the only way to get the PRT is to force lock the device and the user enters password to get in again and seamless SSO starts working. Is there a way to get PRT on persistent VDI’s ( Horizon) automatically without using CBA and breaking user experience?
Current user exp – opens Horizon App -> selects the server -> Browser opens -> successful auth -.> back to horizon app and selects the VDI.
Everything was working fine with Secureauth
CBA is required for PRT with True SSO without user’s password.
Some SecureAuth configs send the user password and that’s why it might have previously been working.
Hi Carl,
would you setup Entra CBA with the same PKI (root ca) as used for True SSO, would that cause seamless login to 365?
This is for our lab environment. Instead of logging in to the UAG, I want to be able to login with just a certificate. Any thoughts on the best way to accomplish this?
Smart cards. https://docs.omnissa.com/bundle/UnifiedAccessGatewayDeployandConfigureV2412/page/Certificateandsmartcardauthentication.html
Hi,
The trueSSO setting work fine for us.
We use the company (sub)CA server te issue the certificates. Our company is planning to migrate the CA servers a to Azure VM.
The CA server’s ip-address will change, but the DNS entry will be changed also. So the CA server stays reachable.
We have stable and redundant connections to the Azure VM. What concerns me is that there is a bit more latency in the connection to the Azure VM compared to the local network connection.
Do you think this will effect the TrueSSO login process (in the way that we get timeout errors or something)?
Regards
I doubt it, but I haven’t tested high latency.
Hi,
is there a way the Horizon Client can force or trigger a specific User / Login for the Azure MFA part? We have Users working from their private computer where a private O365 / M365 is used an this accounts is of course brought up when an attemp of sign is made and there is no option to change the account at the O365 / M365 login prompt (only the MFA method).
Workaround for me was to sign in to office. com with the primary private account and than sign in with a different (the business) account so the browser “knows” the login and gives a choiche when loggin into Azure the next time.
Not all Endusers are familiar with this and need help with this method. So, is there any way the correct account can be forced when Horizon triggers the sign in to Azure without the workaround?
Daniel
Since the actual authentication occurs within the Azure MFA part, I don’t think there would be a way for Horizon Client to pass anything to it. If you’re using UAG, what you might try is enabling the “Always force SAML auth” option when uploading your IDP metadata (seen in the screenshot of step 11 in Carl’s “SAML to UAG” section, here: https://www.carlstalhood.com/vmware-horizon-true-sso-uag-saml/#samltouag).
Trying to set up truesso with Azure MFA for our production view implementation.
It’s a typical UAG to connection server setup.
Azure with mfa works flawlessly, and gets me to the Horizon client session choice screen. Once I a launch a session, it takes about 15 seconds before it times out and we get a regular windows logon prompt, so Truesso is not working. Obviously, when I disable truesso in View the windows login prompt comes up immediately after launching a session. I checked our our CA tied to our enrollment server and the CA never issues a certificate to the user. I set everything up correctly in our DR location and truesso works fine there. We do have quite a restricted network for production. What needs to communicate with what over what ports for truesso to be successful?
I ended up resolving this. Permissions on the truesso template for the enrollmnt server has the issue.
True SSO with Azure has been setup and is working great but its time to renew the certificates for this. Haven’t visited this since we set it up a in 2021 so any guidance would be appreciated.
reading all documentation again as its been a while since I set it up……..I think this is the process I need to follow for the azure app update.
Azure app cert update
Get new cert in enterprise app with new XML metadata file to download.
Import xml metadata into both UAG identity bridge settings upload provider metadata……and then have the horizon portion of the UAG use the new metadata stuff you just imported
Go to horizon connection server console….
Settings……servers….connection servers
Edit both connection servers authentication for saml authenticators and edit the current one named you named and then change the data by importing the xml data manually cutting and pasting out the xml file.
This command was run at the end to set true sso to use the saml connection name we setup
vdmUtil –authAs (username) –authDomain (domain) –authPassword “*” –truesso –authenticator –edit –name “azure uag” –truessoMode ALWAYS
Since it uses the saml authenticator name I will probably want to just edit the above saml authenticator for the connection servers so I don’t have to update the name with that command?
Once I get this part updated I am still looking for some guidance on updating all the certs within the enrollment servers and out CA and Connection servers.
Hey Carl,
I would like to provide one feedback on step no.27 under section SAML to UAG. Please mention uploading the Azure IDP metadata to the connection server. This confused a lot of customers that they were uploading the metadata downloaded from UAG to CS, and then it failed.
Hi Carl,
Bizarre Issue here. We have 4 UAG Servers going to 4 separate Connection servers in 2 different PODS (each POD has a connection server handling internal and external connections via their connected UAGs), 2 external facing UAGs and 2 internal. Our 2 external facing UAGs yesterday gave everyone an error message.
“This Horizon Server expects to get your logon credentials from another application or server, not directly through the client login screen. If you usually access Horizon from another application, please launch that application.”
On your step above, SAML to UAG step 5. We had to redownload the Metadata from M365 and reenter it in step 29. This resolved the issue.
Now today, We had the same issue happen to our internal UAG servers, users were getting the same message but our external UAG servers were fine. We did the same process and now everything works again. As side note we want all users to authenticate with Microsoft Authenticator to the UAGs to get into VDI both external and internal. It is working but we are now running into this issue.
Could there be something in the Metadata in step 29. because it is shared between internal and external connection servers?
Thanks,
Keith
Did you ever find a fix for this? I’m having a very similar problem.
We did not fix the issue. Every 60 days or so we have to reload the metadata. What I am thinking may work, but have not tested the yet, is to create only 2 apps in MS365, 1 per pod, and adding both URLs in one app.
Basicly it would look like this:
Pod1 APP1
Connection Server 1 (Internal) https://connection1.SomePublicDomain.com
Connection Server 2 (External) https://connection2.SomePublicDomain.com
Both URLs will be added the APP1
Pod2 APP2
Connection Server 3 (Internal) https://connection3.SomePublicDomain.com
Connection Server 4 (External) https://connection4.SomePublicDomain.com
Both URLs will be added the APP2
Again, I have NOT tested this yet.
Hope this makes sense.
Thanks,
Keith
When this occurs, is it every user or random users?
It is for anyone who tries to use that UAG.
Hi
I am using palo alto global protectin horizon vdi, once we login to vdi using horizon client and gp get connected we loose vdi connection from horizon. As gp install another network card and connect to there gate on internet.
Basically it create vpn
If there any way we can use 2 nic on vdi?
What configuration need made we never loose connection our network used for horizon client
Hi Carl,
In the middle of a new UAG deployment and working on SAML/TrueSSO. We have it working with our Azure (Entra) configuration, BUT, is there a way to force the Portal page to go right to Authentication? I’m getting push back because right now if you connect externally, you get the Portal page unauthenticated, and you need to click either Native Client, or HTML access, for it to prompt for Login.
Tried the enable.download=false trick, but it completely bricks the portal page and nothing loads. Any advice will be helpful, cheers!
Hi Carl,
Great guide.
We connected our on-prem Horizon environment to Azure AD / Entra ID and it works great.
I’m being asked to eliminate the authentication part in the browser (pop-up) and do the authentication against Azure AD in the Horizon client (without browser).
Is that even possible?
I don’t think Horizon Client supports web-based authentication methods.
Hi Carl,
Thanks for sharing this great guide with us.
Following on from the deployment, what would be the process if the enrolment agent (computer) certificate expires on the enrolment servers, would it just be a case of requested the certificate from personal certificates? Is there any other configuration?
Yep. It doesn’t need to be bound anywhere.
Hi Carl,
We have UAG and onprem horizon. UAG is SAML integrated with Azure AD. So when user key in UAG URL, it will redirect to Azure to do authentication.
If Azure AD doesnt sync user from onprem AD (dont have azure AD connect), in this case, can customer still use TrueSSO with enrollment server?
The SAML Assertion from Entra needs to send a userPrincipalName that matches the userPrincipalName in your local Active Directory.
Hello,
SAML to UAG – step 16
Followed the guide and getting certificate errors when selecting the Identity Provider and saving it. Anyone have any insight? Thanks!
Hi Carl, thank you very much once again for your great work and community spirit.
Just one question about this solution, do you know whether this is a VMware supported solution? I ask because everywhere I look for documentation I see that TrueSSO should be configured with Workspace ONE Access.
Thanks again!
Yes. See https://techzone.vmware.com/enabling-saml-20-authentication-horizon-unified-access-gateway-and-okta-vmware-horizon-operational
Got a strange one we cant pinpoint. TrueSSO set up and working fine using Azure SAML and UAG. However recently users are doing SAML authentication and then in the Horizon client they are also prompted for authentication again as if they were an internal user.
Is there any logging on the enrolment server that can be checked to see if any errors? In the dashboard TrueSSO is all green.
We had the same situation. At first it worked like it should but then it switched to double authentication. Be sure to check all UAGs to be set to use only SAML and not SAML with Auth. When setting this to only SAML everything no works as it should.
Can you implement True SSO while maintaining the standard authentication with Active Directory? Or do I need to plan downtime for implementation and testing?
Yes. True SSO is independent of UAG authentication. True SSO isn’t turned on until the last step in the procedure and it can be set to ENABLED_IF_NO_PASSWORD.
Hey Carl – we have True SSO successfully setup and working. One odd thing we’re seeing is when Edge is used as the default browser, we aren’t prompted for MFA after our initial login. Once we launch Horizon the Edge window pops up and then we are logged into Horizon without any input.
When using Chrome as the default browser we’re prompted for MFA at every login. Have you seen this or have any thoughts as to why Edge is acting differently for us?
Enable “Always force SAML auth” https://docs.vmware.com/en/Unified-Access-Gateway/2312/uag-deploy-config/GUID-863656E2-F306-44C8-B186-70D45F1E73FC.html
Hey Carl – Love your guides and have been following them for years with our View Environment. I followed this guide and got everything working with TrueSSO and our internal PKI (not installed on the Enrollment servers like your example above). Prior to installing TrueSSO I was able to log in through my Azure UAG and was getting prompted for password again at the desktop which worked as expected, but now that TrueSSO is configured and enabled, I’m getting the following error message when selecting one of my VDI pools with static VDI machines:
“The View agent reports that this desktop source is unable to accept connections. Please contact your system administrator.”
The GUI logs indicate that the machine is not ready to accept connections, but the VM is idle with no user connected after a fresh restart. Any thoughts on why I’m getting this error? We’re currently on version 2306 in the environment.
Does every Domain Controller have a certificate?
Does the certificate configuration match exactly what is shown in this article?
Can the Domain Controllers access the CRLs of the issuer of the True SSO certificates?
Download the VDM debug log and see what it says.
Thanks Carl – Yes the PKI has been turned up in our environment for several years now and working for dot1x auth on our endpoints. I did verify the certificate templates match exactly what you have and what the VMware documentation shows. Checking the logs I found the following (some details ommitted):
(SESSION:93f0_***_f45b) [DOMAIN\USERNAME, Desktop=POOLNAME] (9ms): Attempted to start new managed session.
(SESSION:93f0_***_f45b) [DOMAIN\USERNAME, Desktop=POOLNAME] (78ms): Application launch failed, exception was: The agent returned an error response [ERROR-CODE=AGENT_ERR_SSO_REQUIRED]
2024-01-08T14:05:43.832-05:00 WARN (1AC4-0D94) [SessionEventData] UserDn is missing for session in connected state NONE
2024-01-08T14:05:52.696-05:00 ERROR (1AC4-0D94) [JMSMessageSecurity] (type CHANGEKEY from anonymous) Message validation failure: Signature validation failed: Signature invalid for identity
agent/1b05088e-8131-4761-aeb2-6b94a2ad0b25
2024-01-08T14:05:52.696-05:00 WARN (1AC4-0D94) [DesktopTracker] CHANGEKEY message from agent/1b05088e-8131-4761-aeb2-6b94a2ad0b25 is discarded as it cannot be validated
I found an article related to the [ERROR-CODE=AGENT_ERR_SSO_REQUIRED] where they point out a discrepancy in the Certificate Template, but after validation our template is set up correctly on our CA. Our TrueSSO status shows green in the Connection server dashboard as well. I’ll likely make a case with VMware regarding this to check our environment as I’ve followed your guide to the mark as far as I’m aware.
After working with VMware support today, we changed the TrueSSO Template in our PKI to use 2048 key length instead of 4096 (what our PKI is set to issue). Once doing this TrueSSO worked flawlessly. VMware confirmed 2048 is a hard limit set on their end. I requested a feature request to increase the length supported but fat chance we’ll get that within the next few years!
(Also, can you edit out my last name on the first post please and thanks!)
Hi Devin, I also stumbled across the key length of 4096. Thanks for the TIP. Is there an official statement from VMware? What about the Enrollment Agent, is it allowed to work with a key length of 4096 or does it also have to be limited to 2048?
We only changed the certificate template to 2048 that I recall. I didn’t have to re-issue our enrollment agent certificate from my recollection.
Hi Carl,
Thanks for this detailed configuration guide.
We have setup TrueSSO for an on-prem Horizon pod with WorkspaceOne Access and Yubikeys for MFA. The POD resides behind F5 load balancers. I can login the WorkspaceOne Access with the Yubikey , but when we launch a desktop pool in WorkspaceOne we are not passed through to the desktop automatically. We are also prompted for a username and password before the desktop opens. Could this error be relevant to this issue?
[RouterSSLEngineFactory] Certificate thumbprint verification failed, no stored thumbprints. Presented identity: agent/951d335d-a356-49f6-86c2-5783157b6962
Also, all es_diag and vdmutil commands return successfully. and the TrueSSO results in the Horizon console are show a green status with no errors.
Windows supports two authentication methods: Passwords, or certificates. Most modern authentication methods do not provide a password so True SSO is instead used to generate certificates that can log into Windows. If you are using custom certificates, make sure the CA is configured as the Enterprise Trust (NTAuth) for Smart Card authentication.
Hi Carl,
Thank you for your guides on Horizon, it has helped me a lot! I have gotten almost everything to work, but there seems to be some kind of issue with the passing of the TrueSSO certificate. I’m using Okta for SAML authentication, that works well, but once I have logged in to Horizon View via UAG and try to access the cloned desktop I get thrown this error:
“Indicates a referenced user name and authentication information are valid, but some user account restriction has prevent successful authentication (such as time- of- day restrictions). The user account’s password has expired.”
I have checked the user account settings in AD but there should be no time-of-day restrictions or password expiration enabled.
Help much appreciated
The SAML Assertion from Okta includes the same Name ID (user UPN) as what True SSO is using to generate the certificates?
This could be the issue. Our organization have several domains which are different from the domain used in the horizon configuration (AD). I have set up the Okta directory integration to create users in AD using their Okta username + AD domain.
For example, upon Okta propagation john.doe@example1.com would become john.doe@horizon.example.com in the directory. Is there a way to set up SAML Assertion to match john.doe in Okta with john.doe in AD while the domains in the UPN are fundamentally different?
I tried the “include email name in subject name” in the SSO cert template but it didn’t help. The es_diag enrollment test works without any issues and TrueSSO status is green on the connection server.
Ultimately this is Windows Smart Card so follow the Windows Smart Card guide on third party certificate requirements.
Hi,Carl
There are no certificate templates in vdmutil list in my HCS, it’s empty
I checked certificate template security and All places that can be confirmed.
But it still failed.
C:\Users\administrator.VMWARE>vdmutil –authAs vdiadmin –authDomain vmware –authPassword –truesso –environment –list –enrollmentServer es01.vmware.local –domain vmware.local
True SSO environment info
Enrollment server: es01.vmware.local
Domain: vmware.local
Forest:
Name: vmware.local
Enrollment CertState: VALID
Template(s):
Certificate Authority(s):
Name: CA01
Environment:
Horizon Version:2309
CA:Win Server2019
Is there anything else that needs to be checked?
That usually means that the certificate template is missing a setting. Compare it with the configuration detailed in this guide and hopefully you can find what is missing. Also make sure the CA is configured to issue the certificate.
is there any way to make horizon view unlock a session if the user locked is session instead of entering his password ?
Workspace ONE Access can do it. https://docs.vmware.com/en/VMware-Horizon/2309/horizon-console-administration/GUID-102C82F0-11A3-4BBC-AC44-CE6DF05F63C6.html
Carl, all of the references are to Okta or Azure. Is Duo SAML not supported, or are you stuck using Radius?
Any SAML provider should work. The SAML IdP needs to return the user’s userPrincipalName.
Thank you for your amazing guides! I have used and refer to them extensively over the years with great success. We are however currently facing an issue after we “upgraded” our root CA from 2012 R2 up to Server 2022. This was done in the usual manner, by exporting the CA config & registry, then shutting down old OS and rebuilding new server with same name & IP address & importing the CA config & exported registry keys. This all went smoothly for everything except our TrueSSO configuration on Horizon8. Now our CA is marked red in Horizon manager and it gives a message stating:
The primary (and secondary) enrollment server is not connected to the certificate server csa1 (that’s our single root CA).
I’ve gone through the last bits of the config with vdmUtil and deleted the connector, re-added the ES servers, and re-added pointing at the CA. All those commands are successful and don’t have errors when running. Yet something is still amiss, and I don’t know where to look … any suggestions appreciated!
Anything interesting in the logs at C:\Programdata\VMware\VDM\logs?
False alarm! Appreciate the fast response! While troubleshooting this afternoon, we determined that after I reconstructed the CA, someone came later and installed our standard AV tools and whatnot but mistakenly put the firewall in blocking mode. I realized I could no longer use it to issue ANY certs, taking Horizon totally out of the picture. Once we got the firewall off a few minutes ago, Horizon immediately went all green again and life is good.
Hi Carl, how are you?
I have an Workspace One Access using SAML (Azure Auth) with Horizon using UAG without TrueSSO (users should login twice).
On Network ranges I configure to redirect to UAG exteral URL. On the UAG I configure Authentication Passthrough.
On Horizon Connection Server I configure SAML on Allowed and the Dynamic Metadata for the Workspace one Access
When users try to connect, They can Login Workspace One Access correctly, but when they try to access to VDI, this error appeared
This horizon server expects to get your logon credentials from another application or server
Any Ideas?
Do you have more than one Connection Server? Is the SAML Authenticator enabled on each Connection Server?
What do you see in the Connection Server debug log at C:\Programdata\VMware\VDM\logs?
Hi Carl! sorry for the Delay!. Ive disabled the Replica Connection Server in order to make tests on the enviorment. SAML is enable on Allowerd mode (in both connections, but one is in disabled state) and have the WS1 Metadata with dynamic mode (already try on static mode).
The Debug shows: Unable to connect to *WS1 Connector FQDN*, no address served
Unable to connect *WS1 connector FQDN:32111″
But Workspace One Access have that port allowed. Which component have to access to it?
Hi, did you ever figure this out and what was it?
We implemented Horizon True SSO, which was a big hit with our Workspace One Access users, as it removed the password prompt after launching a desktop.
However, we did have some unforseen issues with our Citrix hosted EMR application that is run from the Horizon VM. Citrix now sees the user as a Smart Card authentication and fails the pass through SSO the credentials to the back-end Citrix server. They successfully login to the Storefront, but now the Citrix session prompts with bad password.
Has anyone successfully used True SSO in a scenario like this?
Since you don’t have the user’s password, your Citrix will need the Citrix equivalent of True SSO, which they call Federated Authentication Service. https://www.carlstalhood.com/citrix-federated-authentication-service-saml/
Hi
I suddently getting access denied errors truesso authentication
if run es dig following out put but this work fine on connection server
EnrollmentInterface::SendMsgToEnrollmentPlugin(SubmitRequest) begin
Call to CertEnroll failed: Failed to locate a connected CA – ErrorCode = 2147944650 (0x00000000800708CA), 1
EnrollmentInterface::SendMsgToEnrollmentPlugin(SubmitRequest) end
SubmitRequest Failed
Response ErrorCode = “-2147022646”
ErrorText = “Failed to locate a connected CA”
FailureReason = “SubmitFailureMayRetry”
C:\Temp>es_diag.exe /enrollmenttest /esNAme:CPT2ENVM01 /certauth /domain:am.tsacorp.com /caserver:COV1CER03VM /requester:am\myuser /template:TrueSSO /LogToScreen
Execute EnrollmentDiags::EnrollmentTest:
Connect to the Enrollment Service: CPT2ENVM01
2023-09-27T12:32:13.458+02:00 WARN (03F0-1B00) [es_diag] CERTSSL: Unable to open certificate store VMware Horizon View Certificates, error=5 (Access is denied.)
2023-09-27T12:32:13.458+02:00 WARN (03F0-1B00) [es_diag] ConnectChannelByCertSsl cert not found
Failed to connect channel: certificaste auth failed
Failed to connect a channel to the Enrollment Service.
The Certificate used to Authenticate to the ES may not be trusted.
For more information please see the Horizon View log-file on this system and on the Horizon View Enrollment Server.
Hi
Thanks using you article , I successfully setup UAG and TrueSSO in POC setup.
I had one query regarding same, I had 3 sites in different geographic location where around 700 + VDIs each sites and each have 3 different set LB and Connection Brokers. I know and VMware says we need different UAGs and enrollment servers for each site/setup. Can I used same True SSO and Enrollment agent certificate which I created for POC setup or need create three different templates for each sites. I can publish to locate CA to avoid delay of authentication
I think that will work. Just add the Connection Server cert from each pod to the Enrollment Servers. Also run the vdmutil commands on each pod.
Hi Carl,
Are you aware if enrollment servers can be load balanced using a Citrix Netscaler appliance?
I haven’t tried. Connection Servers can be configured to load balance the Enrollment Servers.
Hi Carl,
i enabled truesso in my environment and everything appears green in horizon and uag admin portals. I can connect to my uag via the horizon client and it gives me all the pools im entitled to but when i click on a pool it immediately tells me access denied. When i check the connection server logs I see “ERROR (1E80-07FC) [ESConnectionManager] CertSso: Certificate generation request failed … Error: 258, ErrorText: The Request timed out, Reason: (258), EsReason: SubmitFailureMayRetry”. My enrollment server is also my CA and i have the registry files to prefer local CA. I can telnet to port 32111 from the connection server to enrollment server
Any help is appreciated!
Check the logs on the Enrollment server. The CA console has a Failed Requests node.
the failed requests in CA console is empty but i checked the logs of the enrollment server and i see this
“MessageFrameWorkDispatch> [wsnm_certenroll] EnrollmentServices::SubmitRequest(): The Request timed out – ErrorCode = 258 (0x0000000000000102)
2023-08-28T10:00:18.953-04:00 ERROR (056C-0818) [wsnm_certenroll] CertEnrollService::CertEnrollOperation::SubmitRequestHandler(): The Request timed out – ErrorCode = 258 (0x0000000000000102)
2023-08-28T10:00:27.191-04:00 WARN (056C-0A78) [wsnm_certenroll] CertificateServer::Submit(): Request to was successful but slow – 33250 ms”
Hello keyko,
Did you ever resolved this issue?
I ran into the same issue.
Kind regards, Alexander
Hi,
I had to modify the template to allow write permissions, as well as read and registration permissions, for the requesting CA. In my case, these are on the enrolment servers.
Kind regards
Mat
Hi gents, I have a question: I have Horizon 7.13 installed as no FIPS mode. And I need to know if my linux desktops could have FIPS mode enabled and SSO will works? Somdoby knows if this configuration is possible?
I’m struggling with the True SSO w/Horizon (not workspace one) passing through to the desktop. I get two different errors.
The attempted logon is invalid. This is due to a bad username or authentication information. An untrusted certificate authority was detected while processing the domain controller certificate used for authentication.
and
The client has failed to validate the domain controller certificate for serverFQDN. The following error was returned from the certificate validation process: A certification chain processed correctly, but one of the CA certificates is not trusted by the policy provider.
The es_diag tool lets me create a cert that looks valid and is signed by our internal MS CA. The chain goes root, sub, cert, and it all looks good. If I remove the domain controller authentication template from the domain controller. Yubikey logon works fine with certs signed by the same local CA and smart card logon on a physical PC. I’m not turning up many results for fixes and VMware support has been very slow. If anyone has seen this please reply.
I finally found the issue.
We have certificates set to auto enroll and the only reason we use those certs is for wireless access. At one point we were rolling certs out like it was nobody’s business when VDIs would spin up and reboot, so we turned off the auto enroll GPO for the VDI environment.
This left our enterprise trust blank in “HKEY_LOCAL_MACHINE\SOFTWARE\Microsoft\EnterpriseCertificates\NTAuth\Certificates”
I ended up adding a powershell script to the end of our onboarding postsync VDI script to include adding our Cas
“certutil -enterprise -addstore NTAuth CAFile.cer”
It appears disabling autoenroll breaks this and I only really stumbled on it by chance. The certs were in the appropriate places (trusted roots, etc) if you were looking in certlm.msc.
https://learn.microsoft.com/en-us/troubleshoot/windows-server/windows-security/import-third-party-ca-to-enterprise-ntauth-store
Hi Carl,
I appreciate all that you do. I’ve been banging my head against this issue for a while now and every time I find someone else with the issue, the thread just dies, without a resolution.
Our SSO through Azure is working, but like others, we are prompted to log in again to the VDI machine. It’s not actually doing the true SSO. In the CS, everything is green. I’ve run es_diag.exe /enrollmenttest and /testlogon and both come back successful.
Enrollment Test
C:\TEMP>es_diag.exe /enrollmenttest /esname:xxxx-01 /certauth /domain:xxxxxx.edu /requester:xxxxxx /template:TrueSSOCert /caserver:xxxxx-01-CA /certFile:TestCert
Execute EnrollmentDiags::EnrollmentTest:
Connect to the Enrollment Service: xxxxx-01
Successfully connected to the Enrollment Server
Configure the enrollment service for the selected domain
Wait up to 30 seconds for the Active Directory to be read
Send Cert-Request(s) to the enrollment service:
Successfully requested a Certificate
Requested : 1, Issued: 1, Failed: 0, Retry: 0
Total Time: 0.023 sec to generate 1 certificates.
Throughput: 43 certificates/second.
Average : 0.023 sec to generate a certificate.
Subject : dxxxxx
UPN : dxxxxx@xxxxxx.edu
SerialNo : 1B:00:00:00:05:EA:38:40:51:A3:3E:50:64:00:00:00:00:00:05
UTC Time : 2023-06-07,14:42:57
Valid From: 2023-06-07,14:32:57
Valid To : 2023-06-08,02:32:57
Validity : Certificate is valid
Saved Certificate to file
TestLogon (not /logontest)
C:\TEMP>es_diag.exe /enrollmenttest /testlogon /esname:xxxxx-01 /certauth /domain:xxxx.edu /requester:xxxxx /template:TrueSSOCert /caserver:xxxxxx-01-CA /certfile:testcert
Execute EnrollmentDiags::EnrollmentTest:
Connect to the Enrollment Service: xxxxxxx-01
Successfully connected to the Enrollment Server
Configure the enrollment service for the selected domain
Wait up to 30 seconds for the Active Directory to be read
Send Cert-Request(s) to the enrollment service:
Successfully requested a Certificate
Requested : 1, Issued: 1, Failed: 0, Retry: 0
Total Time: 0.139 sec to generate 1 certificates.
Throughput: 7 certificates/second.
Average : 0.139 sec to generate a certificate.
Subject : dxxxxxx
UPN : dxxxxxx@xxxxxx.edu
SerialNo : 1B:00:00:00:06:9F:77:29:EA:F0:34:CB:54:00:00:00:00:00:06
UTC Time : 2023-06-07,14:46:59
Valid From: 2023-06-07,14:36:59
Valid To : 2023-06-08,02:36:59
Validity : Certificate is valid
Attempting S4U X.509 Certificate logon
Successfully performed S4U X.509 Certificate logon
Saved Certificate to file
In GPO I’ve set Windows Components/Remote Desktop Services/Remote Desktop Session Host/Security “Always prompt for password upon connection” to Disabled
I’ve also set Local Policies/Security Options/Interactive Logon “Interactive logon: Do not require CTRL+ALT+DEL” to Enabled
We’re between semesters, but people are still using VDI, so this is all going through a test UAG so I don’t impact production.
Any suggestions other than blowing it all out and starting from scratch again?
Thanks!
Check the Kerberos log on the Horizon Agent machine and on the domain controllers. https://learn.microsoft.com/en-us/troubleshoot/windows-server/identity/enable-kerberos-event-logging
Hi Carl,
Thanks for that! For my test user, I was getting an error KDC_ERR_WRONG_REALM.
Unfortunately, we had an architect that decided we had to have a root domain and multiple sub-domains(Staff, Students, Student Computers, etc)…Our plan is to flatten the domain, so all VDI was put on the root domain. So, only root domain users will be in the correct realm and get TrueSSO. I just tested successfully with my root domain test user.
So I guess, now we have to decide if we’re gonna spread our VDI out throughout all of the subdomains. Unless there’s a way to pull the realm based on the Users domain…
Thanks
One forest? Or multiple forests? If multiple forests, is UPN suffix routing configured on the trust?
I would have expected that Windows can traverse the trusts to find the user by UPN but maybe not.
It’s a single forest. I’m looking into cross-realm trusts right now. It’s possible that whoever set all this up disabled it.
I really appreciate how responsive you are and everything you are doing for the community!
I finally see that when this was set up, they did not enable “The other domain supports Kerberos AES encryption”. I’ve requested a change in this for testing.
Hi Carl,
I finally figured it out. VMware does have a trueSSO architecture document
https://docs.vmware.com/en/VMware-Horizon-7/7.13/horizon-administration/GUID-0770E530-6E8A-4242-893A-1920D60CB0F9.html
This states that you need a CA on each domain/subdomain. I set this up, but this only worked for one sub domain (staff.xxx.edu). The student sub domain still didn’t work. The problem was the fqdn is student.xxx.edu while their email address is my.xxx.edu.
I ended up modifying the TrueSSO Cert template to “Include email name in subject name” in the Subject Name tab. Now it seems to be working for all users.
Thanks again for your help!