This article details Horizon pool configuration for Virtual Desktops. RDS Farms and pools are detailed in a separate article at https://www.carlstalhood.com/vmware-horizon-8-rds-farms-pools/.
Navigation
This post applies to all Horizon versions 2006 (8.0) and newer.
Change Log
- 2023 Jan 13 – Automated Full Clone Pool – Horizon 2212 lets you specify the OU.
- 2021 Mar 28 – new section for Automated Persistent Full Clones.
- 2021 Jan 10 – Instant Clones ESXi Maintenance – new Disable ParentVMs feature for VUM
- 2021 Jan 9 – updated screenshots for Horizon 2012 (8.1)
- 2020 Aug 14 – updated entire article for Horizon 2006 (8.0)
Non-Persistent – Instant Clones
All editions of Horizon 2006 and newer include Instant Clones so there is no need to use Composer. Composer is deprecated in Horizon 2006. Composer was removed from Horizon 2012 (8.1) and newer.
Notes on Instant Clones:
- The master VM snapshot is copied to every LUN containing instant clones. Composer does the same.
- If you deploy 12+ VMs per host of the same pool, then “Parent” machines are created on each ESXi host for each datastore. These “parent” machines are powered on and consume CPU/Memory/Disk resources. If you have six hosts and three datastores containing instant clones, then Horizon creates 18 parent virtual machines. Composer does not need parent virtual machines.
- For lower density, Horizon 2006 and newer support Smart Provisioning, which eliminates the need for “Parent” machines. See the Smart Provisioning YouTube video for an overview.
- Horizon 2306 (8.10) and newer now default to no longer creating parent virtual machines.
- Horizon 2306 (8.10) and newer support Persistent Disks with dedicated Instant Clones. See Omnissa 93091 Guidelines for Persistent Disk Migration from Horizon 7 Environments to Horizon 8.
- An alternative is Microsoft FSLogix, or App Volumes Writable Volumes
- See Instant-Clone Desktop Pools at Omnissa Docs.
Infrastructure Prep
- Instant Clones in Horizon 2303 and newer require vSphere 7 or newer. vSphere 6.7 and older will not work.
- Each desktop pool points to one vSphere cluster.
- See 2150348 Horizon 7 sizing limits and recommendations for maximum cluster size and maximum number of virtual machines per cluster.
- Ensure vSwitch has sufficient ports for the new virtual desktops.
- Instant Clones in Horizon 8.1 and newer support all port bindings, including ephemeral. Older versions of Horizon, including Horizon 7.x, require static port binding.
- Ensure the VLAN has enough DHCP addresses for the desktop pool.
- Lower the DHCP lease time too.
- DHCP should be highly available (e.g. Windows DHCP Failover)
- Enable DNS Scavenging.
- See 2005210 Unable to connect to linked clone pools after recomposing when using secure only dynamic updates with DNS to change permissions on DNS Zone so the virtual desktops can update their DNS records after a Push Image.
- KMS Licensing is required, preferably using Active Directory-based activation – MAK licensing (Omnissa Docs) is not supported until Horizon 2212 and newer.
- The virtual desktop pools will use the same hardware specs (e.g., vCPUs, memory size, network label, GPU) specified on the master virtual desktop. Adjust accordingly.
- The master image should be in the same vSphere cluster where the instant clone virtual desktops will be created.
- ESXi must be version 6 update 1 or newer
- Master VM must be version hardware version 11 or newer
- In Horizon Console, add Instant Clone Domain Accounts
- In Horizon Console, enable View Storage Accelerator on your vCenter connection.
- If you upgrade vCenter from version 6.5 or older to version 6.7 or later, then you must upgrade your ESXi hosts to version 6.7 or later at the same time. Afterwards, take a new snapshot of the master image and perform a push operation.
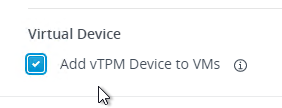
- Windows 11 – Omnissa says don’t add vTPM to the gold image. Instead add the vTPM when creating the Instant Clone pool or Full Clone pool. There are various methods of installing Windows 11 without a vTPM. See Omnissa KB article 85960 Horizon and Horizon Cloud readiness for Microsoft Windows 11.

- vTPM requires a Key Provider. vSphere 7 has a Native Key Provider that does not need any additional servers or licenses.
- In vSphere Client, in Inventory, click the vCenter object. On the right, on the Configure tab, scroll down to Key Providers and add a Native Key Provider.

- After it’s added, select it and then click Back-up to activate it.


- In vSphere Client, in Inventory, click the vCenter object. On the right, on the Configure tab, scroll down to Key Providers and add a Native Key Provider.
Disk space
- One or more LUNs (datastores) for storage of the virtual desktops.
- See Horizon Configuration Maximums for maximum virtual machines per datastore.
- By default, Replicas are copied to each LUN that contains virtual desktops.
- It’s possible to place the Replica and the instant clones on separate LUNs. If you use a dedicated Replica LUN, then there is only one copy of the Replica no matter how many LUNs are used for storing virtual desktops.
- Note: NFS VAAI requires the Replica to be copied to each virtual desktop LUN.
- .vswp files – Plan for disk space for memory swap and graphics memory overhead. If the master virtual desktop has 4 GB of RAM configured and if none of its memory is reserved then each linked clone will have a 4 GB .vswp file.
- To reduce the size of the .vswp files, edit each virtual desktop and reserve its memory. Whatever memory is reserved will be subtracted from the .vswp file size.
- Instant Clone Delta disks – Delta disks start small whenever the virtual desktop boots and grow until the user logs off of the virtual desktop and it reboots.
Non-Persistent, Floating, Automatic, Instant Clone Desktop Pool
Master Image Preparation
Do the following on the master image that the virtual desktops will link to:
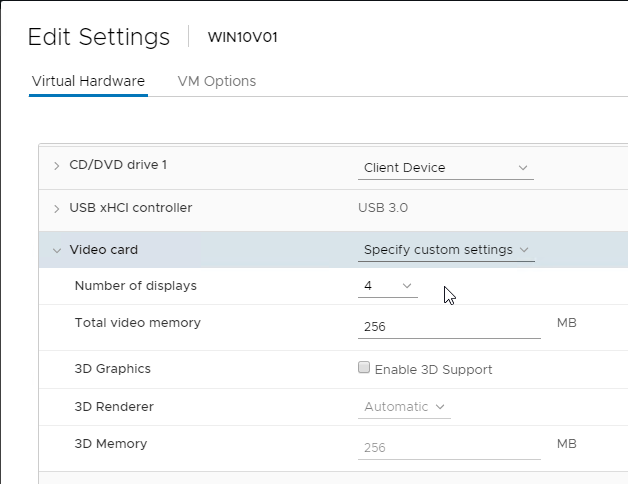
- Video Memory – shut down the master, Edit Settings (hardware) in vSphere client, expand Video card, and set video memory. More video memory means more client monitors. The maximum number of displays and maximum resolution of client monitors depends on the ESXi version, the Horizon version, and the Windows version with newest versions providing the greatest number of client monitors.
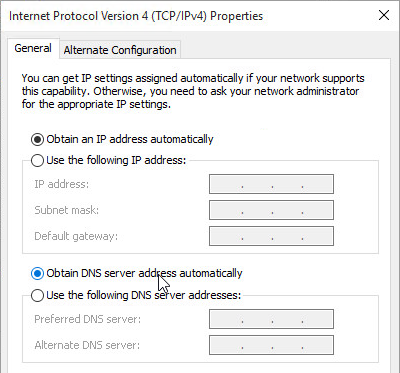
- DHCP – Make sure the master VM is configured for DHCP.
- Join domain – Join the master VM to the domain.
- Computer Group Policy – Make sure the Master VM is in the same OU as the Instant Clones so the Master VM will get the computer-level GPO settings. Run gpupdate on the master after moving the VM to the correct OU. New Instant Clones do not immediately refresh group policy so the group policy settings must already be applied to the master VM. See Omnissa 2150495 Computer-based Global Policy Objects (GPOs) that require a reboot to take effect are not applied on instant clones.
- KMS Licensing or Active Directory-Based Activation (recommended) is required.
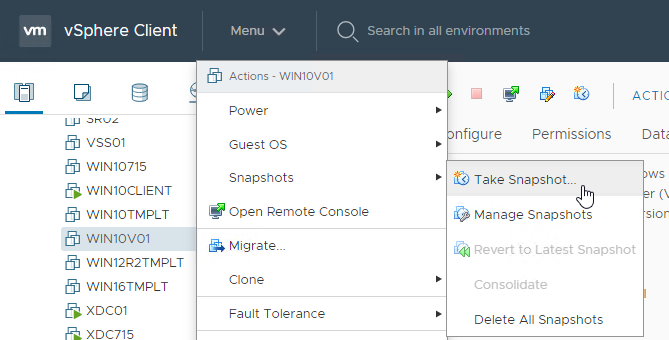
- Snapshot – Shut down the master image and take a new snapshot.
Floating Pool
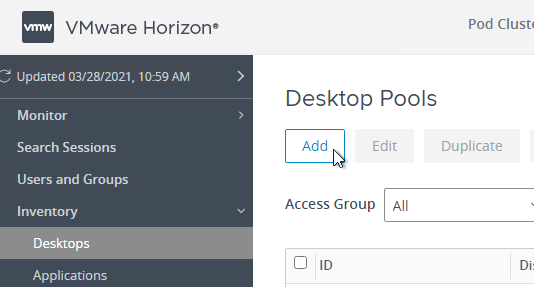
Use Horizon Console to create an Instant Clone pool:
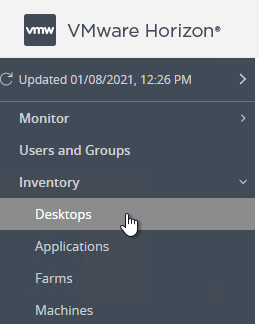
- Login to Horizon Console.
- On the left, under Inventory, click Desktops.
- On the right, if you select an existing pool, you can click Duplicate to copy the settings to a new pool.
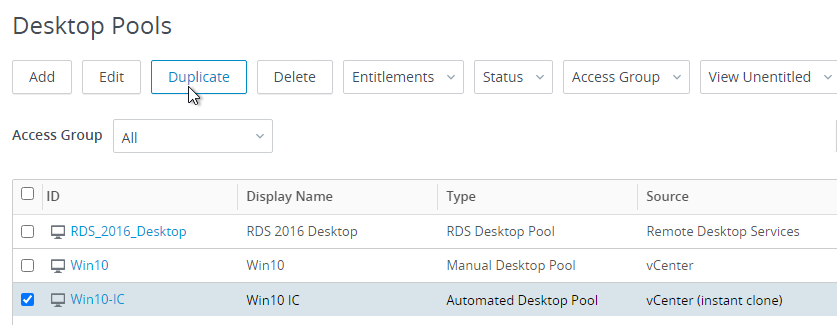
- On the right, click Add.

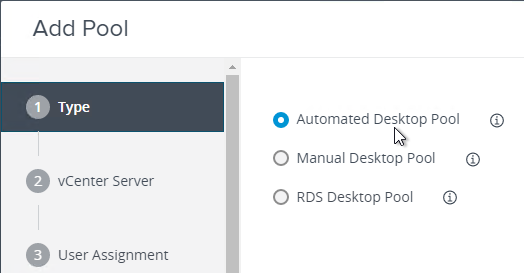
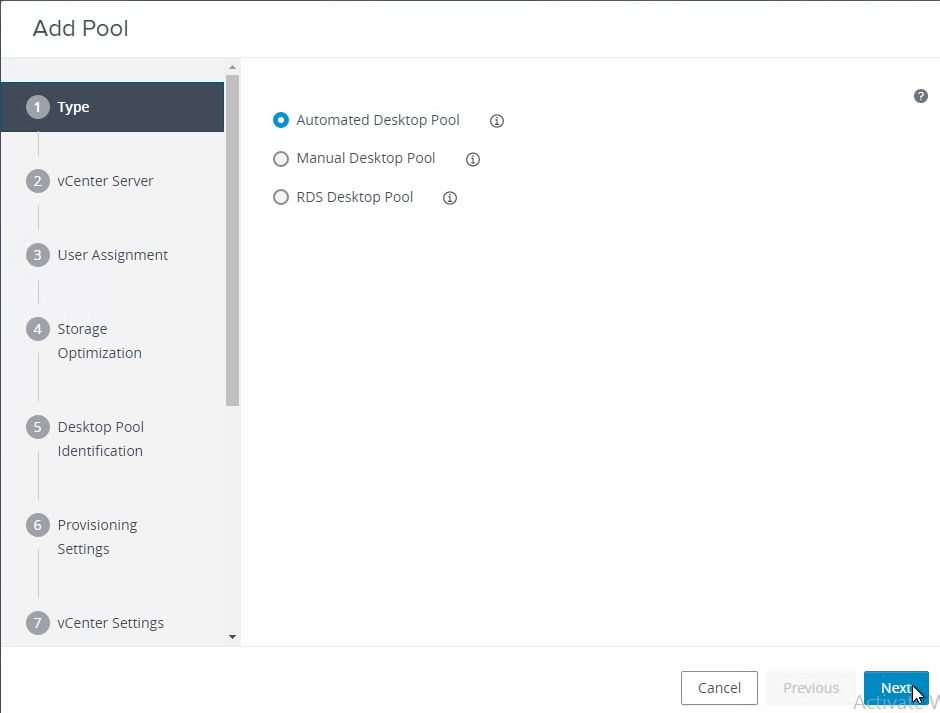
- In the Type page, select Automated desktop pool.
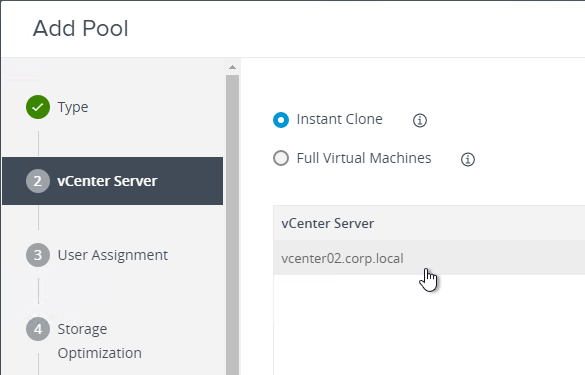
- In the vCenter Server page, select Instant Clone, select a vCenter server, and click Next. Notice that Composer is no longer an option.
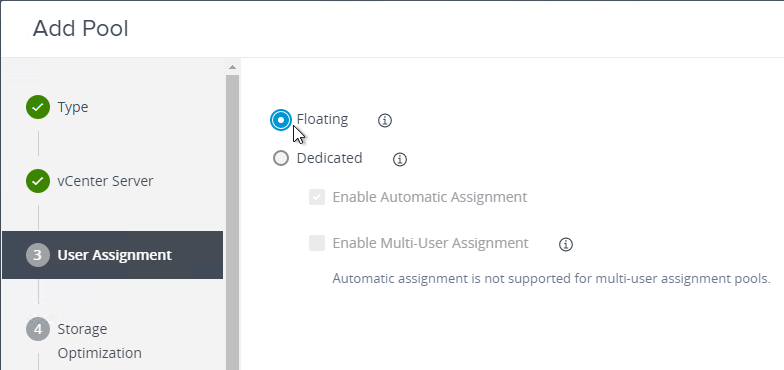
- In the User Assignment page, select Floating, and click Next.
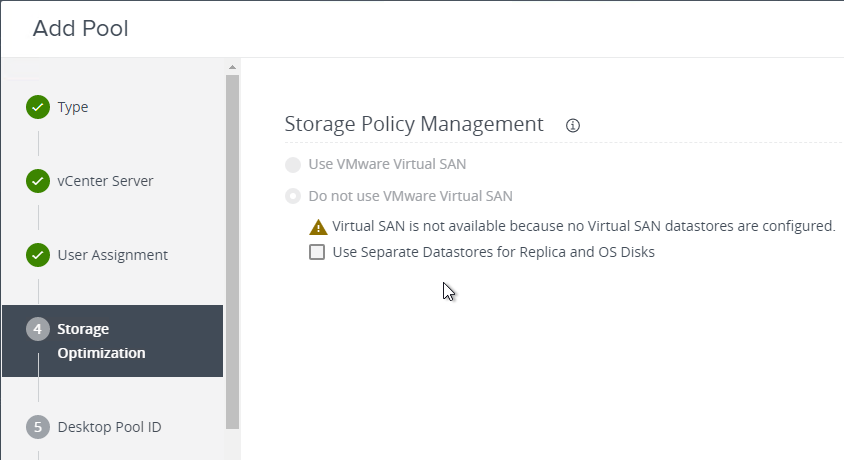
- In the Storage Optimization page, if you want to use storage tiering, check the box for Select separate datastores for replica and OS disk. Click Next.
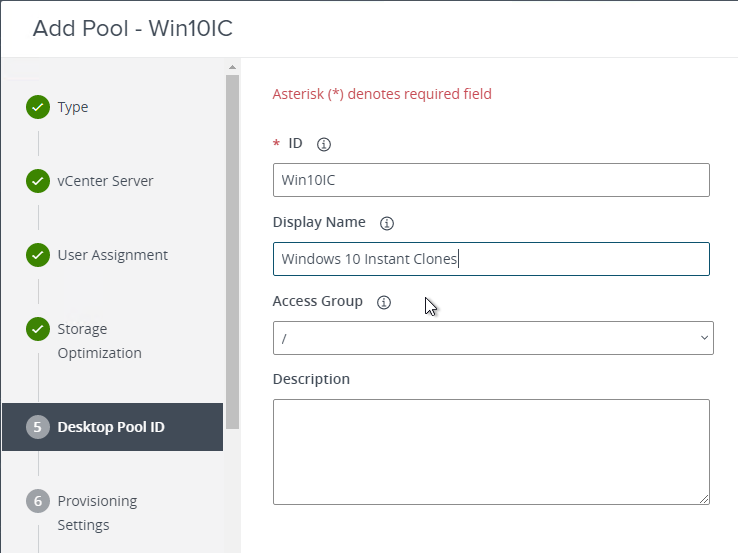
- In the Desktop Pool Identification page, do the following:
- Give the pool a unique ID, which is not shown to the users. Horizon creates a vCenter VM folder with the same name as the Pool ID.
- Enter a Display name, which is shown to the users.
- If you intend to use Omnissa Access, then leave Access group set to /. Otherwise, if you intend to delegate administration of this pool, then select an Access group that the delegated administrators have been assigned to.
- Click Next.
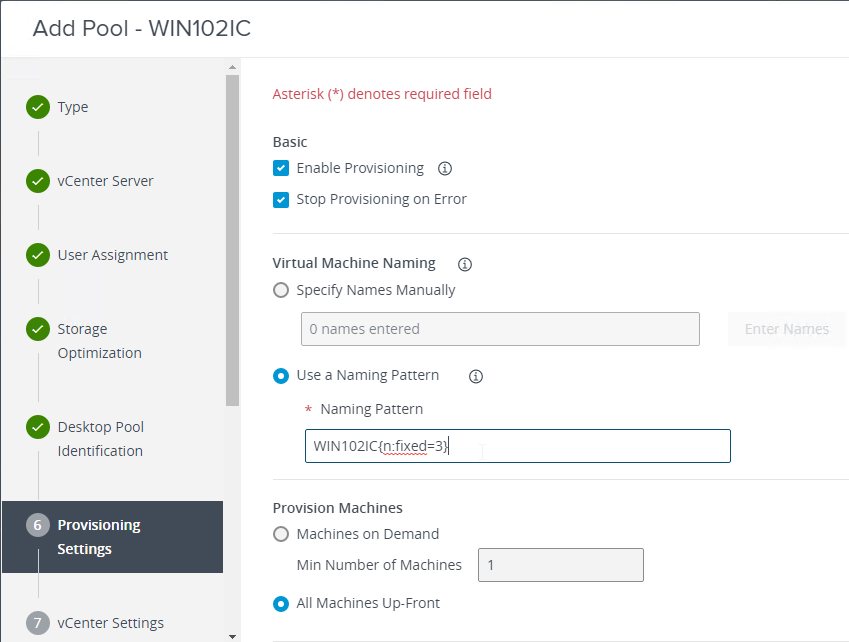
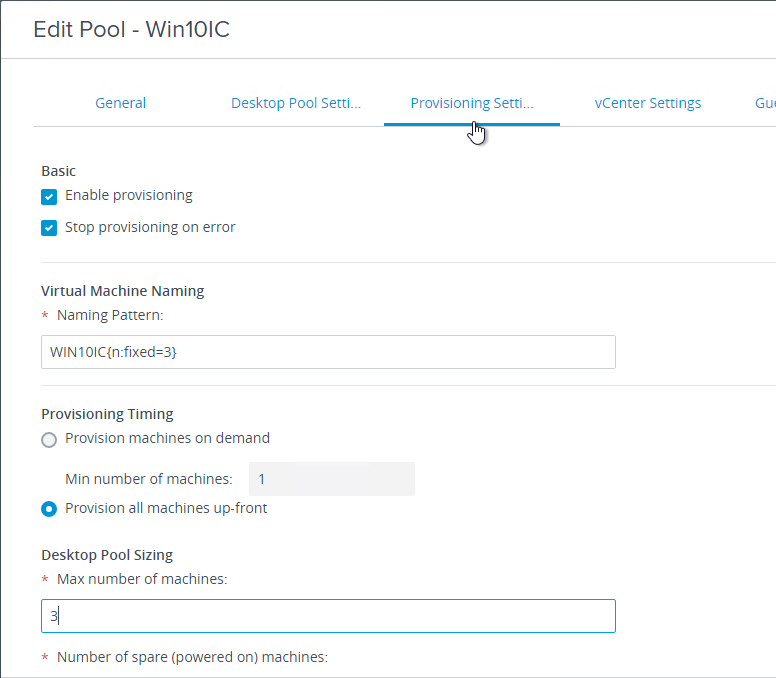
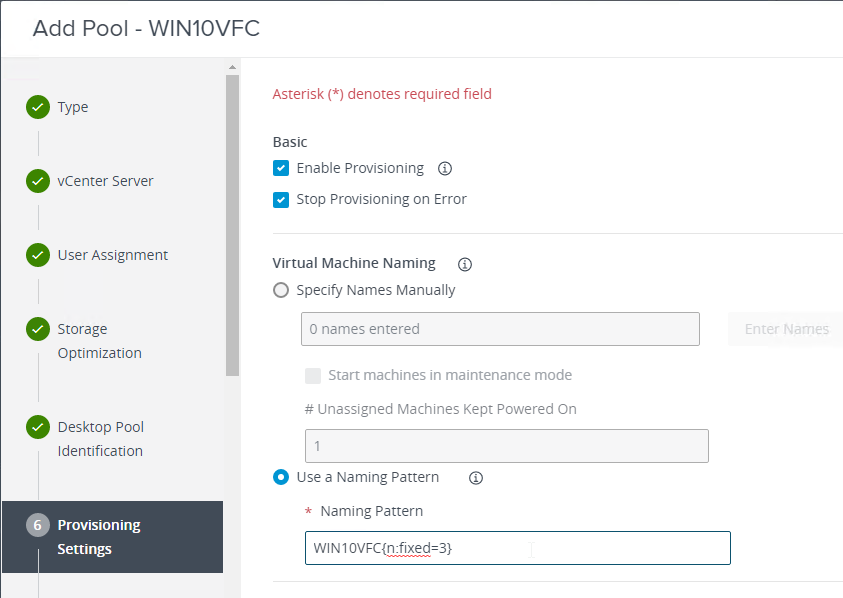
- In the Provisioning Settings page, do the following:
- In Virtual Machine Naming, enter a Naming Pattern. You can use {n:fixed=3} to specify the location for incremented numerals in the machine names. Make sure the naming pattern does not conflict with any existing machines. Remember, the maximum computer name length is 15 characters.
- Horizon 2103 (8.2) and newer let you Specify Names Manually instead of using a naming pattern.
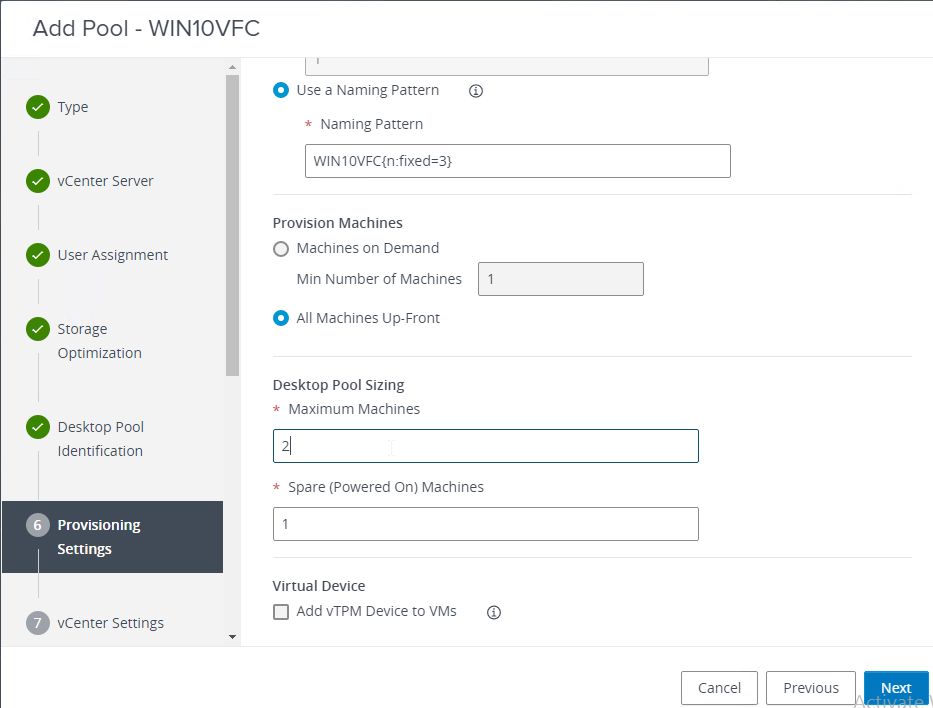
- In Desktop Pool Sizing, enter the maximum number of desktops to create. Ensure that the DHCP scope has enough addresses for the Max number of desktops specified here. If your desktop pool size exceeds a single VLAN, then you can create multiple pools and combine them into a Cloud Pod Global Entitlement.
- Select Provision all machines up-front to create all of the machines now.
- Or select Provision machines on demand, which tells Horizon to create the machines (up to the maximum) as users connect.
- If you’re not creating all machines up-front, then specify the Number of spare (powered on) machines. As users connect, Horizon creates more machines to try to keep this number of spare machines running and waiting for a new connection.
- In Virtual Machine Naming, enter a Naming Pattern. You can use {n:fixed=3} to specify the location for incremented numerals in the machine names. Make sure the naming pattern does not conflict with any existing machines. Remember, the maximum computer name length is 15 characters.
- If Windows 11, consider checking the box to Add vTPM Device to VMs.
- Click Next.
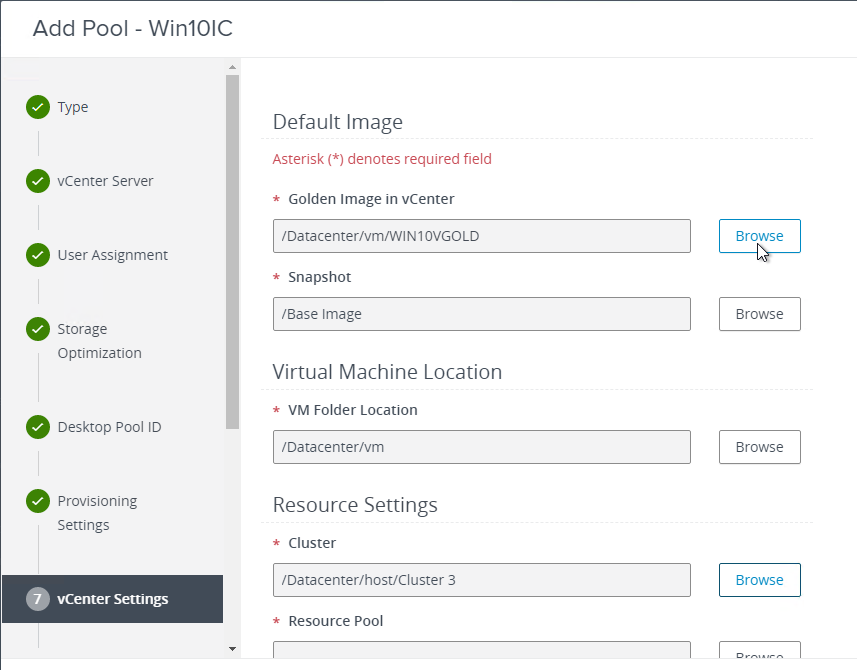
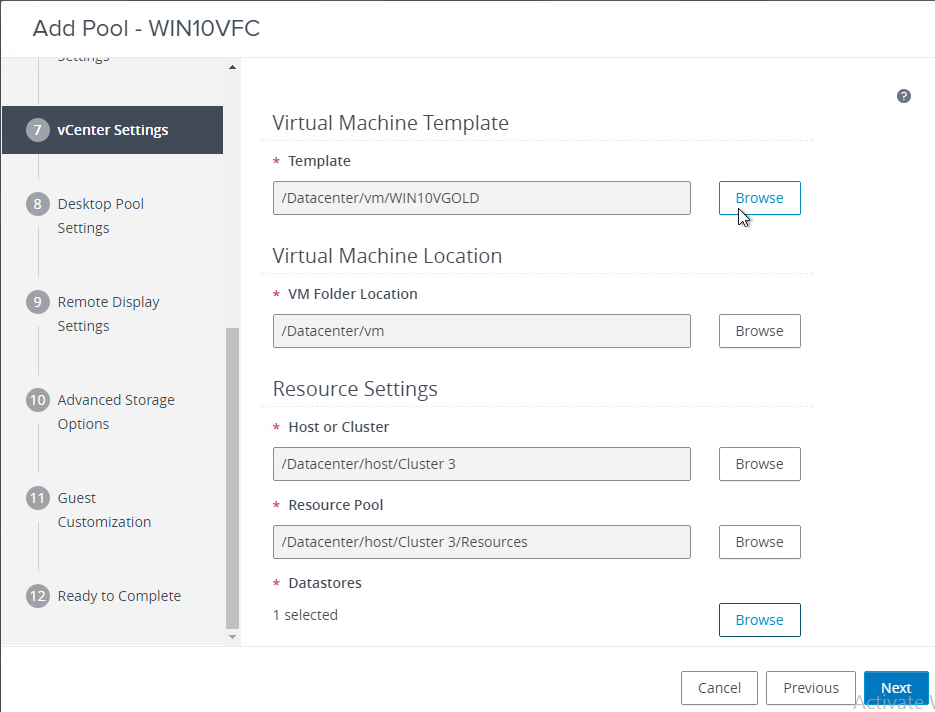
- In the vCenter Settings page, most of these are self-explanatory. Click Browse next to each option and make your selection.
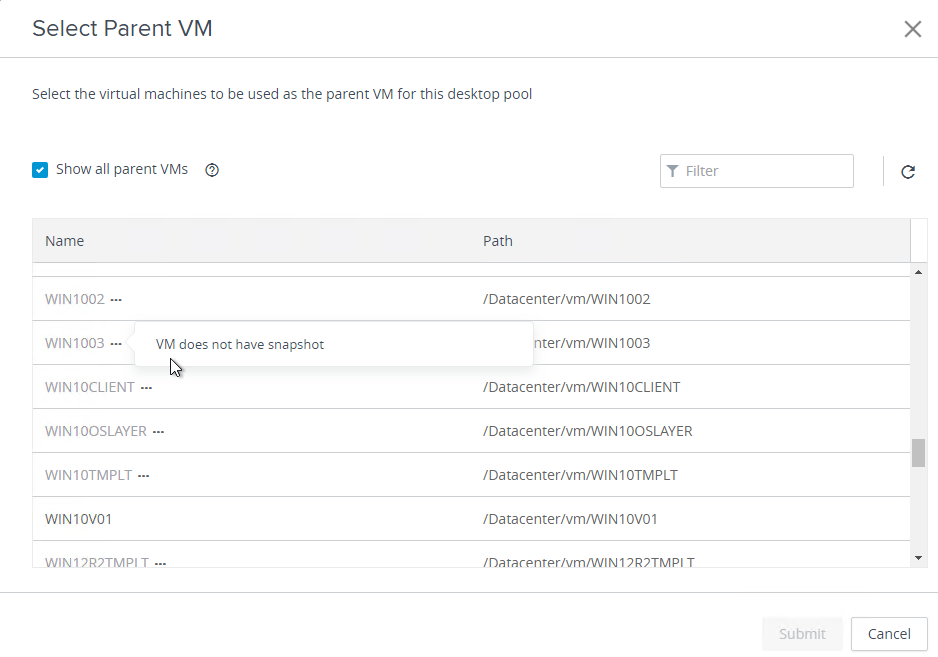
- If the Golden Image VM (aka Parent VM or Master VM) is not showing up in the list, then check the box next to Show all parent VMs and click the … next to the VM to see the issue.
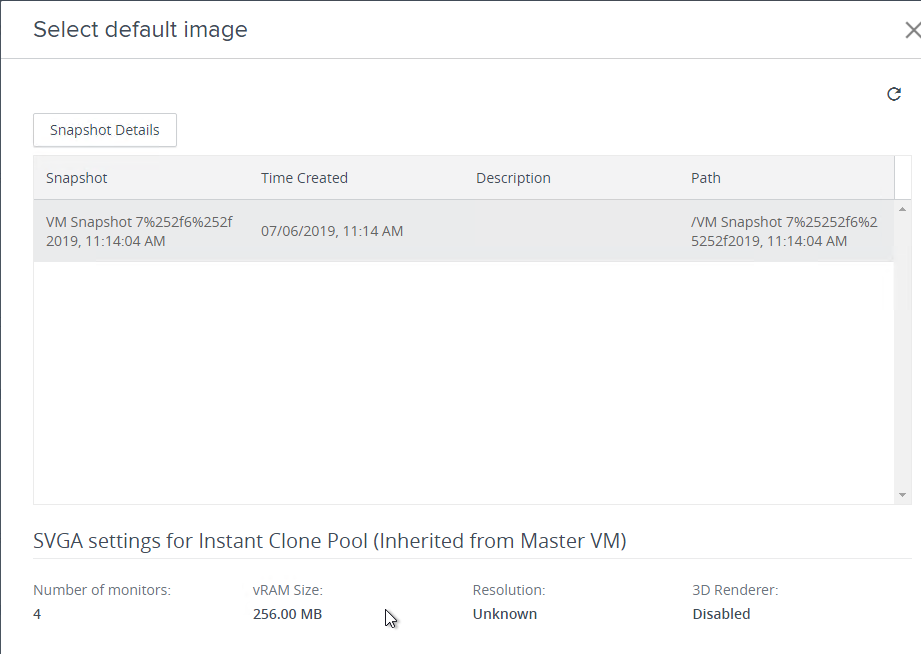
- Instant Clones monitors/resolution – the number of monitors configured on the Master Image (snapshot) is displayed. If not correct, delete the snapshot, edit the master VM’s Hardware Settings, expand video card, make your desired changes, and take another snapshot.
- Scroll down for more settings.
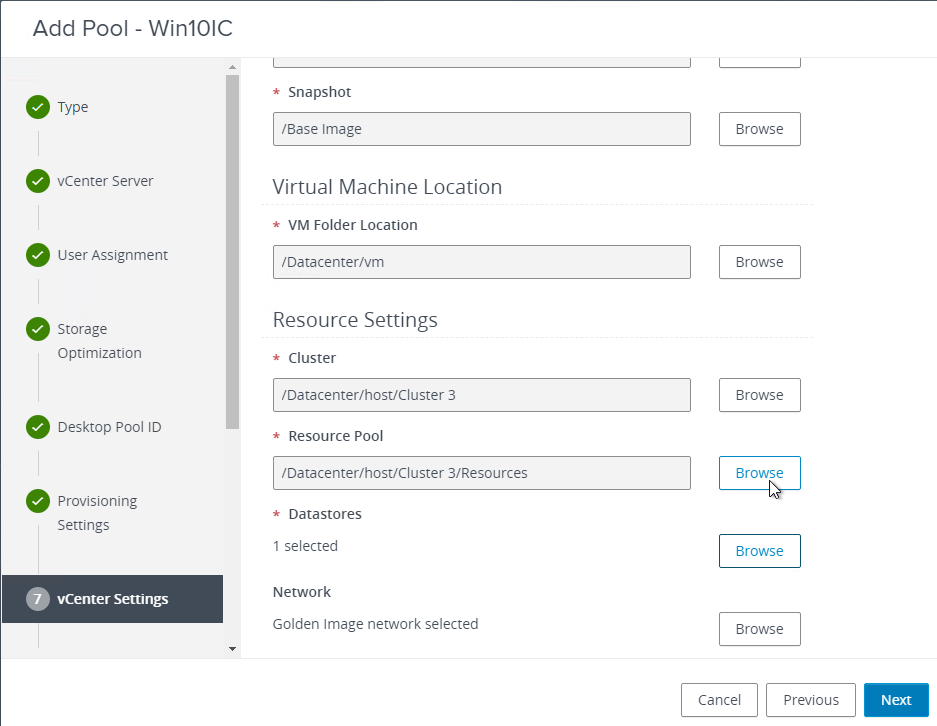
- VM Folder Location – Horizon will create a folder under the location (e.g., datacenter) you choose. Make sure the folder names don’t have any spaces in them.
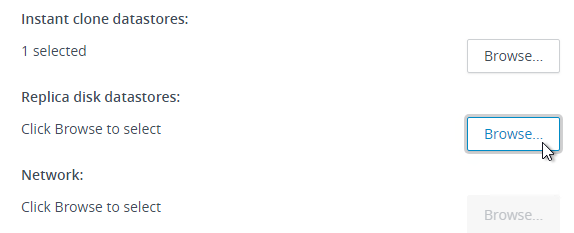
- Datastores – select one or more datastores on which the virtual desktops will be placed.
- If you selected to put Replica on a different datastore, then you’ll have another Browse button for Replica disk datastores.
- When selecting Networks, you can use the Network from the parent image, or uncheck the box and select a different network.
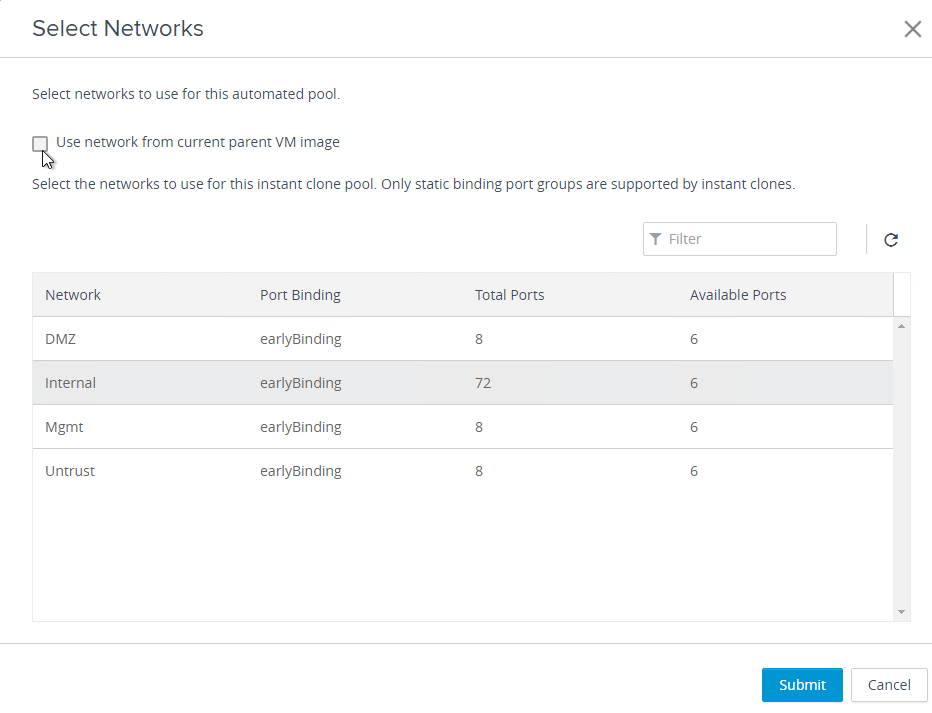
- If the Golden Image VM (aka Parent VM or Master VM) is not showing up in the list, then check the box next to Show all parent VMs and click the … next to the VM to see the issue.
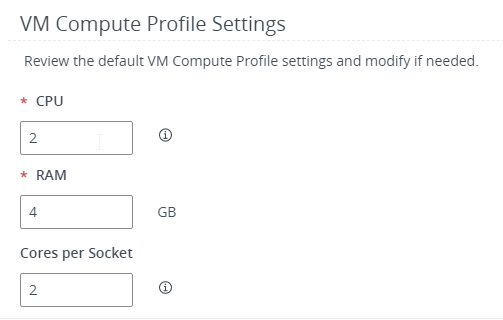
- In Horizon 2206 and newer, in the VM Compute Profile Settings section, you can change the CPU, RAM, and Cores per socket assigned to each new virtual desktop.
- Click Next when done.
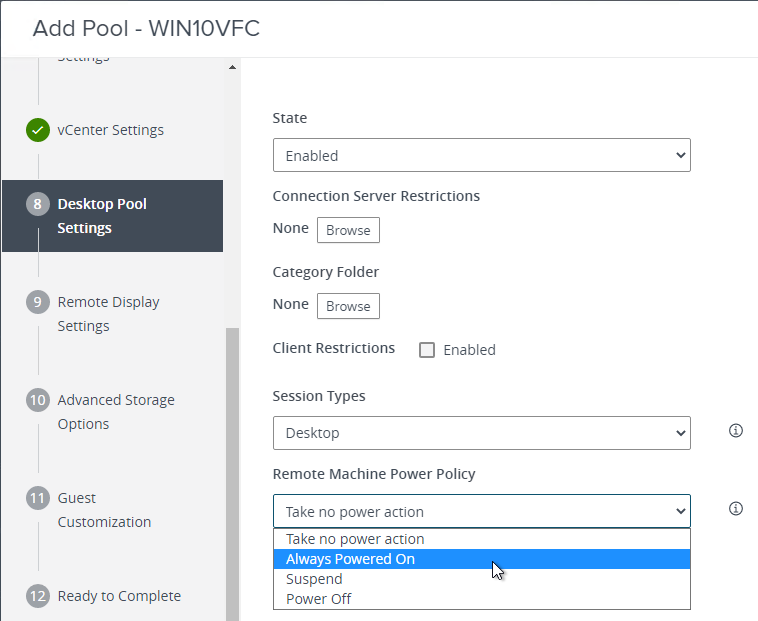
- In the Desktop Pool Settings page:
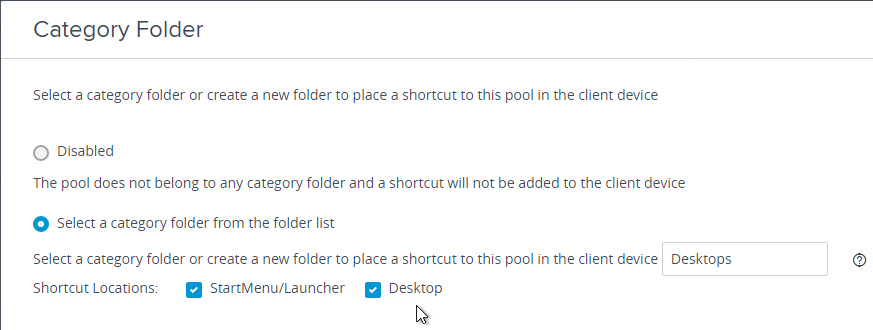
- You can select a Category Folder where the published icon will be placed on the client’s Start Menu and/or Desktop.
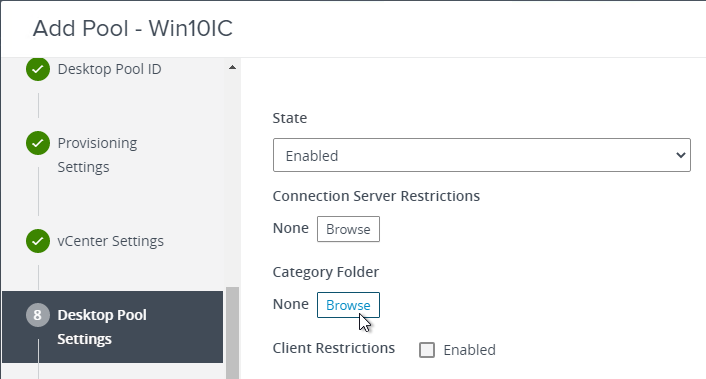
- Change the selection to Select a category folder from the folder list.
- You can type in a new category, or select an existing one.
- Then click Submit.
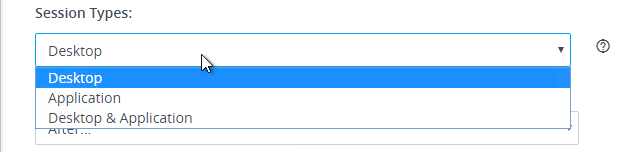
- In the Desktop Pool Settings page, Horizon Enterprise Edition lets you select a Session Type, which means you can optionally publish applications from virtual desktops.
- Change the selection for Logoff after disconnect to After, and specify a disconnect timer.

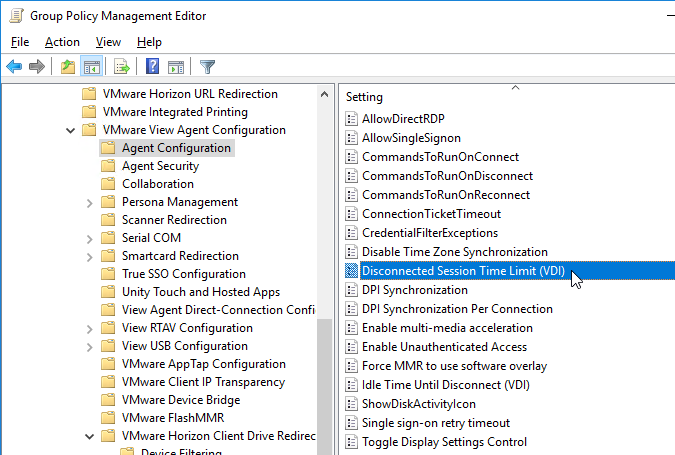
- You can also use Group Policy to configure this. The GPO overrides the pool setting. Install the Horizon GPO Templates if you haven’t already. Edit a GPO that applies to the Horizon Agents. Find the Disconnect Session Time Limit (VDI) setting at VMware View Agent Configuration > Agent Configuration.
- Horizon also has an Idle Time Until Disconnect (VDI) for virtual desktops. Note: RDSH idle timer is configured using Microsoft RDSH GPO settings, not Horizon GPO settings.
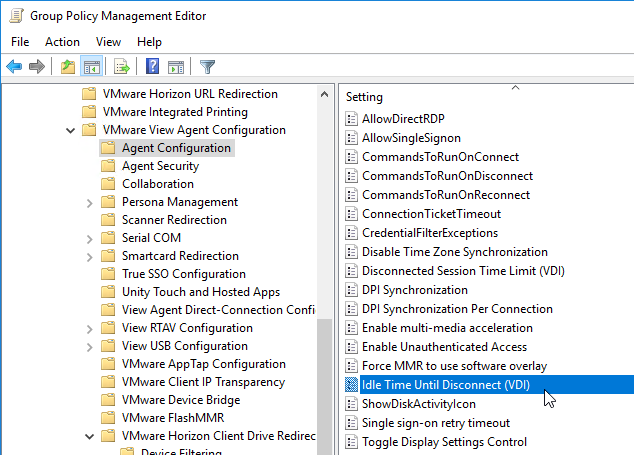
- You can also use Group Policy to configure this. The GPO overrides the pool setting. Install the Horizon GPO Templates if you haven’t already. Edit a GPO that applies to the Horizon Agents. Find the Disconnect Session Time Limit (VDI) setting at VMware View Agent Configuration > Agent Configuration.
- You can allow users to restart their machines.
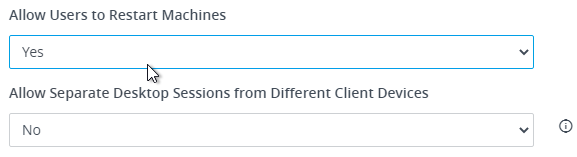
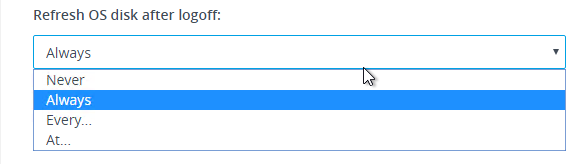
- If you choose Dedicated assignment instead of Floating assignment, there’s an option for Refresh OS disk after logoff. Leaving it set to Always is strongly recommended. The other options cause the delta disk to grow, and will cause data loss surprise for the users when you later push a new image. Instant Clones floating assignment pools always refresh on logoff.
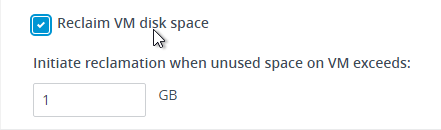
- Reclaim VM disk space is also an option for Dedicated assignment pools. Floating assignment pools always refresh on logoff so there’s no need to reclaim disk space.
- You can select a Category Folder where the published icon will be placed on the client’s Start Menu and/or Desktop.
- Click Next.
- In the Remote Display Settings page:
- In 3D Renderer, there’s an option for NVIDIA GRID VGPU if you have GPUs installed.
- There’s an Allow Session Collaboration checkbox, which adds a VMware Horizon Collaboration icon in the system tray of the remote desktop, which lets you invite users to collaborate. See Session Collaboration for details.
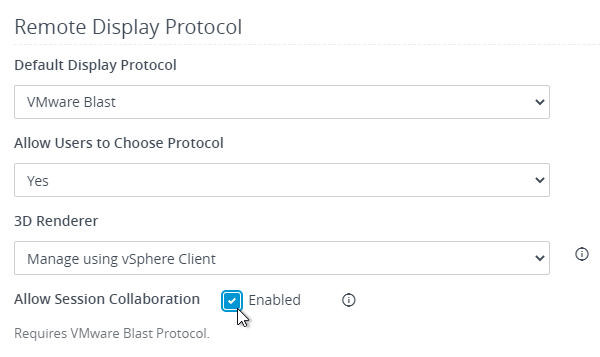
- Click Next.
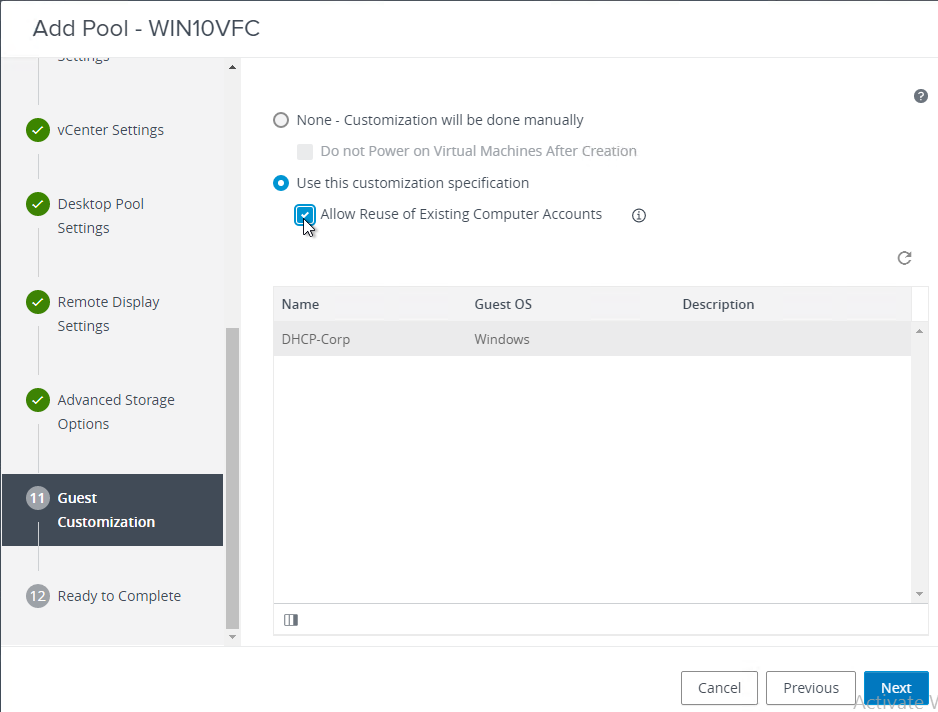
- In the Guest Customization page,
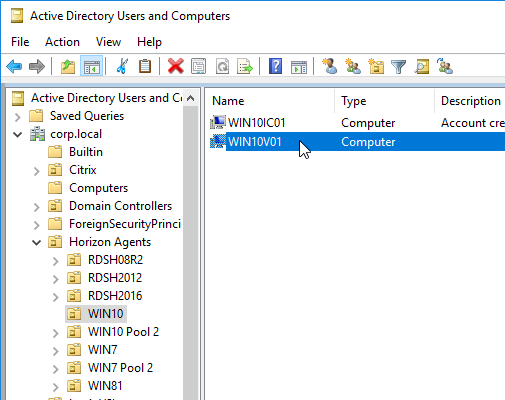
- Next to AD container, click Browse, and select the OU where virtual desktop computer objects will be placed. You can type (paste) into the AD container field.
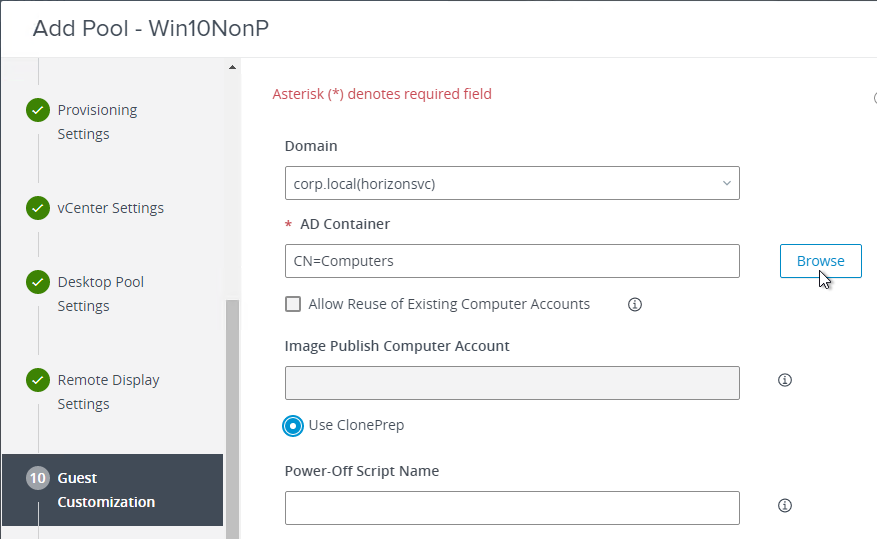
- Consider checking the box next to Allow reuse of pre-existing computer accounts.
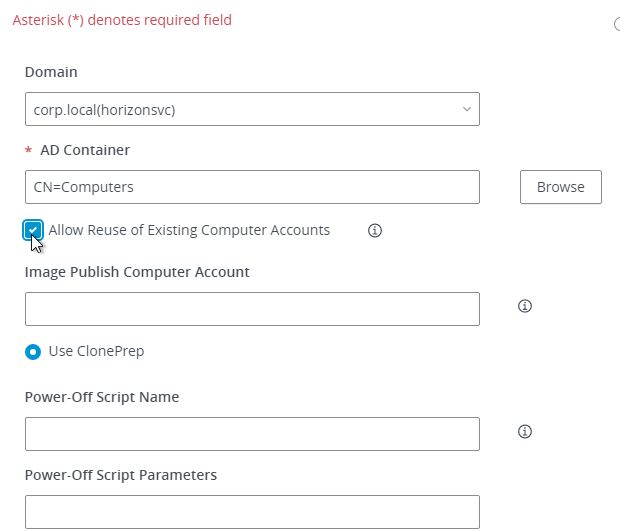
- Next to AD container, click Browse, and select the OU where virtual desktop computer objects will be placed. You can type (paste) into the AD container field.
- Click Next.
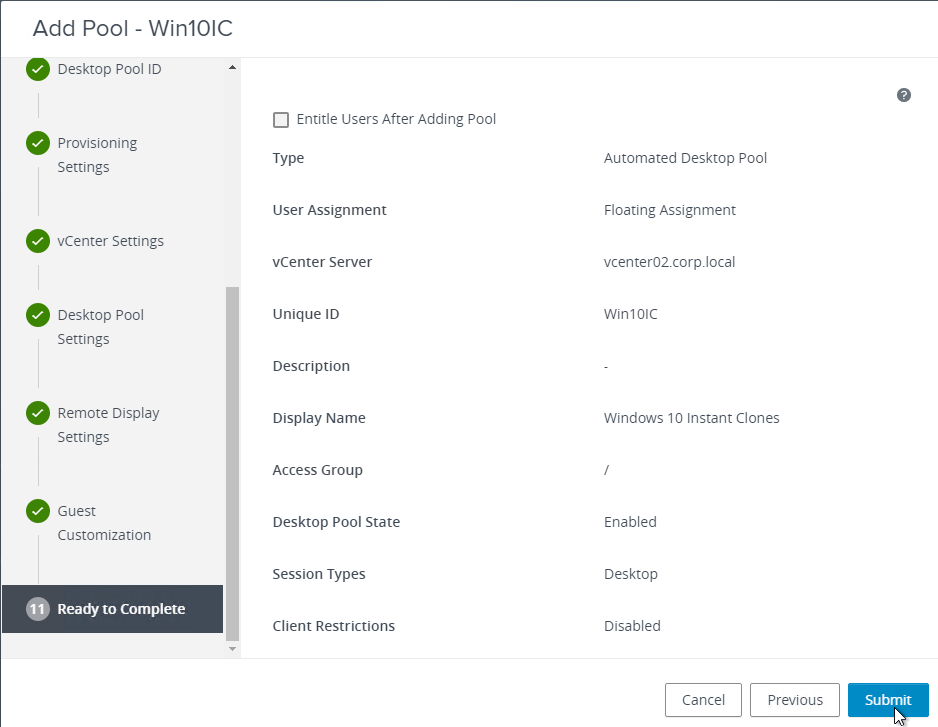
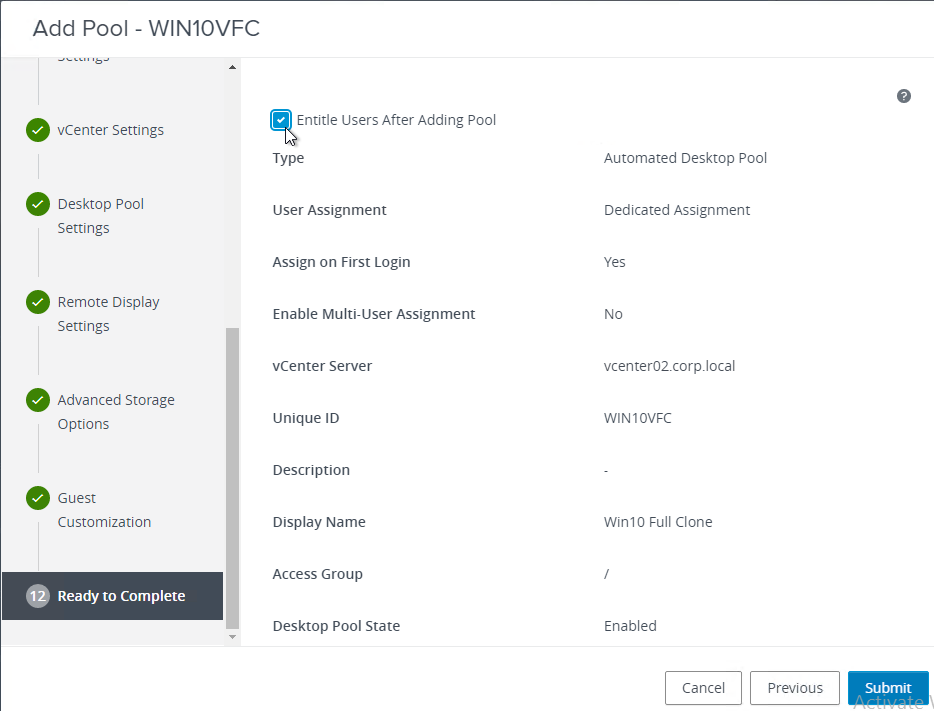
- In the Ready to Complete page, you may entitle users now, or leave it unchecked and do it later. Click Submit.
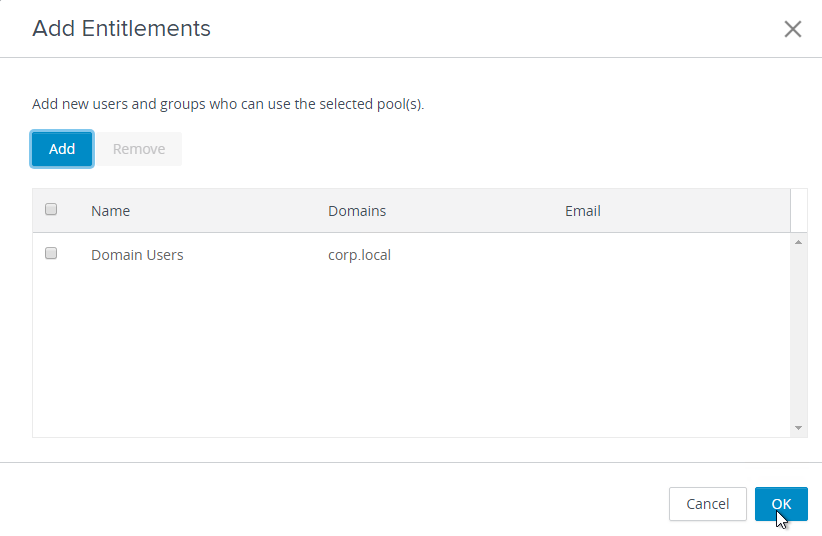
If you opted to add entitlements now:
- In the Add Entitlements window, click Add.
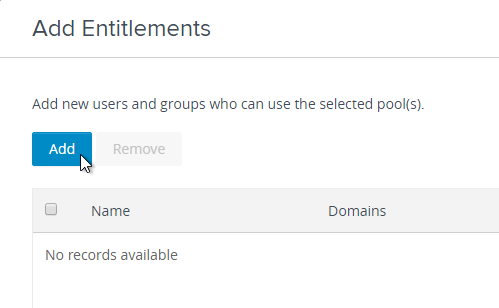
- Find a group that will have permission to log into these desktops, and click OK.
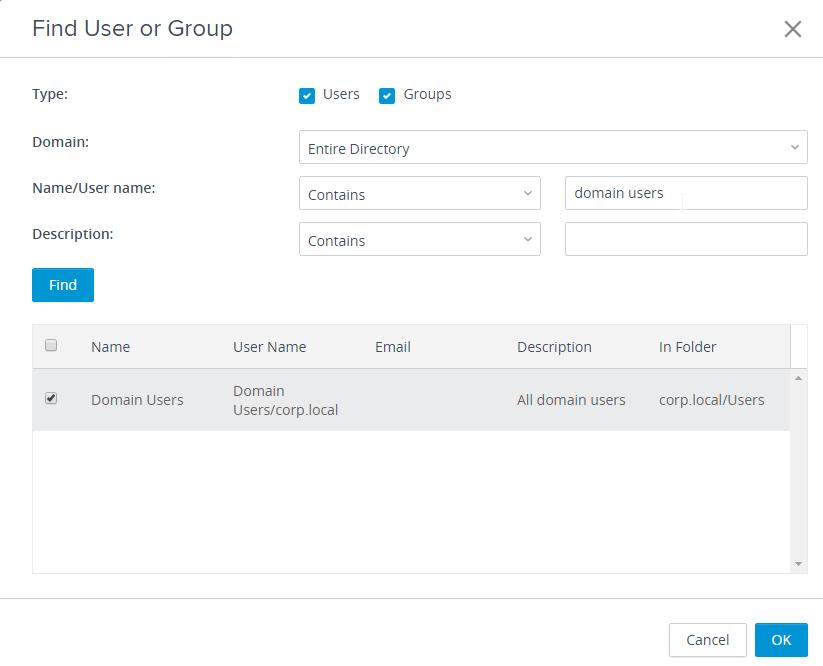
- Then click OK.
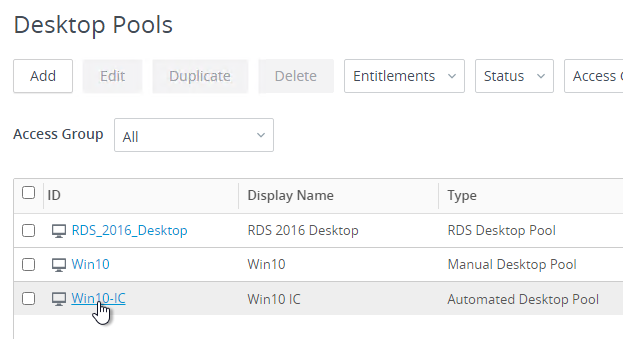
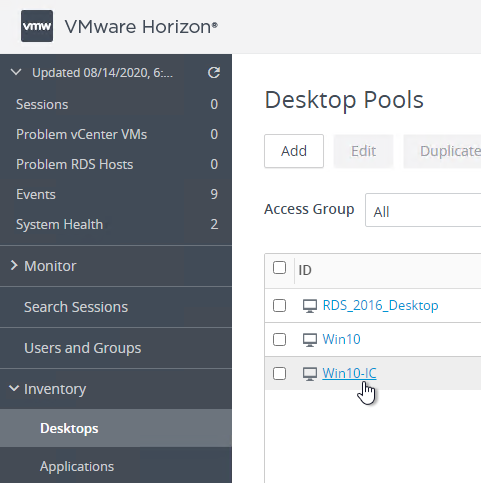
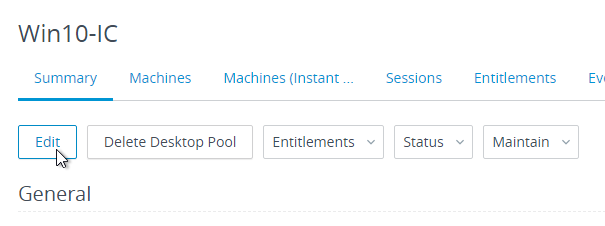
To check the status of the virtual desktops:
- Go to Inventory > Desktops.
- You might have to click the refresh icon on the top right to see the new pool.
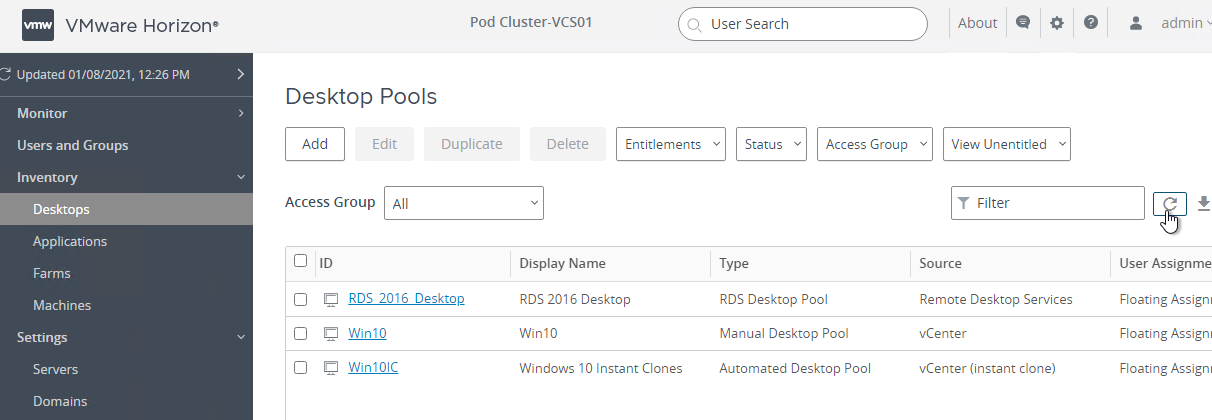
- Click the link for the pool name.
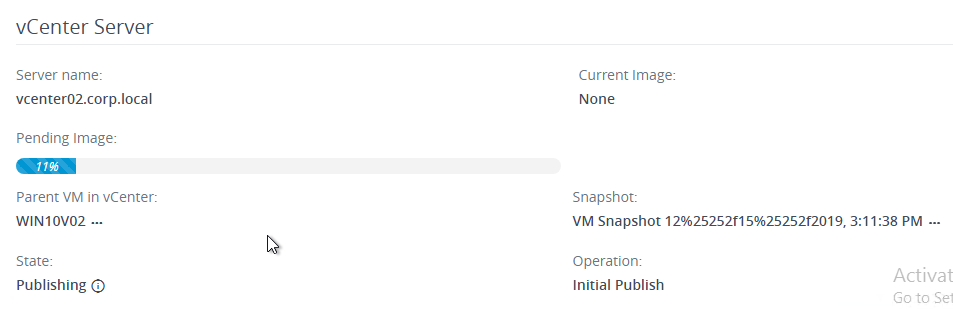
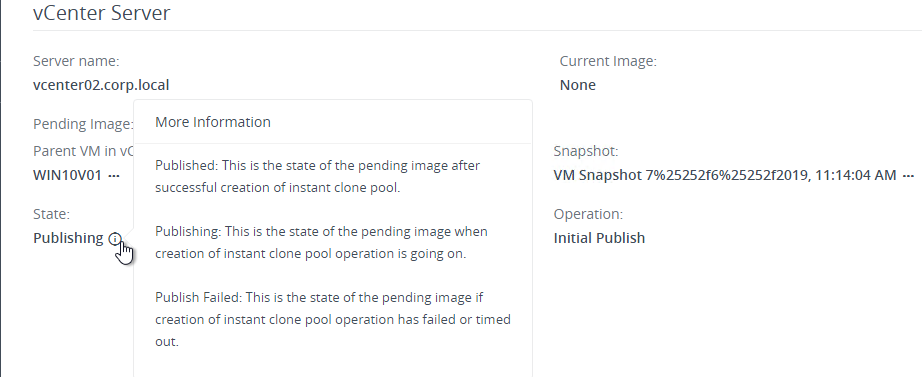
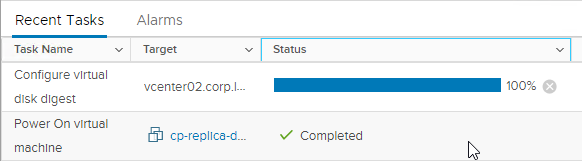
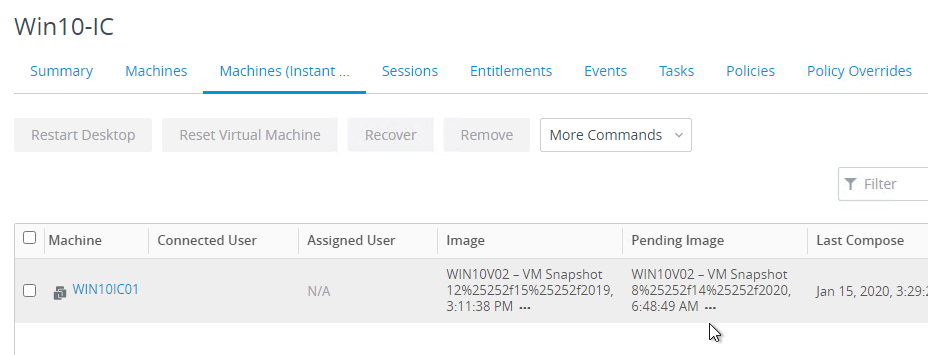
- On the Summary page, if you scroll down, the vCenter Server section has a State field where you can see the status of the pool creation process. It takes several minutes to publish the master image snapshot. After the snapshot is copied to the Replica, vSphere creates a digest file for View Storage Accelerator, which takes a few more minutes.
- Horizon Console has a Pending Image progress bar that doesn’t update automatically. To refresh it, scroll up and click the refresh icon.
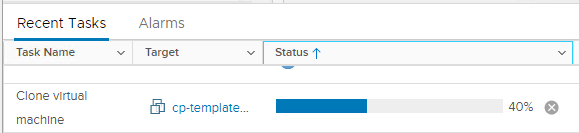
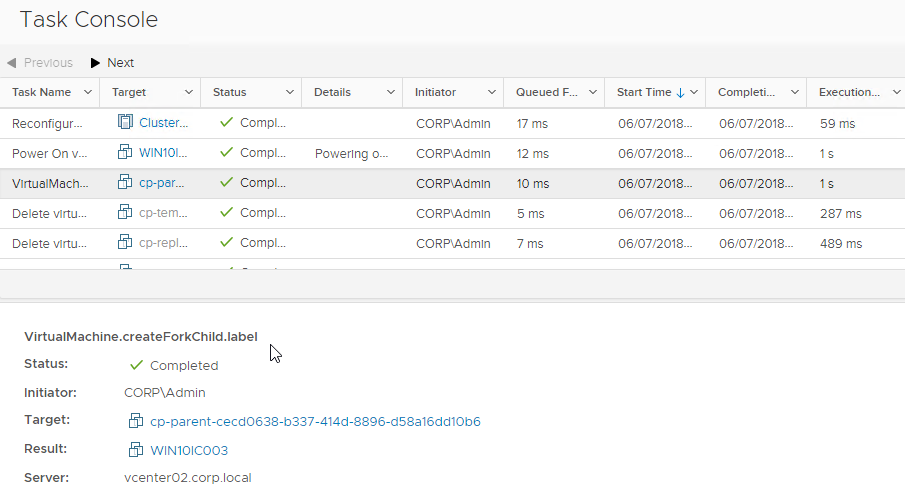
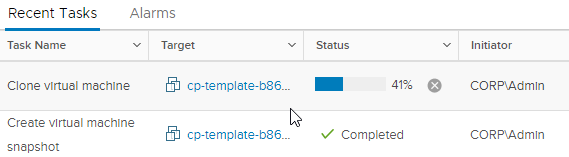
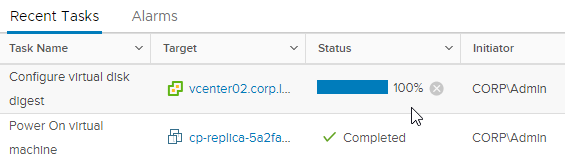
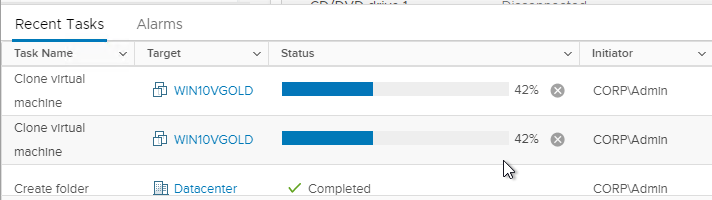
- You can watch the progress in vSphere Client’s Recent Tasks list. In high-density pools, Instant Clones are forked from the cp-parent machine. In low-density pools, Instant Clones are cloned from the cp-replica.

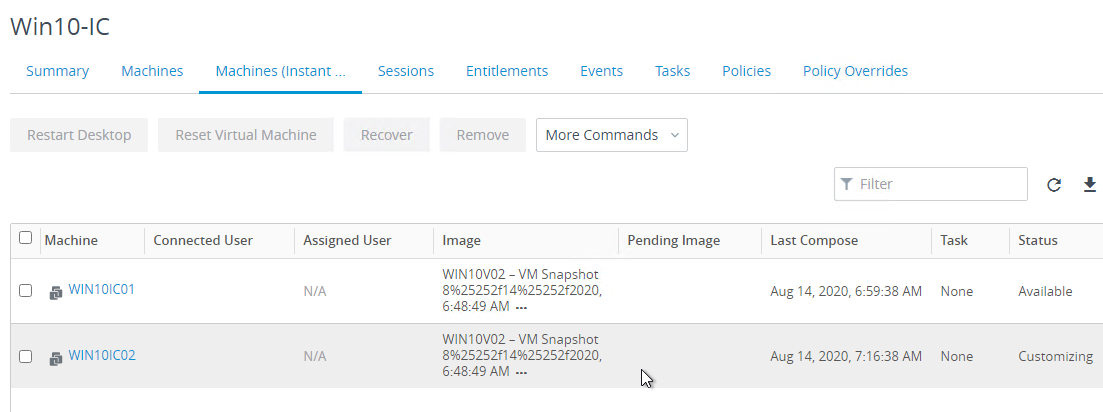
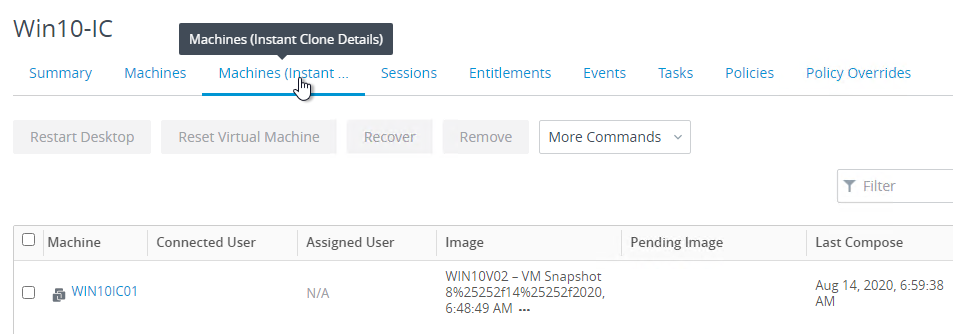
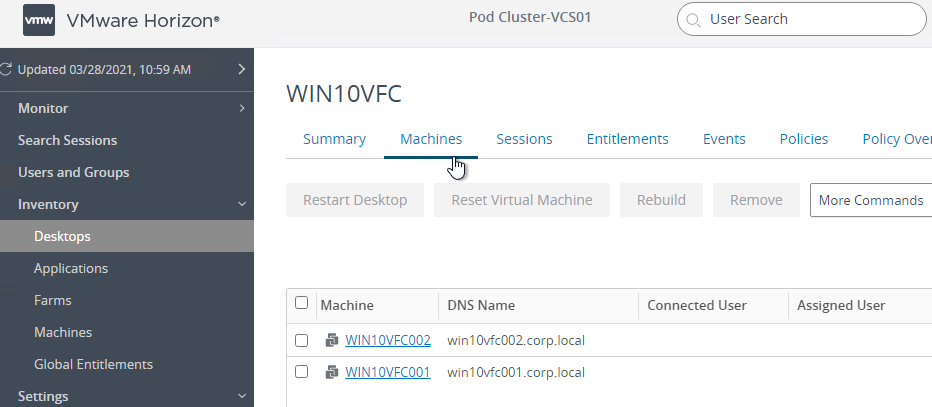
- Eventually the pool’s tabs named Machines and Machines (InstantClone Details) will show the new machines.

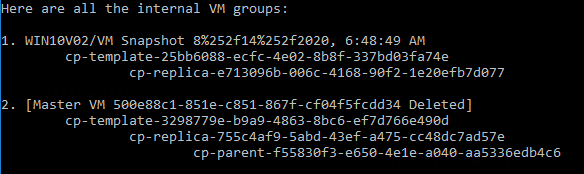
- iccleanup.cmd can show you (list) the structure of the Instant Clones. For higher-density pools, there is a cp-parent at the bottom of the hierarchy. For Smart Provisioning of lower-density pools, there is no cp-parent.
If you wish to automate the creation of the pool, Aresh Sarkari at Automating Desktop Pool creation using PowerCLI – VMware Horizon 7.x explains New-HVPool -spec 'C:\temp\DesktopPool\LinkedClone.json' and the contents of the JSON file.
Entitle Virtual Desktops
To make a pool accessible by a user, it must be entitled.
- In Horizon Console, go to Inventory > Desktops.
- Click the link for a pool name.

- Switch to the Entitlements tab to see the existing entitlements.
- Click Add entitlements.
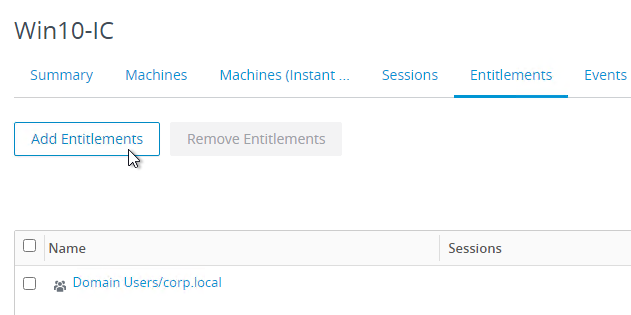
- In the Add Entitlements window, click Add.
- Find a group that will have permission to log into these desktops, and click OK.
- Then click OK.
Add Machine to Pool
- In Horizon Console, on the left, expand Inventory, and click Desktops.
- On the right, click the link for an existing Desktop Pool.
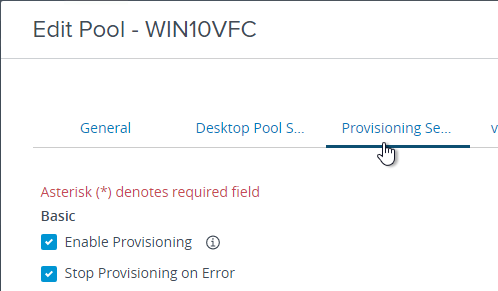
- At the top, click Edit.
- Switch to the Provisioning Settings tab, scroll down, and change the Max number of machines. Then click OK.
- With Instant Clones, this won’t take very long. In high-density pools, the new machine is forked from the cp-parent. In low-density pools, the new machine is cloned from the cp-replica.

- If you open the pool, the tabs named Machines and Machines (InstantClone Details) show the new machines.
Update a Pool
Master Image Preparation
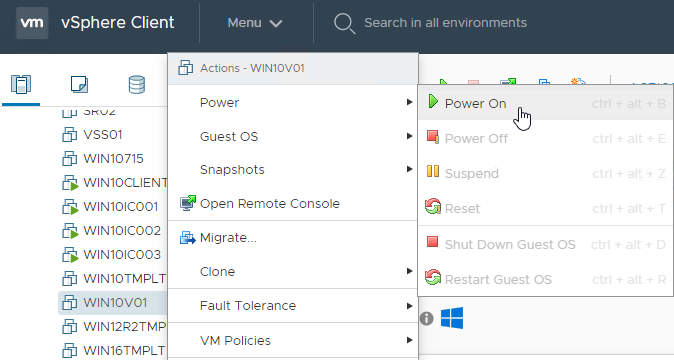
- Power on the master/parent virtual desktop.
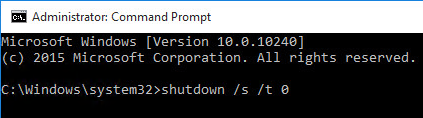
- After making your changes, shut down the master virtual desktop.
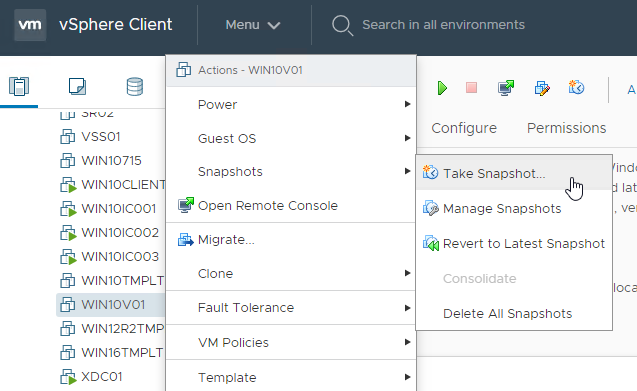
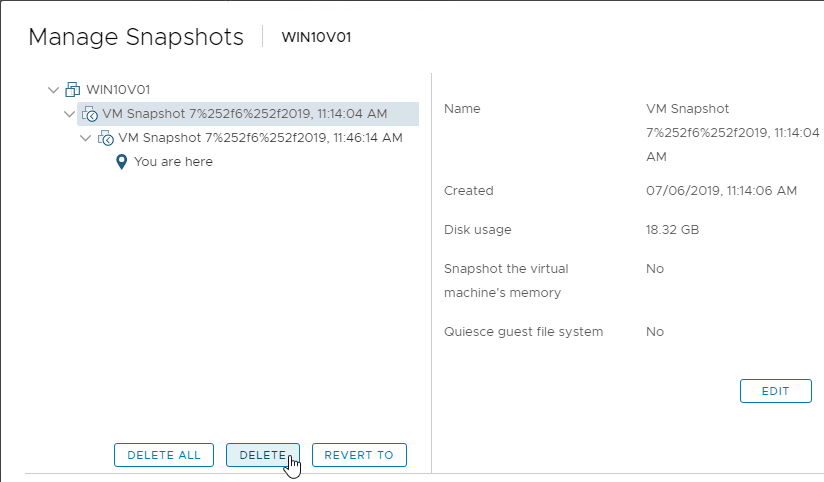
- Right-click the virtual machine and take snapshot. You must create a new snapshot.
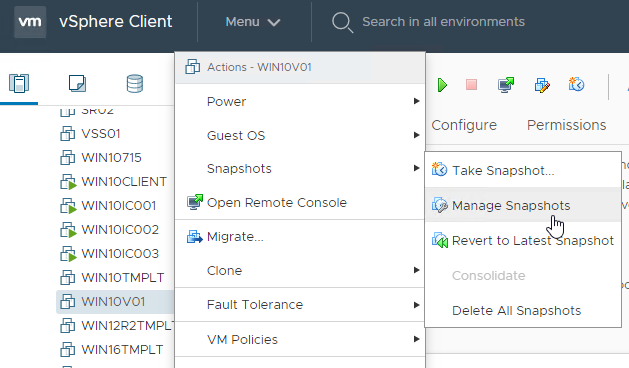
- You’ll need to periodically delete the older snapshots. Right-click the master VM, and click Manage Snapshots.
- Delete one or more of the snapshots.
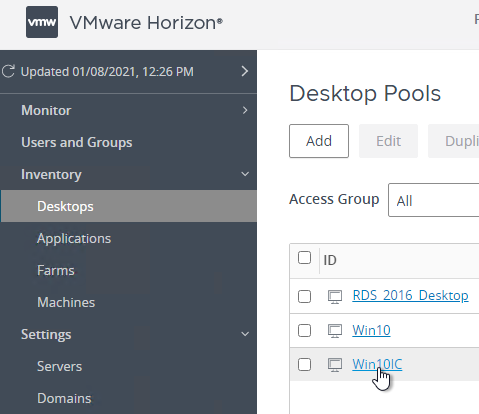
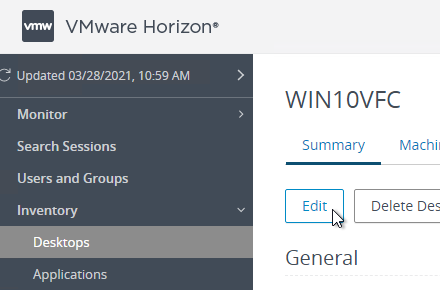
- In Horizon Console, go to Inventory > Desktops.
- Click the link for a pool name.
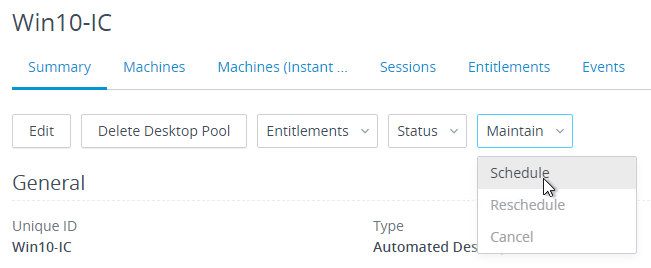
- On the Summary tab, click Maintain, and then click Schedule.
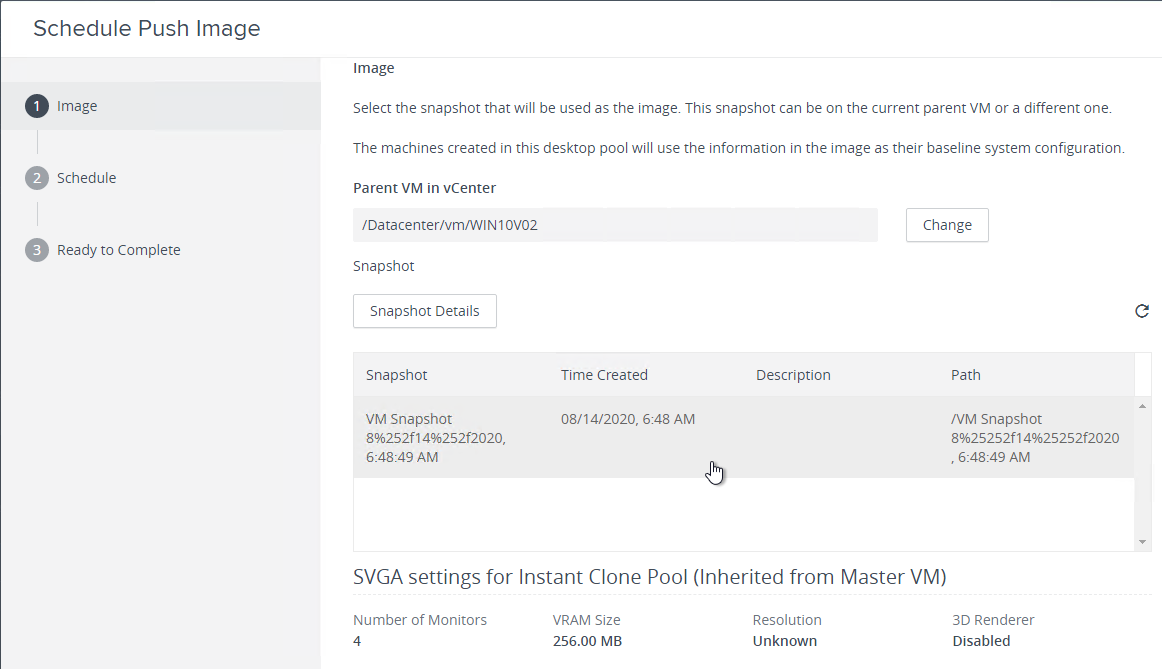
- In the Image page, select the new snapshot. Notice the snapshot’s monitor/resolution settings. Click Next.
- In the Scheduling page, decide when to apply this new image. If you select Force users to log off, notice you can customize the logoff message in Global Settings. Click Next.
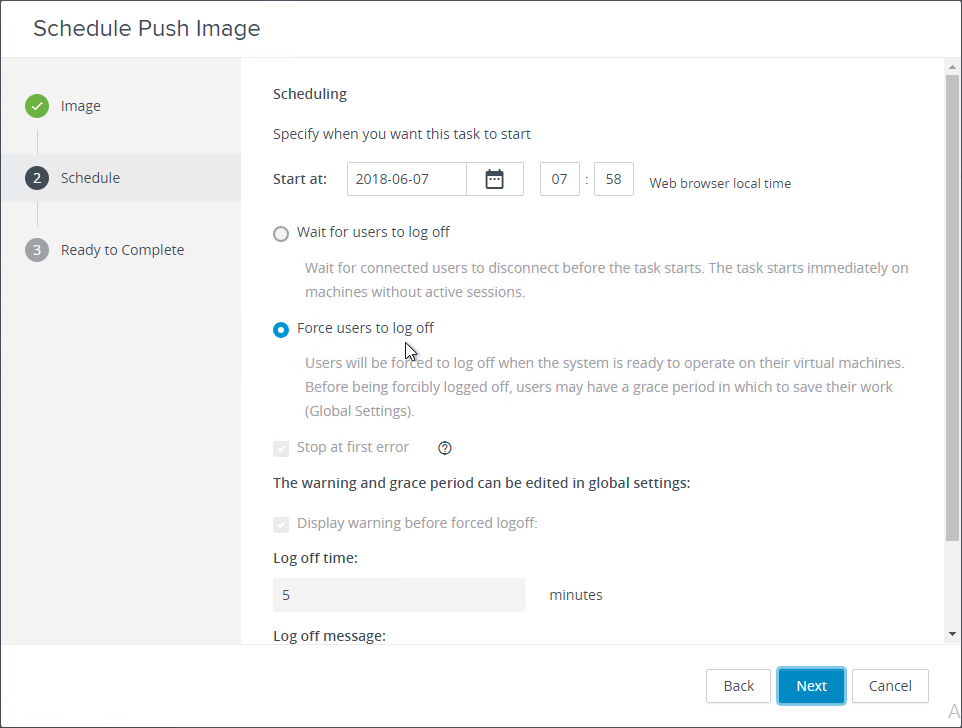
- In the Ready to Complete page, click Finish.
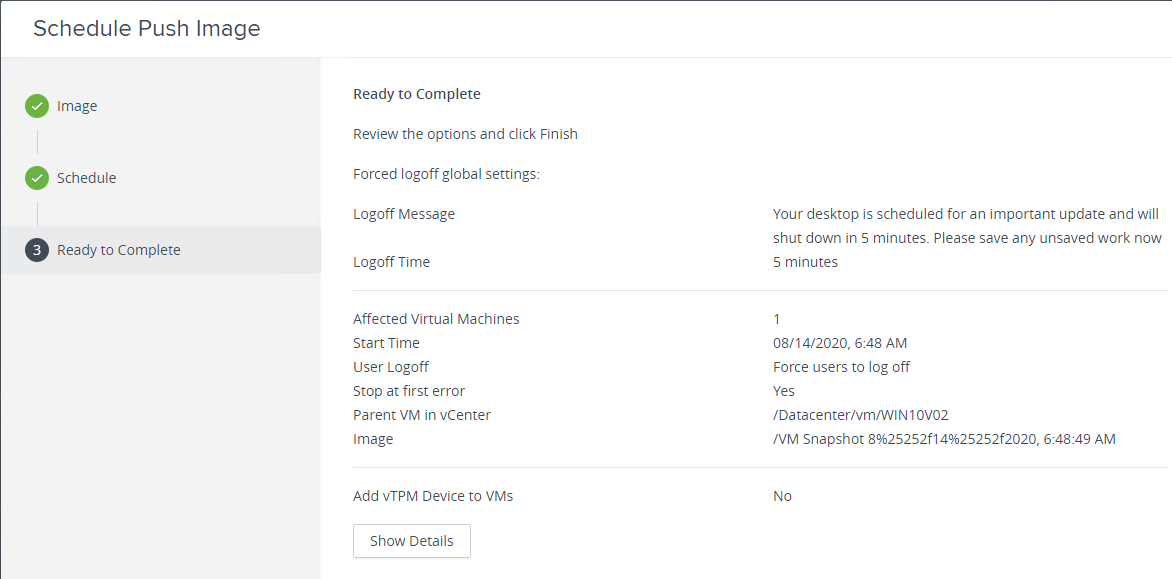
- The pool’s Summary tab, near the bottom, indicates that the image is being pushed.
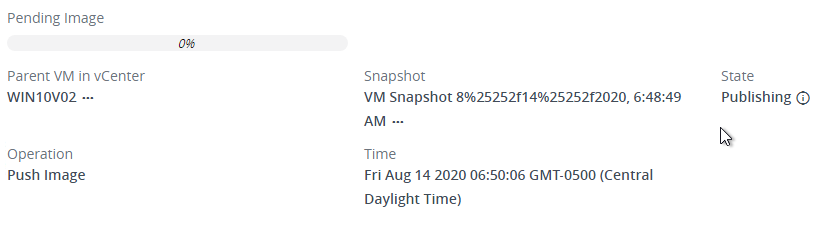
- You can click the tab named Machines (InstantClone Details) to check on the status of the push task. Notice the Pending Image.
- The snapshot is copied to each datastore.
- The snapshot is attached to a Replica, powered on, then powered off. Digest is then computed.
- Then the Replica is attached to a parent, and the parent is powered on. This all takes a bit of time. But the existing Instant Clones remain accessible until the Replica preparation is complete.
- Once Replicas are prepared, each machine is rebooted once.
- Eventually the Pending Image field will be cleared and the desktops are available again.
Host Maintenance – Instant Clones
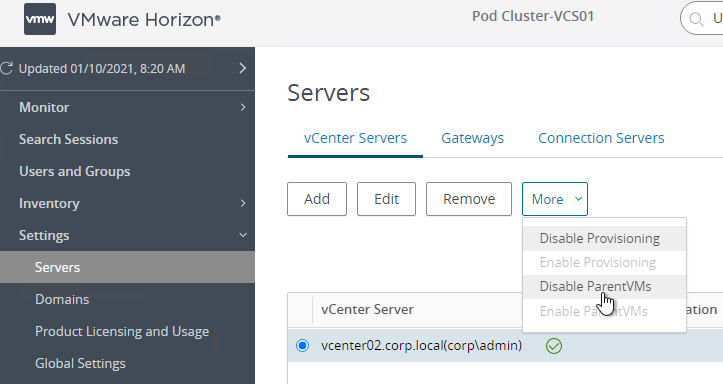
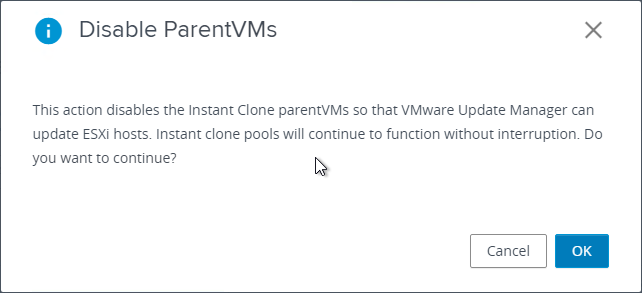
Horizon 2012 (8.1) and newer have an option to Disable ParentVMs so vSphere Update Manager can put the hosts into maintenance mode. This uses the parentless Smart Provisioning technology. Find the option at Settings > Servers, select a vCenter server, click the More menu, and select Disable ParentVMs.
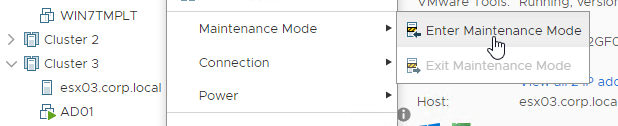
ESXi hosts running Instant Clones can be placed into maintenance mode without any special instructions.
Instant-Clone Maintenance Utilities at Omnissa Docs:
- IcCleanup.cmd – use this utility to unprotect and delete some or all of the internal VMs created by instant clones. This is the easiest method of cleaning up Instant Clone internal machines.
- IcUnprotect.cmd – use this utility to unprotect folders and VMs, delete VMs, and detect VMs whose master image or snapshot is deleted.
- IcMaint.cmd – This command deletes the master images, which are the parent VMs in vCenter Server, from the ESXi host, so that the host can be put into maintenance mode. This utility generally isn’t needed. Also see Omnissa 2144808 Entering and exiting maintenance mode for an ESXi host that has Horizon instant clones.
Persistent Full Clones – Automated
Horizon can clone your Template machine to a specified number of Full Clones. Once Full Clones are created, you’ll need a Software Deployment tool, like Microsoft SCCM, to manage the Full Clones.
Customization Specification
Horizon uses a Customization Specification to specialize each machine cloned from the template:
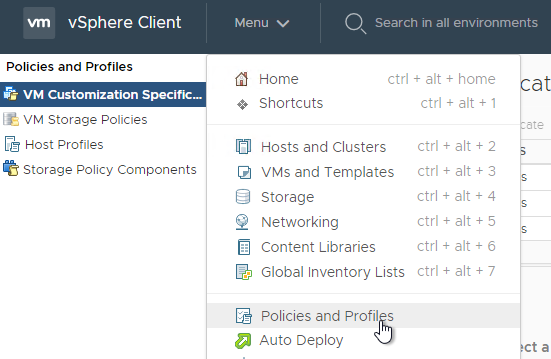
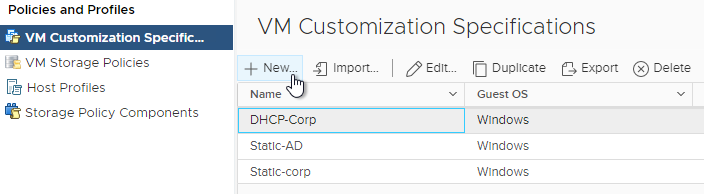
- In vSphere Client, open the Menu and click Policies and Profiles.
- Make sure you have a Customization Specification with the settings detailed in the next few steps. You can create a new Customization Specification.
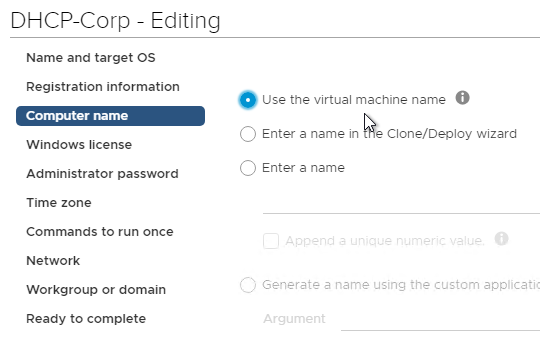
- In the Computer name page, set it to Use the virtual machine name.
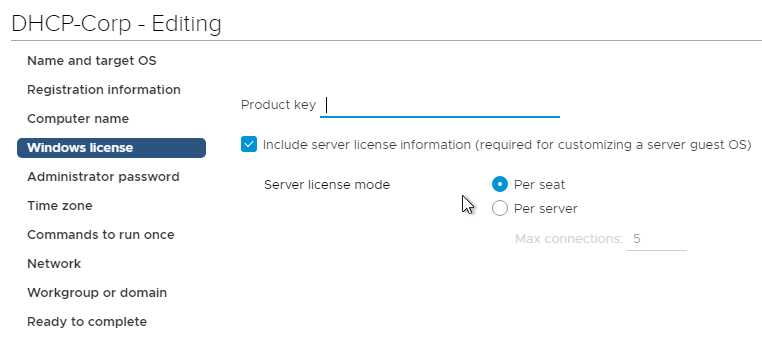
- In the Windows license page, you can optionally set it to Include server license information but change it to Per seat.
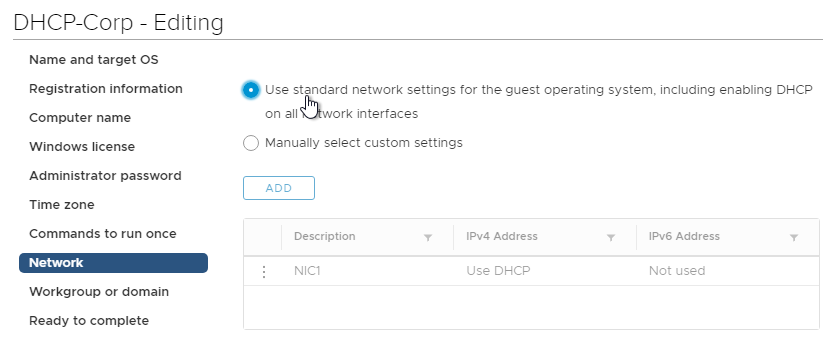
- In the Network page, make sure the networks are set to DHCP. Once the machines are created you can manually set them to Static or configure DHCP reservations.
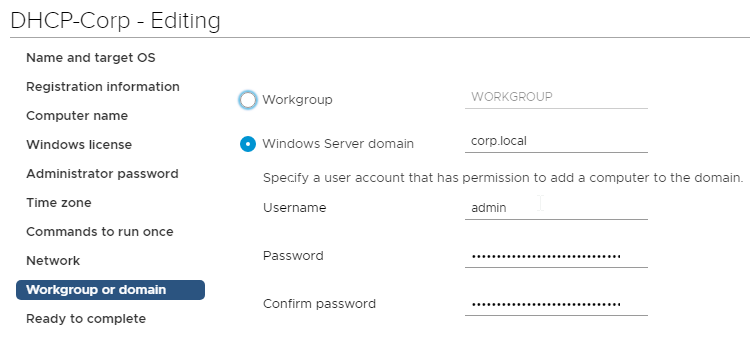
- In the Workgroup or domain page, enter credentials to join the new Full Clones to the domain.
Gold Image Template
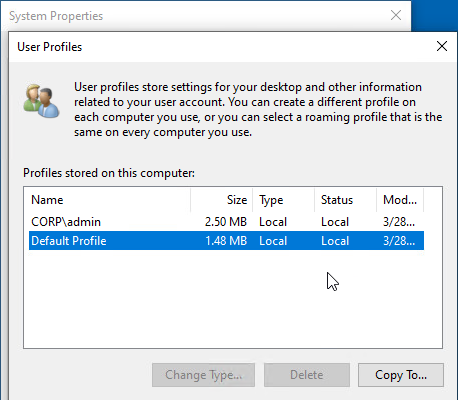
- On the gold image machine, in sysdm.cpl > Advanced > User Profiles > Settings, make sure there are no local profiles other than your administrator profile and the Default Profile. Delete all others. Sysprep frequently fails if there is more than one profile on the template.
- If you have SCCM Client installed on your Gold Image, then see Prepare the client computer for imaging.
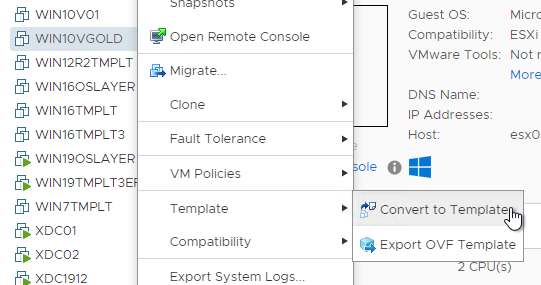
- Shut down the Gold Image.
- Right-click the gold image, expand Template, and then click Convert to Template.
- Before creating a pool, test deploying a new machine from the template to make sure SysPrep is successful.
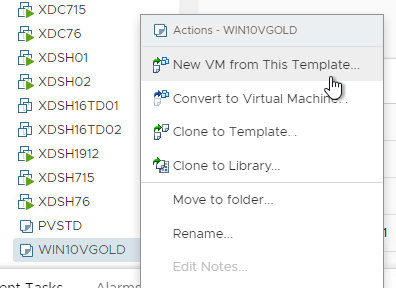
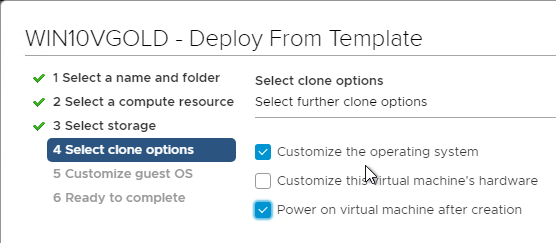
- Right-click the Template and click New VM from This Template.
- In the Select clone options page, check the boxes next to Customize the operating system and Power on virtual machine after creation.
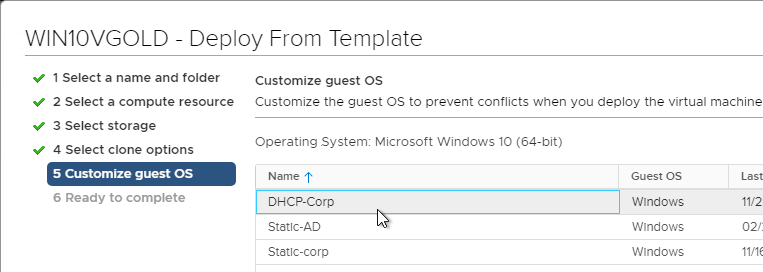
- In the Customize guest OS page, select the Customization Specification you created earlier.
- If cloning fails, then see Broadcom 2001932 Locations of sysprep log files. Store apps (aka UWP apps) are a frequent cause of SysPrep failures. You can convert your Template back to a Virtual Machine, power it on, fix the problem, power it off, and then convert it to a Template again.
- Right-click the Template and click New VM from This Template.
Automated Full Clone Pool
- In Horizon Console, in the left menu, expand Inventory and then click Desktops.
- On the right, click Add.
- In the Type page, select Automated Desktop Pool and click Next.
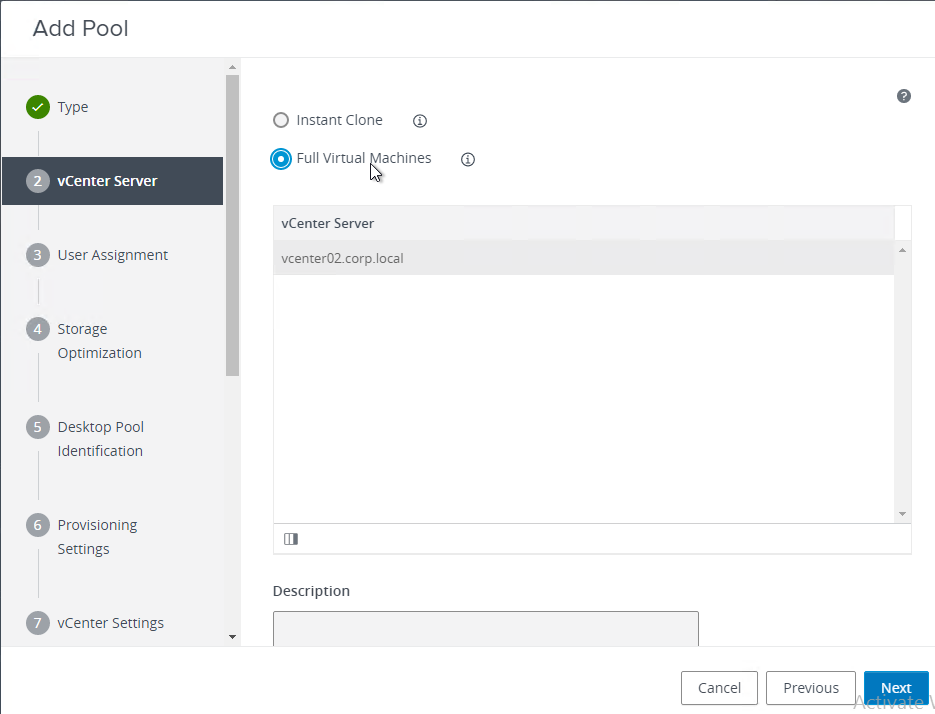
- In the vCenter Server page, select Full Virtual Machines. Select your vCenter Server and then click Next.
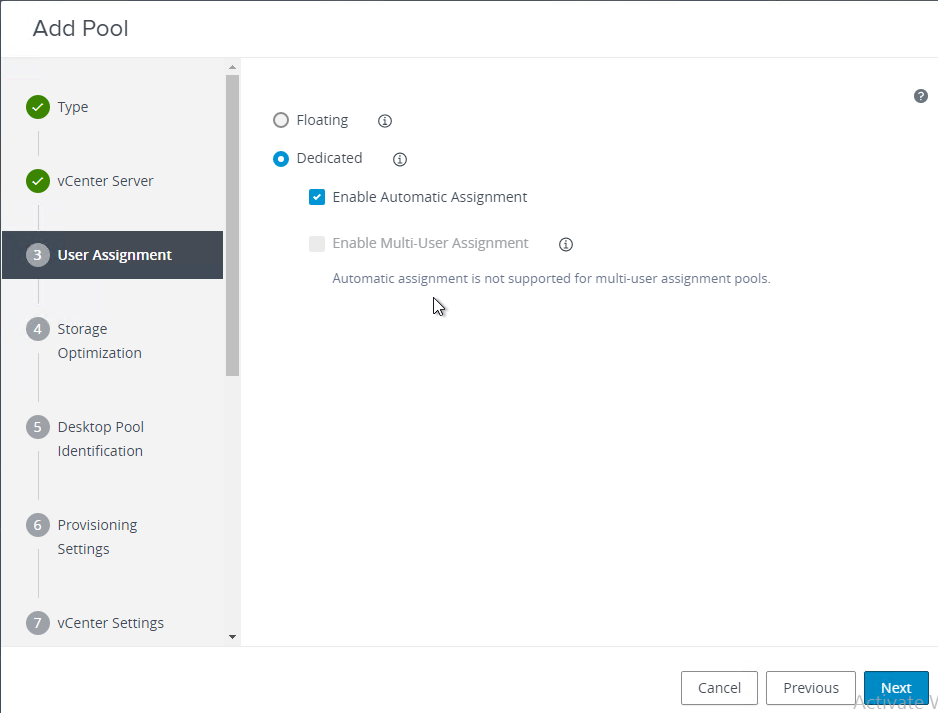
- In the User Assignment page, you usually want Dedicated assignment.
- Automatic Assignment is an optional feature that avoids you having to manually assign users to each full clone desktop. But manual assignments give you more control over capacity planning. Click Next.
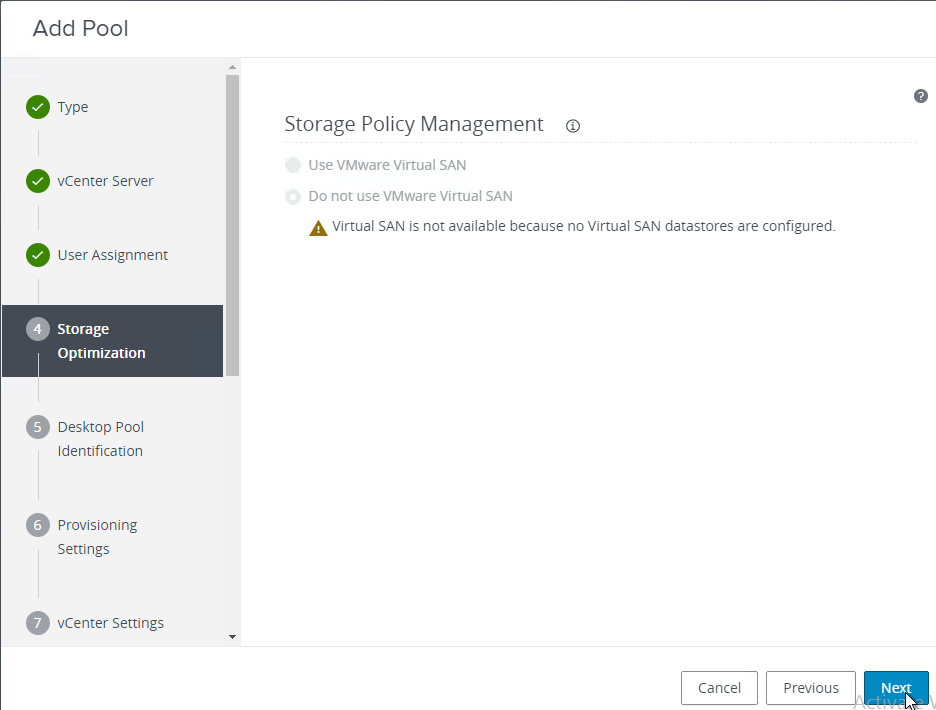
- In the Storage Optimization page, click Next.
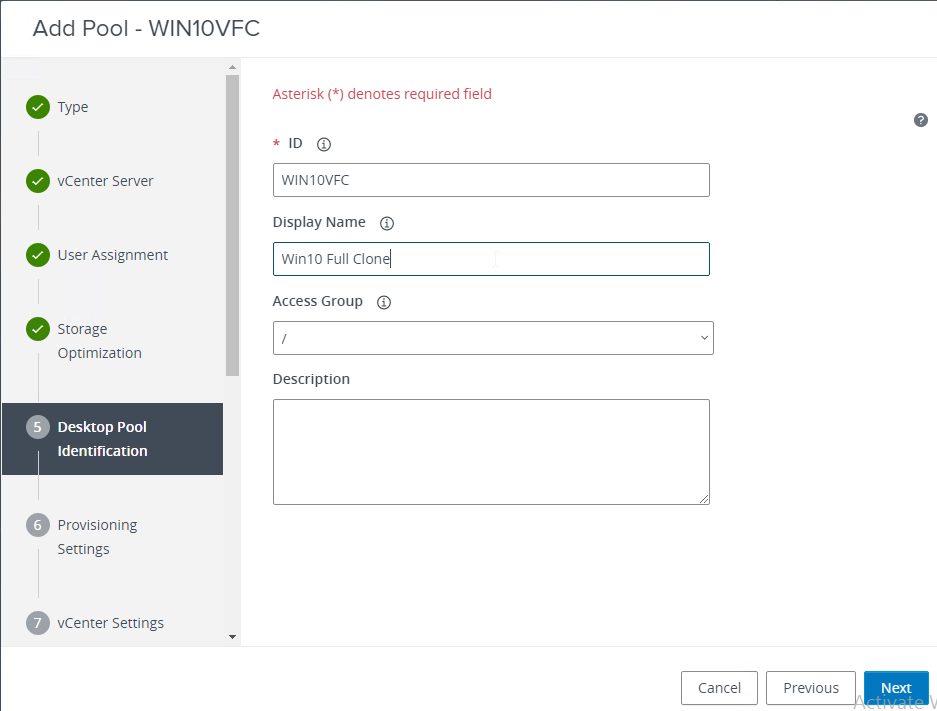
- In the Desktop Pool Identification page, give the pool an ID (no spaces) and a Display Name that is shown to users. Horizon creates a vCenter virtual machine folder with the same name as the ID. Click Next.
- In the Provisioning Settings page, specify a Naming Pattern. You can hover your mouse over the information icon to see the syntax. Then scroll down.
- After scrolling down, specify the number of machines to create. If you specify All Machines Up-Front, then Horizon will create the Maximum Machines. If you specify Spare (Powered On) Machines, then Horizon will try to preserve this specified number of unassigned machines. Click Next.
- In the vCenter Settings page, click Browse next to Template and select the template you created earlier.
- Click Browse next to the other fields and specify where you want the new machines to be created. Make sure VM Folder Location doesn’t have any spaces in it. Click Next.
- In the Desktop Pool Settings page, these settings are the same as Instant Clones, but Remote Machine Power Policy might be different. Scroll down.
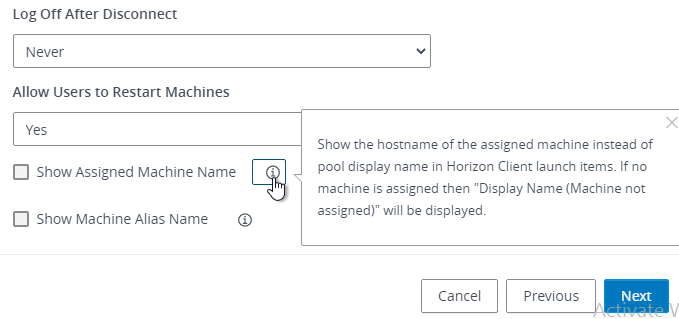
- After scrolling down, notice the option for Show Assigned Machine Name instead of the pool name. Hover your mouse over the information icons. Click Next when done.
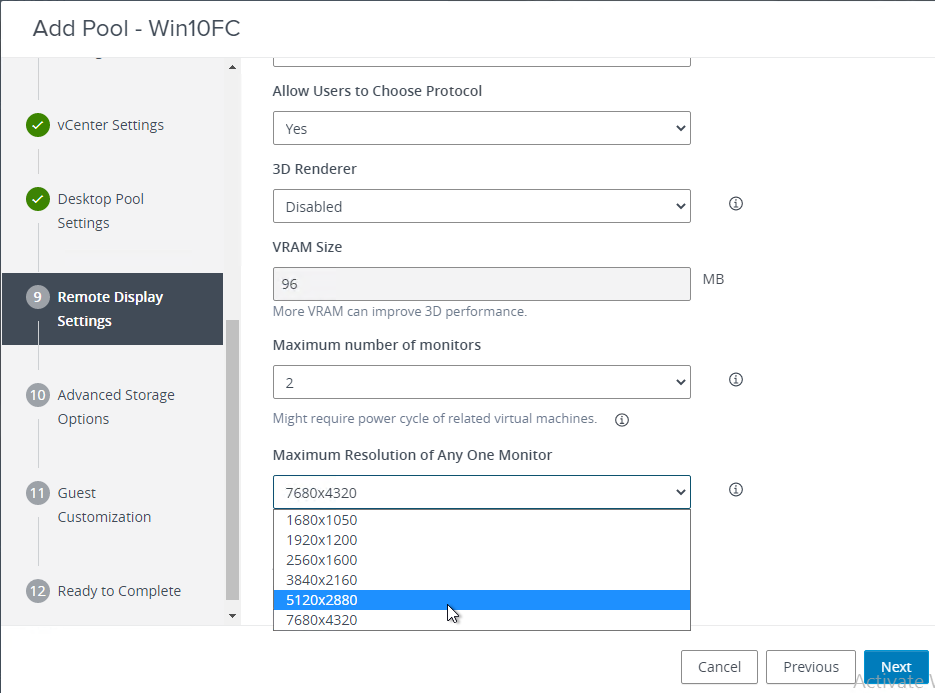
- In the Remote Display Settings page, specify video settings and then click Next. Horizon 2106 (8.3) and newer let you choose 5K and 8K monitors for Blast only.
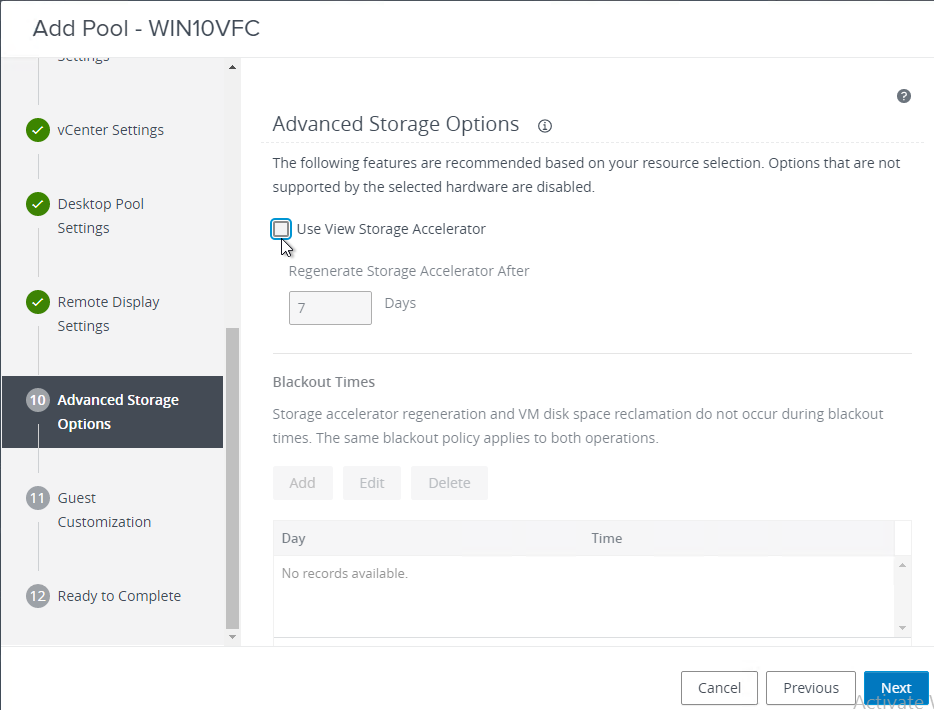
- In the Advanced Storage Options page, note that View Storage Accelerator is just a read cache (no write caching). If your storage can handle the reads then enabling this feature probably isn’t necessary. Click Next.
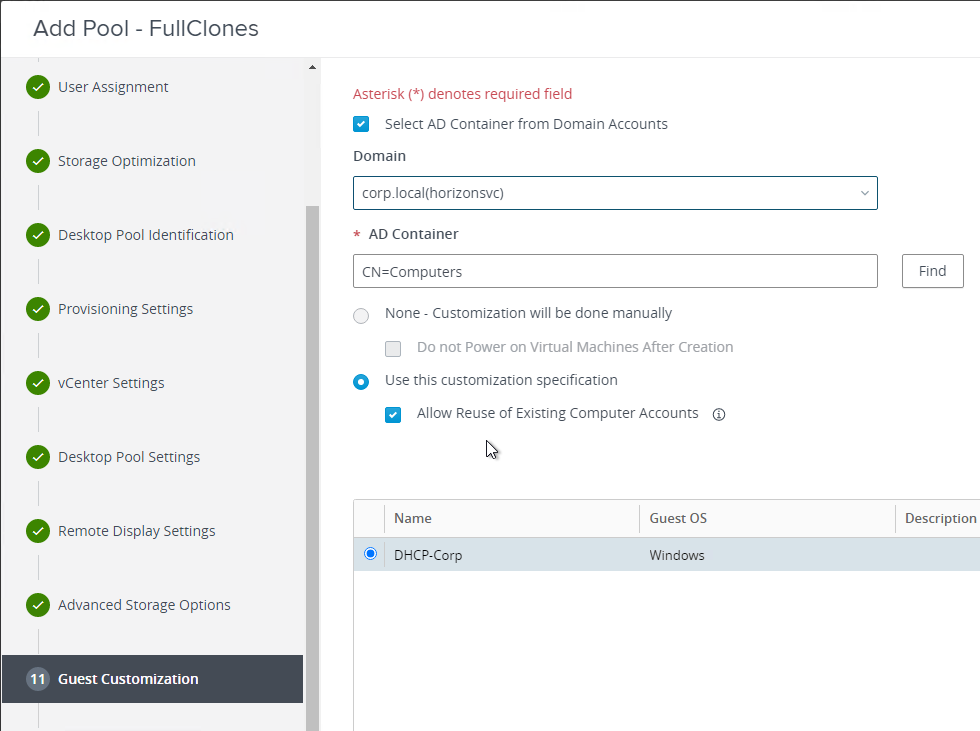
- In the Guest Customization page, select the Customization Specification that you created earlier. Consider checking the box next to Allow Reuse of Existing Computer Accounts.
- Horizon 2212 (8.8) and newer let you specify the OU for the new machines. Otherwise, they are created in the Computers container unless you pre-create the computer accounts in your desired OU. Click Next.
- In the Ready to Complete page, you can optionally Entitle users After Adding Pool. Click Submit. Note: users must both be entitled to the pool and assigned to an individual machine.
Machine Administration
- Cloning progress – Use vSphere Client Recent Tasks to watch the progress of the cloning. It will take time for the cloning to complete plus time for SysPrep to complete.
- If you click the Pool name link and then switch to the Machines tab, you should eventually see the new machines.
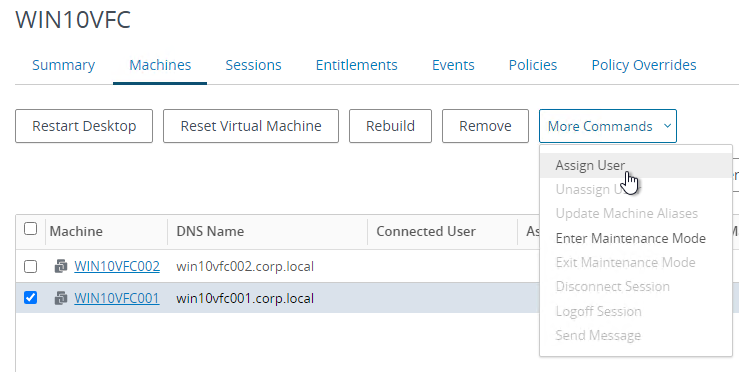
- Assign User to Machine – You can select a machine, click the drop-down for More Commands, and then Assign User.
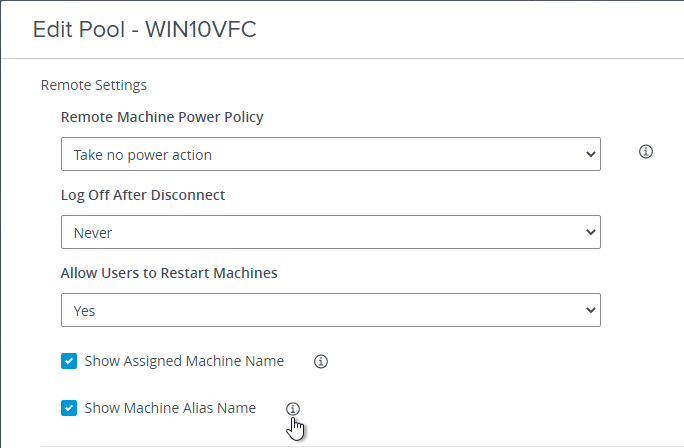
- Machine alias – By default, the pool’s Display name is displayed to each user. You can instead change it to the individual Machine Name, or to an administrator-specified machine alias.
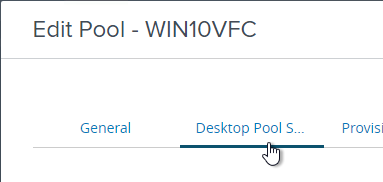
- Go to the pool’s Summary tab and click Edit.
- Switch to the tab named Desktop Pool Settings.
- Scroll down and find the checkboxes for Show Assigned Machine Name and Show Machine Alias Name. If you select Alias Name, then an additional command appears on the Machines page.
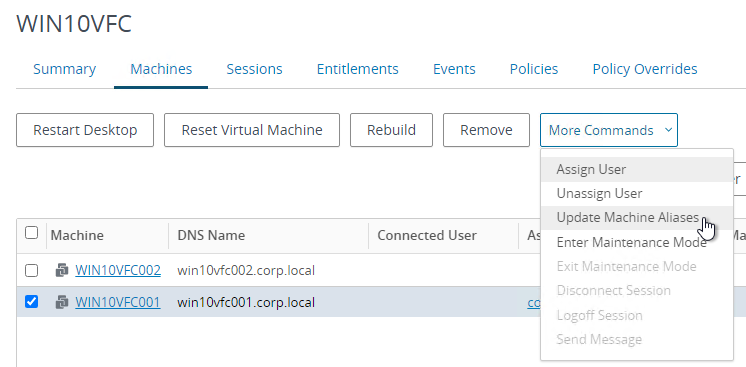
- After editing the pool and enabling Show Machine Alias Name, On the Machines tab, select a machine, and then click the drop-down for Update Machine Aliases. The Alias is shown to the user instead of the pool’s Display Name or the actual machine name.
- Add Machines – To create more Full Clone machines from the same template:
- Click the name (link) of the pool.
- On the Summary tab, click Edit.
- On the Provisioning Settings tab, scroll down and enter a larger Maximum Machines.

- Update Template – If you plan to create more Full Clone machines in the next few months, then you should update your Template by converting it to a virtual machine, update the virtual machine, and then convert it back to a Template. Note that the updated Template only applies to new Full Clones and has no effect on existing Full Clones. To update existing Full Clones, use a Software Deployment tool like Microsoft SCCM.
Related Pages
- Back to Omnissa Horizon 8
hello sir,
i automatiz vdi instant clone pool creation using powershell.
it works well
but by default, vdi pool use network attached to golden template
is it a way to change the network during vdi pool creation or maybe just after creation ?
it s allowed using GUI so it should be ok using powershell or rest api
regards
Hey Carl, how are you doing?
Do you know how do I enable vTPM with persistent disks?
I have created a new pool and checked that option, the image is published with no errors, but during the VM Customization it returns the following error:
Instant clone agent initialization state error 14: Failed configuring persistent disks.
I have tried several images, with vTPM and without, and all of them returned the error that I mentioned.
Can you give any idea of what am I doing wrong?
Hey there,
we have exactly the same problem (omnissa Horizon 2412).
Is there still any workaround? Nothing to find on omnissa customer connect etc.
Thanks a lot.
Good morning , with optimizer were deleted microsoft apps by mistake, is there any way to be able to put them back into golden without having to restart?
Mr. Carl, first of all, love.
I want to delete the machines in the pool with the Powershell script, but I could not find the powershell module. Is there an easy way to do this? thanks a lot.
Is PowerCLI installed? https://docs.omnissa.com/bundle/Horizon-AdministrationV2406/page/SetUptheHorizonPowerCLIModule.html
Grasping at straws here. On an instant clone pool, when connecting to a vpn I am losing connection to the connection server, but if I have a continuous ping going to the connection server, I can see the pings never drop (that is checking via the console after it times out). I’m sure the vpn is taking over dns but even with a hosts file entry and being able to ping the CS, we are still disconnecting.
Split Tunnel enabled on the VPN?
Have you tried a persistent VDI machine?
This is a vm with lots of different vpn setups. Techs can sign into via Horizon and have all the unique vpn’s to support external clients. The vpn isn’t mine to control so I’m assuming split tunneling is not allowed. But for the other vpn’s we’ve been able to get around it with persistent routes added and basic hosts file entries. All other vpn’s work, except for this one and I’m stumped!
Hi Carl,
A big thank you for all your instructions!! You are a life saver!
I have a question, on horizon 7.13, i could detach a disk, change pool and recreate machine.
At horizon 8, 2406 doesn’t seem to be able to switch disk between pools.
Is this correct? is it another way to do it?
Thank you
See https://docs.omnissa.com/bundle/Desktops-and-Applications-in-HorizonV2312/page/UsingPersistentDisksforDedicatedWindowsInstantClones.html
Hi, I’m looking for something similar to this:
https://docs.vmware.com/en/VMware-Horizon-7/7.13/virtual-desktops/GUID-7498DD7B-DD84-4D4F-A1E1-786C1DE41757.html
I cannot change a detached disk pool in horizon 8.
Can you detach the existing disk and then attach it to a different machine? https://docs.omnissa.com/bundle/Desktops-and-Applications-in-HorizonV2406/page/AttachaPersistentDisktoaWinstantClone.html
Hi, thank you for your quick response!
I already saw that, but this means that it will have two disk attach on that vm.
On horizon 7.13 we had before this was much easier, just preselect pool on detach disk menu, and clicking recreate machine will place it to your choosen pool with just that persistent disk.
One more question, can i delete the extra persistent disk from vcenter without breaking the vm?
(i already logged in and change letter to D:, so now vm has D: and F:, can i safely delete that F:?)
Thank you
When creating a pool and you change the ram and cpu in compute profile settings if you recompose the pool with a new snapshot these settings seem to disappear and the cpu and ram that is associated with the gold image is used. Is there a way to prevent this from happening and have it maintain the changes that were made to the compute profile for the pool?
Maybe someone can share real experience about Master Image VM hardware sizing (vCPU/RAM, pCPU to vCPU ratio…) using it for Non-Persistent Instant Clones with MS Teams.
Hey Carl and thanx for all your work,
I am creating floating pools (vsan datastore) but vCPU, RAM and core per socket aren’t working properly, 100% of the time they are only using snapshot’s configuration, which is a problem when you plan to use app virtualisation with a single master but with pools with different needs.
Can you point me a possible source of this issue ?
Newer Horizon lets you specify the CPU, Memory, etc. during pool creation.
Can you create multiple snapshots with different specs?
is this still active ?
we are trying to create vmware horizon, but it show me an error, virtualization is disabled session.Id=1
please help for this issue
Some of our parent images end up with lots of 00000#.vmdk files even though we only have a couple snapshots. Some are well over a year old.
Is there an easy way to determine if they can be deleted from storage or which vmdk’s are tied to the current snapshots?
I need this exact question answered too. I have multipe cp-parent machines per golden image but have not found a way to determine which cp-parent are valid and which can be deleted.
When did VMWare add the requirement that there can be no spaces in the VM Folder location? I have 2 persistent pools that I created on an earlier version and they work fine(currently on 2212.2). Now I’m trying to create a new persistent pool and our datacenter name has a space in it. The pool builds, but no one can log in. If I take the space out of the datacenter, it breaks every other persistent and instant clone pool that we have.
Is there anything I can do, other than killing and rebuilding all of our pools after renaming the datacenter? I’m also worried it might to break our backups on the server side if I rename the datacenter.
What consequences are they to renaming the golden image machine?
Are you asking about the VM name in vCenter? Or are you asking about name in the operating system? I don’t think renaming either one will cause any problems. If you rename the VM name in vCenter, then when you update your pool you simply select the new name. The name inside the OS is ignored since Instant Clones have their own computer names.
Can someone please explain why computer-based GPOs will not apply to the instant clones if they’re not previously stamped on the golden image? If a computer boots up, instant clone or not, whatever GPOs linked to it’s OU should be applied as part of its boot up process. What am I missing here?
What version of Horizon? I think that was fixed in newer versions.
We’re standing up 2312 ESB. They fixed computer based policy applying to instant clones?
I personally always put my gold image in the same OU as the instant clones so that the GPO settings are applied to the gold image. See https://kb.vmware.com/s/article/2150495
Woah woah, stop the press, golden image in the clone OU? Domain joining my master never worked, caused SID issues. Very vexed. Tell me how it his works?
Ok, this article was very helpful. For us, we would rather not have the majority of our computer-based GPO settings tattooed on the golden image. If I’m reading this article correctly, as long as you publish a new snapshot after setting GPO to your clones, the internal forked VMs will go through a power off/on as part of the snapshot update process, therefore the clones will now have those settings. So you can keep your golden images in a separate OU and maintain their pristine state. If you have tons of GPOs this is important when your organizational operations change, as some GPO cause settings which can be difficult to disentangle.
I usually applied computer-based policies that require a reboot in Local Group Policy (gpedit). Then policies that don’t require a reboot can be applied in the OU. Just my $.02.
I just read that the instant clones never really go through a power on process which would explain why. However, what about the “internal quiesced VMs”?
They boot when Mode B https://docs.vmware.com/en/VMware-Horizon/2312/virtual-desktops/GUID-D7C0150E-18CE-4012-944D-4E9AF5B28347.html
I am getting the following error when I try and provision an instant clone VDI Pool
Fault type is UNKNOWN_FAULT_FATAL – unknown error
This is a new VDI Pool
What machines does it create? Check vCenter Recent Tasks.
Check logs in c:\programdata\vmware\vdm\logs on the Connection Server and on the Instant Clone machines created in vCenter.
I have the same issue – see below snippet from the HCS log.
I’ve tried the reg ‘fix’ from https://kb.vmware.com/s/article/76469, no joy.
The master image for this pool is a clone of a production master, applied OS and application updates and increased the memory on the master to 16GB – I really wasn’t expecting any issues at all.
Any ideas?
2024-03-20T09:51:33.148Z DEBUG (021C-15C4) [SDMessageManager] finished waiting, was waiting for 10000ms
2024-03-20T09:51:33.764Z DEBUG (021C-15C0) [DesktopTracker] Handling 1 LDAP notifications. Categories: AddModifyPool:1, addModifyServer:0, deletePools:0, deleteServers:0
2024-03-20T09:51:33.766Z DEBUG (021C-15C0) [DesktopTracker] Update pool from LDAP notification: cn=march24emp,ou=server groups,dc=vdi,dc=vmware,dc=int
2024-03-20T09:51:33.766Z DEBUG (021C-15C0) [InformationBase] PoolInformation[cn=march24emp,ou=server groups,dc=vdi,dc=vmware,dc=int]::pae-PendingParentImageErrorMessage is now Fault type is UNKNOWN_FAULT_FATAL – After waiting for 300 seconds InternalTemplate vm-210620 is still not powered off. Giving up!
2024-03-20T09:51:33.767Z DEBUG (021C-15C0) [InformationBase] PoolInformation[cn=march24emp,ou=server groups,dc=vdi,dc=vmware,dc=int]::pae-PendingParentImageState is now FAILED
2024-03-20T09:51:33.767Z DEBUG (021C-15C0) [InformationBase] PoolInformation[cn=march24emp,ou=server groups,dc=vdi,dc=vmware,dc=int]::pae-NgvcPoolPendingOperation is now null
2024-03-20T09:51:33.767Z DEBUG (021C-15C0) [InformationBase] PoolInformation[cn=march24emp,ou=server groups,dc=vdi,dc=vmware,dc=int]::pae-SVIVmPendingOperationPolicy is now null
2024-03-20T09:51:33.767Z DEBUG (021C-15C0) [InformationBase] PoolInformation[cn=march24emp,ou=server groups,dc=vdi,dc=vmware,dc=int]::pae-SVIVmOperationSchedule is now null
2024-03-20T09:51:33.767Z DEBUG (021C-15C0) [InformationBase] PoolInformation[cn=march24emp,ou=server groups,dc=vdi,dc=vmware,dc=int]::pae-SVIVmOperationFlags is now archiveDatastore=false;archiveOSDisk=false;archiveDatastorePath=;dataDiskId=;addVirtualTPM=false;
2024-03-20T09:51:33.768Z DEBUG (021C-15C0) [DesktopTracker] Update pool: cn=march24emp,ou=server groups,dc=vdi,dc=vmware,dc=int
Do you see InternalTemplate vm-210620 in vCenter? Are you able to log ingo that machine and check its logs?
This seems very familiar to me. Try migrating the new image to another datastore. I’m betting you’ll get an indicator that the disks need to be consolidated. Do that, and then migrate it back to the datastore you want it on. If I were you, I’d probably delete the snapshot before any of this, and do a new snapshot at the end. Then try pushing to your pool.
did you try vmware clone prep? that is all I could do to get to create an IC. I am now having an issue creating a Full Clone. I create one and then if I modify it and try to push it out again it times out on customizing. ;-(
Hi Carl, have come across your website and you may well be the person that can resolve 2 issues I have.
We are running Horizon 8 2312.
First issue, we have M10 nVidia cards inside our ESXi hosts but do not have the nVidia licenses available so have them in SVGA mode to be able to use them. We have the 3D support enabled on the Master Image and in the Desktop Pool we have selected Manage Using VSphere client as I am of the understanding you can’t choose the nVidia Grid option unless you install the software on the image which we don’t do as have no licenses. Is this a valid and supported setup? The reason I ask, is since we have done this, our users keep getting black screens with the mouse cursor flashing, mainly when using Outlook 365. If we remove the 3D support from the Master Image, we don’t see the issue but then the M10 cards inside the hosts are not being used as no VM’s are being assigned to them.
Second Issue, we currently don’t have View Storage Accelerator enabled in the vCenter settings section in the View Admin Console. Reading your notes, you explain that this should be enabled. We have an issue when in the morning, we get a few users that can’t seem to connect to a desktop saying that the pending session expired even though the desktop the user is trying to connect to shows as available inside the pool. Could this have anything to do with it, the fact we don’t have the accelerator enabled. If I do enable it, what would you recommend I set the cache size to?
I hope this makes sense and really hope you can reply and help us out.
If I disable View Storage Accelerator and try to create an Instant Clone pool, it says this on the first page:
“For optimal performance, Instant Clone pools and farms require View Storage Accelerator to be enabled for the vCenter Server.”
What version of NVIDIA GPU Driver is installed? Is Office configured to not use hardware acceleration?
We have the latest version of the NVIDIA GPU Driver installed on the ESXi Hosts as I keep hoping the next release will fix our problem but it hasn’t. We don’t have any NVIDIA drivers installed in the image. As far as I am aware, Office is configured to use hardware acceleration. The reg key of disablehardwareacceleration is set to 0 so assuming that means it is enabled. Should it be enabled?
Hi Graham, if you haven’t already, check out the OS Optimization Tool available from vmware. That should set your hardware acceleration as it is supposed to be.
https://customerconnect.vmware.com/en/downloads/info/slug/desktop_end_user_computing/windows_os_optimization_tool_for_vmware_horizon/1_0
Regarding the black screens your users are experiencing, having run into a similar experience when we upgraded to Horizon 8 2212, I had to uninstall the Horizon Indirect Display Adapter from the image I pushed to my pools (cloned from the golden image). Full-disclosure: sessions were black screens the entire session, not randomly.
Hi.
Yes we do use the Optimisation tool and its set here on this
HKCU\Software\Policies\Microsoft\Office\16.0\common\graphics and disablehardwareacceleration is set to 0.
Interesting theory regarding the Indirect Adapter. It is in there but not being used. I can try and remove it to see if it makes any difference.
In response to your last post Gerald, we had/have (our implementation is on its way out) NVIDIA GPUs as well. Just so you know that our setup is very similar to yours, but using Grid.
Good luck, I’m confident you’ll overcome this.
“If we remove the 3D support from the Master Image, we don’t see the issue but then the M10 cards inside the hosts are not being used as no VM’s are being assigned to them.”
— nvidia grid drivers are made in such a way that they give full power of the video card for the first 20 minutes even without a license. there are ways to increase this time. google to help. if you want use grid – put the grid driver in windows and solve problems with licenses. if you don’t want to use grid – the video card will not thrown inside the VM – so U shall turn off acceleration in the registry\through OSOT, otherwise you will continue to get display problems.
If your users don’t work in professional 2D-3D-CAD software – I don’t see the point of throwing a video card inside the VM. purely for office applications? it makes no sense. office applications work fine on the CPU.
Hi Matty
Thanks for your message. If I turn off acceleration using OSOT, then the issue still occurs but it is less nuisance ie the screen just flashes and comes back straight away rather than hanging on a black screen with a flashing cursor and sometimes having to close Outlook before it goes back to normal. The only way I can stop this from happening is to disable the 3D support from the Master Image VM in the settings so that it then doesn’t use our M10 nVidia cards inside the hosts.
PSA for folks making persistent clones or using SYSPREM for some other reason. As of December’s updates the Edge UWP app is no longer possible to remove. The good folks at Reddit figured out some neat workarounds. Firstly, Windows 11 and Server 2022 include a new PowerShell command to reset UWPs via Reset-AppxPackage however Windows 10 lacks this. The simple fix on the golden image is to remove all users that have profiles. If you must, make a new local Admin, log in as it and delete all profiles including for the built in Administrator and either disable that or log in as that and remove the user you created. The idea is to clear out the profile giving the only user the default UWPs and shut down prepping for cloning as usual. This can also be achieved via a shutdown script if you set it via local group policy but that’s something you’ll want to remove after the new clones are made via a different script etc. That command is simply: powershell -Command “Get-CimInstance -ClassName win32_userprofile | where {$_.SID -like ‘*-500’} | Remove-CimInstance”
Here’s the Reddit link: https://www.reddit.com/r/MicrosoftEdge/comments/18u6itu/microsoft_edge_preventing_sysprep/?rdt=39710
Here’s the bit about the new Rest-AppxPackage method to fix this:
Working solution, use Reset-AppxPackage before applying sysprep.
https://learn.microsoft.com/en-us/powershell/module/appx/reset-appxpackage?view=windowsserver2022-ps
Below explanation triggered the idea of trying Resetting AppxPackage, since i used Edge for my need while preparing template before applying sysprep.
The provider will also fail if an all-user package that’s provisioned into the image was updated by one of the users on this reference computer.
Here’s the bit about using a script or blowing away all user profiles to fix this:
olution 1: Create a new Account, add it to Admin group. Logout and login with new user. Remove the administrator profile (run sysdm.cpl > Advanced tab > User Profiles section). Logout and login with administrator. Delete the temporary account and its user profile.
Solution 2: Create a batch script somewhere (C:\ is fine) and paste this line
powershell -Command “Get-CimInstance -ClassName win32_userprofile | where {$_.SID -like ‘*-500’} | Remove-CimInstance”
The challenge here is to make the script run when we are not logged in. Task Scheduler did not work for me, every task got Queued for some reason. Startup folder in ProgramData was of no help either.
The only way I found working is with a Shutdown script in Local Group Policy.
Run gpedit.msc > Computer Configuration > Windows Settings > Scripts (Startup/Shutdown) > Shutdown > Add your script here. Reboot should take a bit longer. Don’t forget to remove the script and the config in gpedit.
How can we perform upgrade test vTPM enabled for InstantClone pool and FullClone pools?
If I have the base setup with Horizon 2306 (8.10) with vTPM disabled for IC and FC pools , once upgraded to N version , let’s say 2309 (8.11), for IC ,I can perform push image with new snapshot (vTPM enabled). For FC pool how can we perform the enabling of vtpm? In rebuild we don’t get that option of enabling, also increasing of pool size and editing the existing pool , the vtpm is disabled , only at the time of pool creation it is available.
Is there a way to test vTPM on existing pool for Full Clone (once upgraded) like we get the option for Instant Clone Pool at the time push image operation.
I don’t think it’s possible to enable the vTPM option on an existing pool. Instead, make sure the gold image does not have vTPM. Then create a new pool and check the box to add a vTPM to the new machines.
Hi Carl how are you doing?
In the section “Update a Pool – Master Image Preparation”, within point 4 “Delete one or more of the snapshots”, you mention that you can consolidate one or multiple snapshots for a goldenVM.
What we have tested in our environment is that in VDI pools you can consolidate snaps in the Golden when they are not pointing to a pool, but in RDSH Farms, when you consolidate snaps and try to push a new snap, the console says that cannot find the snapshot:
“Could not find the current snapshot because it was modified or deleted”
VMware proposed a workaround for this issue. Cloning the goldenVM so it consolidates all snapshots and then make a new one to push the new image. If you try to keep as much as 2-3 snapshots per golden (as VMware recommends), every time you want to make the forth snap, you have to clone and set-up the golden which takes more time than expected.
Have you tested consolidating snaps with RDSH Farms? Any thoughts on this?
Thank you.
How to stop and start Horizon environments, when planning a downtime
Does that include shutting down the Horizon Agent machines?
I’m not aware of any special procedure.