Navigation
This post applies to all Omnissa Horizon versions 2006 (aka 8.0) and newer.
- Change Log
- Preparation:
- Horizon Console
- Licensing
- Administrators
- Help Desk
- vCenter
- Instant Clone Domain Accounts
- Restrict Remote Access
- Disable Secure Tunnel
- Event Database and Syslog
- Global Settings
- Global Policies
- Backups
💡 = Recently Updated
Change Log
- 2023 July 8 – Global Settings – Horizon Agent Restrictions in Horizon 2306 (8.10) and newer
- 2021 Sep 30 – Horizon Console – added step to disable CORS for Horizon 2106 and newer to fix HTML Access
- 2021 Jan 8 – updated entire article for Horizon 2012 (8.1)
- 2020 Aug 14 – updated entire article for Horizon 2006 (aka Horizon 8)
Preparation
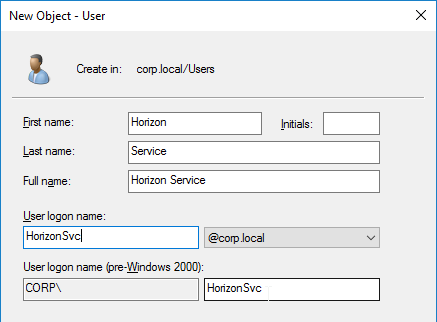
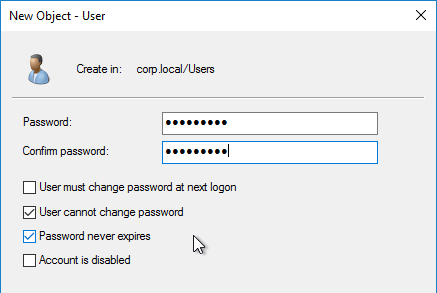
Horizon Service Account
- Create an account in Active Directory that Omnissa Horizon will use to login to vCenter. This account can also be used by Instant Clones to create computer accounts in Active Directory.
- Make sure the password does not expire.
- Domain User is sufficient. Permissions will be delegated where needed.
vCenter Role for Horizon
This role has all permissions needed for both full clones and instant clones. See Privileges Required for the vCenter Server User With Instant Clones at Omnissa Docs.
See the Product Interoperability Matrix for supported vCenter versions.
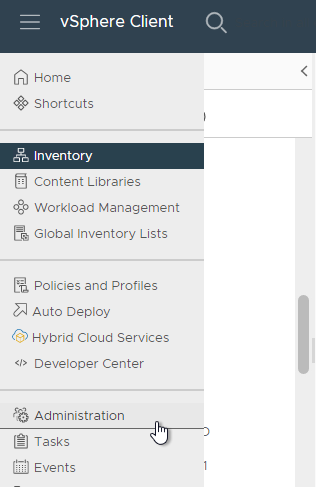
Create vSphere Role:
- In vSphere Web Client, click the hamburger menu icon and then click Administration.
- In the Roles node, click NEW to add a Role.
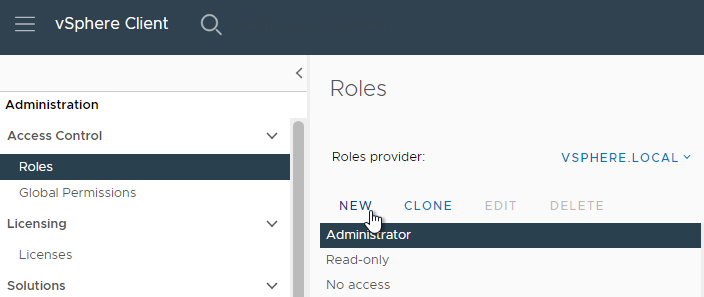
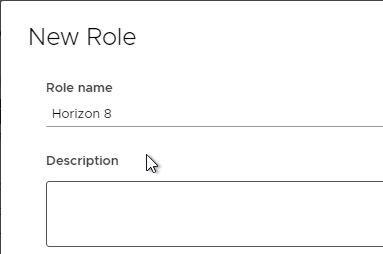
- Give the new role a name.
- If you are using vTPM, then on the left, click Cryptographic operations. On the right, enable Clone, Decrypt, Direct Access, Encrypt, and Manage KMS. Scroll down on the right to see more Cryptographic operations permissions.
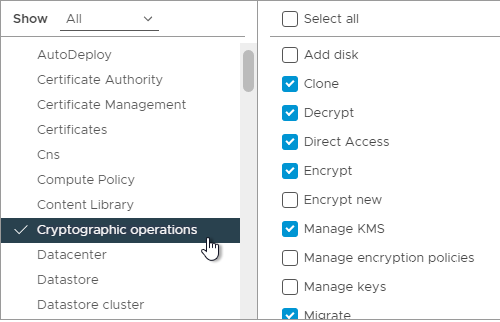
- While still in Cryptographic operations, scroll down and enable Migrate and Register host.
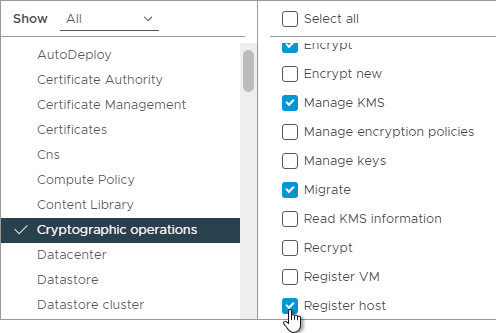
- While still in Cryptographic operations, scroll down and enable Migrate and Register host.
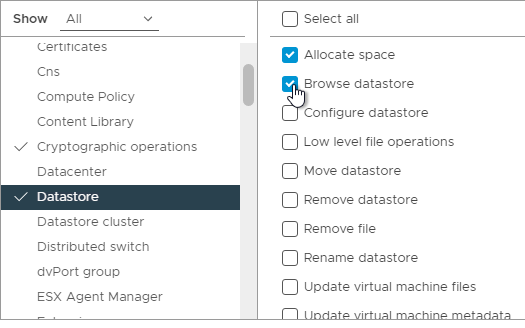
- On the left, click Datastore. On the right, enable Allocate space, and Browse datastore.
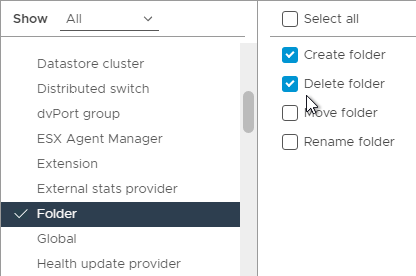
- On the left, click Folder. On the right, enable Create folder, and Delete folder.
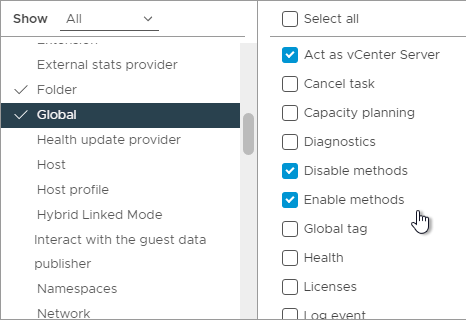
- On the left, click Global. On the right, enable Act as vCenter Server, Disable Methods, and Enable Methods, and then scroll down on the right to see more Global permissions.
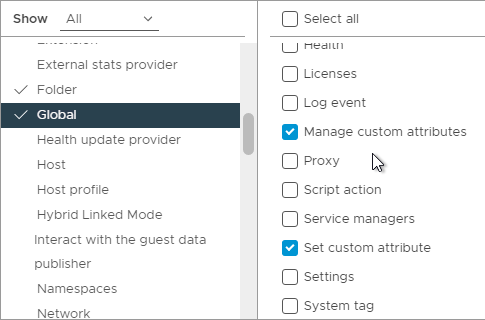
- While still in Global, enable Manage custom attributes, and Set custom attribute.
- While still in Global, enable Manage custom attributes, and Set custom attribute.
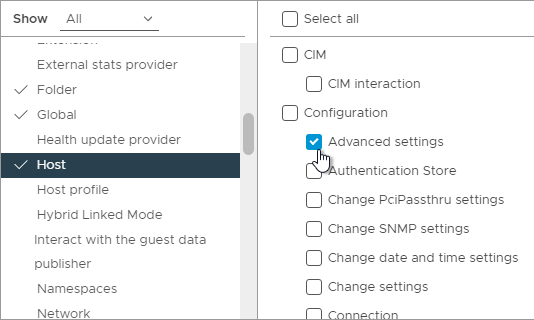
- On the left, click Host. On the right, in the Configuration section, enable Advanced Settings. Then scroll down on the right to see more Host settings.
- While still in Host, scroll down to the Inventory section and click Modify cluster.
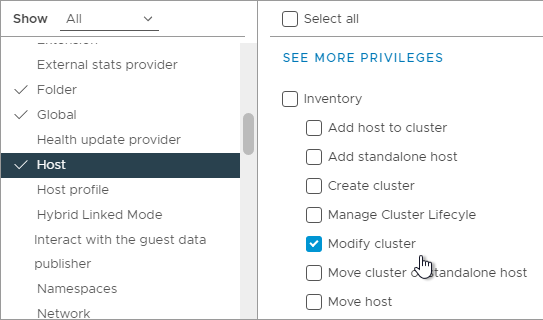
- While still in Host, scroll down to the Inventory section and click Modify cluster.
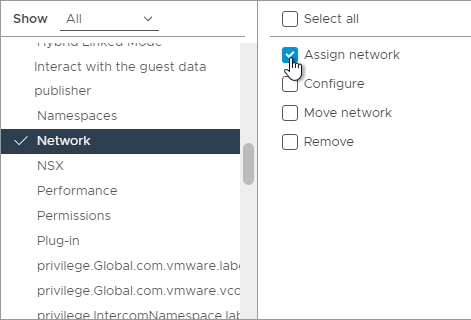
- On the left, click Network. On the right, enable Assign network.
- For Virtual SAN, enable Profile-driven storage and everything under it.

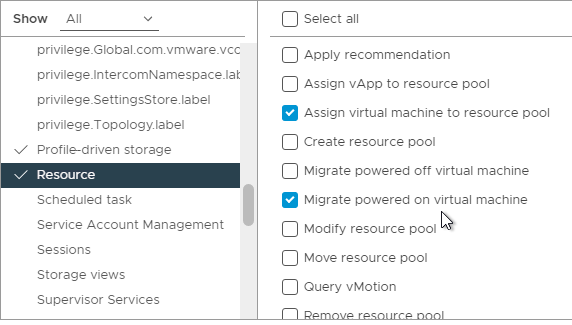
- On the left, click Resource. On the right, enable Assign virtual machine to resource pool, and Migrate powered on virtual machine.
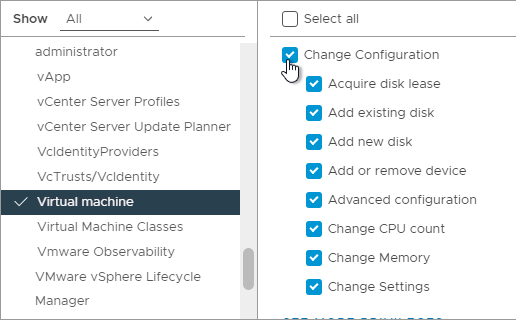
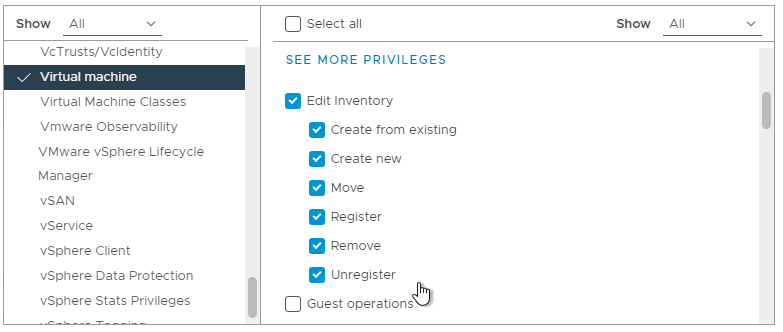
- On the left, click Virtual Machine. On the right, click Change Configuration to enable all Configuration permissions. Scroll down on the right to see more Virtual machine permissions.
- While still in Virtual Machine, scroll down and select everything under Edit Inventory.
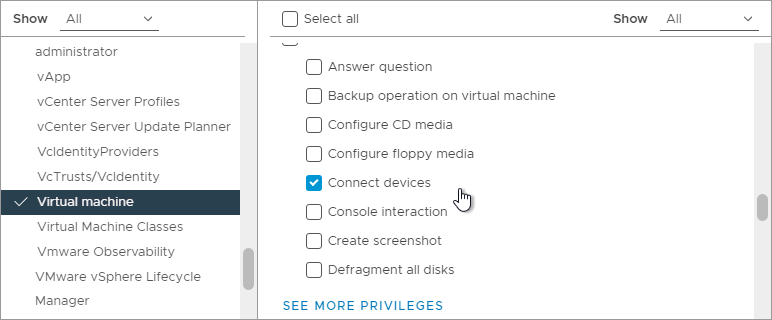
- While still in Virtual Machine, scroll down to the Interaction section, enable Connect devices, and then click See more privileges.
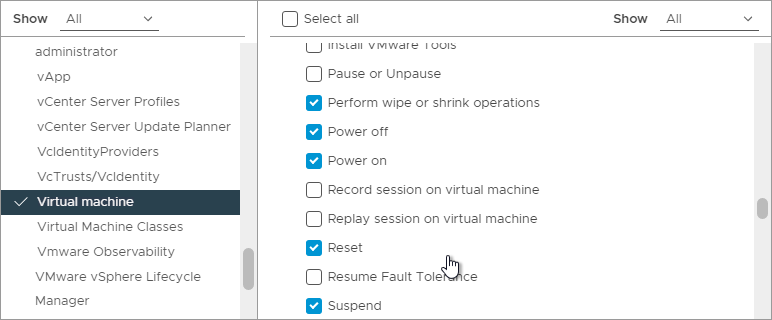
- While still in Virtual Machine, scroll down and enable Perform wipe or shrink operations, Power off, Power on, Reset, and Suspend.
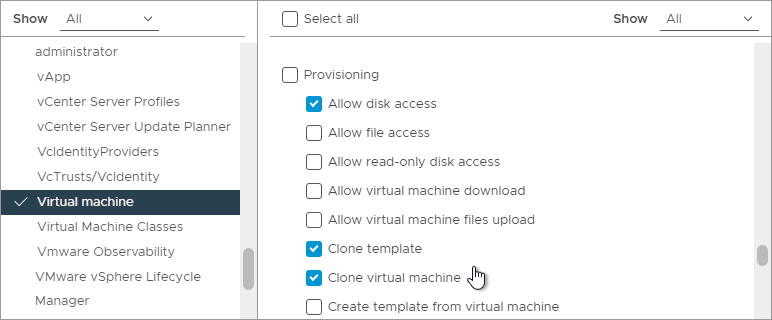
- While still in Virtual Machine, scroll down to the Provisioning section and enable Allow disk access, Clone template, and Clone virtual machine. Then click See more privileges.
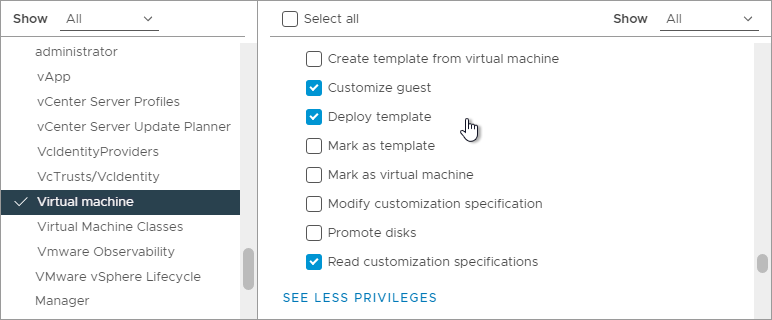
- While still in Virtual Machine, scroll down and enable Customize guest, Deploy template, and Read customization specifications.
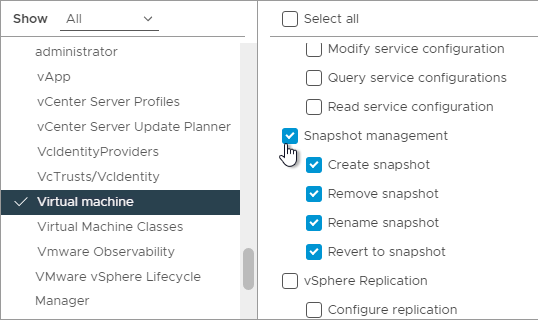
- While still in Virtual Machine, scroll down and click Snapshot Management to enable all Snapshot permissions.
- While still in Virtual Machine, scroll down and select everything under Edit Inventory.
- Click Create.

Assign role to service account:
- Create an account in Active Directory that Horizon will use to login to vCenter.
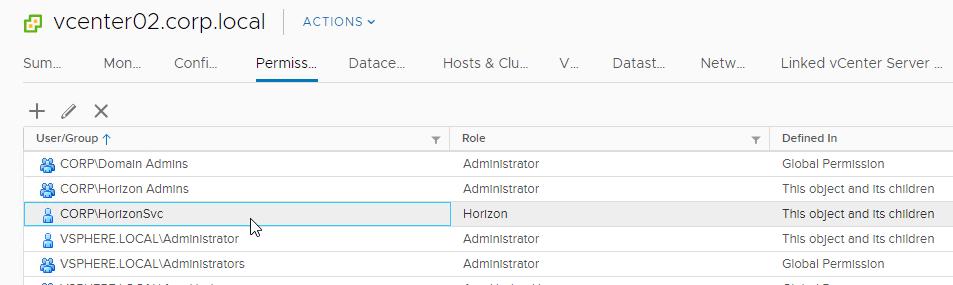
- In vSphere Web Client, in Hosts and Clusters view, browse to the vCenter object. Permissions must be assigned at the vCenter level. It won’t work at any lower level.
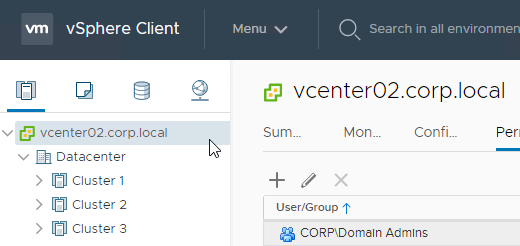
- On the right, select the tab named Permissions.
- Click the plus icon to add a permission.
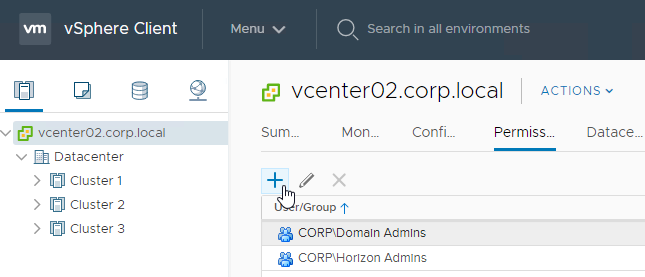
- In the Add Permission dialog box, do the following:
- Change the User domain.
- Search for the service account.
- Change the Role to the one you created in the previous section.
- Check the box next to Propagate to children.
- Click OK.
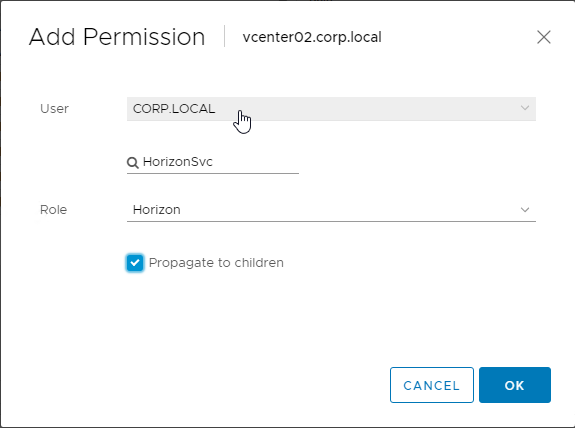
- The service account is now listed on the Permissions tab.
Active Directory Delegation for Instant Clones
Horizon Instant Clones create computer objects in Active Directory. Horizon is configured with an Active Directory service account that must be granted permission to create computer objects. See Create a User Account for Instant-Clone Operations at Omnissa Docs.
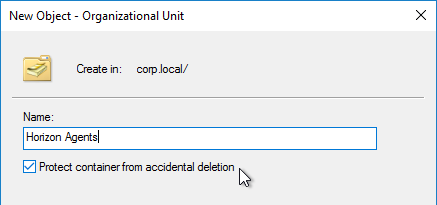
- Create an OU in Active Directory where the Horizon Agent computer objects will be stored.
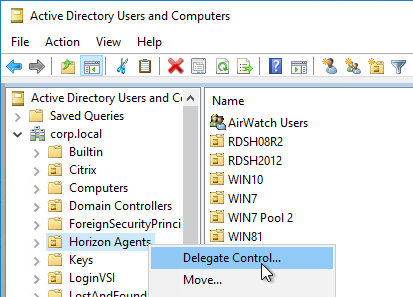
- In Active Directory Users & Computers, right-click the Horizon Agents OU, and click Delegate Control.
- In the Welcome to the Delegation of Control Wizard page, click Next.
- In the Users or Groups page, add the Active Directory service account for Instant Clones and/or Horizon Composer. Then click Next.

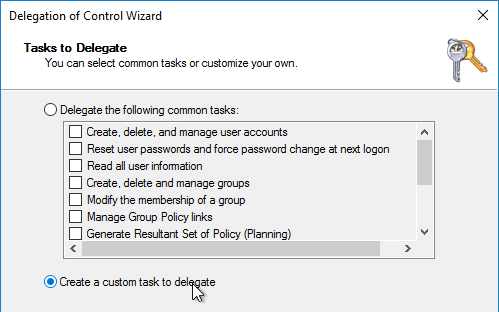
- In the Tasks to Delegate page, select Create a custom task to delegate, and click Next.
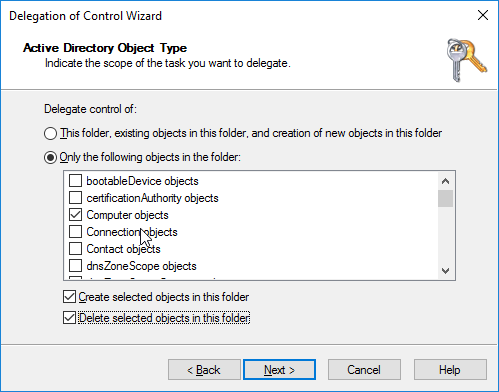
- In the Active Directory Object Type page, do the following:
- Change the radio button to select Only the following objects in the folder.
- Check the boxes next to Create select objects in this folder and Delete selected objects in this folder.
- Click Next.
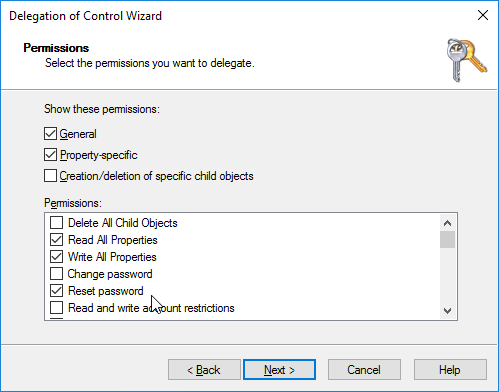
- In the Permissions page, check the boxes next to Read All Properties, Write All Properties, and Reset Password. Then Next.
- In the Completing the Delegation of Control Wizard page, click Finish.
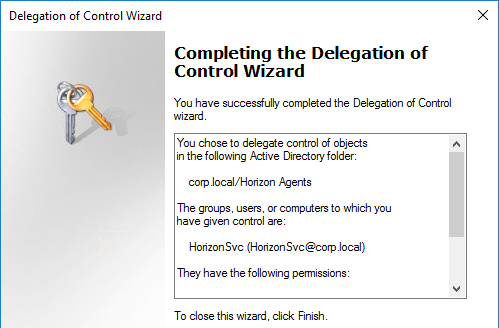
- If you are viewing Advanced Features in Active Directory Users & Computers, if you view the properties of the OU, on the Security tab, click Advanced, find your service account, you should see permissions similar to the following.

Events SQL Database
Horizon 2103 (8.2) and newer support PostgreSQL. See Prepare a PostgreSQL Database for Event Reporting at Omnissa Docs.
Horizon 2106 (8.3) and newer support SSL to the events database. See SSL Connection to Event Database at Omnissa Docs.
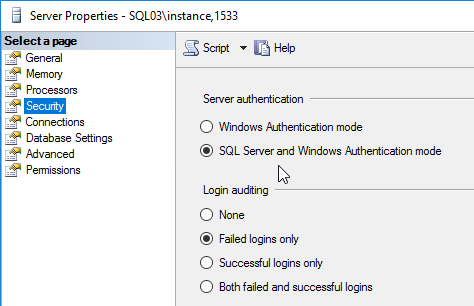
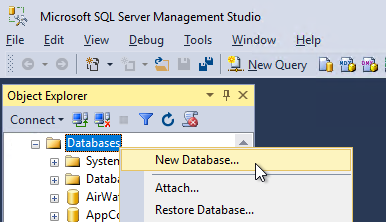
A new empty SQL database is needed for storage of Horizon Events.
- Only SQL Server authentication is supported, so make sure it’s enabled on your SQL Server > Properties > Security page.
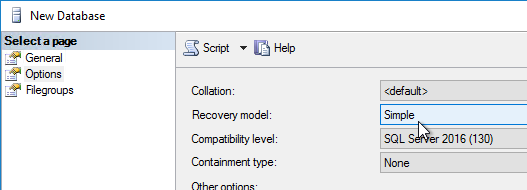
- In SQL Server Management Studio, create a new database.
- Name it OmnissaHorizonEvents or similar. Switch to the Options tab.
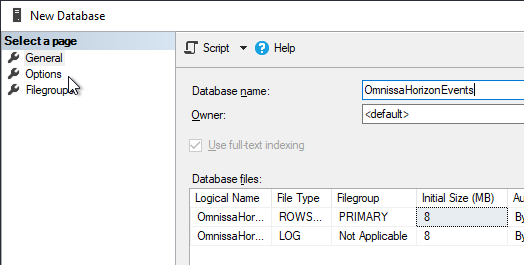
- Select your desired Recovery model and click OK.
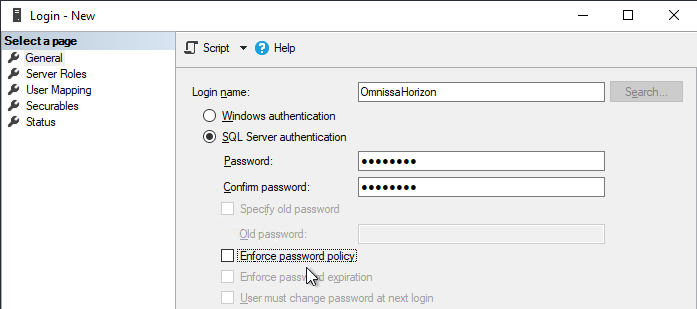
- Under Security > Logins, add a SQL login if one does not exist already. Windows authentication is not supported.
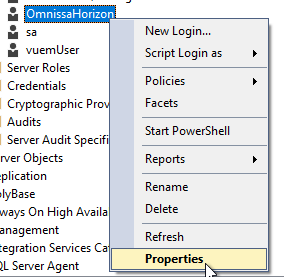
- Right-click a SQL login and click Properties.
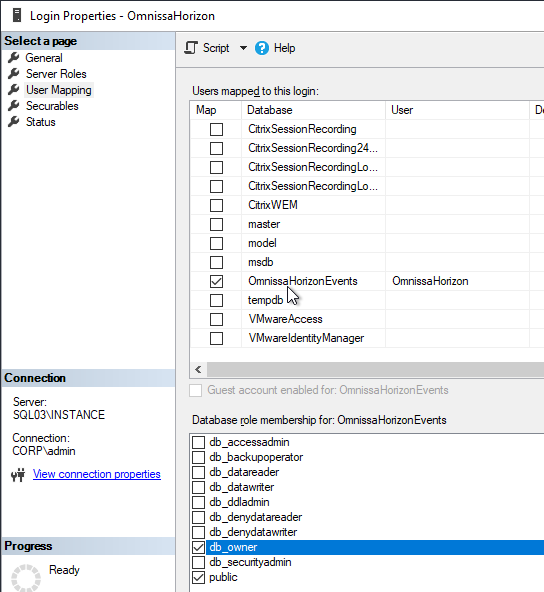
- On the User Mapping page, check the Map box next to the OmnissaHorizonEvents database.
- On the bottom, add the user to the db_owner database role. Click OK when done.
Horizon Consoles
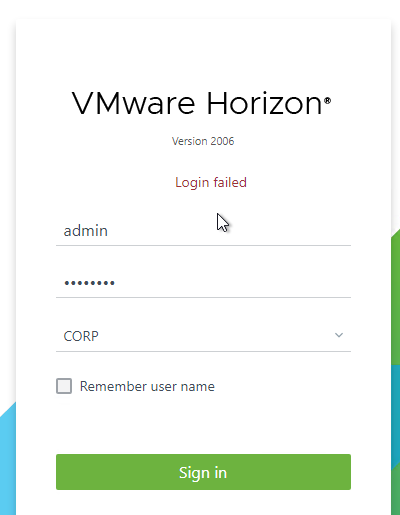
On the desktop of the Horizon Connection Server is an icon to launch Horizon Administrator Console. Don’t use Internet Explorer.

The URL entered in the browser must either be https://127.0.0.1/admin, or the Secure Tunnel URL (Horizon Console > Settings > Servers > Connection Servers tab > Edit). By default, the Secure Tunnel URL is the FQDN of the Connection Server.

If you don’t use one of these URLs then you’ll see 421 Unknown or a Login Failed message.

If you want to use a different URL than the Secure Tunnel URL (e.g., short name instead of FQDN, or load balanced name instead of server name), then go to C:\Program Files\Omnissa\Horizon\Server\sslgateway\conf or C:\Program Files\VMware\VMware View\Server\sslgateway\conf, edit or create locked.properties file, and enter the following:
allowUnexpectedHost=true
checkOrigin=false
enableCORS=false
More details at Omnissa 2144768 Accessing the Horizon View Administrator page displays a blank error window in Horizon and 85801 Cross-Origin Resource Sharing (CORS) with Horizon 8 and loadbalanced HTML5 access. allowUnexpectedHost defaults to false in Horizon 2306 and Horizon 2212.1 and newer. Another option is to add portalHost entries as detailed at Allow Omnissa Horizon Web Client Through a Gateway at Omnissa Docs.

Then restart Omnissa Horizon Secure Gateway service.

Licensing
Horizon Licenses are available either as product keys or as cloud subscription licenses. For cloud subscription licenses, Horizon 2406 and newer can activate the license without needing an Edge Gateway but the Edge Gateway is still recommended to avoid renewing the activation every 90 days. Download the Edge Gateway from the Horizon Cloud next-gen control plane and connect it to a Connection Server. See Deploying a Horizon Edge Gateway for Horizon 8 Environments at Omnissa Tech Zone.
VMware Horizon 8 license keys must be replaced by Omnissa Horizon 8 license keys within 60 days of upgrading to Horizon 2412 or newer.
In the Horizon Administrator Console:
- Open Horizon Administrator Console and login.
- On the left, expand Settings and click Product Licensing and Usage.

- You’ll be asked to activate SaaS subscription license or Term/Perpetual license. Term and Perpetual are license keys.

- If SaaS subscription, then login to Horizon Cloud and complete the wizard.

- If Term or Perpetual, then enter your license key.

- If Term or Perpetual, then licensing information is displayed:
- License expiration is shown.
- Instant Clones are available in all editions.
- Application Remoting (published applications) requires Horizon Advanced Edition.
- Teams Optimization requires Horizon Advanced Edition.
- Session Collaboration requires Horizon Enterprise Edition.
- Help Desk tool is available in all editions.
- App Volumes requires Horizon Enterprise Edition.
- Smart Policies (Dynamic Environment Manager) requires Horizon Enterprise Edition.
- Rest APIs require Horizon Enterprise Edition.

Horizon Administrators
To configure Horizon Administrators:
- In Horizon Console, expand Settings, and click Administrators.

- On the right, near the top, on the Administrators and Groups tab, click Add.

- In the Select administrators or groups page, click Add.

- Enter the name of a group that you want to grant Horizon Administrator permissions to and click Find.
- After the group is found, check the box next to the group (or highlight the group), and then click OK.

- Continue adding groups or just click Next.
Note: This wizard only lets you select one role; so, only add groups that will have the same role assigned. You can run the wizard multiple times.
- In the Select a role page, select the role (e.g. Administrators or Help Desk Administrators, which grants access to the Help Desk tool). Then click Next.

- Select an Access Group to which the permission will be applied and then click Finish.
- Access Groups let you designate permissions to specific pools instead of to all pools.
- Federation Access Groups are available in Horizon 2103 (8.2) and newer and let you restrict admin permissions to specific Global Entitlements (Cloud Pod Architecture).
- In Horizon 2206 and newer, Help Desk role can be assigned to Access Groups.

Help Desk Website
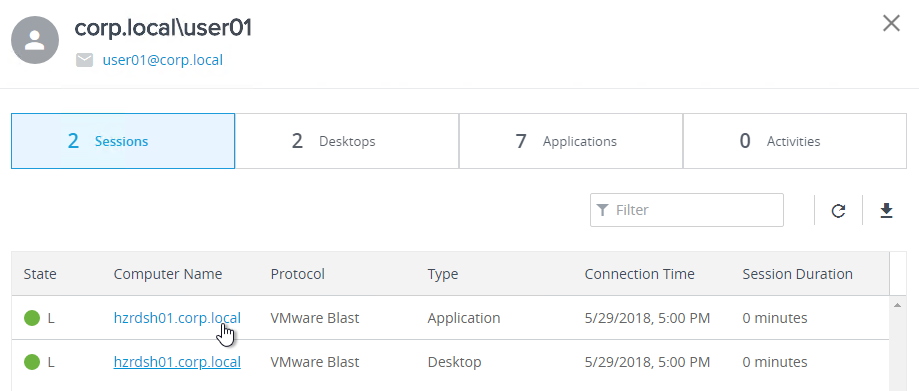
Horizon has a web-based Help Desk tool built into Horizon Connection Server.
- In Horizon Console, simply enter a username in the User Search box at the top of the page.

The Desktops and Applications tabs let you see what the user is entitled to. You can even export these lists.

On the Sessions tab, click a session to see more details.
On the Details tab, scroll down to find action buttons like Remote Assistance. These buttons are kind of hidden.
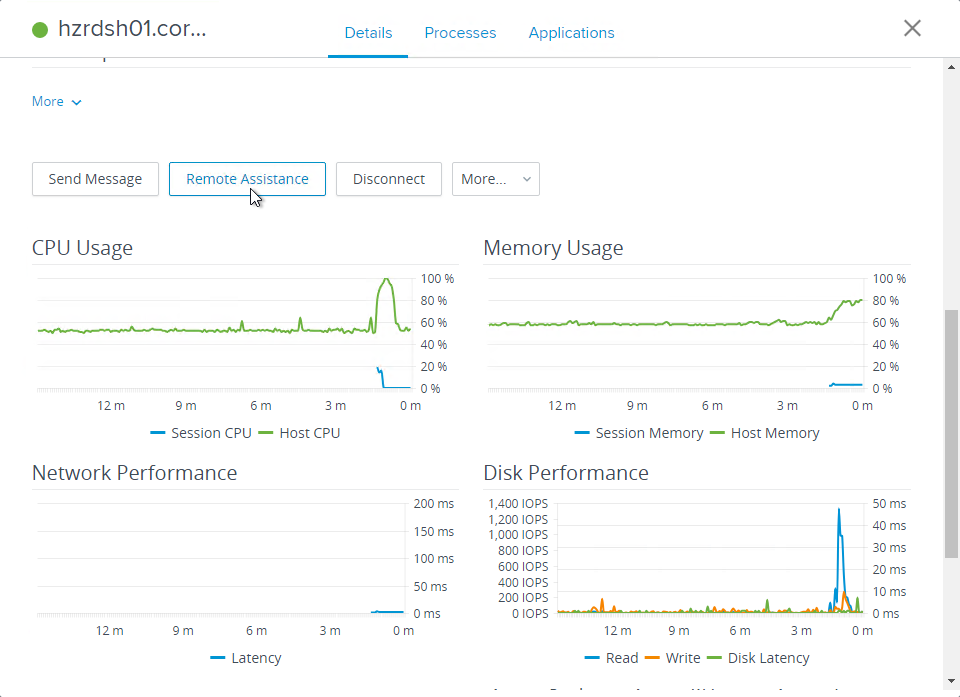
Keep scrolling down and you’ll see Logon Segments.
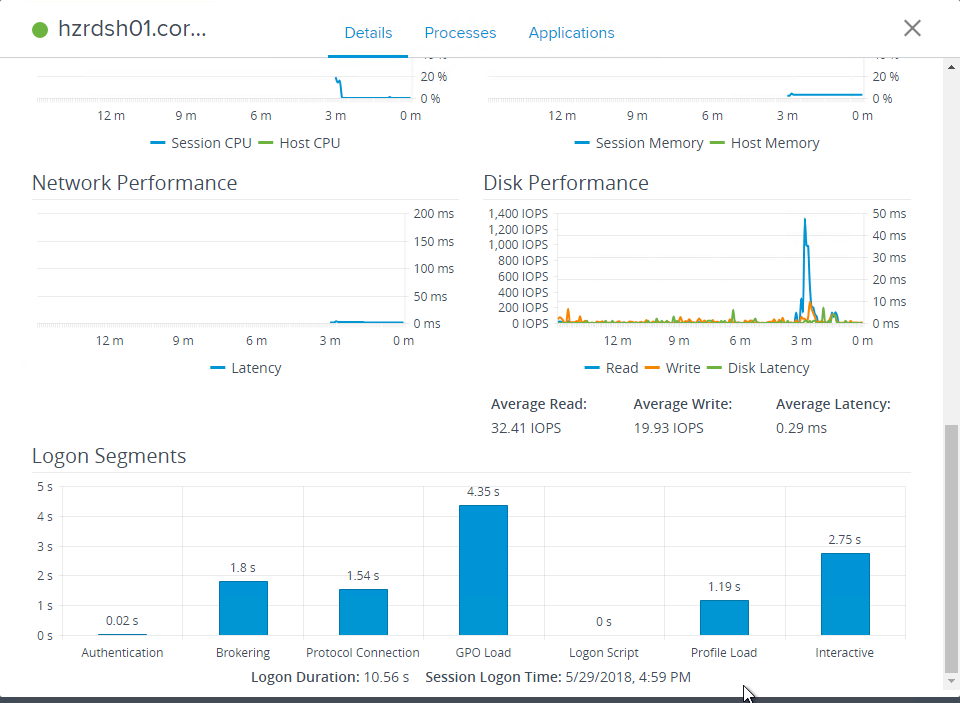
The Processes tab lets you end processes in the user’s session.

Notes on the Help Desk feature:
- Enterprise Licensing – Help Desk tool requires Horizon Enterprise edition license, or Horizon Apps Advanced edition license. Horizon Standard Edition licenses do not include this tool. The Product Licensing page indicates if Help Desk is licensed or not.

- Horizon has a built-in Help Desk Administrators role that enables members to use the Help Desk tool.

- Add Help Desk users to the Administrators and Groups tab and assign them one of the Help Desk roles.

- Add Help Desk users to the Administrators and Groups tab and assign them one of the Help Desk roles.
- 15 minutes of History – There’s only 15 minutes of collected metric data.
See Using Horizon Help Desk Tool in Horizon Console at Omnissa Docs.
vCenter Connection
Horizon must connect to vCenter for several reasons:
- Power manage the virtual machines
- Create new virtual machines using Instant Clones
- Update virtual machines using Instant Clones
See the Product Interoperability Matrix for supported vCenter versions.
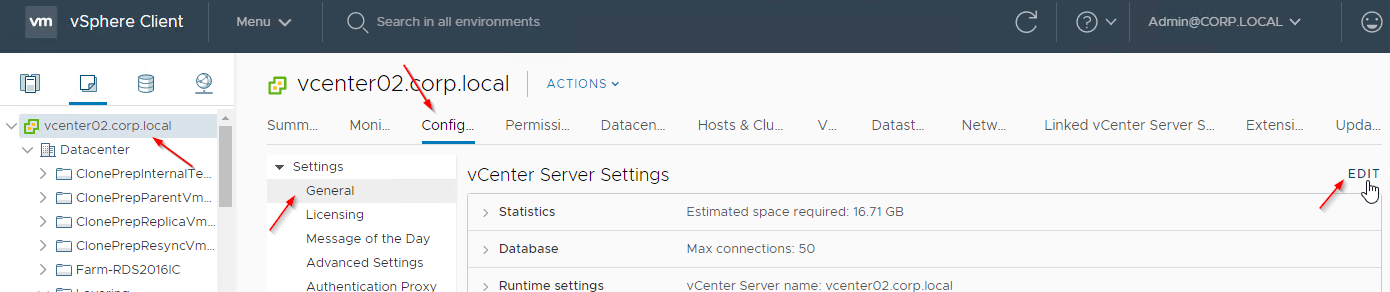
If you are adding multiple vCenter servers to Horizon, make sure each vCenter Server has a Unique ID. In vSphere Client, go to the vCenter Server > Configure > Settings > General > Edit > Runtime Settings, and confirm that the ID is unique for each vCenter server.

To add the vCenter connection:
- In Horizon Console expand Settings, and click Servers.

- In the right pane, in the vCenter Servers tab, click Add.

- In the VC Information page, do the following:
- In the Server address field, enter the FQDN of the vCenter server.
- See the Product Interoperability Matrix for supported vCenter versions.
- In the User Name field, enter the previously created Active Directory account (domainname\username) that Horizon will use to login to vCenter.
- Also enter the service account’s password.
- Horizon 2106 (8.3) and newer have a Deployment Type drop-down. If on-premises, leave it set to General.
- In the Server address field, enter the FQDN of the vCenter server.
- Click Next.

- If you see a message regarding invalid certificate, click View Certificate. Then click Accept.


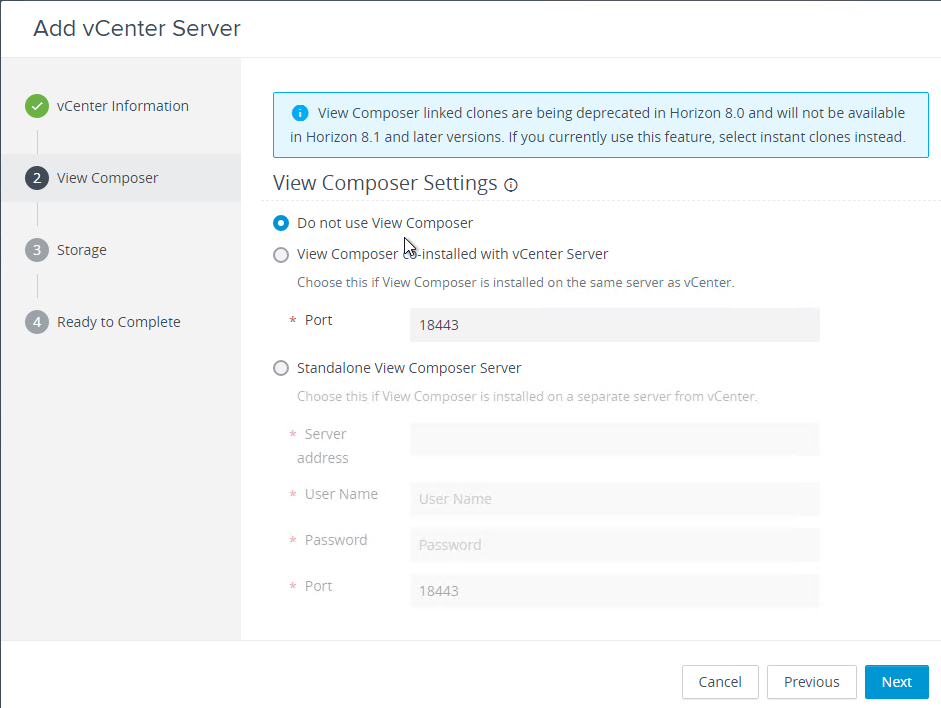
- In Horizon 2012 and newer, View Composer is no longer an option.
- In Horizon 2006, in the View Composer page, select Do not use View Composer. There’s no need to use Composer since all editions of Horizon 2006 and newer include Instant Clones. Click Next.
- In Horizon 2006, in the View Composer page, select Do not use View Composer. There’s no need to use Composer since all editions of Horizon 2006 and newer include Instant Clones. Click Next.
- In the Storage page, do the following:
- Reclaim VM disk space requires IOPS during its operation. It’s only useful for the rare persistent Instant Clones use case and thus is generally unchecked.
- Check the box to Enable View Storage Accelerator and increase the host cache size up to 32768. Notes:
- View Storage Accelerator is required for Instant Clones replica disks.
- The cache size value is removed from RAM and that RAM is no longer accessible to virtual machines.
- Higher host cache sizes should speed up Instant Clone Smart Provisioning (without parent image).
- Click Next.

- In the Ready to Complete page, click Submit.

Instant Clone Domain Accounts
If you plan to use Instant-Clone to create non-persistent virtual desktops, then add an administrator account that can join machines to the domain.
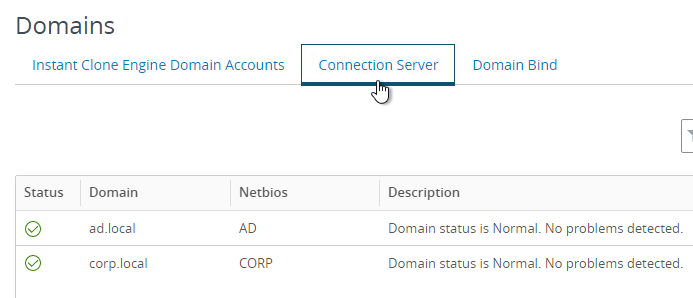
- In Horizon Console 2012 and newer, on the left expand Settings, and click Domains.

- On the right, the Connection Server tab shows the domains that the Connection Servers see.
- On the tab named Domain Accounts, click Add.

- Select the domain.
- Enter credentials of a service account that can join machines to the domain. Click OK.

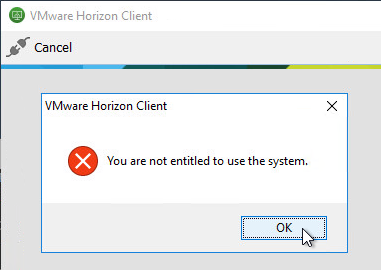
Restrict Remote Access
The Users and Groups node has a Remote Access tab. If you add groups or users to this tab, then only these groups and users can login through Unified Access Gateway (UAG).

Users not in the list can’t login through Unified Access Gateway (UAG).
Disable Secure Tunnel
By default, internal Horizon Clients connect to Horizon Agents by tunneling (proxying) Blast or PCoIP through a Horizon Connection Server. It would be more efficient if the internal Horizon Clients connect directly to the Horizon Agents instead of going through a Connection Server.
- If the tunnels are enabled, and if you reboot the Connection Server, then user connections will drop.
- If the tunnels are disabled, then rebooting the Connection Server will not affect existing connections.
To disable the tunnels:
- In Horizon Console, on the left, expand Settings, and click Servers.

- On the right, switch to the Connection Servers tab.

- Click the Connection Server to highlight it and click Edit.

- On the General tab, uncheck the boxes next to HTTP(S) Secure Tunnel and the PCoIP Secure Gateway.

- For Blast Secure Gateway, change it to Use Blast Secure Gateway for only HTML Access connections to machine. Click OK.

Event Database and Syslog
To add the Events Database:
- In Horizon Console, on the left, expand Settings and click Event Configuration.

- On the right, under Event Database, click Edit.

- In the Edit Event Database dialog box, do the following:
- Enter the name of the SQL server.
- Select Microsoft SQL Server as the Database type. Note: Horizon 2103 (8.2) and newer have an option for PostgreSQL.
- Enter the name of the database.
- Enter the SQL account credentials (no Windows authentication).
- Optionally, enter HE_ (or similar) for the Table prefix. This allows you to use the same Events database for multiple Horizon installations.
- Click OK.

- Horizon 2106 (8.3) and newer support SSL to the events database. See SSL Connection to Event Database at Omnissa Docs.
- On the right, in left column, in the Event Settings section, you can click Edit to change the age of events shown in Horizon Console or Horizon Administrator.

- To add a Syslog server, look on the right side of the page.

- You can go to Monitor > Events to view the events in the database.

Global Settings
- In Horizon Administrator Console, on the left, expand Settings and click Global Settings.

- On the right, under Global Settings, in the General Settings tab, click Edit.

- Under Horizon Console Settings, set the Horizon Console Idle Session Timeout. 4320 minutes (72 hours) is the maximum.

- Enable automatic status updates enables automatic updating of the table displayed in the top-left corner of Horizon Console.

- Under SSO Settings, you can set an idle timeout. This is a disconnect, not logoff.

- In a pool’s Desktop Pool Settings, you can configure Log Off After Disconnect.
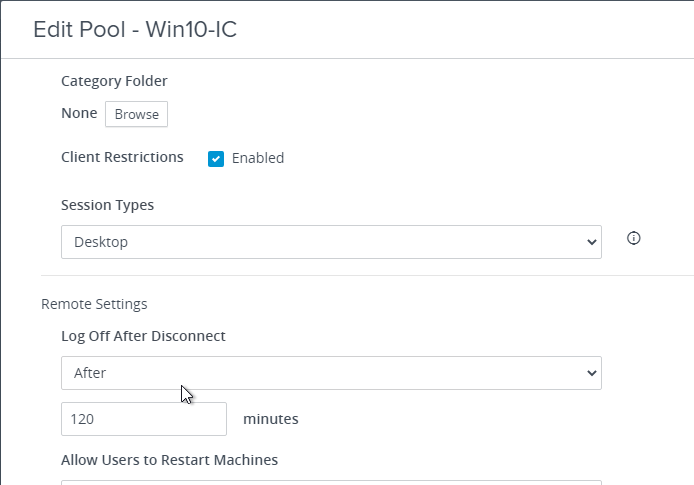
- In a pool’s Desktop Pool Settings, you can configure Log Off After Disconnect.
- Other methods of configuring an idle timeout for desktop sessions:
- Horizon Agent GPO setting Idle Time Until Disconnect (VDI) – combine with the pool’s disconnect timer
- Lithnet.IdleLogoff – Log off users after periods of inactivity (with group policy support)
- Raymond Chen – Scheduled Task that triggers from a Windows Event Log entry caused by screensaver
- Under Client Settings, Forcibly disconnect users is an active session timeout. It is not an idle timeout in that it doesn’t care if the user is working or not. The default is 10 hours so consider increasing it. Note: this timer does not log the user out of Windows. Instead it merely disconnects the user and requires the user to logon to Horizon Connection Server again.

- The Send domain list option is unchecked by default, which means users must enter a domain name instead of picking one from a list. Check this box (and uncheck Hide domain list) to restore functionality from Horizon 7.7 and earlier. See VMware Blog Post Changes in Logon for VMware Horizon.

- Make other changes as desired. Click OK when done.
- Horizon 2306 (8.10) and newer let you restrict which versions of Horizon Agent that users can connect to. Find it at Settings > Global Settings > Horizon Agent Restrictions.


Log On as Current User is also disabled by default. To enable this client feature:
- In Horizon Console, on the left, expand Settings, and click Servers. On the right, switch to the Connection Servers tab. Highlight a Connection Server and click Edit.

- Switch to the Authentication tab.

- Scroll down. Check the box next to Accept logon as current user. Click OK.

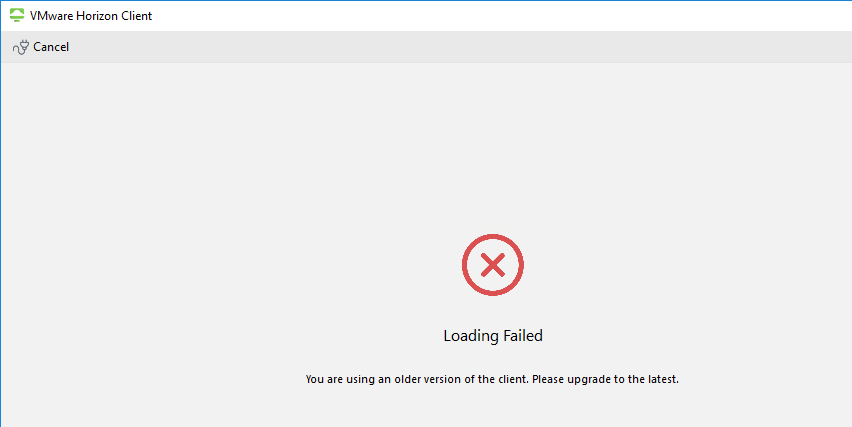
Client Version Restrictions
Horizon can restrict connections to a minimum version of Horizon Client.
- In Horizon Console, on the left, expand Settings, and click Global Settings.
- On the right, switch to the tab named Client Restriction Settings.
- Click Edit.

- For each client type, enter a minimum version number. Additional options are available if you scroll down.

- Block Additional Clients blocks all clients other than the ones you selected. One use case is to block HTML Access.
- You can customize the message that users see if their client is too old. This feature requires Horizon Client 2006 (aka 8.0) or newer.
- Click OK when done.

- The client version is enforced when you try to launch an icon.
Global Policies
By default, Multimedia Redirection is disabled. You can enable it in Global Policies.
- In Horizon Console, go to Settings > Global Policies. On the right, click Edit Policies.

- Set Multimedia redirection (MMR) to Allow and click OK. Notice that Multimedia redirection is not encrypted.

Backups
Connection Server LDAP Backup can be configured in Horizon Console.
- in Horizon Console, on the left, expand Settings and click Servers. On the right, switch to the Connection Servers tab. Select a Horizon Connection Server and click Backup Now. Backups can be found in C:\programdata\Omnissa\Horizon\backups or C:\ProgramData\VMware\VDM\backups.

- To change automatic backup settings, Edit the Horizon Connection Server, and switch to the Backup tab. You can schedule automatic backups.

Related Pages
- Back to Omnissa Horizon 8
Would you happen to have a complete list of the syntax that can be used in the locked.properties file since 8.14 I am having trouble and support has not been helpful.
Carl, we are relatively new to Horizon, we are implementing an infrastructure for Horizon Standard for floating desktops, my question is, is it absolutely necessary to have DHCP for virtual desktops?
Yes. Floating desktops are rebuilt after each user session and it’s not possible to use Horizon to push a static IP to the rebuilt desktops.
Hello Carl,
My IT manager asked me to change the text “Only authorized users” after the login page on Horizon View web portal.
I found a lot of documentation to customize the login page but nothing to customize the next page.
Do you know how to do it or a website or a blog where I can find the documentation to do it?
Regards.
Sébastien
Settings > Global Settings has a Pre-login Message
Hello Carl,
I love your site and have used it for years..
I am trying to edit the domain list a users sees when they log in,
Do you have any documentation on that, trying to use the vmware documentation and its not working for me.
Thanks you,
Patrick
What exactly is not working? I’ve had success with the commands. https://docs.omnissa.com/bundle/Horizon-AdministrationV2406/page/ConfiguringDomainFiltersUsingthe-NOption.html
The vSAN storage permissions have been updated now if you’re using vSphere 8.x see https://nolabnoparty.com/en/vmware-horizon-profile-driven-storage-permissions-in-vsphere-8/
Carl,
The Write up is excellent! Curious to know what your thoughts are on
Machines on Demand vs or inconjunction to Spare Powered On Machines.
any tips or thoughts on how to properly configure those two settings for an instant clone pool?
It depends on how quickly users are logging in. Typically, in the mornings you want spare machines powered on so users don’t have to wait for them to power on. After hours they can wait for a machine to power on.
Hi Carl,
Is there a way to enable the Power On function for VMs via the Horizon Console?
Is your Horizon Console connected to vCenter? When you created pools, did you select your vCenter? Or are you asking about physical desktops?
Hey Carl,
great instructions that you provide 🙂
I had problems with the vCenter permissions. Two additional checkmarks had to be set under “Edit inventory” Create from existing and
Create new. The two permissions are also listed in the Vmware Docs ^^
Thanks. I’m not sure how I missed those. That step is now updated.
I am trying to configure the Horizon Events database to use an instance on a Microsoft SQL server. I can’t seem to figure out or find in the docs the correct format to use in the Horizon Admin console.
The domain is QADomain.Test
The SQL instance is: SQL01\Instance01
Should the database be configured like any of the examples below?
SQL01\Instance01
QADomain.Test\SQL01\Instance01
QADomain\SQL01\Instance01
The port the DBA set is 64125
I can use ODBC64 on the Connection server to test a connection to the database using port 64125
If the instance is on a custom port number, then you don’t need to enter the instance name.
Starting from 2212.1 and 2306 VMware says:
“The default value of security configuration setting allowUnexpectedHost has changed from true to false. This means that connections using the name or IP address of a proxy, gateway or load balancer that is not defined in locked.properties will fail, even if checkOrigin and enableCORS are both set to false. A quick workaround is to add allowUnexpectedHost=true to locked.properties.”
Thanks for the reminder. I’ve been meaning to update that section.
Hi Carl,
I stumbled upon your forum and figured I’d ask away, if you may provide some insight.
Horizon 8 has been set up with several user profiles. For only one user, for some reason, when logging in, Outlook 2019 welcome screen pops up and connects to user’s account. However, upon log off and logging back in, Outlook welcome screen pops up again and registry keys deleted or not saved.
All other user profiles work just fine expect for this one individual. I’m trying to narrow down the issue, if you can provide any possible insight or experienced something similar.
Any help would be greatly appreciated!
What is your roaming profile tool? Is it DEM? If so, is the user getting the GPO settings that enables DEM?
Hi Carl,
We are having 4 connection servers in our environment an we have upgraded our Horizon Environment from 7.10 to 8.x(2111) but when i try to launch the desktop’s i can see the active sessions only for connection server 1. if launch firs desktop the active session will go to 1 and if launch 2, 3 & 4 then the session request should go to connection server 2,3 & 4 but still its going connection server 1 only.
During the upgrade we have changed the servers name to maintain, So i am i missing any configurations here? Kindly help me to resolve the issue.
On the Servers page, if you edit each Connection Server, there are URLs and Gateways. Are any of the Gateways enabled?
i went to Settings -> Servers – > Connection servers and click on edit , on general each connection server and able to see below things.
HTTP(s) Secure Tunnel – Not Checked
PCoIP Secure Tunnel – Not Checked
Blast Secure Gateway – Do not use Blast Secure Gateway Selected
Are you load balancing your Connection Servers? Are all of them enabled on the load balancer?
Yes, We are using F5 load balancer and in fact we are having the virtual name and IP to connect all 4 servers only the issue with broker session, when ever we launch any desktop then go and check in VMware Horizon console -> Dashboard and the active session count shows to connection 1 only.. need to understand why its not taking remaining connection servers. Kindly help me on it.
Are the other three connection servers disabled, perhaps? https://docs.vmware.com/en/VMware-Horizon-7/7.13/horizon-administration/GUID-B079D888-1C5D-4A0B-ADD9-99310FDB6BF6.html
No it’s not disabled.. all 4 servers are active state but the session shows only to connect in server 1
But recently we have changed host names during the migration so I’m doubting if I have missed anything for session related configurations.
For refreshing linked clones. I’d like to reduce the number of clients that can be refreshed all at one time. I’m assuming this is the setting for “Max concurrent vCenter provisioning operations” which appears to default to 20. I’d like to reduce it to 5 or 10, but I can’t find where to change this. Any help would be greatly appreciated. Thanks
I think that’s a global setting for all pools using the same vCenter connection. Go to Configuration > Servers. First tab is vCenter. Edit. Scroll down to Advanced Settings.
Pools have a setting for “Spare (Powered On) Machines”.
I do not believe this option to configure still exists in Horizon 8 because it was only related to recompose operations. Horizon 8 only having instant clones…
Here’s the documentation for what it was in Horizon 7.13: https://docs.vmware.com/en/VMware-Horizon-7/7.13/horizon-console-administration/GUID-2E0A9D2F-E44C-422F-9C2C-FF68E8626E6A.html
Hi Carl,
is it possible, that some of the privileges you’ve listed in “vCenter Role for Horizon” are leftovers from the View Composer era and are therefore not required anymore in an Horizon 8 (Instant Clone only) environment?
For reference, see “View Composer and Instant Clone Privileges Required for the vCenter Server User” (https://docs.vmware.com/en/VMware-Horizon-7/7.13/horizon-installation/GUID-467F552F-3034-4917-A985-B5E5FEC5C68F.html) vs. “Privileges Required for the vCenter Server User With Instant Clones” (https://docs.vmware.com/en/VMware-Horizon/2111/horizon-installation/GUID-467F552F-3034-4917-A985-B5E5FEC5C68F.html).
Also, I think “Migrate powered off virtual machine” (under “Resource”) should be “Migrate powered on virtual machine”, as per the VMware documentation linked above (referred to as “HotMigrate”).
Thanks for reminding me to update that section. It should be good now.
Perfect, thanks!
I just did a fresh install of Horizon 8 (2111) and noticed something weird. When adding the vCenter server, it wouldn’t let me set the View Storage Accelerator default host cache size to more than 2048 MB, even though it says right there in the dialog that “Cache must be between 100 MB and 32,768 MB”.
Have you ever encountered that? (Would you even recommend setting it at something like 32,768 MB?)
If you have fast storage, then you shouldn’t need it. It takes RAM away from VMs.
We have an all-flash FC SAN and more than enough memory to spare.
Would you set a high cache size in that case or is it simply not worth it?
I would do as small as possible. I would disable it if Instant Clones didn’t need it.
I just tried disabling VSA and then creating an Instant Clone pool.
I get a prompt saying “For optimal performance, Instant Clone pools and farms require View Storage Accelerator to be enabled for the vCenter Server. If you do not wish to enable View Storage Accelerator, click ‘Ignore’ and you will be able to proceed with Pool creation without this feature.”.
If I choose “Ignore” it looks like it’s letting me create the IC pool with VSA disabled. Have you ever tried that or would you advise against it?
I don’t recall seeing that before. It would eliminate needing to wait for it to compute digest files.
I am running Horizon 7.13. I am working with a larger active directory that takes a long time to poll. Is it possible to define a root OU that Horizon will work in to reduce the number of objects that need to be loaded?
Has anyone else noticed on an existing farm you can’t modify settings because the ‘OK’ button is grayed out? I can’t do things like change the # of RDS hosts.
I have found that the Horizon console is waiting for the Guest Customization tab to refresh. When this happens I can goto the Guest Customizaton tab and refresh it. Then I can make my modifications and click OK.
Hi Carl, Thank you for sharing the excellent information and I have used most of it when I deployed to our infrastructure. Now I am trying to implement smart card authentication for the zero client and would appreciate if you could please help me on this. I followed some on-line docs but nothing worked. Best Regards!
Can Horizon Console have the Interactive logon to show a warning before login? I know Horizon Client has it with “Display a pre-Login Message” under Global setting of General settings. Where is it for Horizon console?
I wonder if you guys ever experienced that USB connect printers did not work using Horizon Client connecting to a remote Horizon VDI server? We had it working flawlessly in version 8.3 but not now in 8.4.
I’d check and make sure that the VMware Printer Redirection Service in your master image is running and not stopped or disabled. Also check and make sure a GPO isn’t being applied either to the client machine or the Horizon VM that is possibly disabling printer redirection.
Hi Carl,
Wonder if it is possible to restore a connection server vdm lds backup on another server. I have followed VMware guide to restore and it only works on the same server but haven’t been able to make it work if it is a new one. Services appear to be running but web admin page never loads.
Can you build a new Connection Server and have it sync with the one you restored?
Hi Carl,
Would it be a good idea to use SQL Always On for the database? Our idea is use the same server for app_volume db and events db.
Many thanks
There’s no harm in using Always On. The events database just stores audit log and events so it’s not critical.
Hello Carl,
I would like to let you know that the permission for the Horizon vCenter Role reported on the official docs are missing the
“Alarm” -> “Disable or enable alarm on entity” that is needed in order to disable a false memory warning for cp-parents instant clone parent VMs (the one that KB2151438 marks as solved).
Giuseppe
I cannot add my vcenter 6.5.0 appliance to this install of Horizon 2111. I’ve tried every combination of domain\user, user@domain, administrator@vsphere.local and it always says my password is invalid. Help!
whether VMware Horizon 8 have SQL Express by default?
The only Horizon feature that uses SQL is Events. Horizon does not include SQL Express but you can easily download it and install it.
App Volumes also uses SQL.
Hi Carl, I came across your site when searching to resolve the Login Failed issue on our vdi cluster, and I think your settings work for Horizon 7, but there seems to be an additional step required in Horizon 8. I just got off with vcenter support, and they said the KB article has not been posted for Horizon 8 yet.
In your “Horizon Consoles” section of this page, when editing the locked.properties file, in addition to the ‘checkOrigin=false’ attribute, I also had to add the ‘enableCORS=false’ attribute on the next line down, restart the service, and I was then able to log into the admin portal using the shared FQDN.
If you want to test and update your notes, this might help someone else as well.
Thank you for your write-up!
Let me just clarify…They were also working on the earlier versions of Horizon 8, but it seemed to break with the most recent Horizon 8 updates applied in Q3 of 2021.
I have now updated the article. Thanks for the suggestion to disable CORS. Let me know if anything else needs to be improved.
There’s also https://kb.vmware.com/s/article/85801?lang=en_US
If I’m reading that article correctly, would it be better to add a line for “balancedHost = loadbalandedviewurl.company.com” instead of “enableCORS=false”? Thus only allowing your primary local balancer URL to get around the “CORS” feature?
Hello Carl!
I searched for information about the Instant Clone Domain Accounts without success.
Is it possible to add several Instane Clone Accounts in order to create pools in different domains without trust?
Horizon 2106 lets you add untrusted domains for SAML (True SSO) authentication. I don’t think the new feature applies to Instant Clones. https://docs.vmware.com/en/VMware-Horizon/2106/horizon-console-administration/GUID-13DEE5BB-E029-430C-834D-EF4E85A723E4.html
Hello, my vcsa in mngmt network with esxi hosts. How to me add public domain network to working vcsa with horizon 8? Vcsa going to domain? Thx.
Hello Carl,
When I try to add vCenter 7.0.2 to Horizon 8.2 I receive an error message “Certificate validation failed”
What could be the problem?
Thanks!
Is it a custom certificate? Or is it the built-in VMCA certificate? Was the certificate revoked?
Thanks for answering. It`s s bulit-in VMCA certificate. I even downloaded the certificate from vcenter and import it on horizon and tried also with different browser but no success. The weird part is that whatever I put in the fields (even wrong name of vcenter or wrong credentials), the message is the same.
What operating system is your Connection Server? Any firewall or proxy between Connection Server and vCenter? Is outbound Internet blocked from the Connection Server?
Do the Connection Server logs show any more info?
Problem solved. It was some firewall between Connection Server and vCenter. Thank you for your time.
Hi Carl,
How do you think why Remote Access restriction may not work in Horizon 8 (2103)?
I have Horizon 8 (2103), Horizon 7.9.0 and UAG 2103. If I point UAG to Horizon 7.9.0 Remote Access restriction work as expected. If I point UAG to Horizon 8 (2103) users from UAG can login even although no users added to Remote Access tab.
In UAG > Horizon Settings > More, Gateway Location is set to External?
In Horizon Console > Users and Groups > Remote Access, you added at least one group or user? If you don’t add anybody, then it allows everybody.
I just tested UAG 2103.1 with Connection Server 2103 (8.2) and it works.
The key words was “If you don’t add anybody, then it allows everybody. ”
You saved my brain!! I have already install few version from scratch receiving same result, and asking yourself – why? While in other production setup all worked fine.
Anyway this is strange logic, isn’t?
Thanks a lot Carl!
Ah thanks, I should have checked here first
Hi Carl,
Do you have an architectural diagram of all the pieces together in a HA deployment?
Something like figure 98 at https://techzone.vmware.com/resource/workspace-one-and-horizon-reference-architecture#Multi-si? Ignore the JMP servers.