This page contains generic SSL instructions for all SSL Virtual Servers including: Load Balancing, NetScaler Gateway, Content Switching, and AAA.
Navigation
- Change Log
- Preparation:
- SSL vServer Configuration – Bind Cert, Ciphers, ECC, and STS
- SSL Tests
- SSL Redirect Methods:
💡 = Recently Updated
Change Log
- 2018 Feb 1 – In SSL Profiles section, add conversion script info from Enabling the Default Profiles at Citrix Docs
Cipher Group
References:
- Citrix Blogs – Scoring an A+ at SSLlabs.com with Citrix NetScaler – 2016 update
- Citrix CTX201710 Cipher/Protocol Support Matrix of NetScaler Appliances
- CJHarms – NetScaler Cipher Lists – 2016 Edition with ECC/ECDSA
To create a custom secure cipher group:
- Ryan Butler has a PowerShell script at Github that can automate NetScaler SSL configuration to get an A+.
- The easiest way to create a cipher group is from the CLI. See Citrix Blogs Scoring an A+ at SSLlabs.com with Citrix NetScaler – 2016 update for cipher group CLI commands.
- The last cipher is only needed for Windows XP machines. It doesn’t actually require SSL3. If you don’t need to support Windows XP, then skip that command.
add ssl cipher custom-ssllabs-cipher
bind ssl cipher custom-ssllabs-cipher -cipherName TLS1.2-ECDHE-RSA-AES256-GCM-SHA384
bind ssl cipher custom-ssllabs-cipher -cipherName TLS1.2-ECDHE-RSA-AES128-GCM-SHA256
bind ssl cipher custom-ssllabs-cipher -cipherName TLS1.2-ECDHE-RSA-AES-256-SHA384
bind ssl cipher custom-ssllabs-cipher -cipherName TLS1.2-ECDHE-RSA-AES-128-SHA256
bind ssl cipher custom-ssllabs-cipher -cipherName TLS1-ECDHE-RSA-AES256-SHA
bind ssl cipher custom-ssllabs-cipher -cipherName TLS1-ECDHE-RSA-AES128-SHA
bind ssl cipher custom-ssllabs-cipher -cipherName TLS1.2-DHE-RSA-AES256-GCM-SHA384
bind ssl cipher custom-ssllabs-cipher -cipherName TLS1.2-DHE-RSA-AES128-GCM-SHA256
bind ssl cipher custom-ssllabs-cipher -cipherName TLS1-DHE-RSA-AES-256-CBC-SHA
bind ssl cipher custom-ssllabs-cipher -cipherName TLS1-DHE-RSA-AES-128-CBC-SHA
bind ssl cipher custom-ssllabs-cipher -cipherName TLS1-AES-256-CBC-SHA
bind ssl cipher custom-ssllabs-cipher -cipherName TLS1-AES-128-CBC-SHA
bind ssl cipher custom-ssllabs-cipher -cipherName SSL3-DES-CBC3-SHA
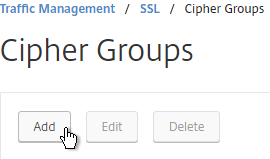
- Or you can create the cipher group using the GUI. Go to Traffic Management > SSL > Cipher Groups.
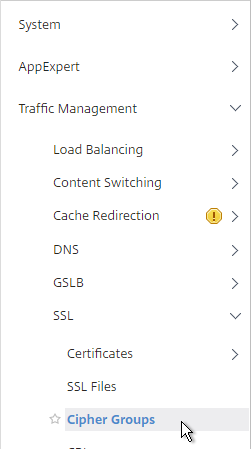
- On the right, click Add.
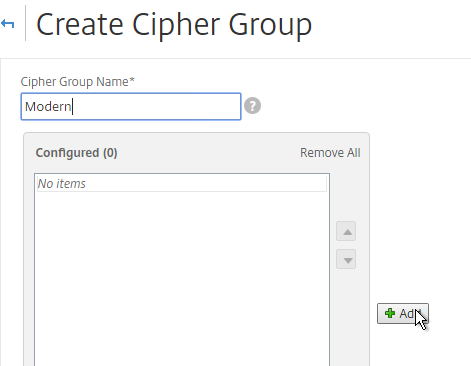
- Name it Modern or similar.
- In the middle, click Add.
- Use the search box to find a particular cipher.
- Check the box next to one of the results and click the arrow to move it to the right. See Citrix Blogs Scoring an A+ at SSLlabs.com with Citrix NetScaler – 2016 update for recommended ciphers. The recommended ciphers vary based on the hardware platform and support for older clients.
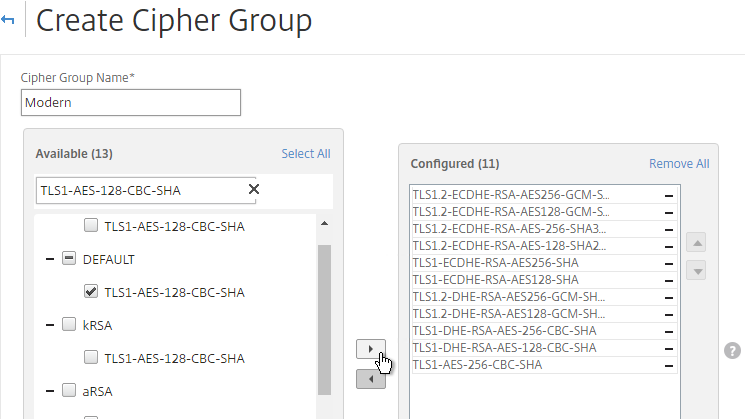
- Use the up and down arrows to order the ciphers. NetScaler prefers the ciphers on top of the list, so the ciphers at the top of the list should be the most secure ciphers.
- Click Create when done.

Strict Transport Security Rewrite Policy
To get an A+ at SSLLabs.com, you need to insert the Strict-Transport-Security HTTP header in the responses. NetScaler Rewrite Policy can do this.
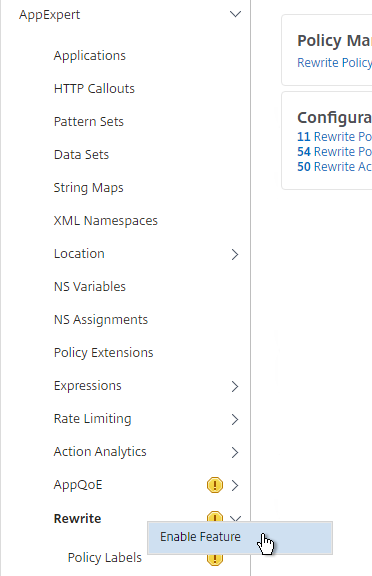
- Go to AppExpert > Rewrite, right-click Rewrite, and click Enable Feature.
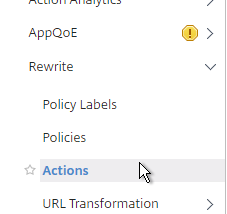
- Go to AppExpert > Rewrite > Actions.
- On the right, click Add.
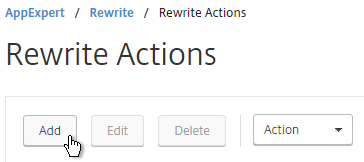
- Name the action insert_STS_header or similar.
- The Type should be INSERT_HTTP_HEADER.
- The Header Name should be Strict-Transport-Security.
- The Expression should be the following:
"max-age=157680000"
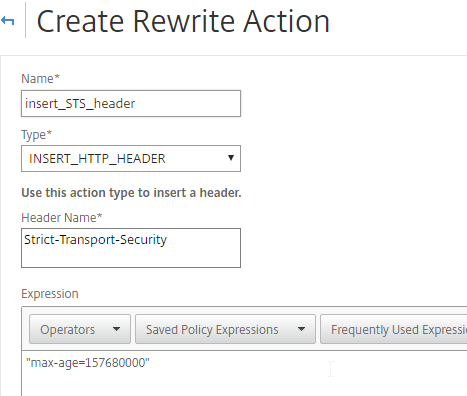
- Click Create.
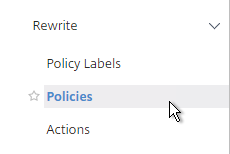
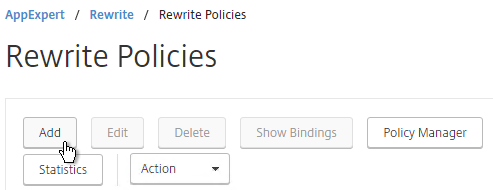
- On the left, go to AppExpert > Rewrite > Policies.
- On the right, click Add.
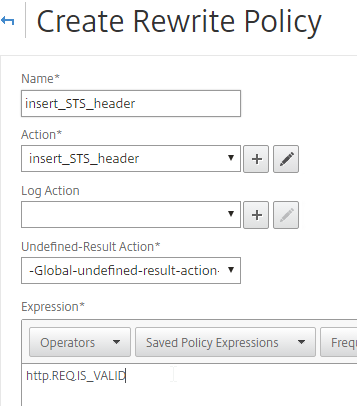
- Name it insert_STS_header or similar.
- Select the previously created Action.
- In the Expression box, enter HTTP.REQ.IS_VALID.
- Click Create.
- Now you can bind this Rewrite Response policy to HTTP-based SSL vServers.
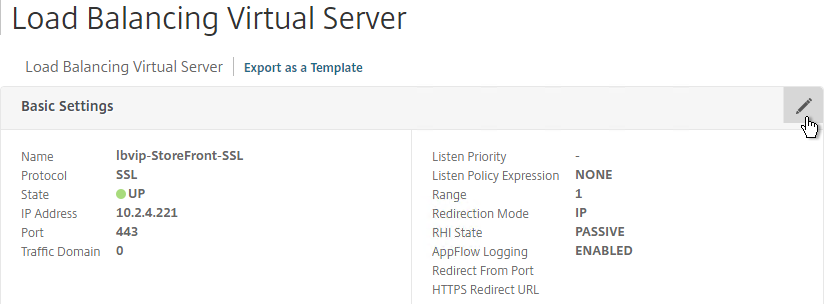
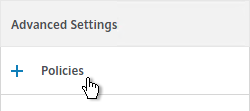
- When editing an SSL vServer, if the Policies section doesn’t exist on the left, then add it from the Advanced Settings column on the right.

- In the Policies section on the left, click the plus icon.

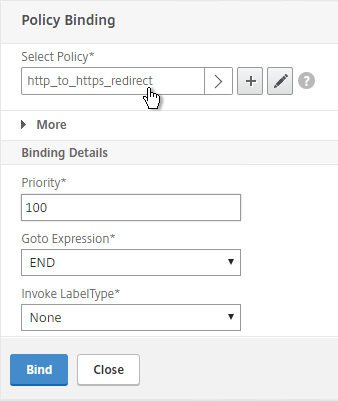
- Select Rewrite > Response and click Continue.

- Then select the STS Rewrite Policy and click Bind.
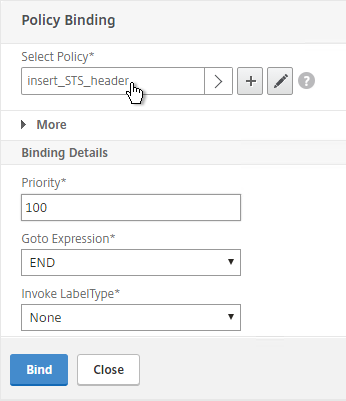
enable ns feature rewrite

add rewrite action insert_STS_header insert_http_header Strict-Transport-Security "\"max-age=157680000\""

add rewrite policy insert_STS_header true insert_STS_header

bind lb vserver MyvServer -policyName insert_STS_header -priority 100 -gotoPriorityExpression END -type RESPONSE
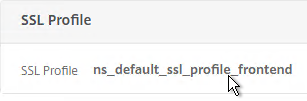
Default SSL Profile
You can use SSL Profiles to package several SSL settings together and apply the settings package (Profile) to SSL vServers and SSL Services. These settings include: disable SSLv3, bind ciphers, bind ECC curves, etc.
There are default SSL Profiles, and there are custom SSL Profiles. The default SSL Profiles are disabled by default. Once the default SSL Profiles are enabled, the default setttings apply to all SSL vServers and all SSL Services, unless you bind a custom SSL Profile. Also, once default is enabled, it’s not possible to disable it.
- Some features of custom SSL Profiles require default SSL Profiles to be enabled. For example, you cannot configure ciphers in a custom SSL Profile unless the default SSL Profiles are enabled.
If you enable the default SSL Profiles, then it’s not possible to configure SNI for backend (services and service groups).
Default SSL Profiles are intended to provide a baseline SSL configuration for all newly created SSL Virtual Servers and SSL Services. You can still create Custom SSL Profiles to override the Default SSL Profiles.
Enabling the default SSL profile will wipe out any SSL configuration on SSL entities (e.g. SSL Virtual Servers) that do not have a custom SSL profile bound. Citrix offers a script that can read your existing SSL entity SSL configuration and convert them to custom SSL Profiles. See Enabling the Default Profiles at Citrix Docs. The default_profile_scriptcan be downloaded from an individual NetScaler ADC firmware download page under Additional Components. The commands output by the script won’t work until the default SSL Profile is enabled. 💡

To enable the Default SSL profiles:
- Make sure you are connected to the appliance using http and not https.
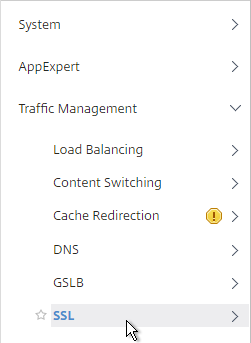
- Go to Traffic Management > SSL.
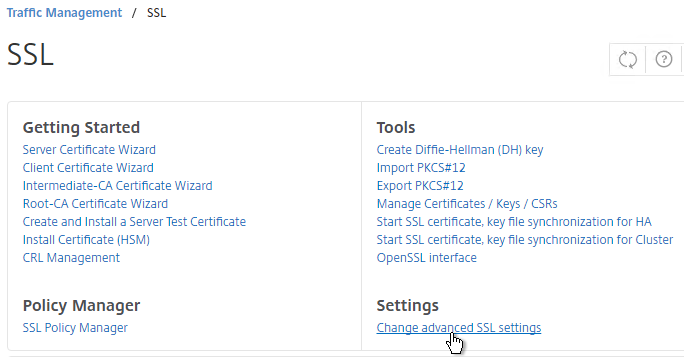
- On the right, in the right column, click Change advanced SSL settings.
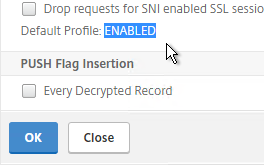
- Near the bottom, check the box next to Enable Default Profile. Note: this will change SSL settings on all SSL Virtual Servers to match the default SSL profile. You might want to do this during a maintenance window. Click OK when done.
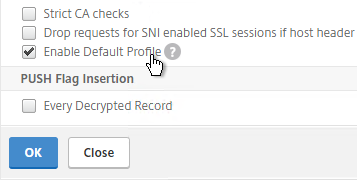
- If you go back into Advanced SSL Settings, notice that the Default Profile is enabled and there’s no way to disable it.
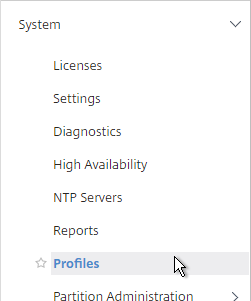
- To change the default SSL profile, on the left, go to System > Profiles.
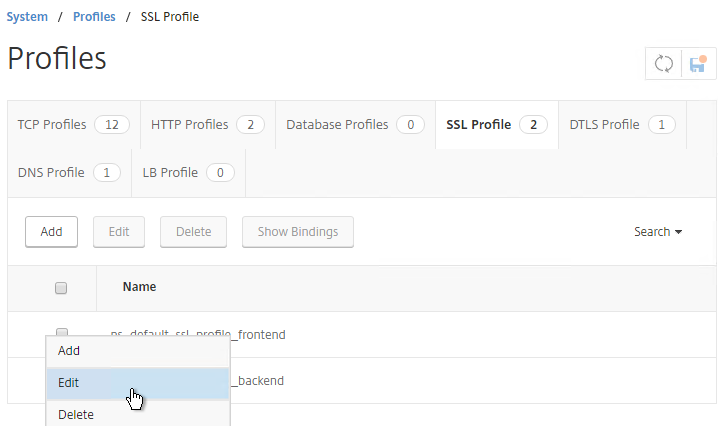
- On the right, switch to the SSL Profile tab.
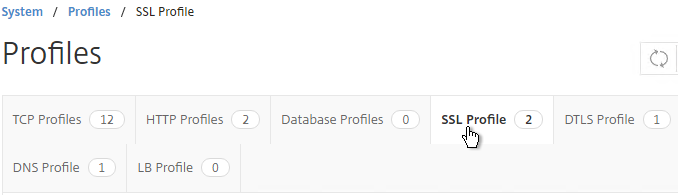
- Click the ellipsis next to the frontend or backend default profile and click Edit. Frontend = client-side connections to SSL vServers. Backend = server-side connections (SSL Services and Service Groups).
- Or you can create a new custom SSL profile.
- Notice that SSLv3 is disabled by default.
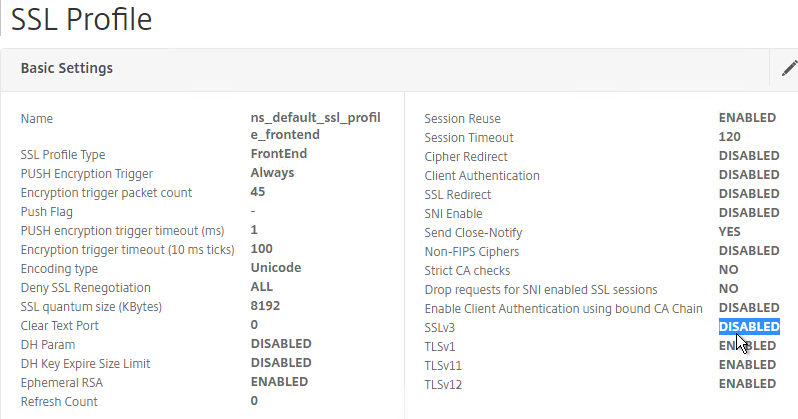
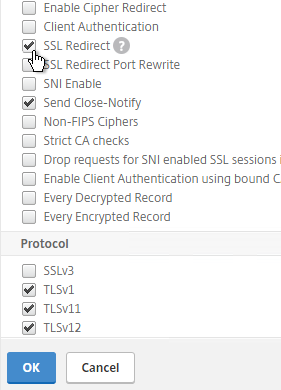
- If you do any SSL Offload (SSL on the client side, HTTP on the server side) then you’ll need to edit the Basic Settings section and enable SSL Redirect. Or you can create a new SSL Profile with this option enabled. It’s near the bottom of the section. With this option enabled, any 301/302 redirects from the server with HTTP locations are rewritten to HTTPS locations. You might need this option for StoreFront load balancing if doing SSL Offload.
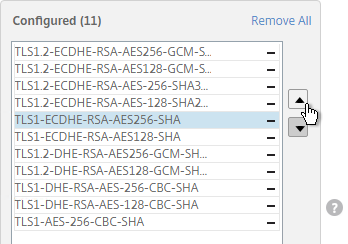
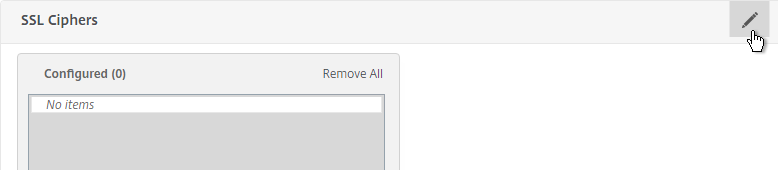
- Scroll down to the SSL Ciphers section and click the pencil icon.
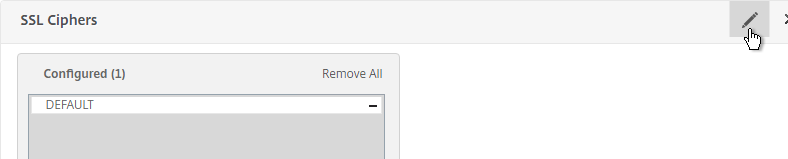
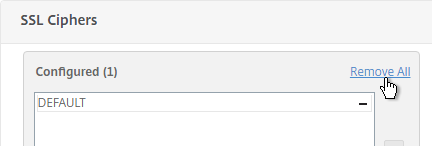
- Click Remove All and click OK. You must click OK before binding the custom cipher group.
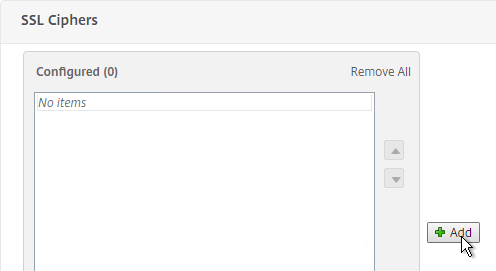
- Click the pencil icon again.
- Click Add.
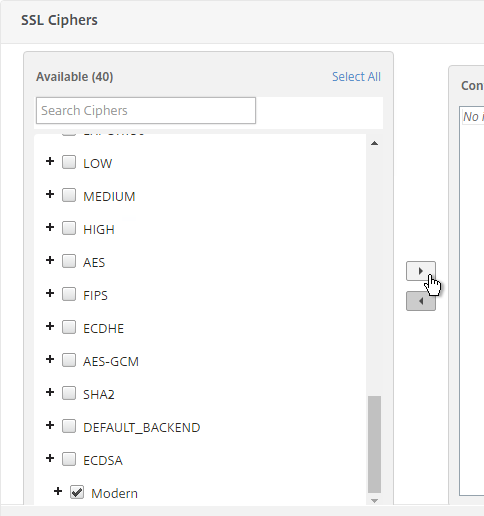
- Scroll down and select your custom cipher group. Then click the arrow to move it to the right. Then click OK.
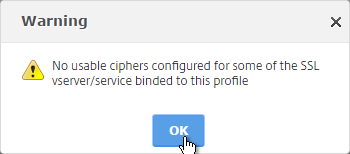
- Click OK when you see the No usable ciphers message. Then click Done to close the SSL Profile.
- If you edit one of your SSL Virtual Servers (e.g. Load Balancing vServer), there’s an SSL Profile section indicating that the default profile is being used. You can change the binding to a different SSL Profile.
- SSL Profiles do not include forcing Strict Transport Security. You’ll still need to create the STS Rewrite Policy and bind it to every SSL vServer as detailed in the next section.
Bind Certificate, Bind Cipher Group, Disable SSLv3, Enable STS
Whether you use SSL Profiles or not, you need to bind certificates and STS Rewrite Policy to every SSL vServer.
If you enabled the Default SSL Profiles feature, you can either leave it set to the Default SSL Profile; or you can change it to a Custom SSL Profile. Or you can bind an SSL Profile without enabling the Default SSL Profiles. If you don’t use the SSL Profiles feature, then you’ll need to manually configure ciphers and SSL settings on every SSL vServer.
Do the following on every SSL vServer:
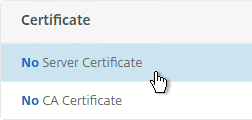
- When creating an SSL Virtual Server (e.g. SSL Load Balancing vServer), on the left, in the Certificates section, click where it says No Server Certificate.
- Click where it says Click to select.
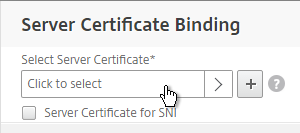
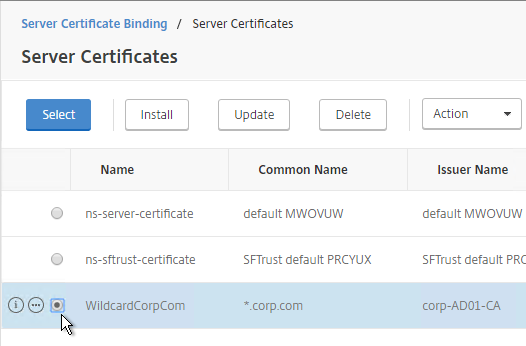
- Select a certificate and click Select.
- Click Bind.
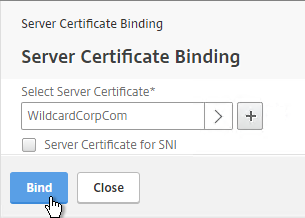
bind ssl vserver MyvServer -certkeyName MyCert
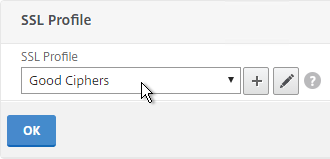
- If you want to bind a custom SSL Profile, if Default SSL Profile is enabled, in the SSL Profile section on the left, click the pencil icon.

- If the SSL Profile section isn’t on the left, then on the right, in the Advanced Settings section, click SSL Profile
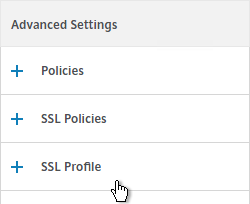
- Select your custom SSL Profile and click OK.
- If you didn’t bind an SSL Profile, on the left, in the SSL Parameters section, click the pencil icon.
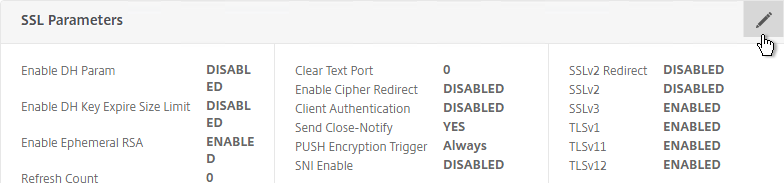
- Uncheck the box next to SSLv3. Make sure TLSv11 and TLSv12 are enabled. Click OK.

set ssl vserver MyvServer -ssl3 DISABLED -tls11 ENABLED -tls12 ENABLED
- If you didn’t bind an SSL Profile, scroll down to the SSL Ciphers section and click the pencil icon.
- Click Remove All and click OK. You must click OK before binding the custom cipher group.
- Click the pencil icon again.
- Click Add.
- Scroll down and select your custom cipher group. Then click the arrow to move it to the right. Then click OK.
- Click OK when you see the No usable ciphers message.
unbind ssl vserver MyvServer -cipherName ALL
bind ssl vserver MyvServer -cipherName Modern
- SSL Virtual Servers created on newer versions of NetScaler will automatically have ECC Curves bound to them. However, if this appliance was upgraded from an older version then the ECC Curves might not be bound. If you are not using SSL Profile, then on the right, in the Advanced Settings section, click ECC Curve.
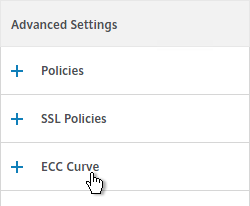
- On the left, in the ECC Curve section, click where it says No ECC Curve.
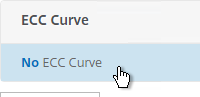
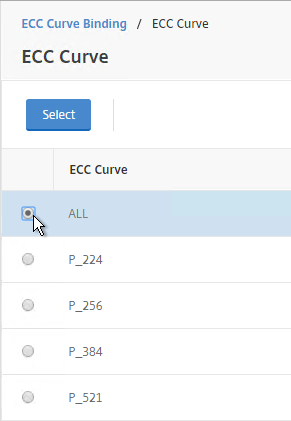
- Click to select.

- Choose ALL and click Select.
- Click Bind.
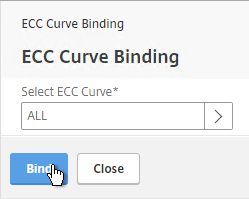
bind ssl vserver MyvServer -eccCurveName ALL
- If the Policies section doesn’t exist on the left, then add it from the Advanced Settings column on the right.
- In the Policies section on the left, click the plus icon.
- Select Rewrite > Response and click Continue.
- Select the STS Rewrite Policy and click Bind.
bind lb vserver MyvServer -policyName insert_STS_header -priority 100 -gotoPriorityExpression END -type RESPONSE
If you experience SSL performance problems on a NetScaler MPX, Citrix CTX207005 Performance Issues with NetScaler MPX SSL recommends creating and binding the following TCP Profile: 💡
add ns tcpProfile tcp_test -WS ENABLED -SACK ENABLED -maxBurst 20 -initialCwnd 8 -bufferSize 4096000 -flavor BIC -dynamicReceiveBuffering DISABLED -sendBuffsize 4096000
SSL Tests
After you’ve created an SSL Virtual Server, run the following tests:
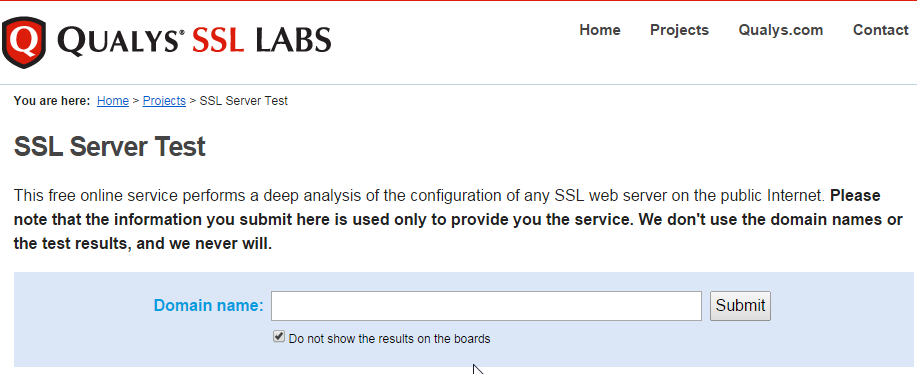
- Go to https://www.ssllabs.com/ssltest/ and check the security settings of the website.
SSL Redirect – SSL Load Balancing vServer Method
New in NetScaler 11.1, you can configure SSL Redirect directly in an SSL Load Balancing vServer (port 443) instead of creating a separate HTTP (port 80) Load Balancing vServer.
Limitations:
- This is only an option for SSL Load Balancing vServers; it’s not configurable in Gateway vServers or Content Switching vServers.
- Only one Redirect URL can be specified. Alternatively, the Responder method can handle multiple FQDNs to one VIP (e.g. wildcard certificate) and/or IP address URLs.
To configure an SSL Load Balancing vServer to redirect from HTTP to HTTPS:
- Edit the SSL Load Balancing vServer (port 443).
- In the Basic Settings section, click the pencil icon.
- Click More.
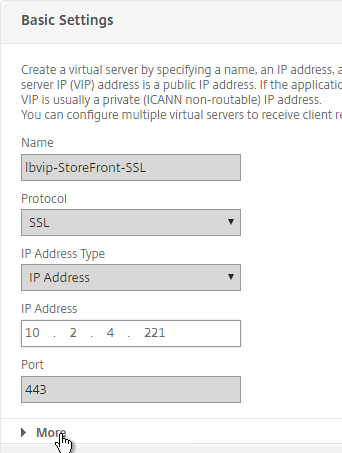
- In the Redirect from Port field, enter 80.
- In the HTTPS Redirect URL field, enter https://MyFQDN. Click Continue twice.

SSL Redirect – Down vServer Method
If you created an SSL Virtual Server that only listens on SSL 443, then users must enter https:// when navigating to the website. To make it easier for the users, create another load balancing Virtual Server on the same VIP but listens on HTTP 80 and then redirects the user’s browser to reconnect on SSL 443.
The Down Virtual Server Method is easy, but the Redirect Virtual Server must be down in order for the redirect to take effect. Another option is to use Responder policies to perform the redirect.
To create the down Redirect Virtual Server:
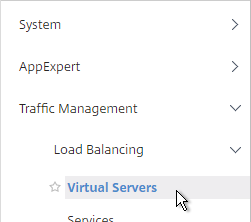
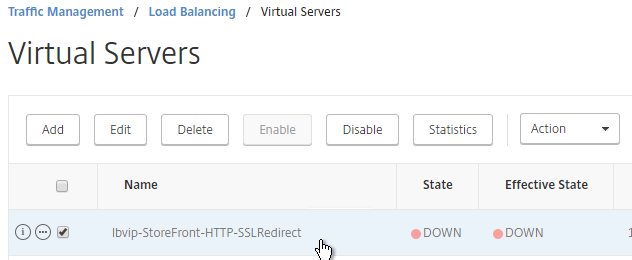
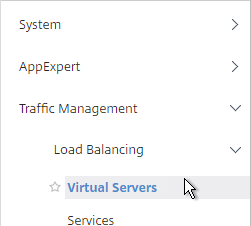
- On the left, under Traffic Management > Load Balancing, click Virtual Servers.
- On the right, find an SSL Virtual Server you’ve already created, click the ellipsis next to it, and click Add. Doing it this way copies some of the data from the already created Virtual Server.
- Or if you are redirecting NetScaler Gateway, create a new Load Balancing vServer with the same VIP as the Gateway.
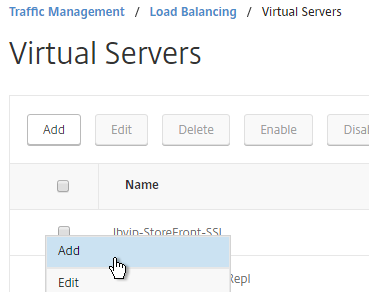
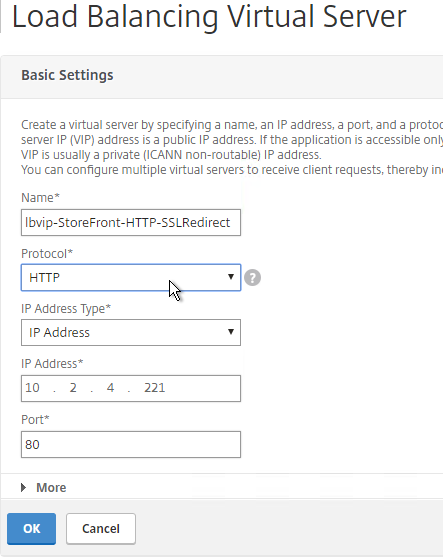
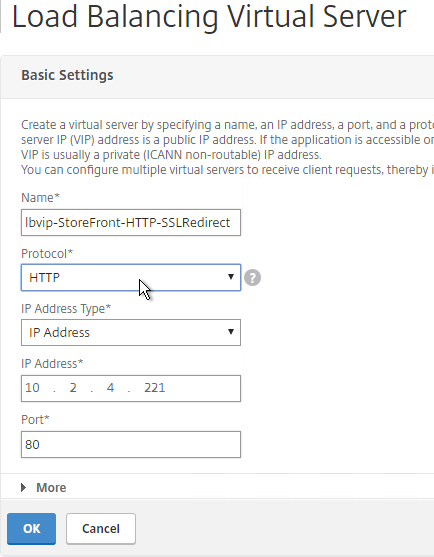
- Change the name to indicate that this new Virtual Server is an SSL Redirect.
- Change the Protocol to HTTP on Port 80.
- The IP Address should already be filled in. It must match the original SSL Virtual Server (or Gateway vServer). Click OK.
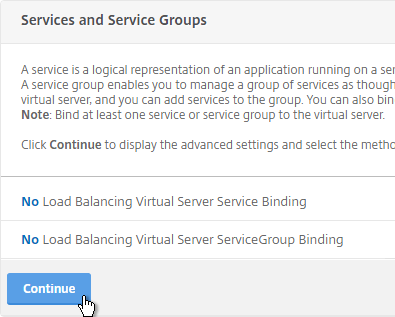
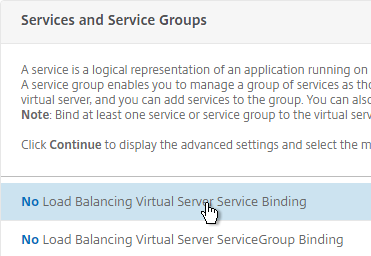
- Don’t select any services. This vServer must intentionally be marked down so the redirect will take effect. Click Continue.
- On the right, in the Advanced Settings column, click Protection.
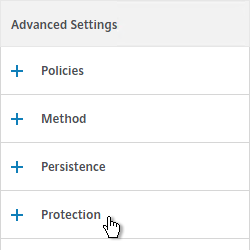
- In the Redirect URL field, enter the full URL including https://. For example: https://storefront.corp.com/Citrix/StoreWeb. Click OK.
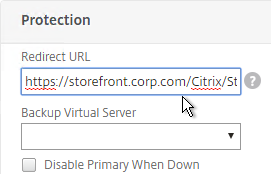

- Click Done.

- When you view the SSL redirect Virtual Server in the list, it will have a state of DOWN. That’s OK. The Port 80 Virtual Server must be DOWN for this redirect method to work.
SSL Redirect – Responder Method
The Down Virtual Server Method is easy, but the Redirect Virtual Server must be down in order for the redirect to take effect. Another option is to use Responder policies to perform the redirect. This method requires the Redirect Virtual Server to be UP.
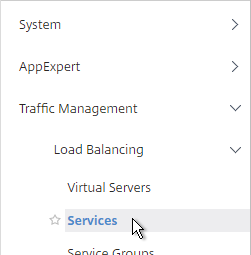
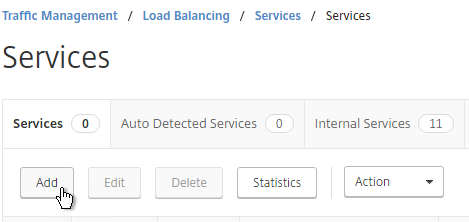
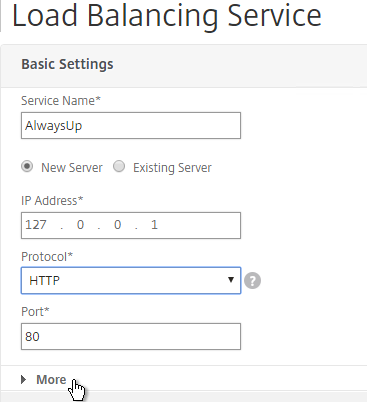
- Create a dummy Load Balancing service. This dummy service can be bound to multiple Redirect Virtual Servers. Go to Traffic Management > Load Balancing > Services.
- On the right, click Add.
- Name it AlwaysUp or similar.
- Use a loopback IP address (e.g. 127.0.0.1). After the service is created, it changes to a NetScaler-owned IP.
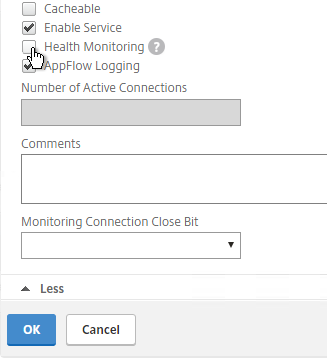
- Click the More link.
- This dummy service must always be UP so uncheck the box next to Health Monitoring. Click OK and then click Done.

add server 127.0.0.1 127.0.0.1
add service AlwaysUp 127.0.0.1 HTTP 80 -healthMonitor NO
- On the left, expand AppExpert and click Responder.
- If Responder is not enabled, right-click Responder and click Enable Feature.
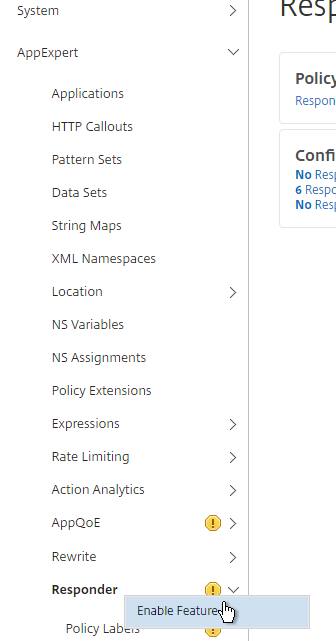
enable ns feature RESPONDER
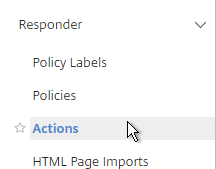
- Under Responder, click Actions.
- On the right, click Add.
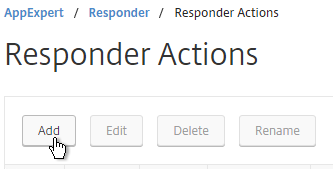
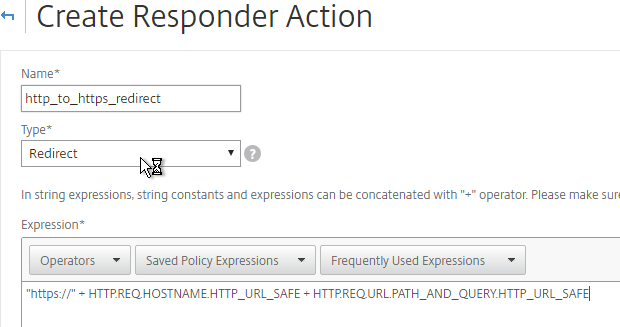
- Give the action a name.
- Change the Type to Redirect.
- Enter an expression. The following expression can be used by multiple Redirect Virtual Servers since it redirects to https on the same URL the user entered in the browser. Or you can create a Responder Action with a more specific Target. Click Create.
"https://" + HTTP.REQ.HOSTNAME.HTTP_URL_SAFE + HTTP.REQ.URL.PATH_AND_QUERY.HTTP_URL_SAFE
add responder action http_to_ssl_redirect_responderact redirect "\"https://\" + HTTP.REQ.HOSTNAME.HTTP_URL_SAFE + HTTP.REQ.URL.PATH_AND_QUERY.HTTP_URL_SAFE" -responseStatusCode 302
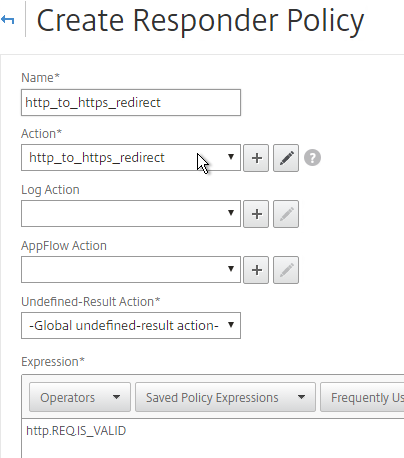
- On the left, under Responder, click Policies.
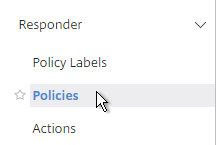
- On the right, click Add.

- Give the policy a name.
- Select the previously created Responder action.
- For the expression, enter the following. Then click Create.
HTTP.REQ.IS_VALID
add responder policy http_to_ssl_redirect_responderpol HTTP.REQ.IS_VALID http_to_ssl_redirect_responderact
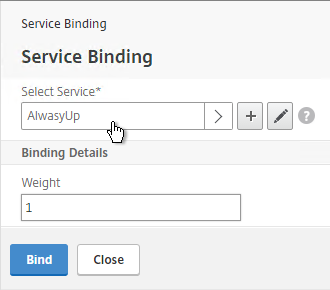
- Create a Load Balancing Virtual Server with Protocol HTTP and Port 80. The VIP should match an existing SSL Virtual Server or NetScaler Gateway Virtual Server.
- Bind the AlwaysUp service and click Bind. Then click Continue.
- On the right, in the Advanced Settings column, click Policies.
- Click the plus icon in the top right of the Policies box.

- Select Responder and click Continue.

- Select the http_to_https Redirect Responder policy and click Bind. Then click Done.
add lb vserver MyvServer-HTTP-SSLRedirect HTTP 10.2.2.201 80

bind lb vserver storefront.corp.com-HTTP-SSLRedirect AlwaysUp

bind lb vserver storefront.corp.com-HTTP-SSLRedirect -policyName http_to_ssl_redirect_responderpol -priority 100 -gotoPriorityExpression END -type REQUEST
- The primary advantage of this method is that the Redirect Virtual Server is UP.

Hey Carl. I recently upgraded our VDI environment from v1811 (on Server 2012) to 1912CU3 (on Server 2019). I followed your docs to build out new 2019 servers and install v1811 on them, add to site/farm, decomm the old ones, then upgrade new ones to v1912.
It works great except for secure STA’s in the VPX. The STAs will not work over https now, and I had to temporarily revert to http which does work.
– I bound the server cert to https on the DDCs via cli.
– CA cert imported into Trusted Root Certs on new DDCs via Group Policy. (CA cert is the same as on old DDCs.)
– Firewall ports are open between the systems. (https STAs were previously working with the old DDCs.)
– DDCs are configured in Storefront to use https.
– STAs in Storefront were changed from old FQDNs to new DDC FQDNs.
– STA FQDN resolves from VPX – evidenced by http STA working, which is utilizing FQDN.
I tried a bunch of things…even going so far as installing IIS on a DDC to make sure the cert was bound to https…it was, I got an error saying it was already bound.
I have two VPX’ (non-HA). It’s happening on VPX1 (prod) with old version 11.0.72.17; as well as on VPX2 (test) with upgraded version 11.1.65.22.
Any thoughts? Thanks for your time.
Go to Traffic Management > Load Balancing > Services, add one, enter the STA IP, enter 443 as the port. Monitor=tcp. Does it come up?
Yes, that worked. The new Load Balancing Service status is Up.
Sometimes I ignore the STA status on the Gateway and it works anyways.
You could do a “nstcpdump.sh host” to see the probe traffic. The STA monitor only checks every 2 minutes.
tcpdump shows traffic between the VPX & https on the DDCs.
I tried removing the http STAs again & it won’t connect to a desktop session.
I tried enabling all ciphers (& reenabling all TLS/SSL protocols) temporarily, thinking maybe it was an issue with different ciphers in 2019, but that didn’t work either.
Hi Carl,
Any suggestions or considerations to upgrading from 11.0.x or 11.1.x to latest 12.1?
Thanks in advance,
N.
I would at least wait for the patched build due this week. 11.1 is already patched but 12.1 is not patched yet. Then see https://www.carlstalhood.com/system-configuration-citrix-adc-13/#upgrade
FYI from Support for my issue: Bug NSHELP-8481 was identified an corrected in 12.1-51.8
Here is an old article I found from citrix, CTX215496. I’m hoping there is a work around by now, this article dates back a couple of years. I did notice I’m generating a 302 when accessing the vip because of it redirecting to the authentication server (AAA).
https://support.citrix.com/article/CTX215496
Carl,
I have an interesting issue with hsts. We have a vip on 443 that is using an authentication server (AAA) to authenticate. When a user goes to the vip, the user is redirected to the authentication server to authenticate, once they authenticate the user is redirected back to the vip. This all works as expected. The problem is that our security team is dinging us with not having hsts configured on the vip. Both the vip and authentication server are using the same ssl profile. When I scan the AAA virtual server, it reports that hsts is enabled. When I scan the vip that users access, it reports that it’s not enabled.
This is what I’ve discovered when running the query against the vip, using chrome, chrome://net-internals/#hsts. When I’m not authenticated and query for hsts, I get not found. Once I authenticate and rerun the query it finds hsts for the vip. To me, ssllabs is not able to even scan for hsts, due to the redirect to the authentication server. I’ve also tried a rewrite policy, without success. We are running 12.1 50.31.nc. I have a support case open with citirx, and funny thing is they sent me a link to your website on configuring a rewrite policy, which did not work. Any information or recommendations is greatly appreciated.
Thanks,
shineknox
Does enabling -sslRedirect on the ssl profile pose any risk? We already do 443 front-end ssl-offload and 80 to the servers often and never had to enable this. I don’t think enabling this will hurt though, right? It’s just rewriting anything with http:// to https:// … does it also fix the port? Some really bad apps do http://whatever:443 or https://whatever:443, does this feature fix that as well?
We have an issue with a VPX based HTTPS responder built using the same methodology
This is for use as a DirectAccess NLS as per an article from Richard Hicks that seems to use this article as its basis (see directaccess.richardhicks.com/2016/05/31/configure-citrix-netscaler-for-directaccess-nls/ if interested its https page)
The problem we get is that immediately after setting it up it works… but after a short while its ARP drops off and then the connections to it subsequently fail.
Even tried setting up the client keep alive flag on the service but it still drops after a while.
Would appreciate any guidance as to why this might be happening
We have tried setting up our VPX to be an HTTPS responder for Microsoft DirectAccess clients as per this posting by Richard Hicks which is broadly the same as Carls steps on this post. https://directaccess.richardhicks.com/2016/05/31/configure-citrix-netscaler-for-directaccess-nls/
The problem we are seeing is that the ARP for the VIP drops very soon after enabling it. At which point the test client can no longer access the responder. Restarting the VIP brings it back online for a short time, but it soon drops again.
We have also tried enabling the client keep alive on the service binding, still no joy.
Does anyone have any ideas what we would need to do to keep this responder online short of static ARP entries on our network (which we are not sure would work in the event of a VPX failover ?)
thanks in advance
Rob
Do you have an IP conflict?
Hi Carl,
In netscaler 11.1 it’s unfortunatly not possible to use the HSTS rewrite policy on a AAA page (Authentication Virtual Server).
Citrix did solve it in Netscaler 12, but I don’t want to migrate to 12 (not yet).
Do you have a solution?
Kind regards,
Gerald
I’m interested if you found a workaround.
Nope, not on netscaler 11.1.
I have my netscaler migrated to netscaler 12.1.
Hi I have question.. New to Netscaler… I want to redirect http url to HTTPS for application name “Application1” rest of I dont want to do.. How to enable this in Netscaler 11? like http://development.domain.com/Application1/Login.html to https://development.domain.com/Application1/Login.html. It should not affect rest of applications ( Application2,Application3… )
Pls help me.
Create a Responder policy with expression like HTTP.REQ.URL.PATH.SET_TEXT_MODE(IGNORECASE).STARTSWITH(“/application1/”) and a Responder Action of type Redirect that redirects to:
“https://” + HTTP.REQ.HOSTNAME.HTTP_URL_SAFE + HTTP.REQ.URL.PATH_AND_QUERY.HTTP_URL_SAFE
Bind the Redirect Policy to the HTTP port 80 Virtual Server.
Thank you and It is awesome .. working..
Hey Carl
Port 80 has to be open from the outside in order to do http to https rewrite or vip down method correct? If the port is closed the traffic will never hit netscaler causing it not to redirect correct
Correct. A redirect is a HTTP 302 response from the port 80 listener.
Hi Carl,
We are trying out the SSL Redirect – Down vServer Method but On the right, in the Advanced Settings column, we don’t have “Protection” option.
Netscaler VPX version is 11.1 – 55.10nc
Any ideas where this versions settings might be?
Is it already on the left? LB vServers should have a Protection section.
Not on the left, no where to be found on right and left. I will ask Citrix
Hi Carl,
I am trying to make a new SSL Profile (Release NS11.1 54.14.nc) and no matter what combination of selections I chose I always get “Invalid argument [strictsigdigestcheck]” as an error.
Any ideas?
Cheers
Same for me in 54. Works for me in 11.1 build 55.
Hi Carl,
How to check the SSL cipher suite binded to a vsever through CLI.
Depends on if you’re doing it using SSL Profiles or not. “show ssl vServer MyvServerName”. You must specify the name of the vServer.
Hi carl,
I need your advice.
I created rdp virtual server for simple reverse proxy to terminal servers.
there is anyway to create special header that will help us to limit the access.
we created application that open seamless app using rds and we don’t want to let people directly connect to ns-rdp-virtual server. but only through the application.
You created a LB vServer with RDP protocol? And now you want NetScaler to insert a header? What header?
hi,
i need to setup ssl/https virtual server which will utlize internal backend servers on TCP-9080. Is that even possible to do on netscaler?
I have done it on F5, but cannot find anyway on netscaler?
when i try to bind those services to the virtual server, then it says vserver type and service mismatch.
thanks
Lovleen
Is the back-end HTTP or HTTPS? If so, create the services (or service group) using the HTTP or SSL protocol but port 9080.
If the back-end is not HTTP (i.e. some other TCP protocol), then the front-end Virtual Server should be SSL_TCP protocol instead of SSL. SSL protocol assumes HTTP. Whereas SSL_TCP does not assume HTTP, and still allows you to bind a certificate to the vServer.
Hi Carl, Sorry for hijacking this post, but would you be able to tell me if the backend server/services will need to use the SSL_TCP protocol or TCP protocol given that the load balanced vip uses SSL_TCP?
My back end is not http either, thanks!
If the vServer is SSL_TCP, I think you can use either SSL_TCP or TCP on the Services/Service Group. This would match HTTP and SSL Offload. But it should be easy to verify by simply creating a vServer.
Dear Carl
I use the responder Method for https redirection:
“”””””
Name it AlwaysUp or similar.
Use a loopback IP address (e.g. 127.0.0.1). After the service is created, it changes to a NetScaler-owned IP.
“””””””””””””
Since this was created, i could access the Netscaler via http anymore.
Also failover in the HA Setup happend since the cluster could not communicate with his fellow node anymore.
After the failover, access to the management console was possible again but only with https.
Any thoughts on this?
cheers David
Any thoughs how to do this properly on Unified Gateway? We had a working configuration previously so that we created a dummy Content Switching server with same IP and bound the responder policy there and it worked perfectly.
However, now on the 11.1 build 49.16 it just broke all the sudden.
There seems to be tons of options on LB level but when you move to Unified GW (manually created, I never use the wizards for prod environment), we seem to run in to trouble.
SSL Redirect? Just bind it to a port 80 load balancer. No need for content switch on port 80.
Hi Carl,
I tried that too but doesn’t seem to work. I also need the “Responder” method since I’m doing a bit tricky reverse proxy thing with the UGW. Let me break it down for you:
1. Normal portal use, users browse to portal.customer.com (with http-> https redir) and get to the logon page. After logon they get to the clientless portal from where they can pick either web links (cVPN, reverse proxy, etc…)
2. Users can access “extranet.customer.com” (with http-> https redir), but if they haven’t logged in they’re redirected to the UGW “portal.customer.com” to authenticate and after this they get SSO’d to the destination.
I’ve tried to bind the Responder policy to a LB on port 80, but I’m still getting the same RST package from NetScaler.
… we have firmware 48.10 in our lab and this seems to be working fine there, so I’m now downgrading the customer test environment to see whether that has the desired functionality.
Firmware downgrade didn’t change anything.
Uhm… My Responder sent HTTP/302 to the client and that seemed to be the problem (for now), since when I changed the code to HTTP/301 it started working.
I’m suspecting this might be somehow related to the customer firewall environment? Could it be that some firewalls would start resetting traffic after several 301s from the backend?
You seem to be using the status code 302 too in your code snippet? I think I’ve read from somewhere that it should be the correct one for this use case. Do you have any references?
Ok. Got even more intresting. If I change my redirect to “Respond with” and use the following expression:
“HTTP/1.1 302 Moved Temporarily\r\n” + “Location: https://” + HTTP.REQ.HOSTNAME.HTTP_URL_SAFE + HTTP.REQ.URL.PATH_AND_QUERY.HTTP_URL_SAFE + “\r\n”
… it works and properly responds with 302. This is a slightly modified version of the https://support.citrix.com/article/CTX133383.
Hi Carl,
Not sure where to post this – but here we go 🙂
Today I had to create a vServer where the backend server only accepted SSL
Client > SSL to Netscaler > SSL to Backend server
All was up and green and the client connected to NetScaler just fine.
After the client connected to the NetScaler nothing happened and looking a packet capture on the backend server I only saw the monitor connectivity.
I had bound the Backend server with a monitor using a Service Group which then was bound to the vServer.
When I deleted the ServiceGroup and created a Service instead all worked fine..
Can you explain this?
Why would a service group not work but a service will?
Regards
Jeppe
Sounds like i firewall issue! If you use a service-group, then monitoring traffic is sourced by the SNIP. With the service only its sourced by the NSIP.