This topic assumes you’ve already set up one VMware Workspace ONE appliance as detailed at https://www.carlstalhood.com/vmware-access/
Navigation
- Change Log
- NetScaler ADC Configuration
- Load Balancing FQDN
- Clone Appliance
- Add to NetScaler
- Multi-datacenter
💡 = Recently Updated
Change Log
- 2021 Sep 8 – updated for VMware Workspace ONE Access 21.08
- 2019 Jul 20 – ADC Load Balancing Configuration – added WebSockets
- 2019 Apr 25 – updated article for Identity Manager 19.03.
- 2018 May 27 – updated Load Balancing Monitor configuration based on Proper VMware Identity Manager Node Monitoring when using F5 BIG-IP Appliances-UPDATED at VMware Communities
Citrix ADC Configuration
VMware recommends a minimum of three VMware Access nodes. See Recommendations for Workspace ONE Access Cluster at VMware Docs.
Setup the load balancing before you clone the appliance. GUI instructions in this section. Or skip to the CLI Commands.
- In your Citrix ADC, go to Traffic Management > Load Balancing > Monitors, and add a monitor.
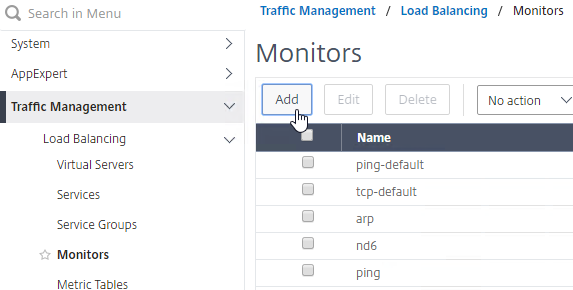
- Give the monitor a name and select HTTP-ECV as the Type. (Source = Proper VMware Identity Manager Node Monitoring when using F5 BIG-IP Appliances-UPDATED at VMware Communities)
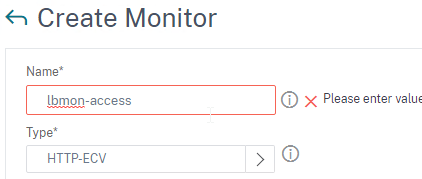
- In the Basic Parameters section:
- In the Send String field, enter
GET /SAAS/API/1.0/REST/system/health/heartbeat - In the Receive String field, enter
ok - Check the box next to Secure. Ignore the SSL Profile field.
- In the Send String field, enter
- Scroll down and click Create.

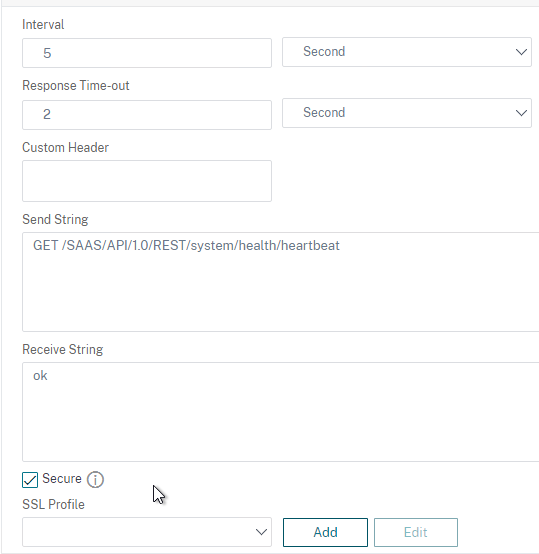
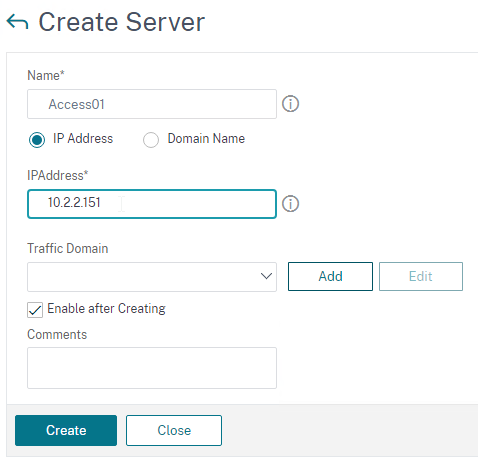
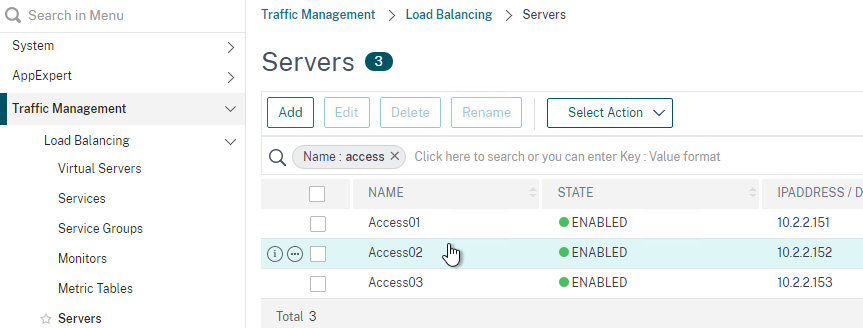
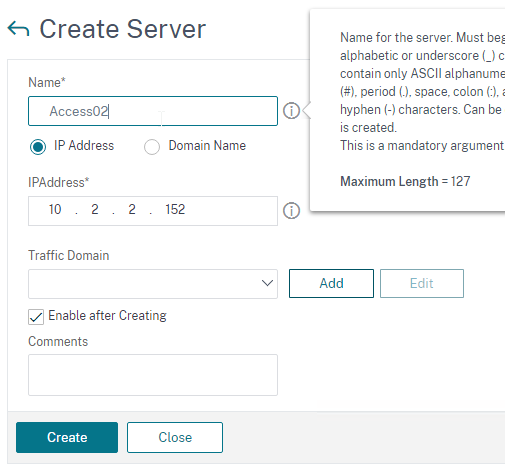
- Go to Traffic Management > Load Balancing > Servers and add three servers that point to the IP addresses of your planned three VMware Access appliances. These don’t have to exist yet.

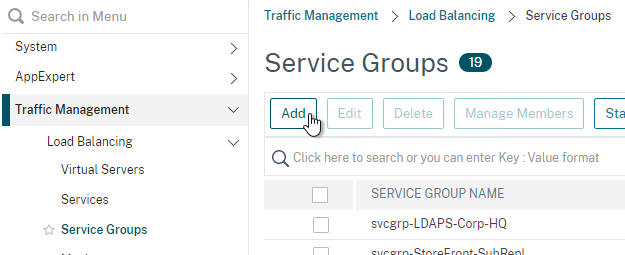
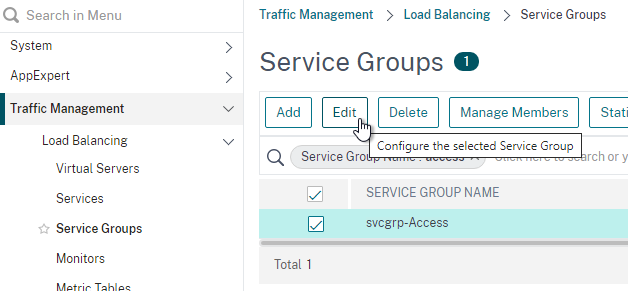
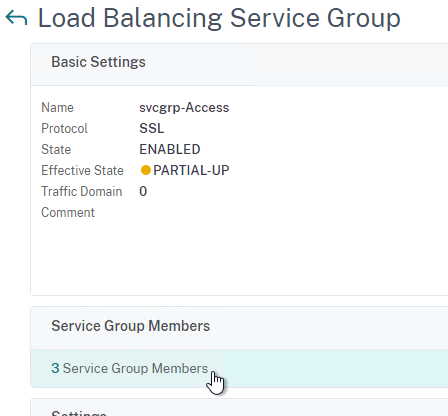
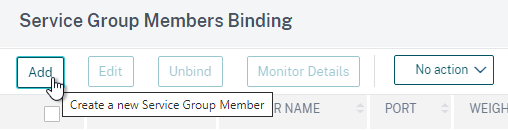
- Go to Traffic Management > Load Balancing > Service Groups and add a Service Group.
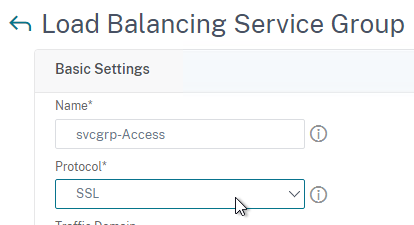
- Give the Service Group a name.
- The protocol is SSL. Note: if you configured certificate-based client authentication in VMware Access, then use SSL_BRIDGE instead of SSL.
- Scroll down and click OK to close the Basic Settings section.
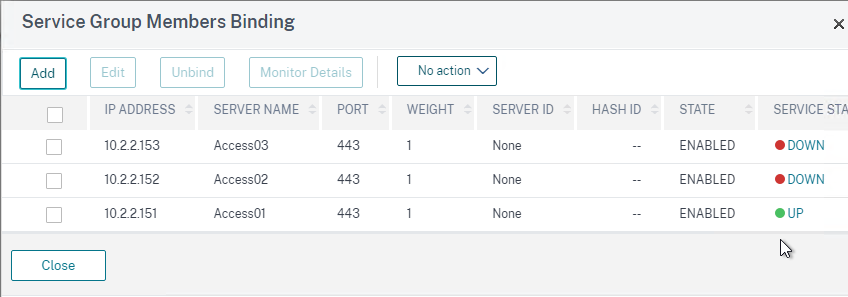
- Bind three members to it and specify port 443.
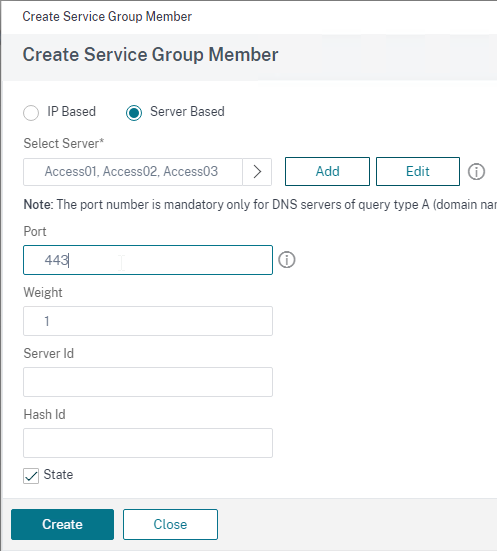
- Click OK to finish adding members.
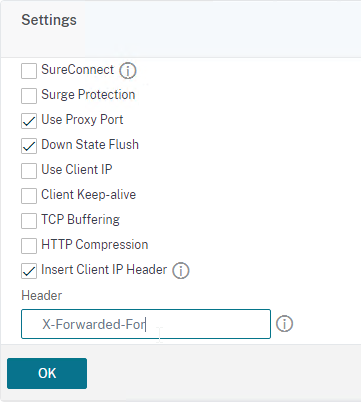
- On the left, in the Settings section, click the pencil icon.
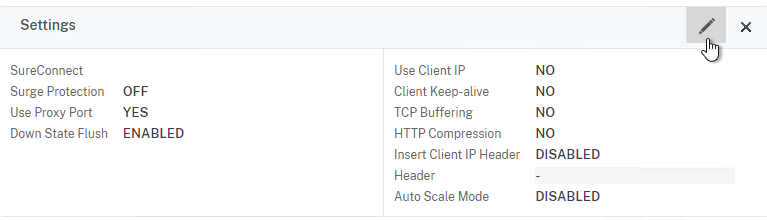
- Check the box for Client IP and enter X-Forwarded-For in the Header field.
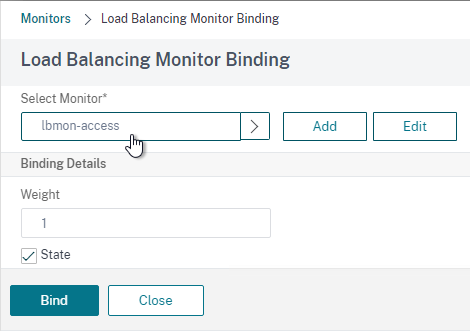
- Bind a monitor, and select the Access monitor you created earlier.
- If you click the three members, then one of them should be UP.
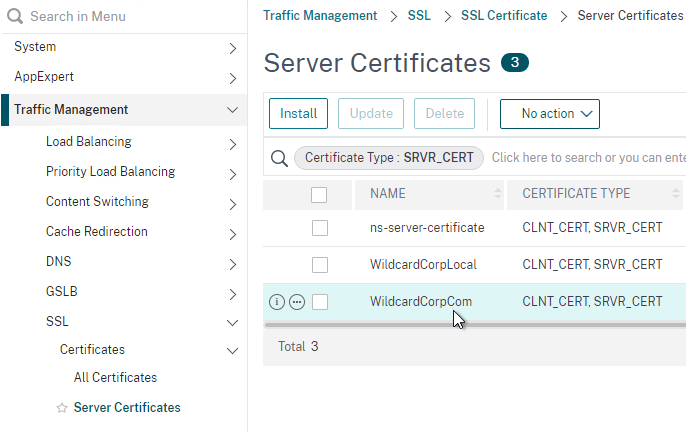
- Go to Traffic Management > SSL > Certificates > Server Certificates and install a certificate that matches your VMware Access FQDN.
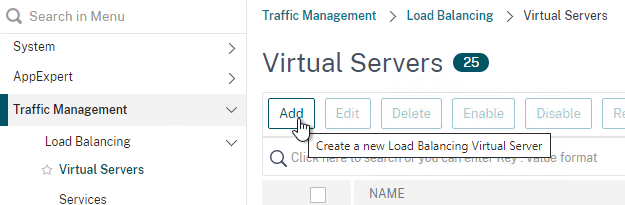
- Go to Traffic Management > Load Balancing > Virtual Servers and add a Virtual Server.
- Give the Load Balancing Virtual Server a name.
- Protocol = SSL. Note: if you configured certificate-based client authentication in VMware Access, then use SSL_BRIDGE instead of SSL.
- Enter a new VIP.

- Click OK to close the Basic Settings section.
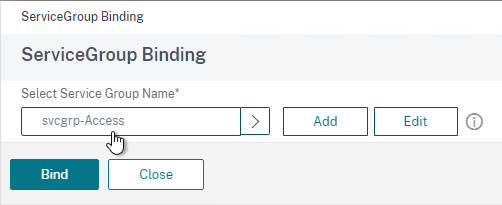
- Bind the Service Group created earlier.
- Bind the certificate. This certificate must match the name users will use to access VMware Access.
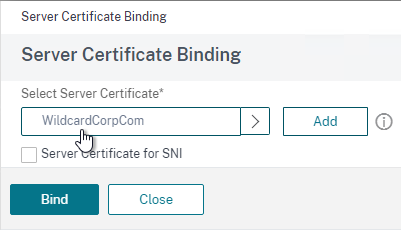
- Configure Persistence:
- While still editing the Virtual Server, on the right, in the Advanced Settings column, click Persistence to move it to the left.

- On the left, in the Persistence section, select SOURCEIP, and give it a timeout of 60 minutes or more. COOKIEINSERT might not work with some mobile devices.
- Click OK to save the Persistence settings. If you don’t click OK, then your persistence settings won’t be saved.
- While still editing the Virtual Server, on the right, in the Advanced Settings column, click Persistence to move it to the left.
- Enable WebSockets for Outbound Connectors:
- While still editing the Virtual Server, on the right, in the Advanced Settings column, click Profiles to move it to the left.
- On the left, in the Profiles section, next to HTTP Profile, click Add.
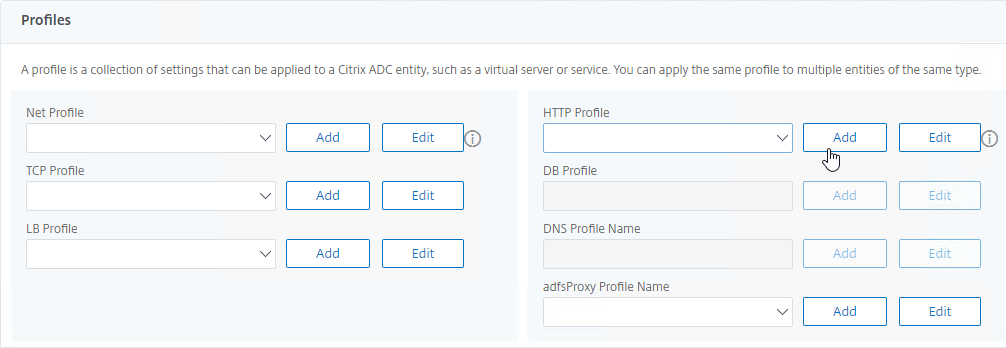
- The primary purpose of this HTTP Profile is to enable WebSockets so name it accordingly.
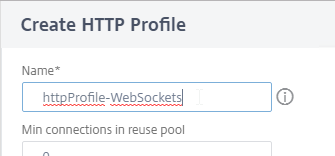
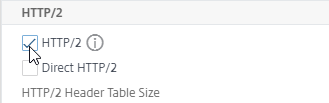
- As you scroll down, optionally check the box next to HTTP/2.
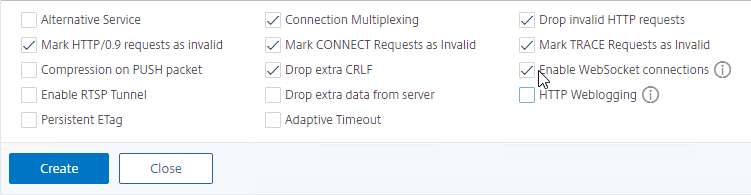
- Scroll down to the bottom and optionally check the boxes next to Mark HTTP/0.9 requests as invalid, Mark CONNECT Requests as Invalid, Mark TRACE Requests as Invalid, and Drop Invalid HTTP requests,

- At the bottom right, check the box next to Enable WebSocket connections.
- Click Create to finish creating the HTTP Profile.
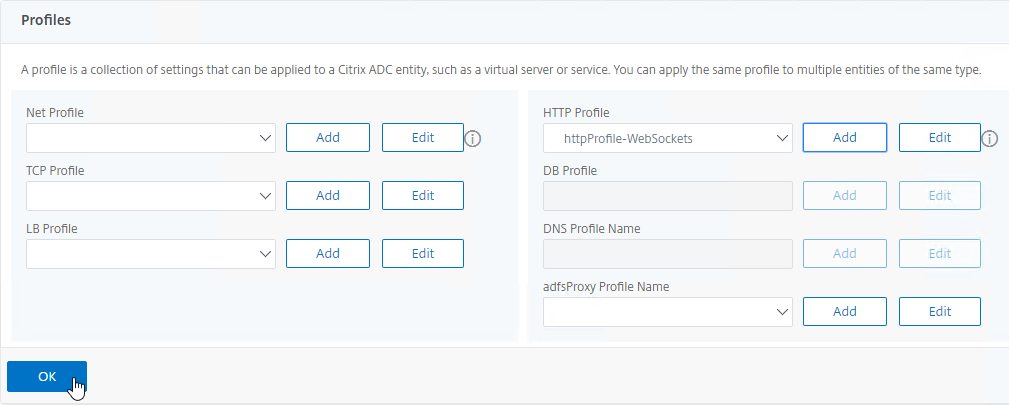
- Back in the Profile section, make sure your new HTTP Profile is selected, and then click OK to close the Profiles section. Make sure you click OK in this section, or your new HTTP Profile won’t be enabled.
- While still editing the Virtual Server, on the right, in the Advanced Settings column, click Profiles to move it to the left.
- If you haven’t enabled the Default SSL Profile, then perform other normal SSL configuration including: disable SSLv3, disable TLSv1, disable TLSv11, bind an A+ Cipher Group, and enable Strict Transport Security. You can do these settings in the GUI in the SSL Parameters and SSL Ciphers sections of the Virtual Server.
set ssl vserver MyvServer -ssl3 DISABLED -tls1 DISABLED -tls11 DISABLED -tls12 ENABLED

unbind ssl vserver MyvServer -cipherName DEFAULT

bind ssl vserver MyvServer -cipherName SSLLabs-APlus

bind ssl vserver MyvServer -eccCurveName ALL
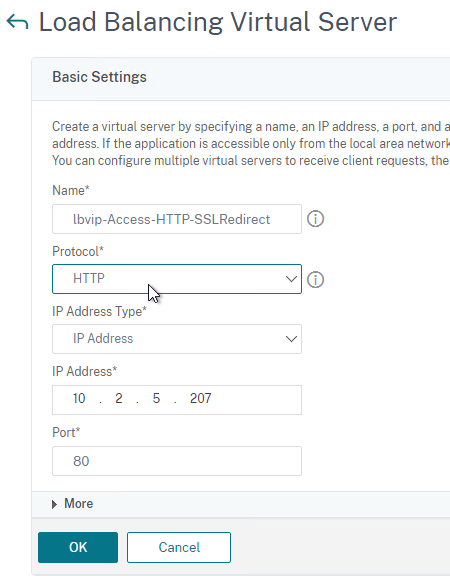
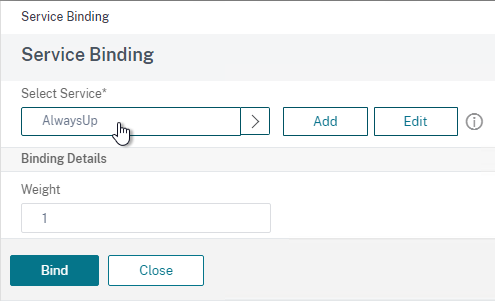
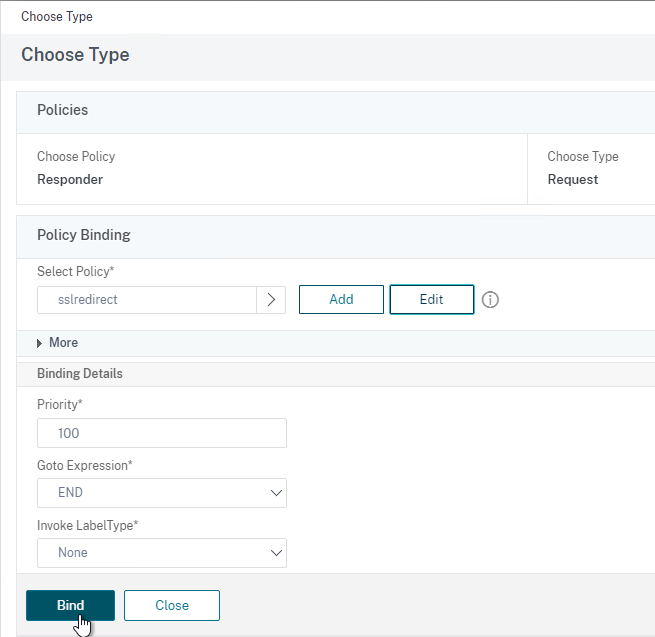
- Create another Load Balancing Virtual Server on HTTP port 80 and configure it to redirect HTTP to HTTPS.
CLI Commands
Here are the CLI Commands for the configuration shown above:
add server Access01 10.2.2.151
add server Access02 10.2.2.152
add server Access03 10.2.2.153
add lb monitor lbmon-access HTTP-ECV -send "GET /SAAS/API/1.0/REST/system/health/heartbeat" -recv ok -secure YES
add service AlwaysUp 1.1.1.1 HTTP 80 -healthMonitor NO
add serviceGroup svcgrp-Access SSL -cip ENABLED X-Forwarded-For
bind serviceGroup svcgrp-Access Access01 443
bind serviceGroup svcgrp-Access Access02 443
bind serviceGroup svcgrp-Access Access03 443
bind serviceGroup svcgrp-Access -monitorName lbmon-Access
add ns httpProfile httpProfile-WebSockets -dropInvalReqs ENABLED -markHttp09Inval ENABLED -markConnReqInval ENABLED -markTraceReqInval ENABLED -webSocket ENABLED -http2 ENABLED -builtin MODIFIABLE
add lb vserver lbvip-Access-SSL SSL 10.2.5.207 443 -persistenceType SOURCEIP -timeout 60 -httpProfileName httpProfile-WebSockets
add lb vserver lbvip-Access-HTTP-SSLRedirect HTTP 10.2.5.207 80
add responder action http_to_ssl_redirect_responderact redirect "\"https://\" + HTTP.REQ.HOSTNAME.HTTP_URL_SAFE + HTTP.REQ.URL.PATH_AND_QUERY.HTTP_URL_SAFE"
add responder policy http_to_ssl_redirect_responderpol HTTP.REQ.IS_VALID http_to_ssl_redirect_responderact
bind lb vserver lbvip-Access-HTTP-SSLRedirect AlwaysUp
bind lb vserver lbvip-Access-SSL svcgrp-Access
bind lb vserver lbvip-Access-HTTP-SSLRedirect -policyName http_to_ssl_redirect_responderpol -priority 100 -gotoPriorityExpression END -type REQUEST
set ssl vserver lbvip-Access-SSL -sslRedirect ENABLED -ssl3 DISABLED -tls11 ENABLED -tls12 ENABLED
bind ssl vserver lbvip-Access-SSL -cipherName SSLLabs-APlus
unbind ssl vserver lbvip-Access-SSL -cipherName DEFAULT
bind ssl vserver lbvip-Access-SSL -certkeyName WildCorpCom
bind ssl vserver lbvip-Access-SSL -eccCurveName ALL
VMware Access Load Balancing FQDN
VMware Access must be able to connect to the Load Balanced FQDN on HTTPS 443. The load balancing certificate must match the Load Balanced FQDN and must be trusted by VMware Access. See below to import a root certificate to VMware Access.
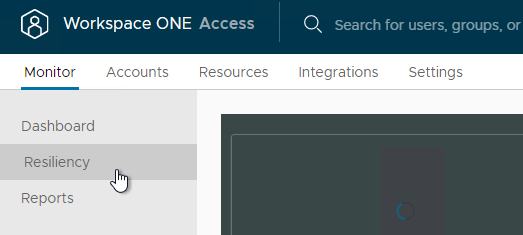
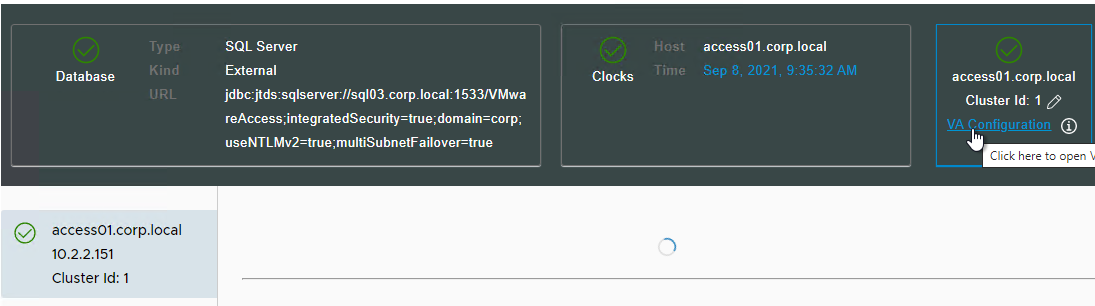
- In the VMware Access appliance, go to Monitor> Resiliency.
- Select an appliance. Then in the top right, click VA Configuration.
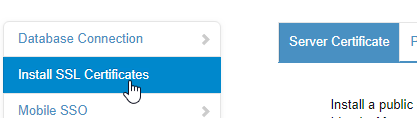
- On the left, click Install SSL Certificates.
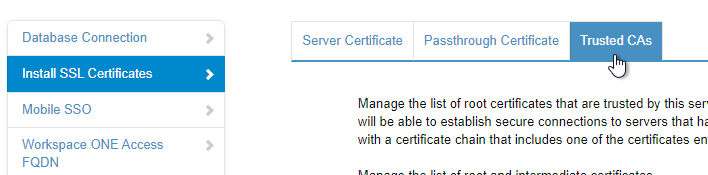
- On the right, switch to the tab named Trusted CAs.
- Paste in the CA root certificate in PEM (Base64) format. This is the CA cert that signed the server cert that is bound to the load balancing VIP. Click Add.
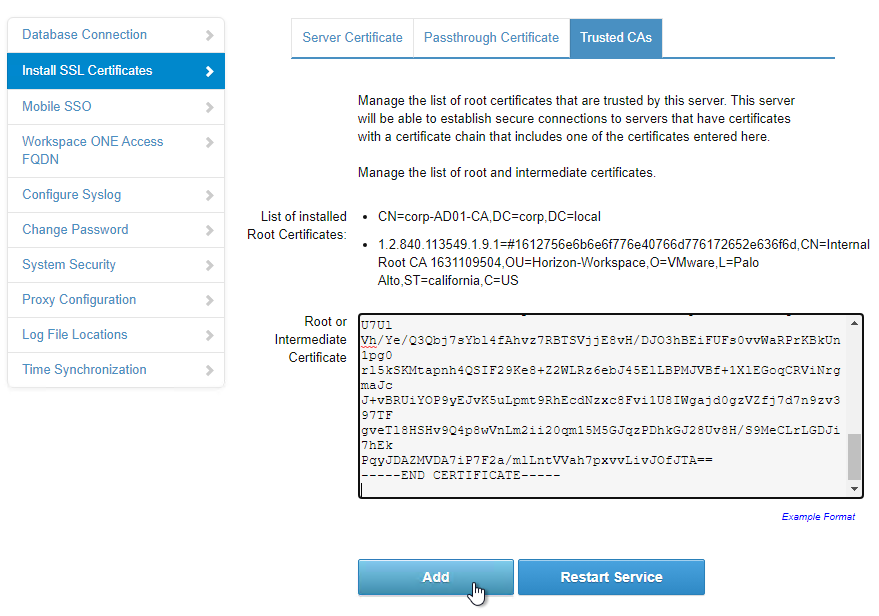
- Click Restart Service.

- On the left, click the Workspace ONE Access FQDN page.
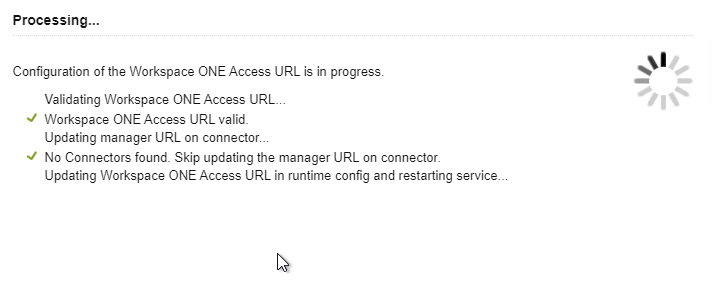
- Enter the FQDN that resolves to the VIP on the load balancer and click Save.
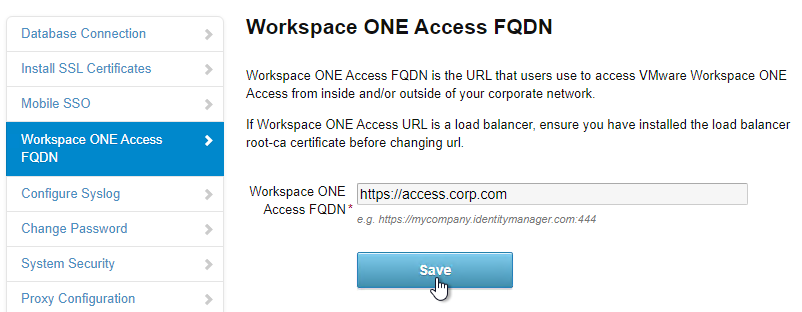
- The appliance will restart.
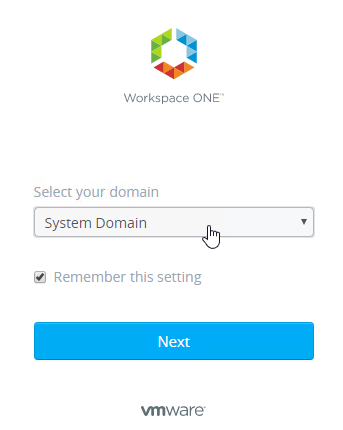
- Connect to the load balanced DNS name, select System Domain, and login as admin.
- In 22.09 and newer, go to Settings > New End User Portal UI and enable it if it’s not already enabled.
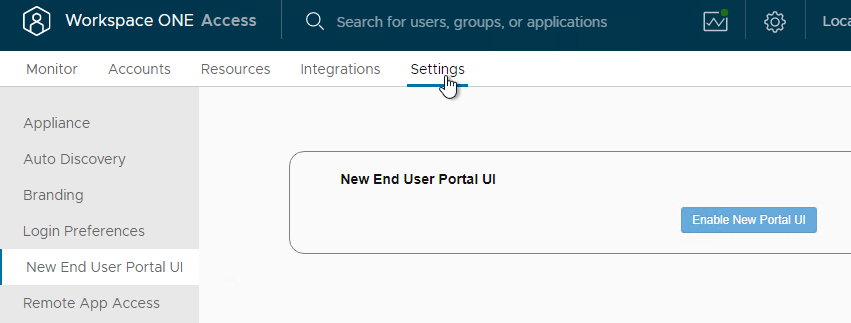
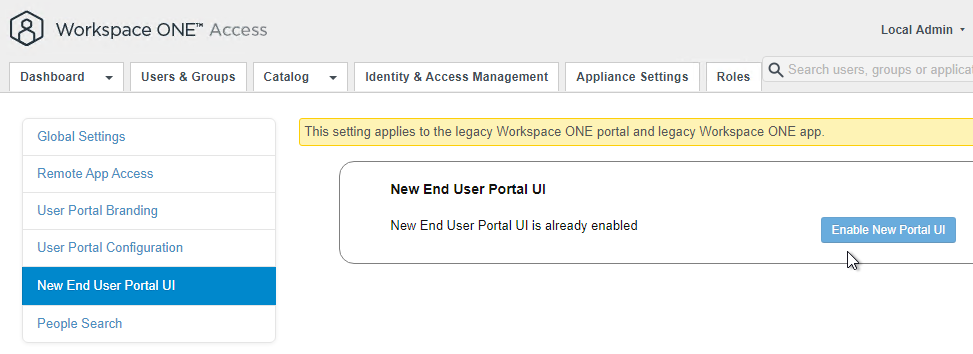
- In older VMware Access:
- Go to Catalog > Settings.
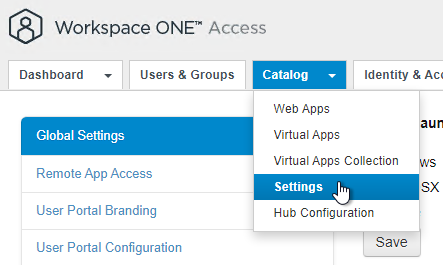
- On the left, click New End User Portal UI.
- On the right, click Enable New Portal UI if it’s not already enabled.
- Go to Catalog > Settings.
Clone Appliance
In Identity Manager 2.7 and newer, VMware recommends a minimum of three nodes. See Recommendations for Workspace ONE Access Cluster at VMware Docs.
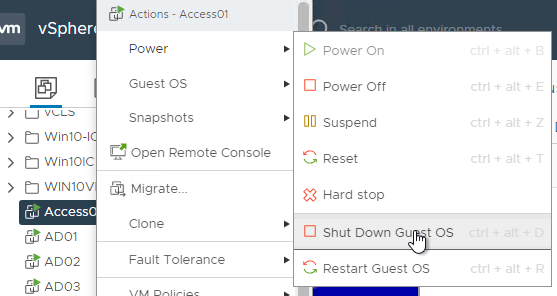
- Login to the appliance console.
- If you see the file /etc/udev/rules.d/70-persistent-net.rules, delete it.

- Shut down the original VMware Access appliance.
- Right-click the VMware Access appliance and clone it to a new Virtual Machine.
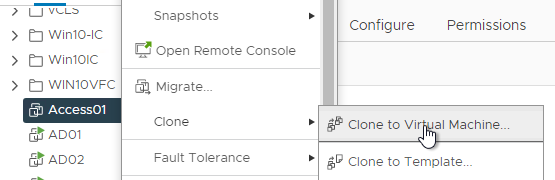
- Give the cloned appliance a name.

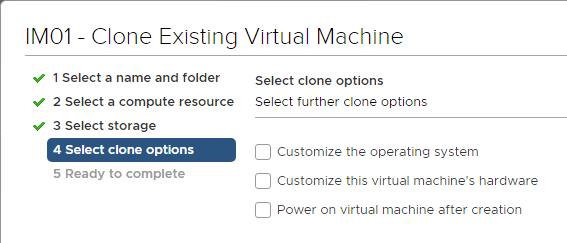
- In the Select clone options page, do not customize, and do not power on the machine. The original VM should be powered on before powering on the new VM. Click Next.
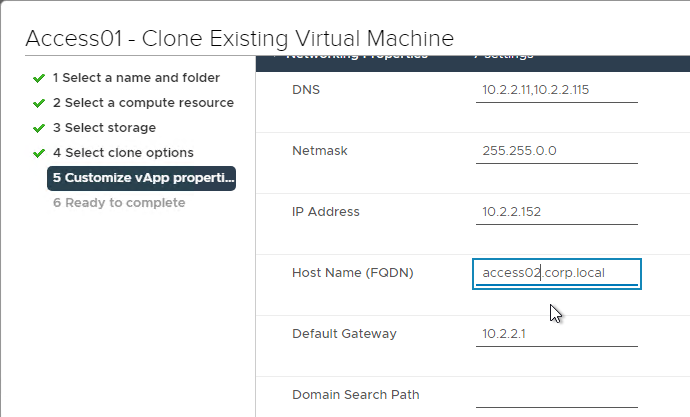
- In the Customize vApp properties page, expand Networking Properties and change the IP Address and Host Name (FQDN). Click Next and then click Finish.
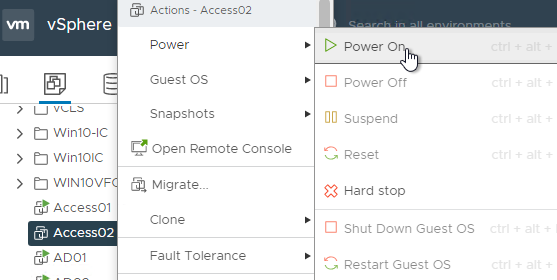
- After cloning is complete, power on the original VMware Access appliance. Don’t power on the cloned appliance until the original is fully functional.

- Wait for the original appliance to fully boot (you see the blue screen).
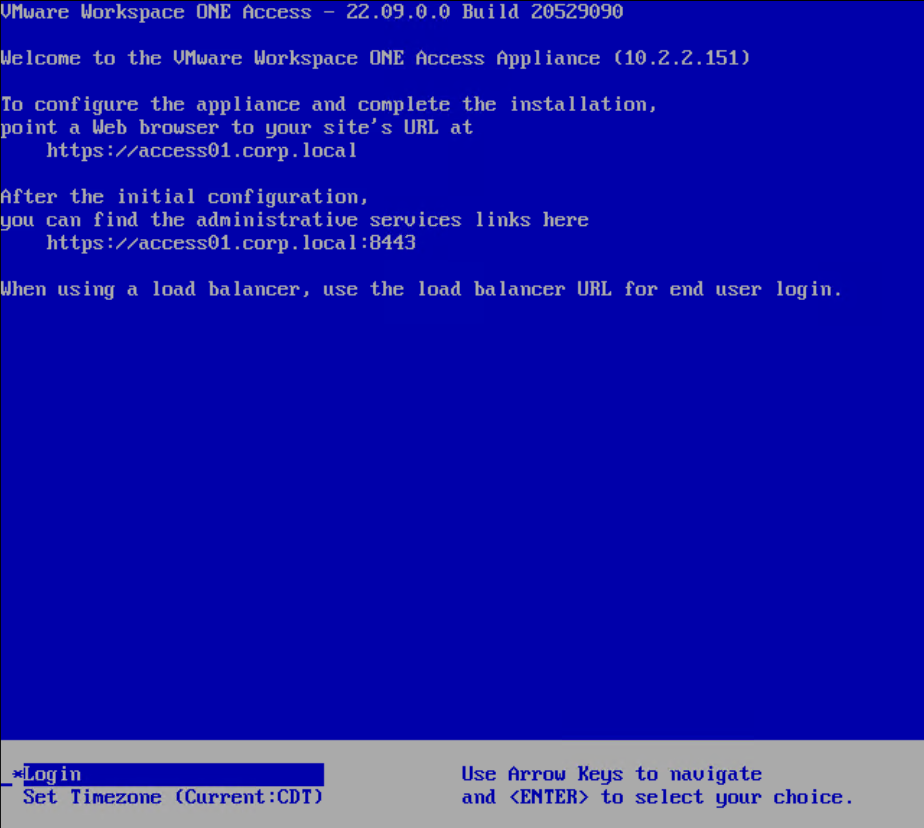
- Once the original appliance is running (the blue login screen is shown), you can power on the new cloned appliance.
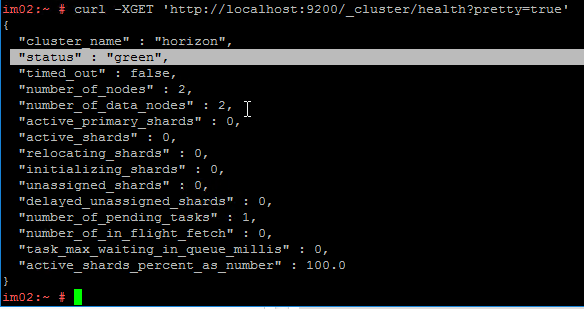
- Once both appliances are booted, login to one of them and run
curl -XGET 'http://localhost:9200/_cluster/health?pretty=true'. Make sure it says two nodes and status is green. It might take a couple minutes before the two nodes become clustered. You might have to reboot the cloned node before it joins the cluster.
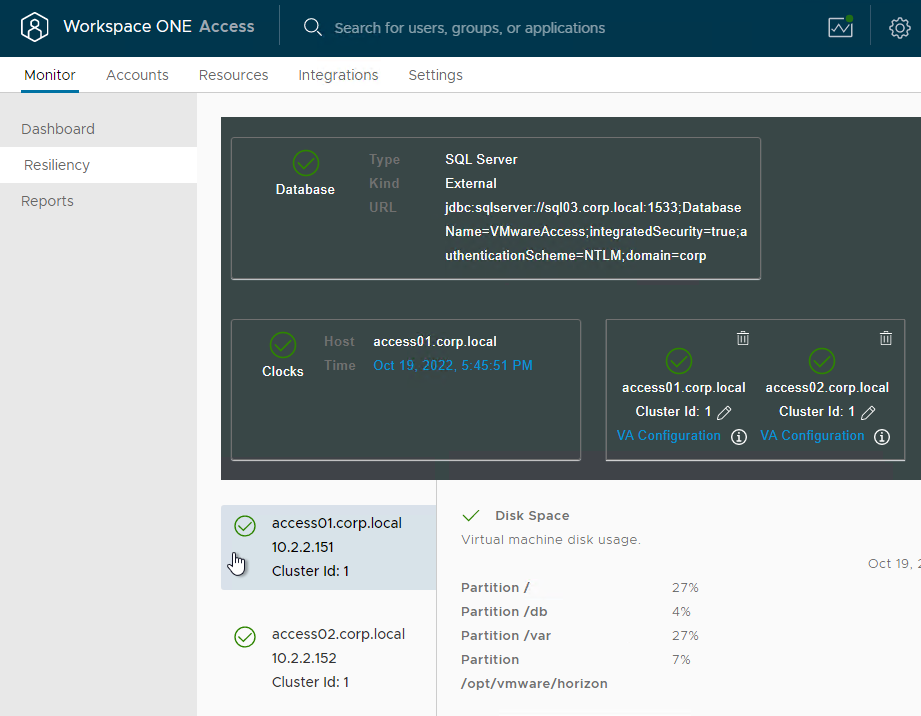
- In VMware Access Admin Console, go to Monitor > Resiliency.
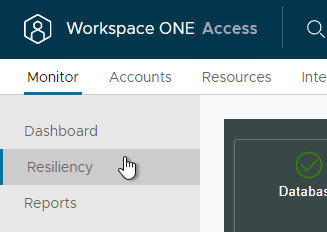
- All nodes should be shown with green check mark status.
- Repeat this entire section to clone to a third appliance.
Add Cloned Appliances to NetScaler ADC
- In Citrix ADC, go to Traffic Management > Load Balancing > Servers, and add a Server for the new appliance.
- Go to Traffic Management > Load Balancing > Service Groups and edit the existing VMware Access Service Group.
- Click the Members section.
- Bind a new Member and select the new appliance on Port 443. The rest of Load Balancing should already have been configured.

Multi-datacenter
For multi-datacenter, see Component Design: Multi-site Design at Workspace ONE Access Architecture at VMware Tech Zone.
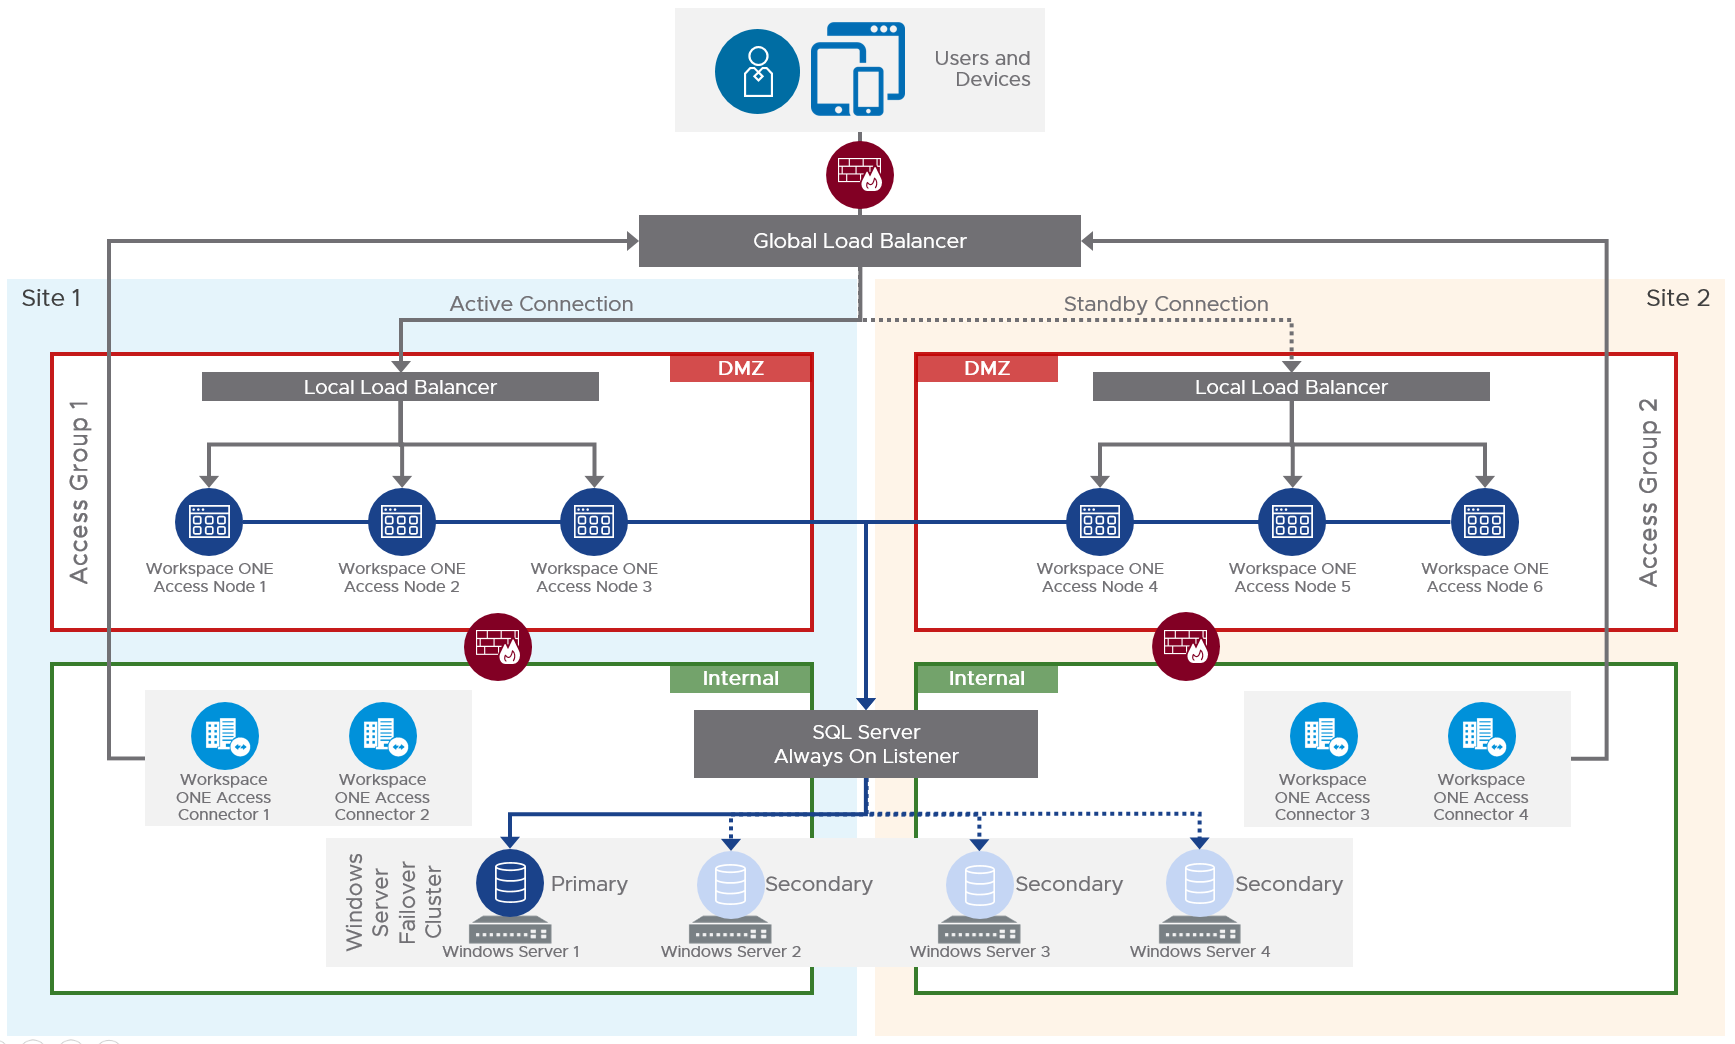
Also see Setting up a Secondary Data Center for Workspace ONE Access at VMware Docs.
- The database in the primary datacenter is replicated to the secondary datacenter.
- The VMware Access appliances in the secondary datacenter have read-only connectivity to the database in the secondary datacenter.
- Active-active data centers is not supported. The secondary data center is a hot stand-by.
- Horizon Connection Server groups are configured in failover order.
- Citrix ADC GSLB or F5 GTM handles failover of the VMware Access DNS name.
Hello Carl,
I tried to load balance ws1 Access on AVI LB but I got error 444 on it.
can you help me please
Hello Carl,
I have just one node ws1 access , and we need to change the fqdn/dns name for it.
I change it from the /cfg/setup page but after that this configuration page cant open with new dns , just with ip address.
any suggestion please
Hi,
for some reason we had to change the monitor after updating to Access 23.09.0.0.
We are using F5 Loadbalancer and the old Monitor from the F5 documentation is this:
GET /SAAS/API/1.0/REST/system/health/heartbeat HTTP/1.1\r\nHost: \r\n\Connection:Close\r\n\r\n
This gave us a 400 Bad Request answer from Access after updating.
We changed it to this and it is working:
GET /SAAS/API/1.0/REST/system/health/heartbeat HTTP/1.1\r\nHost: \r\n\r\n
Maybe this is the case on other Loadbalancers as well.
Is there any guide for workspace one access load balancing by AVI (nsx advanced load balancer)?
I got error 444 on it
I used this and it worked for me: https://avinetworks.com/docs/20.1/load-balancing-ws1-access-with-nsx-alb/
Great content as always Carl! Have you seen anything weird around web caching with Workspace ONE Access? Our setup is exactly per above, and we find that, when entitlements are changed on the back end, very often users will not see the change in icons on the portal page until after they do a manual F5/refresh of that page. Even after logging out, closing the browser, opening the browser, and logging in again. The browser seems to hold onto the cached version of the page showing all the icons until a forced refresh, at which point new entitlements show up and icons that have been unentitled disappear.
Is there some way to stop this behavior with a NetScaler setting, or is there perhaps something we may have misconfigured that would explain it?
Thanks much!
Are you licensure for ADC Premium Edition? Is Integrated Caching feature enabled?
We have a Platinum license. This seems to permit Integrated Caching, but it appears disabled? (Yellow exclamation mark icons next to everything under the Menu -> Optimization section. Citrix ADC NS 12.1.57.18.nc.
Hi,
There seems to be no vApps settings to set the new hostname and IP while cloning from Vcenter 6.0.0. Is there any solution to this?
Hi Carl! Do you know if these steps require updating for Workspace ONE Access Appliance 20.01, or should they be pretty much the same?
Thanks!
I’m not aware of anything that’s changed. You can also refer to F5’s documentation for Access load balancing.
How do I configure vidm load balancing with nginx?
Carl, great document. I am trying to configure Loginsight to use vIDM for authenticaiton. When I use the vIDM node FDQN or IP, it works, but when I give the VIP of the vIDM cluster, it returns – “No response is received. Check if authentication source is available”.
Hi Carl, Do we need to do patching for instant clone master image ? If yes, then how often do we run windows updates. Also, Can you please explain the procedure. Because when I fully patched a image it started taking too long to boot up. Many Thanks.
Are you asking about Windows Updates? Then yes. But Feature Upgrades (example: upgrade from 1803 to 1809) might be more troublesome.
I have some instructions at https://www.carlstalhood.com/vmware-horizon-7-virtual-desktop-pools/#updatepool
Carl, we are testing HA/Failover for the outbound connector functionality and have run into issues with authentication while the environment has been failed over to the DR site. We have worked with Citrix and VMware on the issue and it appears there is a requirement to enable/allow Websocket connections for the IDM virtual server/pool. We need to create a new HTTP profile and bind it to the IDM virtual server/pool, but there are few settings that we need to verify/confirm. Can you provide any guidance to what settings should be configured for the HTTP profile?
I assume you can clone the default HTTP profile (right-click default HTTP profile and click Add) and then enable WebSockets in the cloned profile.
I just added WebSocket instructions to this article. Thanks for the suggestion.
Hey Carl,
Looks like VMware changed the “send string” for the HTTP-ECV monitor. This article mentions that it should be changed for the F5, but they also don’t provide any formal instructions for the Netscaler. Seems the send string would be the same for both.
https://docs.vmware.com/en/VMware-Identity-Manager/19.03/idm_windows_upgrade/GUID-157905A8-C240-4225-B5E2-C09BB56A26CC.html?hWord=N4IghgNiBcIOIFEAqACA9AZQIJY2rACgJJoCMAdAAxoBKCGSaAzgJ5MAuApgLZoAWnSOz79BAJ3YAjQexQAJJEgJlypADpqxGgHZyA9h2goNIAL5A
They changed it to “GET /SAAS/API/1.0/REST/system/health/heartbeat HTTP/1.1\r\nHost: your_workspace_url\r\nConnection: Close\r\n\r\n” instead of just “GET /SAAS/API/1.0/REST/system/health/heartbeat”
It’s working for me without the HOST header so I’m not sure if it’s really needed.
Hey Carl, thanks for adding all of this great information.
Would the above be the same for a cluster of 3 IdentMan’s outside of the DMZ with two connectors within the DMZ providing sync and authorization?
I’ve followed everything and all horizon entitlements show up for users once logged into IdentMan but when I click on it I get redirected to Horizon but get a message saying “This Horizon server expects to get your logon credentials from another application or server, not directly through the client log in screen. If you usually access Horizon from another application, please launch that application.”
Trying to narrow down where the issue could be.
Thanks for any help!
Here’s a thread – https://communities.vmware.com/thread/551448
hey barry are you already solve this problem ?
Hi Carl,
I’ve followed this article but my appliances won’t form a cluster.
With the curl command it’s stating the same as in you’re printscreen but with the rabbitmqctl cluster_status it looks like it are two different clusters.
From appliance 1:
Cluster status of node ‘rabbitmq@lc-gc-idm01’ …
[{nodes,[{disc,[‘rabbitmq@lc-gc-idm01’]}]},
{running_nodes,[‘rabbitmq@lc-gc-idm01’]},
{cluster_name,<>},
{partitions,[]},
{alarms,[{‘rabbitmq@lc-gc-idm01’,[]}]}]
From appliance 2:
Cluster status of node ‘rabbitmq@lc-gc-idm02’ …
[{nodes,[{disc,[‘rabbitmq@lc-gc-idm02’]}]},
{running_nodes,[‘rabbitmq@lc-gc-idm02’]},
{cluster_name,<>},
{partitions,[]},
{alarms,[{‘rabbitmq@lc-gc-idm02’,[]}]}]
Do you have any idea why this is?
Kind regards,
Martijn
Did you resolve this issue?
Hello Carl I am stuck at one point of the documentation and I can’t seem to understand what do and perhpas you can share your thoughts on how I can perhaps leverage it. The load balancer on my second datacenter is using the same FQDN as my primary DC. How can I can configure the second site. There are some steps to following on each nodes on the primary dc before deploying the second site. One of them is to specify the LB FQDN for site 2 for replication. Last time I put the same FQDN and my whole setup crashed.
I know it’s been a while since anyone posted on this….
First Thanks for all the amazing wealth of info you post on here.
Just wondered if you wanted to update with new best practice to deploy 3 IDM appliances for the Elasticsearch functionality not working with only 2 nodes. Other than that amazing!!!!
http://pubs.vmware.com/identity-manager-27/index.jsp#com.vmware.wsp-install_27/GUID-3BFB1D4D-D5C2-480D-94E0-31ED6B0CAA63.html
That’s it, again can’t say enough how much I appreciate your step by steps and the sheer amount of time to screenshot and document.
Hello Carl. Thank you for your answer.
Yes, I use SAML and all icons are OK. When I click on it, the browser open “an URL” (the Connection Server Name…). This *must* be a balanced/public name? In effect, internally it works (DNS resolution is OK), but externally no. What are the best practices you know to implement access from externally?
Please let me know and many thank you for your patience.
Francesco
Your internal “Network Range” should use an internal DNS name that is load balancing Connection Servers. The external “Network Ranges” should use a DNS name that resolves to the Access Point that can proxy the PCoIP connection to the internal Agents.
Than you for your suggestion. I think this is the problem I have… For now, I have a unique FQDN (load balancer) that is resolved with a public IP externally (Secure Gateways) and with an internal IP from internal (Connection Server).
Just another “little” question. I have an internal Connection Server that is on a separate POD that (for license problems) has two RDSH Servers configured. This CS is configured under the previous IM.
When I click on an RDSH application, I have the previous problem: the URL is mapped with the name/IP of my RDSH. I must do the same configuration (load balancer vs RDSH Servers)?
Many thanks.
Hello Carl. Thank you very much for your articles!
A “little” question. I would like to access to my Horizon View desktops/RDSH application throw Identity Manager (IM).
I have configured an Access Point appliance that acts as reverse proxy vs IM. Under IM, I have configured my 4 Connections Servers (2 standard CS and 2 Secure Gateway).
From internal it’s all OK (it seems…) because the internal name of CS are resolved. But from external?
How must configure IM to resolve this?
Thank you
Francesco
Are you not able to see View icons in Identity Manager? Or are you not able to launch icons? For launching, you edit the Network Range to specify the external URL for View.
Hello Carl. I have not tried, but from external we have RSA enabled. My doubts are: when I access from Internt throw AP and, then, to IM, how can IM directs this request of authentication to the correct CS? And after: from Internet the name of the CS used must be resolved. It’s true?
Thank you very much
Hello Carl,
any idea? I would like to clarify. From external, I “must” resolve my Connection Servers name (when I logon to Identity manager). It’s true? How can accomplish this goal?
Thank you very much
Identity Manager is connected to the Connection Servers using SAML authentication, correct? Is this the problem you’re having? So you don’t see any of the View Pools in Identity Manager? The IM Connector is responsible for communicating with View Connection Servers.
After the icons are displayed, when you click one of them, the PCoIP connection goes through the URL (Access Point) defined in the Network Range.
Hey Carl. I’ve been trying to figure something out…. In your setup, you mention “Paste in the root certificate in PEM (Base64) format”. Where did you get this certificate from?
Thanks.
Double-click the certificate. On the Certification Path tab, double-click the top Cert. On the Details tab, click Copy to File and export it in Base-64 format.
Good Afternoon Carl, I have a question regarding Netscaler Gateway 11 and Identity Management. One of our clients purchased Netscaler Gateway Universal license for their Horizon Suite Implementation. They thought it was needed to load balance their Identity Management and Security Servers. My understanding is the Netscaler Gateway can only be used for a Citrix XenApp/XenDesktop environment due to the STA’s. Is there any use for the Netscaler Gateway if our customer is using Identity Mangement connecting to their Horizon Environment? I am unable to find any information on it while researching, but hoping there can be some use to this. The licenses were quite expensive… Thank You
Maybe if they’re using Identity Mgr with XenApp. Or maybe if they want a VPN tunnel. Otherwise Identity Mgr just needs regular SSL reverse proxy (load balancing) and Security Server or Access Point handles the PCoIP connection.