This article applies to Citrix ADC 13.1, Citrix ADC 13.0, Citrix ADC 12.1, and NetScaler 12.0. Citrix ADC is the new name for NetScaler. Citrix Gateway is the new name for NetScaler Gateway.
Navigation
- Change Log
- Monitor to verify that StoreFront is UP
- Server Objects
- Service Group
- Virtual Server
- SSL Redirect
- StoreFront Base URL
- Subscriptions/Favorites Replication Load Balancing
- CLI Commands
Change Log
- 2020 Jun 17 – StoreFront Monitor – added link to Configure to source Citrix ADC FreeBSD data traffic from a SNIP address
- 2020 Mar 26 – replaced screenshots with screenshots from ADC 13
- 2018 Aug 1 – StoreFront Monitor – added link to Citrix Blog Post Load Balancing Citrix StoreFront LTSR with NetScaler and DISA STIGs for custom monitor not based on Perl script so SNIP is used instead of NSIP.
- 2018 June 15 – StoreFront Monitor – added Install-DSServiceMonitorFeature info
- 2017 Dec 25 – updated entire article for 12.0 build 56.
- Monitor section has new instructions for 12.0 build 56.
Monitor
Note: This is a Perl monitor, which uses the NSIP as the source IP. To use SNIP, see Configure to source Citrix ADC FreeBSD data traffic from a SNIP address at Citrix Docs. Alternatively, you can create custom monitors not based on Perl as detailed in Citrix Blog Post Load Balancing Citrix StoreFront LTSR with NetScaler and DISA STIGs.
12.0 build 56 and newer
If your NetScaler 12.0 is older than build 56, jump to the older monitor instructions.
If your Citrix ADC is 12.1 or newer, or your NetScaler 12.0 is build 56 or newer, then do the following:
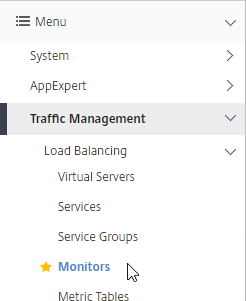
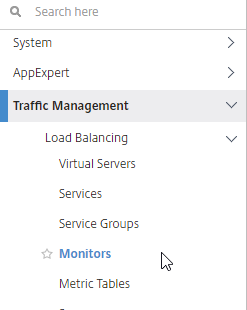
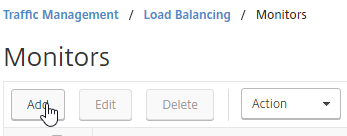
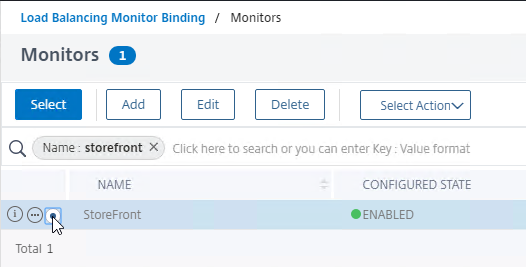
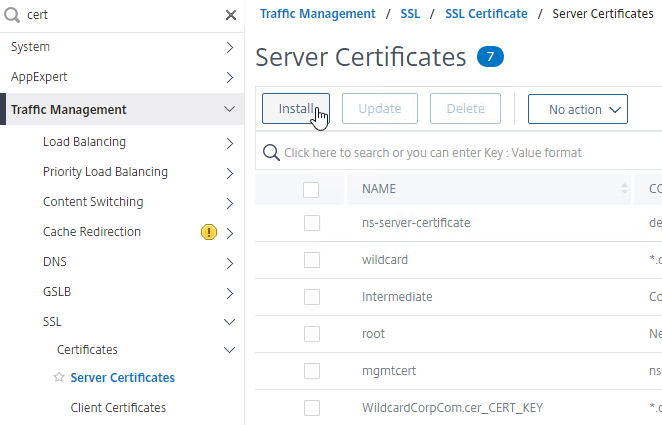
- On the left, expand Traffic Management, expand Load Balancing, and click Monitors.
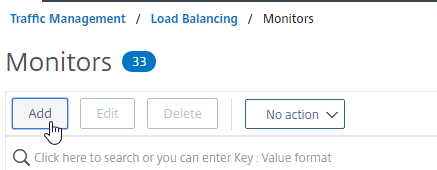
- On the right, click Add.
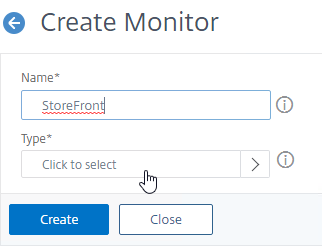
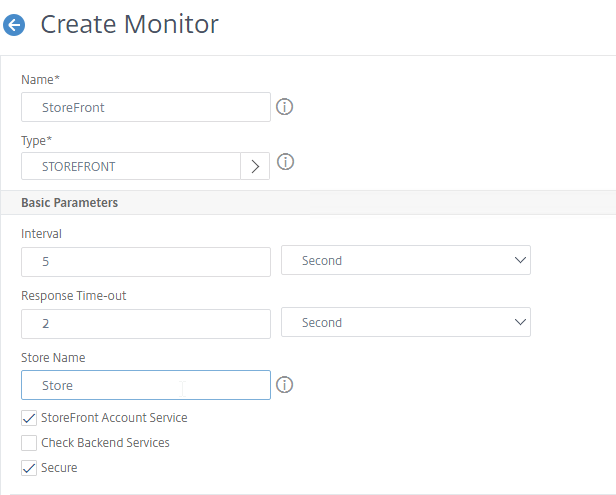
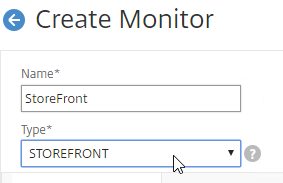
- Name it StoreFront or similar.
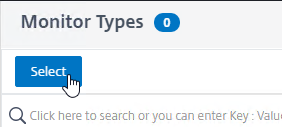
- In the Type field, click where it says Click to select.
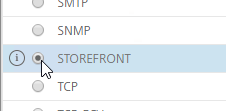
- Scroll down and click the circle next to STOREFRONT.
- Scroll up to the top of the page and click the blue Select button.
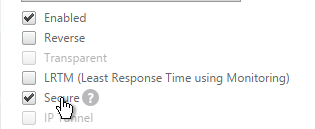
- If you will use SSL/TLS/https to communicate with the StoreFront servers, in the Basic Parameters section, check the box next to Secure.
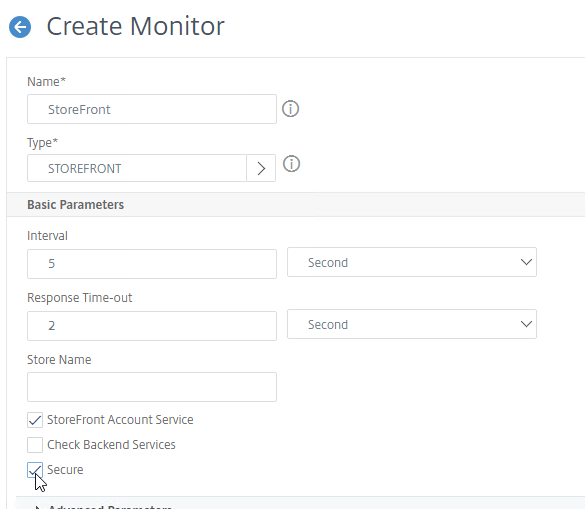
- If you wish to enable the Check Backend Services checkbox, then see Citrix Service Monitor at Citrix Docs for the service that must be installed on the StoreFront Servers.
Install-DSServiceMonitorFeature -ServiceUrl "https://localhost:443/StorefrontMonitor"
- If you wish to enable the Check Backend Services checkbox, then see Citrix Service Monitor at Citrix Docs for the service that must be installed on the StoreFront Servers.
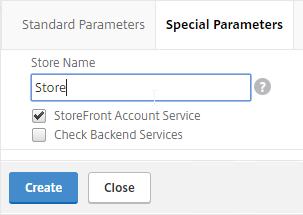
- In the Store Name field, enter the name of your store (e.g. MyStore) without spaces.
- Scroll down and click Create.

add lb monitor StoreFront STOREFRONT -scriptName nssf.pl -dispatcherIP 127.0.0.1 -dispatcherPort 3013 -secure YES -storename Store
- Jump to the Servers section.
12.0 older than build 56
If your NetScaler 12.0 is not yet build 56 or newer:
- On the left, expand Traffic Management, expand Load Balancing, and click Monitors.
- On the right, click Add.
- Name it StoreFront or similar.
- Change the Type drop-down to STOREFRONT.
- If you will use SSL/https to communicate with the StoreFront servers, then scroll down, and check the box next to Secure.
- Scroll up, and switch to the Special Parameters tab.
- In the Store Name field, enter the name of your store (e.g. MyStore) without spaces.
- Click Create.
add lb monitor StoreFront STOREFRONT -scriptName nssf.pl -dispatcherIP 127.0.0.1 -dispatcherPort 3013 -secure YES -storename Store
Servers
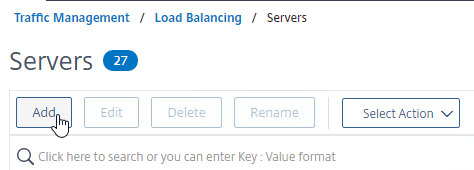
- On the left, expand Traffic Management, expand Load Balancing, and click Servers.
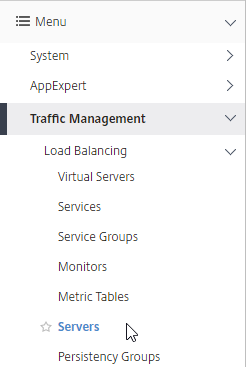
- On the right, click Add.
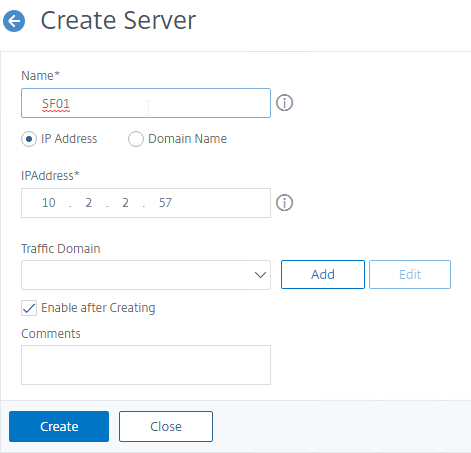
- In the Name field, enter a descriptive server name. Usually it matches the actual server name.
- Enter the IP address of the server.
- Enter comments to describe the server. Click Create.
- Continue adding StoreFront servers.
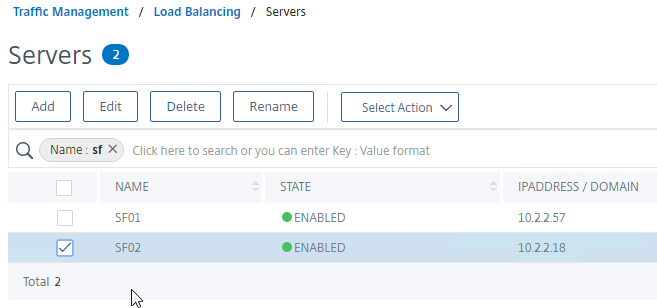
add server SF01 10.2.2.57
add server SF02 10.2.2.58
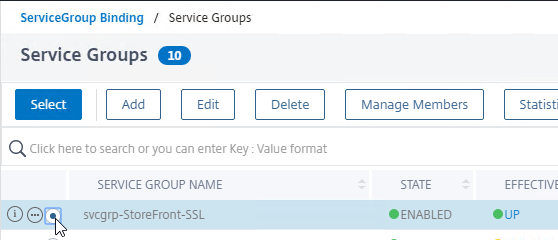
Service Group
- On the left, expand Traffic Management, expand Load Balancing, and click Service Groups.

- On the right, click Add.
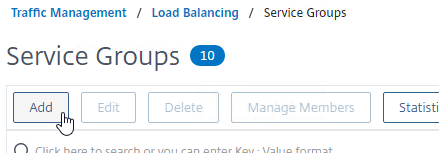
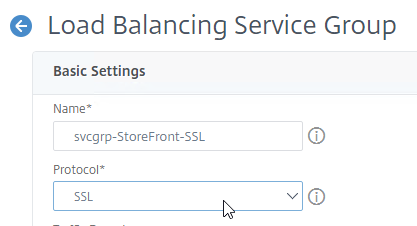
- Give the Service Group a descriptive name (e.g. svcgrp-StoreFront-SSL).
- Change the Protocol to HTTP or SSL. If the protocol is SSL, ensure that the StoreFront Monitor has Secure checked.
- Scroll down, and click OK.

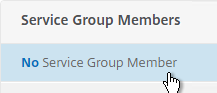
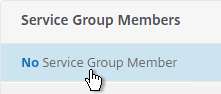
- Click where it says No Service Group Member.
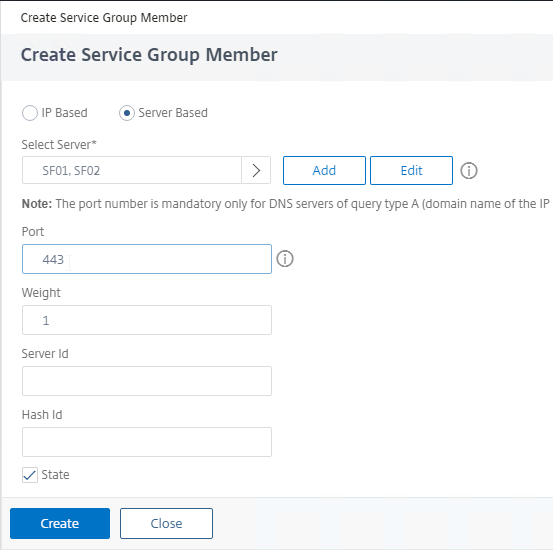
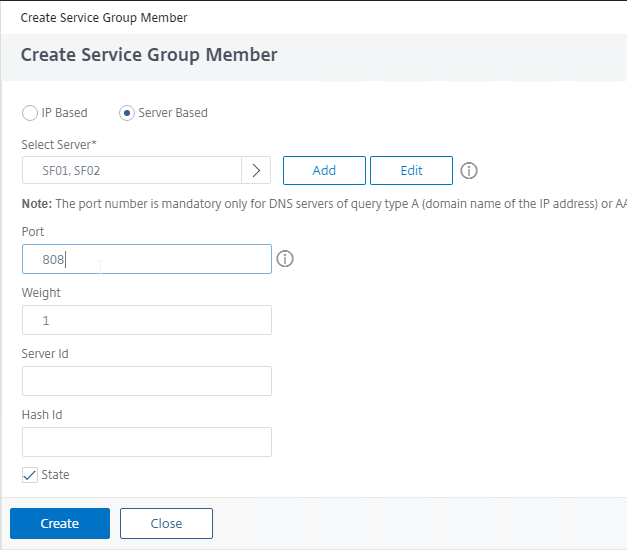
- If you previously created server objects, then change the selection to Server Based, and select the server objects.
- If you did not create server objects, then enter the IP address of a StoreFront Server.
- Enter 80 or 443 as the port. Then click Create.
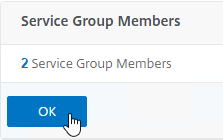
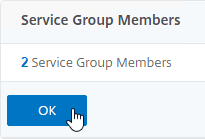
- In the Service Group Members section, click OK.
- If you previously created server objects, then change the selection to Server Based, and select the server objects.
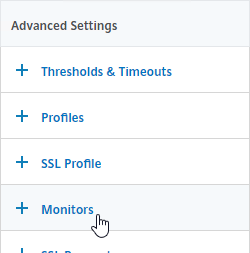
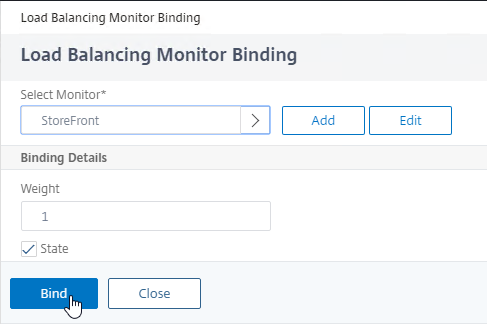
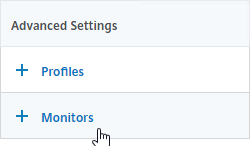
- On the right, under Advanced Settings, click Monitors.
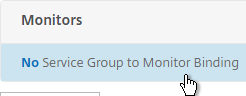
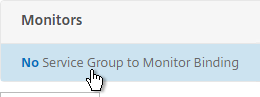
- On the left, scroll down to the Monitors section, and click where it says says No Service Group to Monitor Binding.
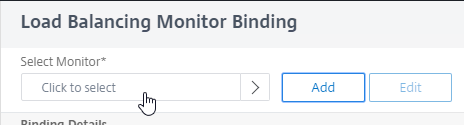
- In the Select Monitor field, click where it says Click to select.
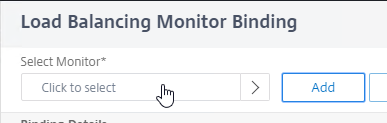
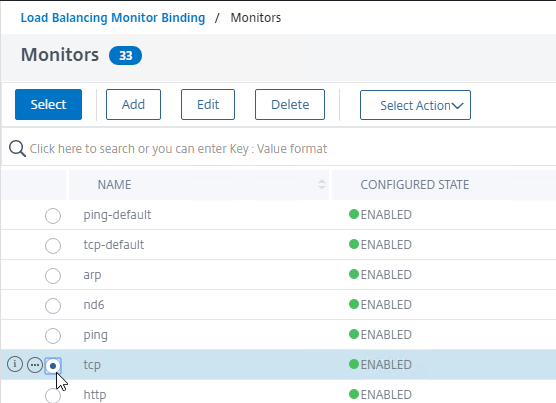
- Find your StoreFront monitor. It might be on Page 2.
- Click the circle next to your StoreFront monitor.
- You must click exactly in the circle (there’s no room for error). If you click outside the circle, then the monitor will open for editing instead of being selected. If you accidentally open a monitor, click Close to return to the selection screen.
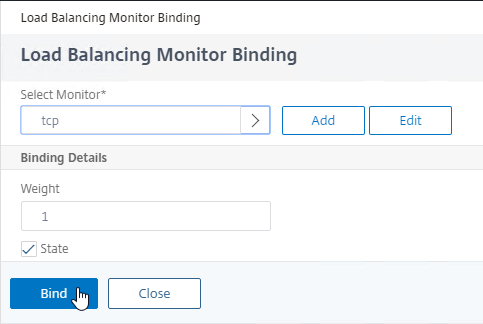
- After the monitor is selected, scroll to the top of the window and click the blue Select button.
- Then click Bind.
- In the Select Monitor field, click where it says Click to select.
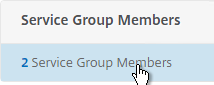
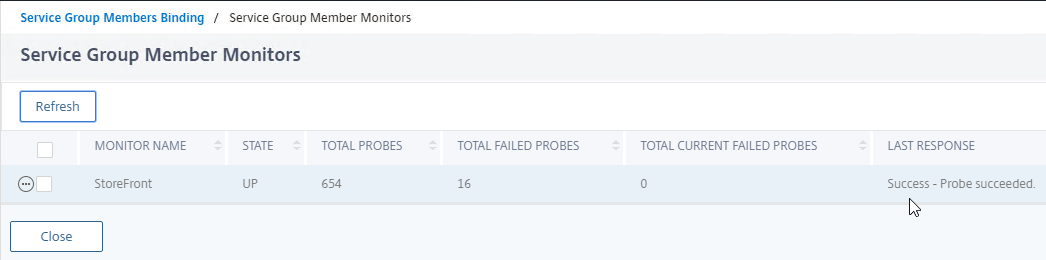
- To verify that the monitor is working, on the left, scroll up to the Service Group Members section, and click the Service Group Members line.
- Right-click a member, and click Monitor Details.
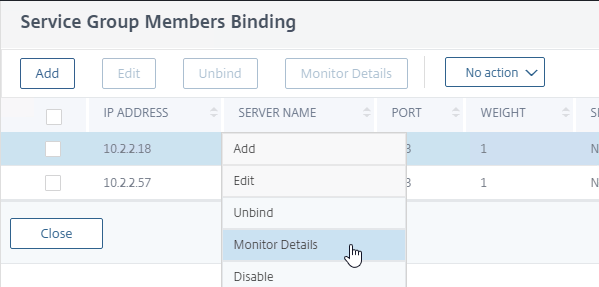
- The Last Response should be Success – Probe succeeded. Click Close twice. It’s too bad you can’t edit the monitor from here.
- Right-click a member, and click Monitor Details.
- On the left, if you see a Settings section, then click the pencil icon.
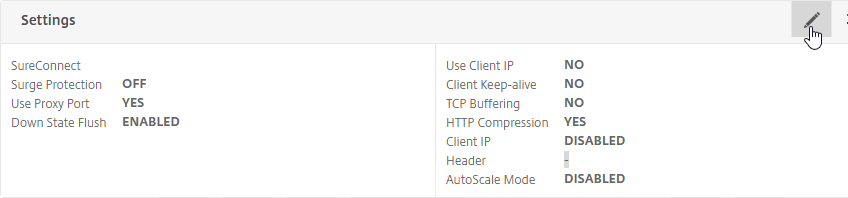
- If you don’t see the Settings section, then on the right, under Advanced Settings, click Settings.
- If you don’t see the Settings section, then on the right, under Advanced Settings, click Settings.
- On the left, in the Settings section, check the box for Client IP, and enter X-Forwarded-For as the Header.
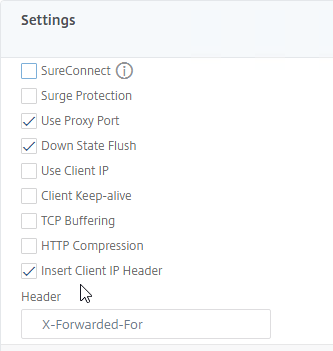
- Then click OK in the Settings section. Make sure you click OK or your change won’t be saved.

- Scroll down, and click Done to finish creating the Service Group.

add serviceGroup svcgrp-StoreFront-SSL SSL -maxClient 0 -maxReq 0 -cip ENABLED X-Forwarded-For

bind serviceGroup svcgrp-StoreFront-SSL SF01 443
bind serviceGroup svcgrp-StoreFront-SSL SF02 443
bind serviceGroup svcgrp-StoreFront-SSL -monitorName StoreFront
- If the Service Group is http, and if you don’t have certificates installed on your StoreFront servers (aka SSL Offload), then you’ll need to enable loopback in StoreFront.
- In StoreFront 3.5 and newer, you enable it in the GUI console.
- In StoreFront 3.0, run the following commands on the StoreFront 3.0 servers as detailed at Citrix Blog Post What’s New in StoreFront 3.0.
& "C:\Program Files\Citrix\Receiver StoreFront\Scripts\ImportModules.ps1"

Set-DSLoopback -SiteId 1 -VirtualPath /Citrix/StoreWeb -Loopback OnUsingHttp
Load Balancing Virtual Server
- Create or install a certificate that will be used by the StoreFront SSL Load Balancing Virtual Server. This certificate must match the DNS name for the load balanced StoreFront servers.
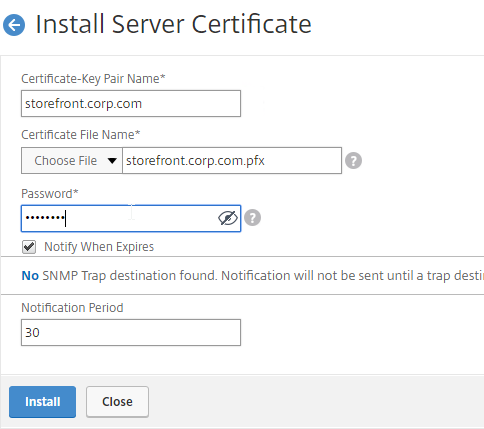
- For email discovery in Citrix Receiver, the certificate must match discoverReceiver.email.suffix for each email suffix, which can be accomplished by configuring Subject Alternative Names.
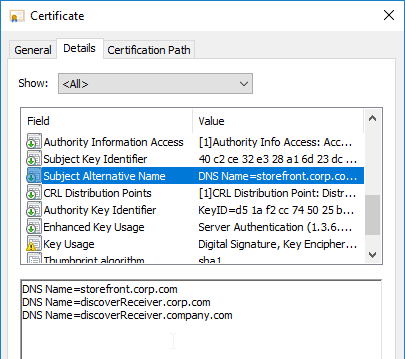
- For email discovery in Citrix Receiver, the certificate must match discoverReceiver.email.suffix for each email suffix, which can be accomplished by configuring Subject Alternative Names.
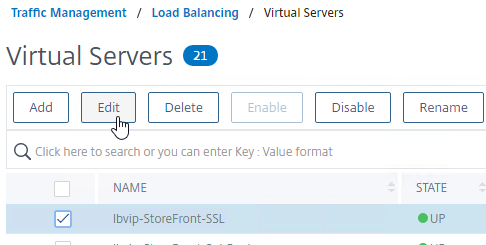
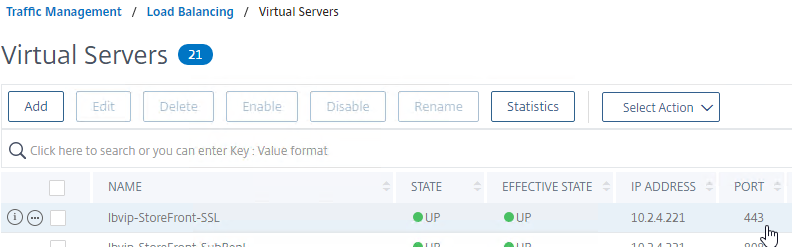
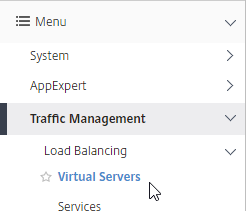
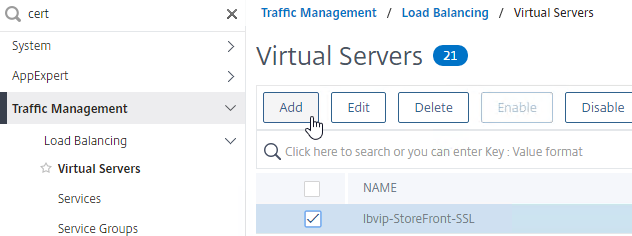
- On the left, under Traffic Management > Load Balancing, click Virtual Servers.
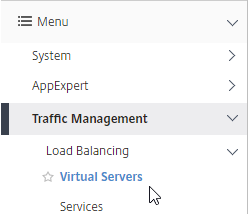
- On the right, click Add.

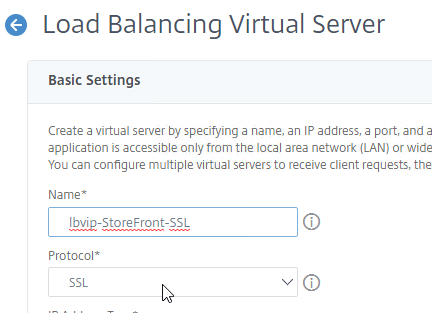
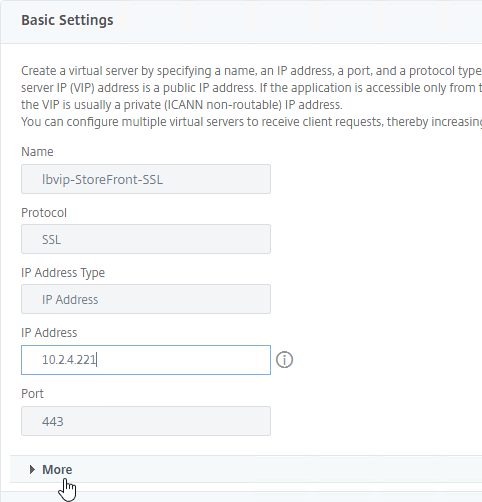
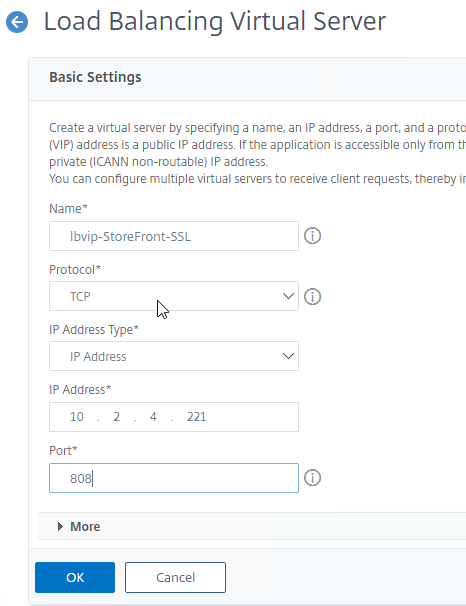
- Name it lbvip-StoreFront-SSL or similar.
- Change the Protocol to SSL.
- Specify a new internal VIP.
- Enter 443 as the Port.
- Click OK.
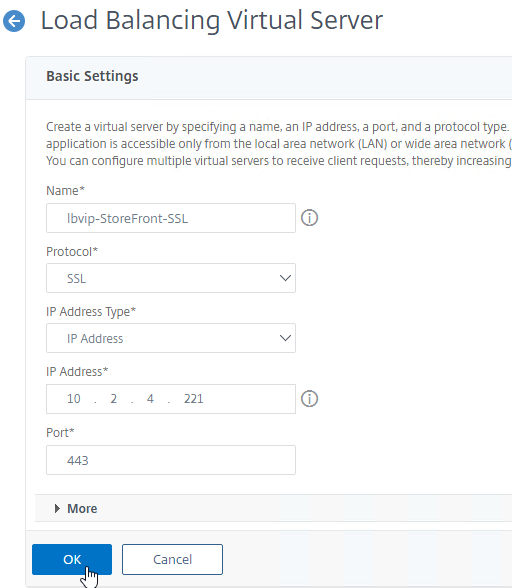
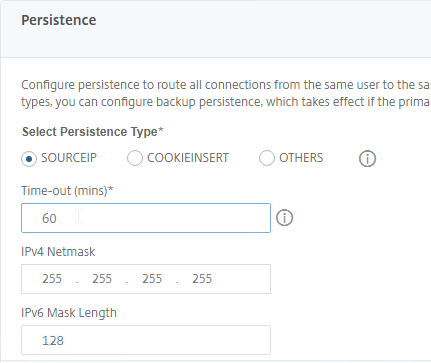
add lb vserver lbvip-StoreFront-SSL SSL 10.2.2.221 443 -persistenceType SOURCEIP -timeout 60
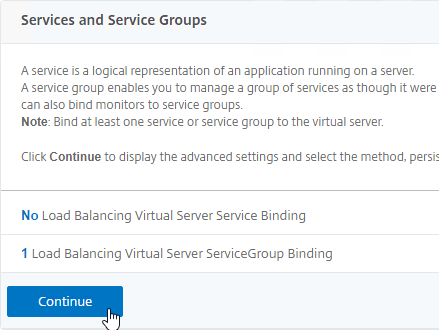
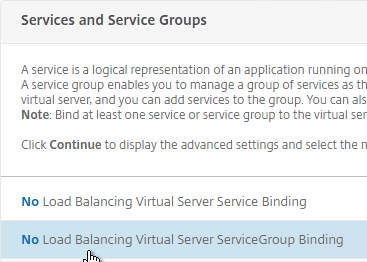
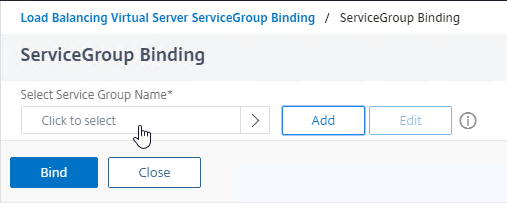
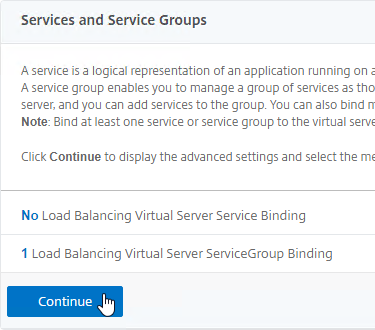
- On the left, in the Services and Service Groups section, click where it says No Load Balancing Virtual Server ServiceGroup Binding.
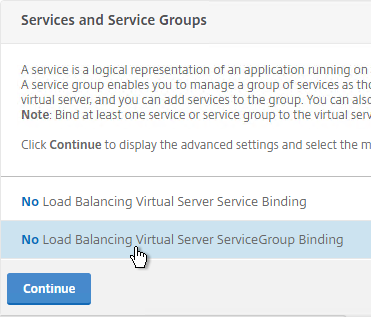
- Click where it says Click to select.
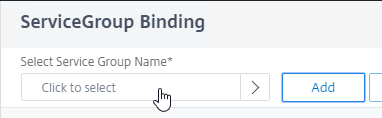
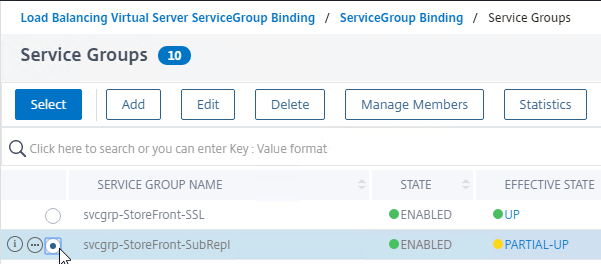
- Click the circle next to your StoreFront Service Group.
- You must click the circle exactly (no room for error). If you click outside the circle, then the Service Group will open for editing. If that happens, click the x on the top right, or click the Done button on the bottom, to return to the selection screen.
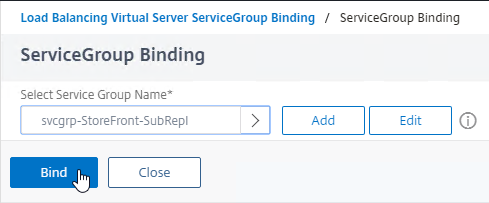
- At the top of the window, click the blue Select button.
- Click Bind.
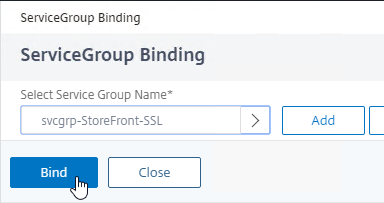
bind lb vserver lbvip-StoreFront-SSL svcgrp-StoreFront-SSL
- Click where it says Click to select.
- In the Services and Service Groups section, click Continue.
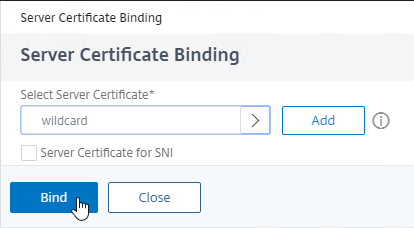
- Click where it says No Server Certificate.
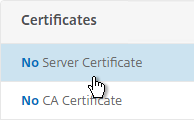
- Click where it says Click to select.
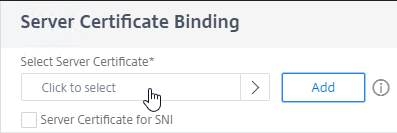
- Click the circle next to the certificate for this StoreFront Load Balancing Virtual Server.
- At the top of the window, click the blue Select button.

- Click Bind.
bind ssl vserver lbvip-StoreFront-SSL -certkeyName WildCorpCom
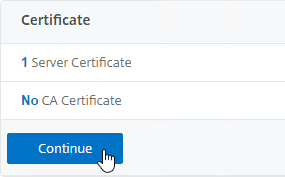
- Click where it says Click to select.
- In the Certificates section, click Continue.
- On the right, in the Advanced Settings column, click Persistence.
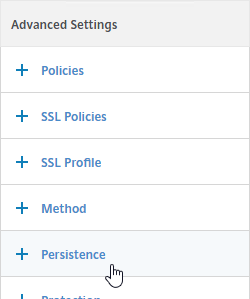
- On the left, in the Persistence section, select SOURCEIP.
Note: With SOURCEIP, all Citrix Gateway connections to StoreFront will go to the same StoreFront server because Gateway uses SNIP as the Source IP. COOKIEINSERT allows Citrix Gateway connections to be spread across multiple StoreFront servers but COOKIEINSERT might not work with Android clients.
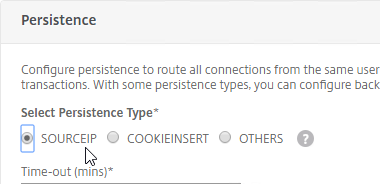
- Set the Persistence timeout to match the timeout of Receiver for Web.
- Click OK to close the Persistence section. If you don’t click OK then you will lose the change that you made.

- If the Citrix ADC communicates with the StoreFront servers using HTTP (aka SSL Offload, which means SSL 443 on the client-side, and HTTP 80 on the server-side):
- If the default SSL Profile is not enabled, then you’ll need to edit the SSL Parameters section on the vServer, and at the top right, check the box next to SSL Redirect. Otherwise the Receiver for Web page will never display.
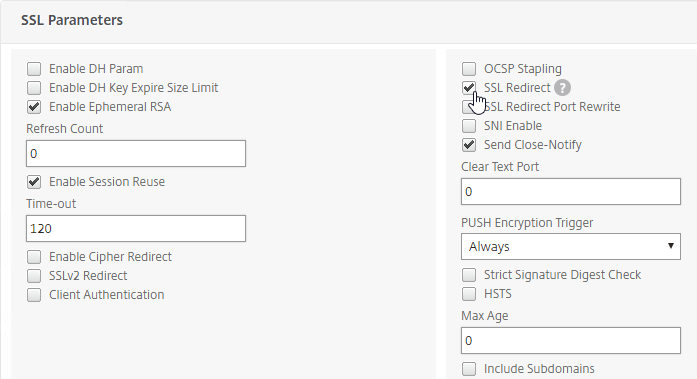
set ssl vserver lbvip-StoreFront-SSL -sslRedirect ENABLED -ssl3 DISABLED
- If you have enabled the Default SSL Profile, then you’ll either need to edit the Default SSL Profile to include the SSL Redirect option, or create a new custom SSL Profile with the SSL Redirect option enabled, and then bind the custom SSL Profile to this vServer.
- If the default SSL Profile is not enabled, then you’ll need to edit the SSL Parameters section on the vServer, and at the top right, check the box next to SSL Redirect. Otherwise the Receiver for Web page will never display.
- If you haven’t enabled the Default SSL Profile, then perform other normal SSL configuration including: disable SSLv3, disable TLS v1.0, disable TLS v1.1,, bind an A+ Cipher Group, and enable Strict Transport Security.
bind ssl vserver lbvip-StoreFront-SSL -certkeyName MyCert

set ssl vserver lbvip-StoreFront-SSL -ssl3 DISABLED -tls1 DISABLED -tls11 DISABLED -tls12 ENABLED

unbind ssl vserver lbvip-StoreFront-SSL -cipherName ALL

bind ssl vserver lbvip-StoreFront-SSL -cipherName custom-ssl-labs

bind ssl vserver lbvip-StoreFront-SSL -eccCurveName ALL

bind lb vserver lbvip-StoreFront-SSL -policyName insert_STS_header -priority 100 -gotoPriorityExpression END -type RESPONSE
When connecting to StoreFront through load balancing, if you want to put the server name on the StoreFront webpage so you can identify the server, see Nicolas Ignoto Display server name with Citrix StoreFront 3.

SSL Redirect – SSL Load Balancing vServer Method
Users must enter https:// when navigating to the StoreFront website. To make it easier for the users, enable SSL Redirection.
This procedure details the SSL Load Balancing vServer method of performing an SSL redirect. An alternative is to use the Responder method.
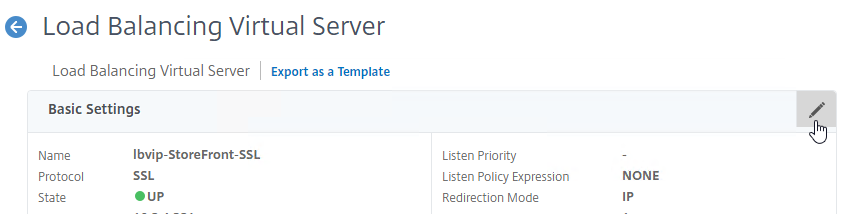
- On the left, under Traffic Management > Load Balancing, click Virtual Servers.
- On the right, find the SSL Virtual Server you’ve already created, right-click it, and click Edit.
- In the Basic Settings section, click the pencil icon.
- Click the More link.
- In the Redirect from Port field, enter 80.
- In the HTTPS Redirect URL field, enter your StoreFront Load Balancing URL (e.g. https://storefront.corp.com).
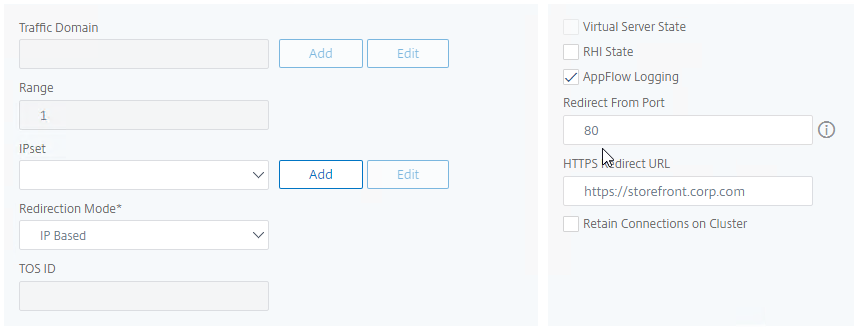
- Scroll down, and click Continue twice.

set lb vserver lbvip-StoreFront-SSL -redirectFromPort 80 -httpsRedirectUrl https://storefront.corp.com
- Note: this method does not show you that the Virtual Server is listening on both port 80 and 443. If you look in the Virtual Servers list, you only see port 443, when actually it’s also listening on port 80.
StoreFront Base URL
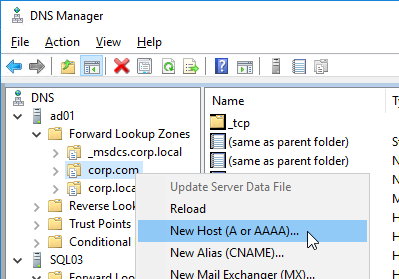
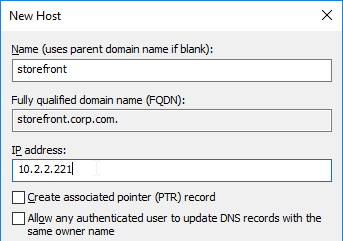
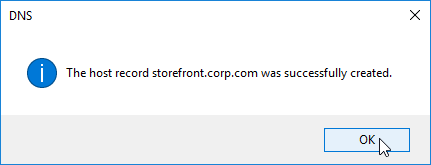
- Create a DNS Host record that resolves to the new StoreFront Load Balancing VIP.
- The DNS name for StoreFront load balancing must be different than the DNS name for Citrix Gateway. Unless you are following the Single FQDN procedure.
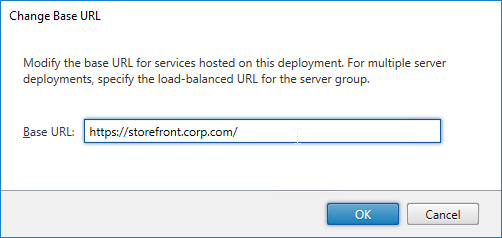
- In the Citrix StoreFront console, right-click Server Group, and click Change Base URL.
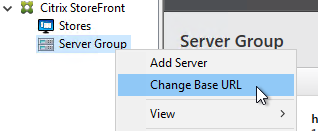
- Enter the new Base URL in https://storefront.corp.com format. This URL must match the certificate that is installed on the load balancer. Click OK.
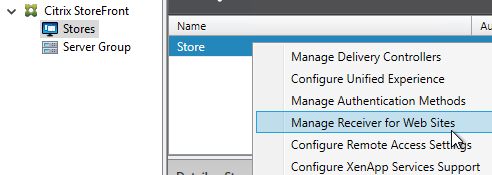
- Right-click your store, and click Manage Receiver for Web Sites.
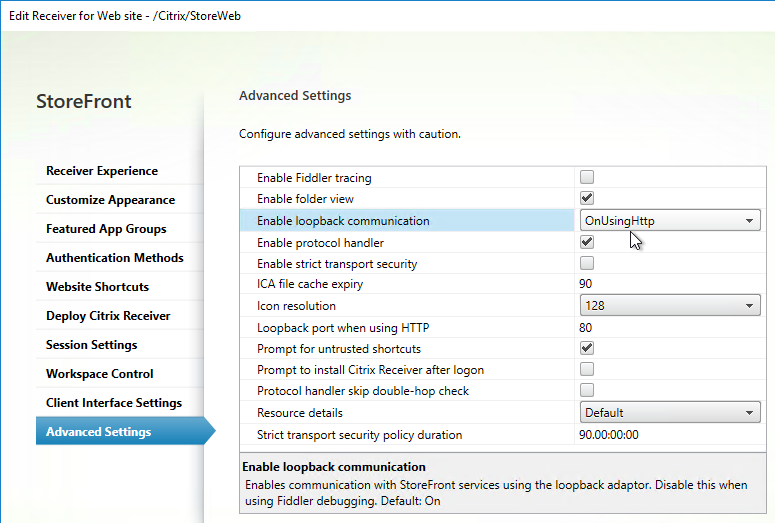
- Click Configure.
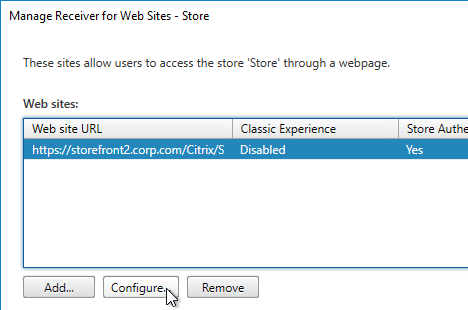
- On the Advanced Settings page, in the third row, change Enable loopback communication to OnUsingHttp. This tells StoreFront to not use the load balancer for inter-server communication.
Subscription Replication Load Balancing
If you have multiple StoreFront Server Groups (usually in separate datacenters), you might want to replicate subscriptions (favorites) between them. StoreFront subscription replication uses TCP port 808. To provide High Availability for this port number, load balance TCP port 808 on the StoreFront servers. See Configure subscription synchronization at Citrix Docs for more information.
- On the left, expand Traffic Management, expand Load Balancing, and click Service Groups.
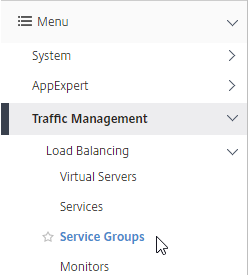
- On the right, right-click your existing StoreFront service group, and click Add.
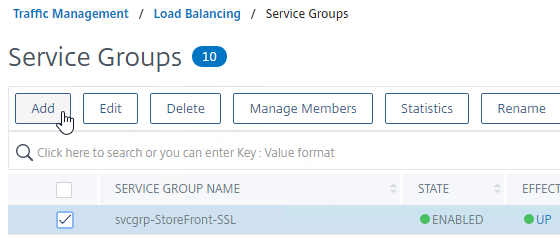
- Change the Service Group name to indicate that it’s for Favorites (aka Subscriptions) Replication on TCP port 808.
- Change the Protocol to TCP.
- Scroll down, and click OK.

- In the Service Group Members section, click where it says No Service Group Member.
- Change the selection to Server Based, and select the StoreFront servers.
- Enter 808 as the port. Then click Create.
- Click OK to close the Service Group Members section.
- On the right, under Advanced Settings, click Monitors.
- On the left, scroll down, and in the Monitors section, click where it says No Service Group to Monitor Binding.
- Click where it says Click to select.
- Click the circle next to the tcp monitor.
- You must click the circle exactly (no room for error). If you click outside the circle, then the monitor will open for editing. If this happens, click the Close button to return to the selection screen.
- At the top of the window, click the blue Select button.
- Click Bind.
- Click Done to close the Service Group.

add serviceGroup svcgrp-StoreFront-FavRepl TCP
bind serviceGroup svcgrp-StoreFront-FavRepl SF01 808
bind serviceGroup svcgrp-StoreFront-FavRepl SF02 808
- On the left, under Traffic Management > Load Balancing, click Virtual Servers.
- On the right, right-click the existing StoreFront Load Balancing vServer, and click Add.
- Change the name to indicate that this Virtual Server is for Favorites (aka Subscriptions) replication.
- Change the Protocol to TCP.
- Specify the same VIP that you used for SSL Load Balancing of StoreFront.
- Enter 808 as the Port.
- Click OK.
- In the Services and Service Groups section, click where it says No Load Balancing Virtual Server ServiceGroup Binding.
- Click where it says Click to select.
- Click the circle next to your StoreFront Subscription Replication Service Group.
- You must click the circle exactly (no room for error). If you click outside the circle, then the Service Group will open for editing. If this happens, click the x on the top right, or click the Done button on the bottom, to return to the selection screen.
- After selecting the Service Group, at the top of the window, click the blue Select button.
- Click Bind.
- In the Services and Service Groups section, click Continue to close the section.
- Scroll down, and click Done to close the Virtual Server. There’s no need for persistence or redirects.

add lb vserver lbvip-StoreFront-FavRepl TCP 10.2.2.201 808 -persistenceType NONE

bind lb vserver lbvip-StoreFront-FavRepl svcgrp-SF-FavRepl
CLI Commands
Here is a list of Citrix ADC CLI commands for StoreFront Load Balancing:
# SSL Global Parameters
# ---------------------
set ssl parameter -denySSLReneg NONSECURE

# SSL Cipher Group
# ----------------
add ssl cipher custom-ssllabs-cipher
bind ssl cipher custom-ssllabs-cipher -cipherName TLS1.2-ECDHE-RSA-AES256-GCM-SHA384 -cipherPriority 1
bind ssl cipher custom-ssllabs-cipher -cipherName TLS1.2-ECDHE-RSA-AES128-GCM-SHA256 -cipherPriority 2
bind ssl cipher custom-ssllabs-cipher -cipherName TLS1.2-ECDHE-RSA-AES-256-SHA384 -cipherPriority 3
bind ssl cipher custom-ssllabs-cipher -cipherName TLS1.2-ECDHE-RSA-AES-128-SHA256 -cipherPriority 4
bind ssl cipher custom-ssllabs-cipher -cipherName TLS1-ECDHE-RSA-AES256-SHA -cipherPriority 5
bind ssl cipher custom-ssllabs-cipher -cipherName TLS1-ECDHE-RSA-AES128-SHA -cipherPriority 6
bind ssl cipher custom-ssllabs-cipher -cipherName TLS1.2-DHE-RSA-AES256-GCM-SHA384 -cipherPriority 7
bind ssl cipher custom-ssllabs-cipher -cipherName TLS1.2-DHE-RSA-AES128-GCM-SHA256 -cipherPriority 8
bind ssl cipher custom-ssllabs-cipher -cipherName TLS1-DHE-RSA-AES-256-CBC-SHA -cipherPriority 9
bind ssl cipher custom-ssllabs-cipher -cipherName TLS1-DHE-RSA-AES-128-CBC-SHA -cipherPriority 10
bind ssl cipher custom-ssllabs-cipher -cipherName TLS1-AES-256-CBC-SHA -cipherPriority 11
bind ssl cipher custom-ssllabs-cipher -cipherName TLS1-AES-128-CBC-SHA -cipherPriority 12


# Cert
# -----
add ssl certKey WildcardCorpCom -cert WildcardCorpCom.pfx -key WildcardCorpCom.pfx -inform PFX -passcrypt "Passw0rd"

# Load Balancing Global Parameters
# --------------------------------
enable ns mode FR L3 Edge USNIP PMTUD ULFD
set ns param -cookieversion 1 -timezone
set ns tcpParam -WS ENABLED -SACK ENABLED
set ns httpParam -dropInvalReqs ON

# Servers
# -------
add server SF01 10.2.2.17
add server SF02 10.2.2.18

# Service Groups
# --------------
add serviceGroup svcgrp-StoreFront-SSL SSL -maxClient 0 -maxReq 0 -cip ENABLED X-Forwarded-For -usip NO -useproxyport YES -cltTimeout 180 -svrTimeout 360 -CKA NO -TCPB NO -CMP NO
bind serviceGroup svcgrp-StoreFront-SSL SF01 443
bind serviceGroup svcgrp-StoreFront-SSL SF02 443
bind serviceGroup svcgrp-StoreFront-SSL -monitorName StoreFront
bind ssl serviceGroup svcgrp-StoreFront-SSL -eccCurveName P_256
bind ssl serviceGroup svcgrp-StoreFront-SSL -eccCurveName P_384
bind ssl serviceGroup svcgrp-StoreFront-SSL -eccCurveName P_224
bind ssl serviceGroup svcgrp-StoreFront-SSL -eccCurveName P_521

add serviceGroup svcgrp-StoreFront-SubRepl TCP -maxClient 0 -maxReq 0 -cip DISABLED -usip NO -useproxyport YES -cltTimeout 9000 -svrTimeout 9000 -CKA NO -TCPB NO -CMP NO
bind serviceGroup svcgrp-StoreFront-SubRepl SF01 808
bind serviceGroup svcgrp-StoreFront-SubRepl SF02 808
bind serviceGroup svcgrp-StoreFront-SubRepl -monitorName tcp


# Load Balancing Virtual Servers
# ------------------------------
add lb vserver lbvip-StoreFront-SSL SSL 10.2.5.221 443 -persistenceType SOURCEIP -timeout 60 -cltTimeout 180 -redirectFromPort 80 -httpsRedirectUrl "https://storefront5.corp.com"
bind lb vserver lbvip-StoreFront-SSL svcgrp-StoreFront-SSL

add lb vserver lbvip-StoreFront-SubRepl TCP 10.2.5.221 808 -persistenceType NONE -cltTimeout 9000
bind lb vserver lbvip-StoreFront-SubRepl svcgrp-StoreFront-SubRepl


# SSL Virtual Servers
# -------------------
set ssl vserver lbvip-StoreFront-SSL -ssl3 DISABLED -HSTS ENABLED -maxage 1576800000
unbind ssl vserver lbvip-StoreFront-SSL -cipherName ALL
bind ssl vserver lbvip-StoreFront-SSL -cipherName custom-ssllabs-cipher
bind ssl vserver lbvip-StoreFront-SSL -certkeyName WildcardCorpCom
bind ssl vserver lbvip-StoreFront-SSL -eccCurveName P_256
bind ssl vserver lbvip-StoreFront-SSL -eccCurveName P_384
bind ssl vserver lbvip-StoreFront-SSL -eccCurveName P_224
bind ssl vserver lbvip-StoreFront-SSL -eccCurveName P_521
Migrated from Netscaler to AWS ALB.
We’re now having issues with SSO Domain Pass-through. Everything works ok except that you can randomly get the Welcome XX for another person and see their favorites / apps. Any ideas what could be wrong?
Storefront in 1912 CU4, ALB using Load balancer generated cookie.
When we use Storefront URL directly we don’t have this issue, only through the LB URL.
Hi Carl – as ever as great write up…
We are facing an odd issue. we utilise a custom storecustomization_launch.dll to allow the passign of parameter to a app launch using a URL generated in a 3rd party app… What we see is that it work fine about 80% of the time but in the other 20% of occasions we see it launches with a set of previous parameters.
we use SF load balancing and we can see that the parameters get stored within the SF cookie, added as NSC_TASS by netscaler.
what we think is happening is that sometimes the netscaler loadbalancer is failing to update the cookie.
Any thoughts on this and how we might ensure that the cookie is always updated?
If the user deletes the cookie between every launch then the issue does not happen, but they launch the app a lot – often in quick succession. 🙁
Thanks
on further investigastion – it seems the nsc-tass entry in the cookie never gets updated after the initial session connection – and yet subsequesnt launches seem to be right about 80% of the time. so I am no longer convinced the fact that the cookie is not updated is causing our issue, but then it leaves the question on how come if we delete the cookie between sessions the issue does not happen!… all very confusing :/
bypassed NS direct to SF and issue also not happening, so must be related to NS LB in some way…. 🙁
Just an update here – after working with Citrix on the case, the issue does not actually lie with the load balancer for SF but with the session cookie. what we have seen is that the authentication to netscaler strips off any parameters from the URL and stores them into the session cookie under NSC_TASS. A responder policy is required to then re-add the parameters post authentication.
The session cookie is only properly deleted if the session timeout is instigated by storefront not netscaler.
Where we were going wrong is that the netscaler authentication timeout was less than the storefront timeout. therefore the when the netscaler timeout occurred the session cookie remained and subsequent launch saw the responder policy triggered on re-authnetication and replace the desired parameters with those originally stored in the session cookie…
Therefore – NS auth timeout must be longer than SF timeout.!
As and aside it was also discovered that the NS session timeout set in the session policy is ignored and the global setting is used – this is thought to be an error on the current release of netscaler.
I am receiving an error from my storefront server “The server name a****1.nlets.org cannot be resolved. The specified Secure Ticket Authority could not be contacted and has been temporarily removed from the list of active services.” The issue is that the domain is supposed to be nlets.internal instead it is trying to resolve the nlets.org. I have our 2 STA IPs in the config that both resolve to nlets.internal. Netscaler config seems correct, any advice?
In StoreFront console, on the top right click Manage Citrix Gateways. Edit them. On the STA page, what are the URLs?
Thank you we fixed that issue. We now have a new issue. Another error inside the director on the controller shows this “The client did not connect to the VDA after the VDA was prepared for session launch. The session was successfully brokered, but a time-out occurred while waiting for the client to connect to the VDA.”
That usually means there’s a firewall between the NetScaler SNIP and the VDA. Or the NetScaler Gateway denied the connection because of STA not matching.
We found the firewall denies prohibiting the connection. Thank you so much for the guidance. Have a great weekend.
What does aaad.debug show you?
Hello,
Just a basic question as I’m a novice on this tech.
You can configure load balancing for both Storefronts and DDC’s on the same netscaler?
Also, why load balance the DDC’s in the Netscaler when you can configure load balancing for the Storefronts and on Storefront servers you have anyway configured the 2 DDC’s in case of one going down?
Thank you.
A NetScaler can have multiple load balancing VIPs.
I usually don’t load balance DDCs. Advocates of load balancing DDCs say that NetScaler does a better job of monitoring DDC availability.
Thank you for the explanations!
What could be the problem if the virtual server is down, but the Health shows up?
Certificate is not bound to the vServer?
“enable feature SSL”
solves your problem
Hello Carl,
Dell WYSE clinets are getting two logins.
They are internal and uses GSLB in WYSE configuration. The published application on the two Gateway vservers are distinct storefront lb vservers.
2nd login seems to go to SF. Does beacon settings play a role here ?
Probably. If the Internal Beacon is reachable, then the client will bypass the Gateway and go directly to StoreFront, which has its own authentication.
Hi~Carl
I had two storeFront server and set Netscaler NLB.I had a problem that when i shutdown one StoreFront server.The original user login this server will shows “can not complete your request” close browser or private mode the same situation.The new user can login fine.seems the new user NLB to another StoreFront server fine.but existing users had been login the shutdown server will show the message.About 3 minutes latter the user can login normally.Is anything got wrong setting.My StoreFront 1912 cu1.I also test same message with cu3,cu4.Can help this?
Thank you.
What monitor did you attach to the service group? What is the interval for the monitor?
What if I want to stand up a parallel environment with the same base URL (to cutover to later)? I’m talking new StoreFront servers, DDCs, License Server, separate gateway, different VDAs, separate database instance, the whole nine yards. But I don’t want users to be impacted. How can I separate this? I have hosts file entries in all the new servers, but what about on the gateway? If both base URLs are “https://baseurl.contoso.com” but the stores are different, would it be split out in netscaler gateway’s session profile? I’m trying but it doesn’t seem to be working.
The session action can contain IP address instead of DNS name.
I create a new monitor and the Type select STOREFRONT.all setting using default value.Interval 5 second,Response Time-out 2 second.In Service Group to Monitor Binding,set bind the monitor i created.
I create a new monitor and Type select STOREFRONT.all setting using default value.Interval 5 second,Response Time-out 2 second.In Service Group to Monitor Binding,set bind the monitor i created.
Try changing the persistence on the StoreFront lbvip to SOURCEIP. I’m sure Carl will tell me that I’m wrong here lol because he’s a genius 😉
Hi~Paul,
As uper article step.In the Persistence section, select SOURCEIP.I had already set this.not working…..
Any issue if in a pool I have a SF with telemetry service and another without?
Hi Carl it’s not clear for me.
You said : On the Advanced Settings page, in the third row, change Enable loopback communication to OnUsingHttp. This tells StoreFront to not use the load balancer for inter-server communication.
And : The local Default Web Site must have a certificate that matches the Base URL. If not, then you should change Loopback to OnUsingHttp so it uses port 80 (on 127.0.0.1) and no certificate requirement.
Citrix said : Use only when the load balancer is SSL terminating. Communication between the load balancer and StoreFront servers is with HTTP. You can explicitly configure the HTTP port using the -loopbackPortUsingHttp attribute.
And :
On – This is the default value for new Receiver for Web sites. Receiver for Web uses the schema (HTTPS or HTTP) and port number from the base URL but replace the host part with the loopback IP address to communicate with StoreFront Services. This works for a single server deployment and a deployments with a non SSL-terminating load balancer.
OnUsingHttp – Receiver for Web uses HTTP and the loopback IP address to communicate with StoreFront Services. If you are using an SSL-terminating load balancer, you should select this value. You have to also specify the HTTP port if it is not the default port 80.
I use an SSL terminating LB (netscaler) with a certificate that matches the base URL on each storefront, so which option On or OnUsingHttp?
Security is very important for me.
Thanks
Try On. If it works, then leave it. If it doesn’t work, then change it to OnUsingHttp. If it doesn’t work, then you can look in Event Viewer to see the issue. You’ll see the problem immediately when logging into Receiver for Web.
Thanks, I’ve opened a case.
My second storefront has some bugs (/home/configuration -> incorrect character XML). Fresh install and joined to the pool. (1909)
Hello Carl. We can configure SSL end to end and onUsingHttp activated? (Certificate with VIP fqdn and storefront fqdn)
Receiver for Web communicates with the Base URL. Without loopback, the Base URL resolves to the load balancing VIP. With loopback, the Base URL resolves to 127.0.0.1. The Base URL is normally https so by default loopback tries to connect to https://127.0.0.1, but usually the certificate on the StoreFront server doesn’t match that name. OnUsingHttp avoids that problem by changing the loopback URL to http://127.0.0.1. The only requirement is that IIS still has the http:80 listener.
currently we have ssl end to end with a certificate on netscaler load balancing. This certificate was linked in https on each storefront. The SANs of the certificate correspond only to the address of the load balancing (no fqdn names of the servers). And the OnUsingHttp has been enabled. (port 80 well linked on each storefront)
Hi Carl, thanks for your awesome work!
I have a question regarding loopback communication, that you instruct ‘set to OnUsingHTTP’.
If you’ve got SSL-Off-loading with end-to-end encryption configured as described here
https://docs.citrix.com/en-us/citrix-adc/current-release/ssl/how-to-articles/end-to-end-encrypt.html
(essentailly, services and VIP are 443 and with a valid cert)
does that count as having non-ssl terminating Load Balancer?
I’m concerned because their doco regarding OnUsingHTTP says ‘Use only when the load balancer is SSL terminating.’ but it’s not clear on the scenario where you re-encrypt for the backend.
Without any loopback, Receiver for Web tries to connect to the Base URL, which resolves to the Load Balancing VIP.
With loopback, when Receiver for Web connects to the Base URL, it instead resolves to 127.0.0.1, which is the local machine. The local Default Web Site must have a certificate that matches the Base URL. If not, then you should change Loopback to OnUsingHttp so it uses port 80 (on 127.0.0.1) and no certificate requirement.
Hi Carl,
I’ve followed all of your documentation to the letter. I have an internal StoreFront VIP and a gateway set up on the ADC. Everything appears to be fine, except when I try to log in using my domain credentials, I immediately get sent back to the login screen. There is no error stating my credentials are invalid, and when I run cat aaad.debug, it shows a healthy LDAP bind while logging in. It seeks out my username from AD and everything APPEARS to be good. Support was not too helpful. Do you have any suggestions? I’m on a deadline XD. I know LDAPS is functioning because I am able to log into the management interface with my credentials. The abovementioned cat aaad.debug was run while attempting to authenticate to the StoreFront gateway hosted on the ADC. I’m desperate for assistance, and the forums don’t seem to have what I’m looking for.
Is the second logon a Gateway logon page or is it a StoreFront logon page. What do you see in StoreFront Server > Event Viewer > Applications and Services > Citrix Delivery Services? I’m assuming the Session Policy points to the correct StoreFront address?
Do you have other Gateways and other Session Policies that might be interfering? Is ICA Proxy set to ON in the Session Profile? Authorization = ALLOW?
So, it isn’t a second login, more like there’s some sort of loop, and it loops right back to the original login page. I do not see anything in the event log on the StoreFront server.
I have the two policies. One “Receiver for Web” and one “Receiver Self Service”
The storefront servers:
storefront1.contoso.com
storefront2.contoso.com
I have a DNS entry named storefront.contoso.com with both StoreFront server IP addresses behind it.
For the StoreFront VIP in the ADC, I have a certificate bound to that with storefront.contoso.com, and that load balancing virtual server is configured for SSL.
The gateway is supposed to be internal-only.
It is called citrix.contoso.com and the IP is 192.168.0.51.
I have a DNS entry for the the address that is associated with the gateway virtual server, and a valid certificate bound to it (with the correct subject alternative name).
Oh! Forgot to mention. I ICA is set to on, and I also do have ALLOW selected.
Return to logon can be for several reasons. If you have multiple gateways and are not persisting to the correct gateway. A Responder is doing a redirect. Session Policy or Authorization Policy doesn’t allow logon. Session Policy points to a StoreFront address that is not persistent.
Do you see anything in /var/log/ns.log?
You’re the man, Carl. Had a typo in my session policy. It’s difficult to notice when you have a capital i and a lowercase L right next to each other 🙂
Found it based on your recommendation to look at ns.log. Thank you SO MUCH!!
Hi Carl, For the VIP you use 10.2.4.221, but for DNS Host Record, you use 10.2.2.221.Is it ok?
Good afternoon, Karl.
If I specify StoreFront URL via Https: in Citrix Gateway Settings
then through the browser all Citrix Gatawey works fine, the work tables are launched. And if through citrix WorkSpace displays the message “failed to get your apps from storage”
Http works well everywhere.
what could be the problem?
Hey Carl, thanks for the wealth of knowledge you provide. Should Client Idle Timeout under traffic settings also be set to the same value as our persistence settings and storefront web timeout?
I usually don’t change that setting. If the TCP connection drops, the browser can easily create a new TCP connection. It’s persistence that matters.
“This is a Perl monitor, which uses the NSIP as the source IP.” Is this still valid for NetScaler 13.0.52? When I check my ldaps monitor I can see it is using nsldap.pl script for the monitor. But unter my storefront monitor I don’t even have the option to choose a script.
How do I know which monitors are using perl scripts and therefore NSIP as source?
Do a “show lb monitor MonitorName” from the CLI.
…Scriptname……..:”nssf.pl” …Dispatcher….: 127.0.0.1:3013…
Thank you. Good to know.
Hi Carl – this might be a silly simple question, but I am setting up a new 12.1 netscaler to replace an older one. storefronts are all still staying the same. In doing the load balancing, I’m paranoid about adding the two storefront servers and ‘enabling’ them, before going live with the new netscaler’s LB vsip (i plan on using the same vsip though, so as to not have to change a bunch of firewall rules).
If I ‘enable’ the two storefronts in the monitoring section, on the new netscaler, is that going to cause problems since they’re the same two IP addresses already being connected to and monitored on the old netscaler? Or should it not matter and this is safe to do?
You can have as many VIPs as you want connecting to the same servers. The new NetScaler will send probes. But otherwise the new NetScaler won’t be used unless somebody sends traffic to the new VIP. I typically modify my HOSTS file to test new VIPs.
Hi Carl,
What causes one of the members to be classified as down? I’m trying to simulate the server being up and the port reachable, but storefront not responding, I’ve shut down the following services but the member still reports up
• CitrixConfigurationReplication
• CitrixCredentialWallet
• CitrixDefaultDomainService
• Citrix Peer Resolution Service
• CitrixServiceMonitor
• CitrixSubscriptionsStore
• CitrixTelemetryService
We have had situations in the past and it’s caused issues where storefront wasn’t responding but the server was up and the port was open.
Is “Check Backend Services” enabled on the ADC monitor? https://docs.citrix.com/en-us/storefront/current-release/integrate-with-citrix-gateway-and-citrix-adc/load-balancing-with-citrix-gateway.html
Hi Carl,
Is it possible and is it a good idea to use the load balancer as the STA server on the VPN Virtual Server?
No. StoreFront chooses the STA server. Gateway needs to connect to the same STA server that StoreFront chose. Gateway does this by looking up the unique ID for each STA server.
Hey Carl,
thanks for your very good work in advance!
We set up an LB-VServer for Storefront as mentioned.
As soon as we configure our Thin-Clients for this LB the Netscaler-Cluster fails, please view my article here:
https://discussions.citrix.com/topic/406235-storefront-loadbalancer-ica-proxy-selfmade-ddos-igel-thin-client/
Any advice? Thanks in advance
Hi any way i could setup AAA on Load balancer?
Hi Carl
I need one clarification, can we configure Multiple URI to one store and configure the same in NSG?
Please give me some steps on this one.
Regards
HM
Hi carl,
I want to use NetScaler Gateway connect to NetScaler Load Balance, then connect to Virtual Desktop.
Which Integrate With Citrix Product should I select?
Unified Gateway?XenMobile? or XenApp and Desktop?
How to configure it?
Hi Carl,
I setup a netscaler vpx as load balance.
But,when I add a Service Group is failed.
a storefront is down
I monitor details of StoreFront,
the storefront —— Failure- Probe failed.
I add a ping monitor, it is ok. NetScaler to StoreFront network is ok.
I can use the storefront connection to desktop.
What should I do?
How is your StoreFront monitor configured? StoreFront monitor uses NSIP as the source IP so make sure routing is correct. Make sure “Check Backend Services” is not checked. For SSL, make sure “Secure” is checked.
It’s OK. Thanks!
I do have same problem with StoreFront 7 2203 (fresh deployment) and ADC 13.1.21.50 (freemium as Load balancer for LAN)
Probe fails for both StoreFront servers.
Does “tcp” monitor work?
The STOREFRONT monitor uses NSIP as source IP. Make sure you enter the Store name without “web” on the end.
Ouch… forgot the store name to set properly.
Thanks for reminding 🙂
cheers
Hi Carl,
Thank you for this wonderful article.
I have a situation where load balancer configured for Storefront servers with Source IP persistence and i notice that load on the services [3 SF servers] is not consistent.
Checked the persistence counters and could confirm the same that persistence hits are seen uneven on all 3 services which could be expected as the traffic to this load balancer will come via internal users and also via Gateway [where source will always be SNIP]
Considering the request coming via 2 ways [as mentioned above] to the load balancer vip. What would be the best persistence method to use on LBVIP [for storefront services] to make the load consistent to the LBVIP ?
Regads
Himanshu Aggarwal
Persistence always causes uneven load balancing.
If you don’t have any Android devices, then Cookie Insert persistence might work.
Hi Carl,
Thank you for your response.
If I use the Cookie-Insert persistence type then cookie set by the LB NetScaler will be sent to the client via NetScaler gateway – will there be any issues with it ?
Is there any other way to cater this situation ?
Regards
Himanshu
Hi Himanshu,
like Carl mentioned there is always an uneven load balancing when you use persistence. But there are some ways to keep it a little bit down (Timeouts, Load Balancing Method, Persistence Method).
Scenario:
Citrix ADC Gateway is located in the DMZ. Citrix Storefront Load Balancing Virtual Server is located in LAN. Clients can connect through ADC Gateway or directly to the Storefront Load Balancing Virtual Server.
Possible Solution:
Citrix ADC Gateway seems to create the X-Forwarded-For HTTP Header per default. I didn´t configure it but the Header exists. That will help to create a Persistence at the Storefront Load Balancing Virtual Server. Clients which connect directly to the Storefront Load Balancing Virtual Server don´t send a X-Forwarded-For HTTP Header, they will use the Persistence SOURCEIP.
Configuration GUI:
Select Persistence Type: OTHERS -> RULE
Time-out (mins): 60
Expression: HTTP.REQ.HEADER(“X-Forwarded-For”)
Backup Persistence: SOURCEIP
Backup Time-out (mins): 60
Configuration CLI:
set lb vserver -persistenceType RULE -timeout 60 -persistenceBackup SOURCEIP -backupPersistenceTimeout 60 -rule “HTTP.REQ.HEADER(\”X-Forwarded-For\”)”
The Persistence Table will show Peristence Types of RULE and SOURCEIP with the current Client SourceIPs.
This should work with all kind of clients as far as they connect to the Citrix ADC Gateway with their own IP Address. If there is a NAT between the Client and the ADC Gateway you need to set the X-Forwarded-For HTTP Header at the Device which does NAT or you need to evaluate if you can live with a few clients which cannot perfectly split to your Backend Services.
General Hint about X-Forwarded-For: If you want to use the X-Forwarded-For Header, you should set it at the first Device in your environment where the Client IP changes. If the Header already exists, you need to delete it first or overwrite it. If there is another Hop in your environment where the Client IP changes, you have to trust the Header if the Request was proxied via your first Device. Otherwise you need to delete it first (and set it) or overwrite it. With this you always have the latest trusted Client IP Address in your X-Forwarded-For HTTP Header.
Best regards,
Jens
Once again you saved me from incomplete documentation and misinformed support agents. Thank you. Please keep up the good work.
Hi Carl,
Our External Storefront Url was not working, we have had configured multifactor authentication for external users but it was not passing through Passcode although our base url is working fine so is our internal Url.
After verifying all our connections we just rebooted Storefront servers and it start working.
It so wired but the Change we have done was MS patches. So is that can be a reason for service failure or should drill down further. I Don’t see any suspected event log.
Regards,
Anupam
The Credential Wallet service was running?
Services were up and running
Hi!
I try to configure my storefront load balancing but monitor dont work.
Last Response “FAILURE.PROBE FAILED”
Netscaler 12.0 56.20
any idea?
Is a new configuration NS is empty only basic configuration
thanks
STOREFRONT monitor uses NSIP as Source IP. Can NSIP communicate with the StoreFront servers?
Does a generic TCP monitor work?
Hi!
Yes TCP monitor works , ping too but for example https says: “Failure- Http response code 404 received”
but…..Storefront servers are not in the same VLAN that NSIP but they can communicate without problem
I have:
Stf Vlan: 172.16.13.x
subet ip NS : 172.16.13.x
NSIP 172.16.10 x
Thanks
with HTTPS-EVC work for example
Maybe with NSIP not same vlan is not possible?
Do you have a route for NSIP to StoreFront server? If so, configure PBRs for NSIP. https://www.carlstalhood.com/netscaler-12-system-configuration/#dedicatedmgmt
tried but doesnt work…
Any problem if the configuration is done with HTTPS-EVC?
Hello Carl,
i need your help please
i followed your guide and i have some questions:
1) Is it need to change something else on netscaler side except what reffered to your guide? For example XenApp & XenDesktop profile storefront URL?
2) In which way Netscaler Gateway understand that is a virtual server configured for load balancing?
2) If i understand well after the Base URL change i must bind the Load Balanced URLs certificate (lets say wildcart ) on default web site on both Storefronts ?
Thank you in advance
Just point the Gateway Session Policy/Profile to the Load Balanced FQDN or Load Balanced VIP.
If your StoreFront servers are standalone (not installed on Delivery Controller), then yes. Otherwise, if installed on Delivery Controller, then the certificate should match the Delivery Controller name so you can enable HTTPS between StoreFront and the Delivery Controller.
Thank you very much about this recommendation
but before proceed with above step i must resolve the below, late me make you a small description of config
i have created the Load balanced vServer and everything is up ( here i used the same Wildcart Certificate as on Netscaler Gateway VIP)
i changed the base URL to resolve on Load Balanced DNS
i followed your above step about certificates on Storefront Servers ( SF+DDC on same server)
but when i browse the load balanced URL from Storefront Servers i receive certificate warnings (Mismatched Address – The certificate presented by this website was issued for different website)
and when i browse or trying connection internally from receiver from any other locations i receive “the site not exists”
Note: I use Azure ILB for the load balancing but i believe that as Monitor, Service and vServer are UP the problem not reside on this part of config
What do you thing?
I will appreciate very much your opinion on how to resolve this as i am in the middle of migration
There shouldn’t be any need to browse to the load balanced FQDN from the StoreFront server, especially if you set loopback processing to OnUsingHttp.
Browser works from different machine? Only Receiver doesn’t work? Is the StoreFront Console > Base URL an https:// URL?
Loopback processing is enabled to OnUsingHttp
Neither browser neither Receiver Works from any other machine except on two Storefront Servers
Yes the base URL is https
Any idea?
Hi Carl,
Just wondering if you have seen after upgrading to Netscaler 12, receiver cant authenticate (your apps are not available at this time). thinks the internal beacon is on the outside network and then after a few minutes decides it is on the internal network and then allows the user to log in. Resetting receiver allows it to work.
Laptops that move from internal to external? Are you doing Single FQDN? https://support.citrix.com/article/CTX214975
Hi Carl,
Just the internal network accessing through Citrix Receiver. In the receiver logs it shows as internal beacon is OUTSIDE and then after 2 minutes decides it is INSIDE.
I have just worked around it now by using another netscaler load balancer in another location on v10.5 with almost identical configuration for the storefront load balancer.
The issue just started occurring after a netscaler upgrade to v12
Hi
If SSL protocol is used for LB instead SSL-Bridge, it means Ns will have to handle SSL processing. Can we use SSL Bridge instead?
StoreFront requires insertion of X-Forwarded-For. NetScaler can’t do that if it’s not unencrypting the traffic.
Hi Carl,
I followed your guide to setup load balancing on NetScaler 12 for two StoreFront servers. After done all the steps, the effective state of StoreFront monitor is showing DOWN. For further troubleshooting, I added other monitors.
Ping – Success – ICMP echo reply received.
http – Failure – TCP connection successfull, but application timed out.
https – Failure – HTTP response code 302 received.
StoreFront – Failure – Probe failed.
So if I only keep Ping monitor, the load balancing does work. Also I can successfully connect to each StoreFront server by their DNS or IP. Thank you in advance for your help.
StoreFront monitor uses NSIP as the source IP, not the SNIP.
You can do an HTTP probe to /Citrix/Store/discovery. Or add 302 as a valid response.
Hi Carl, thank you for your reply. To be honest, I am pretty new to the NetScaler. By any chance, could you explain further about your previous reply? In our case, 10.1.52.50 is NSIP, 10.1.52.51 is SNIP and 10.1.52.91 is load balancing vip for storefront, but I am still very confused about where to correct my settings. Please advise. Thank you very much.
Hi, I had a similar issue, that took hours to diagnose.
My Store Name was “Citrix StoreFront” but the actual store name doesn’t include spaces.
The best way to find your store name is to try to login to citrix, then you will see the store name in the URL.
ie: https://gateway.domain.com.au/Citrix/CitrixStoreFrontWeb/
the store name here is: “CitrixStoreFront”
Very frustrating.
Another possibility that I just ran into with NS 10.5 – the way the StoreFront monitor works has changed with newer versions of NS and SF. So in 10.5 an older StoreFront implementation was working fine, monitor probes succeeded. But newer storefront servers were failing the monitor probe. I had a dev NS running 12.1 and it worked fine straight away with the new SF servers. There is also reference to the change (though not too much detail) in CTX207988. So what I did was copy the /netscaler/monitors/nssf.pl from 12.1 as “custom_nssf.pl” on 10.5. It works just fine. I couldnt figure out how to pick the custom script from the gui, but the following command-line works:
set lb monitor Custom-storefront STOREFRONT -scriptName custom_nssf.pl -dispatcherIP 127.0.0.1 -dispatcherPort 3013 -LRTM ENABLED -deviation 0 -interval 5 -resptimeout 2 -downTime 30 -secure YES -storename Store
Note: I think the requirements on newer versions of StoreFront support as far back as NS 10.5, so the above may not work on 10.1
Hi, for anyone else that might be getting a “Failure – Probe failed” if your storefront has an SSL Certificate, see Citrix article https://support.citrix.com/article/CTX200467
Regards
Ken Z
Hi Carl
I have implemented your setup for load balancing but I get a “Unable to launch your application…..Cannot connect to the Citrix XenApp server. There is no xenApp configured on the specified address.” when launching the Xendesktop session. Where did i go wrong?
Is NetScaler Gateway or HDX Optimal Routing configured on the StoreFront server?
Save the ICA file and look for Address or SSLProxyHost. If Address, your client machine access it on TCP 2598 and 1494?
Netscaler gateway is configured on the storefront. I’ve saved the ICA file and it shows an address. Client machine has ports open as it works on our older citrix environment. I followed the setup for single FQDN. I have created an internal DNS to resolve to my VIP on the netscaler load balance virtual server.
The SSLProxHost should point to an FQDN that resolves to a NetScaler Gateway VIP, not a Load Balancing VIP.
My ICA file doesn’t appear to have SSLProxyHost mentioned anywhere.
Address= points to a private IP of a VDA. Controller tells the VDA to prepare for a session, which opens port 2598 on the private IP. Maybe do a wireshark trace to see if there’s traffic between the client and the VDA.
Just double checking, when i implement the store front load balancing, do i still need the netscaler gateway xendesktop setup i.e. use the wizard to set up initial connection to store front?
Only for external access. Those are two different features.
If i explain what I’m trying to achieve, hopefully you can guide me to the right path. I am setting up a netscaler so that mainly external users can access our xendesktop load balanced across two store fronts. I had assumed this article is meant for external users. I hope you can guide me to the correct method to use to achieve this. Thanks.
StoreFront load balancing is for internal users, or for connections between NetScaler Gateway and StoreFront.
See https://www.carlstalhood.com/netscaler-menu/netscaler-12/, specificially:
* LDAP Authentication
* ICA Proxy
* StoreFront Configuration for NetScaler Gateway
Hi Carl,
I have 3 StoreFront servers on 7.12 that are load balanced using a Stingray appliance. Can these be rebooted one at a time during production without dropping any user connections to XenApp or XenDesktop users?
ICA connections don’t go through StoreFront. ICA goes directly from Receiver to VDA, or is proxied by NetScaler Gateway. Rebooting StoreFront would only reset a user’s web session in RfWeb.
NetScaler load Balancing URL is loading very slow while using backend Storefront server as “Next Generation Experience” in UI Experience
But the same NetScaler load Balancing URL is working fine while using backend Storefront server as “Unified Experience ” in UI Experience
Could you please check and advise