Navigation
This page contains generic SSL instructions for all SSL-based Virtual Servers, including: Load Balancing, Citrix Gateway, Content Switching, and AAA.
- Change Log
- Preparation:
- Custom Cipher Group
- Strict Transport Security Rewrite Policy
- SSL Profiles – Default and Custom
- SSL vServer Configuration – Bind Cert, Ciphers, ECC, and enable HSTS
- SSL Test
- SSL Redirect Methods:
💡 = Recently Updated
Change Log
- 2024 April 26 – added link to NetScaler Docs Migrate the SSL configuration to the enhanced SSL profile.
- 2023 Mar 21 – added link to CTX489547 Active TLS1.1 and Weak Ciphers Causing environment Vulnerabilities
- 2020 July 28 – SSL Profile – ADC 13.0 build 61 supports Extended Master Secret (EMS)
- ADC 13 screenshots
Custom Cipher Group
References:
- Citrix Blog Post Scoring an A+ at SSLlabs.com with Citrix NetScaler – Q2 2018 update
- CTX489547 Active TLS1.1 and Weak Ciphers Causing environment Vulnerabilities
- Ciphers available on the Citrix ADC appliances at Citrix Docs
- Ryan Butler has a PowerShell script at Github that can automate NetScaler SSL configuration to get an A+
To get an A+ at SSL Labs, create a custom secure cipher group:
- Enable SSL Secure Renegotiation:
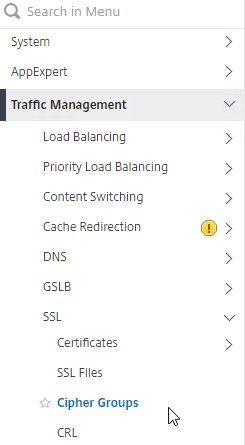
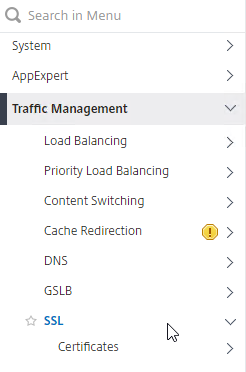
- In the left menu, expand Traffic Management, and then click SSL.
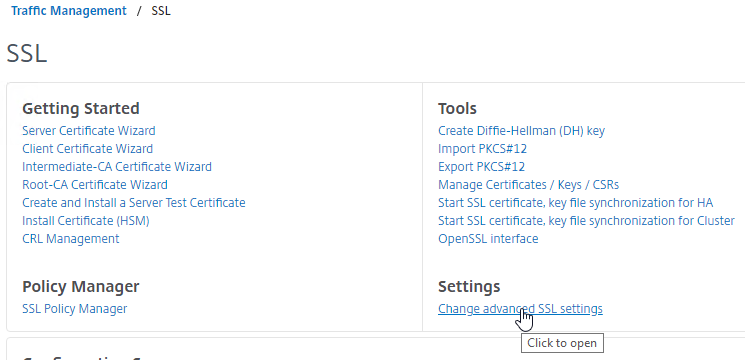
- On the right, in the right column, click Change advanced SSL settings.

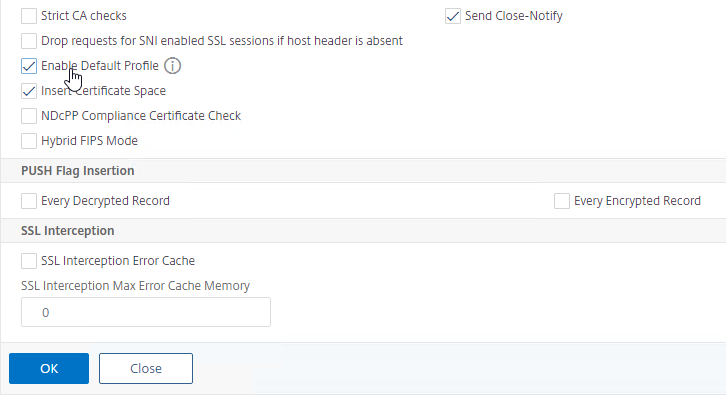
- Find Deny SSL Renegotiation, and set the drop-down to NONSECURE.
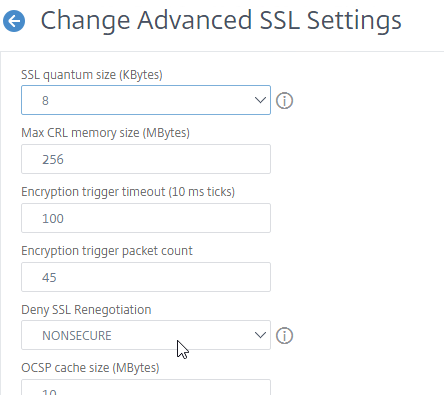
- Scroll down and click OK.

set ssl parameter -denySSLReneg NONSECURE
- The easiest way to create a cipher group is from the CLI. See Citrix Blogs Scoring an A+ at SSLlabs.com with Citrix NetScaler – Q2 2018 update for cipher group CLI commands. Putty (SSH) to the Citrix ADC and paste the following commands.
Note: The TLS 1.3 ciphers are not in the Citrix Blog Post. You can add TLS 1.3 ciphers to the cipher group. Make sure the TLS 1.3 ciphers are listed first (top of the list).
add ssl cipher ssllabs-smw-q2-2018
bind ssl cipher ssllabs-smw-q2-2018 -cipherName TLS1.3-AES256-GCM-SHA384 -cipherPriority 1
bind ssl cipher ssllabs-smw-q2-2018 -cipherName TLS1.3-CHACHA20-POLY1305-SHA256 -cipherPriority 2
bind ssl cipher ssllabs-smw-q2-2018 -cipherName TLS1.3-AES128-GCM-SHA256 -cipherPriority 3
bind ssl cipher ssllabs-smw-q2-2018 -cipherName TLS1.2-ECDHE-ECDSA-AES128-GCM-SHA256
bind ssl cipher ssllabs-smw-q2-2018 -cipherName TLS1.2-ECDHE-ECDSA-AES256-GCM-SHA384
bind ssl cipher ssllabs-smw-q2-2018 -cipherName TLS1.2-ECDHE-ECDSA-AES128-SHA256
bind ssl cipher ssllabs-smw-q2-2018 -cipherName TLS1.2-ECDHE-ECDSA-AES256-SHA384
bind ssl cipher ssllabs-smw-q2-2018 -cipherName TLS1-ECDHE-ECDSA-AES128-SHA
bind ssl cipher ssllabs-smw-q2-2018 -cipherName TLS1-ECDHE-ECDSA-AES256-SHA
bind ssl cipher ssllabs-smw-q2-2018 -cipherName TLS1.2-ECDHE-RSA-AES128-GCM-SHA256
bind ssl cipher ssllabs-smw-q2-2018 -cipherName TLS1.2-ECDHE-RSA-AES256-GCM-SHA384
bind ssl cipher ssllabs-smw-q2-2018 -cipherName TLS1.2-ECDHE-RSA-AES-128-SHA256
bind ssl cipher ssllabs-smw-q2-2018 -cipherName TLS1.2-ECDHE-RSA-AES-256-SHA384
bind ssl cipher ssllabs-smw-q2-2018 -cipherName TLS1-ECDHE-RSA-AES128-SHA
bind ssl cipher ssllabs-smw-q2-2018 -cipherName TLS1-ECDHE-RSA-AES256-SHA
bind ssl cipher ssllabs-smw-q2-2018 -cipherName TLS1.2-DHE-RSA-AES128-GCM-SHA256
bind ssl cipher ssllabs-smw-q2-2018 -cipherName TLS1.2-DHE-RSA-AES256-GCM-SHA384
bind ssl cipher ssllabs-smw-q2-2018 -cipherName TLS1-DHE-RSA-AES-128-CBC-SHA
bind ssl cipher ssllabs-smw-q2-2018 -cipherName TLS1-DHE-RSA-AES-256-CBC-SHA
bind ssl cipher ssllabs-smw-q2-2018 -cipherName TLS1-AES-128-CBC-SHA
bind ssl cipher ssllabs-smw-q2-2018 -cipherName TLS1-AES-256-CBC-SHA
- Or you can create the cipher group using the GUI.
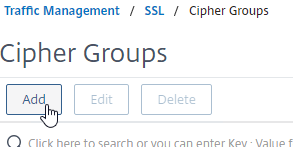
- Go to Traffic Management > SSL > Cipher Groups.
- On the right, click Add.
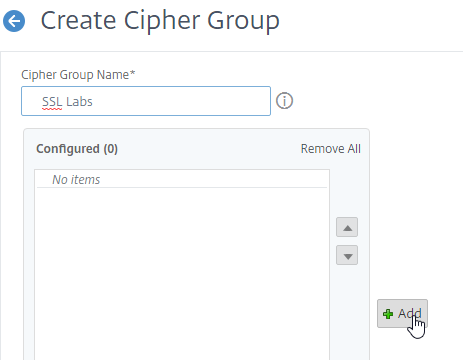
- Name it SSL Labs or similar.
- In the middle, click the button named Add.
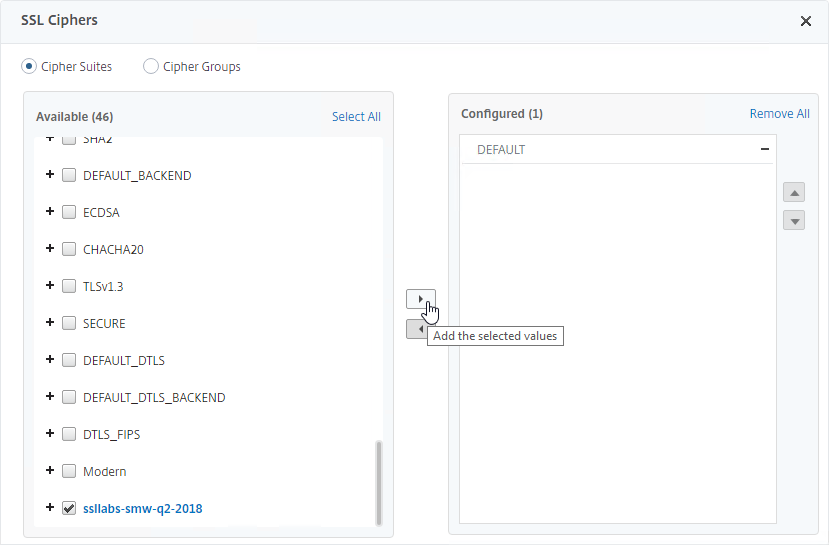
- Use the search box to find a particular cipher.
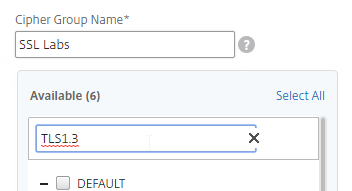
- Check the box next to one of the results, and click the arrow to move it to the right.
- For TLS 1.3 support, add the TLS 1.3 ciphers first.
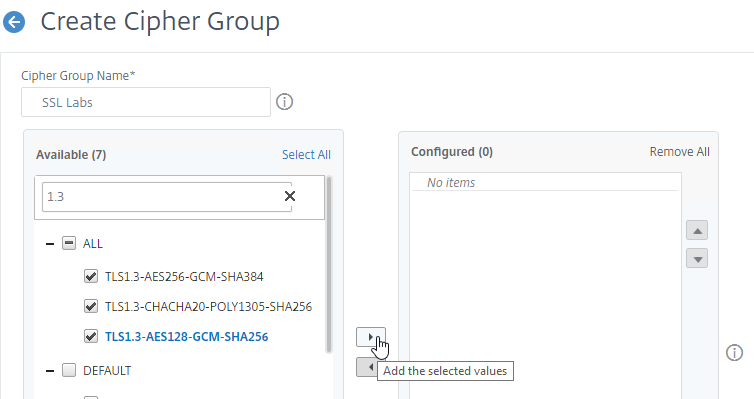
- Then add the ciphers from Citrix Blog Post Scoring an A+ at SSLlabs.com with Citrix NetScaler – Q2 2018 update.
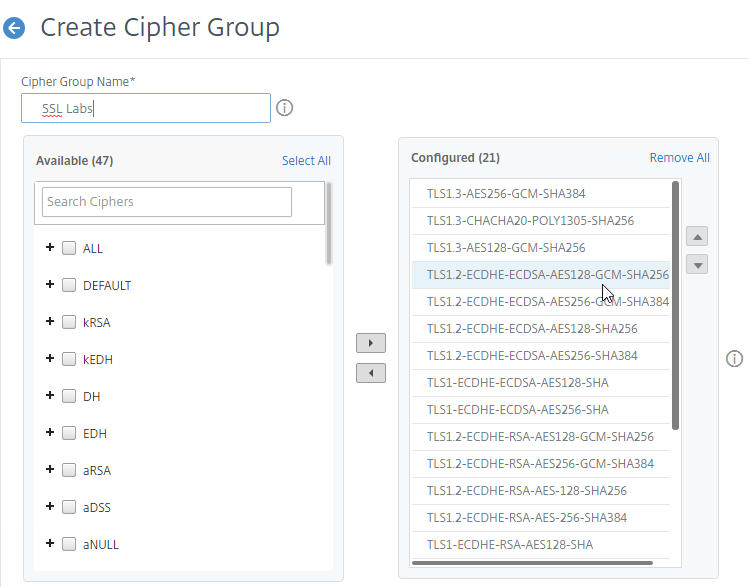
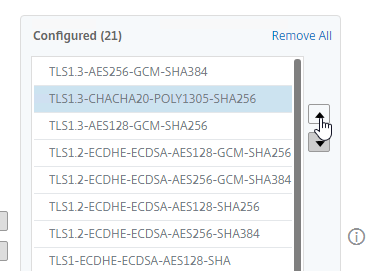
- Use the up and down arrows to order the ciphers. Citrix ADC prefers the ciphers on top of the list, so the ciphers at the top of the list should be the most secure ciphers (TLS 1.3).
- Click Create when done.

- Go to Traffic Management > SSL > Cipher Groups.
Strict Transport Security – Rewrite Policy Method
To get an A+ at SSLLabs.com, you need to insert the Strict-Transport-Security HTTP header in the responses. Citrix ADC Rewrite Policy is one method of doing this. Another method is to enable HSTS in an SSL Profile, or enable it in SSL Parameters on a SSL vServer.
To create a Rewrite Policy that inserts the Strict-Transport-Security HTTP header:
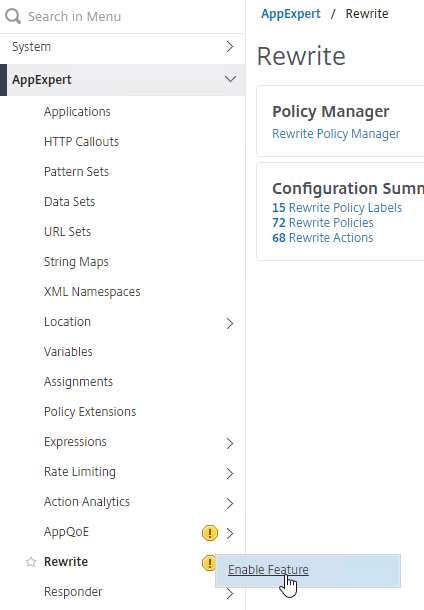
- In the left menu, expand AppExpert, right-click Rewrite, and click Enable Feature.
- Create the Rewrite Action:
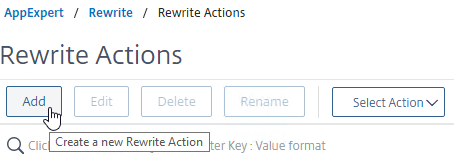
- Go to AppExpert > Rewrite > Actions.

- On the right, click Add.
- Name the action insert_STS_header or similar.
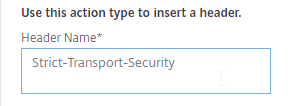
- The Type should be INSERT_HTTP_HEADER.

- In the Header Name field, enter Strict-Transport-Security.
- In the Expression field, enter the following:
"max-age=157680000"

- Click Create.

- Go to AppExpert > Rewrite > Actions.
- Create the Rewrite Policy:
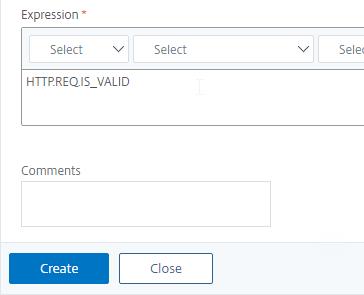
- On the left, go to AppExpert > Rewrite > Policies.
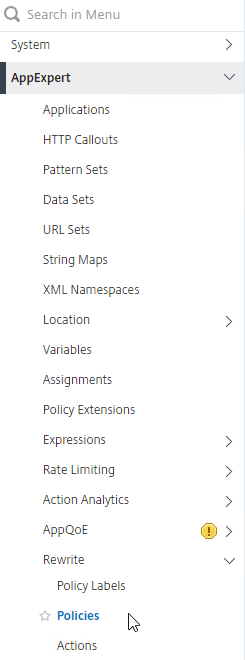
- On the right, click Add.
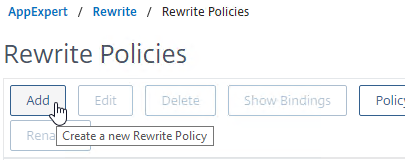
- Name it insert_STS_header or similar.
- Select the previously created Action.

- In the Expression box, enter HTTP.REQ.IS_VALID.
- Click Create.
- On the left, go to AppExpert > Rewrite > Policies.
- Now you can bind this Rewrite Response policy to SSL-based SSL vServers.
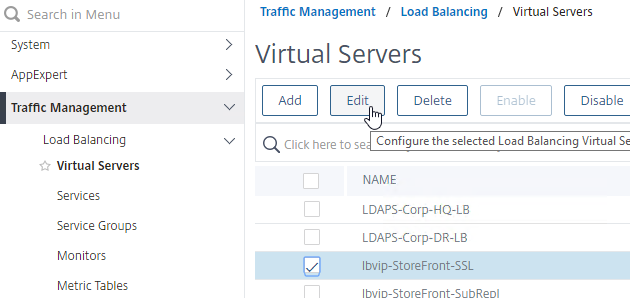
- Edit an SSL vServer (Gateway vServer, Load Balancing vServer, etc.).
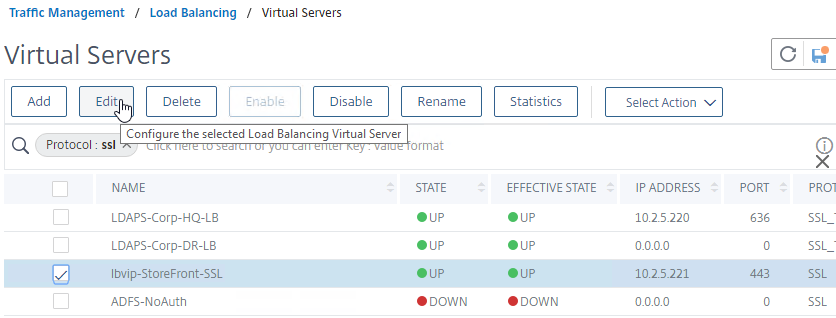
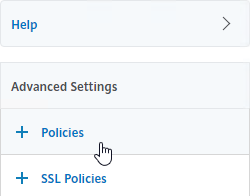
- if the Policies section doesn’t exist on the left, then add it from the Advanced Settings column on the right.
- On the left, in the Policies section, click the plus icon.

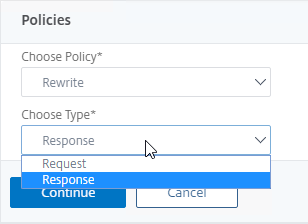
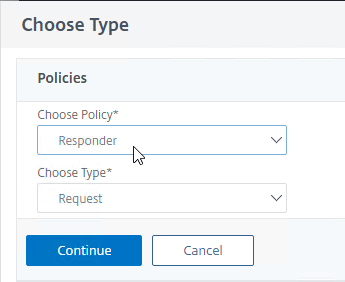
- Change the Choose Policy drop-down to Rewrite.
- Change the Choose Type drop-down to Response, and click Continue.
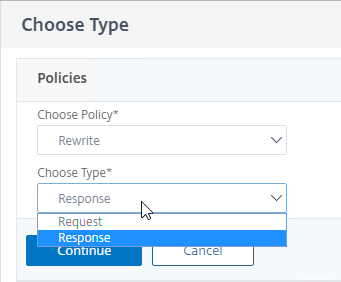
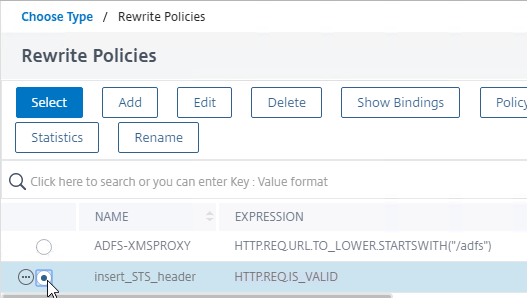
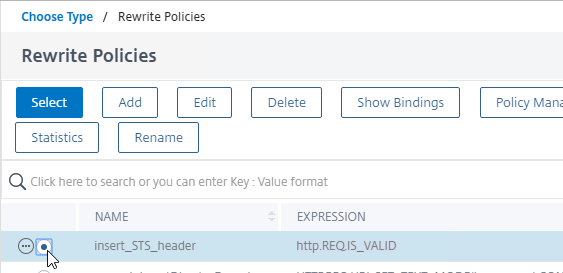
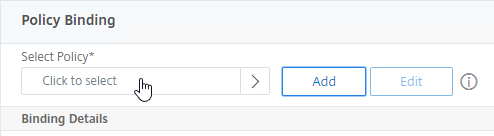
- In the Select Policy field, click where it says Click to select.
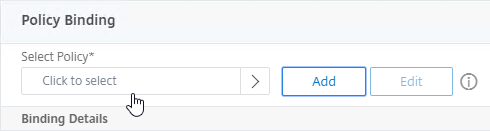
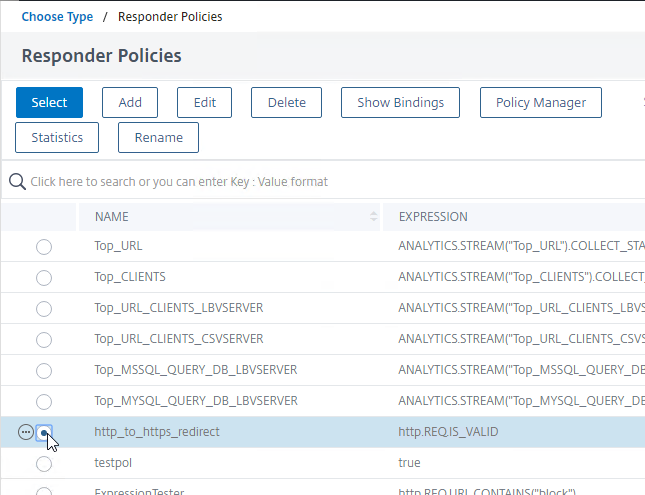
- Click the small circle next to insert_STS_header, and then click the blue Select button at the top of the page.
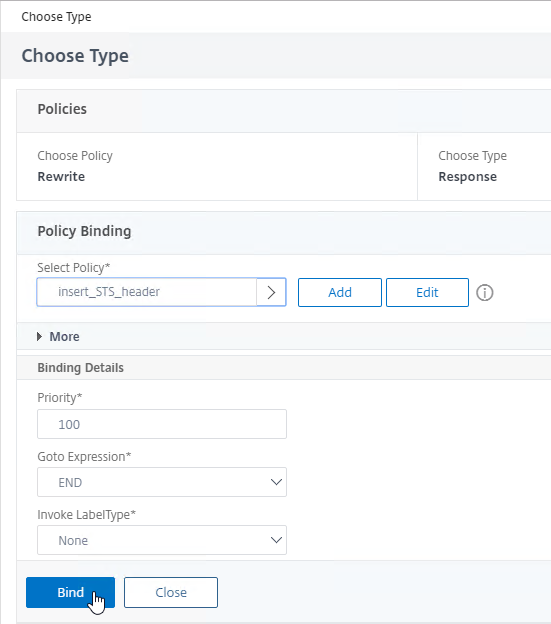
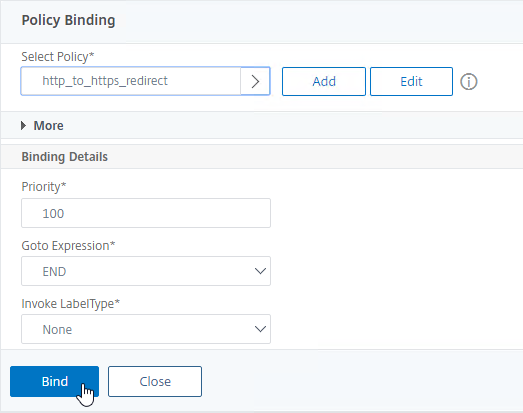
- Click Bind.

- Edit an SSL vServer (Gateway vServer, Load Balancing vServer, etc.).
enable ns feature rewrite

add rewrite action insert_STS_header insert_http_header Strict-Transport-Security "\"max-age=157680000\""

add rewrite policy insert_STS_header true insert_STS_header

bind lb vserver MyvServer -policyName insert_STS_header -priority 100 -gotoPriorityExpression END -type RESPONSE
SSL Profiles – Default and Custom
You can use SSL Profiles to package several SSL settings together and apply the settings package (Profile) to SSL-based Virtual Servers and SSL-based Services. These SSL settings include:
- Disable SSLv3, TLSv1, TLSv11
- Bind secure ciphers
- Bind ECC curves
- Enable Extended Master Secret (EMS)
- Enable HSTS (Strict Transport Security), etc.
There are default SSL Profiles, and there are custom SSL Profiles. The default SSL Profiles are disabled by default because they would impact every SSL-based Virtual Server and Service on the appliance. Once default SSL Profiles are enabled, you cannot disable the default SSL Profiles.
- Some features of custom SSL Profiles require default SSL Profiles to be enabled. For example, you cannot configure ciphers in a custom SSL Profile unless the default SSL Profiles are enabled.
Default SSL Profiles are intended to provide a baseline SSL configuration for all newly created SSL Virtual Servers and SSL Services. You can still create Custom SSL Profiles to override the Default SSL Profiles.
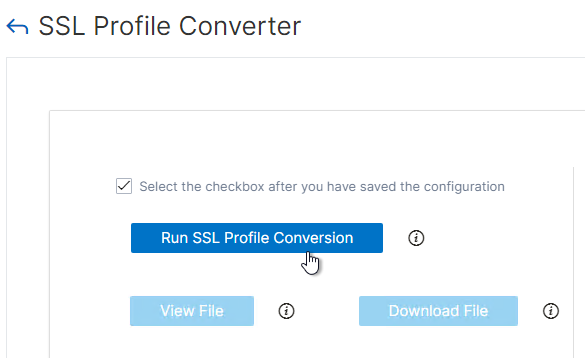
Enabling the default SSL profile will wipe out any SSL configuration on SSL entities (e.g. SSL Virtual Servers) that do not have a custom SSL profile bound. Citrix offers a script that can read your existing SSL entity SSL configuration and convert them to custom SSL Profiles. See Enabling the Default Profiles at Citrix Docs. The default_profile_script can be downloaded from Github. The commands output by the script won’t work until the default SSL Profile is enabled.

- NetScaler 14.1 build 21 and newer include the SSL Profile Converter in the GUI. More details at NetScaler Docs Migrate the SSL configuration to the enhanced SSL profile.

To enable Default SSL profiles
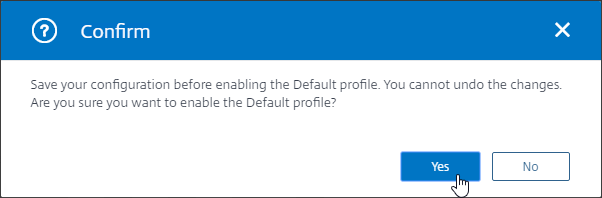
Enabling Default SSL Profiles is irreversible.
- Make sure you are connected to the appliance NSIP using http, and not https.
- In the left menu, go to Traffic Management > SSL.
- On the right, in the right column, click Change advanced SSL settings.
- Near the bottom, check the box next to Enable Default Profile. Note: this will change SSL settings on all SSL Virtual Servers to match the default SSL profile. You might want to do this during a maintenance window.
- Click OK at the bottom of the page.
- Click Yes to confirm that you are enabling the Default profile.
- If you go back into Change Advanced SSL Settings, notice that the Default Profile is enabled, and there’s no way to disable it.
Edit Default SSL Profile with Recommended SSL Profile Settings
The Default SSL Profile applies to all newly created SSL vServers and all newly created SSL Services.
The Default SSL Profile also applies to the management GUI unless you change the SSL Profile assigned to the management Internal Services.
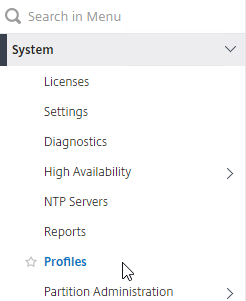
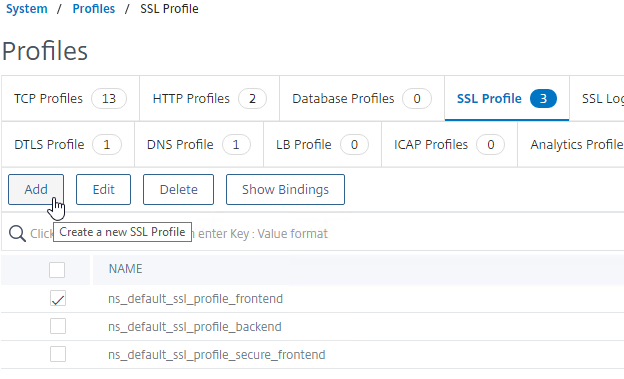
- In the left menu, expand System, and click Profiles.
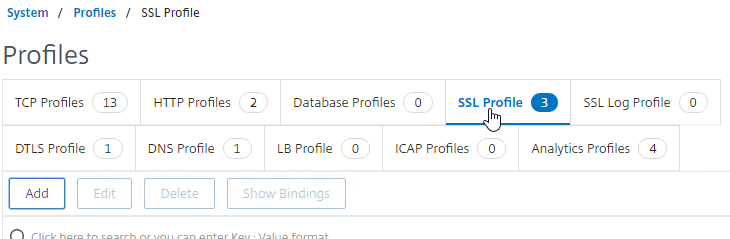
- On the right, switch to the SSL Profile tab.
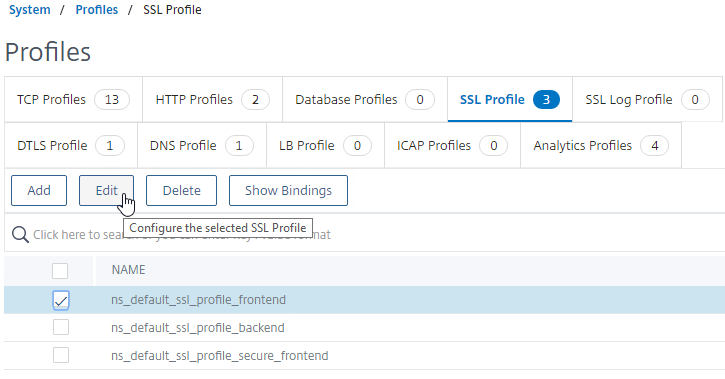
- Edit the default frontend or backend profile.
- Frontend = client-side connections to SSL Virtual Servers.
- Backend = server-side connections (SSL Services and Service Groups).
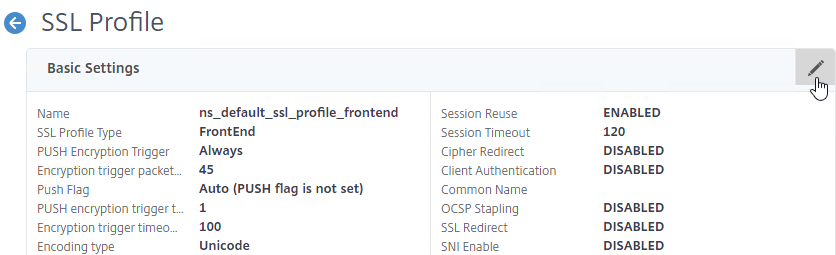
- ns_default_ssl_profile_frontend is automatically applied to all newly created SSL vServers.
- ns_default_ssl_profile_backend is automatically applied to all newly created SSL Services.
- This section focuses on FrontEnd profiles so edit ns_default_ssl_profile_frontend.
- Click the pencil icon in the Basic Settings section.
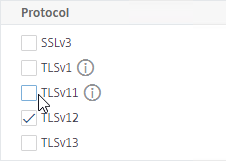
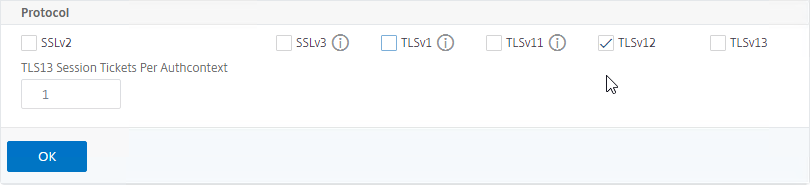
- Scroll all the way down to the Protocol section.
- Notice that SSLv3 is already unchecked.
- It’s recommended that you uncheck TLSv1 and TLSv11 in the Default FrontEnd SSL profile.
- If you have a website that requires TLSv1, then you can create another Custom FrontEnd SSL Profile that has TLSv1 enabled and manually bind the new Custom SSL Profile to the SSL vServers that need it.
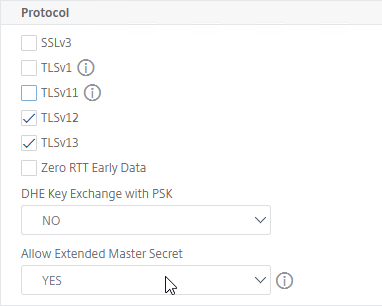
- TLSv13 is an option.
- You can either enable TLSv13 in this Default SSL Profile, or you can create new Custom SSL Profiles that have TLSv13 enabled.
- If you enable TLSv13, then make sure your cipher group includes TLS 1.3 ciphers.
- To log SSL Protocol usage, see NetScaler SSL Protocol’s Used (SSLv3, TLS1.0, etc) at Citrix Discussions.
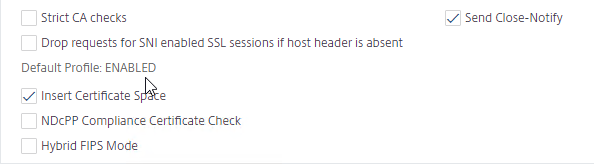
- In ADC 13.0 build 61 and newer, just below the protocols. there is an option to enable Allow Extended Master Secret. Windows machines enforce EMS for resumption. 💡
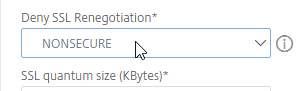
- Find Deny SSL Renegotiation and set it to NONSECURE. To find the setting, press Ctrl+F in your browser and search for it.
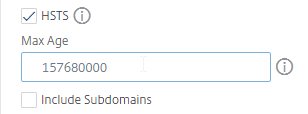
- To enable Strict Transport Security (HSTS), scroll up a little, and check the box next to HSTS.
- Enter 157680000 in the Max Age box.
- You can either enable HSTS in an SSL Profile, or you can enable HSTS by binding a Rewrite policy to your SSL vServer. Do not use both methods at the same time or else you will end up with two Strict-Transport-Security headers in your responses.
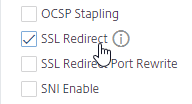
- If you do any SSL Offload (SSL on the client side, HTTP on the server side), then you’ll need to enable SSL Redirect. It’s above HSTS. With this option enabled, any 301/302 redirects from the server with HTTP Location headers are rewritten to HTTPS Location headers. You might need this option for StoreFront load balancing if doing SSL Offload (port 80 to the StoreFront servers).
- This setting might be more appropriate in a Custom SSL Profile instead of the Default SSL Profile.
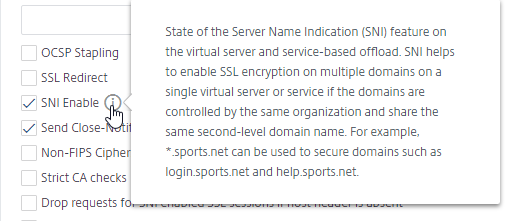
- For SSL vServers that need multiple SSL certificates, you can enable the SNI Enable checkbox.
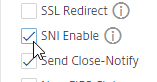
- This setting might be more appropriate in a Custom SSL Profile instead of the Default SSL Profile.
- Click OK when done modifying the Basic Settings section.

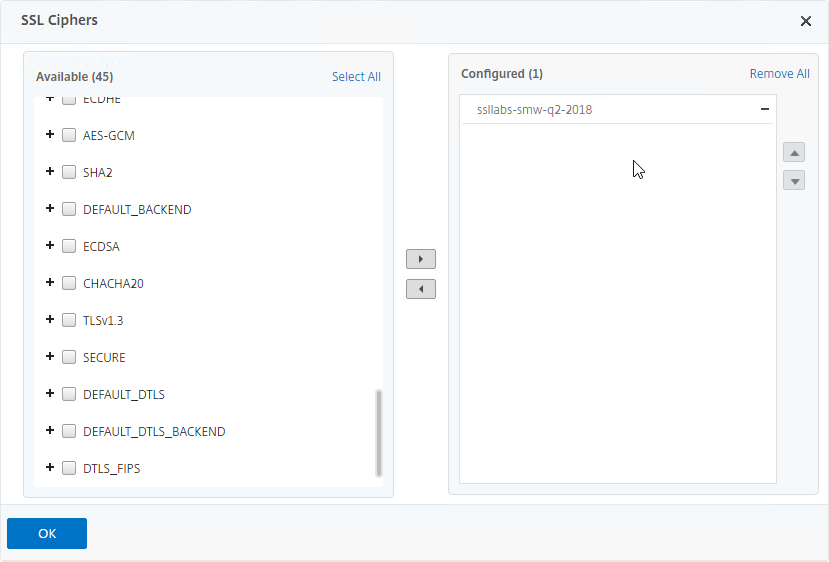
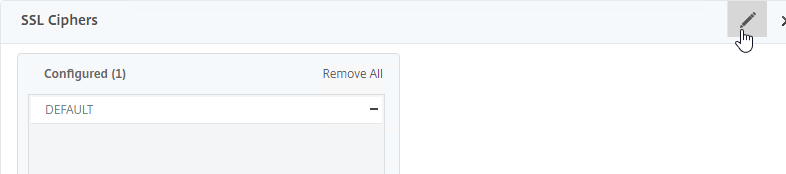
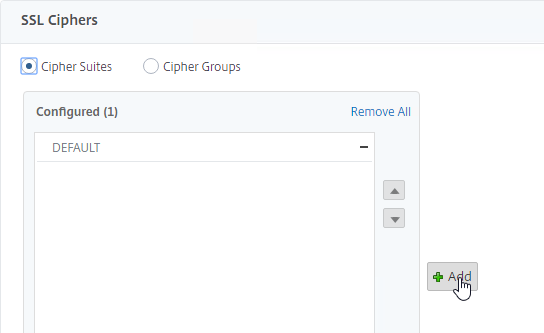
- Scroll down to the SSL Ciphers section, and click the pencil icon.

- Scroll down, and select your custom cipher group (e.g. SSL Labs). Click the arrow to move it to the right.
If you enabled TLS 1.3, then make sure your cipher group includes TLS 1.3 ciphers.
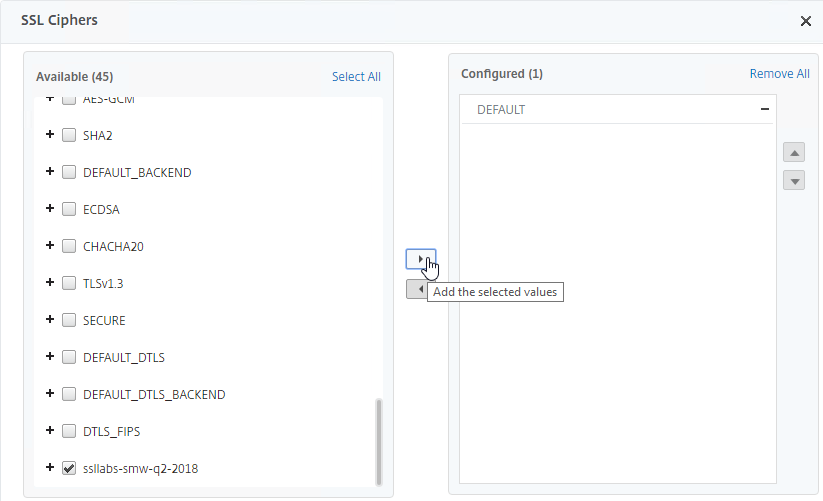
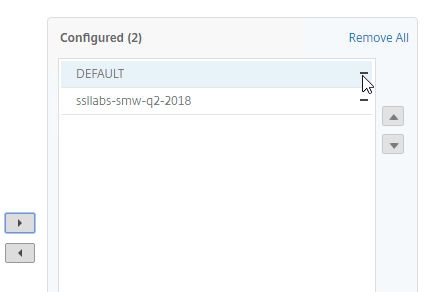
- In the Configured list on the right, click the minus sign next to the DEFAULT cipher group to remove it from the Configured list.
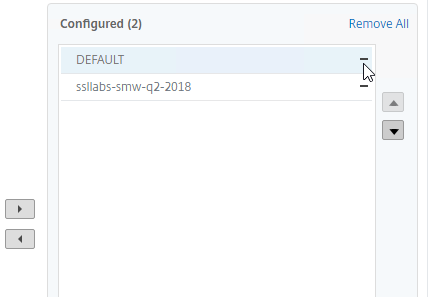
- Click OK to close the SSL Ciphers section.

- If you make changes to the Custom Cipher Group, then you might have to edit the SSL Profile, remove the Custom Cipher Group, and rebind it.
- Scroll down, and select your custom cipher group (e.g. SSL Labs). Click the arrow to move it to the right.
Create a custom SSL Profile
You can create Custom SSL Profiles to override the Default SSL Profile.
- In the left menu, expand System, and click Profiles.
- On the right, switch to the tab named SSL Profile.
- To copy the existing settings from the Default SSL Profile, check the box next to ns_default_ssl_profile_frontend and then click the button named Add.
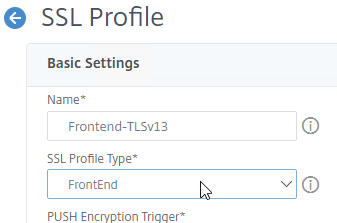
- Enter a name.
- Change the SSL Profile Type to FrontEnd or BackEnd.
- Configure SSL Profile settings as desired (see above for some recommendations).
- For example, your Custom SSL Profile can enable TLSv13 protocol and include TLSv13 ciphers.

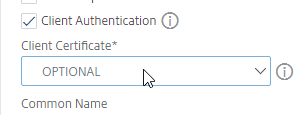
- For example, your Custom SSL Profile can enable Client Authentication (client certificates).
- Another example, your Custom SSL Profile can enable SNI.
- When done, click OK at the bottom of the page.

- When you clone an SSL Profile, the Ciphers are not cloned so you’ll have to rebind the ciphers to the Custom SSL Profile.
- After the SSL Profile is created, edit any SSL-based Virtual Server.
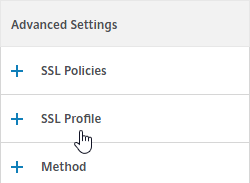
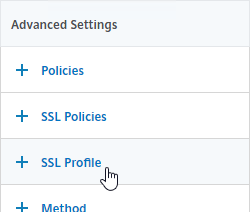
- If you don’t see the SSL Profile section on the left, then on the right, in the Advanced Settings column, click SSL Profile to add the section to the left.
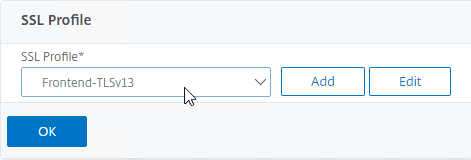
- On the left, scroll down to the SSL Profile section and click the pencil icon.

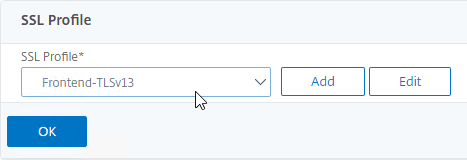
- Select an SSL Profile.
- Click OK to close the SSL Profile section.
- If you don’t see the SSL Profile section on the left, then on the right, in the Advanced Settings column, click SSL Profile to add the section to the left.
SSL vServers – Bind Certificate, Bind Cipher Group, Disable SSLv3, Enable STS
If you enabled the Default SSL Profiles feature, you can either leave the vServer configured with the Default SSL Profile; or you can change the vServer to use a Custom SSL Profile.
If you don’t use the Default SSL Profiles feature, then you’ll need to manually configure ciphers and SSL settings on every SSL vServer.
Do the following on every SSL vServer:
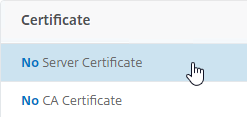
- When creating an SSL Virtual Server (e.g. SSL Load Balancing vServer), on the left, in the Certificates section, click where it says No Server Certificate.
- In the Select Server Certificate field, click where it says Click to select.
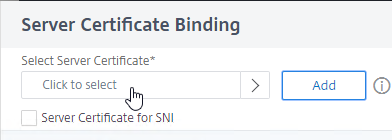
- Click the small circle next to a certificate, and then click the blue Select button at the top of the page.
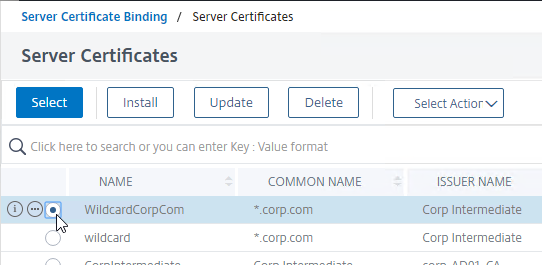
- Click Bind.
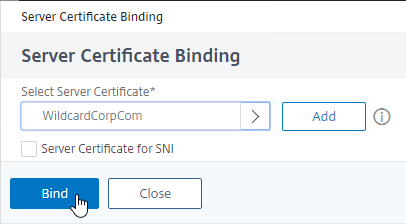
bind ssl vserver MyvServer -certkeyName MyCert
- In the Select Server Certificate field, click where it says Click to select.
- You can bind a Custom SSL Profile:
- Find the SSL Profile section on the left, and click the pencil icon.

- If you don’t see the SSL Profile section on the left, then add the SSL Profile section from the Advanced Settings column on the right.
- If you don’t see the SSL Profile section on the left, then add the SSL Profile section from the Advanced Settings column on the right.
- Select a Custom SSL Profile, and click OK.
- Find the SSL Profile section on the left, and click the pencil icon.
- If default SSL Profiles are not enabled:
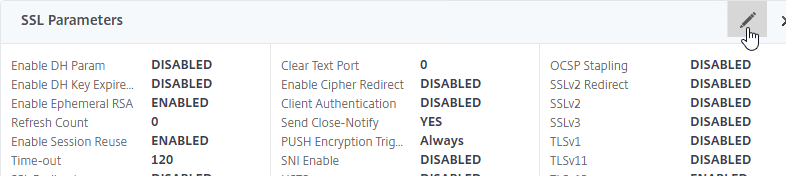
- On the left, in the SSL Parameters section, click the pencil icon. You won’t see this section if Default SSL Profiles are enabled.
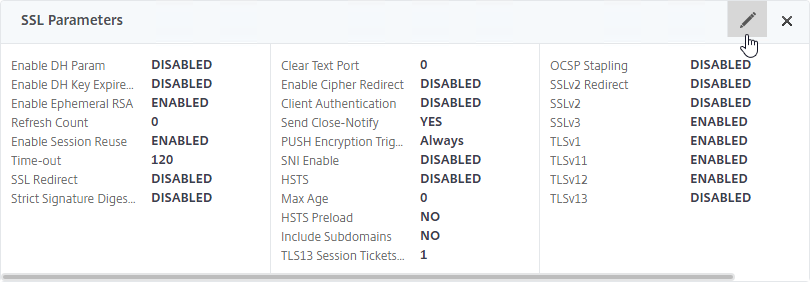
- Uncheck the box next to SSLv3.
- Optionally uncheck the boxes next to TLSv1 and TLSv11.
- Make sure TLSv12 is checked.
- TLSv13 is an option. If you enable this, then make sure your cipher group includes TLS 1.3 ciphers.
- Click OK.
set ssl vserver MyvServer -ssl3 DISABLED -tls12 ENABLED
- To log SSL Protocol usage, see Netscaler SSL Protocol’s Used (SSLv3, TLS1.0, etc) at Citrix Discussions.
- Extended Master Secret (EMS) cannot be enable in SSL Parameters. Instead, use an SSL Profile to enable EMS. Windows machines enforce EMS for resumption. 💡
- Scroll to the SSL Ciphers section, and click the pencil icon.
- In the middle, click Add.
- Select your custom cipher group. It’s probably at the bottom of the list. If you enabled TLS 1.3, then make sure your cipher group includes TLS 1.3 ciphers. Move the cipher group to the right.
- Remove the DEFAULT cipher group from the Configured list
unbind ssl vserver MyvServer -cipherName ALL
bind ssl vserver MyvServer -cipherName ssllabs-smw-q2-2018
- Then click OK to close the SSL Ciphers section.

- On the left, in the SSL Parameters section, click the pencil icon. You won’t see this section if Default SSL Profiles are enabled.
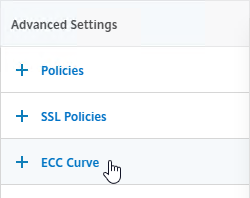
- SSL Virtual Servers created on newer versions of Citrix ADC will automatically have ECC Curves bound to them. However, if this appliance was upgraded from an older version, then the ECC Curves might not be bound. If you are not using SSL Profile, then on the right, in the Advanced Settings column, click ECC Curve.
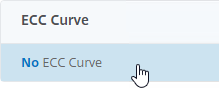
- On the left, in the ECC Curve section, click where it says No ECC Curve.
- In the ECC Curve Binding field, click where it says Click to select.
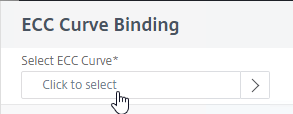
- Click the small circle next to ALL, and then click the blue Select button at the top of the page.
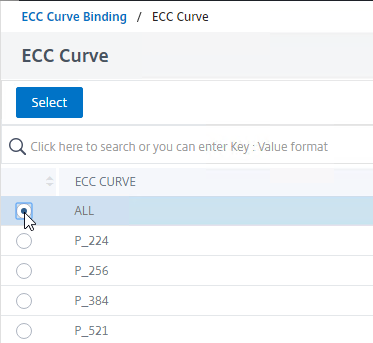
- Click Bind.
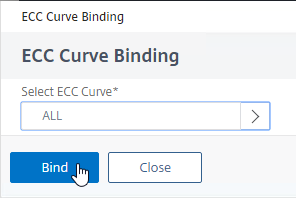
bind ssl vserver MyvServer -eccCurveName ALL
- On the left, in the ECC Curve section, click where it says No ECC Curve.
- If HSTS is not enabled in a bound SSL Profile, you can enable it in SSL Parameters, or you can enable it by binding a Rewrite policy.
- To enable HSTS by configuring SSL Parameters:
- On the left, find the SSL Parameters section, and click the pencil icon. This section is only present if Default SSL Profiles are not enabled.
- In the right column, check the box next to HSTS.
- Enter 157680000 in the Max Age box.
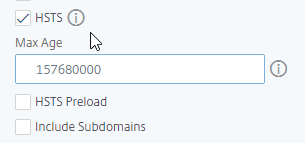
- Click OK to close SSL Parameters.

- On the left, find the SSL Parameters section, and click the pencil icon. This section is only present if Default SSL Profiles are not enabled.
- If enabling HSTS in an SSL Profile or SSL Parameters causes technical issues, then bind a Rewrite policy instead. Don’t do both methods.
- If the Policies section doesn’t exist on the left, then add it from the Advanced Settings column on the right.

- On the left, find the Policies section, and click the plus icon.

- Change the Choose Policy drop-down to Rewrite.
- Change the Choose Type drop-down to Response, and click Continue.
- In the Select Policy field, click where it says Click to select.

- Click the small circle next to the insert_STS_header policy, and then click the blue Select button at the top of the page.
- Click Bind.
bind lb vserver MyvServer -policyName insert_STS_header -priority 100 -gotoPriorityExpression END -type RESPONSE
- If the Policies section doesn’t exist on the left, then add it from the Advanced Settings column on the right.
If you experience SSL performance problems on a Citrix ADC MPX, Citrix CTX207005 Performance Issues with NetScaler MPX SSL recommends creating and binding the following TCP Profile:
add ns tcpProfile tcp_test -WS ENABLED -SACK ENABLED -maxBurst 20 -initialCwnd 8 -bufferSize 4096000 -flavor BIC -dynamicReceiveBuffering DISABLED -sendBuffsize 4096000
SSL Tests
After you’ve created an SSL Virtual Server and configured SSL settings, run the following test:
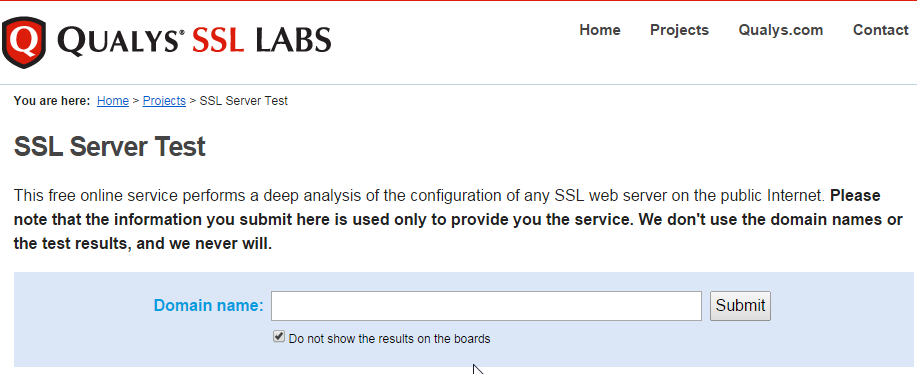
- Go to https://www.ssllabs.com/ssltest/ and check the security settings of the website. Check the box next to Do not show the results on the boards.
SSL Redirect – Methods
There are typically three methods of performing SSL Redirect (http to https) in Citrix ADC:
- Load Balancing Virtual Server Method – enable SSL Redirect directly on the Load Balancing Virtual Server. This is the easiest method.
- This option is not available for Gateway Virtual Servers and Content Switching Virtual Servers.
- There’s nothing in the GUI to indicate that the SSL Virtual Server is also listening on port 80.
- Down vServer Method – create a new Load Balancing Virtual Server on Port 80, and configure the Redirect URL for when it is down.
- The Virtual Server must be DOWN for the Redirect to occur. These Virtual Servers are shown as Red instead of Green.
- Responder Method – create a new Load Balancing Virtual Server on Port 80, and bind a Responder policy that redirects to https.
- The Responder policy only works if the Virtual Server is UP, which means it is shown as Green.
- Some setup tasks are required – create the AlwaysUP service, and create the Responder Policy. But once setup is complete, it only requires slightly more steps than the Down vServer method.
SSL Redirect – SSL Load Balancing vServer Method
You can configure SSL Redirect directly in an SSL Load Balancing vServer (port 443) instead of creating a separate HTTP (port 80) Load Balancing vServer.
Limitations:
- This is only an option for SSL Load Balancing vServers; it’s not configurable in Gateway vServers or Content Switching vServers.
- Only one Redirect URL can be specified. Alternatively, the Responder method can handle multiple FQDNs to one VIP (e.g. wildcard certificate) and/or IP address URLs.
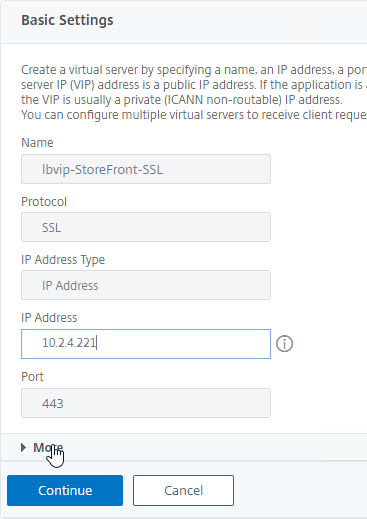
To configure an SSL Load Balancing vServer to redirect from HTTP to HTTPS:
- Edit the SSL Load Balancing vServer (port 443).
- In the Basic Settings section, click the pencil icon.
- Click More.
- In the Redirect from Port field, enter 80.
- In the HTTPS Redirect URL field, enter https://MyFQDN.
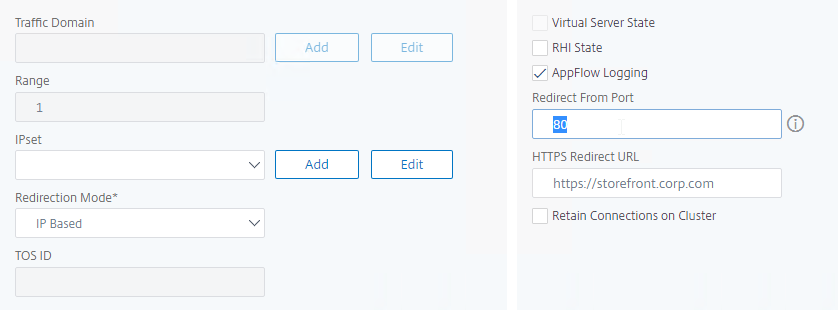
- Click Continue twice.
- When you view the list of Load Balancing Virtual Servers, there’s no indication that it’s listening on port 80.
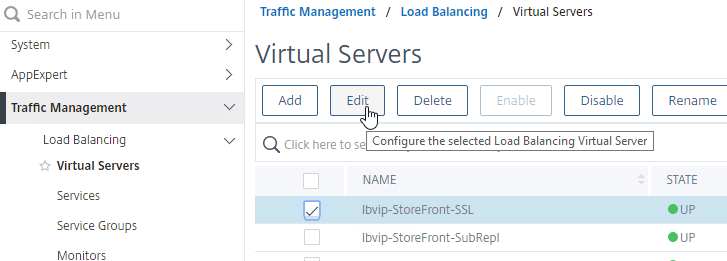
SSL Redirect – Down vServer Method
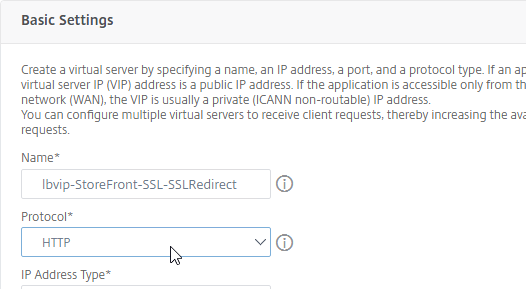
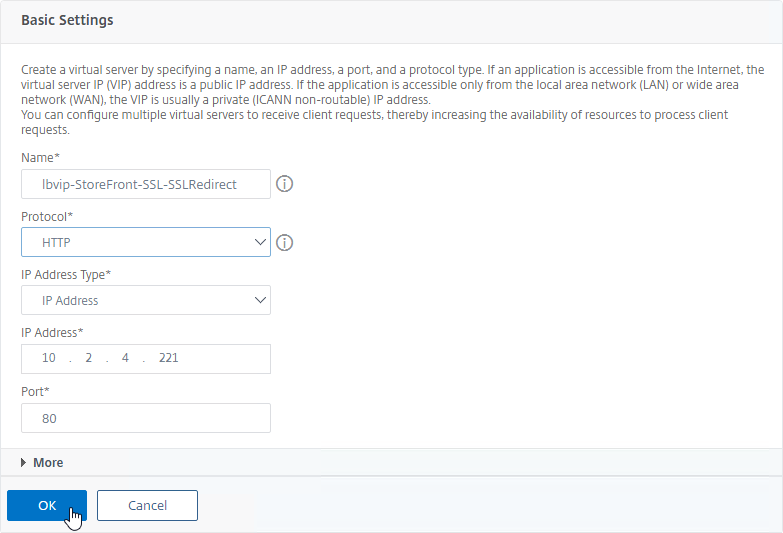
If you created an SSL Virtual Server that only listens on SSL 443, then users must enter https:// when navigating to the website. To make it easier for the users, create another load balancing Virtual Server on the same VIP, but listens on HTTP 80, and then redirects the user’s browser to reconnect on SSL 443.
The Down Virtual Server Method is easy, but the Redirect Virtual Server must be down in order for the redirect to take effect. Another option is to use Responder policies to perform the redirect.
To create the down Redirect Virtual Server:
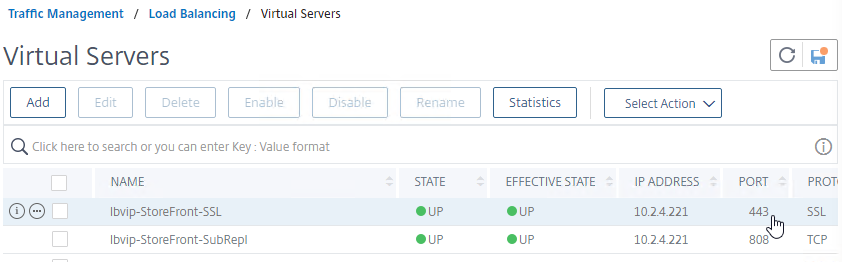
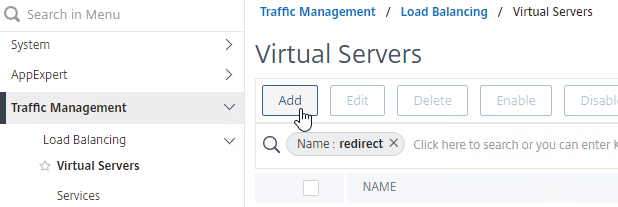
- On the left, under Traffic Management > Load Balancing, click Virtual Servers.
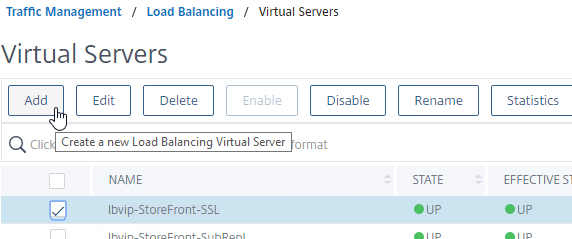
- On the right, right-click an SSL Virtual Server you’ve already created, and click Add. Doing it this way copies some of the data from the already created Virtual Server.
- Or, if you are redirecting Citrix Gateway, create a new Load Balancing vServer with the same VIP as the Gateway.
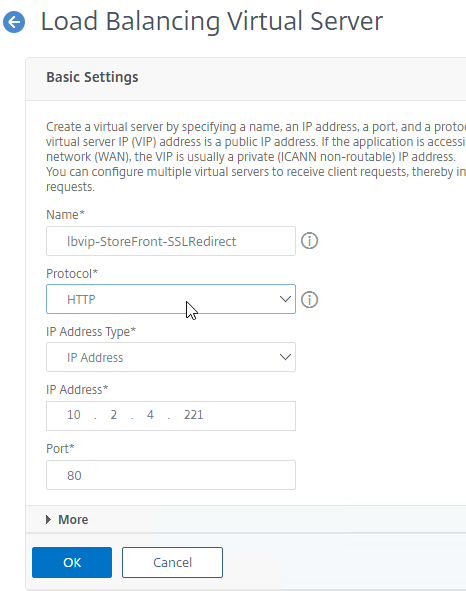
- Change the name of the Virtual Server to indicate that this new Virtual Server is an SSL Redirect.
- Change the Protocol to HTTP on Port 80.
- The IP Address should already be filled in. It must match the original SSL Virtual Server (or Gateway vServer). Click OK.
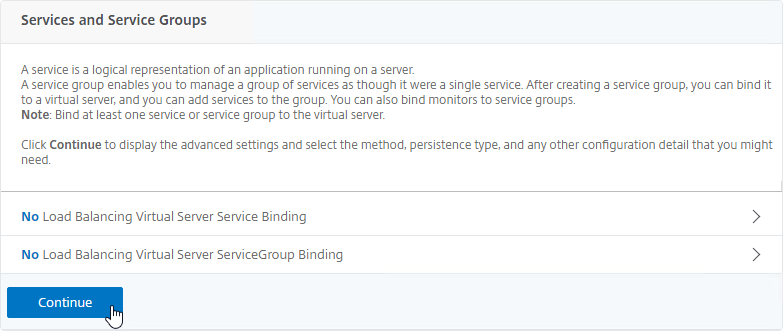
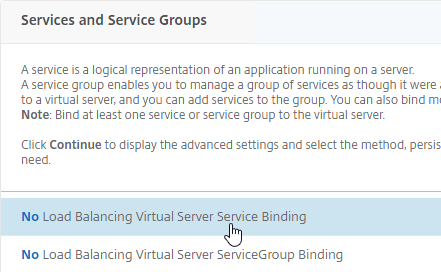
- Don’t bind any services. This vServer must intentionally be marked down so the redirect will take effect. Click Continue.
- On the right, in the Advanced Settings column, click Protection.
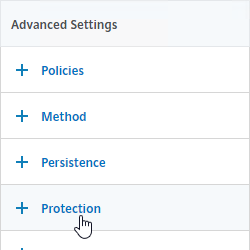
- On the left, in the Protection section, in the Redirect URL field, enter the full URL including https://. For example: https://storefront.corp.com/Citrix/StoreWeb.
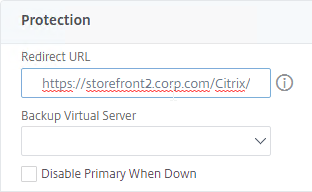
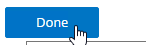
- Click OK to close the Protection section.

- Click Done.
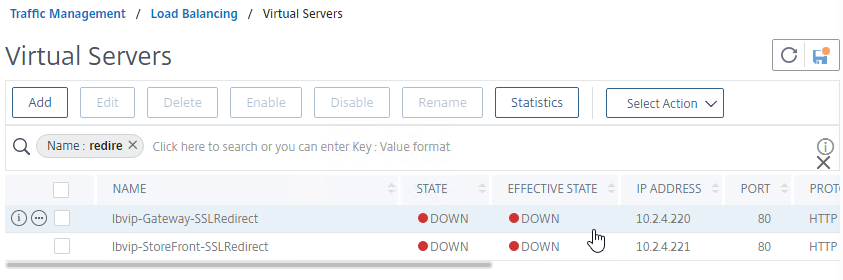
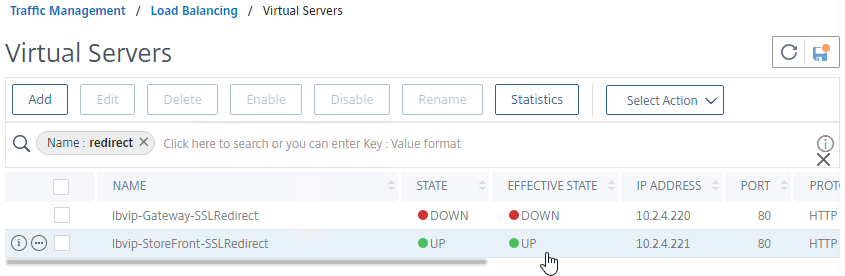
- When you view the SSL redirect Virtual Server in the list, it will have a state of DOWN. That’s expected. The Port 80 Virtual Server must be DOWN for this redirect method to work.
SSL Redirect – Responder Method
The Down Virtual Server Method is easy, but the Redirect Virtual Server must be down in order for the redirect to take effect. Another option is to use Responder policies to perform the redirect. The Responder method requires the Redirect Virtual Server to be UP.
Responder Method Setup Tasks
The following setup tasks are performed once no matter how many redirects you want to configure.
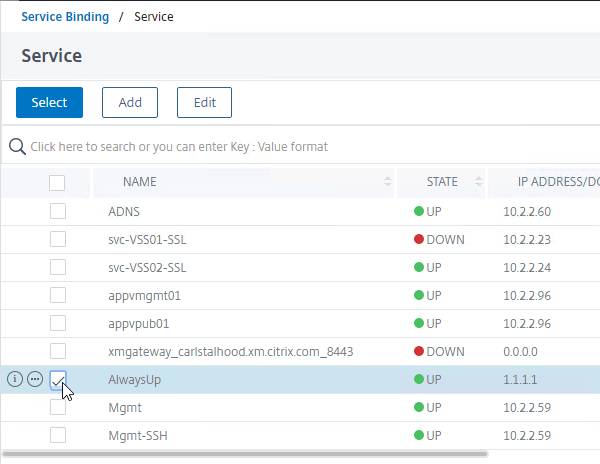
Create a dummy Load Balancing service. This dummy service can be bound to multiple Redirect Virtual Servers.
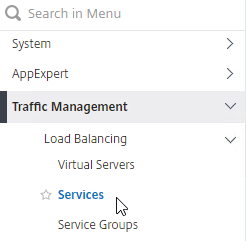
- Go to Traffic Management > Load Balancing > Services.
- On the right, click Add.
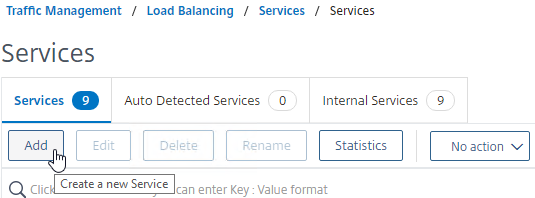
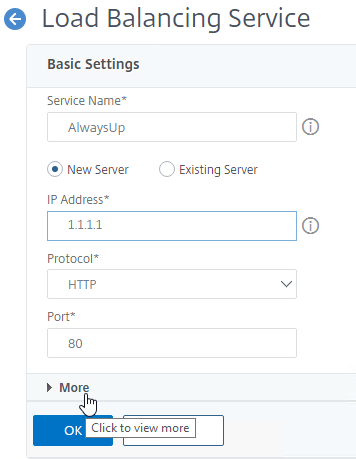
- Name the service AlwaysUp or similar.
- Enter a fake IP address. Try not to use any IP address owned by the Citrix ADC to avoid being able to access the ADC management web page.
- Click the More link.
- This dummy service must always be UP, so uncheck the box next to Health Monitoring.
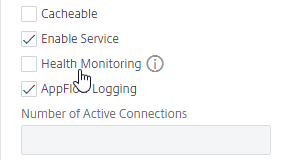
- Click OK, and then click Done to close the Load Balancing Service.


add server 1.1.1.1 1.1.1.1
add service AlwaysUp 1.1.1.1 HTTP 80 -healthMonitor NO
Create the Responder Action:
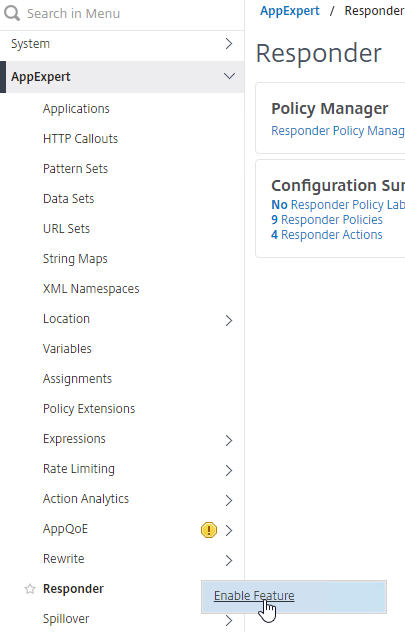
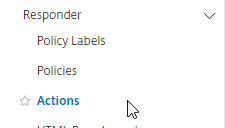
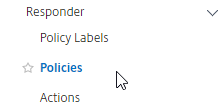
- On the left, expand AppExpert, and click Responder.
- If Responder feature is not enabled, right-click Responder, and click Enable Feature.
enable ns feature RESPONDER
- Under Responder, click Actions.
- On the right, click Add.
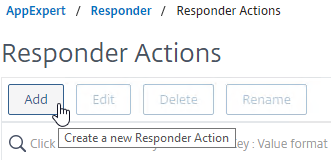
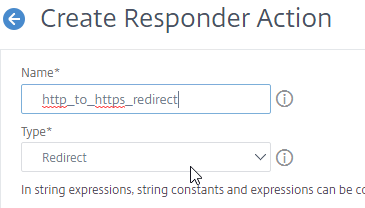
- Give the action a name.
- Change the Type to Redirect. If you leave this set to Respond With then it won’t work.
- Enter an expression. The following expression redirects to https on the same URL the user entered in the browser. Or you can create a Responder Action with a more specific Target.
"https://" + HTTP.REQ.HOSTNAME.HTTP_URL_SAFE + HTTP.REQ.URL.PATH_AND_QUERY.HTTP_URL_SAFE
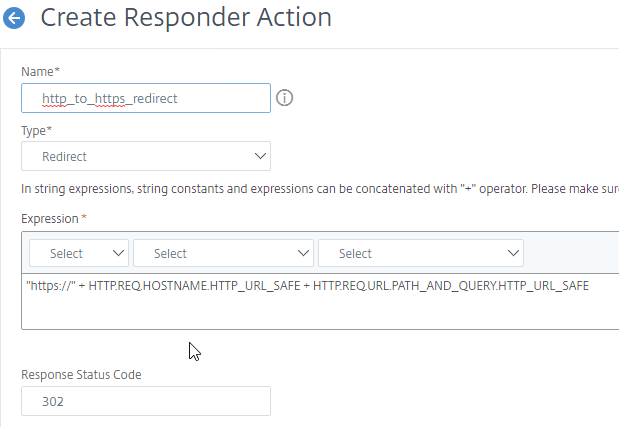
add responder action http_to_ssl_redirect_responderact redirect "\"https://\" + HTTP.REQ.HOSTNAME.HTTP_URL_SAFE + HTTP.REQ.URL.PATH_AND_QUERY.HTTP_URL_SAFE" -responseStatusCode 302
- Click Create.

Create the Responder Policy:
- On the left, under Responder, click Policies.
- On the right, click Add.
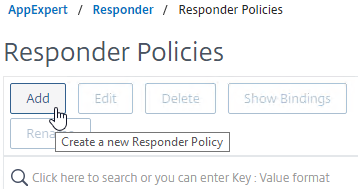
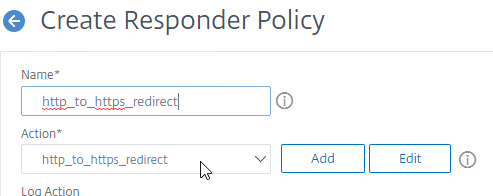
- Give the policy a name.
- Select the previously created Responder action.
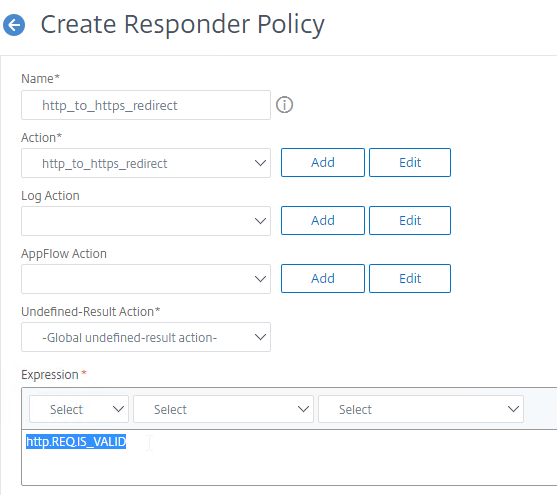
- For the expression, enter the following.
HTTP.REQ.IS_VALID
add responder policy http_to_ssl_redirect_responderpol HTTP.REQ.IS_VALID http_to_ssl_redirect_responderact
- Then click Create.

Enable Redirect using Responder Policy
Repeat this section for each HTTP to HTTPS redirect that you want to configure:
- Create a Load Balancing Virtual Server with Protocol HTTP, and Port 80.
- The vServer’s VIP should match an existing SSL Virtual Server or existing Citrix Gateway Virtual Server.
- Bind the AlwaysUp service.
- In the Services and Service Groups section, click where it says No Load Balancing Virtual Server Service Binding.
- In the Select Service field, click where it says Click to select.
- Check the box next to AlwaysUp, and then click the blue Select button at the top of the page.
- Click Bind.
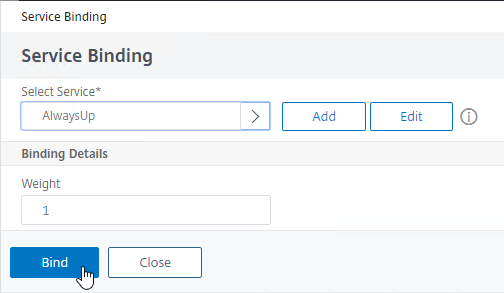
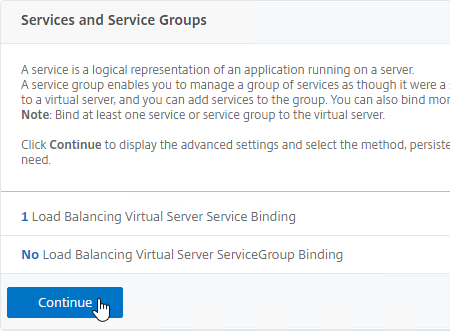
- Click Continue to close Services and Service Groups.
- In the Services and Service Groups section, click where it says No Load Balancing Virtual Server Service Binding.
- Bind the Responder Policy:
- On the right, in the Advanced Settings column, click Policies.
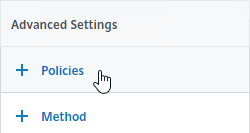
- On the left, scroll down to the Policies section, and click the plus icon in the top right of the Policies box.

- Change the Choose Policy drop-down to Responder. Click Continue.
- In the Select Policy field, click where it says Click to select.
- Click the small circle next to the redirect Responder policy, and then click the blue Select button at the top of the page.
- Click Bind.
- Then click Done to close the Load Balancing Virtual Server.

add lb vserver MyvServer-HTTP-SSLRedirect HTTP 10.2.2.201 80

bind lb vserver storefront.corp.com-HTTP-SSLRedirect AlwaysUp

bind lb vserver storefront.corp.com-HTTP-SSLRedirect -policyName http_to_ssl_redirect_responderpol -priority 100 -gotoPriorityExpression END -type REQUEST
- On the right, in the Advanced Settings column, click Policies.
- The primary advantage of this method is that the Redirect Virtual Server is UP.
Related Pages
- Citrix ADC Certificates
- Back to Citrix ADC 13
Hi Carl,
I have created a custom SSL profile and bound it to all VServers.
Only TLS1.2 & TLS1.3 are activated in this profile.
The cipher groups are as follows.
TLS1.3-CHACHA20-POLY1305-SHA256
TLS1.3-AES128-GCM-SHA256
TLS1.3-AES256-GCM-SHA384
TLS1.2-ECDHE-ECDSA-AES256-GCM-SHA384
TLS1.2-ECDHE-ECDSA-AES128-GCM-SHA256
TLS1.2-ECDHE-RSA-AES256-GCM-SHA384
TLS1.2-ECDHE-ECDSA-AES128-SHA256
TLS1.2-ECDHE-RSA-AES128-GCM-SHA256
TLS1.2-ECDHE-ECDSA-AES256-SHA384
Nevertheless, I get a Grade B in the SSLLAbs test of the RDS gateway because of TLS1.0 & TLS1.1
The following ciphers are also still displayed.
TLS_ECDHE_RSA_WITH_AES_128_CBC_SHA256 (0xc027) ECDH x25519 (eq. 3072 bits RSA) FS WEAK 128
TLS_ECDHE_RSA_WITH_AES_256_CBC_SHA384 (0xc028) ECDH x25519 (eq. 3072 bits RSA) FS WEAK 256
TLS_ECDHE_RSA_WITH_AES_128_CBC_SHA (0xc013) ECDH x25519 (eq. 3072 bits RSA) FS WEAK 128
TLS_ECDHE_RSA_WITH_AES_256_CBC_SHA (0xc014) ECDH x25519 (eq. 3072 bits RSA) FS WEAK 256
TLS_RSA_WITH_AES_128_GCM_SHA256 (0x9c) WEAK 128
TLS_RSA_WITH_AES_256_GCM_SHA384 (0x9d) WEAK 256
TLS_RSA_WITH_AES_128_CBC_SHA256 (0x3c) WEAK 128
TLS_RSA_WITH_AES_256_CBC_SHA256 (0x3d) WEAK 256
TLS_RSA_WITH_AES_128_CBC_SHA (0x2f) WEAK 128
TLS_RSA_WITH_AES_256_CBC_SHA (0x35) WEAK 256
Where can these still be bound?
The same profile is bound to the ICA Gateway but I get an A+ here
Are you doing SSL_BRIDGE to the RDS Gateway? If so, then the ciphers come from RDS Gateway. Run IIS Crypto on RDS Gateway to set the ciphers.
No SSL bridge is configured.
The profile is bound directly to the RDS gateway.
How can I run the IIS on the RDS Gateway?
https://www.nartac.com/Products/IISCrypto
Sorry,
it is only an RDP proxy gateway without server profiles.
The machines to be connected to are not members of an RDS Connection Broker infrastructure.
Hi Carl,
Do you know if Citrix still offers the “default_profile_script” to generate SSL Profiles for download? I cannot find it under Additional Components on any Netscaler build version, nor have I been able to find it anywhere else.
Thanks!
Hi Carl,
I tried to bind a cert with SNI enabled to a Gateway server but it always says “SNI feature not enabled on the vserver/service”. I have enabled SNI on the SSL Parameters of the vServer and on Global Settings before.
I get this error on different NetScaler running version 12.1 or 13.1.
Any idea on this?
Thanks and best regards!
Hong
Is there any current update on chapter “Custom Cipher Group” or is this list still best to have?
I have load balanced my Storefront servers on ADC 13.1 and bound the “Default” cipher group to the virtual server but I get “ERR_SSL_VERSION_OR_CIPHER_MISMATCH” error message when launching the Storefront URL.
Make sure the cipher group prioritizes ECDHE GCM ciphers. I don’t think the DEFAULT group does that. Usually you need a custom group. For a TLS 1.2 cipher group with wide compatibility, see https://www.citrix.com/blogs/2018/05/16/scoring-an-a-at-ssllabs-com-with-citrix-netscaler-q2-2018-update/. For TLS 1.3, see https://docs.citrix.com/en-us/tech-zone/build/tech-papers/networking-tls-best-practices.html
Thanks Carl, I do use custom cipher groups now but still have this message. I enabled DEFAULT profiles as mentioned in one of the artikles an do now use SSL profiles.
Since then browser login at CITRIX Gateway stopps after credential validation with message “Please select one of the following” and that’s it. Had this once after updating ADC firmware.
– thanks for your help anyway 🙂
Is HSTS enabled in your SSL Profile? If so, disable it.
Hi Carl,
you have set -denySSLReneg to NONSECURE.But your link to Ryan Butler Powershell Skript he has FRONTEND_CLIENT. What is here the right (secure) way.
I usually do NONSECURE. Try both options and see which if either of them causes SSL Labs to complain.
I recently used SSLyze v6.0.0 to check a config and here NONSECURE showed up as:
Client Renegotiation DoS Attack: VULNERABLE – Server honors client-initiated renegotiations
With FRONTEND_CLIENT I got:
Client Renegotiation DoS Attack: OK – Not vulnerable
Will move on with FRONTEND_CLIENT.
Hi Carl,
your settings for the default SSL Profile are a little bit different from the ones for the custom SSL Profile, e.g. only TLS 1.3 is enalbed.
Is there a reason for that?
Thanks!
Hong
It depends on your requirements. I don’t have any customers requiring TLS 1.3 yet but it is an option.
Hi Carl, what are you recommendations for ns_default_ssl_profile_backend? Lots of great info on the frontend profile and it would be nice to something similar for the backend.
I usually don’t touch it unless I’m on a build of ADC that doesn’t have TLS 1.2 ciphers in the default group.
Hi Carl,
is there a way to do an SFTP to FTP via Netscaler?
A customer have a windows ftp cluster and would like to expose for a specified host with sftp
the only info that i found is this one https://support.citrix.com/article/CTX120302 but is intended for sftp to sftp.
Hi Carl, I have a VPN Gateway on an VPX in a DMZ and the StoreFront servers is load balanced behind another VPX which sits on the Internal Network. I have exactly this set up in two sites and I run Active / Active GSLB with round robin method. The VPN Gateways Web Interface page at each site publishes its local site’s STF LB VIP. Such that session on a VPN gateway will only consume the STF and Citrix resources at the local site. Everthing works fine except if the Storefront servers in a site goes down, the STF LB VIP goes down as expected, the the VPN Gateway Vserver on the DMZ VPX says up. It’s not keeping track of the state of its wihome. Please how can I set this up so that once the wihome becomes unavailable, the VPN vserver goes down and therefore wont return IP to DNS queries.
I’ve asked for this feature but it’s not there.
On your GSLB Services, add monitors that probe both the Gateway and the StoreFront LB VIP. Or configure the StoreFront LB VIP to fail over to servers in the remote data center.
Hi Carl,
I notice that TLS1-ECDHE-ECDSA-AES256-SHA is from SSLv3.
TLS1 is SSLv3 in my undestanding and get confirmation here https://docs.citrix.com/fr-fr/citrix-adc/13/ssl/ciphers-available-on-the-citrix-ADC-appliances/ecdsa-cipher-suite-support-on-mpx-appliances.html)
Does it mean that SSL3 has to be enable to be able to use this cipher ?
This cipher still to be use for A+ 2019 SSL Labs:
https://docs.citrix.com/en-us/tech-zone/build/tech-papers/networking-tls-best-practices.html
I don’t think the cipher suite is linked to any particular TLS protocol. The “SHA” on the end indicates SHA1, while the newer cipher suites are SHA2 (e.g. SHA256). Prioritize the higher security cipher suites. You can leave the less secure cipher suites for compatibility with older clients. Or you can remove them and require the clients to be current.
I feel confused as even in :
Traffic Management–>SSL–> Cipher Groups:
we can see:
SSLv2 –> SSLv2 protocol ciphers
SSLv3 –>SSLv3 protocol ciphers
TLSv1 –> SSLv3/TLSv1 protocol ciphers
TLSv1 –> _ONLY TLSv1 protocol ciphers
Plus Citrix really named the ciphers with protocole :
TLS1.3-AES256-GCM-SHA384
TLS1.2-ECDHE-ECDSA-AES256-SHA384
TLS1.2-ECDHE-ECDSA-AES256-GCM-SHA384
TLS1-ECDHE-ECDSA-AES256-SHA