Navigation
- Here are three methods of creating certificates for NetScaler:
- If the server certificate is signed by an intermediate authority, import the intermediate certificate and bind it.
- Default Management Certificate Key Length
- Replace the management certificate and then force SSL access for management.
- Update certificates before they expire.
Convert .PFX Certificate to PEM Format
You can export a certificate from Windows and import it to NetScaler. However, Windows certificates can’t be imported on NetScaler in their native PFX format and must first be converted to PEM as detailed below:
- On the Windows server that has the certificate, run mmc.exe, and add the certificates snap-in.
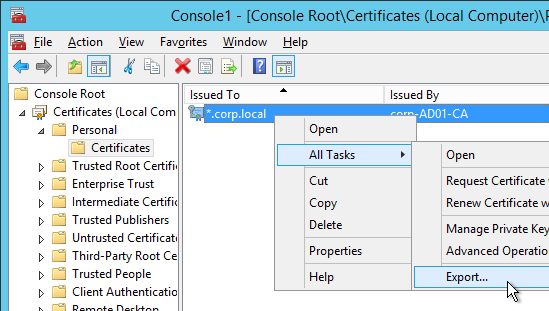
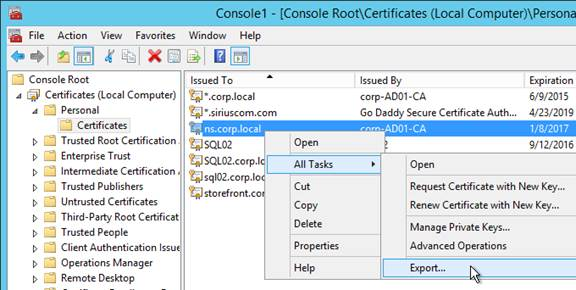
- Right-click the certificate and click Export.
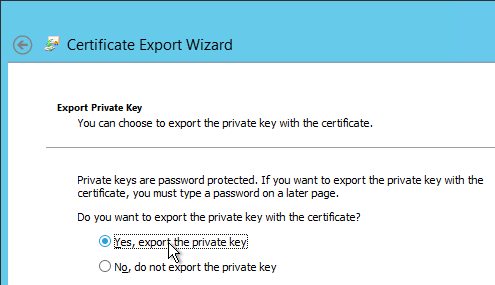
- On the Export Private Key page, select Yes, export the private key and click Next.
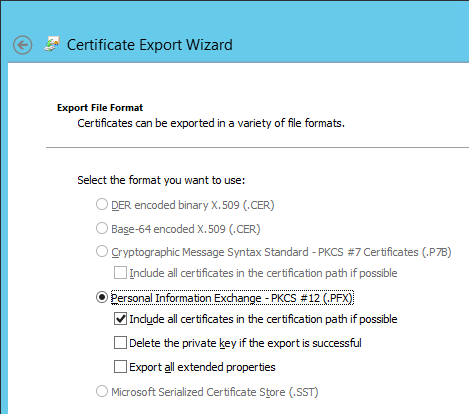
- On the Export File Format page, ensure Personal Information Exchange is selected and click Next.
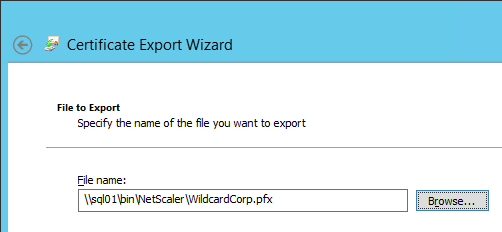
- Save it as a .pfx file. Don’t put any spaces in the filename.
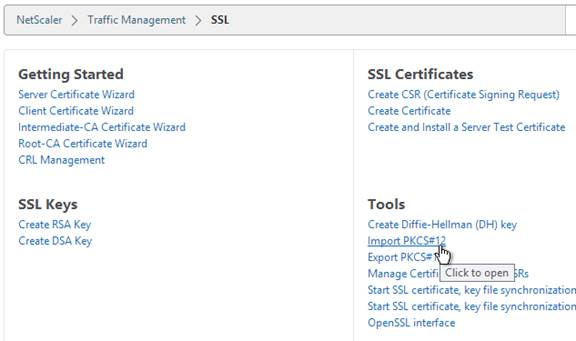
- Back in the NetScaler Configuration GUI, on the left expand Traffic Management and click SSL. If the SSL feature is disabled, right-click it and click Enable Feature.
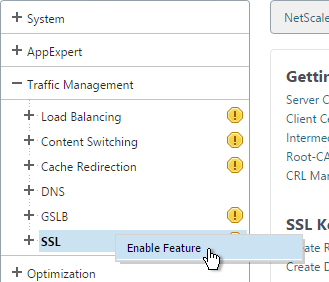
- Back in the NetScaler Configuration GUI, on the left expand Traffic Management and click SSL. If the SSL feature is disabled, right-click it and click Enable Feature.
- On the right pane, click Import PKCS#12 in the Tools section.
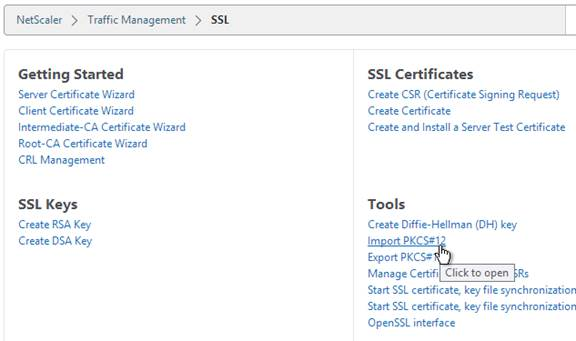
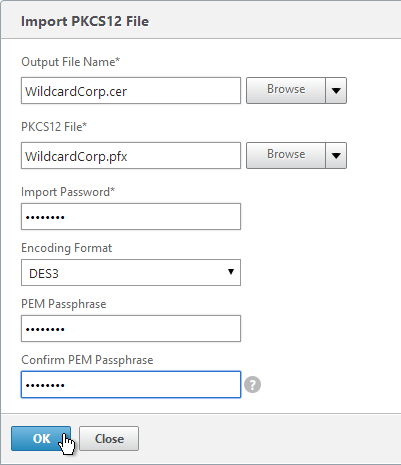
- In the Import PKCS12 File dialog box:
- In the Output File Name field, enter a name (e.g. Wildcard.cer) for a new file where the PEM certificate and key will be placed.
- In the PKCS12 File field, click Browse and select the previously exported .pfx file.
- In the Import Password field, enter the password you specified when you previously exported the .pfx file.
- Change the Encoding Format selection to DES3. This causes the new Output file to be encrypted.
- Enter a password for the Output file and click OK.
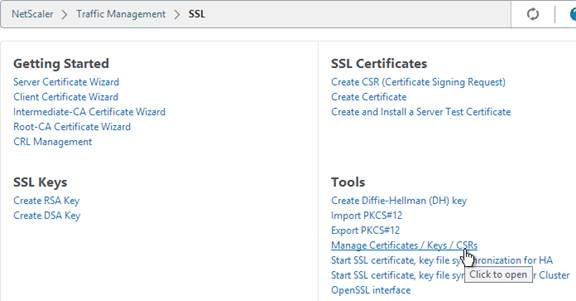
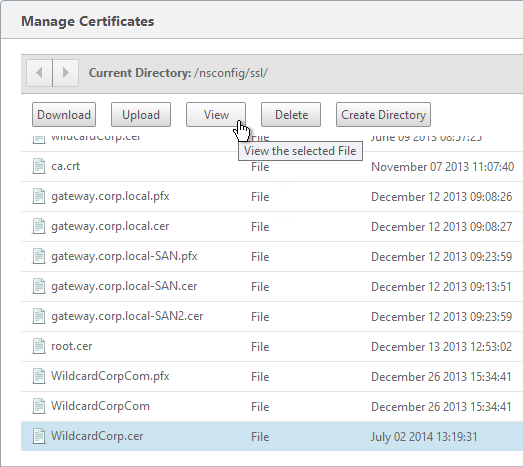
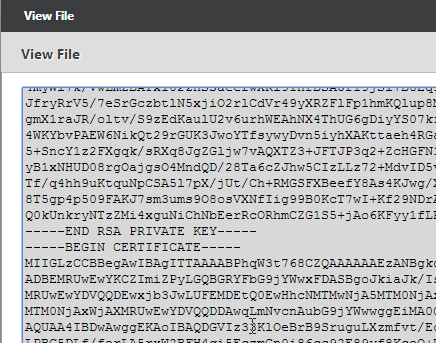
- If you browse to the /nsconfig/ssl directory on the NetScaler and view the new .cer file you just created, you’ll see both the certificate and the private key in the same file. You can use the Manage Certificates / Keys / CSRs link to view the files.
- Notice that the file contains both the certificate and the RSA Private key.
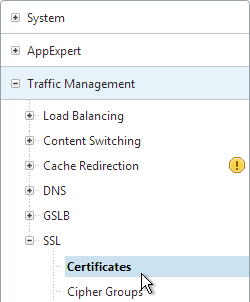
- On the left side of the NetScaler Configuration GUI, expand Traffic Management > SSL, and click Certificates.
- On the right, click Install.

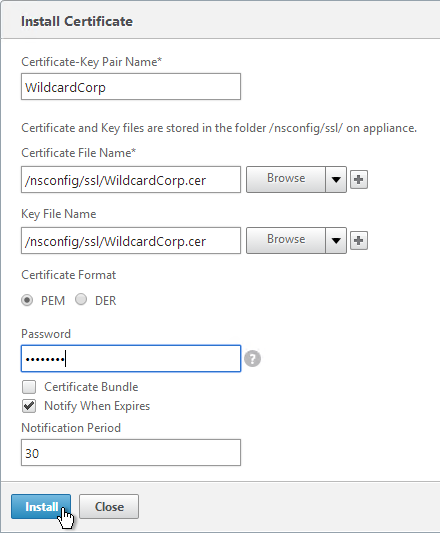
- In the Install Certificate dialog box:
- In the Certificate-Key Pair Name field, enter a friendly name for this certificate.
- In the Certificate File Name field, browse the appliance and select the .cer file you just created.
- In the Key File Name field, browse the appliance and select the same .cer file you just created. Both the certificate and the private key are in the same file.
- If the private key is encrypted, enter the password.
- Click Install. You can now link an intermediate certificate to this SSL certificate and then bind this SSL certificate to SSL Offload and/or NetScaler Gateway Virtual Servers.
- To automatically backup SSL certificates and receive notification when the certificates are about the expire, deploy Citrix Command Center or NetScaler Management and Analytics System. Also see Citrix CTX213342 How to handle certificate expiry on NetScaler.
Create Key and Certificate Request
You can create a key pair and Certificate Signing Request directly on the NetScaler appliance. The Certificate Signing Request can then be signed by an internal or public Certificate Authority.
Most Certificate Authorities let you add Subject Alternative Names when submitting the Certificate Signing Request to the Certificate Authority and thus there’s no reason to include Subject Alternative Names in the Certificate Signing Request. You typically create a Certificate Signing Request with a single DNS name. Then when submitting the Certificate Signing Request to the Certificate Authority you type in additional DNS names. For a Microsoft Certificate Authority, you can enter Subject Alternative Names in the Attributes box of the Web Enrollment wizard. For public Certificate Authorities, you purchase a UCC certificate or purchase a certificate option that lets you type in additional names.
If you instead want to create a Certificate Signing Request on NetScaler that has Subject Alternative Names embedded in it as request attributes, see Citrix Blog Post How to Create a CSR for a SAN Certificate Using OpenSSL on a NetScaler Appliance. These instructions are performed on the NetScaler command line using OpenSSL. Or you can instead create a Subject Alternative Name certificate on Windows.
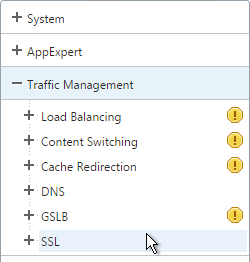
- On the left, expand Traffic Management, and click SSL.
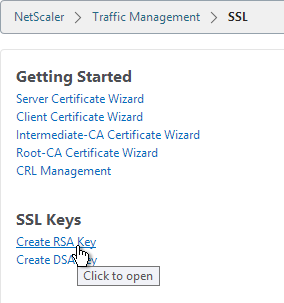
- On the right, in the left column, click Create RSA Key.
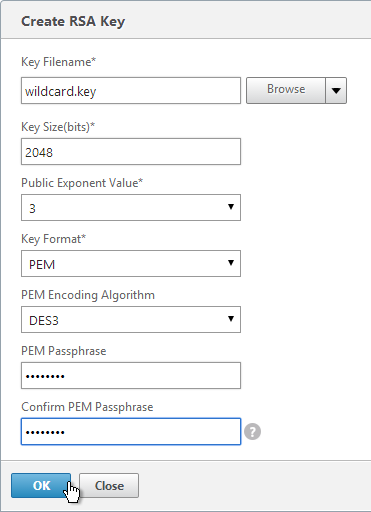
- Give the new .key file a descriptive name.
- Set the Key Size to 2048 bits
- Set the PEM Encoding Algorithm to DES3 and enter a password. This encrypts the key file.
- Click OK. You will soon create a certificate using the keys in this file.
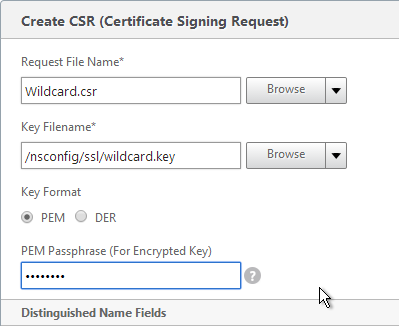
- On the right, in the right column, click Create CSR (Certificate Signing Request).

- In the Request File Name field, enter the name of a new .csr file.
- In the Key Filename field, browse to the previously created .key file.
- If the key file is encrypted, enter the password.
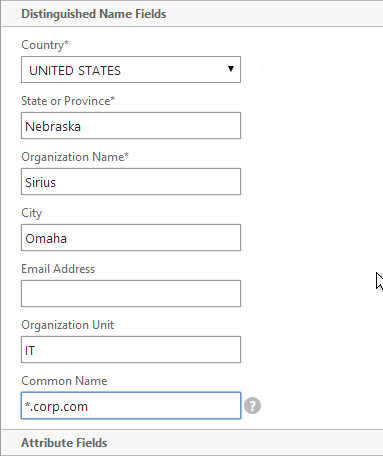
- In the State field, enter your state name without abbreviating.
- In the Organization Name field, enter your official Organization Name.
- Enter the City name.
- Enter IT or similar as the Organization Unit.
- In the Common Name field, enter the FQDN of the SSL enabled-website. If this is a wildcard certificate, enter * for the left part of the FQDN.
- Scroll down, and click OK.
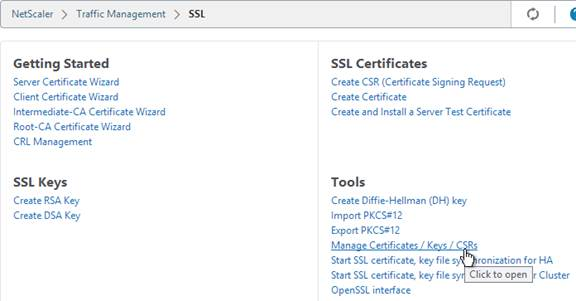
- On the right side of the right pane, click Manage Certificates / Keys / CSRs.
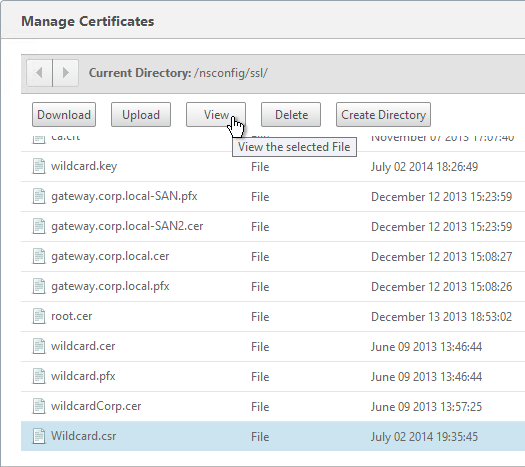
- Find the .csr file you just created, and View it.
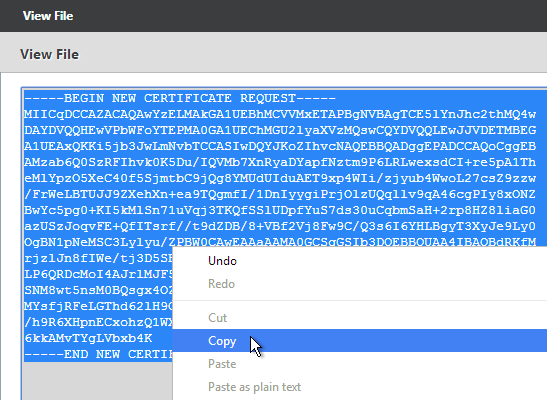
- Copy the contents of the file, and send it to the certificate administrator. Request the signed certificate to be returned in Apache or Base64 format.
- After you get the signed certificate, on the left side of the NetScaler Configuration GUI, expand Traffic Management > SSL, and click Certificates.
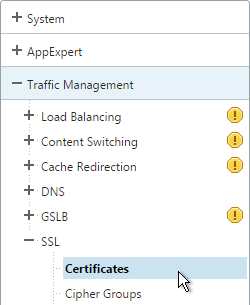
- On the right, click Install.

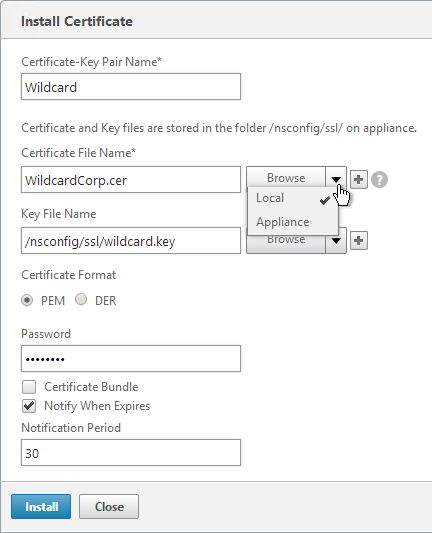
- In the Install Certificate dialog box:
- In the Certificate-Key Pair Name field, enter a friendly name for this certificate.
- In the Certificate File Name field, browse Local and select the Base64 (Apache) .cer (or .crt, or .cert) file you received from the Certificate Authority.
- In the Private Key File Name field, browse the appliance and select the key file you created earlier.
- If the key file is encrypted, enter the password.
- If desired, check the box next to Notify when expires.
- Click Install.
- The certificate is now added to the list. Notice the Days to Expire. You can now bind this certificate to any SSL Load Balancing, NetScaler Gateway, or SSL Content Switching Virtual Server.

- To automatically backup SSL certificates and receive notification when the certificates are about the expire, deploy Citrix Command Center or Citrix NetScaler Management and Analytics. Also see Citrix CTX213342 How to handle certificate expiry on NetScaler.
Intermediate Certificate
If your Server Certificate is signed by an intermediate Certificate Authority, then you must install the intermediate Certificate Authority’s certificate on the NetScaler. This Intermediate Certificate then must be linked to the Server Certificate.
- Sometimes the public Certificate Authority will give you the Intermediate certificate as one of the files in a bundle. If not, log into Windows and double-click the signed certificate.
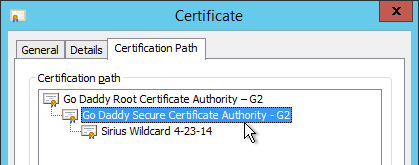
- On the Certification Path tab, double-click the intermediate certificate (e.g. Go Daddy Secure Certificate Authority. It’s the one in the middle).
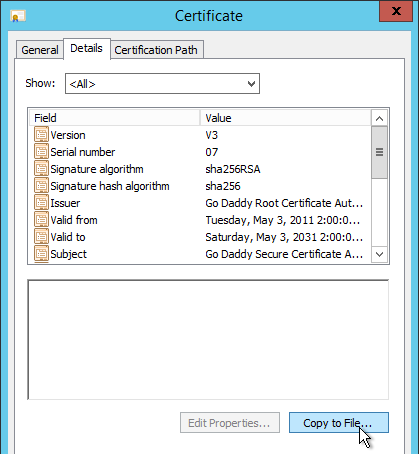
- On the Details tab, click Copy to File.
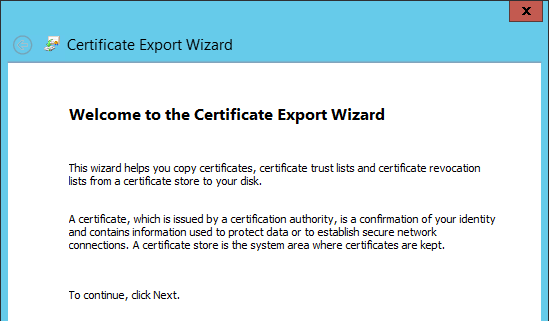
- In the Welcome to the Certificate Export Wizard page, click Next.
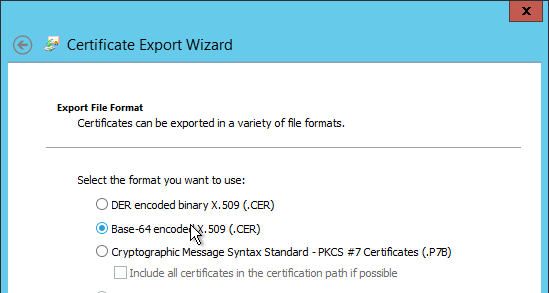
- In the Export File Format page, select Base-64 encoded and click Next.
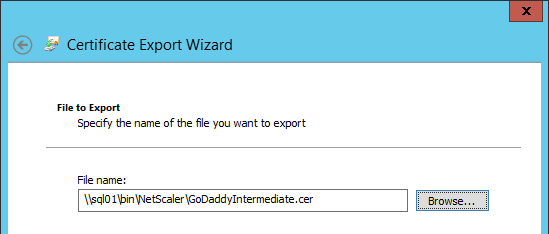
- Give it a file name and click Next.
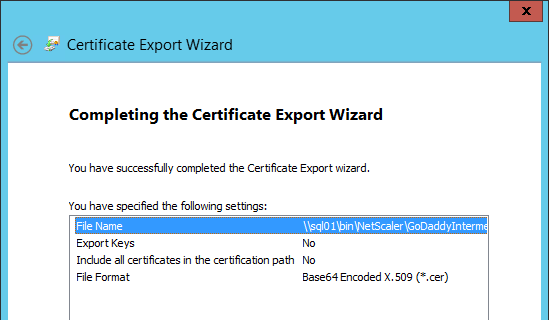
- In the Completing the Certificate Export Wizard page, click Finish.
- In the NetScaler configuration GUI, expand Traffic Management, expand SSL, and click Certificates.
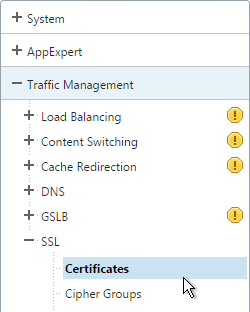
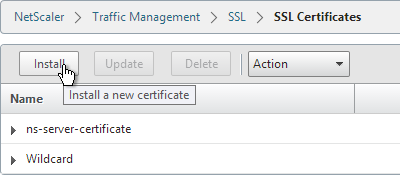
- On the right, click Install.
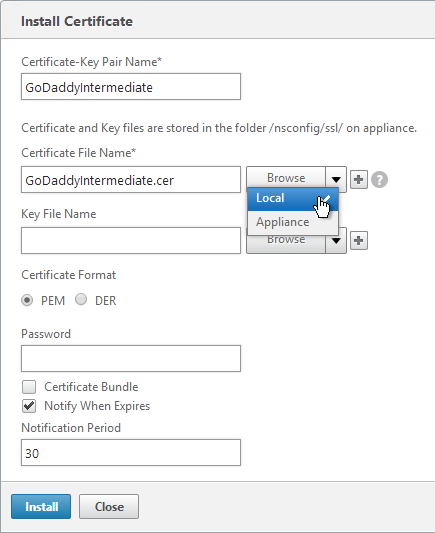
- Name it Intermediate or similar.
- Browse locally for the Intermediate certificate file.
- Click Install. You don’t need a key file.
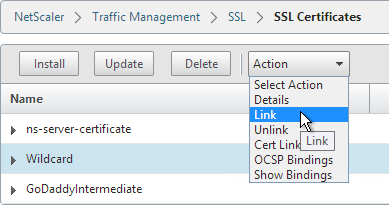
- Highlight the server certificate, open the Action menu, and click Link.
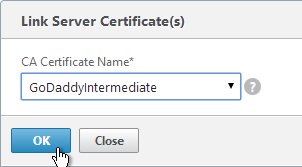
- The previously imported Intermediate certificate should already be selected. Click OK.
Create Certificate with NetScaler as Certificate Authority
If you don’t have an internal Certificate Authority, you can use NetScaler as a Certificate Authority. The NetScaler Certificate Authority can then be used to sign Server Certificates. This is a simple method for creating a new management certificate. The main problem with this method is that the NetScaler root certificate must be manually installed on any machine that connects to the NetScaler.
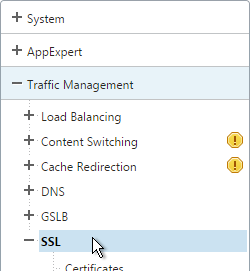
- On the left, expand Traffic Management, and click SSL.
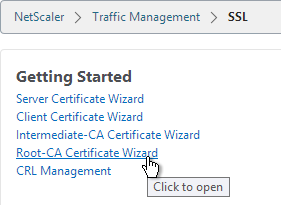
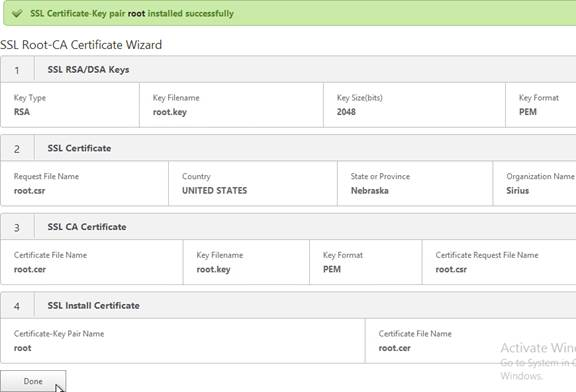
- On the right, in the left column, click Root-CA Certificate Wizard.
- In the Key Filename field, enter root.key or similar. This is a new file.
- In the Key Size field, enter at least 2048.
- Optionally, to encrypt the key file, change the PEM Encoding Algorithm to DES3, and enter a new password.
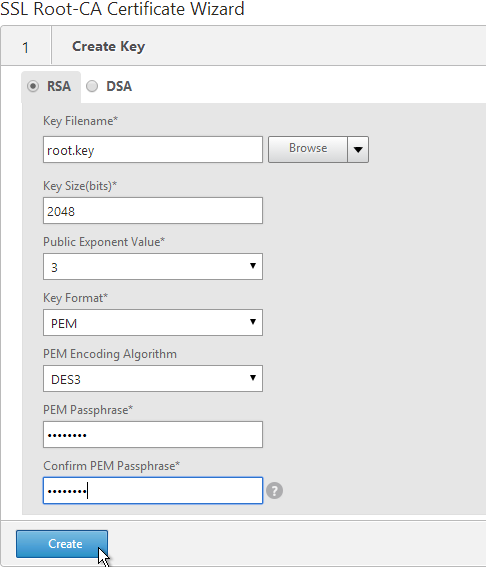
- Click Create.
- In the Request File Name field, enter root.csr or similar. This is a new file.
- If the key file is encrypted, enter the password.
- Scroll down.
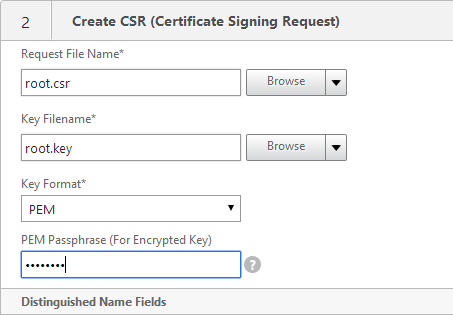
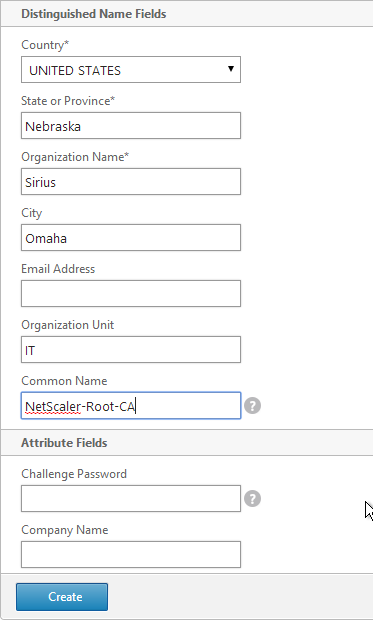
- In the State field, enter the non-abbreviated state name.
- In the Organization Name field, enter the name of your organization.
- Fill in other fields as desired.
- In the Common Name field, enter a descriptive name for this Certificate Authority.
- Click Create .
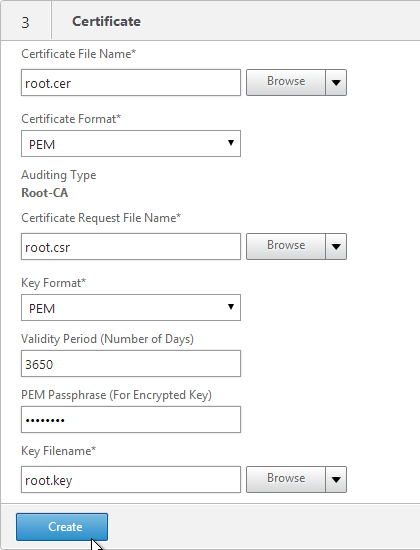
- In the Certificate File Name field, enter root.cer or similar. This is a new file.
- Change the Validity Period to 3650 (10 years) or similar.
- If the key file is encrypted, enter the password in the PEM Passphrase field.
- Click Create.
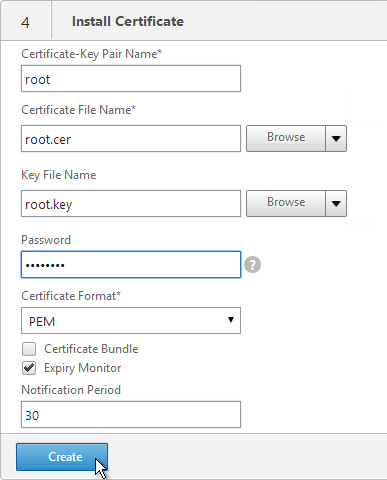
- In the Certificate-Key Pair Name field, enter a friendly name for this Certificate Authority certificate.
- If the key file is encrypted, enter the password in the Password field.
- Click Create.
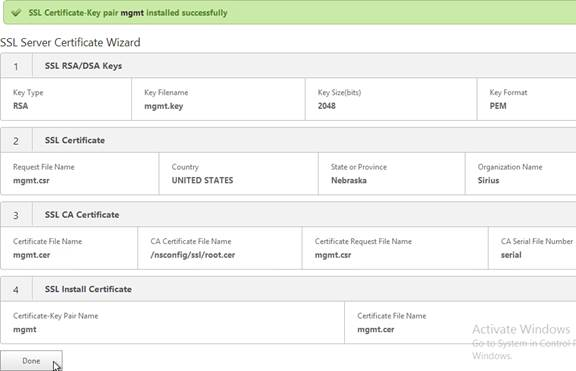
- Click Done.
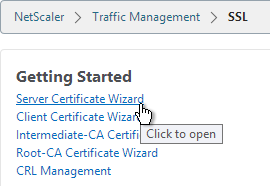
- In the right pane, in the left column, click Server Certificate Wizard.
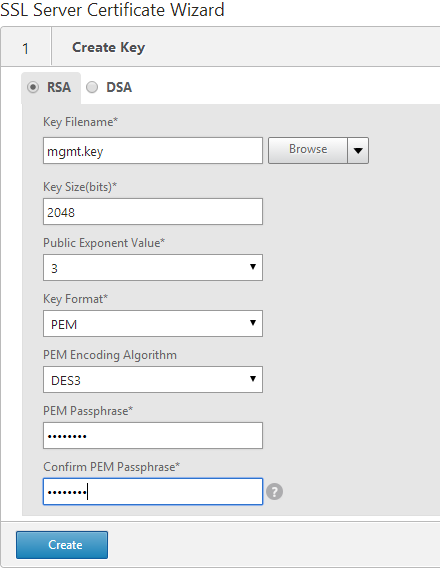
- In the Key Filename field, enter mgmt.key or similar. This is a new file.
- In the Key Size field, enter at least 2048.
- Optionally, to encrypt the key file, change the PEM Encoding Algorithm to DES3, and enter a new password.
- Click Create.
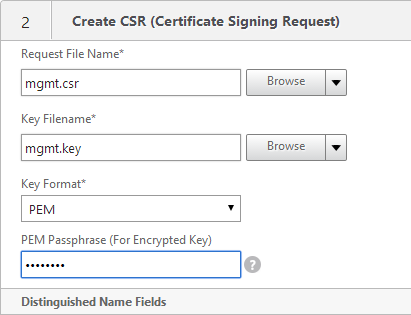
- In the Request File Name field, enter mgmt.csr or similar. This is a new file.
- If the key file is encrypted, enter the password.
- Scroll down.
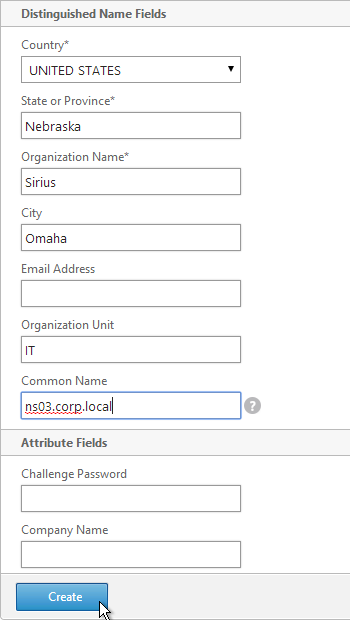
- In the State field, enter the non-abbreviated state name.
- In the Organization Name field, enter the name of your organization.
- Fill in other fields as desired.
- In the Common Name field, enter the hostname (FQDN) of the appliance.
- Click Create.
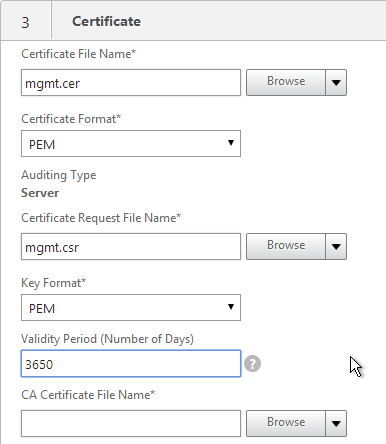
- In the Certificate File Name field, enter mgmt.cer or similar. This is a new file.
- Change the Validity Period to 3650 (10 years) or similar.
- Scroll down.
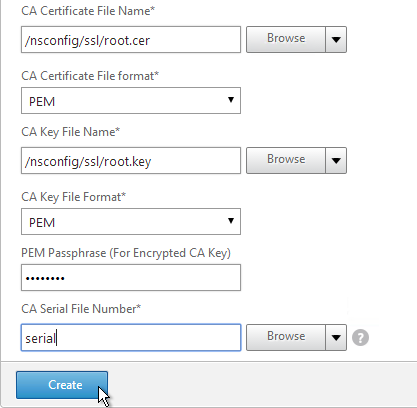
- In the CA Certificate File Name field, browse to the root.cer file.
- In the CA Key File Name field, browse to the root.key file.
- If the key file is encrypted, enter the password.
- In the CA Serial File Number field, enter the name of a new file that will contain serial numbers.
- Click Create.
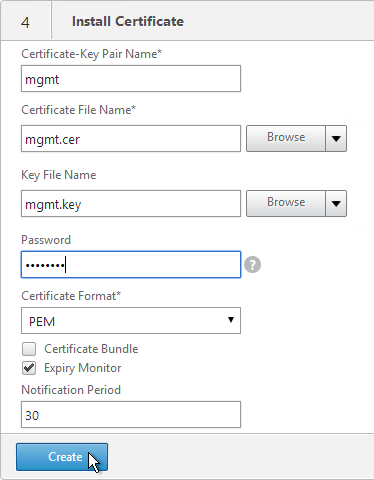
- In the Certificate-Key Pair Name field, enter a friendly name for this management certificate.
- If the key file is encrypted, enter the password in the Password field.
- Click Create.
- Click Done.
Default Management Certificate Key Length
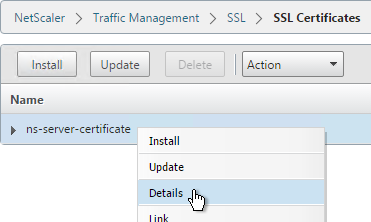
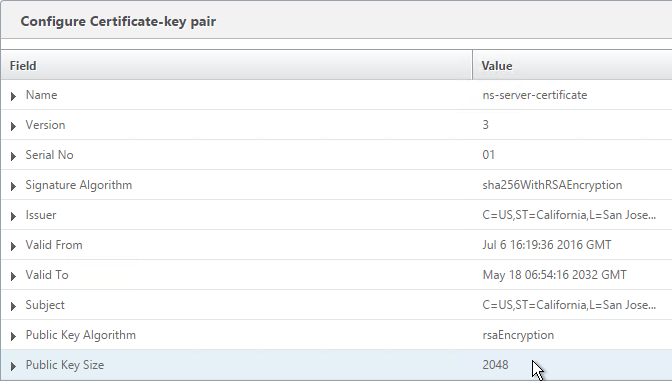
In older NetScaler builds, the default management certificate (ns-server-certificate) key size is only 512 bits. To see the key size, right-click ns-server-certificate, and then click Details.

If you try to use Internet Explorer to connect to the NSIP using SSL, Internet Explorer will consider 512 bits to be unsafe and probably won’t let you connect. Notice there’s no option to proceed.

You can configure Internet Explorer to accept the 512-bit certificate by running Certutil ?setreg chain\minRSAPubKeyBitLength 512 on the same machine where Internet Explorer is running.

When you upgrade NetScaler, the management certificate remains at whatever was installed previously. If it was never replaced, then the management certificate is still only 512 bits. To replace the certificate with a new 2048-bit self-signed certificate, simply delete the existing ns-server-certificate certificate files and reboot.
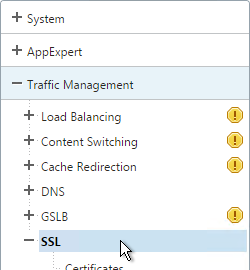
- Go to Traffic Management > SSL.
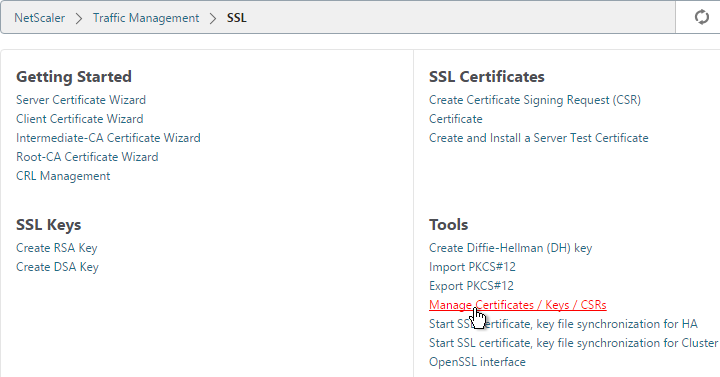
- On the right, in the right column, click Manage Certificates / Keys / CSRs.
- Highlight any file named ns-* and delete them. This takes several seconds.
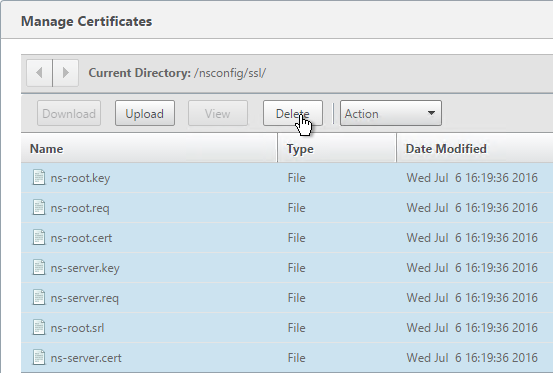
- Then go to System and reboot.

- After a reboot, if you view the Details on the ns-server-certificate, it will be recreated as self-signed with 2048-bit key size.
Replace Management Certificate
You can replace the default management certificate with a new trusted management certificate.
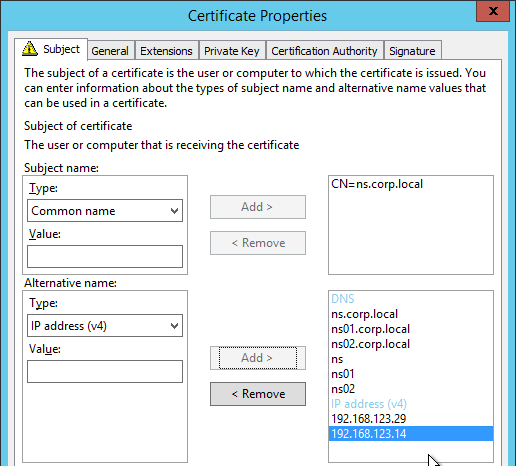
Only one certificate will be loaded on both nodes in a High Availability pair so make sure the management certificate matches the names of both nodes. This is easily doable using a Subject Alternative Name certificate. Here are some names the management certificate should match (note: a wildcard certificate won’t match all of these names):
- The FQDN for each node NSIP in a High Availability pair. Example: ns01.corp.local and ns02.corp.local
- The shortnames (left label) for each node NSIP in a High Availability pair. Example: ns01 and ns02
- The NSIP IP address for each node in a High Availability pair. Example: 192.168.123.14 and 192.168.123.29
- If you enabled management access on your SNIPs, add names for the SNIPs:
- FQDN for the SNIP. Example: ns.corp.local
- Shortname for the SNIP. Example: ns
- SNIP IP address. Example: 192.168.123.30
If you are creating a Subject Alternative Name certificate, it’s probably easiest to do the following:
- Create the certificate using the Certificates snap-in on a Windows box. You can add the Subject Alternative Names in the certificate request wizard. The Subject Alternative Names for the IP addresses must be added as IP address (v4). The other Subject Alternative Names are added as DNS.
- Export the certificate and Private Key to a .pfx file.
- On the NetScaler, use the Import PKCS#12 tool to convert the .pfx to PEM format. Then follow one of the procedures below to replace the management certificate.
There are two methods of replacing the management certificate:
- Use the Update Certificate button for ns-server-certificate in the NetScaler GUI. This automatically updates all of the Internal Services bindings too.
- You cannot rename the certificate in the NetScaler GUI. It remains as ns-server-certificate.
- If your new management certificate is a wildcard that you need to use for other SSL entities, then you will bind ns-server-certificate to those entities instead of a more descriptive name. You can’t re-upload the wildcard certificate again with a different GUI name.
- Or manually Bind the new certificate to the Internal Services.
Update Certificate Method
The Update Certificate button method is detailed below:
- You can’t update the certificate while connected to the NetScaler using https so make sure you connect using http.
- On the left, expand Traffic Management, expand SSL, and click Certificates.
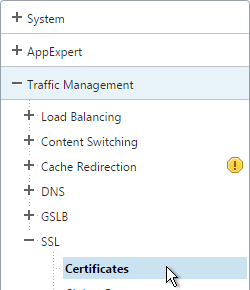
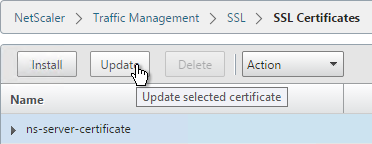
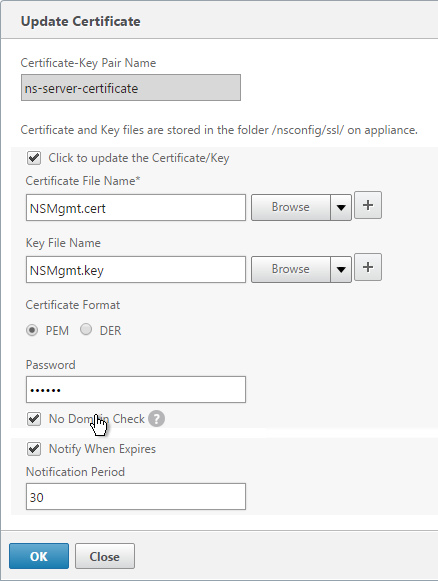
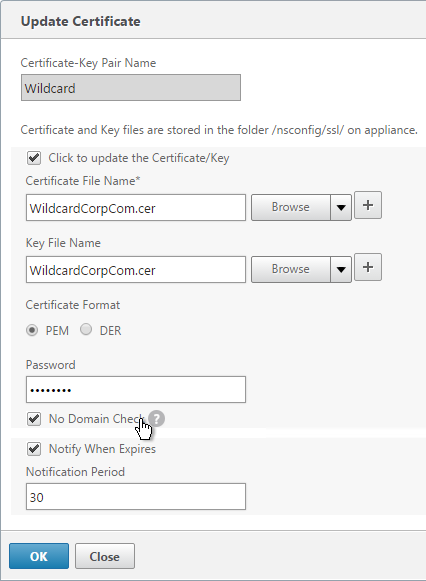
- On the right, highlight ns-server-certificate, and click Update.
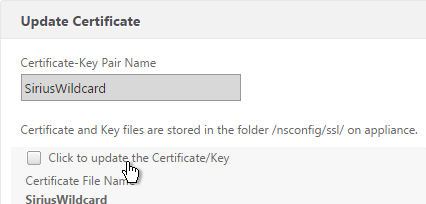
- Check the box next to Click to update the Certificate/Key.
- Browse to the new management certificate. It could be on the appliance or it could be on your local machine.
- Click Yes when asked to update the existing certificate.
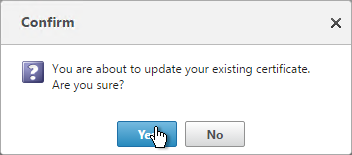
- If the PEM certificate is encrypted, enter the password.
- Check the box next to No Domain Check. Click OK.
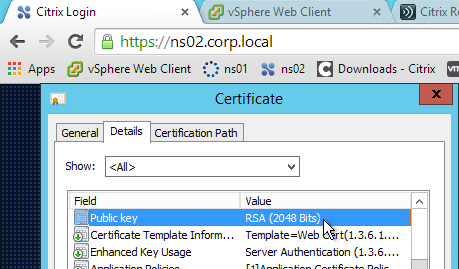
- You can now connect to the NetScaler using https protocol. The certificate should be valid and it should have a 2048 bit key.
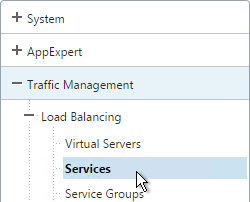
- On the left, expand Traffic Management, expand Load Balancing, and click Services.
- On the right, switch to the Internal Services tab.

- You will see multiple services. Edit one of them.
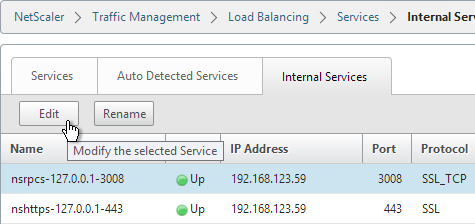
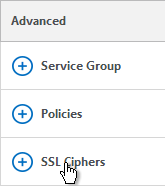
- On the right, in the Advanced column, click SSL Ciphers.
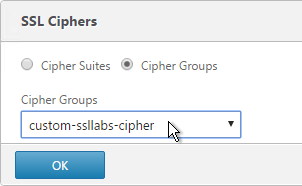
- On the left, in the SSL Ciphers section, bind a custom cipher group that has RC4 ciphers removed. Click OK.
- Scroll down to the SSL Parameters section, and click the pencil icon.

- Uncheck the box next to SSLv3. NetScaler VPX 10.5 build 57 and newer lets you enable TLSv11 and TLSv12. Click OK.

- Repeat for the rest of the internal services.
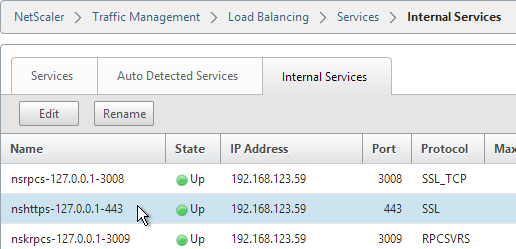
Manual Binding Method
The manual Binding to Internal Services method is detailed below:
- You can’t update the certificate while connected to the NetScaler using https so make sure you connect using http.
- On the left, expand Traffic Management, expand SSL, and click Certificates.
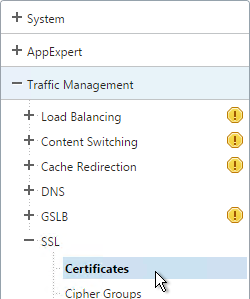
- On the right, use the Install button to install the certificate if you haven’t already done so.
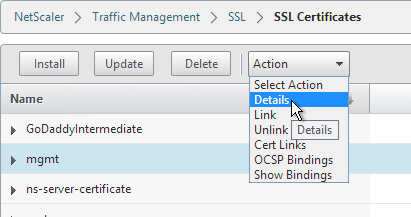
- On the right, highlight the new management certificate, open the Action menu, and click Details.
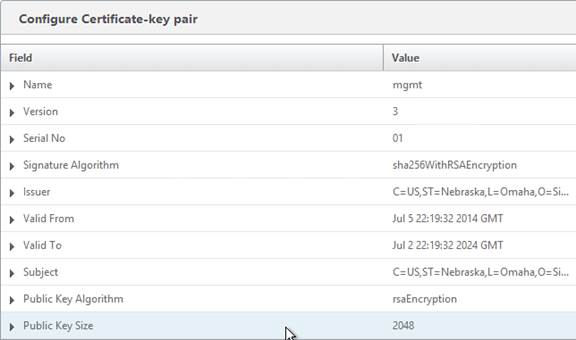
- Verify that the Public Key Size is 2048. Click OK.
- On the left, expand Traffic Management, expand Load Balancing, and click Services.

- On the right, switch to the Internal Services tab.

- You will see multiple services. Edit one of them.

- Scroll down and click where it says 1 Client Certificate.
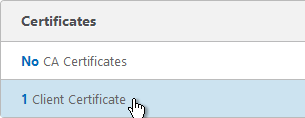
- Highlight the existing management certificate, and click Unbind.
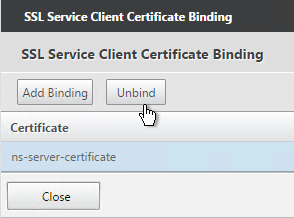
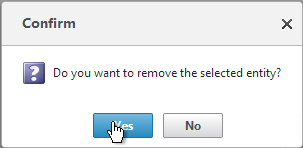
- Click Yes to remove the selected entity.
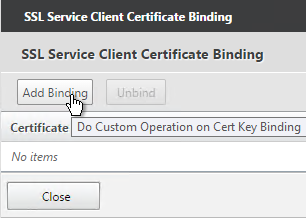
- Click Add Binding.
- Click where it says Click to select.
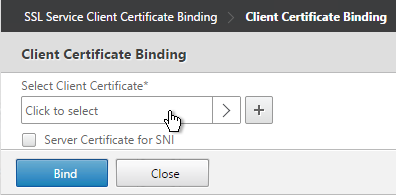
- Select the new management certificate, and click OK.
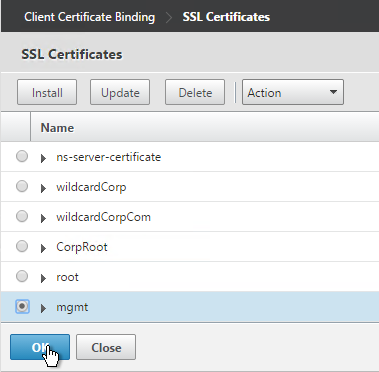
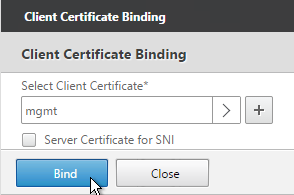
- Click Bind.
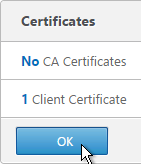
- Click OK.
- On the right, in the Advanced column, click SSL Ciphers.

- On the left, in the SSL Ciphers section, bind a custom cipher group that has RC4 ciphers removed. Click OK.

- Scroll down to the SSL Parameters section, and click the pencil icon.

- Uncheck the box next to SSLv3. NetScaler VPX 10.5 build 57 and newer lets you enable TLSv11 and TLSv12. Click OK.

- Repeat for the rest of the internal services.

Force Management SSL
By default, administrators can connect to the NSIP using HTTP or SSL. This section details how to disable HTTP. Connecting to the NSIP using SSL also causes Java communication to use SSL (TCP 3008).
- Connect to the NSIP using https.
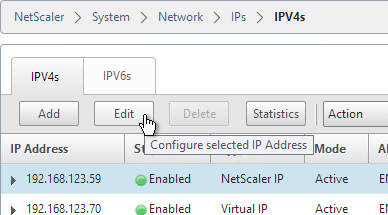
- On the left, expand System, expand Network, and click IPs.
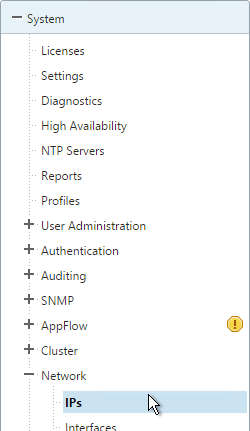
- On the right, highlight your NetScaler IP, and click Edit.
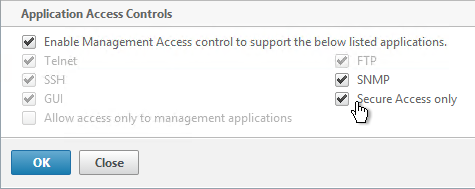
- Near the bottom, check the box next to Secure access only, and then click OK.
- Repeat this on the secondary appliance.
- Repeat for any SNIPs that have management access enabled.
SSL Certificate – Update
If your certificate is about to expire, do the following:
- Create updated certificate files in PEM format. One option is to create a key file and Certificate Signing Request directly on the NetScaler. Another option is to convert a PFX file to a PEM file. Don’t install the certificate yet, but instead, simply have access to the key file and certificate file in PEM format.
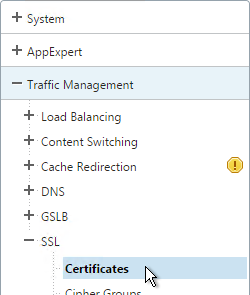
- In NetScaler, navigate to Traffic Management > SSL > Certificates.
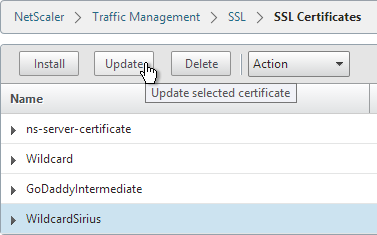
- On the right, highlight the certificate you intend to update, and click Update.
- Check the box next to Click to update the Certificate/Key.

- Browse to the updated certificate file.
- Click Yes when asked to update the existing certificate.

- Browse to the updated key file.
- If the key file is encrypted, enter the password.
- Check the box next to No Domain Check.
- Click OK. This will automatically update every Virtual Server on which this certificate is bound.
- Certificates can also be updated in Citrix Command Center or NetScaler Management and Analytics System.
Hi Carl,
Thank you so much for all information provided on your website. It a reference for me when it comes to Netscaler stuff.
I have basic question about certification configurations on the nescaler. Have been trying to find the answer but so far no luck.
I understand that when you install a server cert you can link it to the intermediate cert so it can be presented to the client. However what is the purpose of adding the CA certificates along with the server certificate? What do we achive with that? Is that required when the cert is signed by a private CA so the root and intermediate certs are also presented to the client?
Thanks
Murilo
Server cert should only be linked to the intermediate certs. The root cert should be installed on the client using an out-of-band method and should not be delivered by NetScaler.
If you’re asking about binding CA certificates to an SSL vServer, that configuration is needed for client certificate authentication so SSL vServer knows which client certificates are acceptable.
When I enabled DTLS on my Virtual Server I am given the message “No usable ciphers configured on the SSL vserver/service” when attempting to bind the SSL Certificate. Have you seen this error before? I can’t seem to find documentation on why that would be occurring only when DTLS is enabled.
Isn’t that just a warning? Does it work?
It does indeed, Sir, warnings just concern me and I wasn’t sure if it was something to be truly concerned with.
Hi Carl,
Thank you so much for this post.
I have a query on section “Updating the SSL certificates”.
My question is “if we upload the renewed certificates and private keys via GUI, will it replace the existing old files (cert & Key) that is residing under /nsconfig/ssl ? If it replaces the old certificate file, how we can roll back?
It does not replace the files. The old files should still be there. You can always download them first to back them up.
Hi Carl
Can you please explain the roll back process a bit more in detail and also what steps be taken prior to applying the renewed certificate so that rollback is smooth, we will be generating certificate from the storefront server
Hi Carl,
I have a doubt about certificates in Netscaler. Is there a way to easily find which certificate files (.crt, .key, .pfx…) are not currently bound to any object and can be removed safely at the filesystem level (through Traffic Management – SSL – Manage Certificates / Keys / CSRs menu)?
Thank you 🙂
One option is to download the running config (System > Diagnostics > Running Config). Search for “add ssl certkey”, which shows the file names. Then compare to your /nsconfig/ssl directory.
Hi
This is very detailed information of SSL management in Netscaler.
I have an issue with our NS11.0.71.18 version.
The “Show Bindings” of a public certificate page shows 4 VSERVER are bound to this certificate. But I can only find 3 of them are used as Netscaler Gateway VIrtual Servers.
I cannot find the fourth one anywhere in my netscaler.
Is it possible that there was such VSERVER but got deleted and Certificate Binding information is not updated?
Or is there anyway to find this missing VSERVER. It is definitely not in Traffic Management sectioin.
Do you have any idea where it could be then?
Many thanks,
Go to System > Diagnostics > Running Configuration. Search it for the name of the certkey.
Hi Carl,
Thanks for the reply.
This VSERVER turns out as another virtual layer of the VPN Virtual Server for Netscaler Gateway.
If the virtual server’s setting DTLS is enabled, it will show up as using the certificate.
Cheers,
NJin
Hi Carl.
We’ve recently replaced our wildcard cert with one from a different CA. Everything works fine for web and IOS devices. Android devices, however, give errors and wont allow some 3rd-party apps to connect. The only exception to this is the Chrome browser in the phone connects fine.
The valid root cert is already on the phone, and only the intermediate cert is bound to the wildcard cert in the Netscaler, which is bound to the VIP. Doing an SSL Labs test shows 2 certificate chains presented by the VIP: one configured correctly with the wildcard and intermediate cert, and another with just the wildcard cert.
I’m running Netscaler version 11.0 65.35.nc.I am planning to reach out to the app developer tomorrow who we have a support contract with to see if it’s something in the app, but it worked fine on the other wildcard cert which expired today.
I’d appreciate any insight you can give.
Steve Hurd
Baptist Health Floyd
New Albany, IN
Make sure the NetScaler wildcard cert is linked only to the intermediate. Do not link the intermediate to the root.
Hi!,
Can i check that after importing/installing a certificate onto the netscaler if it is necessary to bind HTTPS to the certificate on the back end Storefront servers as well?
Thanks 🙂
You can do Http:80 from NetScaler to backend if that’s your preference. I generally try to encrypt that too, since it contains user credentials.
Instead of creating a file with both cert and key in it, is it not best practice to create a cer file and key file separately? Step 8 in first section, you will see cert and key in same file.
When you use NetScaler to convert from pfx to PEM, it puts both of them in the same file. I can’t think of any reason why combining them would be bad.
Hi Carl,
This is very useful.
We are trying to do Server Authentication. The CN in the certificate presented by the server is *.xxx.yyy.com When we try to enter that as the Common name in the common name field of the service which is connecting to the server we get and error message “invalid common name”. Is there a way to do this or do we have to get a specific certificate for that server?
You want NetScaler to verify the certificate presented by the server/service?
yes. We want the Netscaler to to verify the certificate presented by the server to the service.
I assume you’re following http://docs.citrix.com/en-us/netscaler/11-1/ssl/customize-ssl-config/config-common-name-for-cert.html . I don’t think I’ve tried this yet. You have the CA certificate bound to the SSL service?
Or are you saying it’s a wildcard issue? Maybe put in a real FQDN, which should match the wildcard CN?
Hi Carl.
Love your work. Would it be possible for you to include a method using the Netscaler for CSR’s with subject alternative names?
Almost all public CAs prefer that you request the SAN names on the public CA’s website when you purchase the certificate, and not in the CSR. Microsoft CA allows SAN names in the CSR, but it also allows you to specify them after you upload the CSR.
To add SAN names to CSR on NetScaler, you’d need to run openssl commands.
Hi Carl
Great article. thanks
In a HA environment, is there any sequence for installing new certificates on the nodes? Is it necessary to force failover during the process?
Which cert? Management cert? Or vServer cert?
When you update a cert or install a new one, HA will sync the file to the secondary node, and then run the add/update CLI command on both nodes. No failover needed.
Hi Carl,
Just one Simple question, I doing GSLB with SSL, should I need to create different CSRs on local and remote LBs or can I generate it on only one LB and use the same certificate on remote site too?
Thanks in advance.
BK
Once you create the cert on one appliance, you can download the files and use the same files on the other appliance.
Following Root-CA Certificate Wizard, I created root certificate using GUI which in turn logged following entries in syslog server.
#For RSAKey
Feb 21 08:14:16 192.168.10.120 02/21/2017:13:14:16 GMT ns 0-PPE-0 : GUI CMD_EXECUTED 808 0 : User nsroot – Remote_ip 192.168.10.109 – Command “create ssl rsakey NS_Root_RSA_PEM_DES3 2048 -exponent 3 -keyform PEM -des3 -password “********”” – Status “Success”
#For CSR
Feb 21 08:14:58 192.168.10.120 02/21/2017:13:14:58 GMT ns 0-PPE-0 : GUI CMD_EXECUTED 809 0 : User nsroot – Remote_ip 192.168.10.109 – Command “create ssl certReq NS_Root_RSA_PEM_DES3.csr -keyFile NS_Root_RSA_PEM_DES3 -keyform PEM -PEMPassPhrase “********” -countryName US -stateName “New Jersey” -organizationName HomeLab -organizationUnitName HomeLab -localityName “Jersey City” -commonName CAG.HomeLab.local” – Status “Success”
#For Cert
Feb 21 08:15:16 192.168.10.120 02/21/2017:13:15:16 GMT ns 0-PPE-0 : GUI CMD_EXECUTED 810 0 : User nsroot – Remote_ip 192.168.10.109 – Command “create ssl cert NS_Root_RSA_PEM_DES3.crt NS_Root_RSA_PEM_DES3.csr -keyFile NS_Root_RSA_PEM_DES3 -keyform PEM -PEMPassPhrase “********” -days 365 -certForm PEM -CAcertForm PEM -CAkeyForm PEM” – Status “Success”
#To Create CertKeyPair
Feb 21 08:15:38 192.168.10.120 02/21/2017:13:15:38 GMT ns 0-PPE-0 : GUI CMD_EXECUTED 811 0 : User nsroot – Remote_ip 192.168.10.109 – Command “add ssl certKey NS_Root_RSA_PEM_DES3 -cert NS_Root_RSA_PEM_DES3.crt -key NS_Root_RSA_PEM_DES3 -inform PEM “********” -expiryMonitor ENABLED -notificationPeriod 30 -bundle NO” – Status “Success”
#To see CertKeyPair created in step above
Feb 21 08:15:38 192.168.10.120 02/21/2017:13:15:38 GMT ns 0-PPE-0 : GUI CMD_EXECUTED 812 0 : User nsroot – Remote_ip 192.168.10.109 – Command “show ssl certKey NS_Root_RSA_PEM_DES3” – Status “Success”
Now, that I got commands netscaler logged in syslog, I went ahead and removed CertKeyPair by executing following on CLI.
rm certkey NS_Root_RSA_PEM_DES3
and removed file from shell.
root@ns# cd /nsconfig/ssl/
root@ns# rm NS_Root_RSA_PEM_DES3.key NS_Root_RSA_PEM_DES3.csr NS_Root_RSA_PEM_DES3.crt
Then I tried to execute command listed in syslog to see if I can re-create it using CLI and I learn that on 3rd command to create NS_Root_RSA_PEM_DES3.crt it failed.
I had been careful to type accurate password. I think it’s bug in Syslog module and system not logging correct command executed in GUI into syslog. Otherwise it would have worked.
Looks like the “create ssl cert” command needs the ROOT_CERT switch.
You see I am trying to create root cert itself using “create ssl cert” command which was logged in syslog when I ran though “Root-CA Certificate Wizard”.
What I am trying to say is that “Root-CA Certificate Wizard” is executing command which is different then what is logged in syslog.
Can I rebind the Internal Services to use an existing wildcard cert (*.corp.com) I’m using for LB virtual servers if I’m only accessing the NSIP management interface using https://netscaler.corp.com? I don’t plan on using the shortname or the IP address to access the management interface so I’m wondering if I can get by with using the wildcard cert instead of creating a new SAN certificate.
Of course. Have you tried it?
Not yet. I thought it would work but it wasn’t clear in the Replace Management Certificate section if it was possible to use a wildcard cert.
Great article. Going through the update process I renewed an existing cert and uploaed to the netscaler. Following your update method, I receive an error that the resource already exists when renewing cert. Is this due to the keys being the same?
Regards
James
Did you maybe already add the new certKey prior to updating the existing certKey? If so, just delete the recently added certKey and try the update again.
Appreciate the quick reply. I went back and traced my steps and it looks like I exported the old cert out of Exchange and not the new one. Once I uploaded the new one I was able to update the existing cert. Thanks again.
Great page, I am looking for SHA-256 instead of the Netscaler default SHA-1 ??
Is there a easy way to create a CSR with SHA256 ?
Should I use a IIS to create the Request?
Does your CA requires the “CSR” with SHA-256? It doesn’t matter what the CSR is since the final certificate will still be SHA-256.
But if you really want your CSR to be SHA2, then NetScaler 11.1 lets you do it in the GUI. Or you can do it from openssl in the command line.
Good evening I would like to ask you a questio.
Because from the command line with across where the certificate. PFX does not address the certificate with .p7b extension. While manually installing the .pfx certifed installation is successful. I enclose the CLI:
certutil -f -p password -importpfx “\\ Nserver \ scripts $ \ patch \ certificate.pfx”
thanks for collaboration
NetScaler VPX NS10.5 – Do you need to keep the Imported PKCS#12 file once you install the Certificate or can these be deleted?
You can delete it.
Awesome right up on Netscaler config! I was able to set mine up in my lab based off your article. Thank you!
Hi Carl, great article as i was looking into using SAN certs for my HA Netscalers. I followed your steps and use our company’s Enterprise CA to pre-create the cert on a Windows Server. Now we have the cert exported, i keep getting SyntaxError: Invalid character.
Any idea what this can be? made sure to name the cert as its FQDN address, no spaces etc. Also the password we have kept simple, but so far it keeps failing.
We have also tried to export the private key seperate from the cert, so two files. private key as .pfx and cert as .cer. Still fails will trying to import the private key file.
Thanks,
Alvin
Does it work from the CLI?
If you’re doing .pfx, it needs to be converted to .cer and .key in PEM (Base64) format first. Traffic Mgmt > SSL > Import PKCS#12 can do the conversion for you.
Ive got a strange one for you. I created a CA signed certificate request. Uploaded to Godaddy. I downloaded the cert and the bundled cert. I then tried to upload and add in Netscaler (VPX trial). I can do the regular cert but the bundled cert doesn’t work. It tells me I’m using the wrong key. Any ideas? I’ve done this for a couple years and this is a first for me. Totally stumped.
Is the key in the file? Also see http://support.citrix.com/article/CTX136023
Hi Carl, using the NS Gui Import PKCS12 wizard is where it is failing with SyntaxError: Invalid character. This .pfx is created as shown in this article with the certificate wizard on a Windows server. the pfx includes the cert and private key.
Have to lookup the CLI command to try the import as well…
Got it working now, not sure if it is related to my Windows machine or Enterprise CA, but once i got the .pfx, i had to convert it first to a .cer file using “openssl pkcs12 -in certificate.pfx -out certificate.cer” then copy and split it’s contents to seperate files: certificate.pem, rootca.cer, dot1x.cer and privatekey.key. Then merge all *.cer and *.pem back into one fullcertificate.pem file. So leaving the privatekey.key out.
On the NS, run “openssl rsa -in current_keyfilename -out NEW_keyfilename” and then perform the cert install process. If key while was not converted i would get the Invalid private key, or PEM pass phrase required for this private key.
Hi Carl-
Not sure if you still look at this one but great blog. This has puzzled me so I thought I would ask.
What is the proper use of wildcard certificates from a public CA in NS 10.5?
We have (2) Storefront servers that are part of XYZ domain so SF1.XYZ.LOCAL and SF2.XYZ.LOCAL but the Store and NS are using *.XYZ.COM. The cert is for *.XYZ.COM but internal DNS name uses XYZ.LOCAL.
Internal and external beacons are also XYZ.COM and IIS SSL is XYZ.COM
LB VIP for Storefront uses XYZ.COM as well.
This all works fine even without the Intermediate CA linked but I’m wondering…
1) Is linking the intermediate a best practice or a requirement?
2) What are the typical effects of a wildcard not match DNS Name?
Kind regards,
Jim
1. Windows devices are smart enough to download missing intermediate certificates from the Internet. Other devices (iOS, Android) won’t do that. Thus you need to link any middle certificates in the chain.
2. By definition, wildcard matches all xyz.com DNS names. That’s the point of a wildcard. It won’t match xyz.local, of course.
Hi Carl,
We are using wildcard certificates which are going to expire soon. Our security team who is responsible for renewals has said going forward they wont renew wildcard, instead they have asked us to generate a new CSR for each URL.
On some Netscaler gateways we have multiple Virtual Servers each having a seperate VIP (domain name is same for all URLs). I have the following queries related to our scenario:
1. Do we need to generate CSR for each URL / vserver
2. Can I generate a CSR for a vserver configured on another netscaler box. I plan to use cli to generate the CSR to minimize the efforts.
3. Any easier way to generate multiple CSRs
Thanks,
Sid
Certificates match DNS names. If you have multiple Gateways on the same DNS name then you can use the same cert for each Gateway. Unless you want different keys for each Gateway.
You can create the cert on any machine and later import it to NetScaler. I typically create certs in IIS, export to .pfx, and then import to NetScaler. Once they are on a NetScaler they are just files that can be copied to any other NetScaler and “installed”. You can also use OpenSSL to create keys and CSRs.
Thanks Carl for detail information.
I need few clarification further as I’m going to renew existing SSL certificate for our NGs. 1. Do I need to recreate RSA Key for generating CSR?
2. Shall I need to link Intermidiate again once I install renewed certificate to Netscaler, ?
3. Would live sessions be impacted when SSL certificates would be installed?
Looking for your suggestion, mate.
Thanks in advance
Regards
Kallal
1. Not required but it is best practice to change the keys. That’s the reason for cert expiration. Longer keys means more time for hackers to break it.
2. Yes. They sometimes change the intermediate cert when you renew.
3. I would assume so. If ICA Proxy with Session Reliablity then most users won’t notice. NetScaler 11.0 build 64 added a feature to make SSL changes more seamless.
thanks for relpying so quick.
When I try to create another RSA key from Traffic management->SSL->SSL Keys->Create RSA Key, its keep on rolling untill I close this wizard manually. due to which I am unable to create any RSA key further. Whereas DSA key can be created in same way. Is this a known behaviour of Netscaler?
What build? Special characters in the password?
You can also do it from the CLI. Or if you have a Windows box you can create one using IIS, export to .pfx, and then import to NetScaler.
we are using Netscaler(8005), Version: 10.5, Build: 55.8 and have no special character in Password.
Excellent option to create it through IIS. Let me try that once.
Hi Carl
I manage to create the CSR and received the Bundle Certificates(containing root, intermidiate and server certificates). Please can you elaborate how would this bundle certificates be installed on Netscaler? how to link intermidiate and root cert with servers certificate sequentiay after installing these certificates in Netscaler?
Regards
Kallal
I usually upload one at a time and then link them. But don’t link the root. Instead only link the server cert to the intermediates.
thanks Carl but our certificate authority is changed. Shall I still use previous root certificate which was provided by different CA?
Regards
Kallal
When you try to link the certificates it will only give you valid certificate linking options.
On Windows, double-click the server cert. Go to the Cert Path page. You’ll see the full list of CAs that signed the cert. Each of the CAs, except the top one, needs to be uploaded to the NetScaler and linked to the server certificate.
Thanks Carl. I have renewed the certificate successfully on all gateways. thanks for your this article.. It helps a lot
Hey Carl,
Thanks for the explanation,
One question please. If I install a root certificate and link, the already installed and bound, the server certificate to it. Will I see any disconnections in when making this (cert linking) change?
Thanks
Not in NetScaler 11 and newer. Older versions might drop connections. But users might not notice.
Bind 2 server certificates to a Virtual Server?
We will be rolling out a new URL and will like the new and the existing URLs to be active at the same time for a while.
We have wildcard certificates for both URLs.
Do we need to create a new Virtual server on the CAG in order to have both sites up at once?
I thought about pointing the new URL at the existing one (as an alias) and adding the second certificate to the existing Virtual server. But it seems like only one server certificate can be applied at a time to the Virtual server. If we add a second one it bumps the existing one off.
If a wildcard matches both names then you only need the wildcard. But if you need two different certs then you need to enable SNI (Server Name Indication) in your SSL Profile or SSL Parameters. This lets you bind multiple SNI certs to the vServer. Note: this doesn’t work for Windows XP clients.
Hi Carl,
Just wonder if you could point or give me a step by step what I need to do in order to Create, Install a SSL Cert for internal testing of our LB StoreFront on the NetScaler.
Best Regards,
Vinh
You’re asking how to create an certificate that is signed by an internal Certificate Authority? There are numerous Microsoft CA tutorials on the Internet. If you want to use NetScaler as your CA, this page has those instructions. In production, I use public CA certs for both Gateway and internal StoreFront since they are usually the same DNS name.
Great site Carl, really helpful. A (very) minor point that had me scratching my head for a while. When exporting the PFX from windows, ensure the file name used does not contain any spaces, or Netscaler only imports the PFX as-is, leaving you thinking there is something wrong with your wildcard cert!
I just added some text instructing to not put spaces in the filename. I just tried it on NetScaler 11 and I get an error message, which is better than it not working without an error. Thanks for pointing this out.
Hi Carl,
When a user gets the following error message, Unable to launch your application. Contact your help desk with the following information: Cannot connect to the Citrix XenApp server. SSL Error 61: You have not chosen to trust “GeoTrust SSL CA – G3”, the issuer of the server’s security certificate.
Where can I find instructions on how to add the right certificate?
When you purchased the certificate GeoTrust should have given you the intermediate certificate. Just install it on the NetScaler and link it to the server certificate.
Hi Carl..
Thankyou very much.. it worked.. my xenserver was not in sync..
Hi Carl,
I;m getting below error when I try to install the certificate in netscaler, followed the steps properly provided by you.
“certificate is not valid yet”
Time is in sync between certificate server and netscaler, please help me in resolving the issue.
This usually means the date on the appliance is wrong. SSH to the appliance and run date. You can use the same command to change the date. If this is a VPX appliance, make sure the host hypervisor also has the correct date/time.
HI Carl, Many thanks for the above article. Excellent step by step information.
Kind Regards,
Logesh