Navigation
- Here are three methods of creating certificates for NetScaler:
- If the server certificate is signed by an intermediate authority, import the intermediate certificate and bind it.
- Export/Download certificate files from NetScaler 💡
- Default Management Certificate Key Length
- Replace the management certificate and then force SSL access for management.
- Update certificates before they expire.
💡 = Recently Updated
Convert .PFX Certificate to PEM Format
You can export a certificate from Windows and import it to NetScaler.
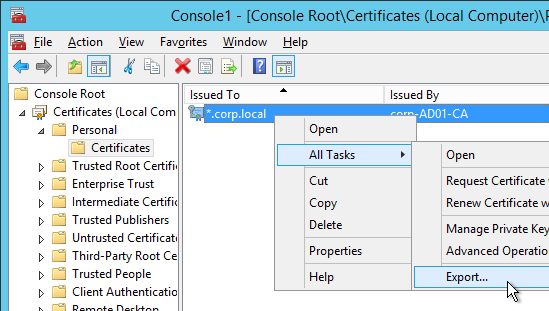
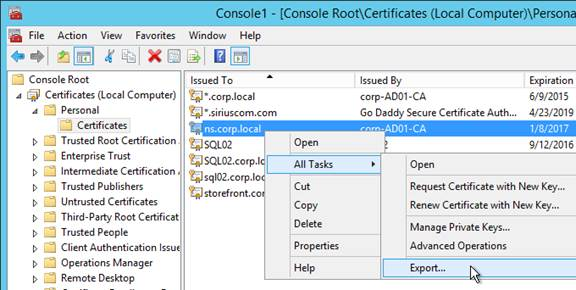
- On the Windows server that has the certificate, run mmc.exe and add the certificates snap-in.
- Right-click the certificate and click Export.
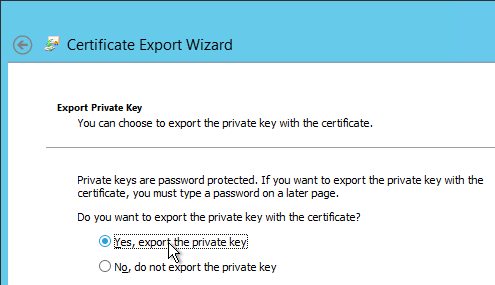
- On the Export Private Key page, select Yes, export the private key and click Next.
- On the Export File Format page, ensure Personal Information Exchange is selected and click Next.
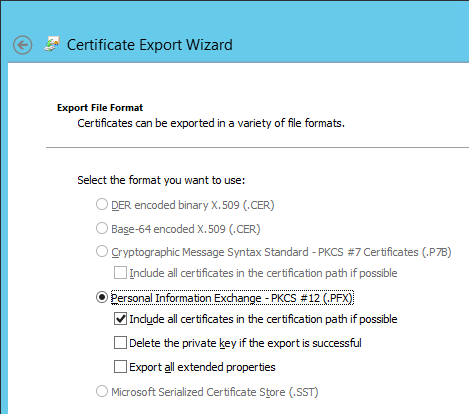
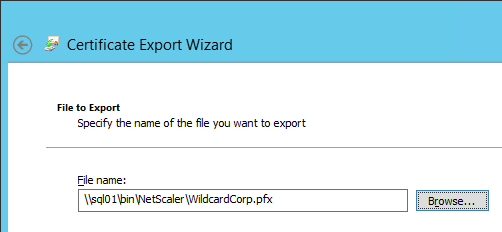
- Save it as a .pfx file. Don’t put any spaces in the filename.
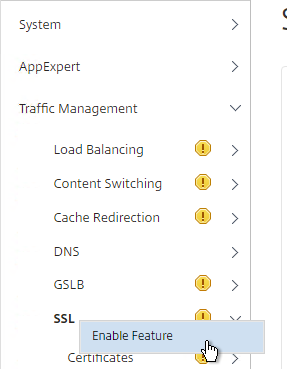
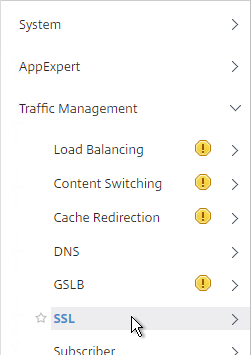
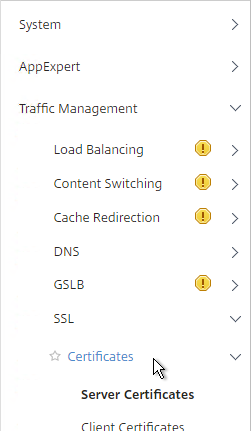
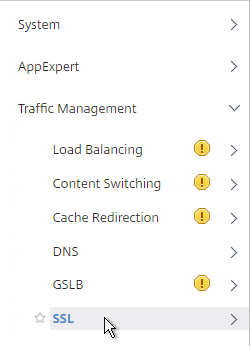
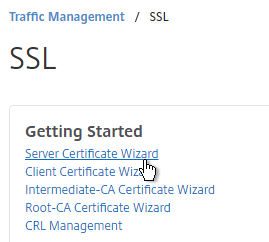
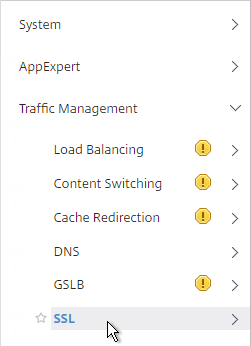
- Go to Traffic Management > SSL. If the SSL feature is disabled, right-click it and click Enable Feature.
- In NetScaler 11.1, it is no longer necessary to first convert the .PFX file to PEM format since NetScaler will convert it for you automatically. Note: when the PFX is automatically converted to PEM, the key is not encrypted.
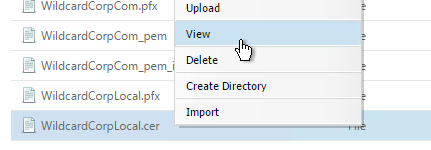
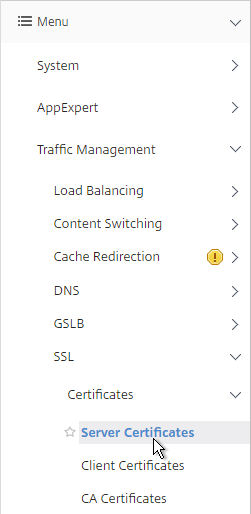
- Go to Traffic Management > SSL > Certificates.
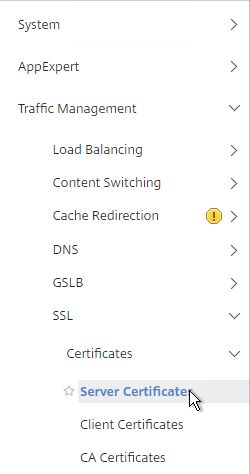
- There are now three different certificate nodes. Server Certificates have private keys. These certificates are intended to be bound to SSL vServers.
- Client Certificates also have private keys but they are intended to be bound to Services so NetScaler can perform client-certificate authentication against back-end web servers.
- CA Certificates don’t have private keys. These certificates can authenticate client certificates. Or you can link Server Certificates to CA Certificates to create a trust chain.
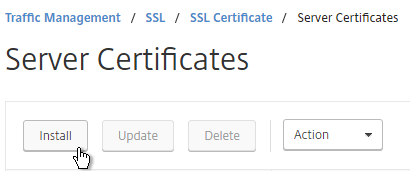
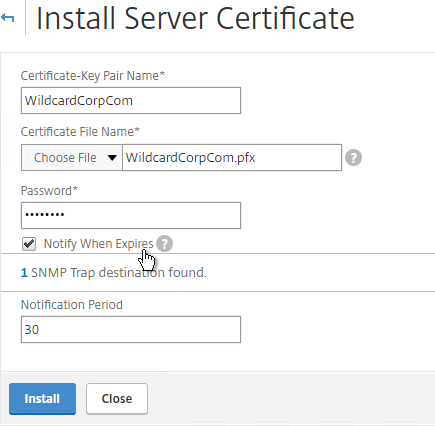
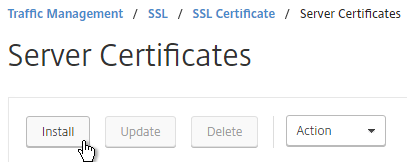
- On the left, click Server Certificates. On the right, click Install.
- Browse (Local) to the PFX file.
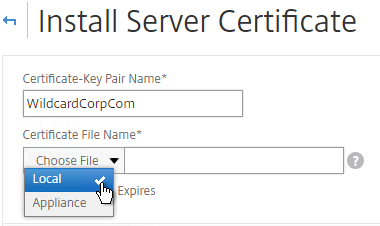
- Enter the PFX password, and then click Install.
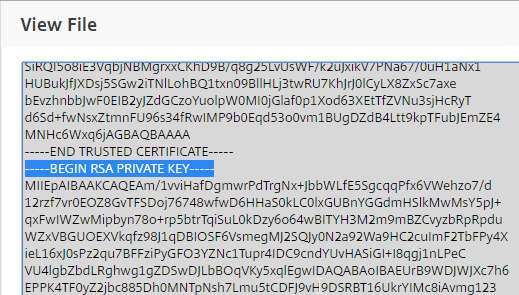
- If you click the information icon next to the certificate, you’ll see that NetScaler created a new file with a .ns extension.

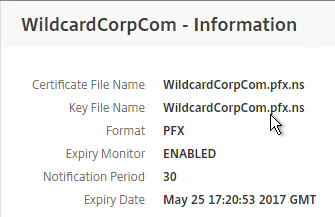
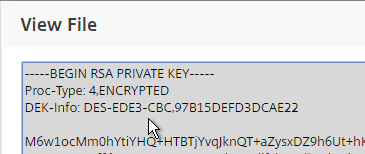
- If you look inside this file by going to Traffic Management > SSL > Manage Certificates / Keys / CSRs, notice that the RSA Private Key is not encrypted, encoded, or password protected.
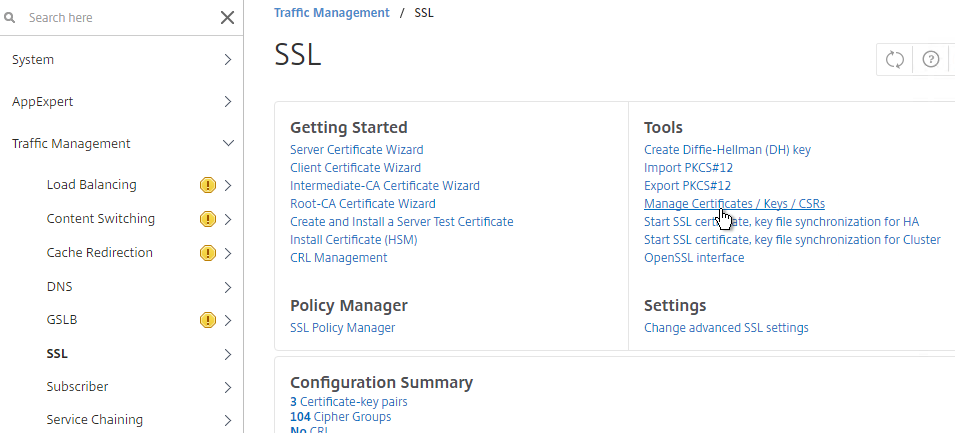
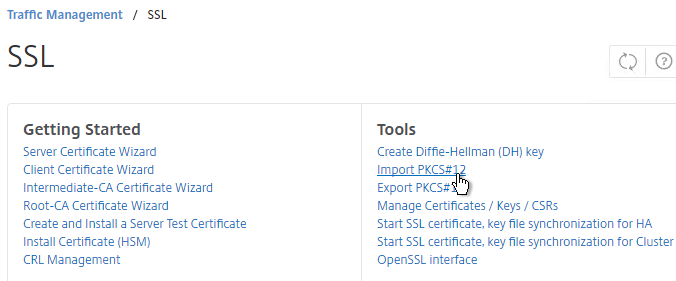
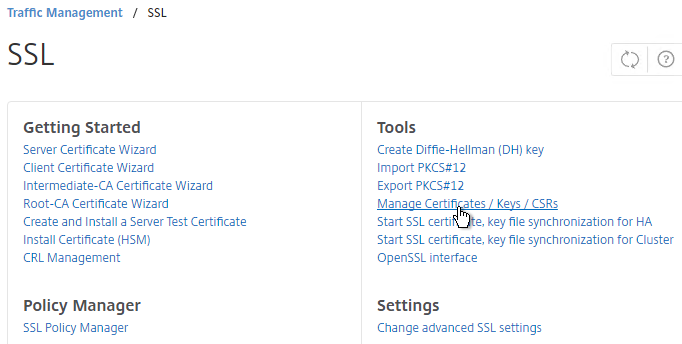
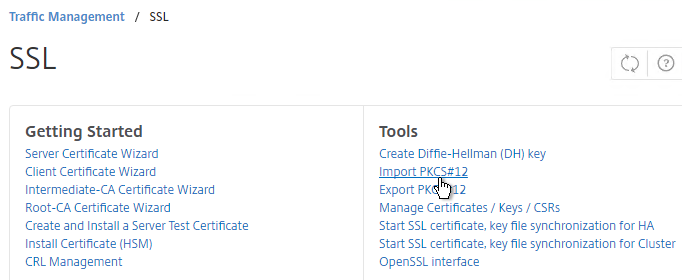
- If you want to encrypt your key file (recommended), use the older method of converting from PFX to PEM. In the NetScaler Configuration GUI, on the left expand Traffic Management and click SSL.
- In the right column of the right pane, click Import PKCS#12 in the Tools section.
- In the Import PKCS12 File dialog box:
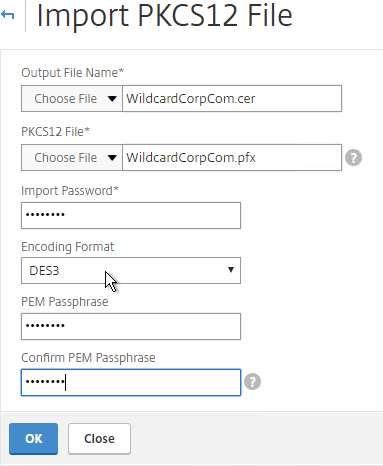
- In the Output File Name field, enter a name (e.g. Wildcard.cer) for a new file where the PEM certificate and key will be placed.
- In the PKCS12 File field, click Browse and select the previously exported .pfx file.
- In the Import Password field, enter the password you specified when you previously exported the .pfx file.
- Change the Encoding Format selection to DES3. This causes the new Output file to be encrypted.
- Enter a password for the Output file and click OK.
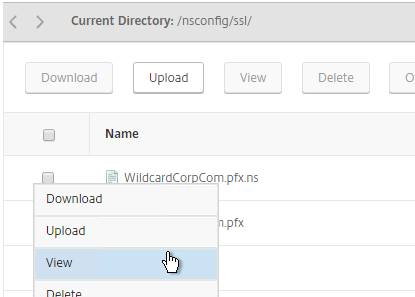
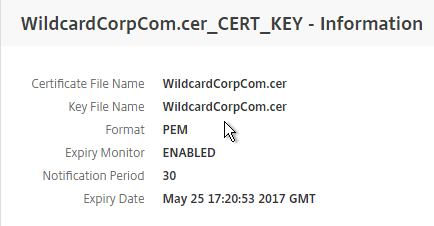
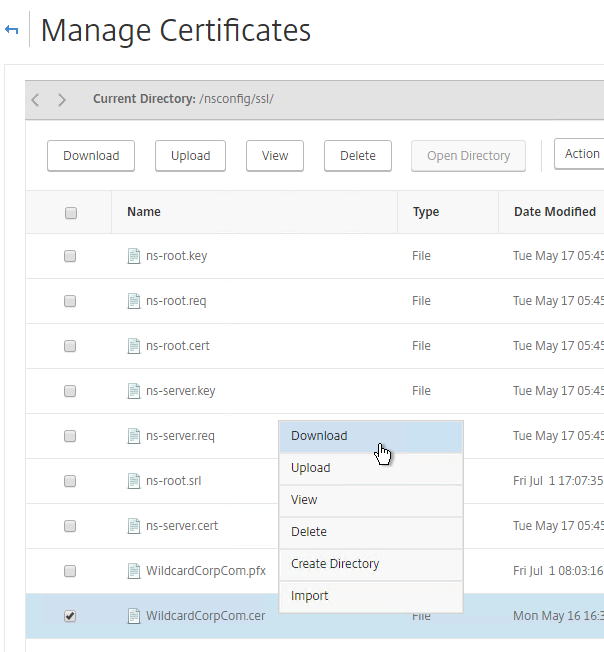
- If you browse to the /nsconfig/ssl directory on the NetScaler and view the new .cer file you just created, you’ll see both the certificate and the private key in the same file. You can use the Manage Certificates / Keys / CSRs link to view the files.
- Notice that the file contains both the certificate and the RSA Private key.
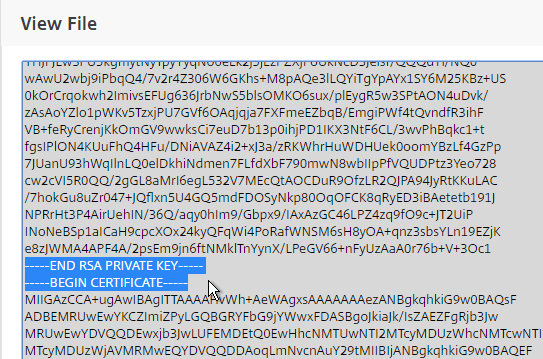
- Also, the Private Key is encrypted.
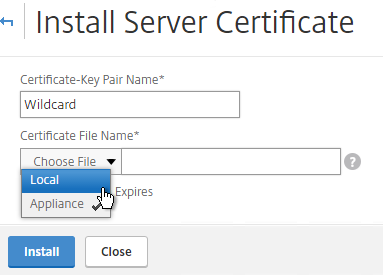
- On the left side of the NetScaler Configuration GUI, expand Traffic Management > SSL, and click Certificates.
- On the right, click Install.
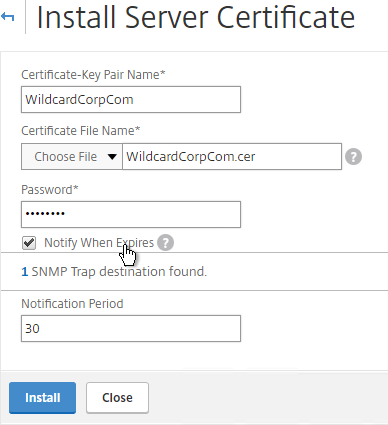
- In the Install Certificate dialog box:
- In the Certificate-Key Pair Name field, enter a friendly name for this certificate.
- In the Certificate File Name field, browse the appliance and select the .cer file you just created.
- If the private key is encrypted, enter the password.
- If desired, check the box next to Notify When Expires.
- Click Install. You can now link an intermediate certificate to this SSL certificate and then bind this SSL certificate to SSL and/or NetScaler Gateway Virtual Servers.
- To automatically backup SSL certificates and receive notification when the certificates are about the expire, deploy Citrix Command Center or NetScaler Management and Analytics System. Also see Citrix CTX213342 How to handle certificate expiry on NetScaler.
- You can also export the certificate files and use them on a different NetScaler.
Create Key and Certificate Request
If you want to create free Let’s Encrypt certificates, see John Billekens’ PowerShell script detailed at Let’s Encrypt Certificates on a NetScaler. 💡
You can create a key pair and Certificate Signing Request directly on the NetScaler appliance. The Certificate Signing Request can then be signed by an internal or public Certificate Authority.
Most Certificate Authorities let you add Subject Alternative Names when submitting the Certificate Signing Request to the Certificate Authority and thus there’s no reason to include Subject Alternative Names in the Certificate Signing Request. You typically create a Certificate Signing Request with a single DNS name. Then when submitting the Certificate Signing Request to the Certificate Authority you type in additional DNS names. For a Microsoft Certificate Authority, you can enter Subject Alternative Names in the Attributes box of the Web Enrollment wizard. For public Certificate Authorities, you purchase a UCC certificate or purchase a certificate option that lets you type in additional names.
If you instead want to create a Certificate Signing Request on NetScaler that has Subject Alternative Names embedded in it as request attributes, see Citrix Blog Post How to Create a CSR for a SAN Certificate Using OpenSSL on a NetScaler Appliance. These instructions are performed on the NetScaler command line using OpenSSL. Or you can instead create a Subject Alternative Name certificate on Windows.
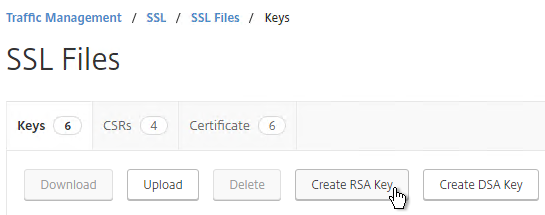
- On the left, expand Traffic Management, expand SSL, and click SSL Files.
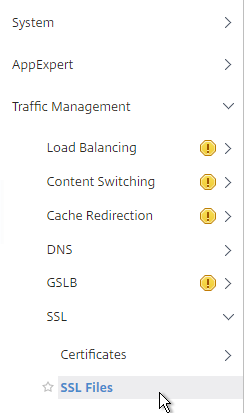
- On the right, switch to the Keys tab.
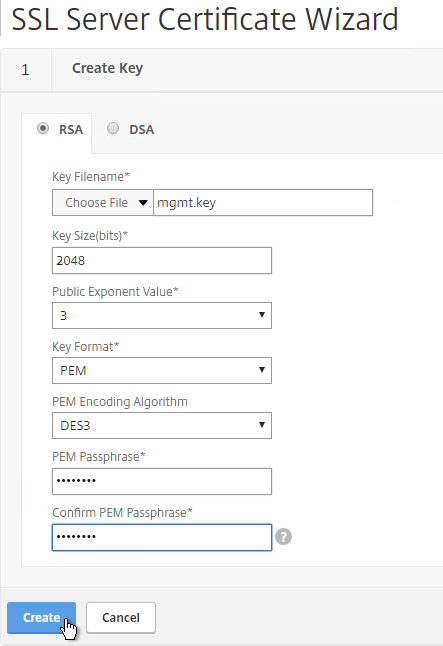
- Click Create RSA Key.
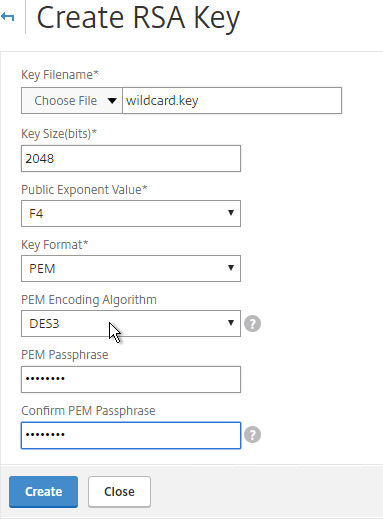
- Give the .key file a descriptive name.
- Set the Key Size to 2048 bits
- Set the PEM Encoding Algorithm to DES3 and enter a password. This encrypts the key file.
- Click OK. You will soon create a certificate using the keys in this file.
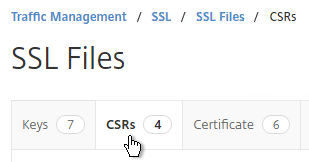
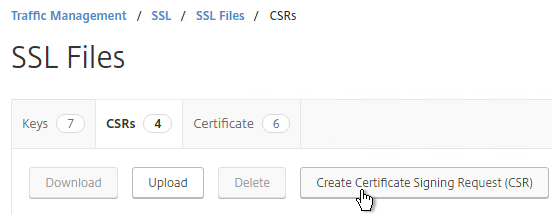
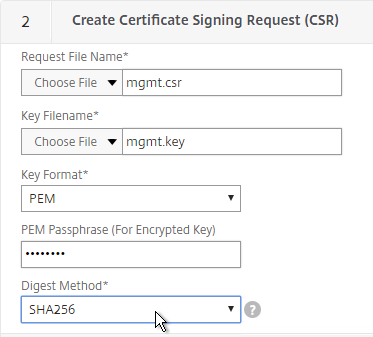
- On the right, switch to the CSRs tab.
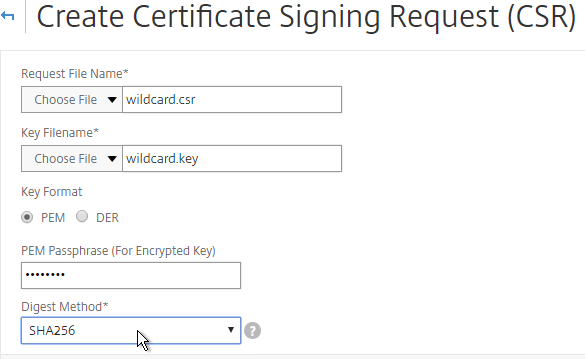
- Click Create Certificate Signing Request (CSR).
- In the Request File Name field, enter the name of a new file.
- In the Key Filename field, browse to the previously created .key file.
- If the key file is encrypted, enter the password.
- Feel free to change the Digest Method to SHA256.
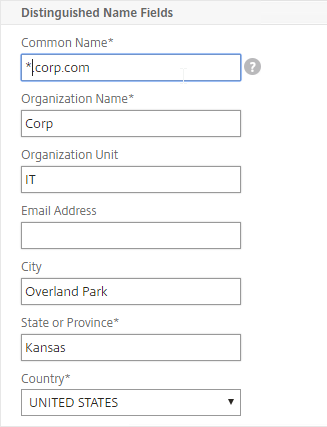
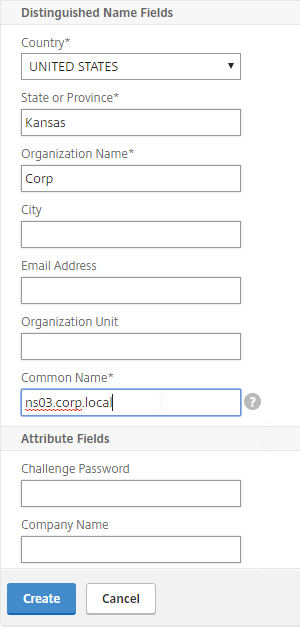
- In the Common Name field, enter the FQDN of the SSL enabled-website. If this is a wildcard certificate, enter * for the left part of the FQDN.
- In the Organization Name field, enter your official Organization Name.
- Enter IT or similar as the Organization Unit.
- Enter the City name.
- In the State field, enter your state name without abbreviating.
- Scroll down and click Create.

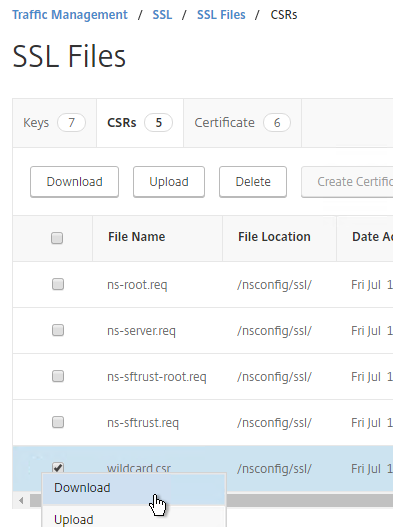
- Click the ellipsis next to the new .csr file and Download the file.
- You can then open the .csr file with Notepad and send the contents to your Certificate Authority. If the CA asks you for the type of web server, select Apache. Save the CA response as a Base64 file.
- After you get the signed certificate, on the left side of the NetScaler Configuration GUI, expand Traffic Management > SSL > Certificates and click Server Certificates.
- On the right, click Install.
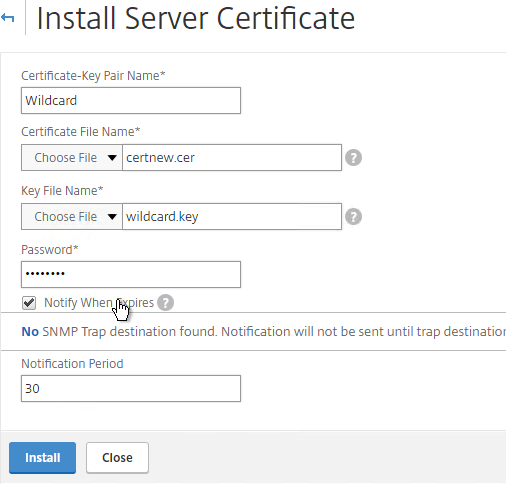
- In the Certificate-Key Pair Name field, enter a friendly name for this certificate.
- In the Certificate File Name field, browse Local and select the Base64 (Apache) .cer file you received from the Certificate Authority.
- In the Private Key File Name field, browse the appliance and select the key file you created earlier.
- If the key file is encrypted, enter the password.
- If desired, check the box next to Notify When Expires.
- Click Install.
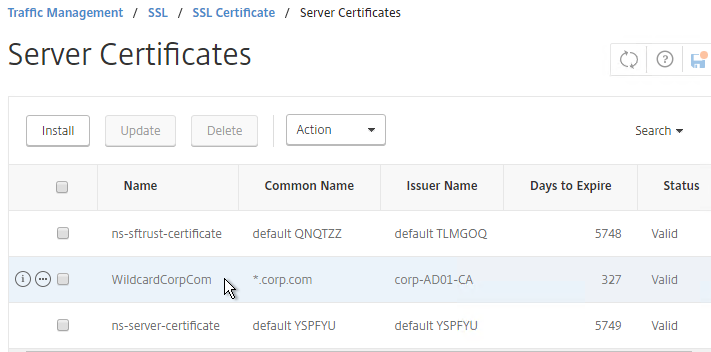
- The certificate is now added to the list. Notice the Days to Expire. You can now bind this certificate to any SSL Load Balancing, NetScaler Gateway, or SSL Content Switching Virtual Server.
- To automatically backup SSL certificates and receive notification when the certificates are about the expire, deploy Citrix Command Center or Citrix NetScaler Management and Analytics. Also see Citrix CTX213342 How to handle certificate expiry on NetScaler.
- You can also export the certificate files and use them on a different NetScaler.
Intermediate Certificate
If your Server Certificate is signed by an intermediate Certificate Authority, then you must install the intermediate Certificate Authority’s certificate on the NetScaler. This Intermediate Certificate then must be linked to the Server Certificate.
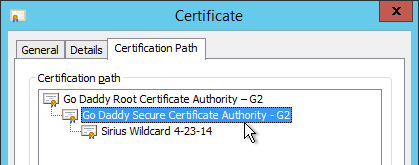
- Sometimes the public Certificate Authority will give you the Intermediate certificate as one of the files in a bundle. If not, log into Windows and double-click the signed certificate.
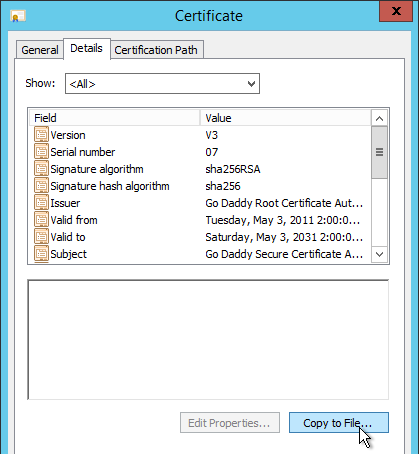
- On the Certification Path tab, double-click the intermediate certificate (e.g. Go Daddy Secure Certificate Authority. It’s the one in the middle).
- On the Details tab, click Copy to File.
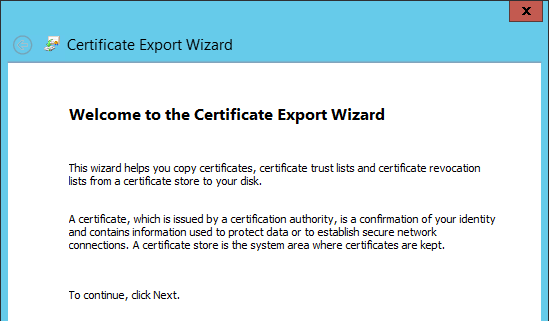
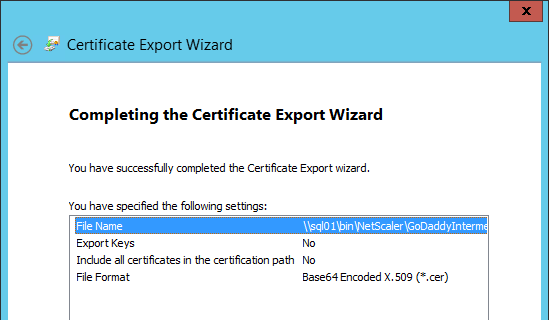
- In the Welcome to the Certificate Export Wizard page, click Next.
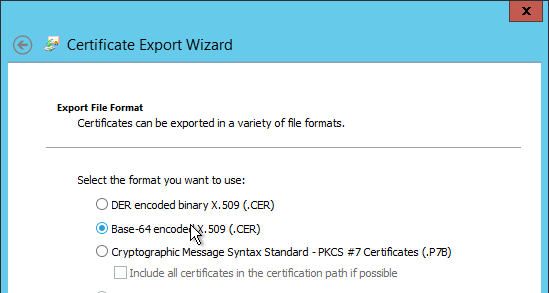
- In the Export File Format page, select Base-64 encoded and click Next.
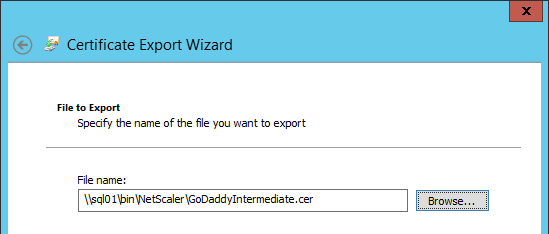
- Give it a file name and click Next.
- In the Completing the Certificate Export Wizard page, click Finish.
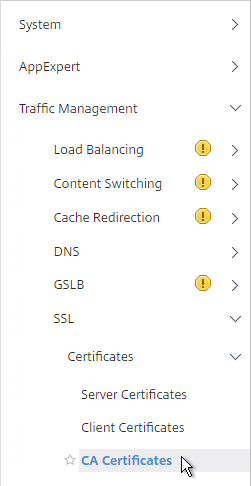
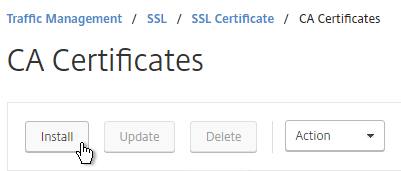
- In the NetScaler configuration GUI, expand Traffic Management, expand SSL, expand Certificates, and click CA Certificates.
- On the right, click Install.
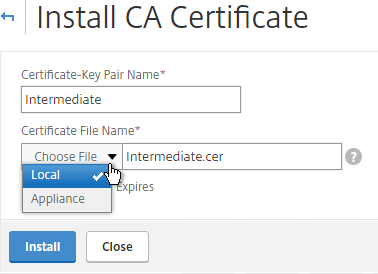
- Name it Intermediate or similar.
- Browse locally for the Intermediate certificate file.
- Click Install.
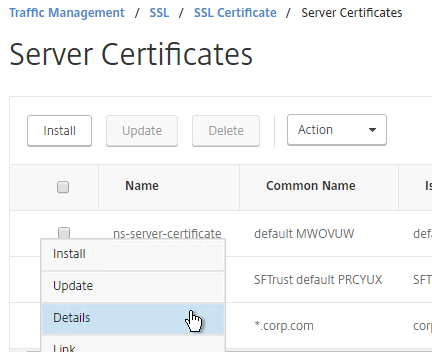
- Go back to Server Certificates.
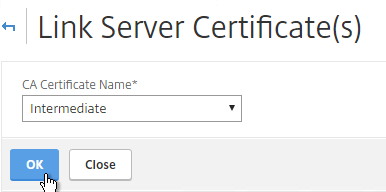
- Click the ellipsis next to the server certificate, and click Link.
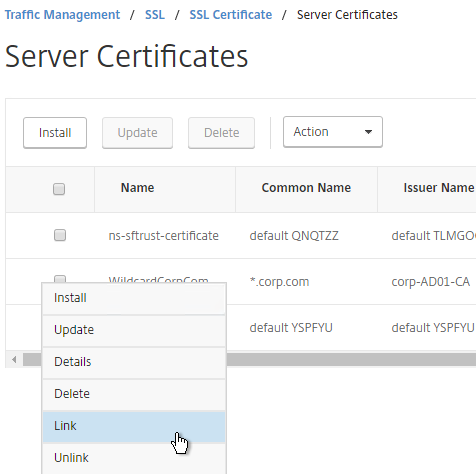
- The previously imported Intermediate certificate should already be selected. Click OK.
Export Certificate Files from NetScaler
You can easily export certificate files from the NetScaler and import them to a different NetScaler.
- Go to Traffic Management > SSL > Certificates > Server Certificates.
- Move your mouse over the certificate you want to export, and then click the information icon on the far left.
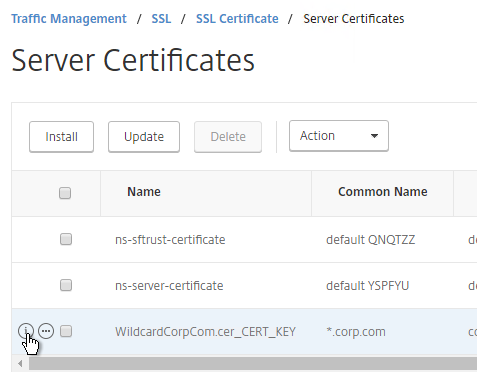
- Note the file names. There could be one or two file names.
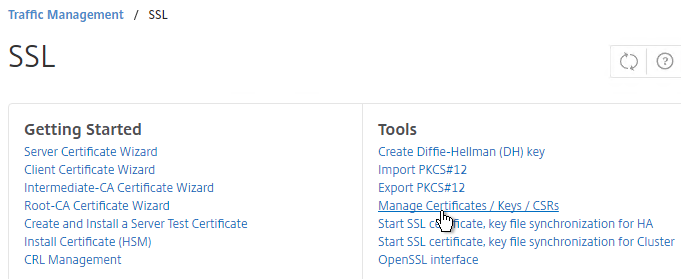
- Go to Traffic Management > SSL.
- On the right, in the right column, click Manage Certificates / Keys / CSRs.
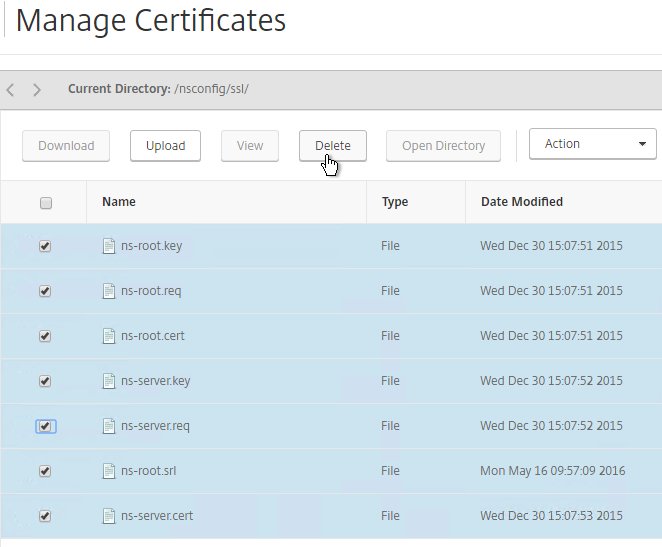
- Find the file(s) in the list, right-click it, and click Download.
- Also download the files for any linked intermediate certificate.
- You can now use the downloaded files to install certificates on a different NetScaler.
Create Certificate with NetScaler as Certificate Authority
If you don’t have an internal Certificate Authority, you can use NetScaler as a Certificate Authority. The NetScaler Certificate Authority can then be used to sign Server Certificates. This is a simple method for creating a new management certificate. The main problem with this method is that the NetScaler root certificate must be manually installed on any machine that connects to the NetScaler.
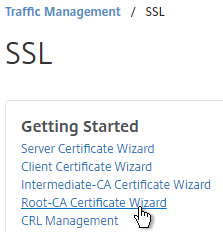
- On the left, expand Traffic Management, and click SSL.
- On the right, in the left column, click Root-CA Certificate Wizard.
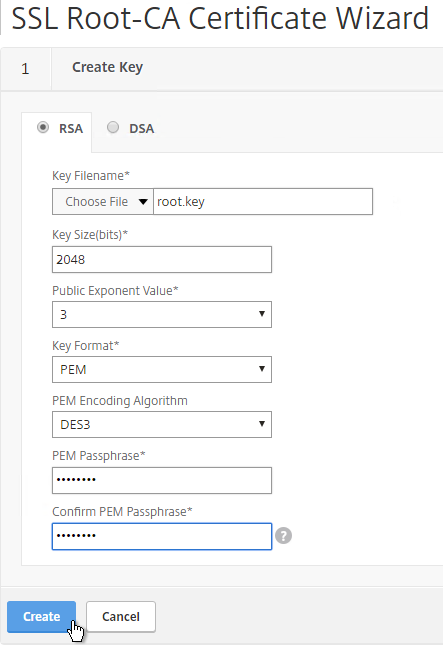
- In the Key Filename field, enter root.key or similar. This is a new file.
- In the Key Size field, enter at least 2048.
- Optionally, to encrypt the key file, change the PEM Encoding Algorithm to DES3, and enter a new password.
- Click Create.
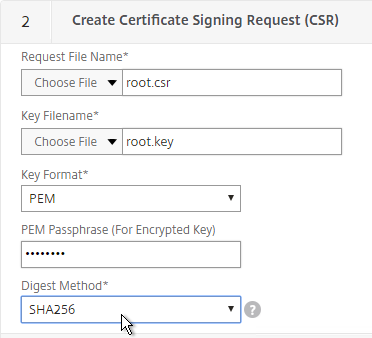
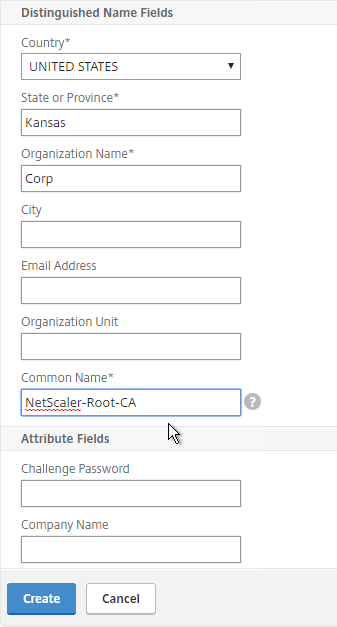
- In the Request File Name field, enter root.csr or similar. This is a new file.
- If the key file is encrypted, enter the password.
- Scroll down.
- In the State field, enter the non-abbreviated state name.
- In the Organization Name field, enter the name of your organization.
- Fill in other fields as desired.
- In the Common Name field, enter a descriptive name for this Certificate Authority.
- Click Create .
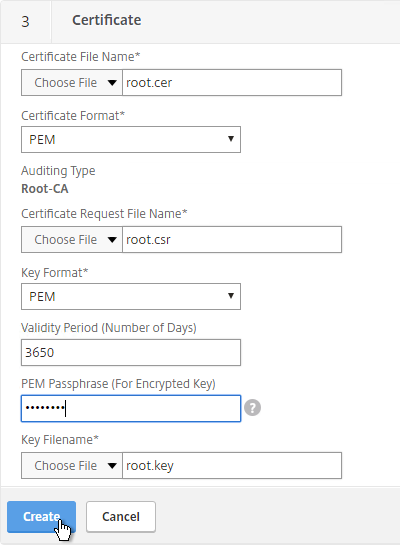
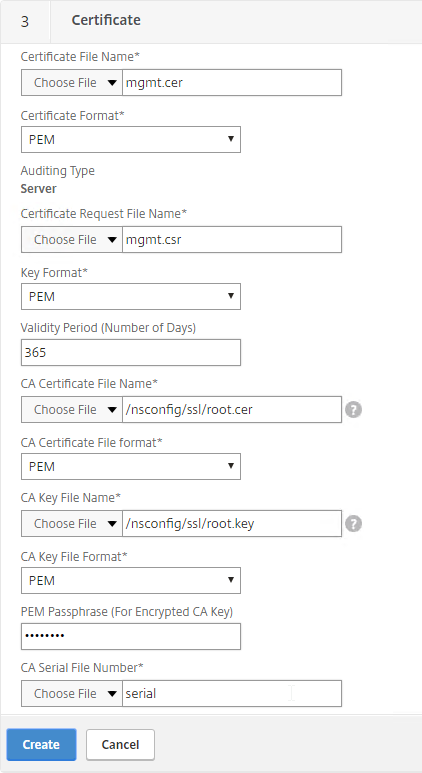
- In the Certificate File Name field, enter root.cer or similar. This is a new file.
- Change the Validity Period to 3650 (10 years) or similar.
- If the key file is encrypted, enter the password in the PEM Passphrase field.
- Click Create.
- In the Certificate-Key Pair Name field, enter a friendly name for this Certificate Authority certificate.
- If the key file is encrypted, enter the password in the Password field.
- Click Create.
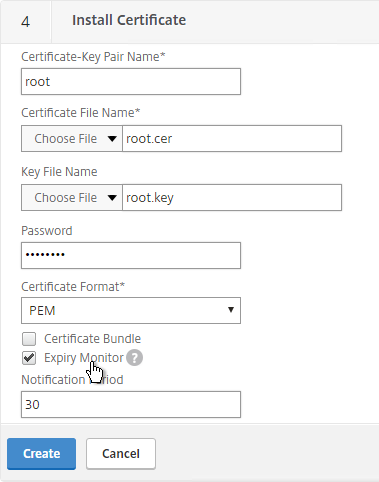
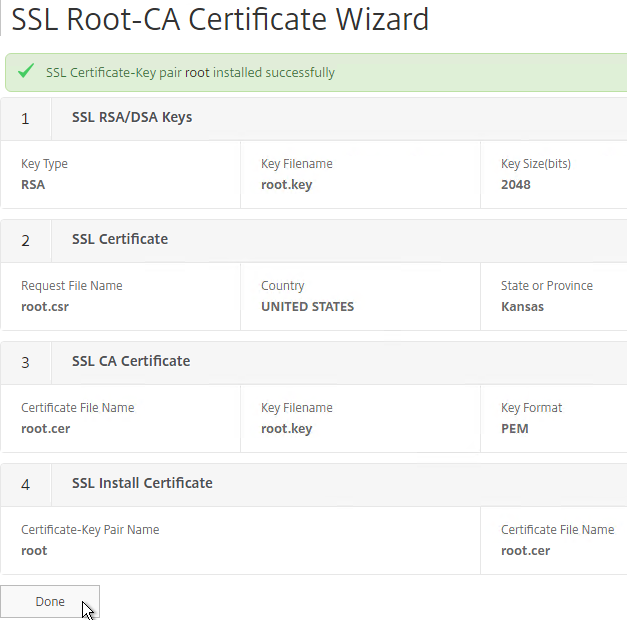
- Click Done.
- In the right pane, in the left column, click Server Certificate Wizard.
- In the Key Filename field, enter mgmt.key or similar. This is a new file.
- In the Key Size field, enter at least 2048.
- Optionally, to encrypt the key file, change the PEM Encoding Algorithm to DES3, and enter a new password.
- Click Create.
- In the Request File Name field, enter mgmt.csr or similar. This is a new file.
- If the key file is encrypted, enter the password.
- Scroll down.
- In the State field, enter the non-abbreviated state name.
- In the Organization Name field, enter the name of your organization.
- Fill in other fields as desired.
- In the Common Name field, enter the hostname (FQDN) of the appliance.
- Click Create.
- In the Certificate File Name field, enter mgmt.cer or similar. This is a new file.
- Change the Validity Period to 3650 (10 years) or similar.
- Scroll down.
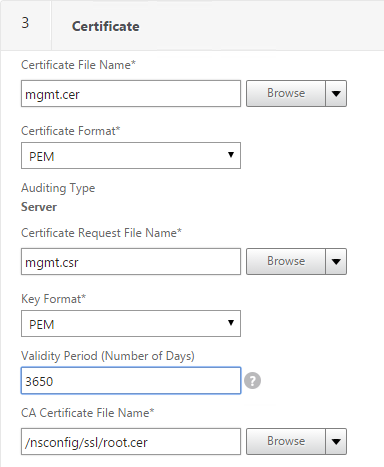
- In the CA Certificate File Name field, browse to the root.cer file.
- In the CA Key File Name field, browse to the root.key file.
- If the key file is encrypted, enter the password.
- In the CA Serial File Number field, enter the name of a new file that will contain serial numbers.
- Click Create.
- In the Certificate-Key Pair Name field, enter a friendly name for this management certificate.
- If the key file is encrypted, enter the password in the Password field.
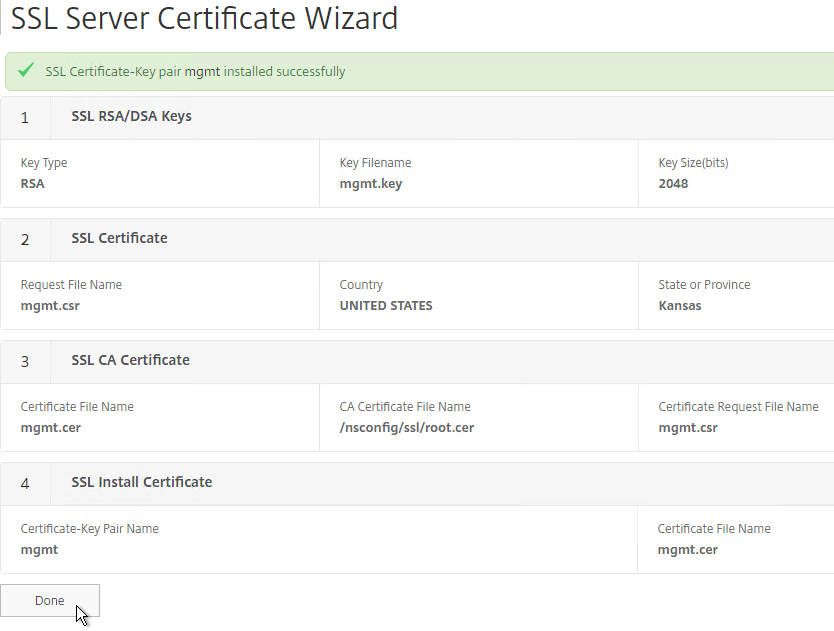
- Click Create.
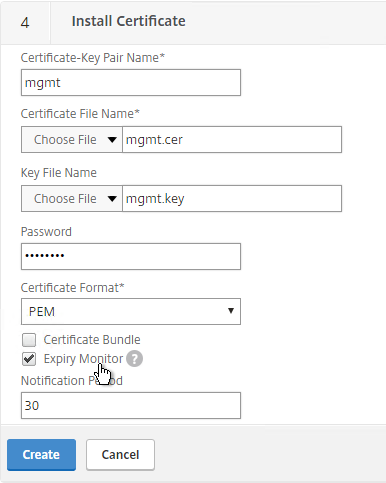
- Click Done.
Default Management Certificate Key Length
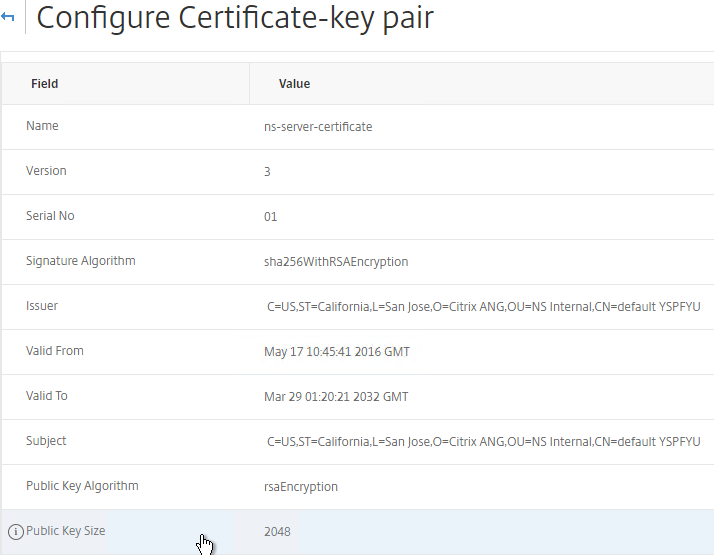
In older NetScaler builds, the default management certificate (ns-server-certificate) key size is only 512 bits. To see the key size, click the ellipsis next to ns-server-certificate and then click Details.

If you try to use Internet Explorer to connect to the NSIP using SSL, Internet Explorer will consider 512 bits to be unsafe and probably won’t let you connect. Notice there’s no option to proceed.

You can configure Internet Explorer to accept the 512-bit certificate by running Certutil ‑setreg chain\minRSAPubKeyBitLength 512 on the same machine where Internet Explorer is running.

When you upgrade to 11.1, the management certificate remains at whatever was installed previously. If it was never replaced, then the management certificate is still only 512 bits. To replace the certificate with a new 2048-bit self-signed certificate, simply delete the existing ns-server-certificate certificate files and reboot.
- Go to Traffic Management > SSL.
- On the right, in the right column, click Manage Certificates / Keys / CSRs.
- Highlight any file named ns-* and delete them. This takes several seconds.
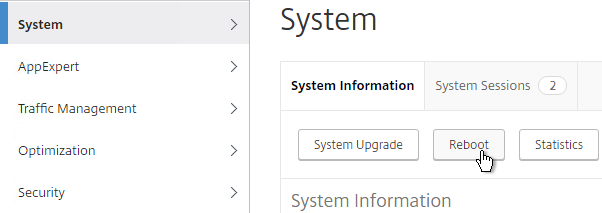
- Then go to System and reboot.
- After a reboot, if you view the Details on the ns-server-certificate, it will be recreated as self-signed with 2048-bit key size.
Replace Management Certificate
You can replace the default management certificate with a new trusted management certificate.
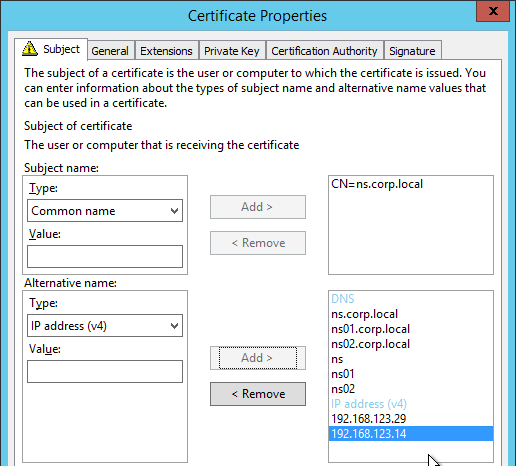
Only one certificate will be loaded on both nodes in a High Availability pair so make sure the management certificate matches the names of both nodes. This is easily doable using a Subject Alternative Name certificate. Here are some names the management certificate should match (note: a wildcard certificate won’t match all of these names):
- The FQDN for each node NSIP in a High Availability pair. Example: ns01.corp.local and ns02.corp.local
- The shortnames (left label) for each node NSIP in a High Availability pair. Example: ns01 and ns02
- The NSIP IP address for each node in a High Availability pair. Example: 192.168.123.14 and 192.168.123.29
- If you enabled management access on your SNIPs, add names for the SNIPs:
- FQDN for the SNIP. Example: ns.corp.local
- Shortname for the SNIP. Example: ns
- SNIP IP address. Example: 192.168.123.30
If you are creating a Subject Alternative Name certificate, it’s probably easiest to do the following:
- Create the certificate using the Certificates snap-in on a Windows box. You can add the Subject Alternative Names in the certificate request wizard. The Subject Alternative Names for the IP addresses must be added as IP address (v4). The other Subject Alternative Names are added as DNS.
- Export the certificate and Private Key to a .pfx file.
- On the NetScaler, use the Import PKCS#12 tool to convert the .pfx to PEM format. Then follow one of the procedures below to replace the management certificate.
There are two methods of replacing the management certificate:
- Use the Update Certificate button for ns-server-certificate in the NetScaler GUI. This automatically updates all of the Internal Services bindings too.
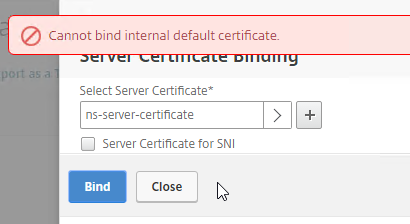
- You cannot rename the certificate in the NetScaler GUI. It remains as ns-server-certificate.
- ns-server-certificate cannot be bound to Virtual Servers. So make sure it is a dedicated management certificate.
- Or manually Bind a new certificate to the Internal Services.
Update Certificate Method
The Update Certificate button method is detailed below:
- You can’t update the certificate while connected to the NetScaler using https so make sure you connect using http.
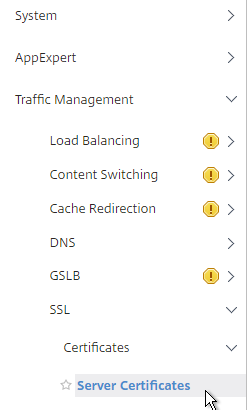
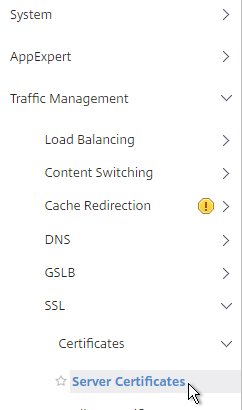
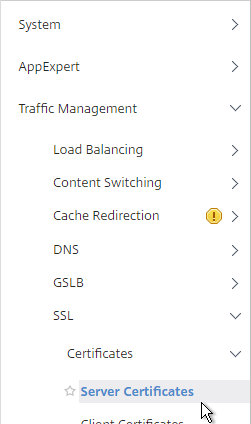
- On the left, expand Traffic Management, expand SSL expand Certificates, and click Server Certificates.
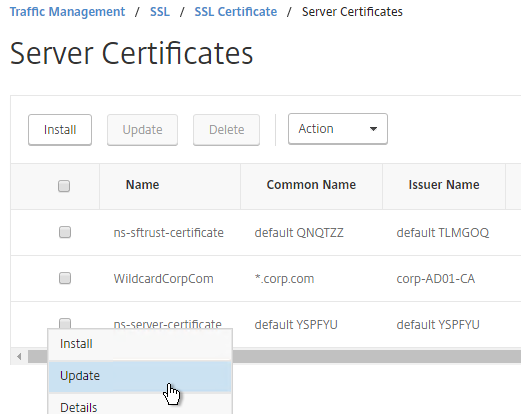
- On the right, click the ellipsis next to ns-server-certificate and click Update.
- Check the box next to Click to update the certificate and key.
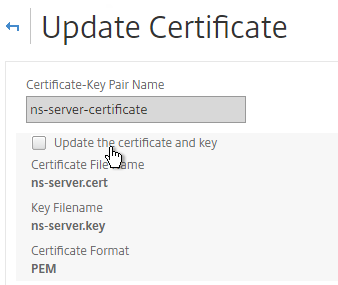
- Browse to the new management certificate. It could be on the appliance or it could be on your local machine.
- If the PEM certificate is encrypted, enter the password.
- Check the box next to No Domain Check. Click OK.

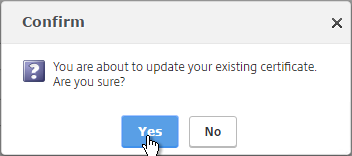
- Click Yes to update the certificate.
- You can now connect to the NetScaler using https protocol. The certificate should be valid and it should have a 2048 bit key.

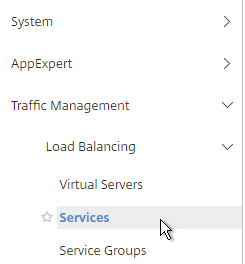
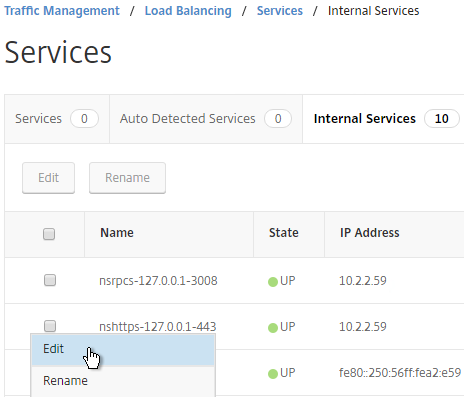
- Go to Traffic Management > Load Balancing > Services.
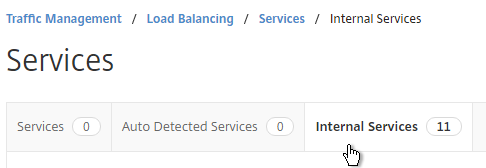
- On the right, switch to the Internal Services tab.
- Click the ellipsis next to one of the services and click Edit.
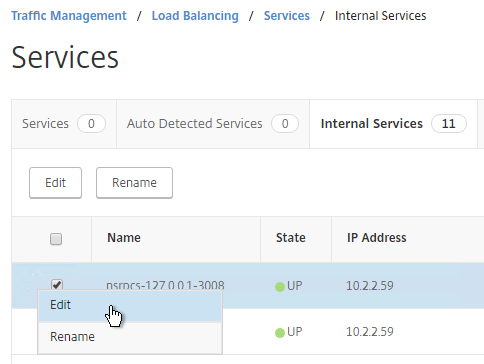
- Scroll down to the SSL Ciphers section. Feel free to change the ciphers to a more secure cipher group. NetScaler 11.1 no longer includes RC4 ciphers in the DEFAULT cipher group, but you might want to rearrange the ciphers.
- Repeat this for each of the Internal Services.
Manual Binding Method
The manual Binding to Internal Services method is detailed below:
- You can’t update the certificate while connected to the NetScaler using https so make sure you connect using http.
- On the left, expand Traffic Management, expand SSL, expand Certificates, and click Server Certificates.
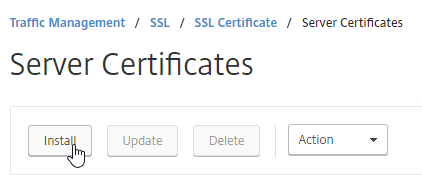
- On the right, use the Install button to install the new management certificate.
- On the left, expand Traffic Management, expand Load Balancing, and click Services.
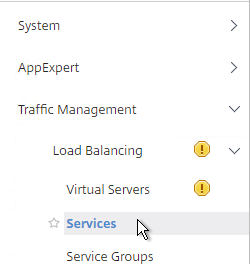
- On the right, switch to the Internal Services tab.
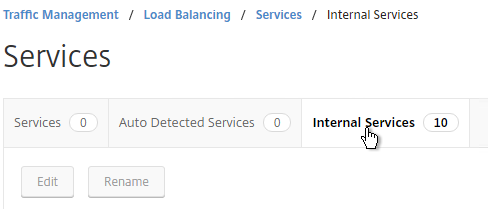
- You will see multiple services. Edit one of them.
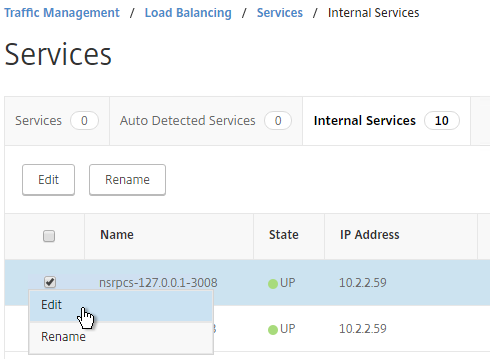
- Scroll down and click where it says 1 Server Certificate.
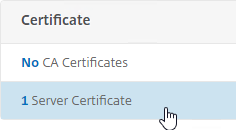
- Select the existing management certificate, and click Unbind.
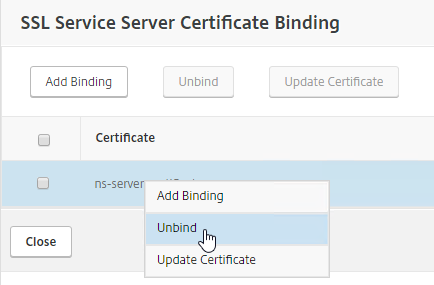
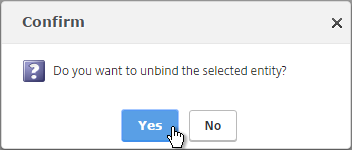
- Click Yes to remove the selected entity.
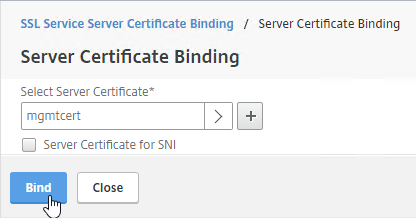
- Click Add Binding.

- Click where it says Click to select.
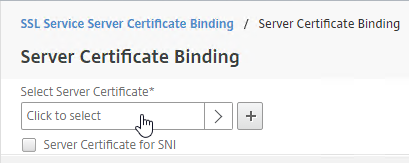
- Select the new management certificate, and click Select.
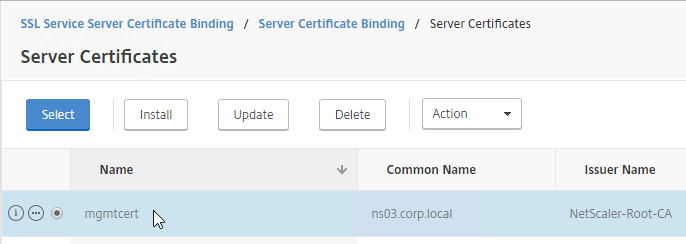
- Click Bind, and click Close.
- Scroll to the SSL Parameters section, and click the pencil icon.
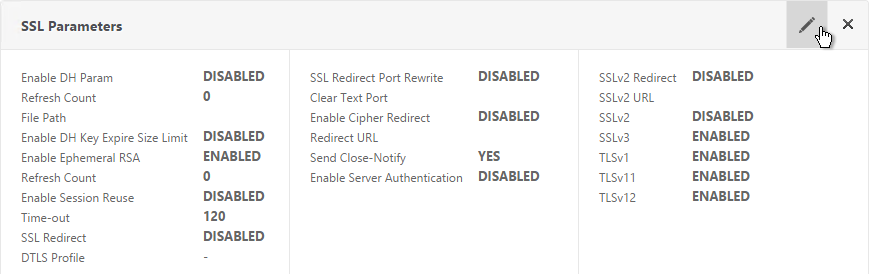
- Uncheck the box next to SSLv3. Make sure TLSv11 and TLSv12 are enabled. Click OK.

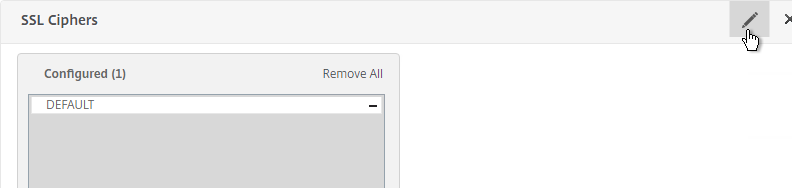
- On the left, in the SSL Ciphers section, click the pencil icon.
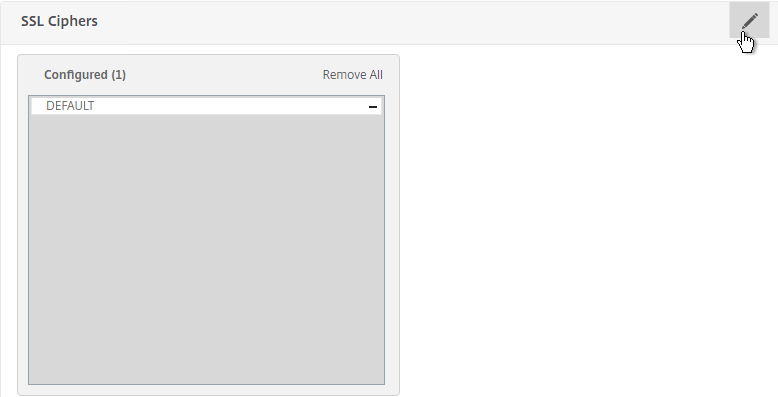
- Select a more secure Cipher Group. NetScaler 11.1 no longer includes RC4 in the DEFAULT cipher group, but the ciphers could be reordered in a more secure order.
- Repeat for the rest of the internal services.
Force Management SSL
By default, administrators can connect to the NSIP using HTTP or SSL. This section details how to disable HTTP.
- Connect to the NSIP using https.
- On the left, expand System, expand Network, and click IPs.

- On the right, select your NetScaler IP, and click Edit.
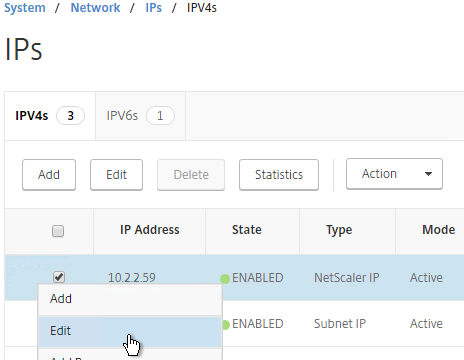
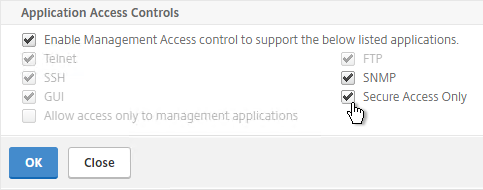
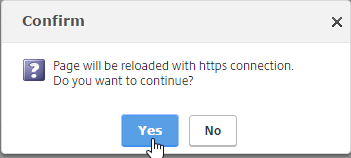
- Near the bottom, check the box next to Secure access only, and then click OK.
- If you are connected using http, the page will reload using https.
set ns ip 10.2.2.126 -gui SECUREONLY
- Citrix CTX204217 How to redirect users from HTTP to HTTPS while accessing NSIP/Management IP. Requires a Responder policy, and a nsapimgr command.
- Repeat this on the secondary appliance.
- Repeat for any SNIPs that have management access enabled.
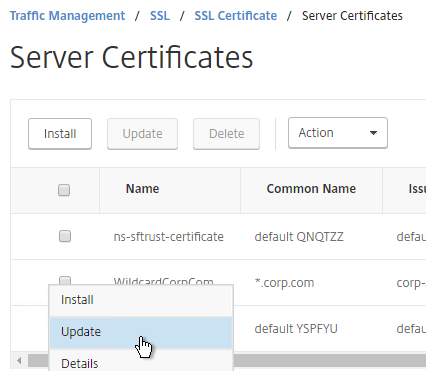
SSL Certificate – Update
If your certificate is about to expire, do the following:
- Create updated certificate files in PEM format. One option is to create a key file and Certificate Signing Request directly on the NetScaler. Another option is to convert a PFX file to a PEM file. Don’t install the certificate yet, but instead, simply have access to the key file and certificate file in PEM format.
- In NetScaler, navigate to Traffic Management > SSL > Certificates > Server Certificates.
- On the right, click the ellipsis next to the certificate you intend to update, and click Update.
- Check the box next to Click to update the Certificate/Key.
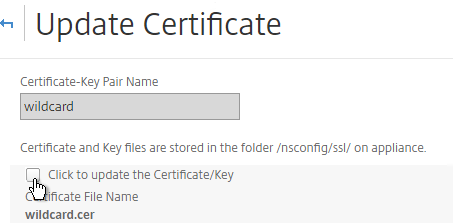
- Browse to the updated certificate and key files. If the private key is encrypted, specify the password.
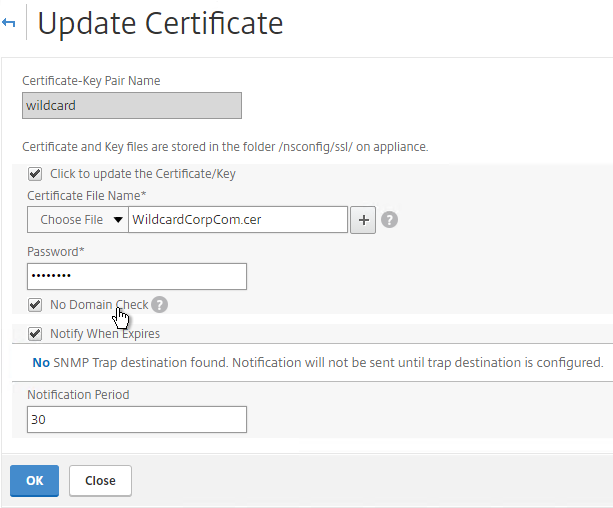
- Click Yes to update the certificate.

- Click OK. This will automatically update every Virtual Server on which this certificate is bound.
- Certificates can also be updated in Citrix Command Center or NetScaler Management and Analytics System.
Had an issue with the key file saying it was invalid, this was the fix. https://support.citrix.com/article/CTX134233
HI, in Step 25 I also have the issuer certificate mismatch error two.
When i select the cer file from appliance that i converted before I get another configuration line popping in. Its named Key File Name, but its not in your or any other guide i can find.
When i leave it empty i get the Error above. when i select the cer twice, i get it too. What to do here? The Gui is different. Version 11.1 with recent 63 update
HI carl
if the internal cert changed,Can only update the certificate ?
You can certainly update the existing certificate. Or you can Install a new certificate and then swap out the certificate bound to each of the Internal Services.
Can the serial number of NetScaler VPX be the same across multiple VPX appliances? We have multiple NetScaler VPX appliances that were imported to our vSpehere environment via the OVA
OVA is a template. It’s meant to be cloned/deployed.
Each VPX has a unique MAC address, and hence unique licensing.
Thanks Carl. The reason Im asking this question is because we have a third party application that queries the NetScaler serial number for other funtionality. Base on what you are stating it sounds as if it’s ok to have all 20 or 30 NetScalers VPX with the same serial number, correct?
Carl,
Maybe Im missing something. I set this up and created a server authentication cert for ldaps.domain.com. Every-time I connect using LDP.exe I get connection cannot open. I know LDAPS works because I hit the server directly just fine. I also thought maybe its because I used IP and the “name” didn’t match, but using my host file to force DNS to match didn’t help any.
The certificate is trusted by the client?
Yep. Its created from our internal CA. I also created a custom cert for a test DC thats described here (https://blogs.technet.microsoft.com/russellt/2016/06/03/custom-ldap-certs/) to accept ldaps.example.com on the server end…which works fine. Should I just export that cert?
Maybe do a Network trace and look for SSL Handshake errors in Wireshark.
Under the section for “Convert .PFX Certificate to PEM Format”, on step 25, i get an error “Issuer certificate mismatch”I have checked on PEM file..its showing 3 certificate..how to delete 2 cert
Thank you, Kevin Davidson. I carefully read and followed your description, and was also able to work around this issue by editing my .cer file and moving the last cert in it up above the one directly above it, just as you stated. Seems to have worked like a champ.
Hi. I’m running the latest netscaler release (11.1.52) and I modified the management cert to a 3rd party signed with a large list of SANs. Everything was peachy, but when you try to assign to another lbserver, you will get the error “Cannot bind internal default certificate”. The solution is – replace ns-server-certificate to another cert pair (ns can generate it for you), then create a manual cert pair and unbind/bind it to each of the 8 internal services – a task much faster using notepad and the CLI. This may help anyone using a wildcard cert.
Hi Carl, trying to install ca certificate from local gives me “invalid file”. I verified its Base-64 encoded. Its a vpx instance from sdx. Please let me know what could be? Thanks
Does it work from the CLI?
Not too familiar with what would the cli be for local appliance? Could you help me out with that? much thanks
Add ssl certKey
Thanks Carl, cert is on local drive i am guess i would need to copy it first to /nsconfig/ssl directory or is there a cli that can point to local drive outside of appliance?
Nope. You have to upload it first.
Hi,
I’m running environment lab of netscaler version 11.1 with trial platinum license
Just tried to upload a server certificate.
and its look like the process completed successfully. (no error at all…)
but unfortunately I can’t really see the new server certificate on the GUI screen.
If i’m trying to look for the server certificate from the CLI I could see it. but there is something strange there:
(Certificate Type: Unknown)
# show ssl certKey
7) Name:………..
Cert Path: buildPFX.pfx
Key Path: buildPFX.pfx.ns
Format: PFX
Status: Valid, Days to expiration:364
Certificate Expiry Monitor: ENABLED
Expiry Notification period: 30 days
—-> Certificate Type: Unknown
Version: 3
Serial Number: ……..
Signature Algorithm: sha256WithRSAEncryption
Issuer: DC=com,DC=….,CN=….-CA
Validity
Not Before: Apr 4 12:55:32 2017 GMT
Not After : Apr 4 13:05:32 2018 GMT
Subject: C=IL,ST=…..,L=…..,O=….,CN=…….com
Public Key Algorithm: rsaEncryption
Public Key size: 2048
Ocsp Response Status: NONE
what am I missing?
why can’t see the server certificate?
I was able to bind this certificate manually using the CLI and its working OK.
but I want to be able to see the certificates using the GUI.
Thanks alot!
The new certificates GUI in NetScaler 11.1 is definitely problematic. Citrix has requested that anybody seeing certificates classified incorrectly, please call Support so they can fix it in a future release.
Thank you very much for the quick response and for your time.
your’e awesome!
Under the section for “Convert .PFX Certificate to PEM Format”, on step 25, i get an error “Issuer certificate mismatch”. I had imported the PFX file, used DES3, then went to install Server Certificate from local appliance. This is a SAN certificate. Any ideas?
Does the .cer file contain multiple certificates? If so, try removing all of them except for the actual server certificate.
Hi, I am getting the same error message and cannot install the certificate under Server Certificates. “Issuer certificate mismatch”. I exported the certificate base64 with the private keys and checked to include the certificate chain. I uploaded the Cert using the import function, and password protected it with the DES3 as suggested. Any ideas on why we are seeing this error?
Thank you in advance for your advice.
Does it work if you don’t import the certificate chain? Just do the cert/key?
Hi, yes, that worked. Thank you
Bit late to the party on this question, but I ran into a similar issue. What ended up being the problem was the order in which the certs were presented in the .PEM file after converting the PFX. When opening the file, I could see the RSA key was at the top, and by splitting out the files I was able to identify the correct order of the certificates. Doing this, I discovered that the order in the PEM was Key>Root>Server>Intermediate. Simply moving the intermediate above the Server cert corrected the issue. It seems when the netscaler attempts to read the PEM file, it reads them in a cascading order. So the original PEM made the Netscaler try to read the Root as the issuer of the server cert , as opposed to the intermediate.
Tested on 10.5 and 11.1.
Hi Carl, great posts. But I think step 25 at the top is missing some info and the screenshot probably needs to change also. Please feel free to delete this post.
Hi Ryno,
Can you be more specific? I looked at all three step 25’s and they looked fine to me. Thanks for helping me perfect these instructions.