Navigation
- Change Log
- Overview
- Prerequisites
- XenApp and XenDesktop Wizard
- Portal Theme and Login Schema
- StoreFront Configuration for Gateway
- StoreFrontAuth and Multiple Domains
- Multi-factor authentication
Change Log
- 2018 Dec 22 – updated screenshots for Citrix Gateway 12.1
Overview
NetScaler Gateway 12 and Citrix Gateway 12.1 and newer support a new form of authentication called StoreFrontAuth, which delegates Active Directory authentication to a StoreFront server. StoreFrontAuth replaces LDAP on Citrix Gateway. You usually don’t need both.
- StoreFrontAuth uses nFactor, which means Citrix ADC must be licensed for Advanced Edition (formerly known as Enterprise Edition) or Premium Edition (formerly known as Platinum Edition).
The easiest method of enabling StoreFrontAuth is to use the XenApp and XenDesktop Wizard. The Wizard lets you select from several different authentication methods, including multi-factor.
- Or, you can manually configure StoreFrontAuth in nFactor and bind the AAA vServer to a Gateway vServer. See George Spiers NetScaler Gateway authentication direct to StoreFront for manual nFactor configuration.
Prerequisites
License – make sure the appliance is licensed for Advanced Edition (formerly known as Enterprise Edition) or Premium Edition (formerly known as Platinum Edition).
DNS Servers – make sure DNS Servers are configured on the Citrix ADC.
The Wizard creates a whole new Gateway Virtual Server. You’ll need the following:
- DNS name for the Gateway
- VIP for the Gateway
- Certificate for the Gateway
URL to the StoreFront servers – StoreFront must be reachable from Citrix ADC SNIP and NSIP
- To retrieve the list of stores, NSIP must be able to reach the StoreFront URL
- StoreFront must be version 3.11 or newer
RADIUS – If you are doing multi-factor authentication, then you’ll need RADIUS information, including adding Citrix ADC NSIP and/or SNIP as RADIUS Clients.
Also see Citrix CTX223882 FAQ – Configuring Authentication at StoreFront using NetScaler Gateway
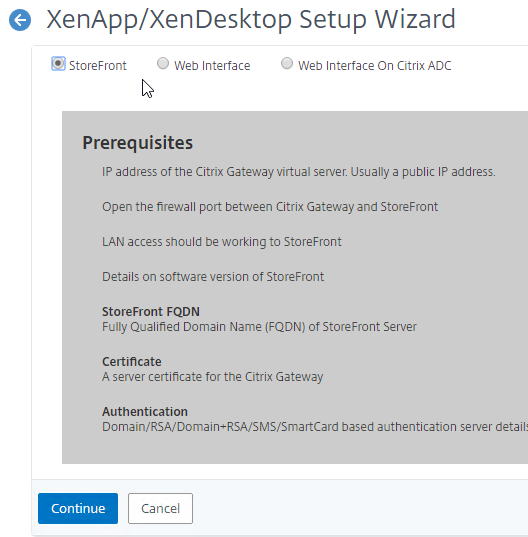
XenApp and XenDesktop Wizard
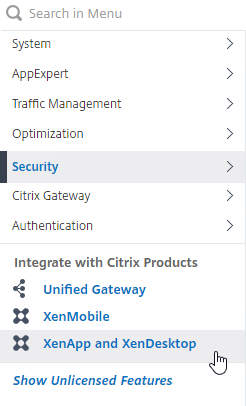
- In Citrix ADC, click XenApp and XenDesktop on the bottom left.

- On the right, click Get Started.
- Select StoreFront and then configure Continue
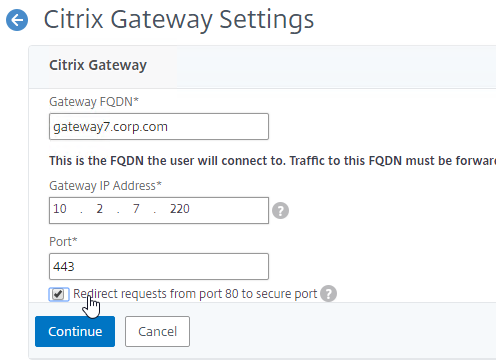
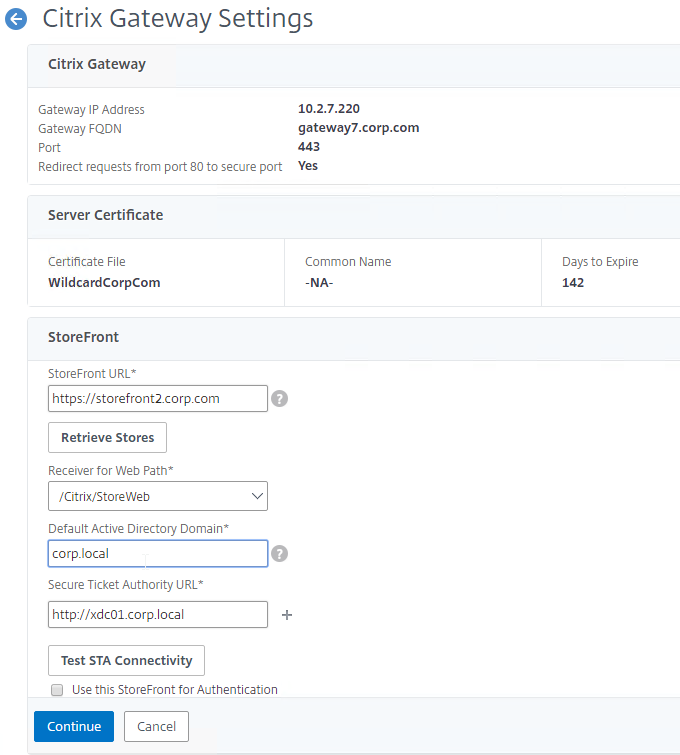
- In the Citrix Gateway section, enter the FQDN for the new Gateway.
- Enter the VIP for the new Gateway.
- Check the box next to Redirect requests from port 80 to secure port, and click Continue.
- In the Server Certificate section, if you already have a certificate on this appliance that matches the new Gateway FQDN, then select it. Or, change the selection to Install Certificate, and import a .pfx file. Click Continue when done.

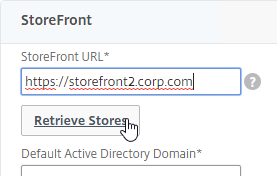
- In the StoreFront section, enter the URL to StoreFront, and click Retrieve Stores.
- In the Receiver for Web Path drop-down, select a Receiver for Web Path.
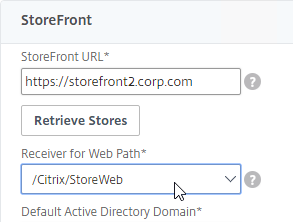
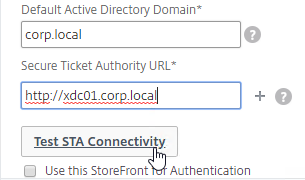
- In the Default Active Directory Domain field, enter a domain name that your StoreFront server will accept.
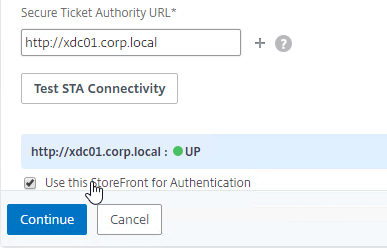
- Enter a Secure Ticket Authority URL, including http:// or https://. Use the plus icon to add more than one STA server. STAs are usually your XenDesktop Controllers. Then click Test STA Connectivity.
- Check the box next to Use this StoreFront for Authentication and click Continue.
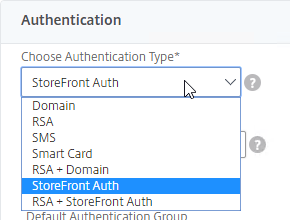
- In the Authentication section, in the Choose Authentication Type drop-down, notice that there are several options. Multi-factor will be detailed later. Leave it set to StoreFront Auth.
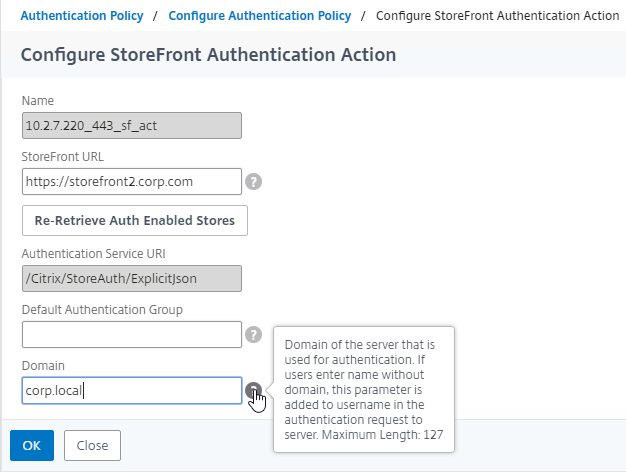
- Click the button to Retrieve Auth Enabled Stores.
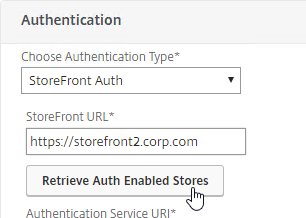
- Use the Authentication Service URI drop-down to select a store.
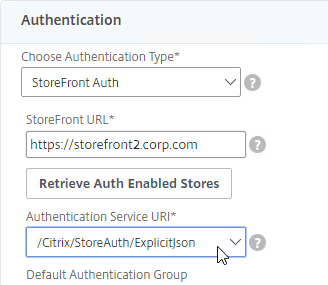
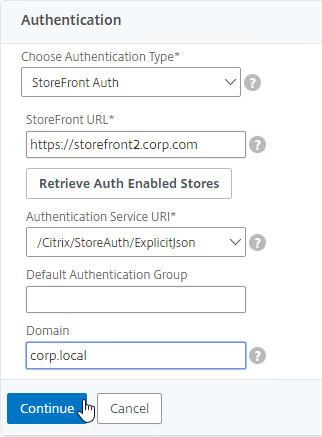
- The Domain field can be used to enter a default domain. Note: the domain name entered here must match one of the domain names permitted by StoreFront. This will be explained below in the Multiple Domains section.
- Click Continue
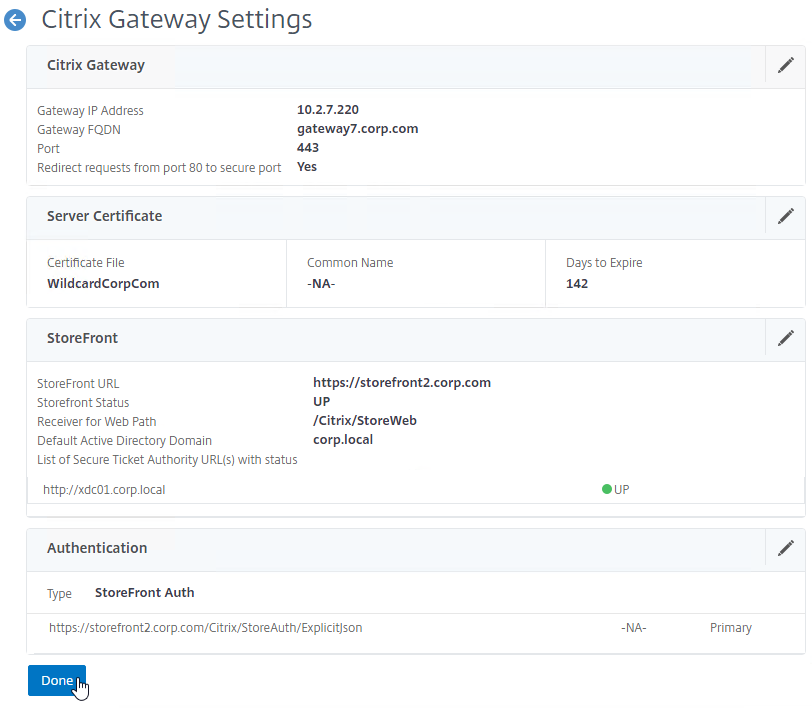
- Review the summary screen, and click Done.
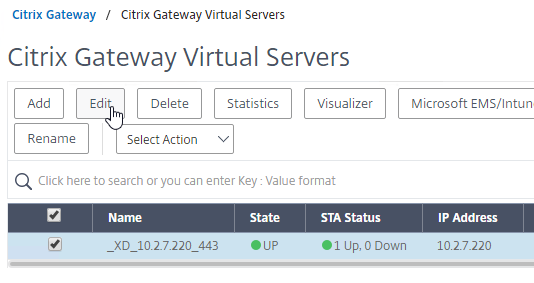
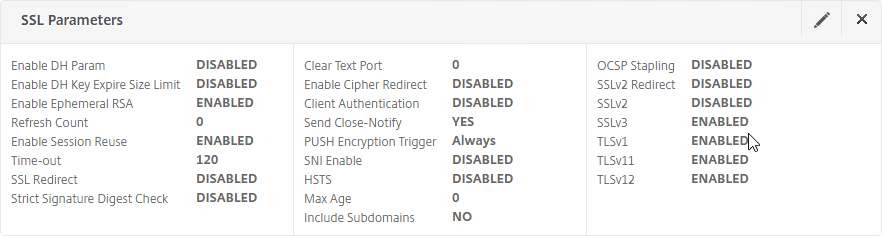
- If Default SSL Profiles are not enabled, then go to Citrix Gateway > Virtual Servers, edit the Gateway Virtual Server, and configure standard SSL vServer Settings.
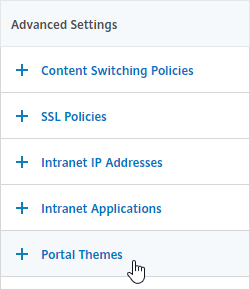
Portal Theme and Login Schema
- If you point your browser to the Gateway URL, notice it’s an old theme.
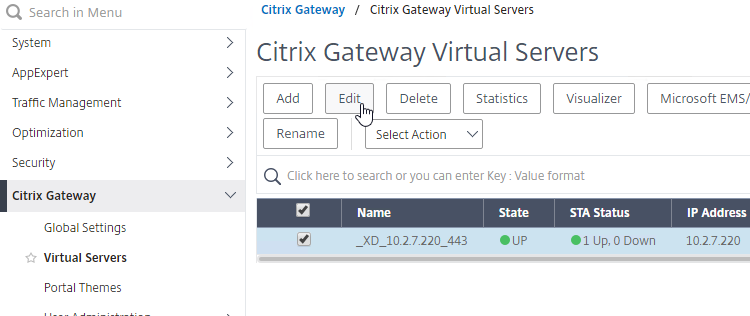
- On the left, go to Citrix Gateway > Virtual Servers.
- On the right, edit the Gateway Virtual Server that was created by the wizard.
- On the right, in the Advanced Settings column, click Portal Themes.
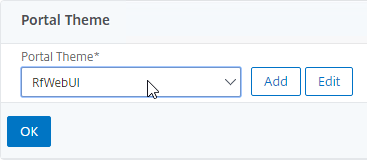
- On the left, scroll down, and change the Portal Theme selection to RfWebUI, or one of its derivatives. Click OK.
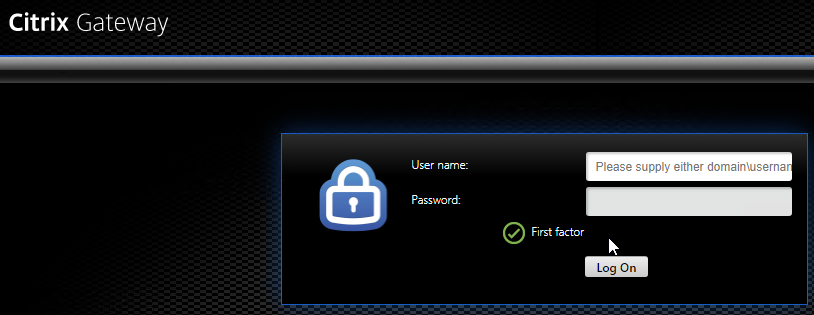
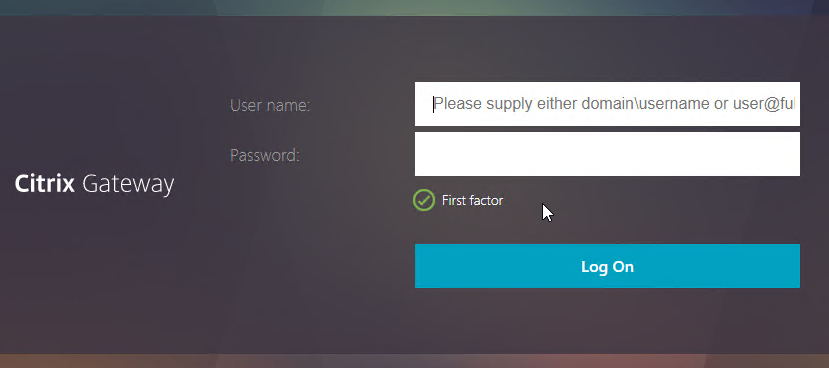
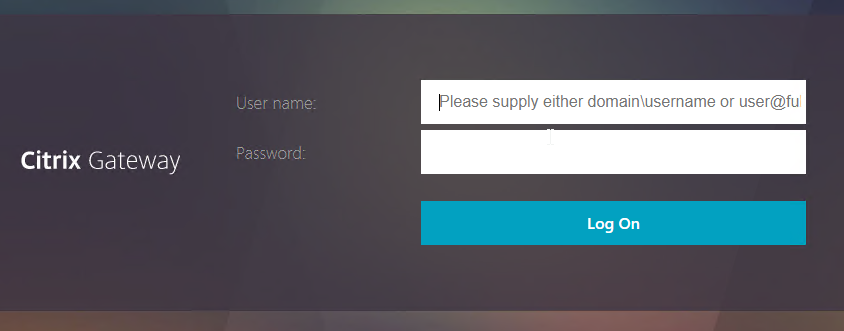
- Now when you visit the Gateway URL, it’s shown using a newer theme. However, there’s a “First Factor” text in the middle of the page. We can fix that.
- Back in your Citrix Gateway, near the middle of the page, find the Authentication Profile section. Click the pencil icon. This object enables nFactor.

- Click the Edit button to edit the Authentication Profile.
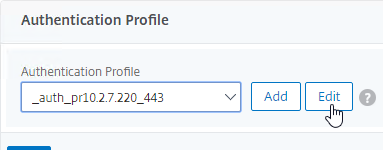
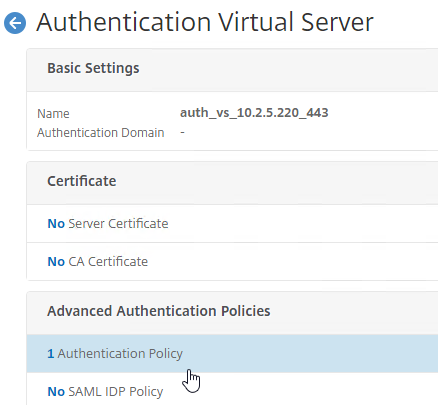
- Note the name of the AAA vServer. Unfortunately, this Edit button doesn’t take us to a place where we can make the edit we need.

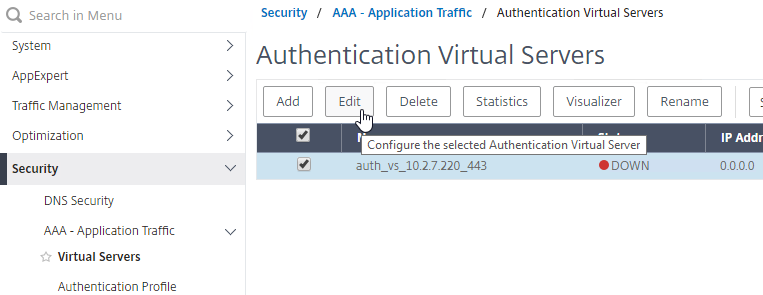
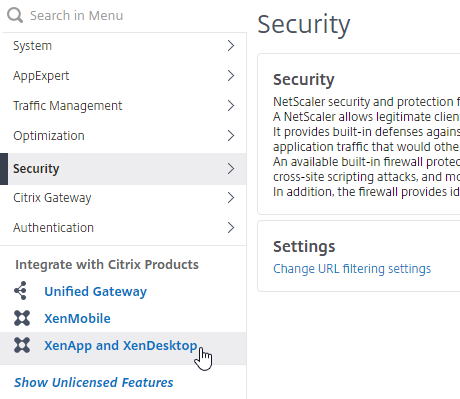
- Go back to the main Citrix ADC navigation menu, and go to Security > AAA – Application Traffic > Virtual Servers.
- You’ll see a new AAA vServer in the list. It’s down because there’s no certificate bound to it, but it still works. If the red icon bothers you, you’re welcome to bind a certificate to it.
- Edit the AAA vServer.
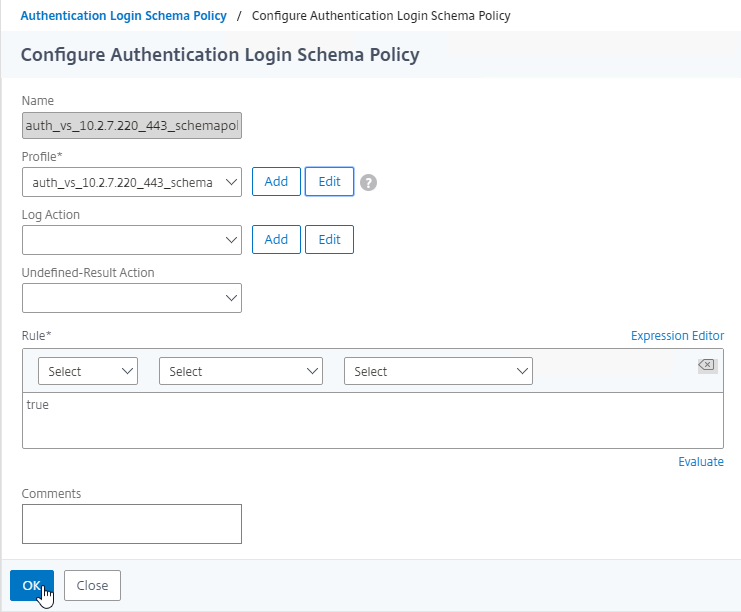
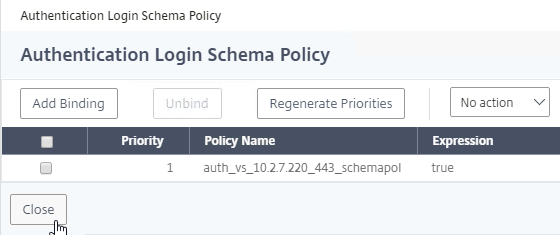
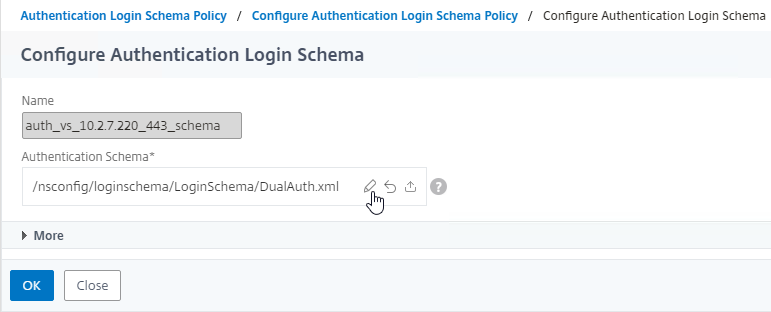
- Scroll down, and click where it says 1 Login Schema.
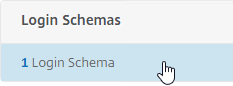
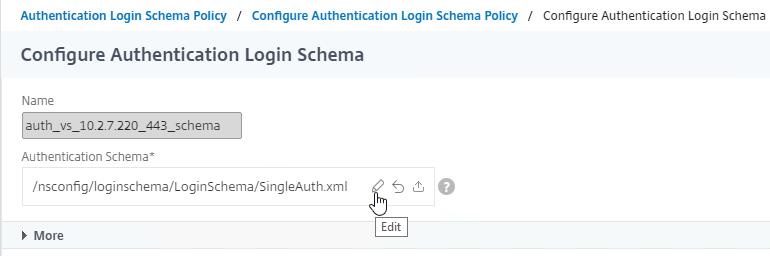
- Right-click the Login Schema, and click Edit.
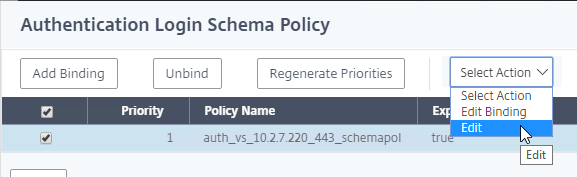
- Click the Edit button next to the Profile field.
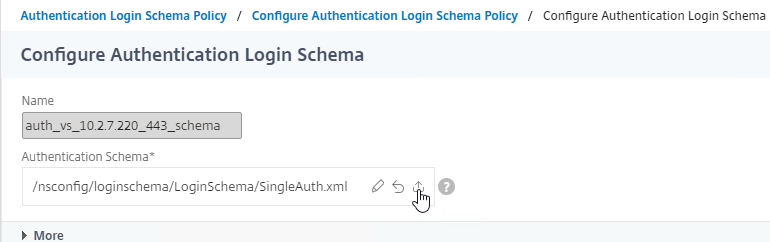
- Click the pencil in the Authentication Schema field.
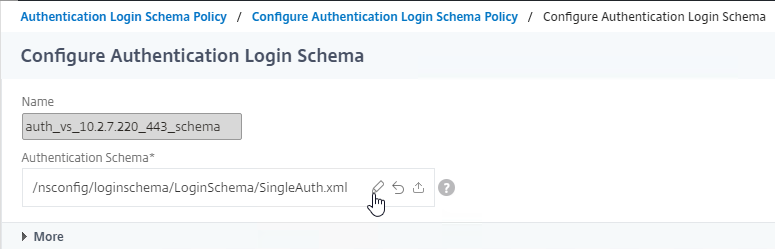
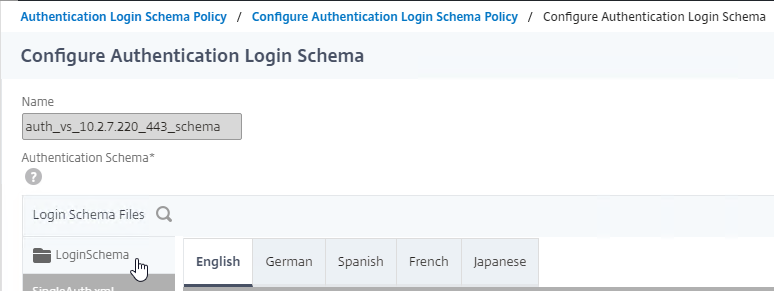
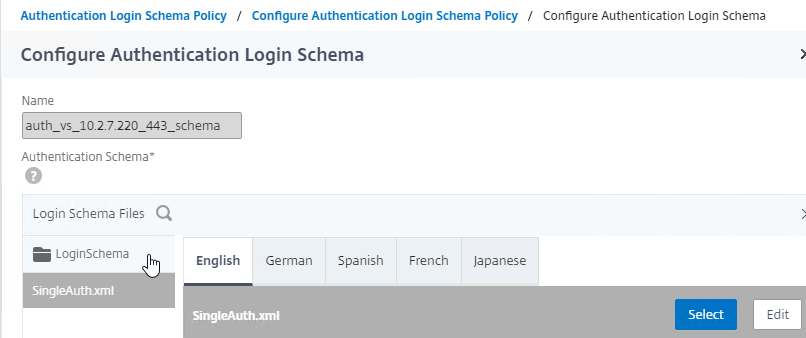
- On the left, click the LoginSchema folder to open it.
- Move your mouse over the SingleAuth.xml file and click the download icon. Save it somewhere.
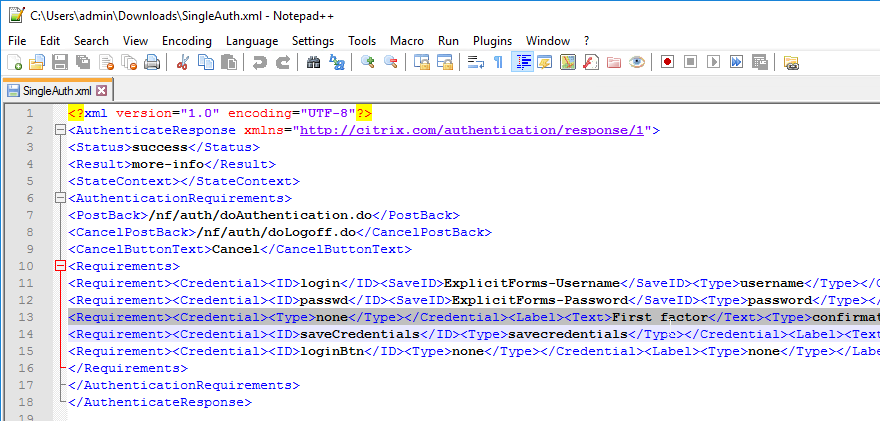
- Edit the downloaded .xml file.
- Find the line containing the First factor text and delete the line. Save the file with a new name.
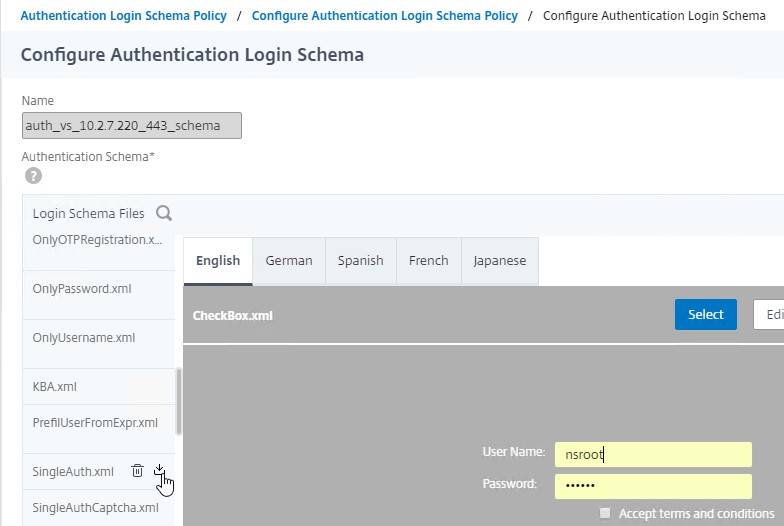
- Go back to the Login Schema dialog box. In the Authentication Schema field, click the upload icon. Select the edited file to upload it.
- Unfortunately, uploading a new Login Schema .xml file does not actually select the uploaded file. Click the pencil icon.
- On the left, click the new file to highlight it.
- On the right, click the blue Select icon.
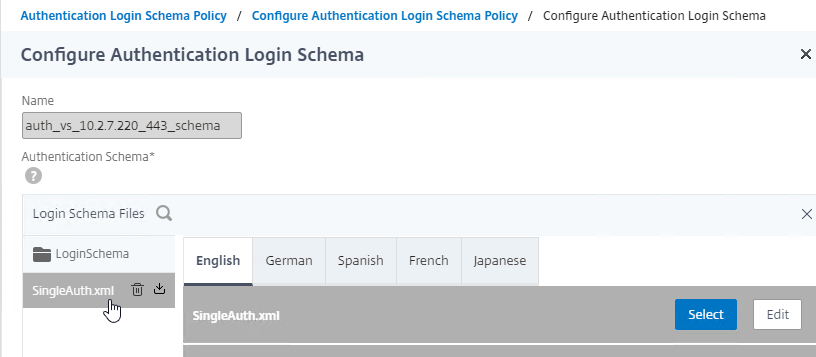
- Notice that the file name has now changed to the new file. Click OK.
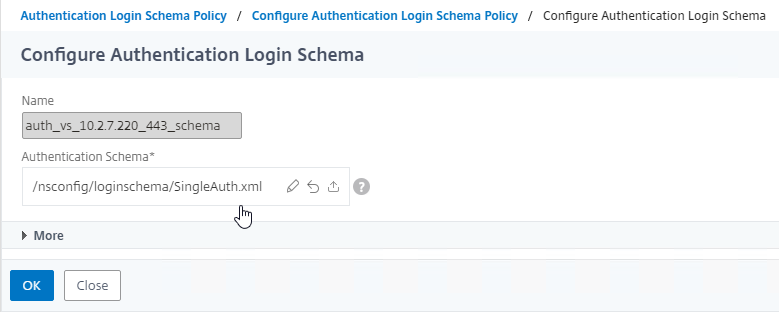
- Click OK again.
- Click Close.
- If you point your browser to the Gateway FQDN again, the extra text is gone. You’re welcome to make additional changes to the .xml file.
StoreFront Configuration for Gateway
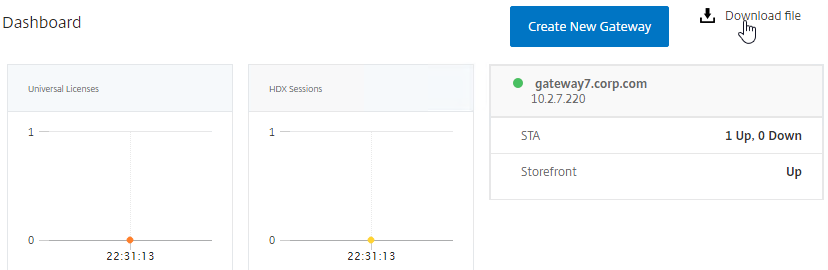
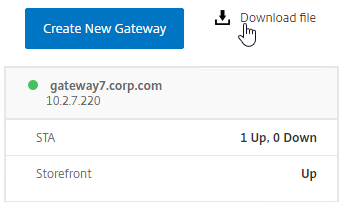
- In Citrix ADC, on the bottom left, click XenApp and XenDesktop.
- On the top right, click Download file.
- In the Download StoreFront Settings page, you can either export all virtual servers, or just one of them. Click OK.
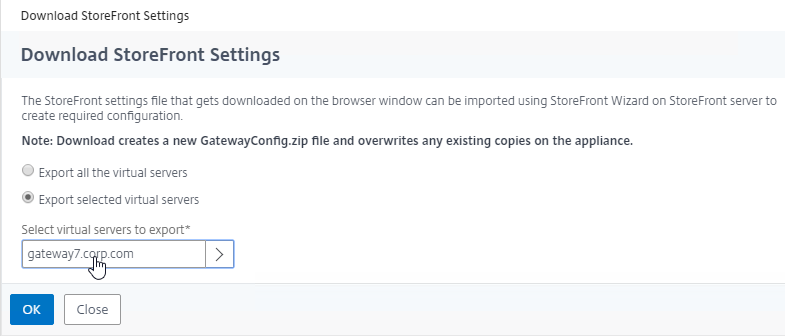
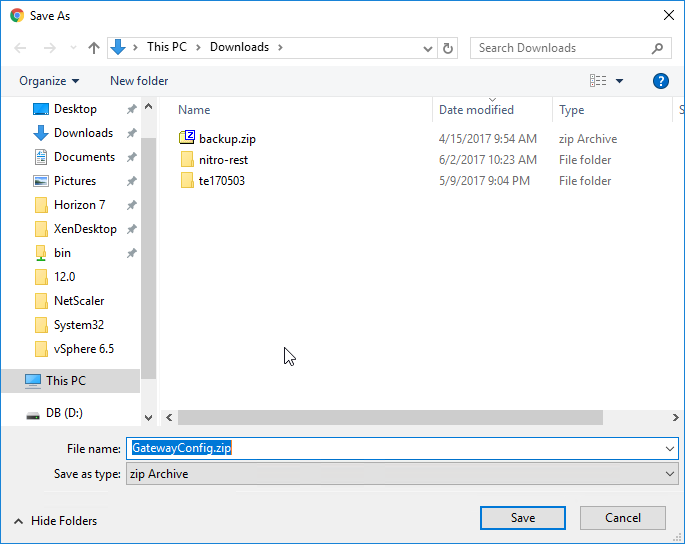
- Save the GatewayConfig.zip file somewhere.
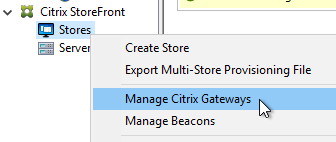
- In StoreFront console, on the left, right-click the Stores node, and click Manage Citrix Gateways.
- At the top of the window, click the blue link imported from file.
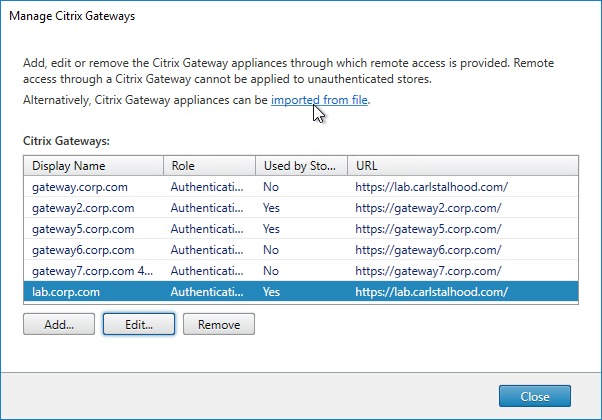
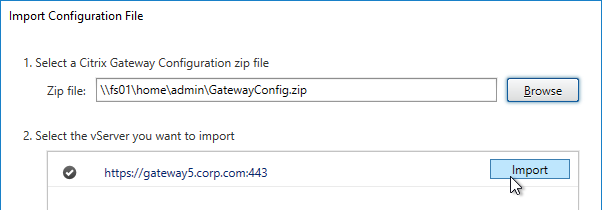
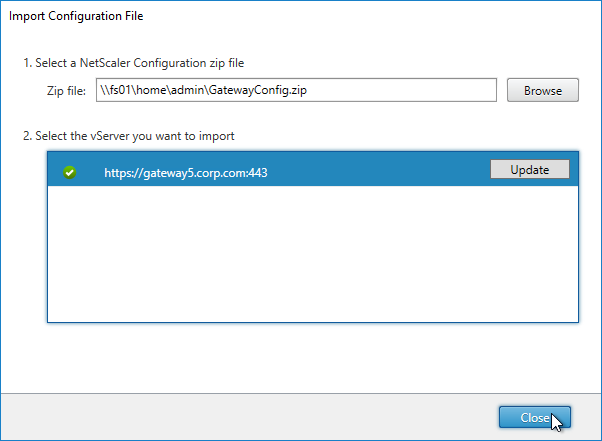
- Click the Browse button, and select the GatewayConfig.zip file you saved earlier.
- Click the Import button next to the Gateway vServer you want to import.
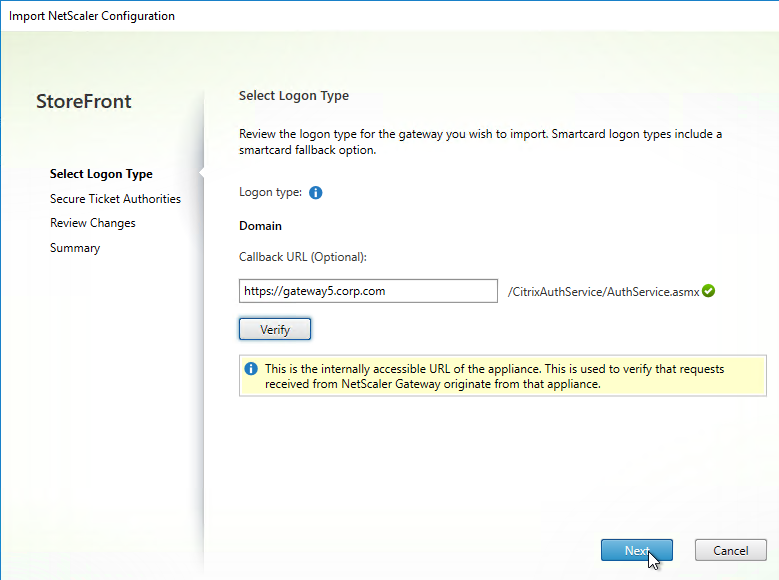
- In the Select Logon Type page, you can optionally enter a SmartAccess Callback URL that resolves to any Citrix Gateway on the same appliance that authenticated the user. Click Verify.
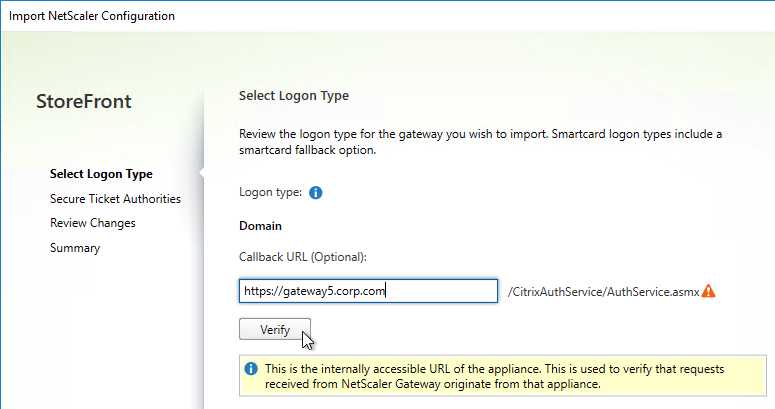
- Click Next.
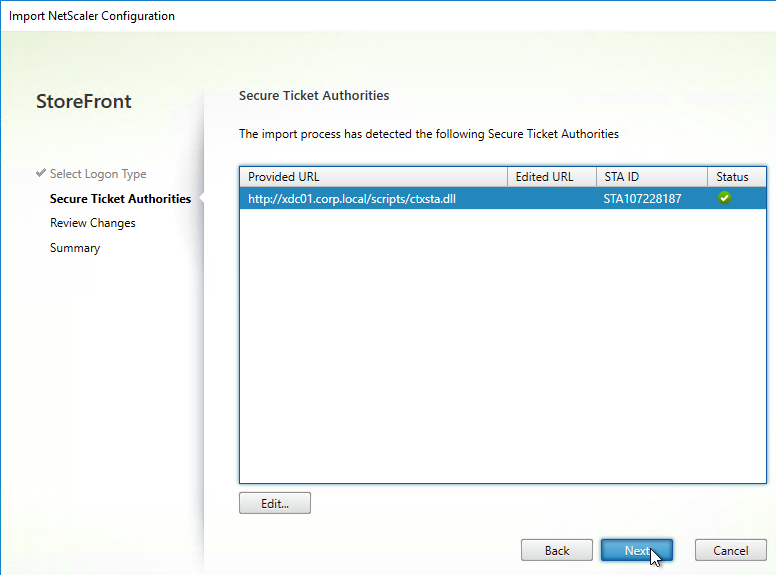
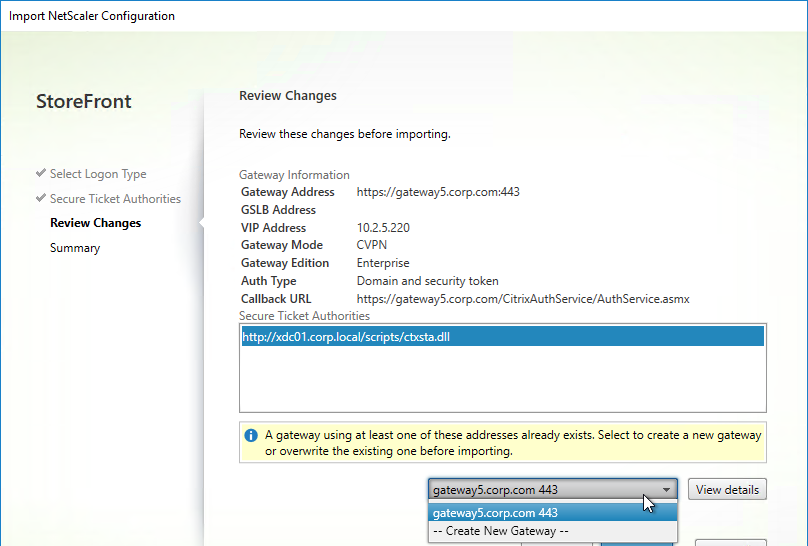
- In the Secure Ticket Authorities page, review the list of STAs, and click Next.
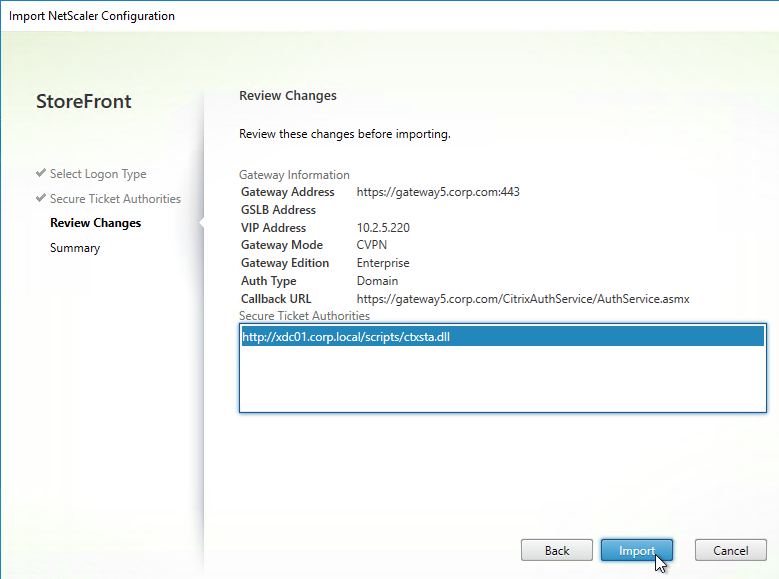
- In the Review Changes page, click Import.
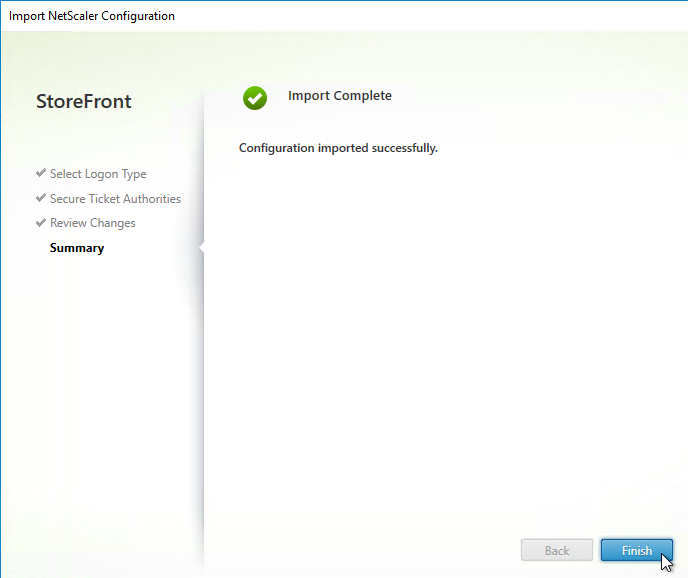
- In the Summary page, click Finish.
- Click Close.
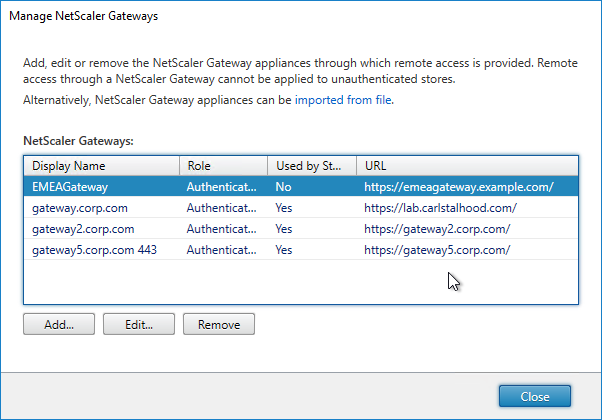
- The new Gateway is shown in the list. Notice that the new Gateway is already Used by Store, so there’s no need to enable Remote Access on the Store yourself. Click Close.
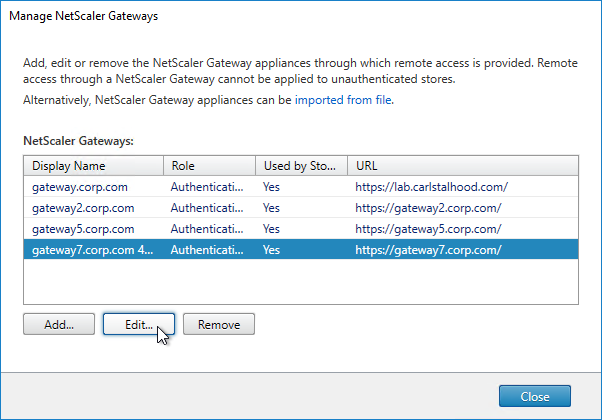
- Edit the newly imported Gateway object.
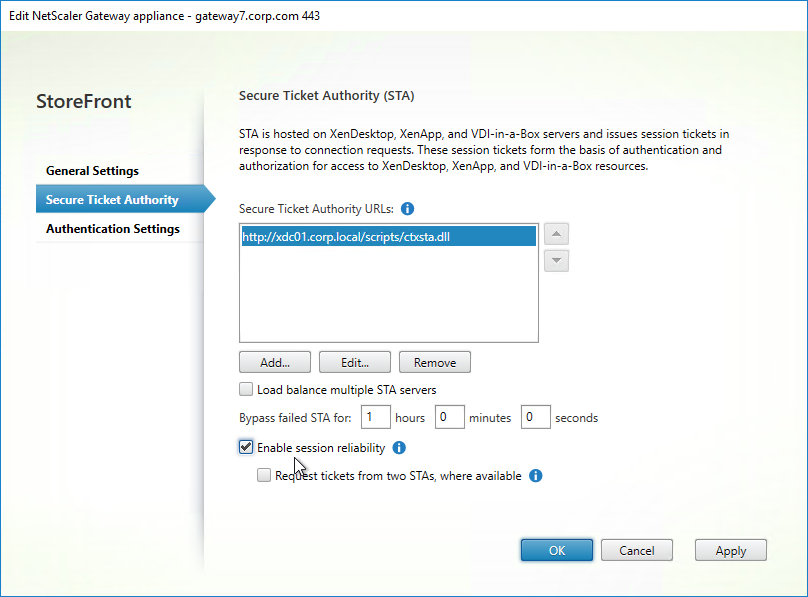
- On the Secure Ticket Authority page, check the box next to Enable session reliability. EDT protocol will not work unless you check this box. Click OK.
StoreFrontAuth and Multiple Domains
The wizard configures Session Profiles with a default domain name. Multiple domains won’t work until you remove this SSON Domain.
- At Citrix Gateway > Virtual Servers, edit the Gateway Virtual Server created by the wizard.
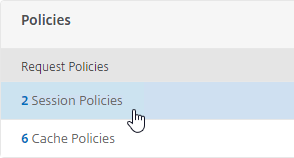
- Scroll down, and click where it says 2 Session Policies.
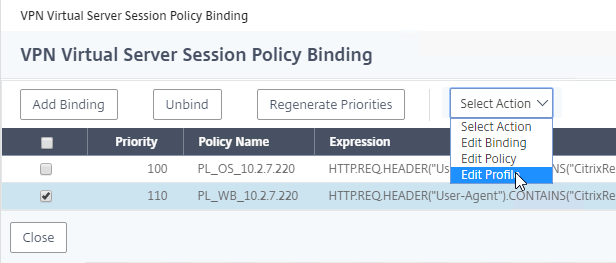
- Right-click each Session Policy, and click Edit Profile.
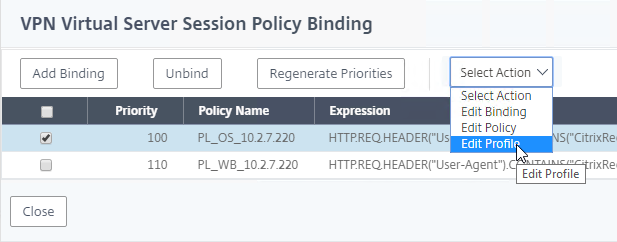
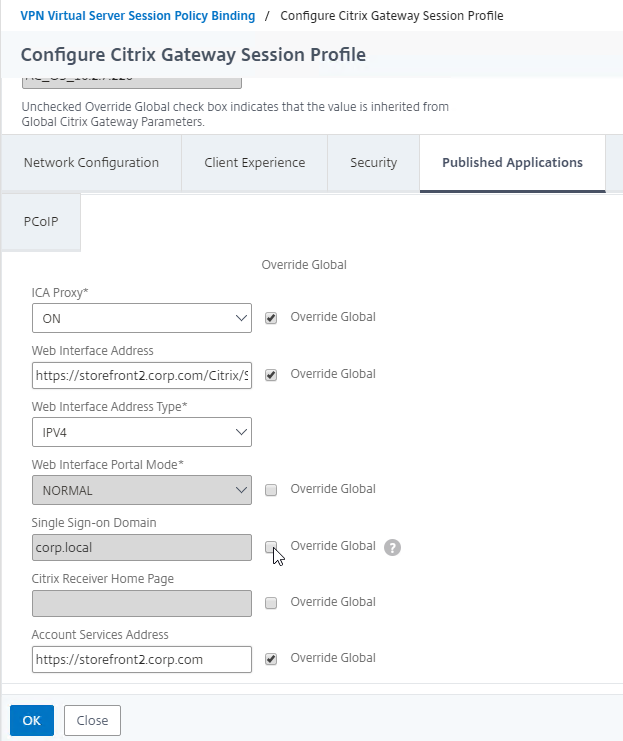
- On the tab named Published Applications, uncheck the box next to Single Sign-on Domain. Click OK.
- Repeat for the other Session Profile.
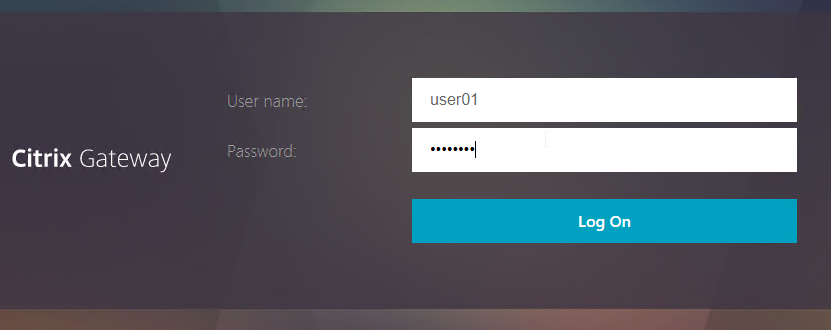
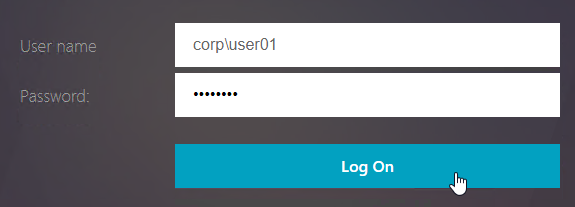
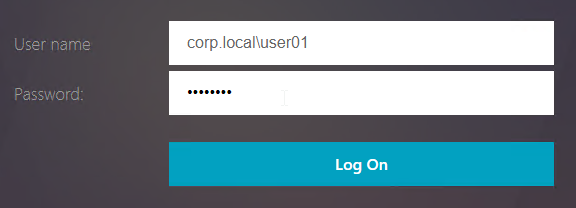
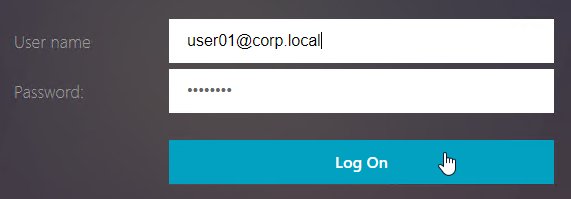
StoreFrontAuth authenticates users to StoreFront using normal StoreFront username syntax:
- username only
- Domain\username
- username@domain.suffix (aka userPrincipalName)
If no domain name is specified, StoreFrontAuth can be configured with a default domain name.
- Go to Security > AAA > Virtual Servers, right-click the AAA vServer that has StoreFrontAuth enabled, and click Edit.
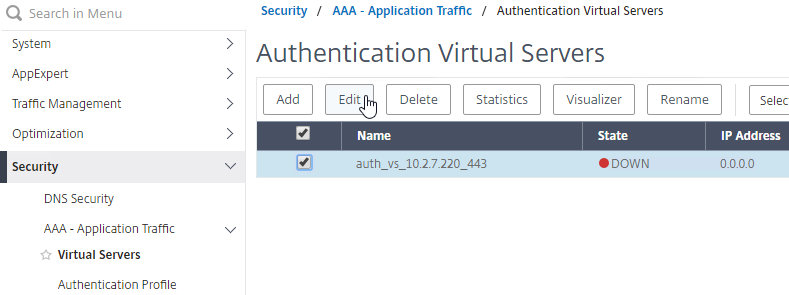
- Scroll down, and click where it says 1 Authentication Policy.
- Right-click the StoreFrontAuth policy, and click Edit Policy. Unfortunately, Edit Action doesn’t seem to work.
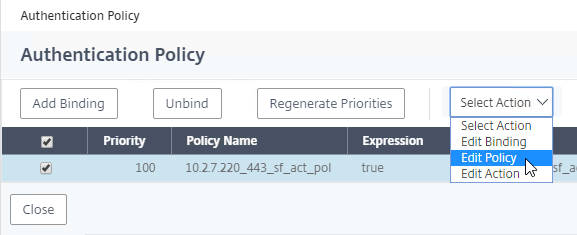
- Click the Edit button next to the Action.
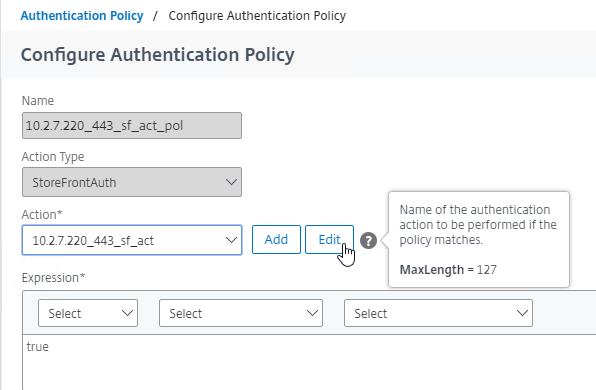
- In the Domain field, enter a default domain name that will be used if the user does not specify a domain. Click OK.
Notes on domain names:
- The domain names entered by users (domain\username, or username@domain.suffix), must be accepted by StoreFront.
- The default domain name entered in the StoreFront Authentication Action must be accepted by StoreFront.
- After StoreFront Authentication authenticates the user, it sends back the user’s UPN. Citrix Gateway then uses the UPN to Single Sign-on to StoreFront. Thus, the UPN suffixes must be accepted by StoreFront.
To configure the domain names accepted by StoreFront:
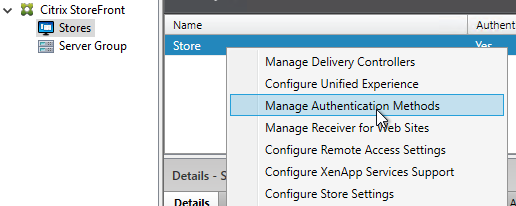
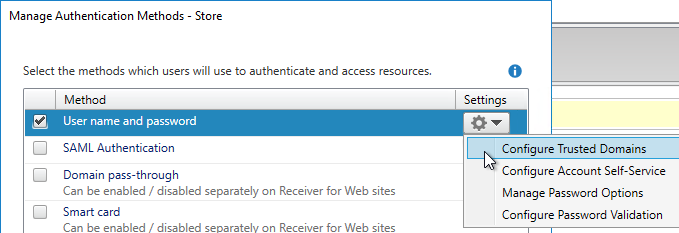
- In StoreFront Console, right-click your store, and click Manage Authentication Methods.
- Click the top gear icon, and click Configure Trusted Domains.
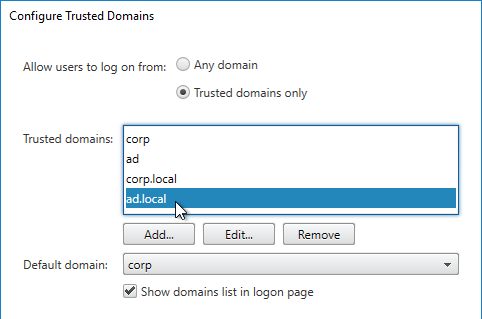
- If the selection is Any domain, then you’re good, and you don’t need to change anything.
- If it’s set to Trusted domains only, then make sure that UPN domain suffixes are in the list.
- To make it easier for users, add the NetBIOS domain names too. However, if you checked the box for Show domains list in logon page, then internal users will see both the NetBIOS domain names, and the UPN domain suffixes.
- Notice that there’s a drop-down to select the Default domain. This default domain is only used if the user does not specify a domain name, and if no domain name is configured in the StoreFrontAuth action.
Depending on how you configured the StoreFront trusted domains, users have several options for logging into Citrix Gateway:
- Username only – the default domain name configured in the StoreFrontAuth action is used. If StoreFrontAuth default domain is not configured, then it uses the default domain name configured in StoreFront.
- Domain\username – requires the short domain name (NetBIOS) to be included in StoreFront’s list of trusted domains.
- UPN.suffix\username – this should always work, since you always need to add UPN suffixes to the StoreFront trusted domains list.
- username@UPN.suffix – this should always work, since you always need to add UPN suffixes to the StoreFront trusted domains list.
Multi-factor authentication
The XenApp and XenDesktop Wizard supports several authentication configurations:
- On the bottom left, click XenApp and XenDesktop.
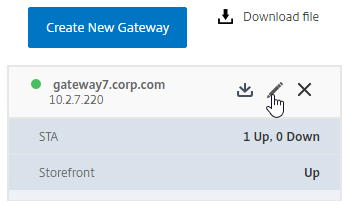
- On the top right, move your cursor over the existing Gateway, and click click the pencil icon to edit it.
- If you earlier removed the Single Sign-On Domain to support multiple AD domains, then the wizard will prompt you to re-enter a Default Active Directory Domain. Unfortunately, this field is not optional. After entering a domain name, and completing the steps shown in this section, you can follow the above instructions to remove it again.
- In the Authentication section, click the pencil icon.

- At the top of the Authentication section, there’s a drop-down for Choose Authentication Type. There are several options. Since this article is focused on StoreFront Auth, only RSA + StoreFront Auth will be detailed below.
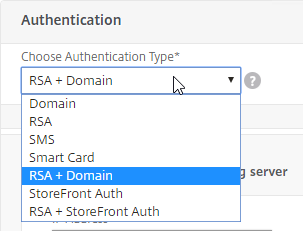
- The RSA + Domain option is equivalent to Citrix Gateway RADIUS + LDAP. The RADIUS + LDAP authentication is performed directly by Citrix Gateway, which means it doesn’t use nFactor or a AAA vServer. Unfortunately, the wizard does not configure Citrix Gateway correctly. See my Citrix Gateway RADIUS Authentication article to fix the authentication policies and Gateway binding configuration.
The RSA + StoreFront Auth option will ask you for RADIUS authentication information.
- Change the Choose Authentication Type drop-down to RSA + StoreFront Auth.
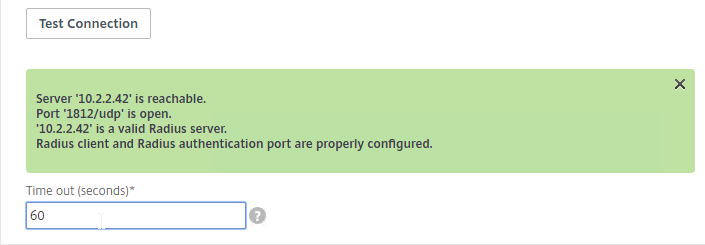
- Enter the RADIUS information, and click Test Connection. Citrix ADC will use its SNIP to verify the connection.
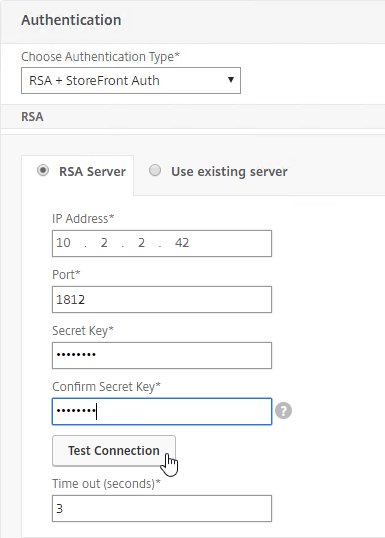
- Increase the RADIUS Time-out if your multi-factor is phone-based.
- StoreFront Auth should already be configured, so just click Continue.
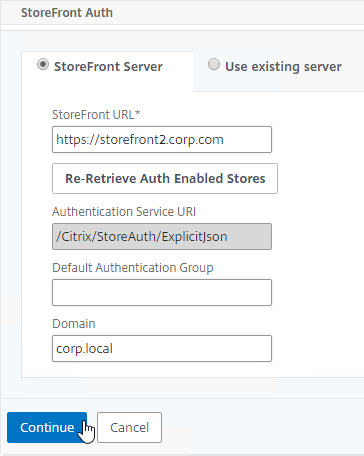
- Note, if you see any error messages, you might have to completely delete the Gateway, and run the wizard from scratch. Unfortunately, the XenApp and XenDesktop wizard seems to be quite buggy.
- Click Done to close the Citrix Gateway Settings page.

- After changing the Gateway authentication, on the top right, download the configuration file again, and import to StoreFront.
- When you import to StoreFront, you can select an existing Gateway to overwrite.
- The Gateway that it imports to StoreFront is automatically configured with Domain and security token so you don’t have to configure this yourself.

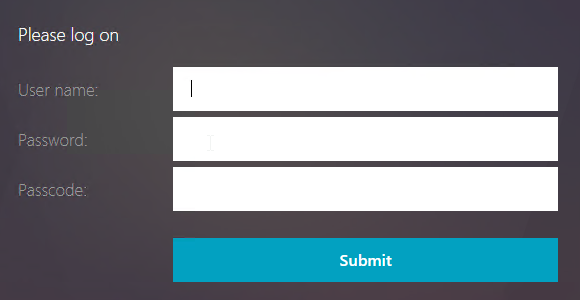
If you point your browser to the Gateway URL, you will see two password fields. You would think that the first password field is where you enter the AD Password, but that’s incorrect. Actually, it wants Passcode in the first field, and AD Password in the second field.
To swap the fields, do the following:
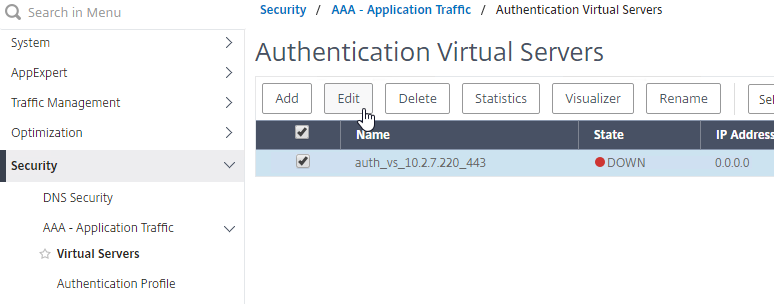
- Go to Security > AAA – Application Traffic > Virtual Servers.
- Edit the AAA vServer that is linked to the Gateway vServer.
- Scroll down, and click where it says 1 Login Schema.
- Right-click the Login Schema, and click Edit.
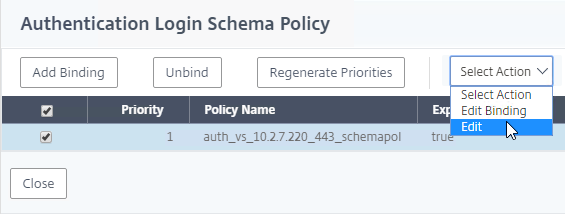
- Click the Edit button next to the Profile field.

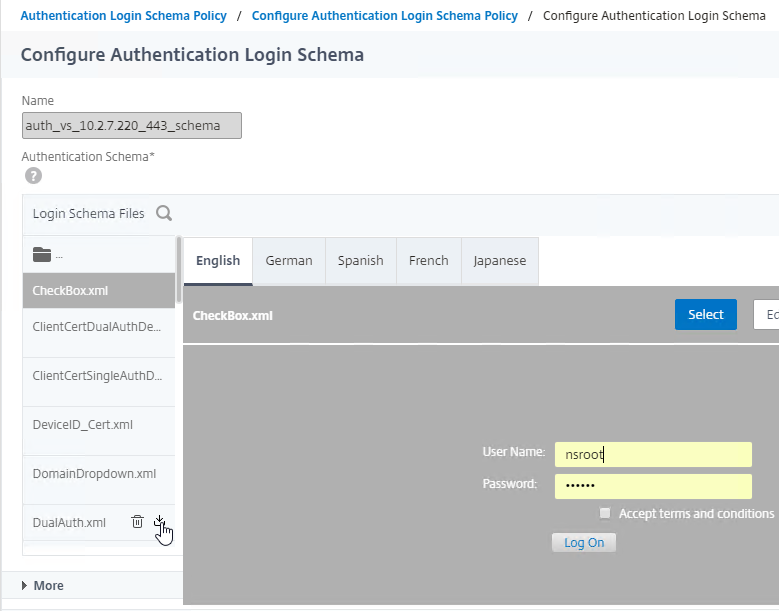
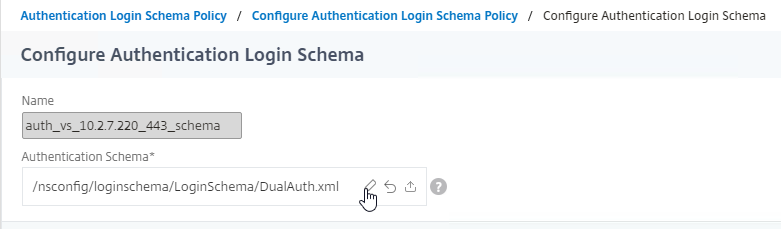
- Notice the DualAuth.xml file selection. Click the pencil in the Authentication Schema field.
- On the left, click the LoginSchema folder to open it.
- Move your mouse over the DualAuth.xml file, and click the download icon. Save it somewhere.
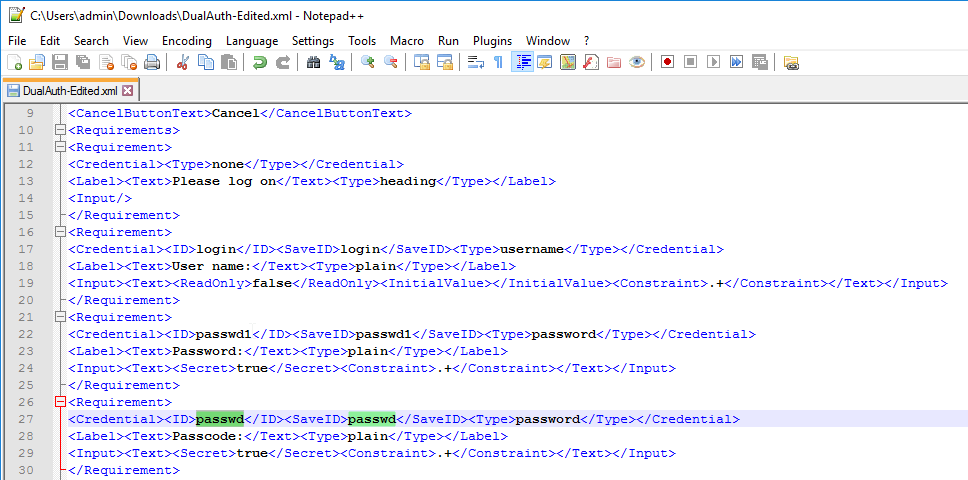
- Edit the downloaded .xml file.
- Look for the two lines containing passwd. Swap the passwd1 and passwd IDs. In other words, remove the 1 from passwd in line 27, and add it to the passwd in line 22. There are two ID tags in each line. Save the file with a new name.
- Go back to the Login Schema dialog box. In the Authentication Schema field, click the upload icon. Select the new file to upload it.

- Unfortunately, uploading a new Login Schema .xml file does not actually select the uploaded file. Click the pencil icon.
- On the left, click the new file to highlight it.
- On the top right, click the blue Select icon.
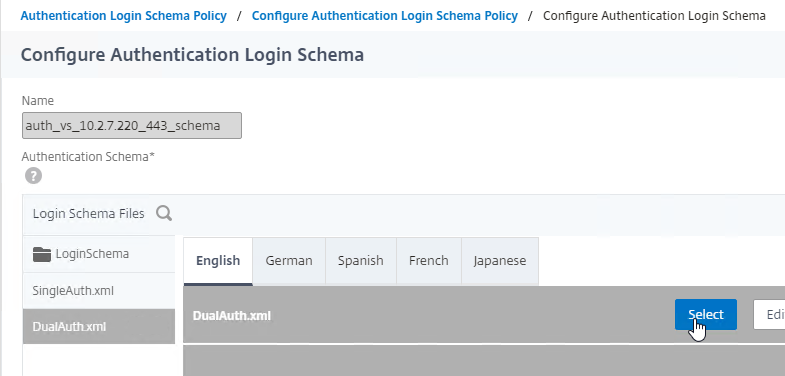
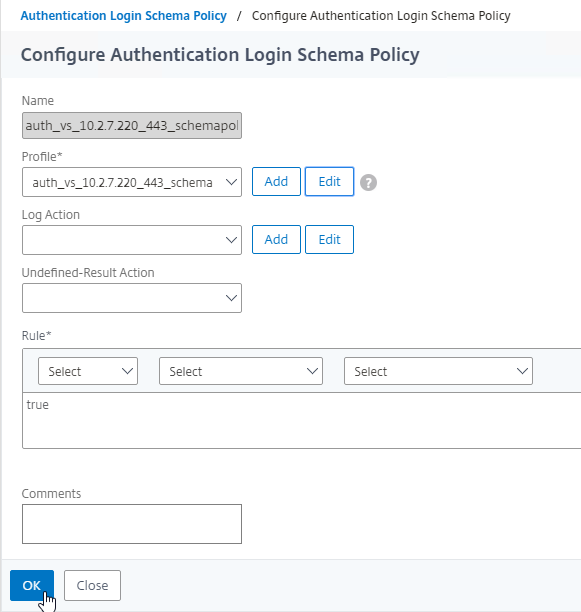
- Notice that the file name has now changed to the new file. Click OK.

- Click OK again.
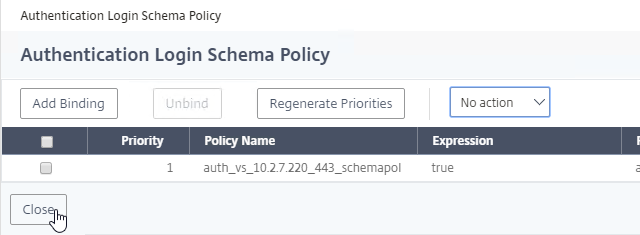
- Click Close.
- Now when you go to the Gateway URL, the fields should work as expected.
Hello Carl,
We have just migrated the storefront and delivery controller from version 7.15 to version 2402 (new machines, new OS), the Netscaler has not evolved, we are in version 13.1.
There are no problems internally, the applications work perfectly
On the other hand, externally (virtual server citrix gateway), we connect from a web browser to the virtual servers citrix gateway, the applications are available in the browser, but we can’t launch an application, we got this error message : Failed to launch application
We set same STA servers on Citrix Gateway virtual server as on Storefront servers
If you have any ideas, that would be great
Thank you in advance
Isabelle
Is FAS enabled?
Look in StoreFront Server > Event Viewer > Applications and Services > Citrix Delivery Services
No FAS is not enabled
I have this error in event viewer :
There was an error during a launch status request.
System.Net.WebException, System, Version=4.0.0.0, Culture=neutral, PublicKeyToken=b77a5c561934e089
The remote server returned an error: (500) Internal Server Error.
Url: https://xxx.xxx.xxx/Citrix/Store/resources/v2/RmFybS5NUyBFWENFTCBvbiBYQTAxVA–/launch/ica
ExceptionStatus: ProtocolError
ResponseStatus: InternalServerError
at Citrix.DeliveryServicesClients.Resources.ResourcesClient.TryGetChallenge(Exception ex, String serviceUrl)
at Citrix.DeliveryServicesClients.Resources.ResourcesClient.Launch(String serviceUrl, String token, String clientAddress, String deviceId, Boolean showDesktopViewer, String displayNameDesktopTitle, Boolean createFileFetchTicket, IDictionary`2 extraHeaders, String icaTemplate, String launcher, CitrixAuthChallenge& challenge)
at Citrix.Web.StoreProxy.Controllers.ResourcesController.GetLaunchStatus(String id, String displayNameDesktopTitle, Boolean createFileFetchTicket)
Internal Server Error. Check the other Event Logs for .NET errors. Or you might have to call Citrix Support.
Hi Carl,
thank you for your effort and accuracy on your guides.
I’ve successfully setup the Citrix Gateway with Storefront Auth, I’m facing an unexpected behavior on response errors, on the login page of the Citrix Gateway it answer always “Try again after some time or contact your help desk” instead on Storefront the message is correct, for example “Wrong Password”. Many thanks in advance.
NetScaler might be trying to hide the real reason to make it harder for hackers. There’s a Gateway setting to enable enhanced feedback. https://support.citrix.com/article/CTX223404/how-to-enable-and-customize-enhanced-security-feedback-messages-on-netscaler
Hi, enabled but unsuccesfully, opened a ticket to Citrix but they’re not doing progress, seems the error is that the Netscaler doesn’t receive the correct error code. There’s something to enable on StoreFront? I’m using as StoreFront Auth server the LoadBalancing of the two StoreFront, maybe this can drop some comunication?
Hello Carl,
thanks for the article.
I have a problem setting up the Storefront.
My storefront is accessible over a public IP-Adress and when I enter “storefront.domain.com it works perfectly.
But when I enter the URL in ADC under “StoreFront URL” I getting the error “StoreFront could not be contacted. The status of the server is DOWN”.
What I can do to fix this problem.
I hope you cam help me.
Thanks
Are you entering the DNS name? If so, can your NetScaler resolve that DNS name to the correct IP?
Do you have multiple interfaces on the NetScaler? Is the routing table correct? Go to Traffic Load Balancing > Load Balancing > Services, add a service, enter the IP of StoreFront, 443 as the port, and see if it comes up.
Hi Carl,
Thanks for the fast reply.
The Gateway and the Storefront are now available.
But now I have a second Problem.
When I Entering the Gateway-URL and I log in to Gateway, the Browser redirects to Storefront Store-URL, but I get the Error “net::ERR_CONNECTION_RESET”
What I have forgotten to configure or Something?
Can you please Help me?
Thanks
Dear Carl,
our NetScaler should act as a “proxy” between client and VDA. We tried to configure StoreFront Log On (StoreFrontAuth) when authentication is disabled on Citrix Gateway VIP. For Browser it works fine, but via workspace app from “outside” we get no authentication dialog (location inside = vendor network, outside = our company network).
Is there a solution also for the workspace app? Our Clients can only connect to our NetScaler and the NetScaler can’t contact domain controller from vendor network. Login in workspace app from client with vendor domain account.
We found an article from Citrix (see Integrate with Citrix Gateway and Citrix ADC | StoreFront 1912 LTSR
), that it will work only in internal network or with Citrix Receiver for Web!?
With best regards, Frank
Hey Carl,
I have storefront loadbalanced behind the Netscaler so that we can do storefront Auth, However we are using a content switch (UG Setup) so want to hide the storefront behind the CS.
We have a rule in the content switch that has the storefront. URL and when browsing to it that works fine, however when you go through Auth setup and put the URL under the action we get an error Storefront could not be contacted the server is down. We know its not and if we create a LB on its own IP everything works as expected. So I know the CS is not matching to the policy. Any ideas on how to get the content switch to work?
CS policy rule looks like the following:
HTTP.REQ.HOSTNAME.SET_TEXT_MODE(IGNORECASE).EQ(“storefront.XXX”)
Thanks,
NC
Hi Carl, thank you for very detailed article.
We currently have two factor configured with Web Interface 5.4 where NetScaler prompts for 1st factor (RSA) and after successful authentication redirects to Web Interface where it prompts for second factor (AD). I am trying to have the same with StoreFront but to no avail.
Any recommendation ?
See https://support.citrix.com/article/CTX200066
thank you Carl, works like a charm ! The only issue is how to pass user ID from NetScaler to StoreFront and not to enter it again. I’m sure can be done with NetScaler but haven’t found it.
Hi Carl,
Thanks for the detailed post. I have been trying to find a way to integrate third party link for self-sign password reset on netscaler but I have not had any success with .js file / custom.css file or theme.css. I see article about EULA but I could not find any articles adding hyperlink for sspr. hopefully, there are some options on 12.1
What kind of theme? The instructions for RfWebUI are different than the instructions for X1. See https://www.carlstalhood.com/netscaler-gateway-12-tweaks/#logonlinks
Hi Carl,
In multi factor Auth, 1st Auth is validated by Netscaler Gateway and 2nd Auth is validated by storefront ?
Hi Carl,
Quick question: There is a feature on NetScaler called WebInterface on Netscaler. This shows up on the XA/XD integration wizard.
What is this? Does this allow you to run a Storefront like site without storefront servers? If so why use SF?
What are the use cases for this and why would you not advise a large organisation to use this?
If you have any information that I could use to answer these questions I would be very grateful.
Only for the older Web Interface. The NetScaler version is Java based. I don’t recommend it.
Hello Carl,
Thanks for nice article.
I have setup Citrix ifnra test lab in AWS environment. I have deplyed NS in AWS with single interface. NSiP, SNIp and Citrix infra servers are same subnet (10.0.64.x)
From putty i am able to ping DNS/AD server. When I am DNS server in NS it is showing down whereas LDAP is working perfectly. As this my test lab all ports are open through and fro.
Once login to Netscaler page after credential authenication happens and getting error message “Http/1.1 Internal Server Error 43531”. I have enabled MBF in NS. (tried with route as but same issue)
Any suggesion?
Regards,
Dip
When you SSH to NetScaler and run ping, that is sourced from the NSIP, not the SNIP. To ping from SNIP, in GUI, go to Traffic Mgmt > Load Balancing > Services, add a service, enter the destination IP. Change the monitor to a ping monitor.
Is AWS aware of all IP addresses assigned to the appliance? I think you typically add multiple NICs. Or in AWS assign multiple IPs to the NIC.
Is the DNS server in the same subnet as NetScaler? If not, what is your route 0.0.0.0 0.0.0.0?
Hell Carl,
Thanks for reply. It really helped.
You rightly pointed. I have not assinged SNIP to Nic. Once i have assigned it DNS is up now.
But problem is this is my test environment, i have used self signed cert on netscaler and same cert i have deoyed on my machin so in Trustted root CA option. I able to login to NS via Internet and able to see VDI icon in storeront.
But when I am launchig it gives me error
//
—————————
Windows 10 Desktop ERROR
—————————
Unable to launch your application. Contact your help desk with the following information:
Cannot connect to the Citrix XenApp server.Network issues are preventing your connection. Please try again. If the problem persists, please call your help desk.
—————————
Desktop Viewer
—————————
The connection to “Windows 10 Desktop” failed with status (Unknown client error 0).
\\
However internally (Intern Jump Server) when i am login getting :”Your logon has expired. Please log on again to continue” via Netscaler. (there is not cert deployed on Storefront)
But direct storeront link is working properly and able to launch vdi.
As this test environment i have not using intermediate certicate. is that the probem? or any suggestion how can I user self signed cert.
Regards,
Dip
Carl, when setting up Citrix Receiver to go through StoreFrontAuth, I get “double” prompted. The first is the NS, then again from the AAA VServer (I recognize the test from the LoginSchema). What am I missing here?
Hello CAril
How are you
I hace created a lab with NS 12
My prod network is 192.168.1.0/24
I did the xenapp and xendesktop wizard my vip is 172.16.0.10
I can ping it from the cli
But if I connect from y windows 10 client and type to https the vip no answer
for you info my vm NS has only one network card
tks for your help
Are you saying that your NetScaler is connected to multiple subnets? Did you configure VLANs? https://www.carlstalhood.com/netscaler-12-system-configuration/#twoarm
Hi Carl, Thanks for your article.
I have an existing PoC setup where users are connecting directly to Storefront with Pass-through authentication turned on.
In new setup, we have AG setup for internal users (to force all traffic through SNIP). This means users need to type their credentials to authenticate at NetScaler.
Users want to be able to use Pass-through authentication (similar to their Poc). I understand Pass-through authentication is not supported in NetScaler Gateway
If I configure Storefront-auth as described, Is it possible to make pass-through working?
Bottom line: Users want to automatically logged in from their domain-joined machines using Pass-through, even when connecting from NetScaler AG.
Note: I have enabled the Pre-reqs for Passthrough to work already (Receiver GPO, TrustingXML etc)
Is there a specific step needed to enable “Storefront Auth” on step 12 (Click the button to Retrieve Auth Enabled Stores)?
When I click the button, I get an error stating: “There are no auth enabled stores on the specified StoreFront”
I usually have to click it a couple times.
Or, maybe you’ve upgraded StoreFront several times and don’t have a store with integrated auth.
I’m with this error using Netscaler 12. How can i fix it ?
Hi Carl,
i change from LDAP Auth to the new StoreAuth methode, after i change it i become an Error on Storefront
Eventlog: Citrix Authentication Service ID:1 (1008) /UserDomain
” Beim Verarbeiten einer expliziten JSON-Anforderung ist ein Fehler aufgetreten.
System.ArgumentNullException, mscorlib, Version=4.0.0.0, Culture=neutral, PublicKeyToken=b77a5c561934e089
Der Wert darf nicht NULL sein.
Parametername: userDomain
bei Citrix.DeliveryServices.Security.Claims.Specializations.Directory.Client.DelegatedDirectoryClaimFactory.CreateDirectoryClaimForAllUserGroups(String userSecurityIdentifier, String userDomain, String issuer, String original, IEnumerable`1 requiredProperties, Boolean searchGC)
bei Citrix.DeliveryServices.Authentication.Explicit.ExplicitJson.Controllers.ExplicitJsonController.AuthenticateUsernamePassword(UsernamePasswordRequest upr)
bei Citrix.DeliveryServices.Authentication.Explicit.ExplicitJson.Controllers.ExplicitJsonController.Authenticate(JsonRequestHolder holder)
”
I hope you can help me.
Thx
Thomas
HI Carl do you thing Netscaller v12 is ready for production deployment at a Green Field Site or should I be sticking to V11.1.
Alan
I would stay with 11.1, unless you need the new features, and are tolerant to risk.
Thank you Carl. Is it still possible to restrict gateway access to only members of a specific AD group using StorefrontAuth method?
The Session Profile has a “Groups allowed to login” field.
It worked! Thank you Carl.
Hey Carl, testing Storefront Auth and running into an issue using RfWebUi, other themes work. After loging no apps are disabled. My account also is only showing my samaccount and not full name. Sf without NetScaler works fine as does the X1 theme. Any ideas? Used the wizard to configure everything. SF is set to any domain.
Hi Chuck,
I have the same problem here. NS 11.1. with RfWebUI against SF 3.5 is working. Update NS to 12.0.53.6 and RfWebUI aganist SF3.5 produce a error “no apps aor desktops available at this time”. Switching Theme to X1 and login again, it’s working as expceted. Any Ideas where the problem is?