Navigation
- Change Log
- Persistent vs Non-persistent
- Zones (CVAD and XenApp/XenDesktop 7.7 and newer)
- Zone Preference (CVAD and XenApp/XenDesktop 7.11 and newer)
- Machine Creation Services (MCS)
- MCS – Full Clones (CVAD and XenApp/XenDesktop 7.11 and newer)
- MCS – Machine Naming
- MCS – Storage I/O optimization (i.e. Memory Caching, aka MCSIO) (CVAD and XenApp/XenDesktop 7.9 and newer)
- MCS – Image Prep – KMS Rearm
- MCS – Base Disk Deletion
- MCS – Static (Dedicated) Catalog Master Image
- MCS – Hybrid Azure AD Join
- Controller – Name Cache
- Delivery Group License Type (CVAD and XenApp/XenDesktop 7.14 and newer)
- Delivery Group Published Apps and Desktops in 7.8 and newer
- Maximum Desktop Instances in Site/Farm (CVAD 1808 and newer)
- Logoff Closed Desktop (Workspace app 2309 and newer)
- Tags (CVAD and XenApp/XenDesktop 7.12 and newer)
- RDSH Scheduled Restart
- Autoscale
- Allow one user to have Multiple Sessions
- Catalog Maintenance:
- Published Applications
💡 = Recently Updated
Change Log
- 2023 Oct 5 – Logoff Closed Desktop (Workspace app 2309 and newer)
- 2023 Sept 16 – Autoscale Vertical Load Balancing
- 2023 June 1 – Autoscale in CVAD 2305+ Web Studio
- 2023 June 1 – Hybrid Azure AD Join in CVAD 2305+ Web Studio
- 2023 Mar 21 – Multiple Sessions – configure session roaming in Web Studio 2303+
- 2021 Apr 4 – RDSH Scheduled Restarts – Restart after draining users
- 2020 Jun 19 – RDSH Scheduled Restarts – added link to Scheduled restarts for machines in maintenance mode at Citrix Docs
- 2019 Sep 22 – RDSH Scheduled Restarts – added link to Scheduled restarts delayed due to database outage at Citrix Docs
- 2019 Mar 31 – MCS Storage I/O optimization (i.e. Memory Caching, aka MCSIO) – updated for MCSIO driver in CVAD 1903.
- 2018 Dec 16 – RDSH Scheduled Restart – multiple schedules in 1811 Studio
- 2018 Oct 29 – Static (Dedicated) Catalog Master Image – new section with link to Knowcitrix Machine Catalog Update Tool
- 2018 Oct 7 – Catalog Types – added link to Reddit thread Citrix at scale.
- 2018 Sep 30 – MCS Full Clones – added link to CTX129205 How to Update Master Image for Dedicated and Pooled Machine Types using PowerShell SDK Console
- 2018 Sep 8 – added Maximum Desktop Instances in Site/Farm (CVAD 1808 and newer)
- 2018 June 15 – RDSH Scheduled Restart – added link to Wedel IT – Citrix Reboot Scheduler
- 2018 June 9 – updated Persistent vs Non-Persistent for Layering, SCCM, and LHC.
- 2018 May 13 – Scheduled Restart section, added Delivery Group time zone info from CTX234892 Scheduled Restart Happen At Incorrect Time For A Specific Delivery Group) .
- 2017 Dec 25 – in Zones section, added link to Citrix Blog Post where Citrix recommends multiple sites/farms instead of zones.
- 2017 Dec 4 – updated Docs links to current-release
Persistent vs Non-persistent
VDA design – One of the tasks of a Citrix Architect is VDA design. There are many considerations, including the following:
- Machine type – single user (virtual desktop), or multi-user (Remote Desktop Session Host). RDSH is more hardware efficient.
- Machine operating system – Windows 7, Windows 10, Windows Server 2008 R2, Windows Server 2012 R2, Windows Server 2016
- Machine persistence – persistent, non-persistent
- Number of new machines – concurrent vs named-users
- Machine provisioning – full clones, Machine Creation Services (MCS), Citrix Provisioning
- Hardware for the new machines – hypervisor clusters, storage
- How the machines are updated – SCCM, MCS, Citrix Provisioning etc.
- Application integration – locally installed, App-V, Layering, Virtual Apps or XenApp published, leave on local endpoint machine, cloud apps, etc.
- User Profiles – roaming, mandatory, home directories
- Group Policies – session lockdown, automation
- Disaster Recovery – replication. VDAs running in a warm site. DR for profiles and home directories too.
Desktop Management in a Citrix environment – Some environments try to use Citrix to improve desktop management. Here are some desktop management aspects of Citrix that aren’t possible with distributed physical desktops:
- Datacenter network speeds – The VDAs have high speed connectivity to the desktop management tools, which eliminates WAN bandwidth as a desktop management consideration. For example, you can use Microsoft App-V to stream apps to VDAs. And SCCM deployments have much greater success rates than PCs that are frequently offline.
- Non-persistence – Non-persistent VDAs revert at every reboot. To update non-persistent VDAs, simply update your master image, and push it out.
- Layering – The VDA VMs can be composed of multiple layers that are combined during machine boot, or when the user logs in. Citrix App Layering is an example of this technology. A single layer can be shared by multiple VDAs. The layers are updated once, and all machines using the layer receive the updated layer at next boot/login.
- See the Reddit thread Citrix at scale.
Non-persistent VDAs – Probably the easiest of these desktop-management technologies is non-persistence. That’s because you install your applications once into a master image, and you can easily create a pool of identical machines based on that master image. Whenever an update is needed, you install the update once into your master image and push it out.
However, there are several drawbacks to non-persistence:
- Multiple Master Images – it’s extremely rare for there to only be one master image. You’ll probably have a number of master images, each with different application sets. The more master images you have, the more effort is required to maintain them.
- Same apps in multiple images – Some apps are common to multiple images. For example, Office and Adobe Reader. How do you update these common apps identically on multiple master images?
- Multi-datacenter – how do you perform the same master image updates in multiple datacenters? Replicate the master images? Perform the same change multiple times?
- Automation – You’ll need new automation for managing the multiple master images and updating Catalogs. Automation complicates the simple management you were hoping to achieve.
- One option is SCCM Package Deployment to the Master Images, but not the linked clones. See Implementing SCCM in a XenDesktop VDI environment for info on using Client Classes to create a dynamic Collection for non-persistent machines.
- Master Images must be designed – Which apps go on which master image? Do you install the same app on multiple master images?
- How do you know which apps a user needs? – Most Citrix admins, and even desktop teams, don’t know every app that a user needs. You can use tools like Liquidware Labs or Lakeside Software to discover app usage, but it’s a very complicated process to find commonality across multiple users.
- How are One-off apps handled? – If you have an app used by only a small number of users, do you add it to one of your master images? Do you create a new master image? Do you publish it from Virtual Apps or XenApp (double hop)? Do you stream it using App-V? Layering is another option.
- Application Licensing – for licensed apps, do you install the licensed app into the master image and try to hide it from non-licensed users? Or do you create a new master image for the licensed users?
- Patching multiple images – when a new OS patch needs to be deployed, you have to update every master image running that OS version. Thus Citrix admins usually try to limit the number of master images, which makes image design more complicated.
- How do you manage an app that is installed on multiple master images? – Layering might help with this.
- Who manages the master images? – Citrix admins? Desktop team? It’s unlikely that traditional desktop management will ever be completely removed from an enterprise environment, which means that master image management is an additional task that was not performed before. Does the Citrix admin team have the staff to take on this responsibility? Would the desktop management team be willing to perform this new process?
- Politically feasible? – Large enterprises usually have mature desktop management practices. Would this new process interfere with existing desktop management requirements?
- Responsibility – if the Citrix admins are not maintaining the master images, and if a Catalog update causes user problems, who is responsible?
- Compliance – template machines usually go through a security and licensing compliance process. If the Citrix team is managing the master images, who checks them for compliance?
- RDSH Apps are complicated – who is responsible for integrating apps into Remote Desktop Session Host (Virtual Apps or XenApp)? Does the desktop team have the skills to perform the additional RDSH testing?
- Change Control – Longer Deployment Times – Any change to a master image would affect every machine/user using that image, thus dev/QA testing is recommended for every change, which slows down app update deployment. And once a change is made to the master, it doesn’t take effect until the user’s VDA is rebooted.
- Roaming Profiles – some apps (e.g. Office) save user settings in user profiles. Since the machines are non-persistent, the profiles would be lost on every reboot unless roaming profiles are implemented. This adds a dependency on roaming profile configuration, and the roaming profile file share.
- How is the Outlook OST file handled? – With Cloud Hosted Exchange, for best performance, Outlook needs to run in Cached Exchange mode, which creates a large OST file in the user’s profile.
- OST files are large (multiple gigabytes). One option is to use group policy to minimize the size of the OST file.
- How is the large OST file roamed? If you leave the OST in the default location, then the OST is copied back and forth every time the user logs on and logs off. You usually want to put the OST file on a file share, or in a mounted VHDX file that is stored on a file share.
- Search indexes are rebuilt every time the user starts a new session. This takes time and performance.
- Citrix Profile Management 7.18 has an Outlook OST and Search roaming capability.
- Another option is to purchase a 3rd party OST handling product like FSLogix.
- How is the Outlook OST file handled? – With Cloud Hosted Exchange, for best performance, Outlook needs to run in Cached Exchange mode, which creates a large OST file in the user’s profile.
- IT Applications (e.g. antivirus) on non-persistent machines – Many IT apps (antivirus, asset mgmt, security, etc.) have special instructions to work on non-persistent machines. Search the vendor’s knowledgebase for “VDI”, “non-persistent”, “Citrix”, etc.
- Antivirus in particular has a huge impact on VDA performance. The special antivirus instructions for non-persistent VDAs are in addition to normal antivirus configuration.
- Local Host Cache does not easily support non-persistent virtual desktops – if the Citrix Virtual Apps and Desktops (CVAD) SQL database is down, and if users need to connect to non-persistent random desktops, then Local Host Cache won’t help you. It’s not possible to connect to non-persistent virtual desktops until the Citrix Virtual Apps and Desktops (CVAD) SQL database connection is recovered.
Application Integration Technologies – Additional technologies can be used to overcome some of the drawbacks of non-persistent machines:
- Microsoft App-V – this technology can dynamically stream apps to a non-persistent image. Different users get different apps. And the apps run in isolated bubbles. However:
- App-V is an additional infrastructure that must be built and maintained.
- App-V requires additional skills for the people packaging the apps, and the people troubleshooting the apps.
- Since the apps are isolated, app interaction is configured manually.
- Because of application isolation, not every app can run in App-V. Maybe 60-80% of apps might work. How do you handle apps that don’t work?
- Layering – each application is a different layer (VHD file). The layering tool combines multiple layers into a single unified image. Layers are updated in one place, and all images using the layer are updated, which solves the issue of a single app in multiple images. Layering does not use application isolation, so almost 100% of apps should work with layering. Layers can be mounted dynamically based on who’s logging in. There’s also a persistent user layer that lets users install apps, or admins can install one-off apps. Citrix has an App Layering feature. Notes:
- Citrix App Layering is a separate infrastructure that must be built and maintained.
- Somebody has to create the layers. This is an additional task on top of normal desktop management packaging duties.
- It takes time to update a layer and publish it to multiple images.
- Citrix App Layering captures the OS Layer. So OS patches are handled by Citrix App Layering. It takes time to push an OS security update to every image based on the same OS Layer.
- Other Layering products don’t capture the OS Layer. As a result, they can’t achieve 100% app compatibility like Citrix App Layering can.
- With Layers, it’s very easy to remove a layer from an image. There’s no need to completely rebuild an image because one app is corrupted.
- Citrix’s App Layering does not have a supported API, so you can’t automate it.
Persistent virtual desktops – Another method of building VDAs is by creating full clone virtual desktops that are persistent. Each virtual desktop is managed separately using traditional desktop management tools. If your storage is an All Flash Array with inline deduplication and compression, then full-clone, persistent virtual desktops probably take no more disk space than non-persistent linked clones. Here are some advantages of full-clone, persistent virtual desktops as opposed to non-persistent VDAs:
- Skills and Processes – No new skills to learn. No new desktop management processes. Use existing desktop management tools (e.g. SCCM). The existing desktop management team can manage the persistent virtual desktops, which reduces the workload of the Citrix admins. Just treat the persistent virtual desktops like that are more PCs.
- The persistent virtual desktops are usually powered on and in the datacenter, thus improving the success rate of package deployment.
- However, pushing a package to many desktops at once can result in a “patch storm”, which reduces performance while the patches are being installed.
- One-off applications – If a user needs a one-off application, simply install it on the user’s persistent desktop. The application can be user-installed, SCCM self-service installed, or administrator installed.
- User Profile – Outlook’s OST file is no longer a concern since the user’s profile persists on the user’s virtual desktop. It’s not necessary to implement roaming profiles when using persistent virtual desktops. If you want a process to move a user profile from one persistent virtual desktop to another, how do you do it on physical desktops today?
- API integration – a self-service portal can use VMware PowerCLI and Citrix’s PowerShell SDK to automatically create a new persistent virtual desktop for a user. Chargeback can also be implemented.
- Offline Citrix Virtual Apps and Desktops (CVAD) SQL Database – if the Citrix Virtual Apps and Desktops (CVAD) SQL database is not reachable, then Citrix Local Host Cache can still broker sessions to persistent virtual desktops that have already been assigned to users. This is not possible with non-persistent virtual desktops.
Concurrent vs Named User – one advantage of non-persistent virtual desktops is that you only need enough virtual desktops to handle the concurrent user load. With persistent virtual desktops, you need a separate machine for each named user, whether that user is using it or not.
Disaster Recovery – for non-persistent VDAs, one option is to replicate the master images to the DR site, and then create a Catalog of machines either before the disaster, or after. If before the disaster, the VDAs will already be running and ready for connections; however, the master images must be maintained separately in each datacenter.
Persistent virtual desktops have several disaster recovery options:
- Immediately after the disaster, instruct the persistent users to connect to a pool of non-persistent machines.
- In the DR site, create new persistent virtual desktops for the users. Users would then need to use SCCM or similar to reinstall their apps. Scripts can be used to backup the user’s profile and restore it on the DR desktops. This method is probably closest to how recovery is performed on physical desktops.
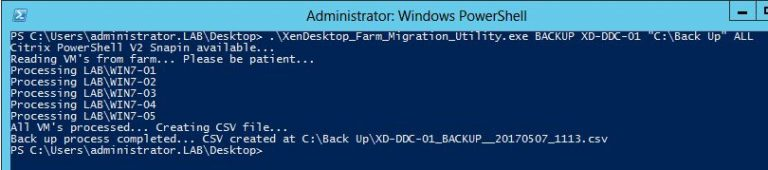
- The persistent virtual desktops can be replicated and recovered in the DR site. When the machines are added to Citrix Studio in DR, each recovered machine needs to be assigned to specific users. This process is usually scripted, or automated using a tool like XenDesktop Farm Migration Utility.
Zones
Caveats – Zones let you stretch a single Citrix Virtual Apps and Desktops (CVAD) site/farm across multiple datacenters. However, note these caveats:
- Studio – If all Delivery Controllers in the Primary Zone are down, then you can’t manage the farm/site. This is true even if SQL is up, and Delivery Controllers are available in Satellite Zones. It’s possible to designate an existing zone as the Primary Zone by running
Set-ConfigSite -PrimaryZone <Zone>, where <Zone> can be name, UID, or a Zone object. - Version/Upgrade – All Delivery Controllers in the site/farm must be the same version. During an upgrade, you must upgrade every Delivery Controller in every zone.
- Offline database – In Citrix Virtual Apps and Desktops (CVAD) and XenApp/XenDesktop 7.11 and older, there is no offline database option similar to XenApp 6.5’s Local Host Cache. If the database is down, then Connection Leasing is used. In Citrix Virtual Apps and Desktops (CVAD) and XenApp/XenDesktop 7.12 and newer, there’s Local Host Cache. However, the LHC in 7.12 and newer has limitations: no non-persistent desktops (dirty desktops are an option in 7.14 and newer), maximum of 5,000 VDAs per zone (10,000 per zone, 40K per site, in 7.14 and newer), has issues if Delivery Controller is rebooted, etc. Review the Docs article for details.
- Complexity – Zones do not reduce the number of servers that need to be built. And they increase complexity when configuring items in Citrix Studio.
- Zone Preference – to choose a VDA in a particular zone, your load balancer needs to include a special HTTP header (X-Citrix-ZonePreference) that indicates the zone name. This requires StoreFront 3.7, and Citrix Virtual Apps and Desktops (CVAD) or XenApp/XenDesktop 7.11 and newer.
The alternative to zones is to build a separate site/farm in each datacenter, and use StoreFront to aggregate the published icons. Here are benefits of multiple sites/farms as compared to zones:
- Isolation – Each datacenter is isolated. If one datacenter is down, it does not affect any other datacenter.
- Versioning – Isolation lets you upgrade one datacenter before upgrading other datacenters. For example, you can test upgrades in a DR site before upgrading production.
- SQL High Availability – since each datacenter is a separate farm/site with separate databases, there is no need to stretch SQL across datacenters.
- Home Sites – StoreFront can prioritize different farms/sites for different user groups. No special HTTP header required.
Citrix Consulting recommends separate Citrix Virtual Apps and Desktops (CVAD) sites/farms in each datacenter instead of using zones. See Citrix Blog Post XenApp 7.15 LTSR – Now Target Platform for Epic Hyperspace!.
Here are some general design suggestions for Citrix Virtual Apps and Desktops (CVAD) in multiple datacenters:
- For multiple central datacenters, build a separate Citrix Virtual Apps and Desktops (CVAD) site/farm in each datacenter. Use StoreFront to aggregate the icons from all farms. Use NetScaler GSLB to distribute users to StoreFront. This provides maximum flexibility with minimal dependencies across datacenters.
- For branch office datacenters, zones with Local Host Cache (7.12 and newer) is an option. Or each branch office can be a separate farm.
Create Zones – This section details how to create zones and put resources in those zones. In 7.9 and older, there’s no way to select a zone when connecting. In 7.11 and newer, NetScaler and StoreFront can now specify a zone and VDAs from that zone will be chosen. See Zone Preference for details.
Citrix Links:
- Zones at Citrix Docs.
- Citrix Blog Post Deep Dive: XenApp and XenDesktop 7.7 Zones
- Citrix Blog Post Zones, Latency and Brokering Performance
There is no SQL in Satellite zones. Instead, Controllers in Satellite zones connect to SQL in Primary zone. Here are tested requirements for remote SQL connectivity. You can also set HKLM\Software\Citrix\DesktopServer\ThrottledRequestAddressMaxConcurrentTransactions to throttle launches at the Satellite zone.
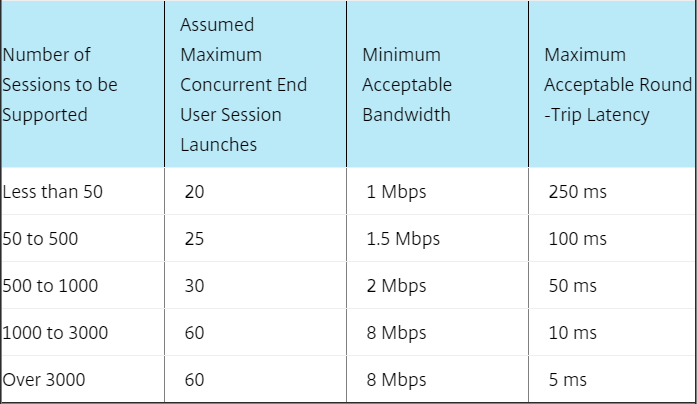
From Mayunk Jain: “I guess we can summarize the guidance from this post as follows: the best practice guidance has been to recommend a datacenter for each continental area. A typical intra-continental latency is about 45ms. As these numbers show, in those conditions the system can handle 10,000 session launch requests in just under 20 minutes, at a concurrency rate of 36 requests.”
If Satellite zone loses connectivity to SQL, then the Connection Leasing feature kicks in. See Citrix Docs Connection leasing and CTX205169 FAQ: Connection Leasing in XenApp/XenDesktop 7.6 for information on Connection Leasing limitations (e.g. no pooled virtual desktops, 2 week-old leases, etc.).
The following items can be moved into a satellite zone:
- Controllers – always leave two Controllers in the Primary zone. Add one or two Controllers to the Satellite zone.
- Hosting Connections – e.g. for vCenter in the satellite zone.
- Catalogs – any VDAs in satellite catalogs automatically register with Controllers in the same zone.
- NetScaler Gateway – requires StoreFront that understands zones (not available yet). StoreFront should be in satellite zone.
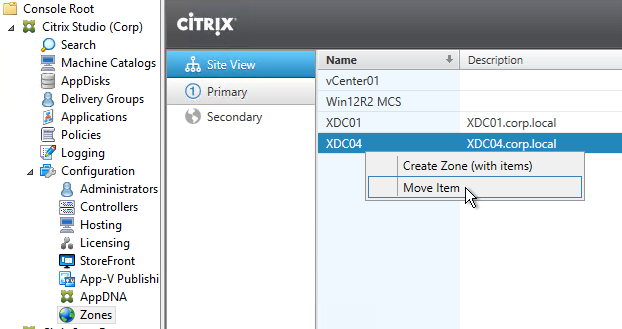
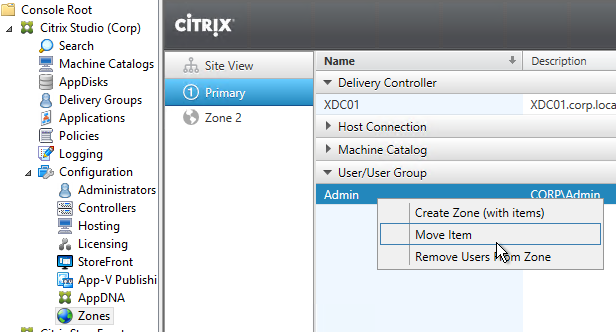
Do the following to create a zone and move items into the zone:
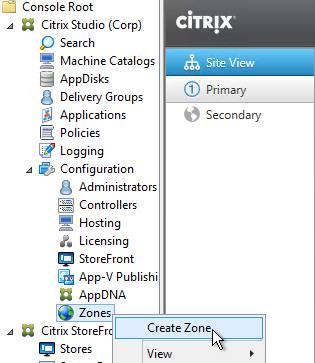
- In Citrix Studio 7.7 or newer, expand the Configuration node, and click Zones.
- If you upgraded from an older XenApp/XenDesktop and don’t see zones, then run the following commands:
cd 'C:\Program Files\Citrix\XenDesktopPoshSdk\Module\Citrix.XenDesktop.Admin.V1\Citrix.XenDesktop.Admin\StudioRoleConfig'

Import-AdminRoleConfiguration –Path .\RoleConfigSigned.xml
- Right-click Zones, and click Create Zone.
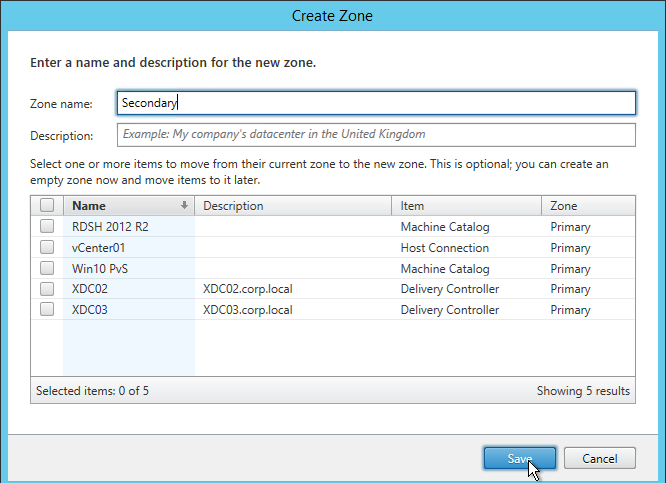
- Give the zone a name. Note: Citrix supports a maximum of 10 zones.
- You can select objects for moving into the zone now, or just click Save.
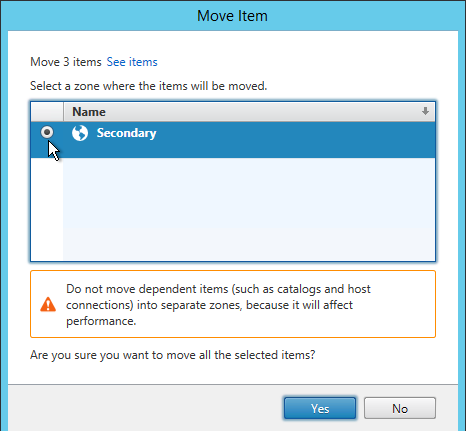
- Select multiple objects, right-click them, and click Move Item.
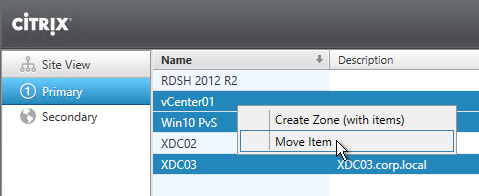
- Select the new Satellite zone and click Yes.
- To assign users to the new zone, create a Delivery Group that contains machines from a Catalog that’s in the new zone. Zone Preference requires StoreFront 3.7 and Citrix Virtual Apps and Desktops (CVAD) or XenApp/XenDesktop 7.11 and newer.
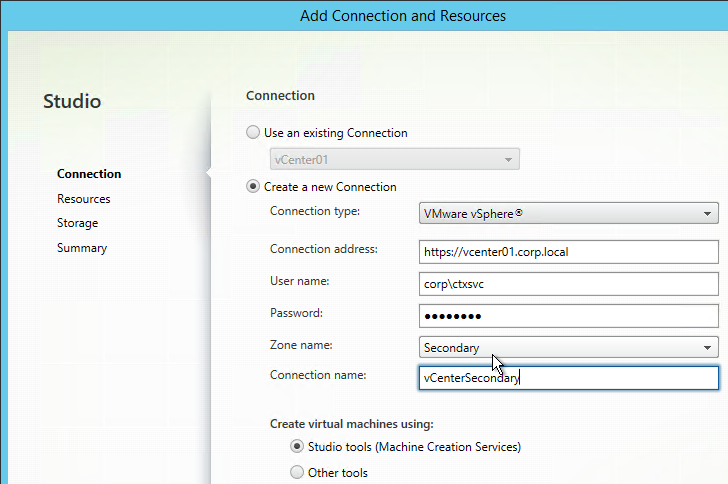
- If your farm has multiple zones, when creating a hosting connection, you’ll be prompted to select a zone.
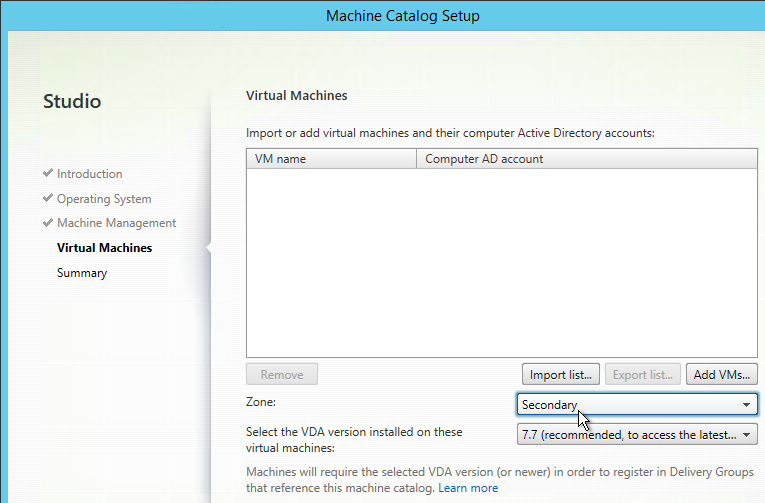
- If your farm has multiple zones, when creating a Manual catalog, you’ll be prompted to select a zone.
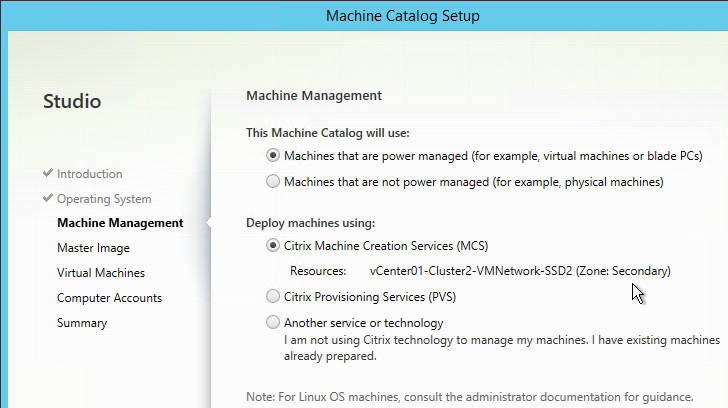
- MCS catalogs are put in a zone based on the zone assigned to the Hosting Connection.
- The Citrix Provisioning Citrix Virtual Desktops Setup Wizard ignores zones so you’ll have to move the Citrix Provisioning Machine Catalog manually.
- New Controllers are always added to the Primary zone. Move it manually.
Zone Preference
Citrix Virtual Apps and Desktops (CVAD) and XenApp/XenDesktop 7.11 and newer have Zone Preference, which means NetScaler ADC (11.0 build 65 and newer) and StoreFront (3.7 and newer) can request Delivery Controller to provide a VDA in a specific zone.
Citrix Blog Post Zone Preference Internals details three methods of zone preference: Application Zone, User Zone, and NetScaler Zone.

To configure zone preference:
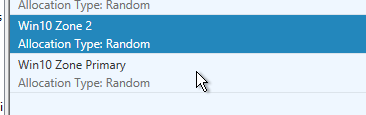
- Create separate Catalogs in separate zones, and add the machines to a single Delivery Group.
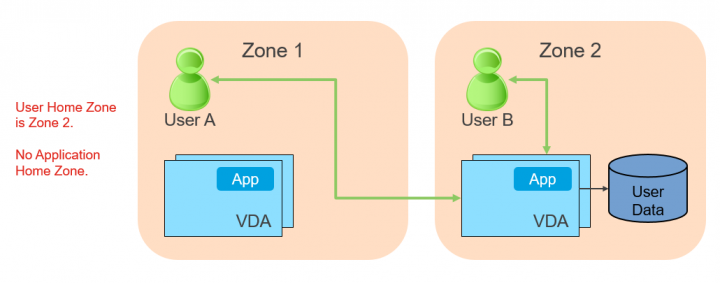
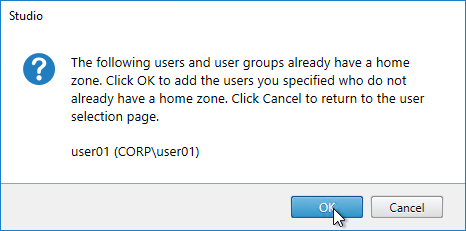
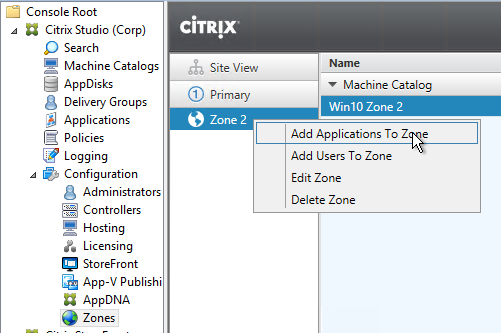
- You can add users to one zone by right-clicking the zone, and clicking Add Users to Zone. If there are no available VDAs in that preferred zone, then VDAs are chosen from any other zone.

- Note: a user can only belong to one home zone.
- You can delete users from a zone, or move users to a different zone.
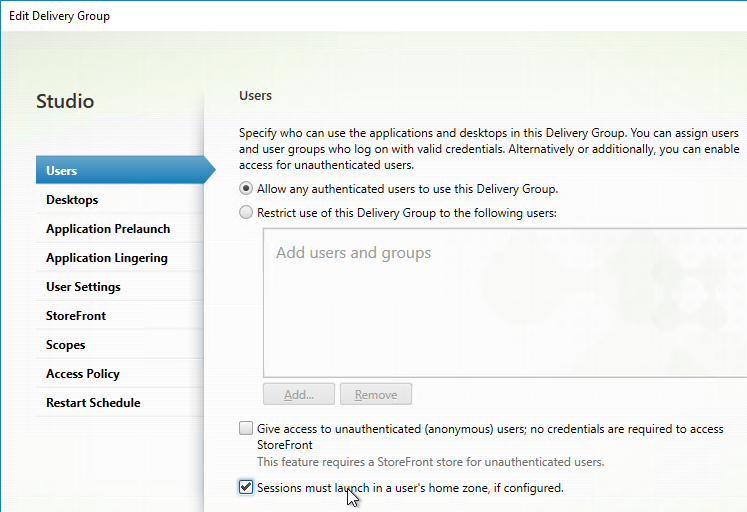
- If you edit the Delivery Group, on the Users page, you can specify that Sessions must launch in a user’s home zone. If there are no VDAs in the user’s home zone, then the launch fails.
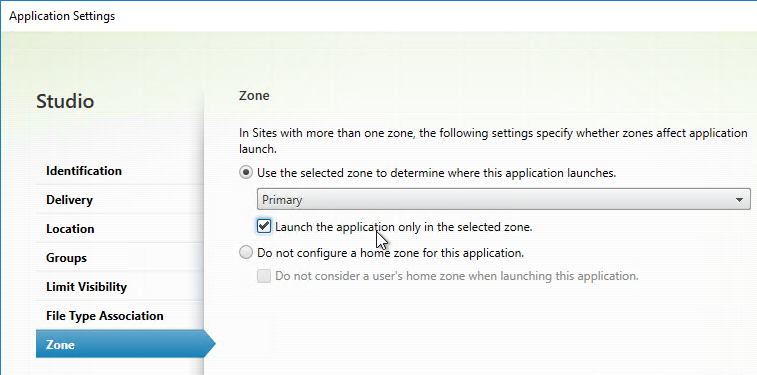
- For published apps, on the Zone page, you can configure it to ignore the user’s home zone.
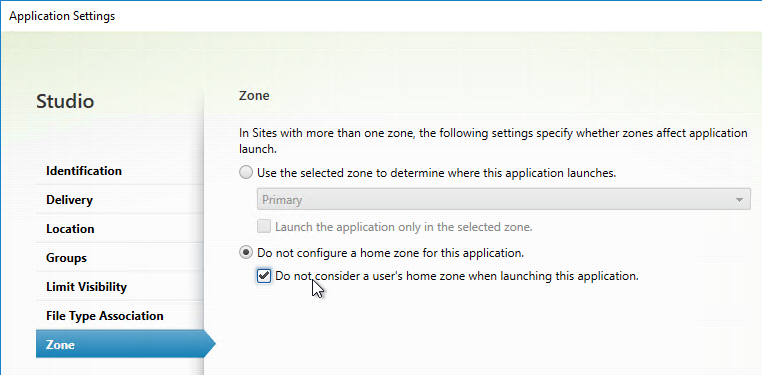
- You can also configure a published app with a preferred zone, and force it to only use VDAs in that zone. If you don’t check the box, and if no VDAs are available in the preferred zone, then VDAs can be selected from any other zone.
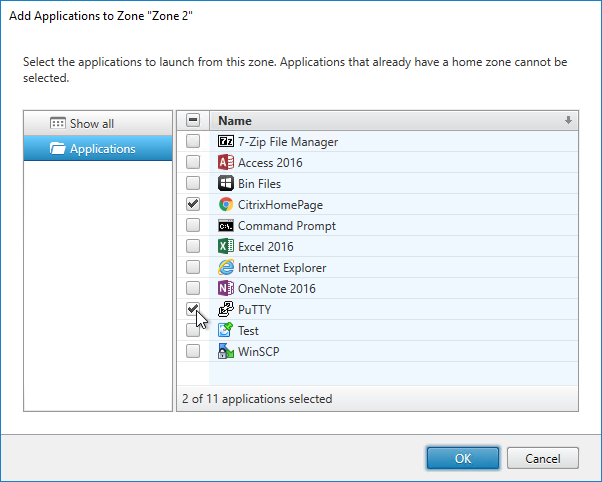
- Or you can Add Applications to Zone, which allows you to add multiple Applications at once.
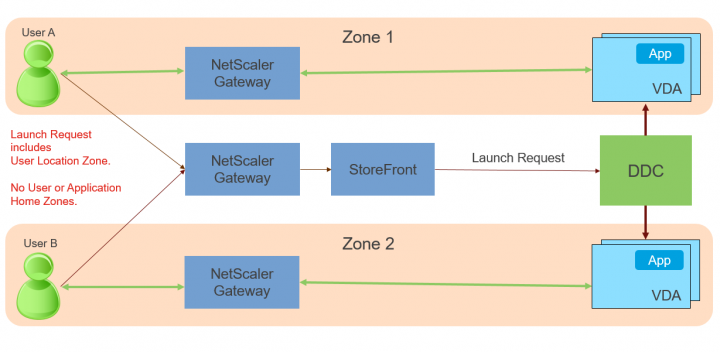
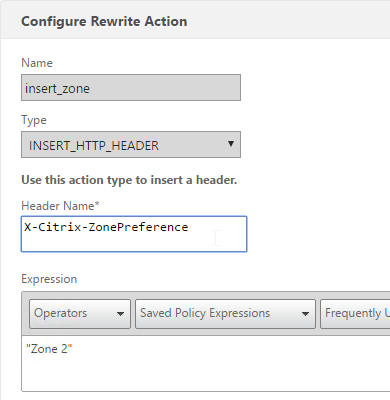
- NetScaler can specify the desired zone by inserting the X-Citrix-ZonePreference header into the HTTP request to the StoreFront 3.7 server. This header can contain up to 3 zones. The first Zone in the header is the preferred Zone, and the next 2 are randomised such as EMEA,US,APAC or EMEA,APAC,US. StoreFront 3.7 will then forward the zone names to Delivery Controller 7.11, which will select a VDA in the desired zone. This functionality can be combined with GSLB as detailed in the 29 page document Global Server Load Balancing (GSLB) Powered Zone Preference. Note: only StoreFront 3.7 and newer will send the zone name to the Delivery Controller.
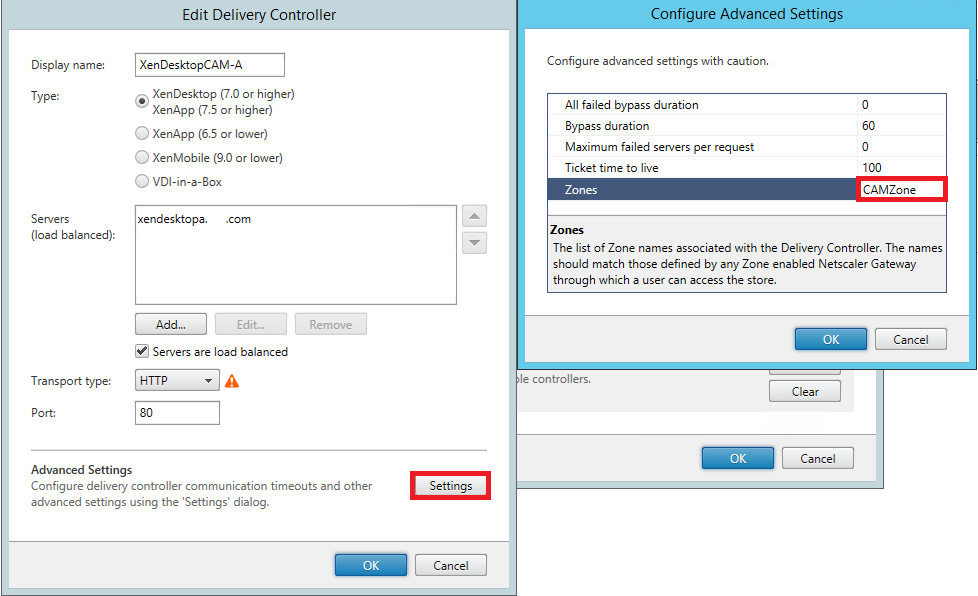
- Delivery Controller entries in StoreFront can be split into different entries for different zones. Create a separate Delivery Controller entry for each zone, and associate a zone name with each. StoreFront uses the X-Citrix-ZonePreference header to select the Delivery Controller entry so the XML request is sent to the Controllers in the same zone. HDX Optimal Gateways can also be associated to zoned Delivery Controller entries. See The difference between a farm and a zone when defining optimal gateway mappings for a store at Citrix Docs.
- Citrix Blog Post Zone Preference Internals indicates that there’s a preference order to zone selection. The preference order can be changed.
- Application’s Zone
- User’s Home Zone
- The Zone specified by NetScaler in the X-Citrix-ZonePreference HTTP header sent to StoreFront.
Machine Creation Services (MCS)
CTP Aaron Parker Machine Creation Services Capacity Sizing on Hyper-V details storage sizing for the following:
- Delta Clones (aka linked clones) – Master Image, AppDisks, Personal vDisks, and other Hyper-V files
- Delta Clones with Storage Optimization (aka MCS Memory Caching)
- Full Clones
MCS – Full Clones
In Citrix Virtual Apps and Desktops (CVAD) and XenApp/XenDesktop 7.11 and newer, for dedicated (persistent) Desktop OS (aka Single session OS) Catalogs, MCS can create Full Clones instead of Linked Clones. Linked Clones can’t be moved, but Full Clones are regular virtual machines that can be moved without impacting MCS.
- Full Clones is only an option for Desktop OS (aka Single session OS). It’s not an option for Server OS (aka Multi-session OS ).
In XenApp/XenDesktop 7.9 and earlier, persistent Linked Clones are created by selecting Yes, create a dedicated virtual machine in the Create Catalog wizard. Please, never do this in 7.9 or earlier, since you can’t move the machines once they’re created.

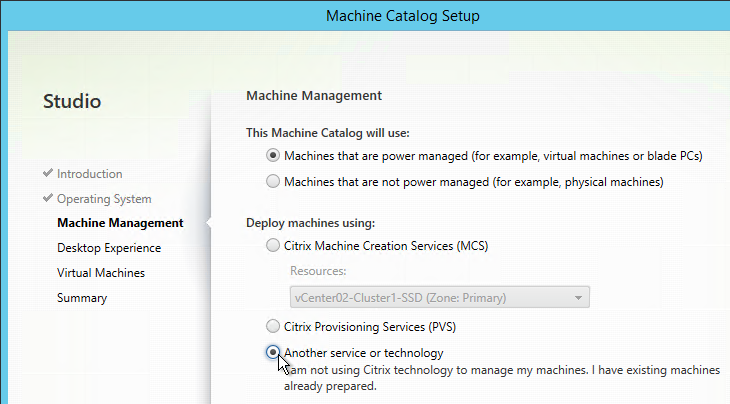
A much better option in 7.9 and earlier is to use vCenter to create Full Clones of a template Virtual Machine. Then when creating a Catalog, select Another service or technology (Manual Catalog) to add the VMs that have already been built.
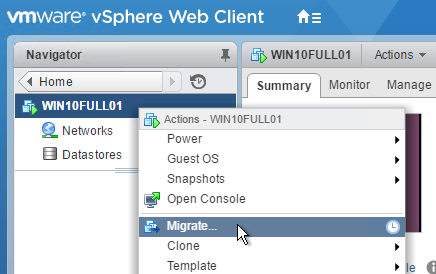
In Citrix Virtual Apps and Desktops (CVAD) and XenApp/XenDesktop 7.11 and newer, you can use MCS to create Full Clones. Full Clones are a full copy of a template (master) virtual machine. The Full Clone can then be moved to a different datastore (including Storage vMotion), different cluster, or even different vCenter. You can’t do that with Linked Clones.
For Full Clones, simply prepare a Master Image like normal. There are no special requirements. There’s no need to create Customization Specifications in vCenter since Sysprep is not used. Instead, MCS uses its identity technology to change the identity of the Full Clone. That means every Full Clone has two disks: one for the actual VM, and one for identity (machine name, machine password, etc).
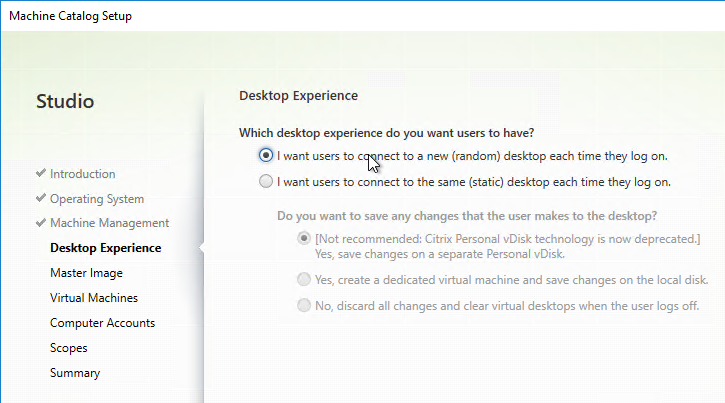
In Citrix Virtual Apps and Desktops (CVAD) and XenApp/XenDesktop 7.11 and newer, during the Create Catalog wizard, if you select Yes, create a dedicated virtual machine…

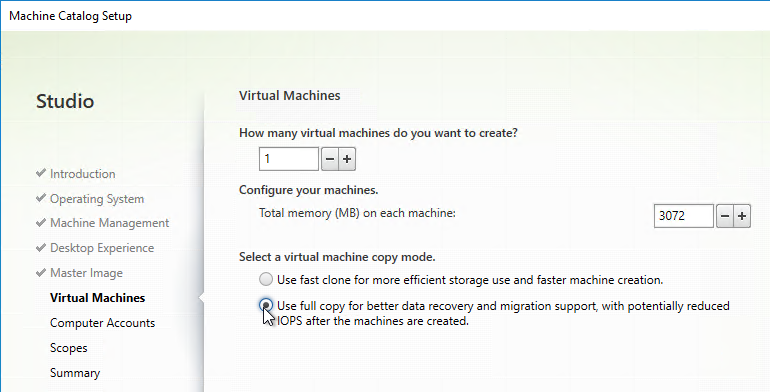
After you select the master image, there’s a new option for Use full copy for better data recovery and migration support. This is the option you want. The Use fast clone option is the older, not recommended, option.
During creation of a Full Clones Catalog, MCS still creates the master snapshot replica and ImagePrep machine, just like any other linked clone Catalog. The snapshot replica is then copied to create the Full Clones.
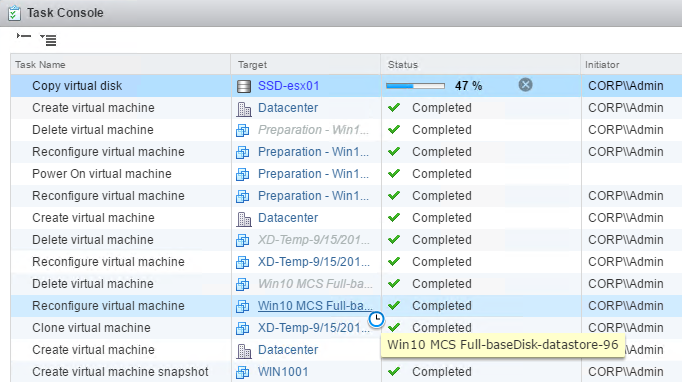
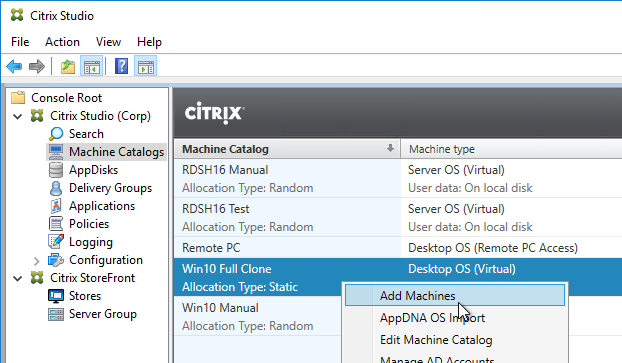
When you add machines to the MCS Full Clone Catalog, it uses the Master Image snapshot selected when you initially ran the Create Catalog Wizard. There is no function in Citrix Studio to change the Master Image. Instead, use the PowerShell commands detailed at CTX129205 How to Update Master Image for Dedicated and Pooled Machine Types using PowerShell SDK Console.
Since these are Full Clones, once they are created, you can do things like Storage vMotion.
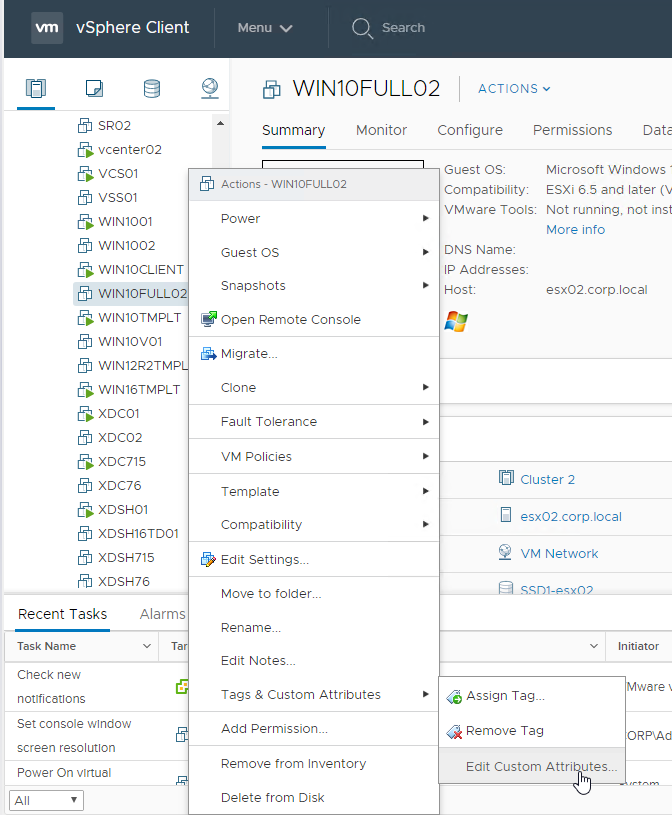
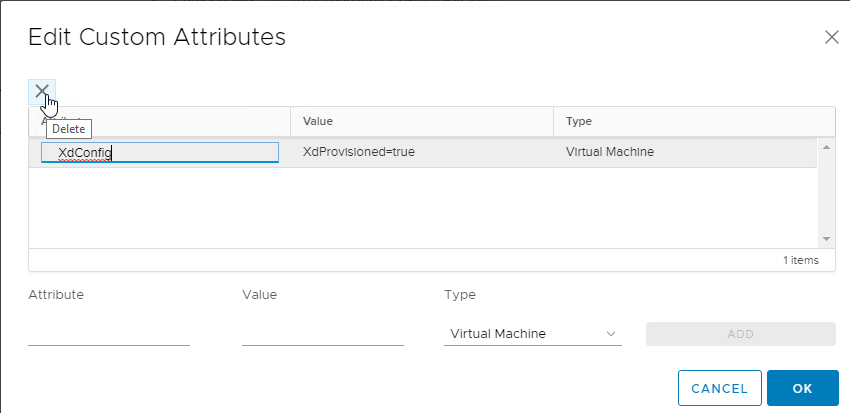
During Disaster Recovery, restore the Full Clone virtual machine (both disks). You might have to remove any Custom Attributes on the machine, especially the XdConfig attribute.
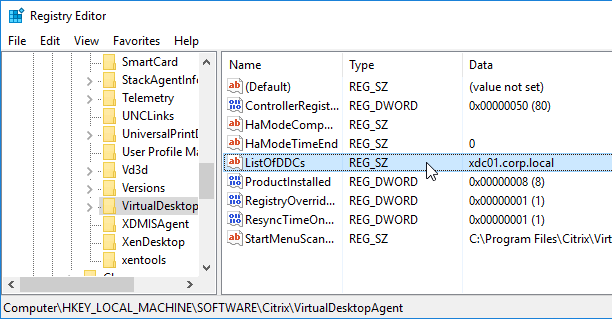
Inside the virtual machines, you might have to change the ListOfDDCs registry value to point to your DR Delivery Controllers. One method is to use Group Policy Preferences Registry.
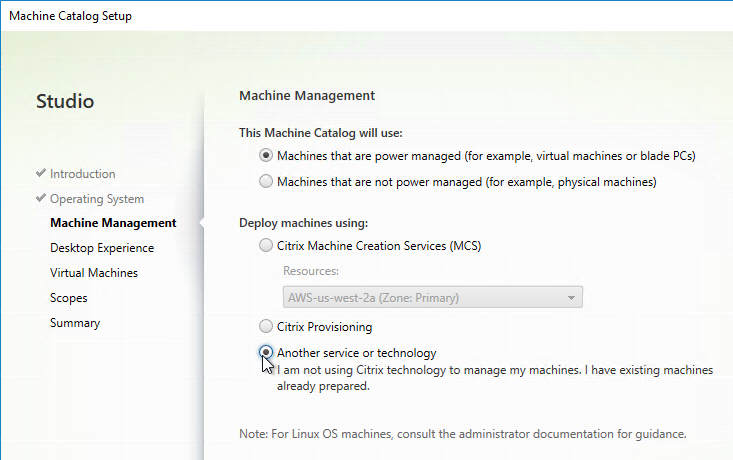
In the Create Catalog wizard, select Another Service or technology.
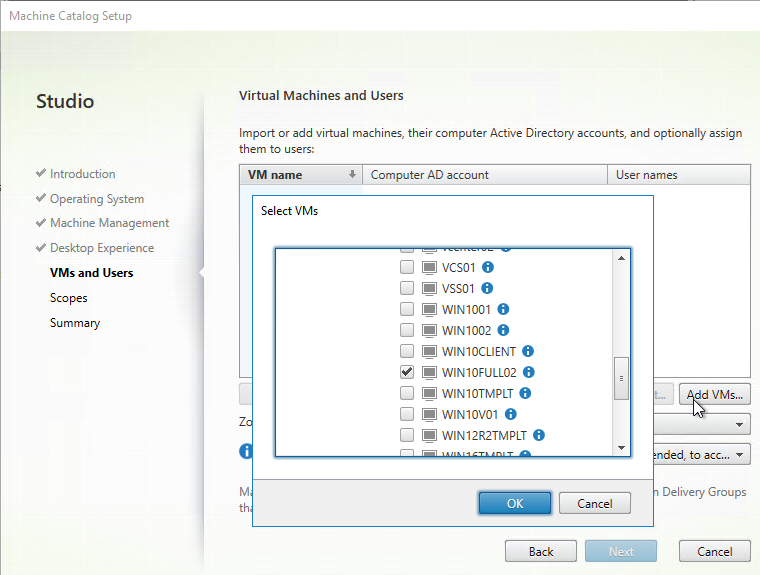
And use the Add VMs button to add the Full Clone machines. The remaining Catalog and Delivery Group steps are performed normally.
MCS – Machine Naming
Once a Catalog is created, you can run the following commands to specify the starting count:
Get-AcctIdentityPool
Set-AcctIdentityPool -IdentityPoolName "NAME" -StartCount VALUE
MCS – Storage Optimization Memory Caching (Citrix Virtual Apps and Desktops (CVAD) and XenApp/XenDesktop 7.9 and newer)
Memory caching (aka MCSIO, aka Storage Optimization) in MCS is very similar to Memory caching in Citrix Provisioning. All writes are cached to memory instead of written to disk. With memory caching, some benchmarks show 95% reduction in IOPS.
In CVAD 1903 and newer, MCS now uses the exact same Memory Caching driver as Citrix Provisioning. If you want to use the MCSIO feature, upgrade to CVAD 1903 or newer. Older versions of CVAD, including 7.15, have performance problems.
- For more info on the MCSIO enhancements in Citrix Virtual Apps and Desktops (CVAD) 1903 and newer, see Machine Creation Services (MCS) storage optimization at Citrix Docs.
Here are some notes:
- You configure a size for the memory cache. If the memory cache is full, it overflows to a cache disk.
- Whatever memory is allocated to the MCS memory cache is no longer available for normal Windows operations, so make sure you increase the amount of memory assigned to each virtual machine.
- The overflow disk (temporary data disk) can be stored on shared storage, or on storage local to each hypervisor host. Since memory caching dramatically reduces IOPS, there shouldn’t be any problem placing these overflow disks on shared storage. If you put the overflow disks on hypervisor local disks then you won’t be able to vMotion the machines.
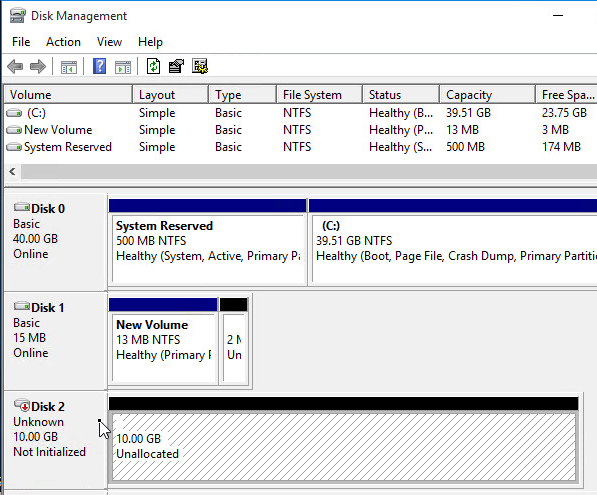
- In CVAD 1811 and older, the overflow disk is uninitialized and unformatted. Don’t touch it. Don’t format it.
- In CVAD 1903 and newer, the overflow disk is formatted, and you can put logs (e.g. Event Logs) and other persistent files on it just like you do in Citrix Provisioning. See Andy McCullough MCSIO Reborn!
Memory caching requirements:
- Citrix Virtual Apps and Desktops (CVAD) or XenApp/XenDesktop 7.9, VDA 7.9, and newer.
- Recommendation versions are CVAD 1903 and newer.
- Random Catalogs only (no dedicated Catalogs)
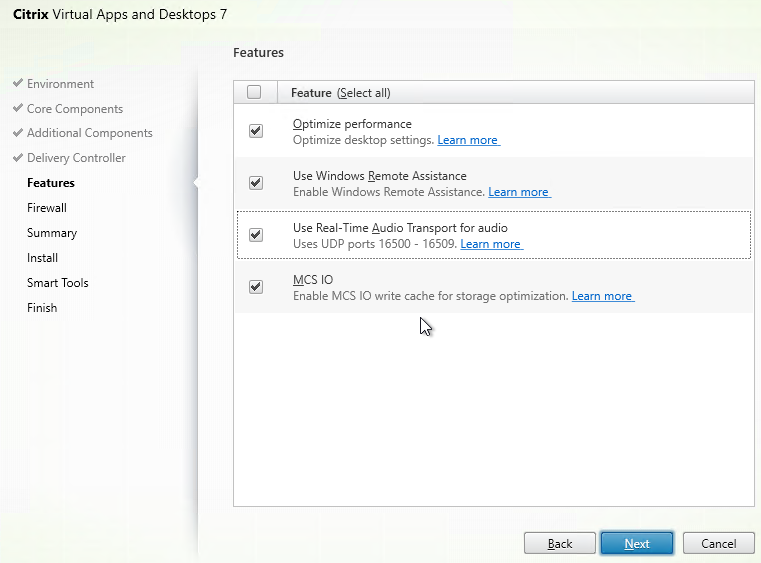
When installing the VDA software, on the Features page, make sure you select the MCS IO option. VDA 1903 and newer are the recommended versions.
Studio needs to be configured to place the temporary overflow disks on a datastore. You can configure this datastore when creating a new Hosting Resource, or you can edit an existing Hosting Resource.
To create a new Hosting Resource:
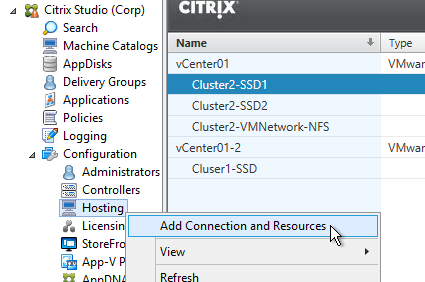
- In Studio, go to Configuration > Hosting, and click the link to Add Connection and Resources.
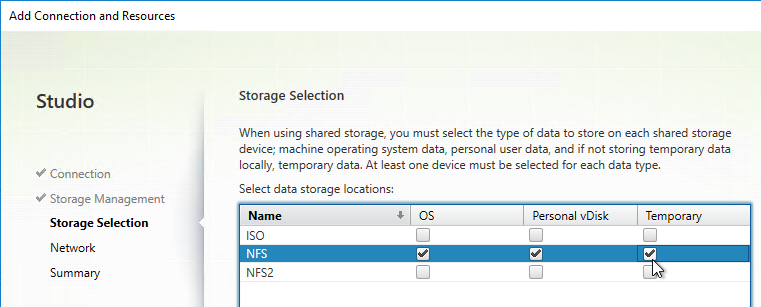
- In the Storage Management page, select shared storage.
- You can optionally select Optimize temporary data on local storage, but this might prevent vMotion. The temporary data disk is only accessed if the memory cache is full, so placing the temporary disks on shared storage shouldn’t be a concern.

- Select a shared datastore for each type of disk.
Or you can edit an existing Hosting Resource:
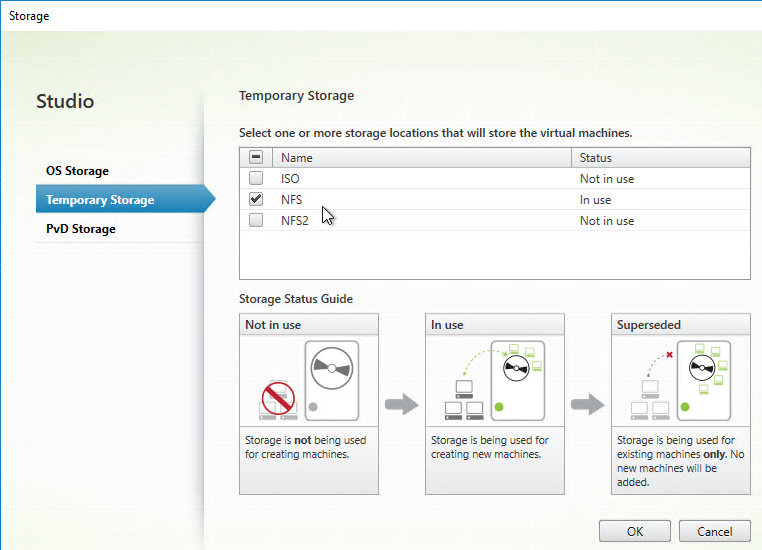
- In Studio, go to Configuration > Hosting, right-click an existing resource, and click Edit Storage.

- On the Temporary Storage page, select a shared datastore for the temporary overflow disks.
Memory caching is enabled when creating a new Catalog. You can’t enable it on existing Catalogs. Also, no AppDisks.
- For virtual desktops, in the Desktop Experience page, select random.
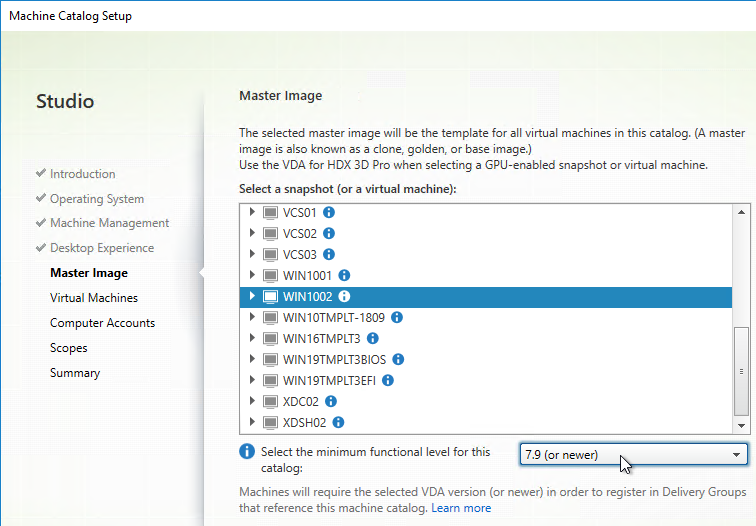
- Master Image VDA must be 7.9 or newer.
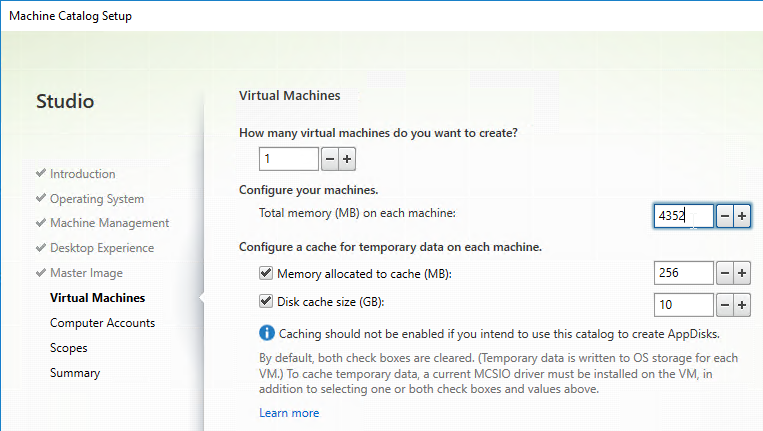
- In the Virtual Machines page
- CVAD 1903 and newer require you to specify a Disk cache size first. It needs to be large enough for memory write cache overflow, pagefile, and logs.
- Then allocate some memory to the cache. For virtual desktops, 256 MB is typical. For RDSH, 4096 MB is typical. More memory = less IOPS.
- Whatever you enter for cache memory, also add it to the Total memory on each machine. Any memory allocated to the cache is no longer available for applications so you should increase the total memory to account for this.
- Once the machines are created, add them to a Delivery Group like normal.
- In CVAD 1903 and newer, the Write Cache Disk is formatted and has a drive letter, just like Citrix Provisioning.
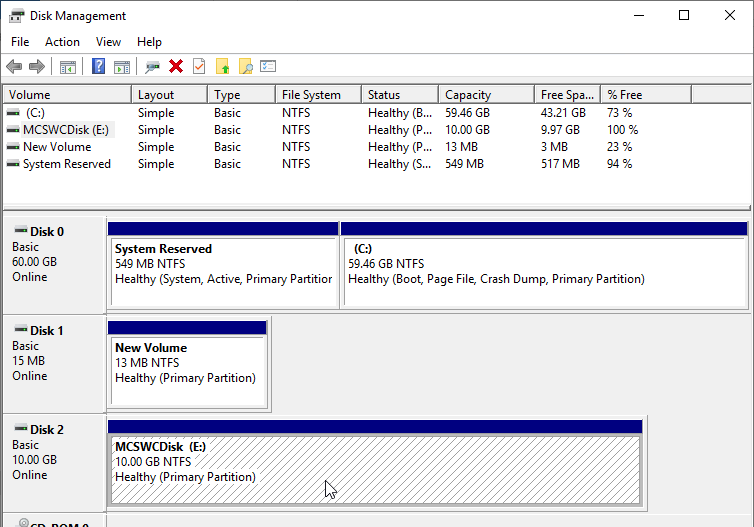
- In CVAD 1811 and older, the temporary overflow disk is not initialized or formatted. From Martin Rowan at discussions.citrix.com: “Don’t format it, the raw disk is what MCS caching uses.”
MCS – Image Prep
When a Machine Creation Services catalog is created or updated, a snapshot of the master image is copied to each LUN. This Replica is then powered on and a few tasks are performed like KMS rearm.
From Citrix Blog Post Machine Creation Service: Image Preparation Overview and Fault-Finding and CTX217456 Updating a Catalog Fails During Image Preparation: if you are creating a new Catalog, here are some PowerShell commands to control what Image Prep does: (run asnp citrix.* first). These commands do not affect existing Catalogs.
Set-ProvServiceConfigurationData -Name ImageManagementPrep_Excluded_Steps -Value EnableDHCPSet-ProvServiceConfigurationData -Name ImageManagementPrep_Excluded_Steps -Value OsRearmSet-ProvServiceConfigurationData -Name ImageManagementPrep_Excluded_Steps -Value OfficeRearmSet-ProvServiceConfigurationData -Name ImageManagementPrep_Excluded_Steps -Value "OsRearm,OfficeRearm"Set-ProvServiceConfigurationData -Name ImageManagementPrep_DoImagePreparation -Value $false
If you are troubleshooting an existing Catalog, here are some PowerShell commands to control what Image Prep does: (run asnp citrix.* first)
Get-ProvScheme– Make a note of the “ProvisioningSchemeUid” associated with the catalog.Set-ProvSchemeMetadata -ProvisioningSchemeUid xxxxxxx -Name ImageManagementPrep_Excluded_Steps -Value EnableDHCPSet-ProvSchemeMetadata -ProvisioningSchemeUid xxxxxxx -Name ImageManagementPrep_Excluded_Steps -Value OsRearmSet-ProvSchemeMetadata -ProvisioningSchemeUid xxxxxxx -Name ImageManagementPrep_Excluded_Steps -Value OfficeRearmSet-ProvSchemeMetadata -ProvisioningSchemeUid xxxxxxx -Name ImageManagementPrep_DoImagePreparation -Value $false
If multiple excluded steps, separate them by commas: -Value "OsRearm,OfficeRearm"
To remove the excluded steps, run Remove-ProvServiceConfigurationData -Name ImageManagementPrep_Excluded_Steps or Remove-ProvSchemeMetadata -ProvisioningSchemeUid xxxxxxx -Name ImageManagementPrep_Excluded_Steps.
A common issue with Image Prep is Rearm. Instead of the commands shown above, you can set the following registry key on the master VDA to disable rearm. See Unable to create new catalog at Citrix Discussions.
- HKEY_LOCAL_MACHINE/SOFTWARE/Microsoft/Windows NT/CurrentVersion/SoftwareProtectionPlatform
- SkipRearm (DWORD) = 1
Mark DePalma at XA 7.6 Deployment Failure Error : Image Preparation Office Rearm Count Exceeded at Citrix Discussions had to increase the services timeout to fix the rearm issue:
- HKLM\SYSTEM\CurrentControlSet\Control
- ServicesPipeTimeout (DWORD) = 180000
From Mark Syms at Citrix Discussions: You can add one (or both) of the following MultiSZ registry values
- HKLM\Software\Citrix\MachineIdentityServiceAgent\ImagePreparation\Before
- HKLM\Software\Citrix\MachineIdentityServiceAgent\ImagePreparation\After
The values are expected to be an executable or script (PoSh or bat), returning 0 on success
Citrix CTX140734 Error: “Preparation of the Master VM Image failed” when Creating MCS Catalog in XenApp or XenDesktop: To troubleshoot image prep failures, do the following:
- In PowerShell on a Controller, for a new Catalog, run:
asnp citrix.*

Set-ProvServiceConfigurationData -Name ImageManagementPrep_NoAutoShutdown -Value $True
- For an existing Catalog, run the following:
asnp citrix.*
Get-ProvScheme
Set-ProvSchemeMetadata -ProvisioningSchemeUid xxxxxxx -Name ImageManagementPrep_NoAutoShutdown -Value $True
- On the master image, set the DWORD registry value HKLM\Software\Citrix\MachineIdentityServiceAgent\LOGGING to 1
- If you now attempt catalog creation, an extra VM will be started; log into this VM (via the hypervisor console, it has no network access) and see if anything is obviously wrong (e.g. it’s bluescreened or something like that!). If it hasn’t there should be two log files called “image-prep.log” and “PvsVmAgentLog.txt” created in c:\ – scan these for any errors.
- When you’ve finished doing all this debugging, remember to run one of the following:
Remove-ProvServiceConfigurationData -Name ImageManagementPrep_NoAutoShutdown
Remove-ProvSchemeMetadata -ProvisioningSchemeUid xxxxxxx -Name ImageManagementPrep_NoAutoShutdown
MCS – Base Disk Deletion
Citrix CTX223133 How to change the disk deletion interval to delete unused base disks on the VM storage. Every 6 hours, Citrix Virtual Apps and Desktops (CVAD) runs a task to delete unused base disks.
The Disk Reaper interval is configured using PowerShell. The default values are shown below:
Set-ProvServiceConfigurationData -Name DiskReaper_retryInterval -Value 6:0:0 | Out-Null
Set-ProvServiceConfigurationData -Name DiskReaper_heartbeatInterval -Value 1:0:0 | Out-Null
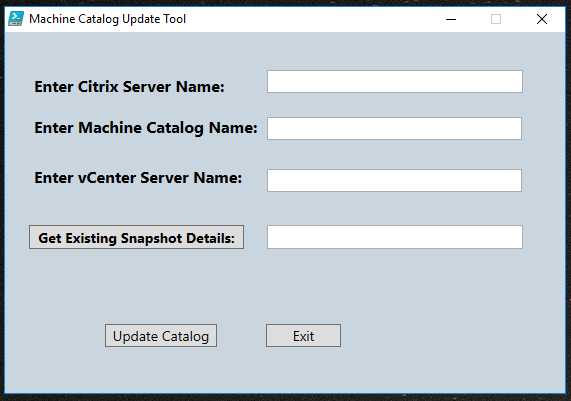
MCS – Static (Dedicated) Catalog Master Image
If you create a Machine Catalog of Dedicated Machines (aka Static Catalog), then it’s not possible to update the Master Image using Citrix Studio.
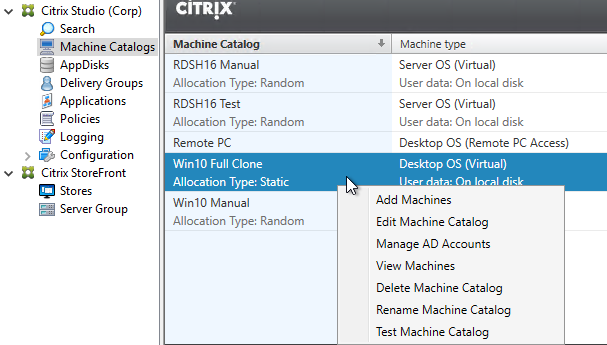
You might want to change the Master Image so that machines added to this Static Catalog are cloned from a new Master Image instead of the Master Image that was originally selected with the Catalog was created.
Official instructions are at CTX129205 How to Update Master Image for Dedicated and Pooled Machine Types using PowerShell SDK Console.
If vSphere, Chaitanya at Machine Catalog Update Tool at knowcitrix.com created a GUI for these Citrix and vSphere PowerShell commands.
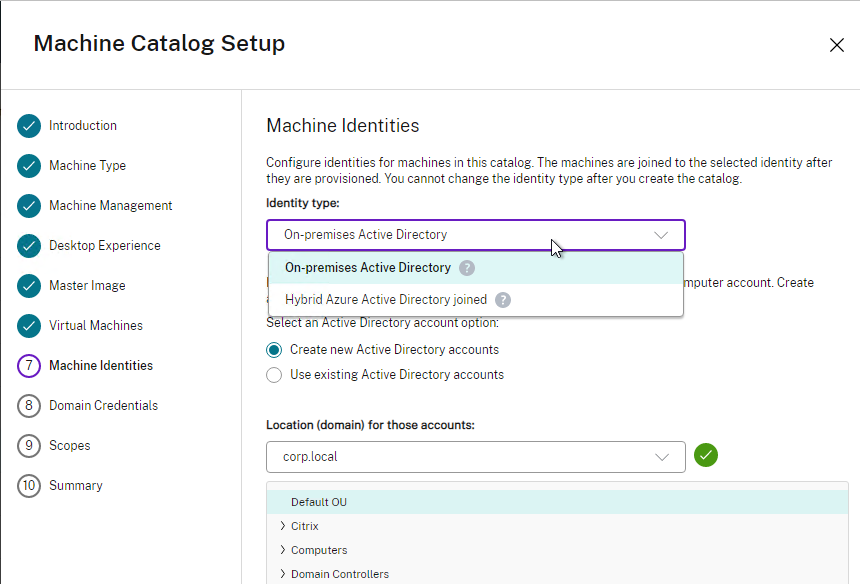
MCS – Hybrid Azure AD Join
CVAD 2305 and newer support Hybrid Azure AD Join when creating a Catalog. See Hybrid Azure Active Directory joined at Citrix Docs. VDA Registration is delayed until the computer is synced to Azure AD, which can take 30 minutes or longer.
Controller – Name Caching
George Spiers in Active Directory user computer name caching in XenDesktop explains how the Broker Service in Delivery Controller caches Active Directory user and computer names. The cache can be updated by running Update-BrokerNameCache -Machines or Update-BrokerNameCache -Users. Also see Update-BrokerNameCache at Citrix SDK documentation.
Delivery Group License Type (7.14 and newer)
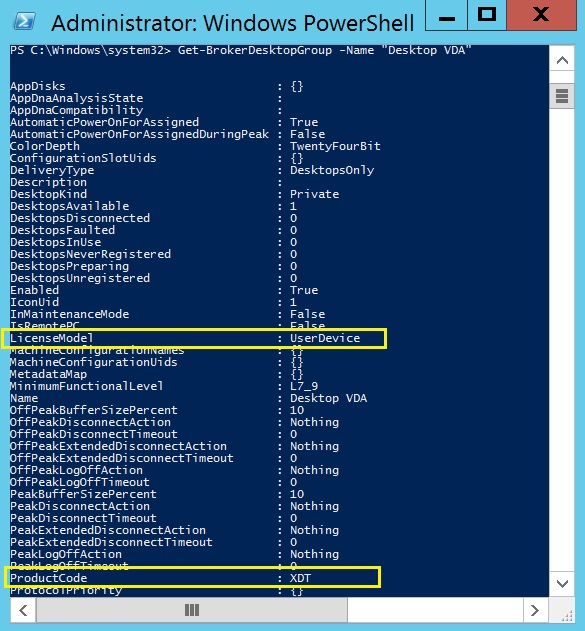
Citrix Virtual Apps and Desktops (CVAD) and XenApp/XenDesktop 7.14 and newer supports multiple license types (e.g. XenApp Concurrent and XenDesktop User/Device) within a Single farm/site. However, a farm/site only supports a single Edition (i.e. Enterprise or Platinum, but not both). The license model and product are configured at the Delivery Group. See CTX223926, and Multi-type licensing at Citrix Docs.
To configure license model and product, run the following PowerShell commands (run asnp citrix.* first):
Set-BrokerDesktopGroup –Name "DeliveryGroupName" –LicenseModel LicenseModel
Set-BrokerDesktopGroup –Name "DeliveryGroupName" –ProductCode ProductCode
LicenseModel can be UserDevice, or Concurrent. ProductCode can be XDT (Citrix Virtual Apps and Desktops [CVAD] or XenDesktop) or MPS (Citrix Virtual Apps [CVA] or XenApp).
Delivery Groups in 7.8 and newer
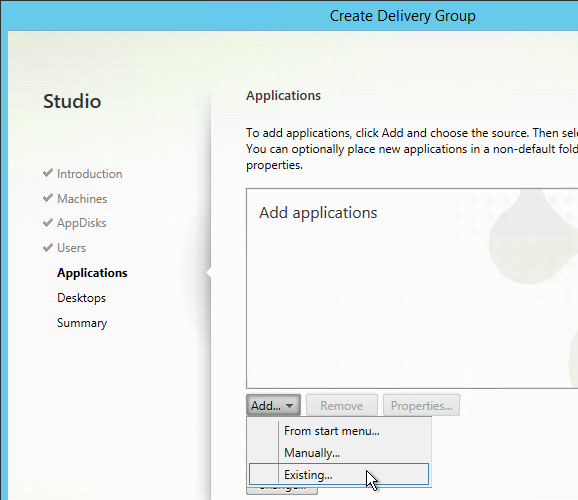
In Citrix Virtual Apps and Desktops (CVAD) and XenApp/XenDesktop 7.8 and newer, when creating a Delivery Group, there are new options for publishing applications and publishing desktops.
On the Applications page of the Create Delivery Group wizard, From start menu reads icons from a machine in the Delivery Group and lets you select them. Manually lets you enter file path and other details manually. These are the same as in prior releases.
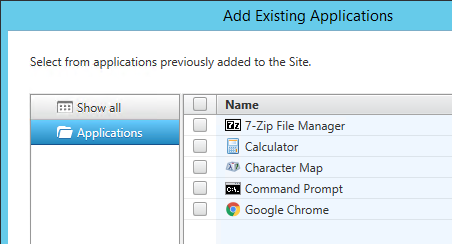
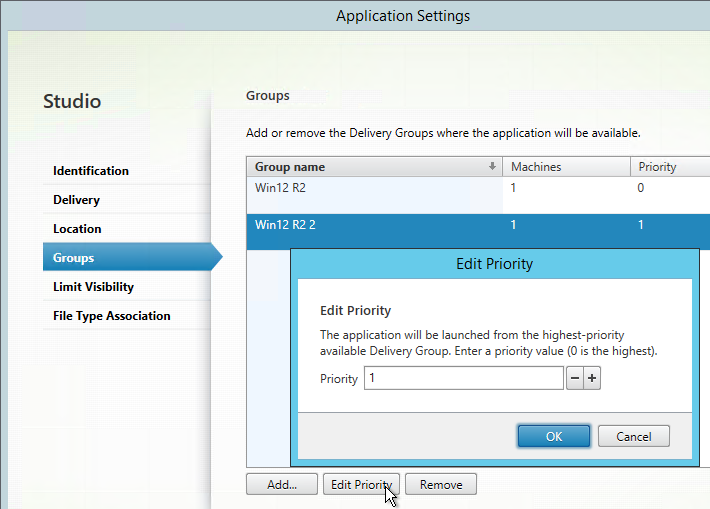
Existing is the new option. This lets you easily publish applications across multiple Delivery Groups.
You can also go to the Applications node, edit an existing application, change to the Groups tab, and publish the existing app across additional Delivery Groups.
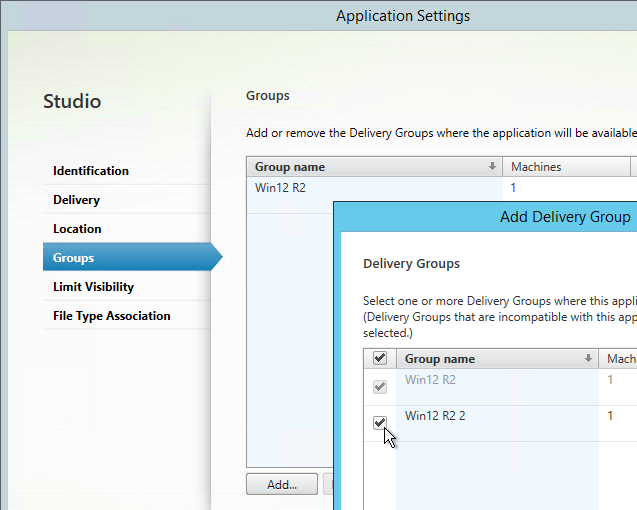
Once multiple Delivery Groups are selected, you can prioritize them by clicking the Edit Priority button.
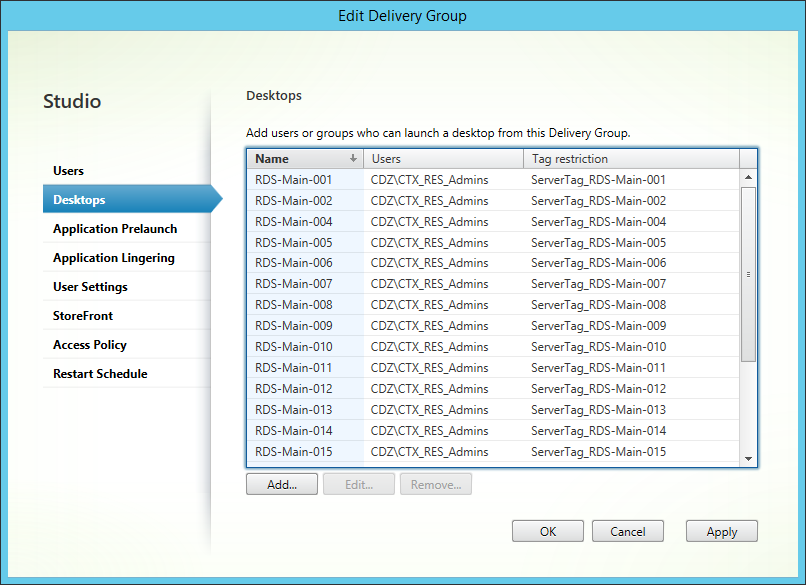
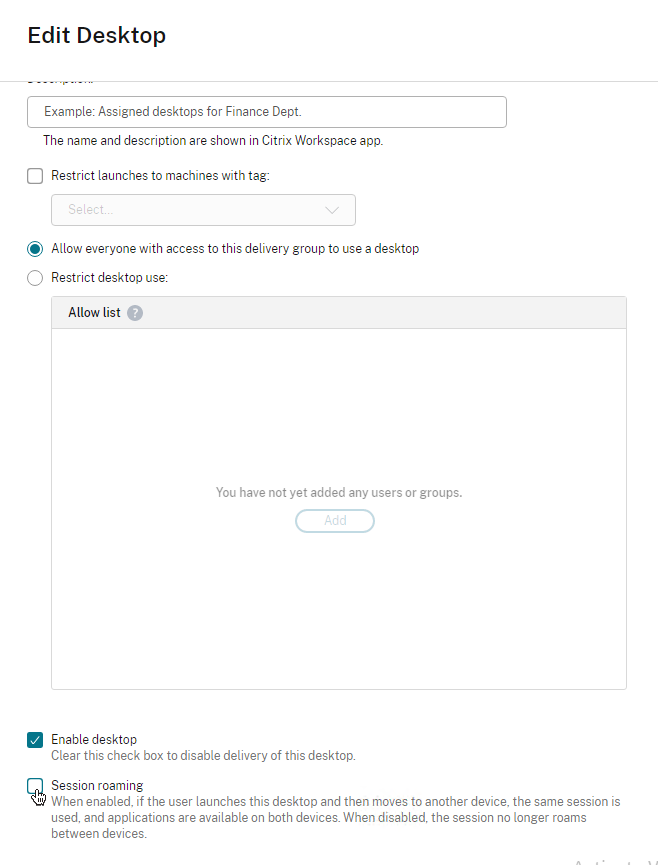
On the Desktops page of the Create Delivery Group wizard, you can now publish multiple desktops from a single Delivery Group. Each desktop can be named differently. And you can restrict access to the published desktop.
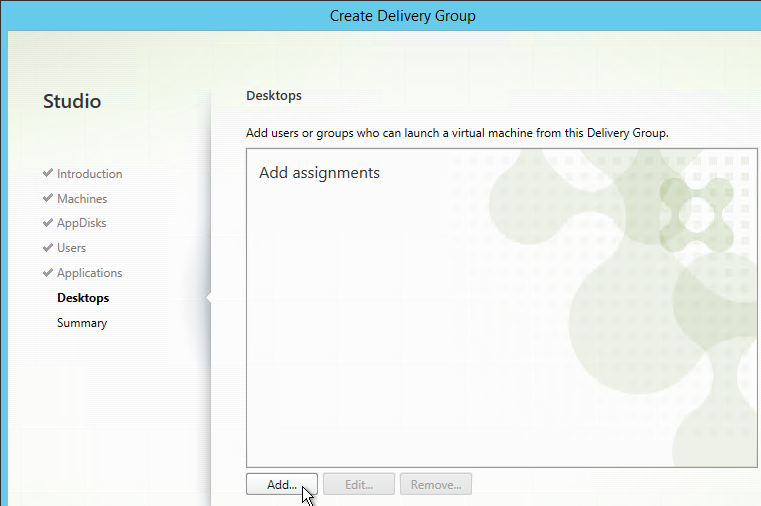

There doesn’t seem to be any way to publish a Desktop across multiple Delivery Groups.
To publish apps and desktops across a subset of machines in a Delivery Group, see Tags.
Maximum Desktop Instances in Site/Farm
Citrix Virtual Apps and Desktops (CVAD) 1808 and newer lets you restrict the maximum instances of a published desktop in the Site. This feature is configured using PowerShell.
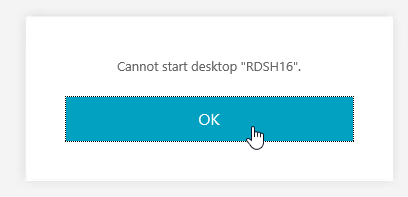
asnp citrix.*
Get-BrokerEntitlementPolicyRule | Select-Object Name,PublishedName
Set-BrokerEntitlementPolicyRule -Name RDSH16_1 -MaxPerEntitlementInstances 1
If too many instances are launched, the user sees Cannot start desktop in StoreFront.
And StoreFront Server > Event Viewer > Applications and Services > Citrix Delivery Services shows session-limit-reached.
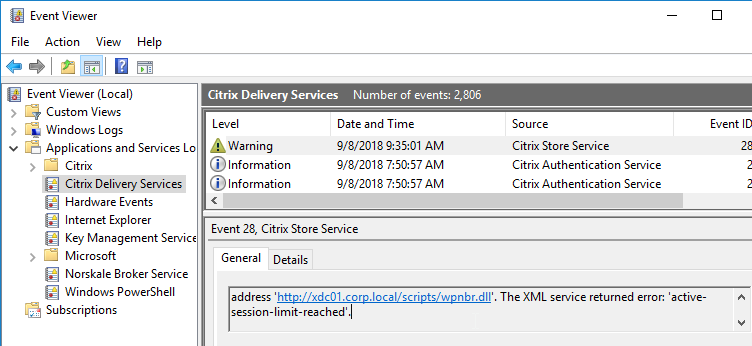
To revert to unlimited instances of the published desktop, set MaxPerEntitlementInstances to 0.
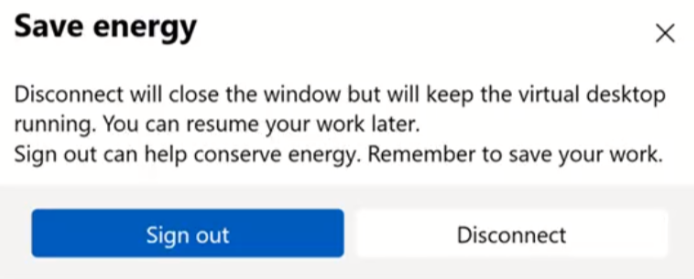
Logoff Closed Desktop
In Citrix Workspace app 2309 version onwards, when users close a desktop session, users can be asked to Sign out instead of Disconnect. This feature is called Save energy or Logoff on Close.
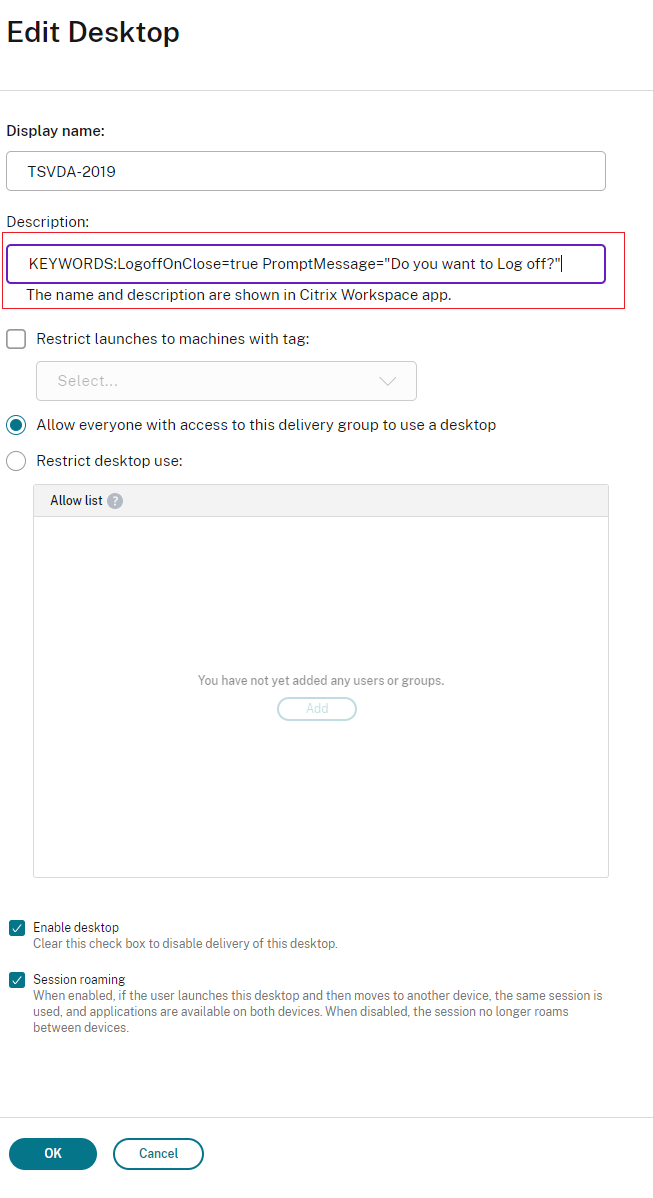
To enable the feature, edit a published desktop, find the Description field, and enter something similar to the following:
KEYWORDS:LogoffOnClose=true PromptMessage="Do you want to Log off?"
Tags (Citrix Virtual Apps and Desktops [CVAD] and XenApp/XenDesktop 7.12 and newer)
In Citrix Virtual Apps and Desktops (CVAD) and XenApp/XenDesktop 7.12 and newer, you can assign tags to machines. Then you can publish apps and/or desktops to only those machines that have the tag. This means you can publish icons from a subset of the machines in the Delivery Group, just like you could in XenApp 6.5.
Tags also allow different machines to have different restart schedules.
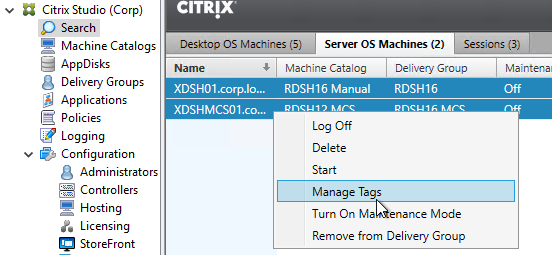
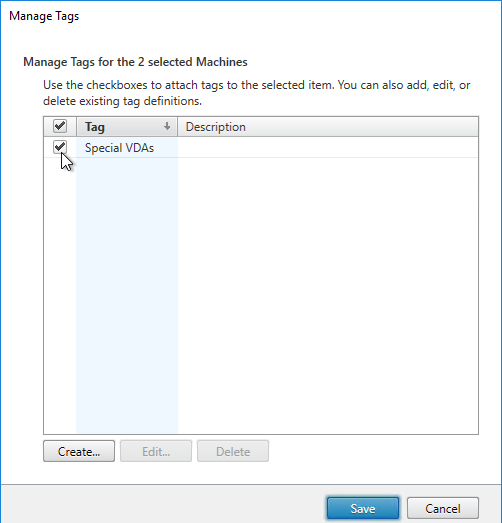
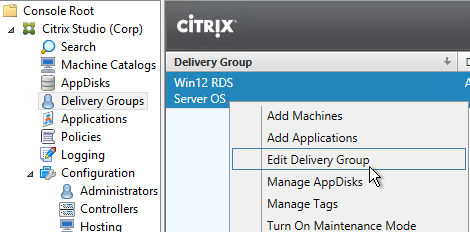
- In Citrix Studio, find the machines you want to tag (e.g. double-click a Delivery Group). You can right-click one machine, or select multiple machines and right-click them. Then click Manage Tags.
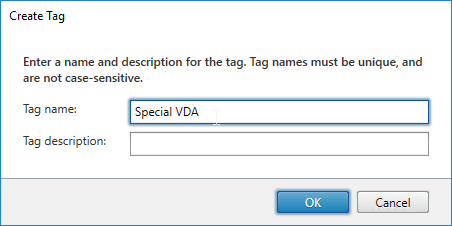
- Click Create.
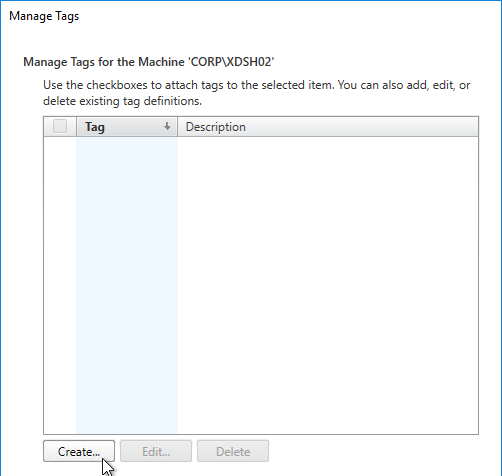
- Give the tag a name and click OK. This tag could be assigned to multiple machines.
- After the tag is created, check the box next to the tag to assign it to these machines. Then click Save.
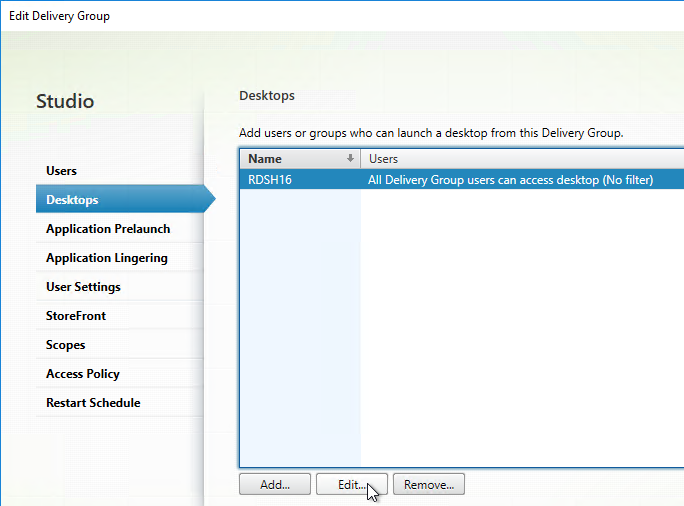
- Edit a Delivery Group that has published desktops. On the Desktops page, edit one of the desktops.
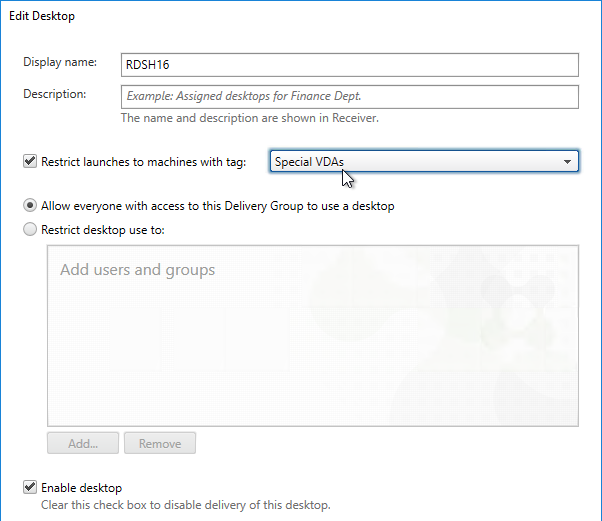
- You can use the Restrict launches to machines with tag checkbox and drop-down to filter the machines the desktop launches from. This allows you to create a new published desktop for every machine in the Delivery Group. In that case, each machine would have a different tag. Create a separate published desktop for each machine, and select one of the tags.
- A common request is to create a published desktop for each Citrix Virtual Apps (CVA) server. See Citrix Blog Post How to Assign Desktops to Specific Servers in XenApp 7 for a script that can automate this configuration.
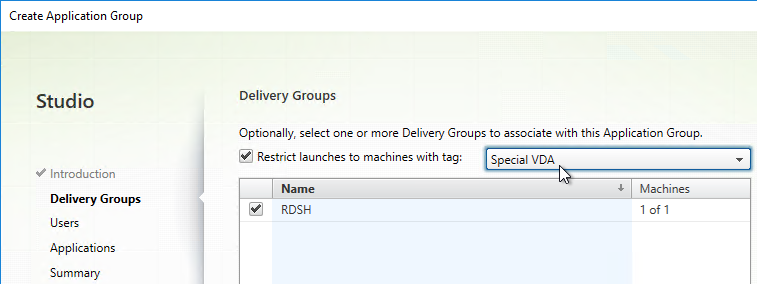
- When you create an Application Group, on the Delivery Groups page, there’s an optional checkbox to Restrict launches to machines with tag. Any apps in this app group only launch on machines that have the selected tag assigned. This lets you have common apps across all machines in the Delivery Group, plus one-off apps that might be on only a small number of machines in the Delivery Group. In that case, you’ll have one app group with no tag restrictions for the common apps. And a different app group with tag restriction for the one-off apps.
RDSH Scheduled Restart
If you create a Scheduled Restart inside Citrix Studio, it applies to every machine in the Delivery Group. Alternatively, you can use the 7.12 tags feature to allow different machines to have different restart schedules.
To configure a scheduled reboot on RDSH machines:
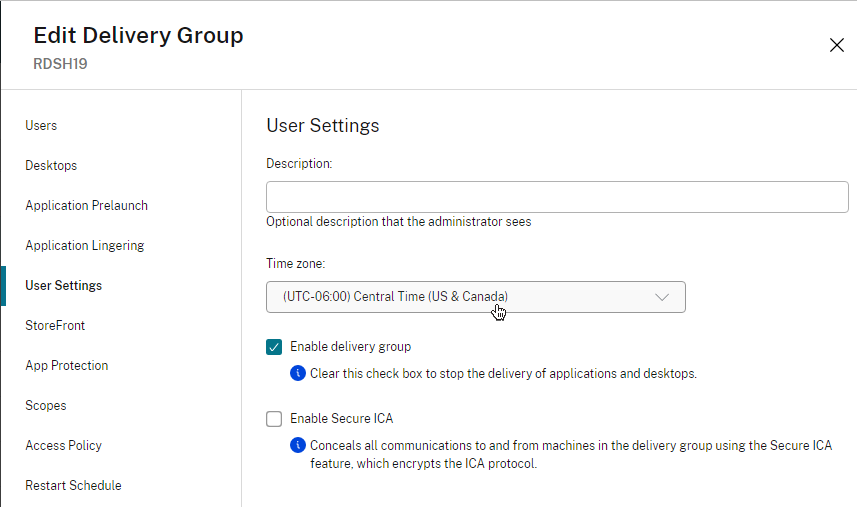
- Right-click an RDSH Delivery Group and click Edit Delivery Group.
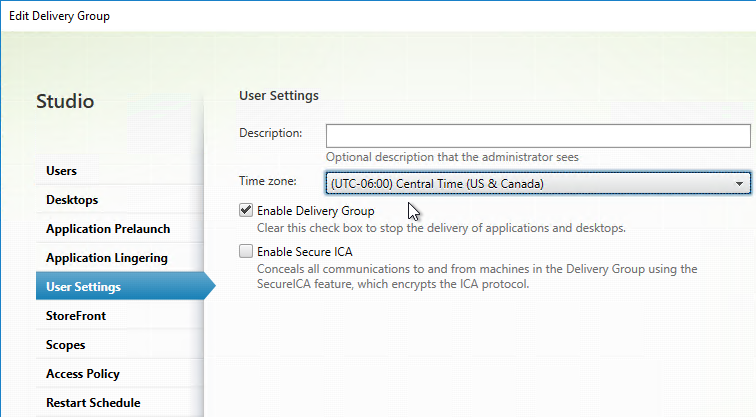
- On the User Settings page, make sure the Time zone is configured correctly. Scheduled restarts use this time zone. (Source = CTX234892 Scheduled Restart Happen At Incorrect Time For A Specific Delivery Group)
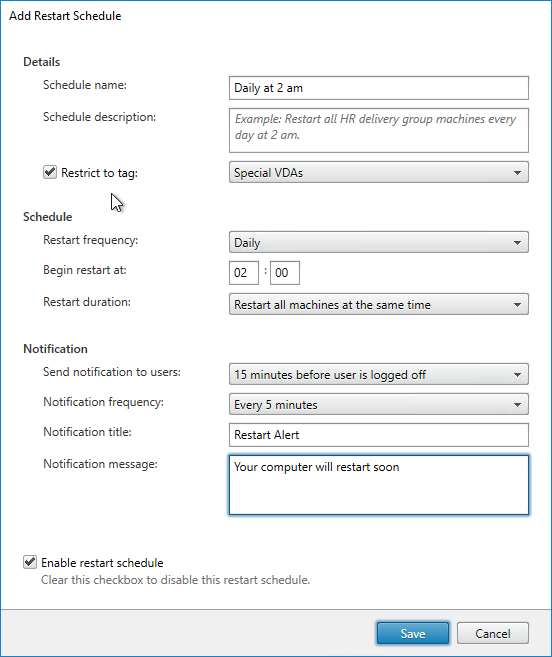
- In Citrix Virtual Apps and Desktops (CVAD) 1811 and newer, you can create multiple Restart Schedules from the GUI. First, tag your machines. Then create a restart schedule for each tag.
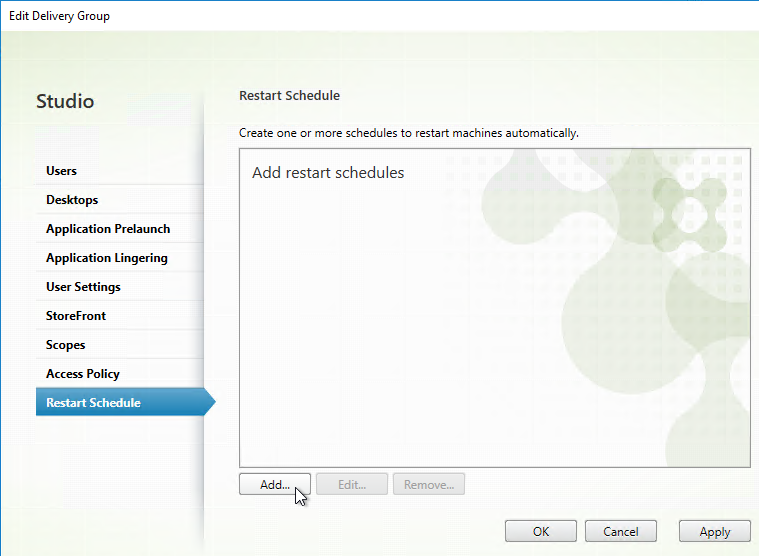
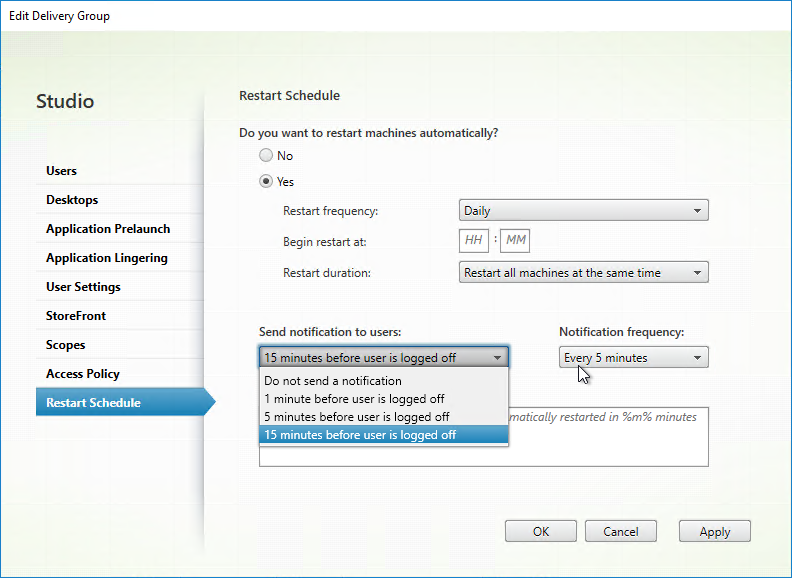
- The Restart Schedule page lets you schedule a restart of the session hosts.

- Citrix Virtual Apps and Desktops (CVAD) and XenApp 7.7 and newer lets you send multiple notifications.
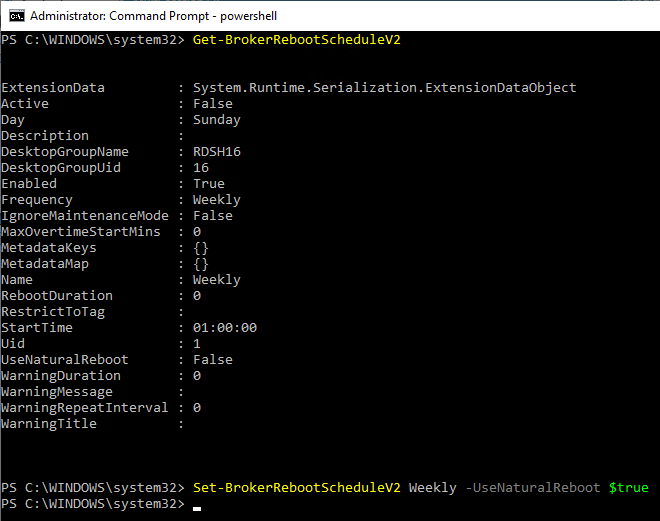
- Restart after drain – in CVAD 2103 and newer, you can configure a Restart Schedule to wait for all users to log off of the machine. Use the
-UseNaturalReboot $trueparameter with the New-BrokerRebootScheduleV2 and Set-BrokerRebootScheduleV2 cmdlets. Run Get-BrokerRebootScheduleV2 to see the existing schedules. Then run Set-BrokerRebootScheduleV2 to modify the schedule. This feature is not available in Citrix Studio.
- Restart after database outage – If a site database outage occurs before a scheduled restart begins for machines (VDAs) in a Delivery Group, the restarts begin when the outage ends. This can have unintended results. To help avoid this situation, you can use the MaxOvertimeStartMins parameter for the New-BrokerRebootScheduleV2 and Set-BrokerRebootScheduleV2 cmdlets in CVAD 1909 and newer. See Scheduled restarts delayed due to database outage at Citrix Docs.
- Maintenance mode and restarts – VDAs in Maintenance Mode will not restart automatically.
- In CVAD 2006 and newer, the
Set-Brokerrebootschedulev2cmdlets have-IgnoreMaintenanceMode $true. This setting is not available in Citrix Studio. See Scheduled restarts for machines in maintenance mode at Citrix Docs. - Or see Matthias Schlimm at Reboot Schedule – VM’s in Maintenance Mode … do it at CUGC provides a script that reboots maintenance mode VDAs.
- In CVAD 2006 and newer, the
- If all the user sessions on the VDA are not logged off within 10 minutes, and if machine is not shutdown gracefully, then the Delivery Controller sends a force shutdown of the VDA, and machine does not power on. The following Delivery Controller registry values can be tweaked. Source = Citrix CTX239537 Server VDA’s Remain ShutDown And Do Not Turn On Automatically After Scheduled Reboot
- HKLM\Software\Citrix\DesktopServer\SiteServices\MaxShutdownTimeSecs
- HKLM\Software\Citrix\DesktopServer\RebootSchedule\MaxShutdownDelayMin
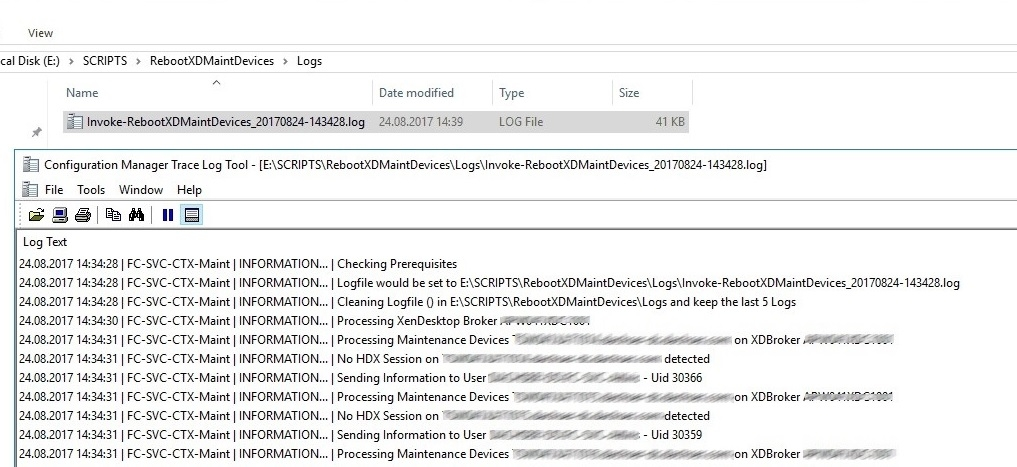
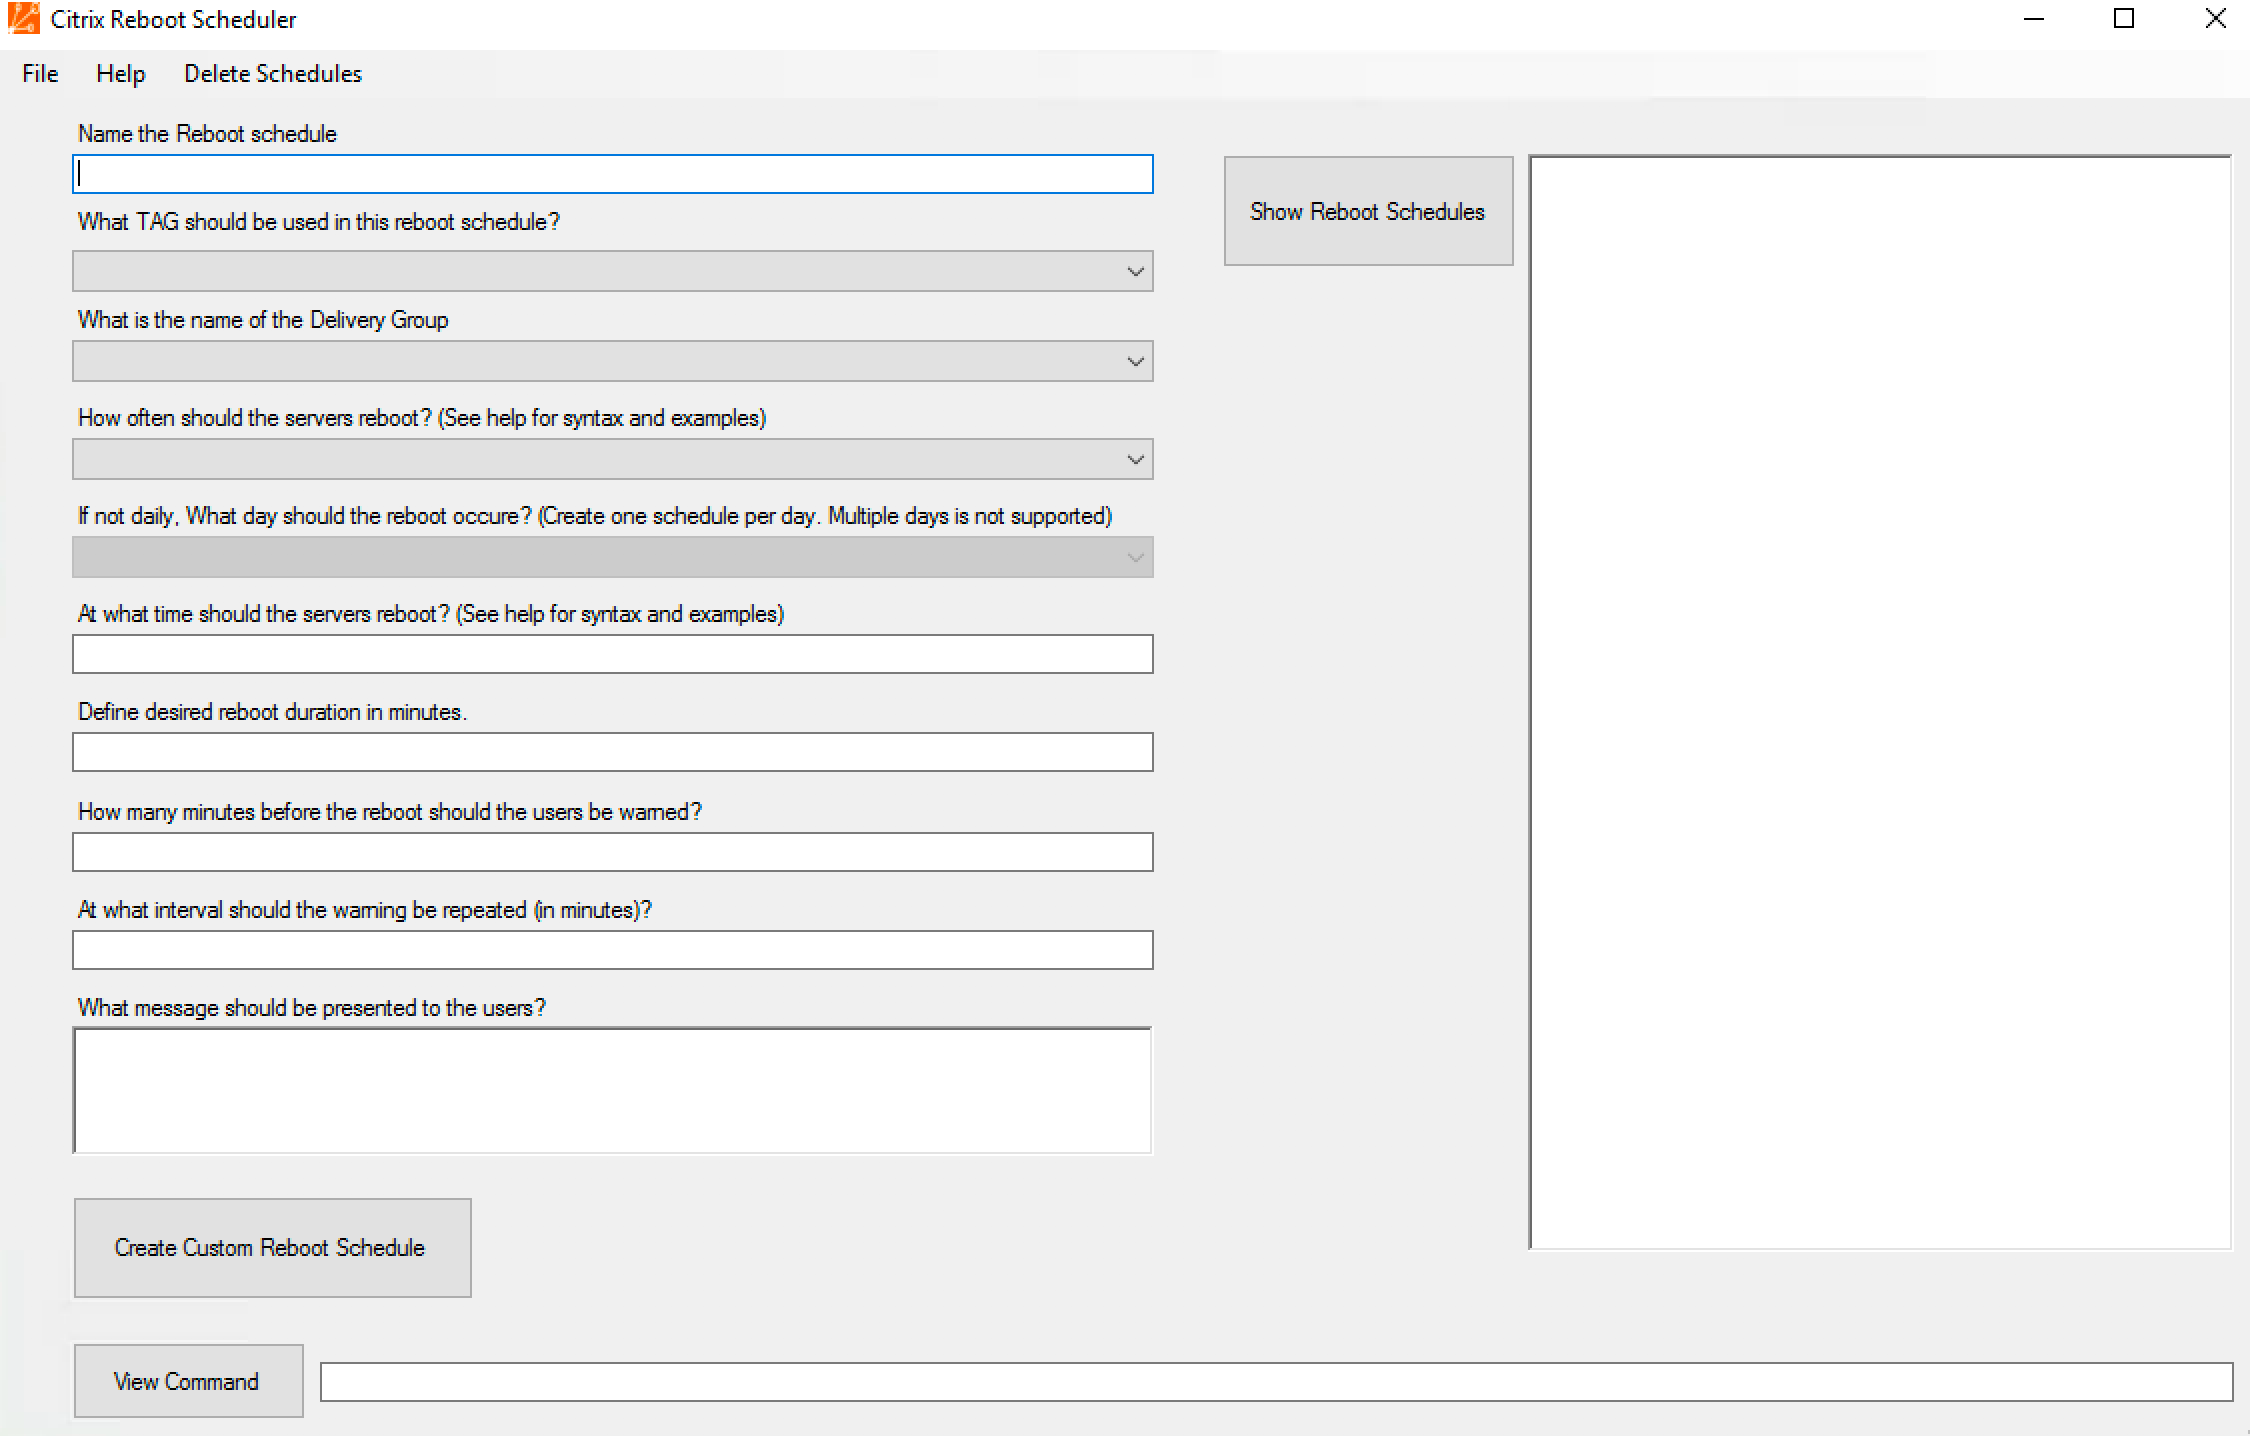
Or use a reboot script/tool:
- Wedel IT – Citrix Reboot Scheduler – GUI to create multiple reboot schedules in 7.12 and newer
- Citrix Blog Post – XenApp & XenDesktop 7.x Server OS VDA Staggered Reboot Framework v2
- Citrix Blog Post – XenApp and XenDesktop 7.x Server OS VDA Staggered Reboot
- Shaun Ritchie – XenDesktop 7 Rolling Reboot Script
- Dane Young – Citrix Chained Reboot Scripts, now supporting XenApp 5, 6, 6.5 and XenDesktop 7.0, 7.1, 7.5, and 7.6!
- Citrix Blog Post – XenApp 7.x Reboot Schedules – 2017 Edition– reboots odds or evens in a Delivery Group with customizable drainTimer
- Citrix CTX203346 – Scheduled Reboots for XenApp 7.6 Application Servers (odds, evens) Using Script
Autoscale
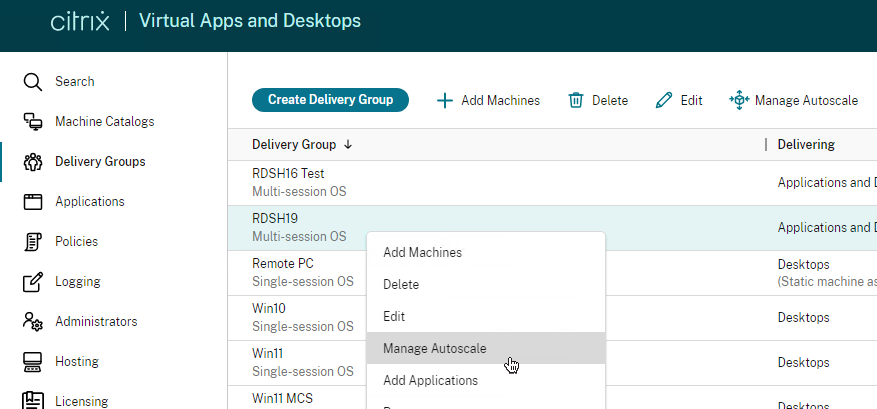
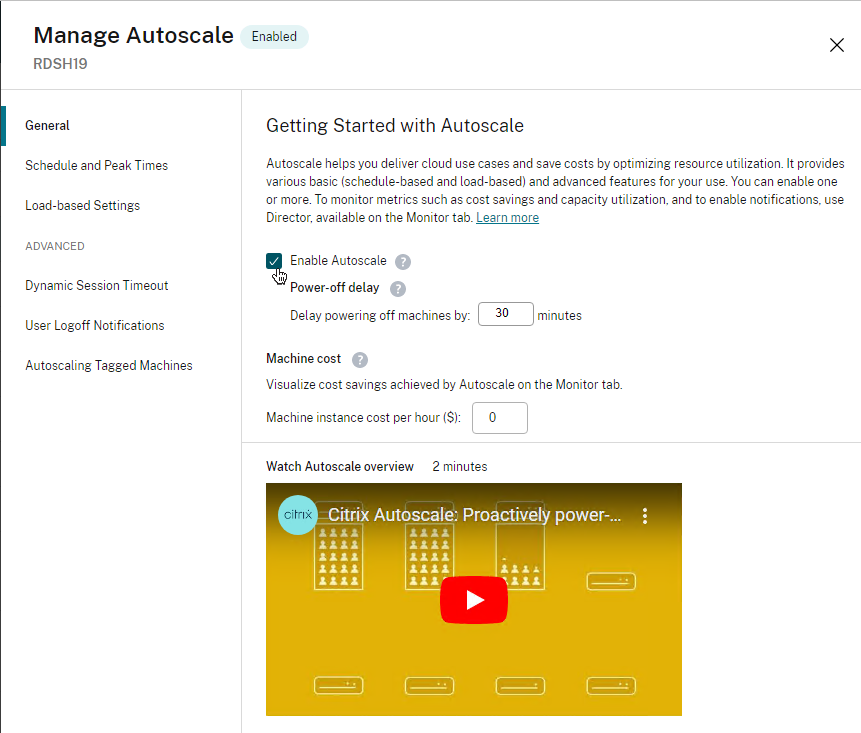
In CVAD 2305 and newer, Web Studio supports Autoscale. Right-click a Delivery Group and click Manage Autoscale. See Getting started with Autoscale at Citrix Docs.
For schedule-based autoscale, edit the Delivery Group and set the Time Zone on the User Settings page.
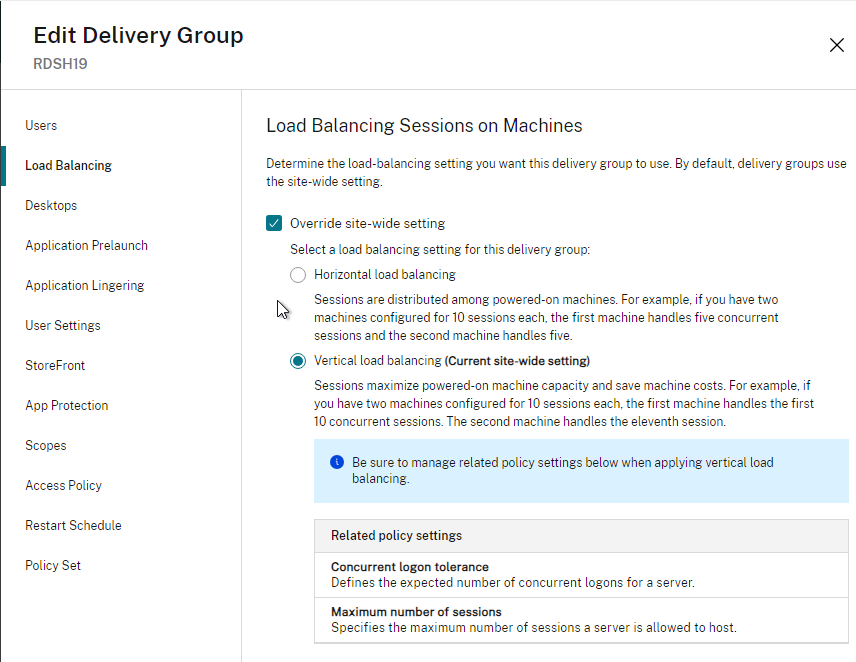
Web Studio 2308+ on the Settings page has an option for Vertical load balancing.
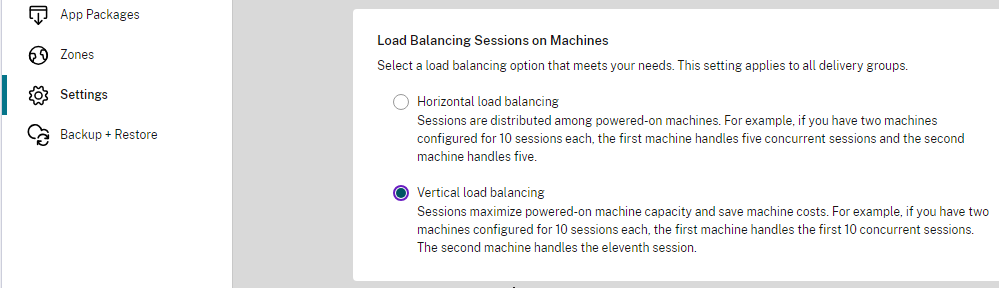
CVAD 2311 and newer let you set Vertical load balancing at the Delivery Group instead of only at the Site.
Multiple Sessions
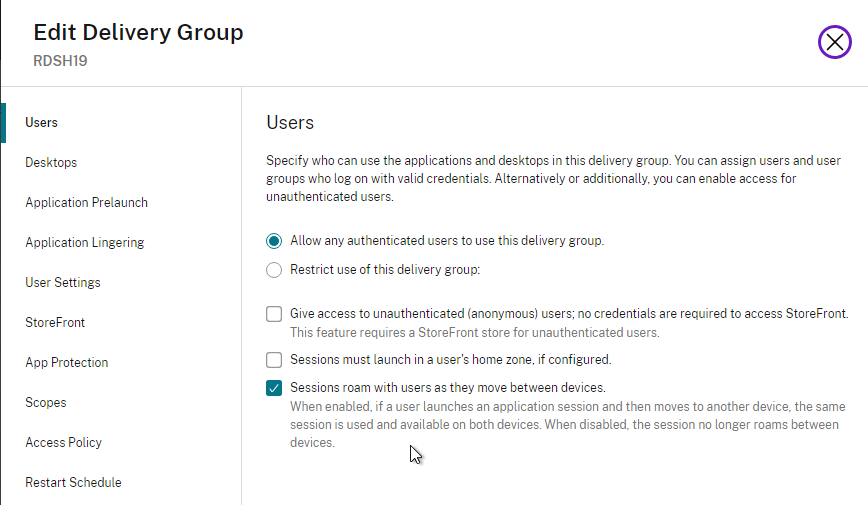
From Configure session roaming at Citrix Docs: By default, users can only have one session. Citrix Web Studio in CVAD 2303 and newer lets you configure session roaming by editing the delivery group. For published apps, disable it on the Users page. For published desktops, edit a published desktop and disable it on the bottom of the window.
Or you can configure the SessionReconnection setting available via PowerShell. On any Server OS delivery group, run:
Set-BrokerEntitlementPolicyRule <Published Desktop Name> -SessionReconnection <Value>
For <Published Desktop Name>, run Get-BrokerEntitlementPolicyRule and look for the Name field.
<Value> can be:
- Always – This is the default and matches the behavior of a VDI session. Sessions always roam, regardless of client device.
- DisconnectedOnly – This reverts back to the XenApp 6.x and earlier behavior. Sessions may be roamed between client devices by first disconnecting them (or using Workspace Control) to explicitly roam them. However, active sessions are not stolen from another client device, and a new session is launched instead.
- SameEndpointOnly – This matches the behavior of the “ReconnectSame” registry setting in XenApp 6.x. Each user will get a unique session for each client device they use, and roaming between clients is completely disabled.
For app sessions, use:
Set-BrokerAppEntitlementPolicyRule <App Entitlement Rule Name> -SessionReconnection <Value>
For <App Entitlement Rule Name>, run Get-BrokerAppEntitlementPolicyRule and look for the Name field.
Static Catalog – Export/Import Machine Assignments
It is sometimes useful (e.g. DR) to export machine assignments from one Catalog/Delivery Group and import to another.
From Adil Dean at Exporting Dededicated VDI machine names and user names from catalog in Xendesktop 7.x at Citrix Discussions: Hopefully this is what you are after, it turns out you don’t actually need PowerShell as the functionality is built into the tool.
- In Studio, click Delivery Groups on the lefthand menu
- Right click Edit delivery group
- Select Machine allocation tab on the left
- Click Export list
- Select a file name > Click Save
- Create the new machine catalog
- Right click the delivery group > Click Edit
- Select Machine allocation tab on the left
- Click Import list..
- Select the list you exported in step 4
- Click Apply
Your clients will now have users re-assigned to machines.
Shane O’Neill produced an export utility that can be scheduled to run periodically. See XenDesktop Farm Migration Utility Update – Version 1.2.
Monitor the Number of Free Desktops
Sacha Thomet wrote a script at victim of a good reputation – Low free pooled XenDesktops that polls Director to determine the number of free desktops in a Delivery Group. If lower than the threshold, an email is sent.
List Desktops Not Used for x Days
CTP Kees Baggerman has a script at Making sure your Citrix Desktops are utilized with Powershell v2 that does the following:
- Grab all the desktops that haven’t been used within x amount of days
- Notify the user
- Set the desktop to maintenance mode
- Uses the Office 365 SMTP servers for notifications
Good morning,
I have Session Policy. After 120 minutes of inactivity, my session disconnects and after 120 minutes, my session logoff.
What happens when the “Power Management” part is configured (session part disconnected at 120min). If the time of Power Management is less than Citrix Policy ?
Citrix Policy wins compared to Power Management time?
THANKS