Navigation
Overview
If you plan to use LDAP (Active Directory) for NetScaler Gateway or NetScaler management authentication, load balance the Domain Controllers that are used for authentication.
An alternative to load balancing is to configure NetScaler Gateway and NetScaler management authentication with multiple authentication policies, each pointing to a single Domain Controller. However, NetScaler will try each authentication policy until it finds one that works. If the user enters a wrong password and if you have three authentication policies pointing to different Domain Controllers in the same domain then three different failure attempts will be recorded thus causing premature account lockout. Use Load Balancing to avoid this behavior.
This page details LDAPS, aka Secure LDAP. This protocol requires certificates to be installed on the Domain Controllers. When a user’s password expires, Active Directory does not allow password changes over clear text LDAP so LDAPS must be used instead. Make sure you have certificates installed on your Domain Controllers. The easiest way to accomplish that is to deploy a Microsoft Certificate Authority. Once that’s done the Domain Controllers will request certificates automatically.
An ldaps monitor can be used to verify that the Domain Controller is functional. The ldaps monitor will login as an account, perform an LDAP query, and look for a successful response. The ldaps monitor uses a service account to login. Make sure the service account’s password does not expire. Domain User permissions are sufficient. Since this monitor is a Perl script, it uses NSIP as the source IP.
If you have Domain Controllers in multiple datacenters, you can create multiple load balancing Virtual Servers and cascade them so that the local Domain Controllers are used first, and if they’re not available, then the Virtual Server fails over to Domain Controllers in remote datacenters.
The Load Balancing Virtual Server for LDAPS can be TCP or SSL_TCP:
- If the protocol is TCP, then SSL-encrypted LDAP traffic is not terminated on the NetScaler, and is simply forwarded to the LDAP servers. If your LDAP client needs to verify the LDAP server certificate, then this Load Balancing configuration will not work, since each back-end LDAP server will have a different certificate.
- If your Load Balancing Virtual Server is protocol SSL_TCP, then a certificate must be installed on the NetScaler and bound to the Load Balancing Virtual Server. SSL is terminated at the NetScaler and re-encrypted before sending it to the destination Domain Controller. The primary benefit of NetScaler SSL termination is that your LDAP clients can verify the Virtual Server SSL certificate.
When NetScaler uses a local (same appliance) load balanced Virtual Server for LDAPS authentication, the traffic is sourced from the NetScaler SNIP (Subnet IP). When NetScaler uses a direct connection to a Domain Controller without going through a local Load Balancing Virtual Server, or if NetScaler uses a remote (different appliance) Load Balancing VIP, then the traffic is sourced from the NetScaler NSIP (NetScaler IP). Adjust firewall rules accordingly.
LDAPS Monitor
LDAPS monitor instructions from Citrix article CTX117943 – Secure LDAP Monitor Does not Work. Note: Perl monitor uses NSIP as the source IP.
- Use WinSCP or similar to connect to the NetScaler appliance.
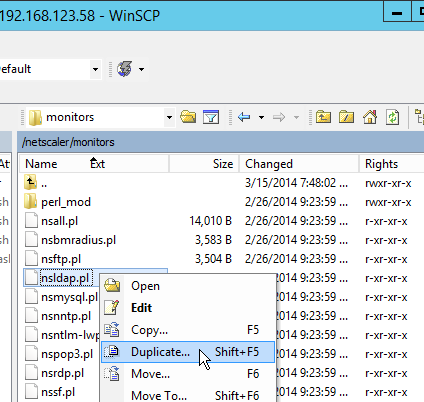
- On the right, navigate to /netscaler/monitors.
- Right-click nsldap.pl, and click Duplicate.
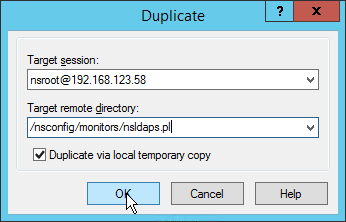
- Change the target remote directory to /nsconfig/monitors/nsldaps.pl, and check the box next to Duplicate via local temporary copy. Click OK. The source file is in the /netscaler/monitors directory, but it needs to be copied to the /nsconfig/monitors directory.
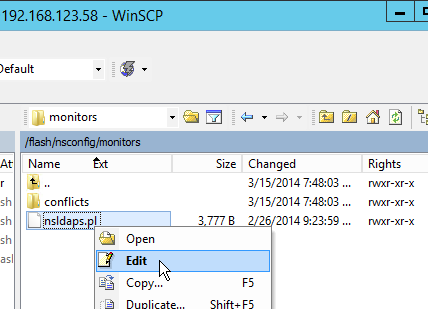
- Navigate to /nsconfig/monitors. Right-click the new nsldaps.pl file, and click Edit.
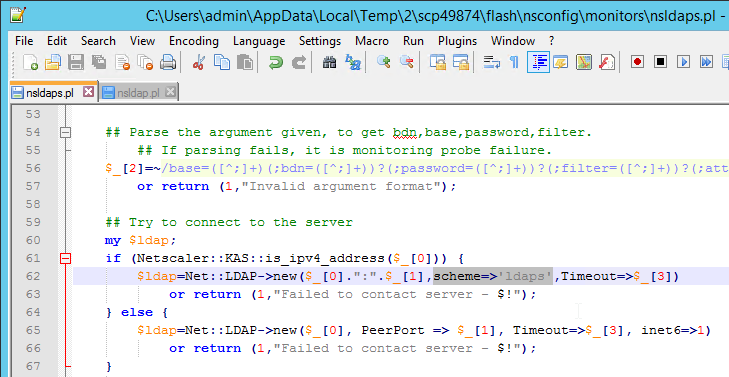
- Search for the following entry in the file:
my $ldap=Net::LDAP->new($_[0].":".$_[1],Timeout=>$_[3]) - Replace the entry with the following entry. The only change is the addition of: scheme=>’ldaps’
my $ldap=Net::LDAP->new($_[0].":".$_[1],scheme=>'ldaps',Timeout=>$_[3]) - Save the file.
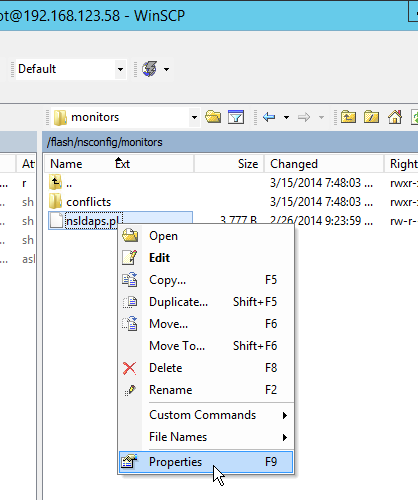
- Right-click the nsldaps.pl file, and click Properties.
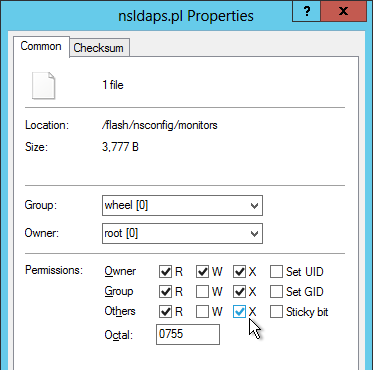
- Check the X box in all three rows, and click OK.
- Use WinSCP to download the nsldaps.pl file to your computer, and then copy it to the secondary appliance in the /nsconfig/monitors directory.
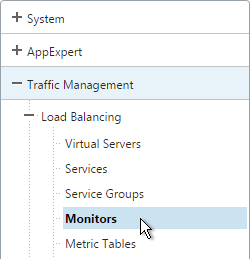
- In the NetScaler Configuration Utility, expand Traffic Management, expand Load Balancing, and click Monitors.
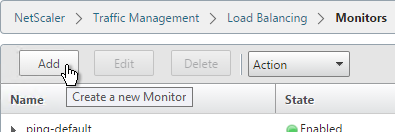
- On the right, click Add.
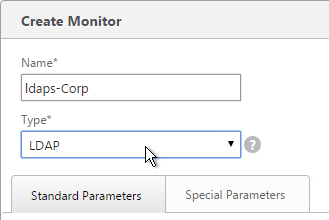
- Name the monitor ldaps-Corp or similar. The ldaps monitor logs into Active Directory, performs an LDAP query, and looks for a successful response. The monitor configuration has domain specific information, so if you have multiple Active Directory domains, then you will need multiple ldaps monitors. Include the domain name in the monitor name.
- Change the Type to LDAP.
- On the Special Parameters tab, use the Script Name drop-down list to select the nsldaps.pl file.
- In the Base DN field, enter your domain name in LDAP format (e.g. dc=company,dc=com)
- In the Bind DN field, enter the UPN login (e.g. ctxsvc@company.com) of a service account in the domain that can browse all objects. Any normal Domain User should be sufficient. Just make sure the password doesn’t expire.
- In the Filter field, enter cn=builtin. This limits the search results.
- In the Password field, enter the password for the service account. Make sure there is no semicolon in the password or the script will be unable to parse the parameters.
- Click Create.

add lb monitor LDAP-Corp LDAP -scriptName nsldaps.pl -dispatcherIP 127.0.0.1 -dispatcherPort 3013 -password Passw0rd -secure YES -baseDN "dc=corp,dc=local" -bindDN "corp\\ctxsvc" -filter cn=builtin
- If you have multiple domains, then create additional monitors: one for each domain.
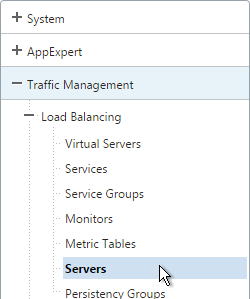
Servers
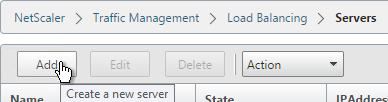
- On the left, expand Traffic Management, expand Load Balancing, and click Servers.
- On the right, click Add.
- Enter a descriptive server name, usually it matches the actual server name.
- Enter the IP address of the server.
- Enter comments to describe the server. Click Create.
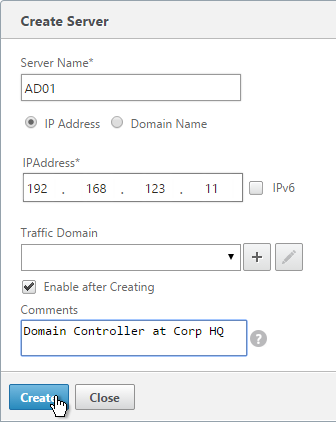
add server AD01 10.2.2.11
add server AD01 10.2.2.12
- Continue adding Domain Controllers.
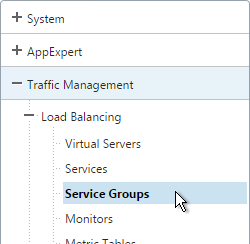
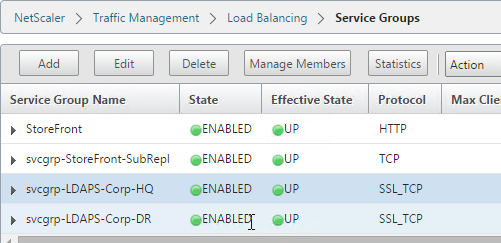
Service Groups
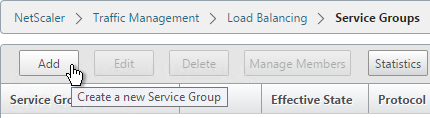
- On the left, expand Traffic Management, expand Load Balancing, and click Service Groups.
- On the right, click Add
.
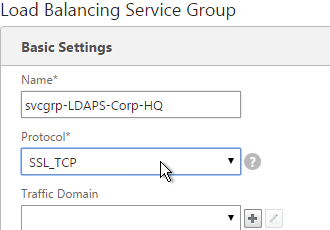
- You will create one Service Group per datacenter. Enter a name reflecting the name of the data center. Also, you will create a set of service groups per Active Directory domain so include the domain name.
- Change the Protocol to SSL_TCP. Scroll down, and click Continue.
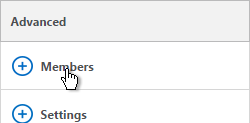
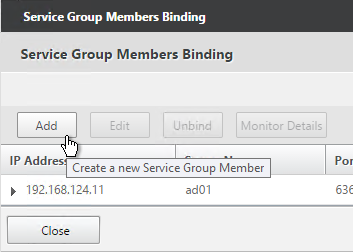
- On the right, in the Advanced column, click Members.
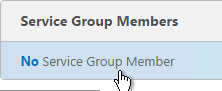
- On the left, in the Service Group Members section, click where it says No Service Group Member.
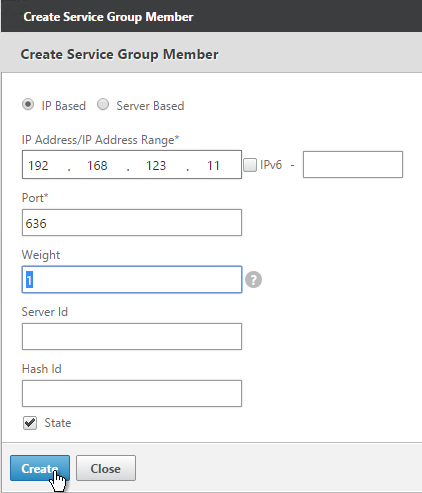
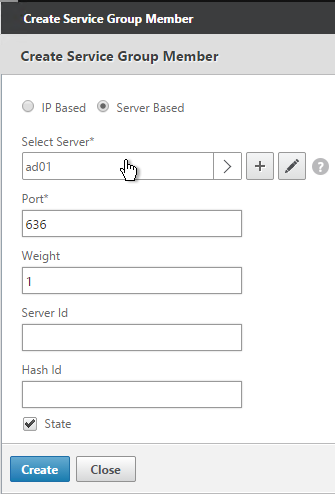
- If you did not create server objects then enter the IP address of a Domain Controller in this datacenter. If you previously created a server object, then change the selection to Server Based, and select the server object. In the Port field, enter 636 (LDAPS).
- Note: Any Domain Controller you add to this list must have an SSL certificate installed. The easiest way to install SSL certificates on the Domain Controllers is with Active Directory Certificate Services since it installs the certificates automatically.
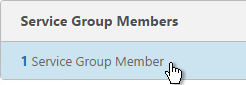
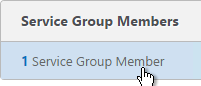
- To add more members, click where it says 1 Service Group Member and then click Add. Click Close when done.
- On the right, in the Advanced column, click Monitors.
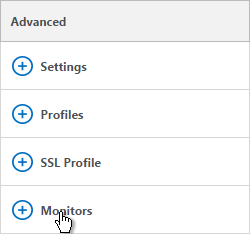
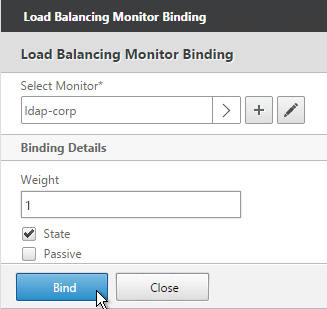
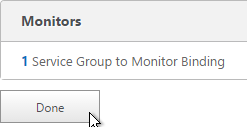
- On the left, in the Monitors section, click where it says No Service Group to Monitor Binding.
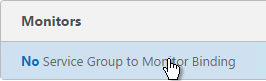
- Click the arrow next to Click to select.
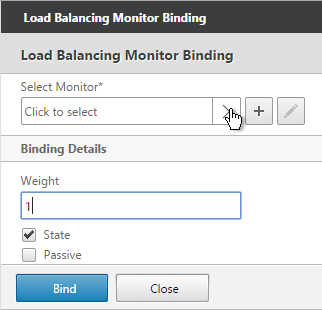
- Select your new LDAPS monitor and click OK.
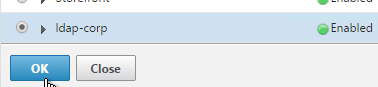
- Click Bind.
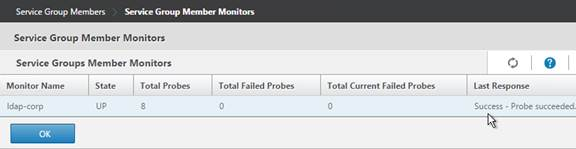
- To verify the member is up, click in the Service Group Members section.
- Highlight a member and click Monitor Details.
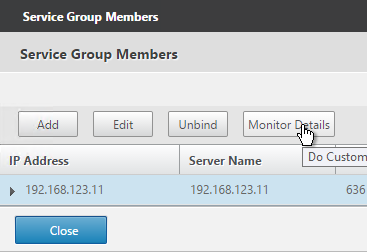
- It should say Probe successful. Click OK.
- If the monitor doesn’t work, use ldp.exe to verify the Domain Controller certificate.
- Click Done to finish creating the Service Group.
add serviceGroup svcgrp-LDAP-Corp SSL_TCP
bind serviceGroup svcgrp-LDAP-Corp AD01 636
bind serviceGroup svcgrp-LDAP-Corp AD02 636
bind serviceGroup svcgrp-LDAP-Corp -monitorName LDAP-Corp
- The Service Group is displayed as UP.

- Add additional service groups for Domain Controllers in each data center.
Virtual Server
- Create or import a certificate that matches the FQDN that resolves to the new Load Balancing VIP for LDAPS.
- On the left, expand Traffic Management, expand Load Balancing, and click Virtual Servers.
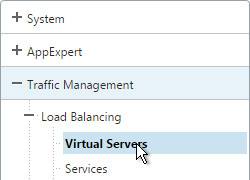
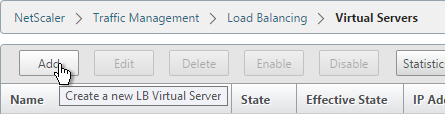
- On the right, click Add.
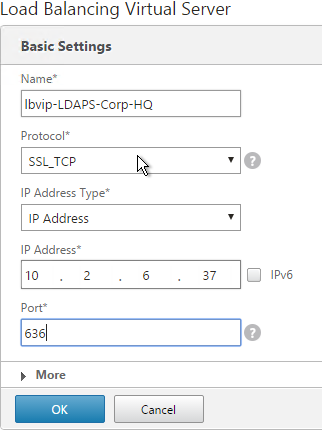
- Name it lbvip-LDAPS-Corp-HQ or similar. You will create one Virtual Server per datacenter so include the datacenter name. Also, each domain has a separate set of Virtual Servers so include the domain name.
- Change the Protocol drop-down to SSL_TCP.
- Enter a Virtual IP. This VIP cannot conflict with any other IP + Port already being used. You can use an existing VIP that is not already listening on TCP 636.
- Enter 636 as the Port. Click OK.
- On the left, in the Service Group section, click where it says No Load Balancing Virtual Server ServiceGroup Binding.
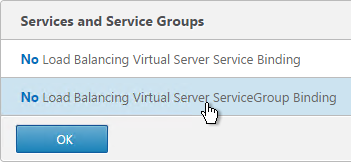
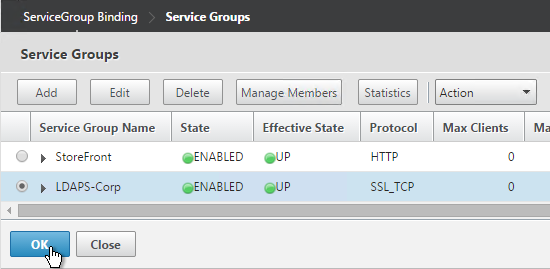
- Click the arrow next to Click to select.
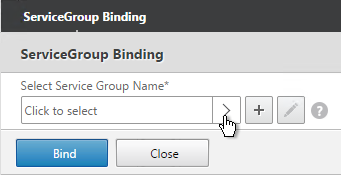
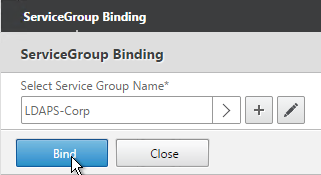
- Select the previously created Service Group, and click OK.
- Click Bind.
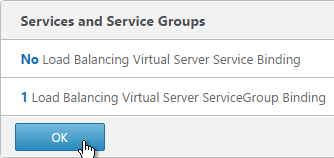
- Click OK.
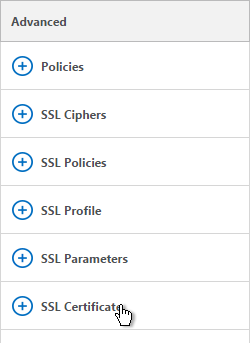
- On the right, in the Advanced column, click SSL Certificate.
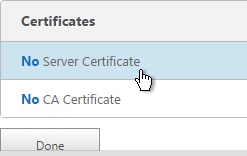
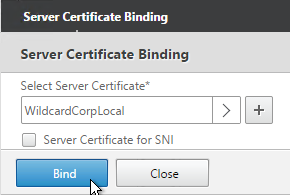
- On the left, in the Certificates section, click where it says No Server Certificate.
- Click the arrow next to Click to select.
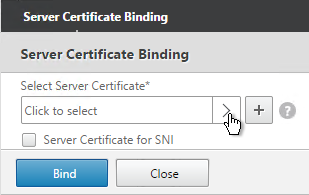
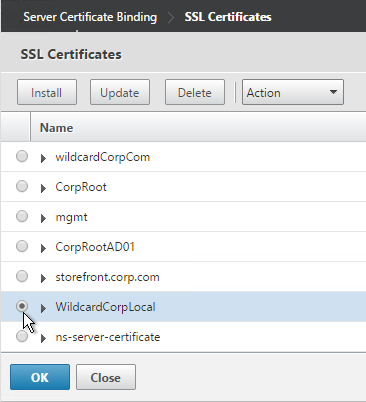
- Select a certificate that matches the FQDN that will resolve to this VIP. Click OK.
- Click Bind.
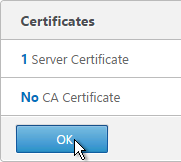
- Click OK.
add lb vserver lbvip-LDAP-Corp SSL_TCP 10.2.2.210 636 -persistenceType NONE -cltTimeout 9000

bind lb vserver lbvip-LDAP-Corp svcgrp-LDAP-Corp
- Perform other normal SSL configuration including: disable SSLv3, and bind a Modern Cipher Group.
bind ssl vserver MyvServer -certkeyName MyCert

set ssl vserver MyvServer -ssl3 DISABLED -tls11 ENABLED -tls12 ENABLED

unbind ssl vserver MyvServer -cipherName ALL

bind ssl vserver MyvServer -cipherName Modern

bind ssl vserver MyvServer -eccCurveName ALL
- Click Done to finish creating the Virtual Server.
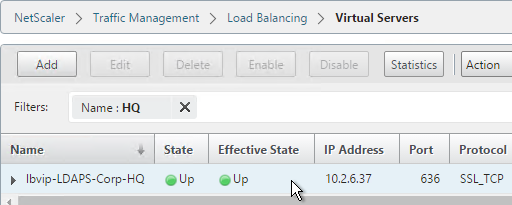
- The new Virtual Server should show as Up.
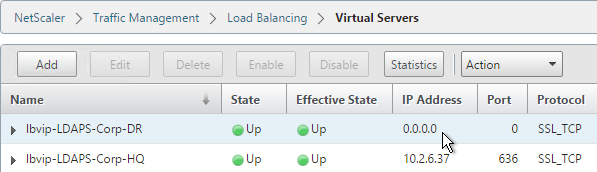
- Create additional Virtual Servers for each datacenter. These additional Virtual Servers do not need a VIP, so change the IP Address Type to Non Addressable. Only the first Virtual Server will be accessible.

add lb vserver lbvip-LDAP-Corp-Backup SSL_TCP 0.0.0.0 0
- Notice that the additional datacenter Virtual Servers show up with an IP Address of 0.0.0.0 and port of 0.
- After you are done creating a Virtual Server for each datacenter, right-click the primary datacenter’s Virtual Server and click Edit.
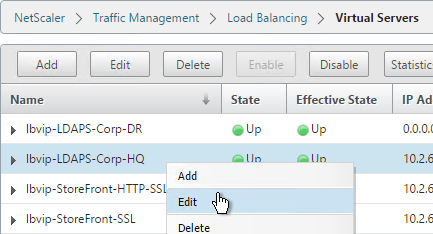
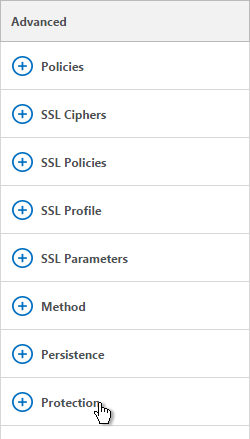
- On the right, in the Advanced column, click Protection.
- On the left, in the Protection section, change the Backup Virtual Server to one of the other datacenter Virtual Servers. If all of the services in this datacenter are DOWN, the backup Virtual Server will be used instead. You can cascade multiple Virtual Servers using this method. Click OK and Done.
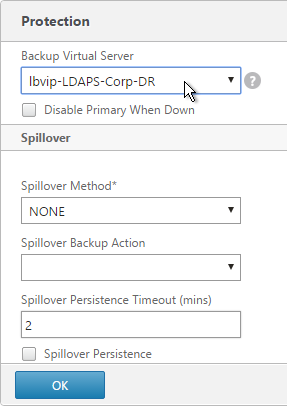
set lb vserver lbvip-LDAP-Corp -backupVServer lbvip-LDAP-Corp-Backup
Next Steps
You may now use this Virtual IP in your LDAP authentication policies for NetScaler Gateway and/or NetScaler management login.