Navigation
This page contains the following topics:
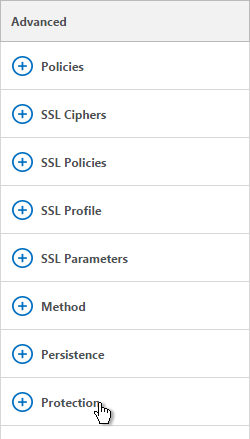
- Java Security
- NetScaler VPX on vSphere Hang Issue
- Licensing:
- Upgrade Firmware
- High Availability
- Multiple Interfaces/VLANs (aka two-arm)
- DNS Servers
- NTP Servers
- Syslog Server
- SNMP Configuration
- Call Home
- Change nsroot password
- TCP, HTTP, SSL, and Security settings
- LDAP Authentication for Management
- CLI Prompt
Java Security
Citrix docs.citrix.com has information on configuring browsers for Java
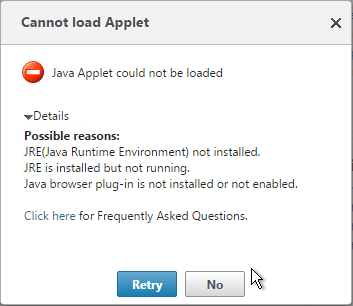
When performing operations on NetScaler that require Java, you might see the message “Java Applet could not be loaded”. To fix it, do the following:
- Java uses TCP 3008 and TCP 3010 to communicate with the NetScaler NSIP (and/or SNIP). Make sure these ports are open on any firewall between the administrator workstations and the NetScaler management IPS.
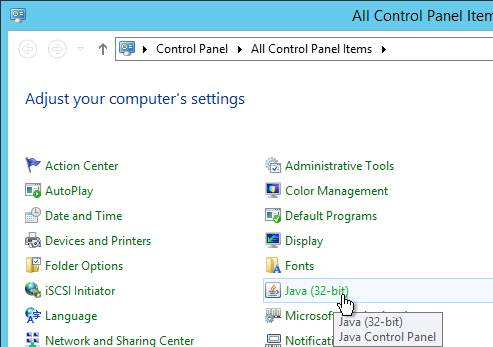
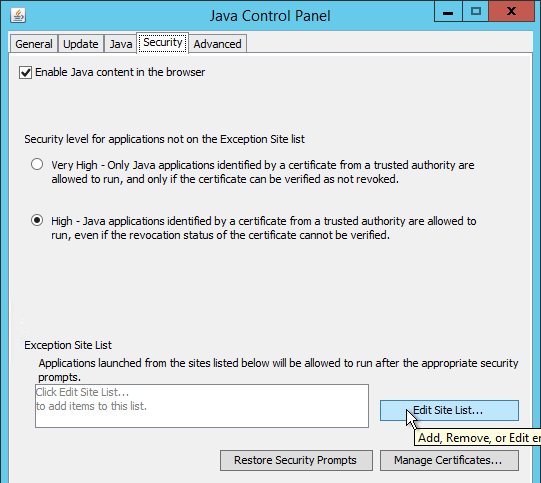
- Go to Control Panel and open the Java applet.
- Switch to the Security
- Click Edit Site List.
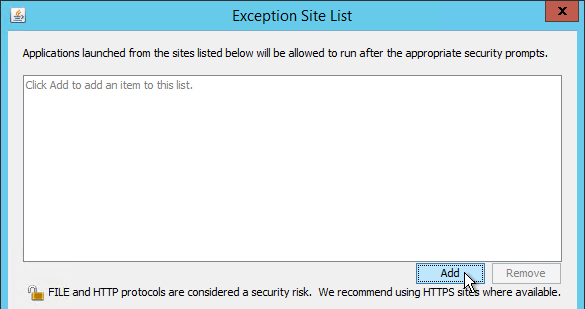
- Click Add.
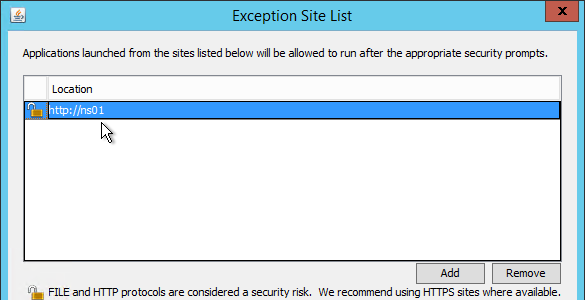
- Type in a URL to a NetScaler management IP. You must prepend http and/or https. The management IP is NSIP and/or SNIP.
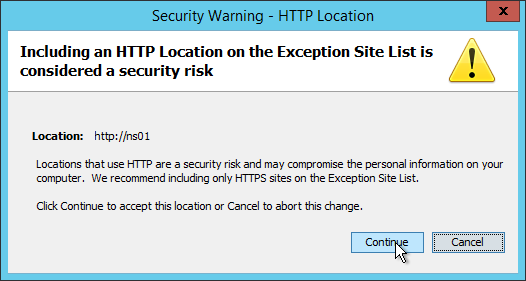
- If you enter an http URL then you will see a warning message. Click Continue.
- Continue adding NetScaler management URLs to the list. Add both http and https so you can use either. Click OK when done.
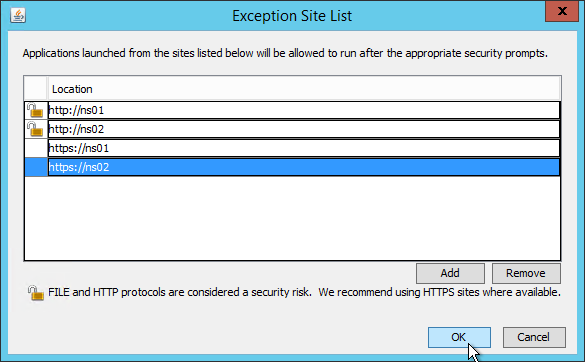
- Then click OK to close the Java Control Panel applet.
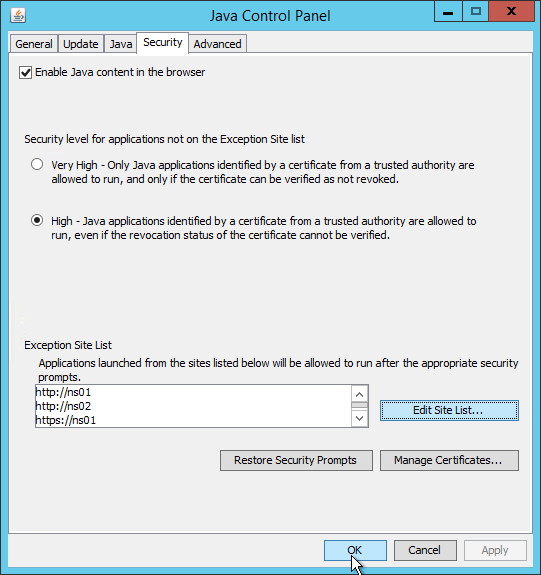
- The Java site exception list is stored in %userprofile%\AppData\LocalLow\Sun\Java\Deployment\security\exception.sites and can be transferred to other users.
VPX – vSphere 5.1 and 5.5 issue
If you are licensed for VPX-1000 or higher, see Citrix Knowledgebase Article CTX139485 (Resource Requirements for Optional Multi-PE Configuration for NetScaler VPX) for correct vCPU and Memory configuration.
From VMware knowledgebase article 2092809: After applying patches to an ESXi 5.1/5.5 host, Citrix NetScaler virtual machine with e1000 vNIC loses network connectivity: After patching your ESXi host to version 5.5 Update 2 (build 2143827) or 5.1 Patch 6 (build 2191751), you experience these symptoms:
- Some Citrix NetScaler virtual machine appliance running the guest Operating System with e1000 vNIC driver loses network connectivity
- Cannot access the console after applying the patches
See VMware’s article for their workaround.
From Citrix Knowledgebase article CTX200278 – NetScaler VPX Loses Network Connectivity on VMware ESXi 5.1.0 2191751 and VMware ESXi 5.5 2143827:
- Log in to the Citrix NetScaler virtual machine appliance as nsroot
- Type
shell. - Type the following command:
cd /flash/boot - Type the following command:
touch /flash/boot/loader.conf.local - Edit (vi) the file conf.local and add the following line to the end of it:
hw.em.txd=512 - Save the changes
- Restart the NetScaler virtual machine appliance
Licensing – VPX Mac Address
To license a NetScaler VPX appliance, you will need its MAC address.
- One method is to look in the GUI.
- In the right pane, look down for the Host Id This is the MAC address you need for license allocation.
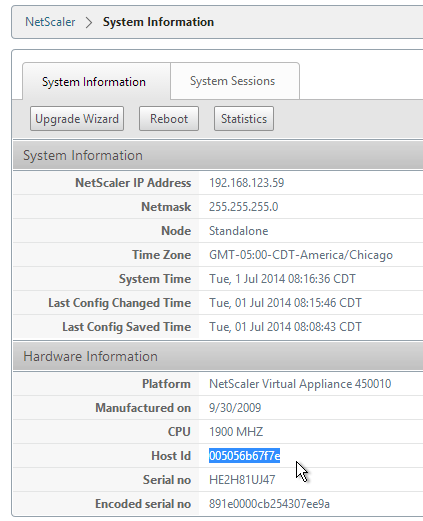
- In the right pane, look down for the Host Id This is the MAC address you need for license allocation.
- Another option is to SSH to the appliance and run
shell.- Then run
lmutil lmhostid. The MAC address is returned.
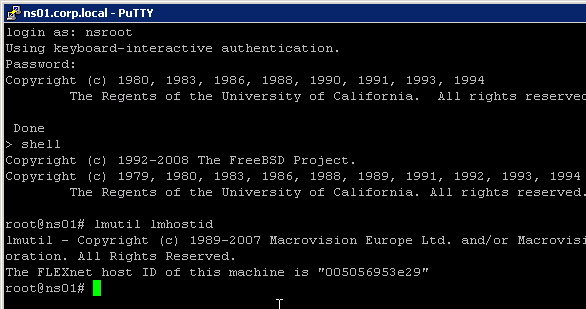
- Then run
Licensing – Citrix.com
- Login to citrix.com.
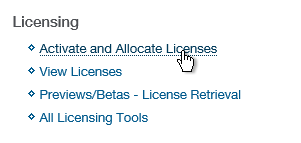
- Click Activate and Allocate Licenses.
- Check the box next to a Citrix NetScaler license and click Continue.
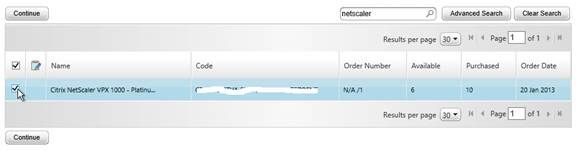
- If this is a NetScaler MPX license then there is no need to enter a host ID for this license so click Continue. If this is a NetScaler VPX license, enter the
lmutil lmhostidMAC address into the Host ID field and click Next.
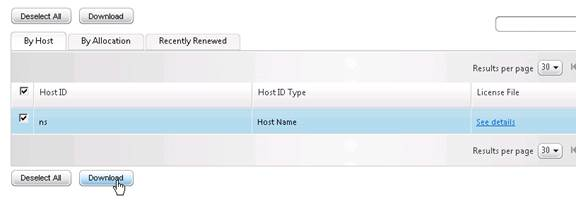
 For a VPX appliance, you can also get the Host ID by looking at the System Information page.
- Click Confirm.

- Click OK when asked to download the license file.
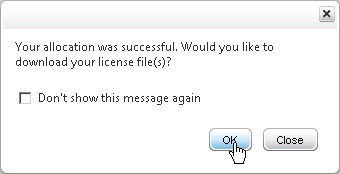
- Click Download.
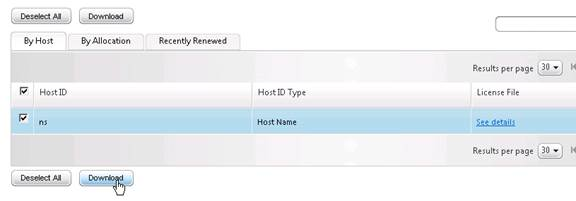
- Click Save and put it somewhere where you can get to it later.
- If you purchased NetScaler Gateway Universal Licenses, allocate them. These licenses can come from XenMobile Enterprise, XenApp/XenDesktop Platinum Edition, NetScaler Platinum Edition, or a la carte.
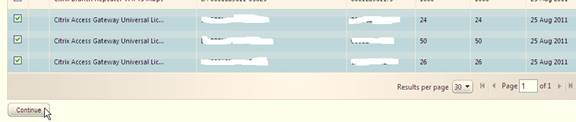
- Enter your appliance hostname as the Host ID for all licenses.
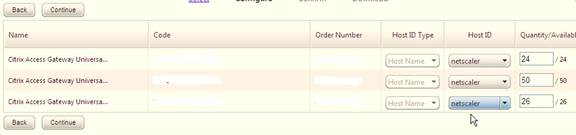
- Click Confirm.
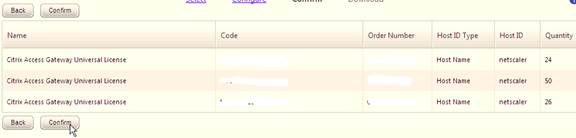
- Click OK when prompted to download your license file.
- Click Download.
- Click Save.
- If you have two appliances in a High Availability pair with different hostnames then you will need to return the NetScaler Gateway Universal licenses and reallocate them to the other hostname.
Install Licenses on Appliance
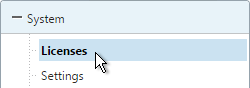
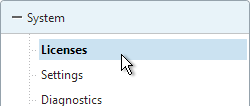
- In the NetScaler Configuration GUI, on the left, expand System and click Licenses.
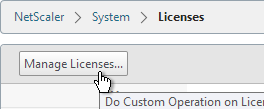
- On the right, click Manage Licenses.
- Click Add New License.
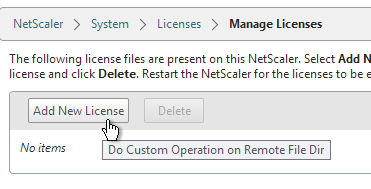 License files are stored in
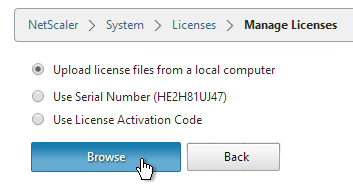
/nsconfig/license. - If you have a license file, select Upload license files from a local computer, and then click Browse.
- Click Reboot when prompted. Login after the reboot.
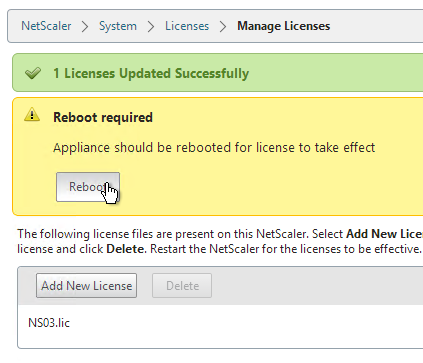
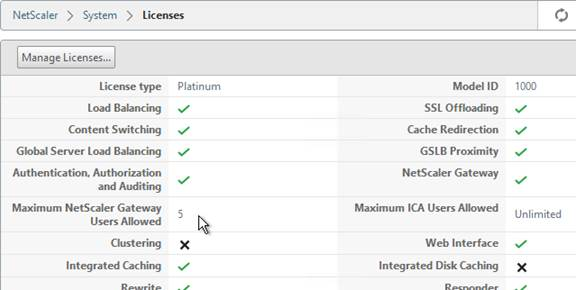
- After rebooting, the Licenses node should look something like this. Notice that Maximum ICA Users Allowed is set to Unlimited.
- Note: the NetScaler SNMP counter allnic_tot_rx_mbits must remain less than the licensed bandwidth or packets will drop.
Upgrade Firmware
Citrix CTX127455 – How to Upgrade Software of the NetScaler Appliances in a High Availability Setup:
- Download firmware. Ask your Citrix Partner or Citrix Support TRM for recommended versions and builds. At the very least, watch the Security Bulletins to determine which versions and builds resolve security issues. You can also subscribe to the Security Bulletins at http://support.citrix.com by clicking the Alerts link on the top right.
Note: Citrix sometimes refreshes firmware builds (e.g 10.1 build 130.13 replaces 10.1 build 130.10). If this happens, make sure you install the refreshed version since the original version can no longer be downloaded. If you have an HA pair running 130.10, and if one of the appliances needs to be replaced, you can’t download 130.10 and thus can’t install it on the new secondary, and thus the config won’t replicate when you join the HA pair since the node firmware versions will be different. If you don’t have access to the 130.10 firmware, your only option is to upgrade the primary to 130.13 before joining the new secondary running 130.13.
- Make sure you Save the config before beginning the upgrade.
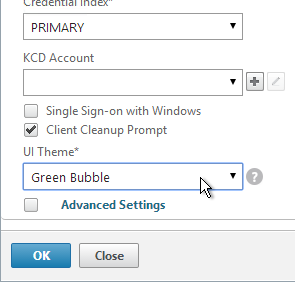
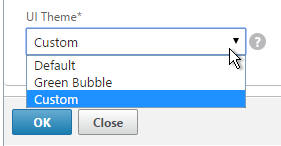
- If you configured NetScaler Gateway to use a Custom theme, change the theme back to Default (or Green Bubble). You will have to re-create the customtheme.tar.gz file after you upgrade.
- Transferring the firmware upgrade file to the appliance will be slow unless you license the appliance first. An unlicensed appliance will reduce the maximum speed to 1 Mbps.
- Start with the Secondary appliance.
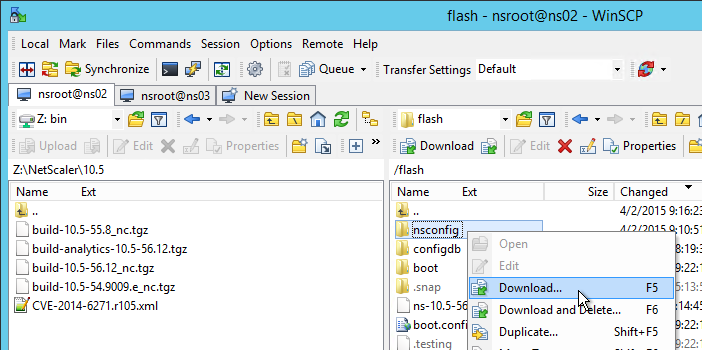
- Before upgrading the appliance, consider using WinSCP or similar to back up the /flash/nsconfig directory.
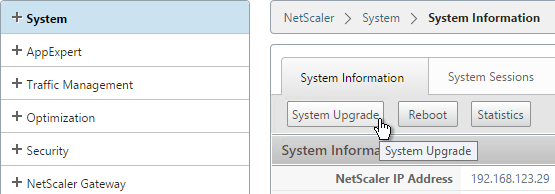
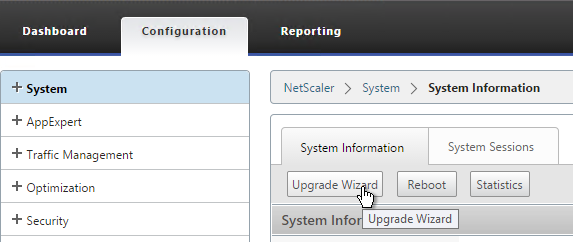
- In the NetScaler GUI, with the top left node (System) selected, click System Upgrade.
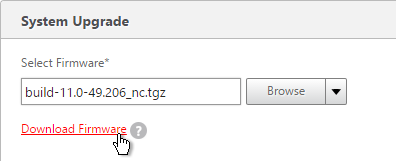
- Browse to the build…tgz file. If you haven’t downloaded firmware yet, then you can click the Download Firmware link.
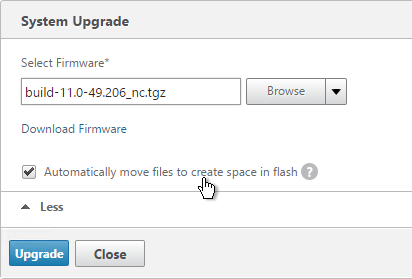
- Click More and then check the box next to Automatically move files to create space. Click Yes to acknowledge the prompt.
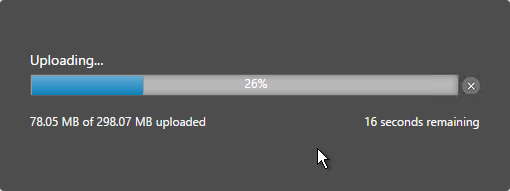
- Click Upgrade.
- The firmware will upload.
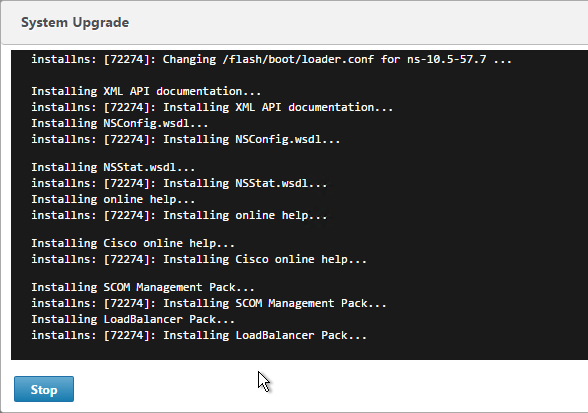
- You should eventually see a System Upgrade window with text in it. It will reboot automatically.
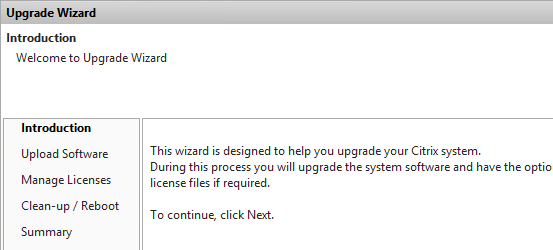
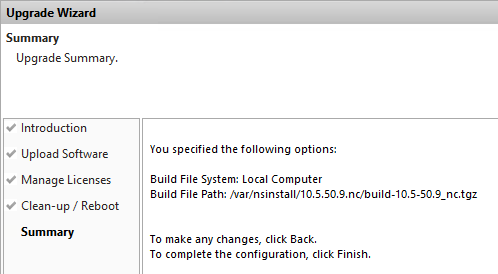
- Or if older than 10.5 build 56, click Upgrade Wizard
- In the Introduction page, click Next.
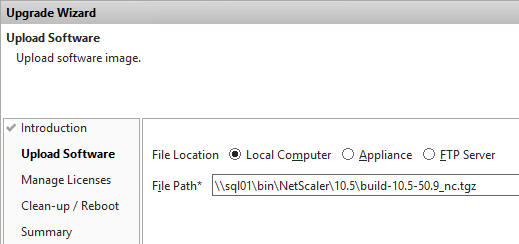
- In the Upload Software page, browse to the build…tgz file and click Next.
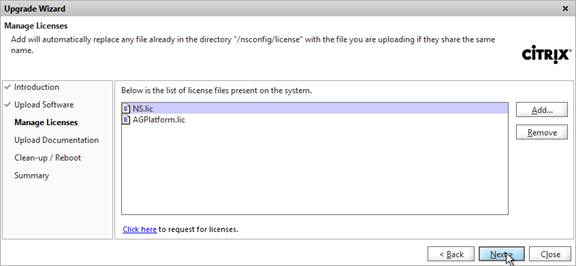
- In the Manage Licenses page, click Next.
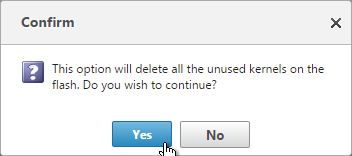
- In the Clean Up / Reboot page, check both boxes and then click Next.
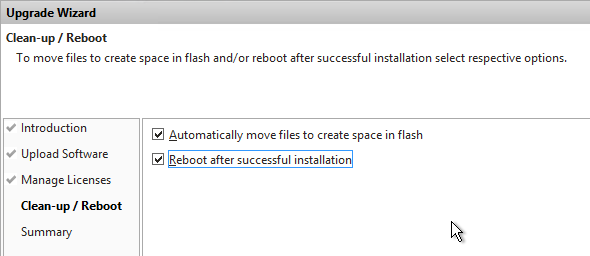
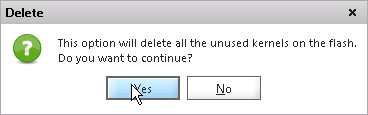
- If you select the option to automatically move files, you will be asked to delete unused kernels. Click Yes.
- In the Summary page, click Finish. The upgrade will begin. Do not disturb your browser session until you see that it is rebooting. It will run several commands after uploading the files.
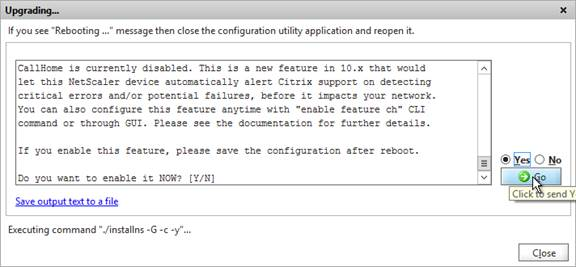
- If you are asked to enable Call Home, select Yes, and click Go.
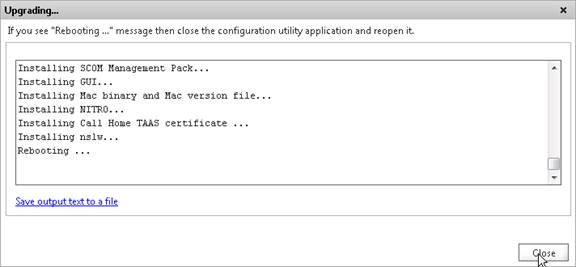
- When you see the message Rebooting… it is then safe to close the window.
- Once the Secondary is done, login and failover the pair.
- Then upgrade the firmware on the former Primary.
To install firmware by using the command-line interface
- To upload the software to the NetScaler Gateway, use a secure FTP client (e.g. WinSCP) to connect to the appliance.
- Create a version directory under
/var/nsinstall(e.g. /var/nsinstall/10.5.63). - Copy the software from your computer to the /var/nsinstall/<version> (e.g. /var/nsinstall/11.5.63) directory on the appliance.
- Open a Secure Shell (SSH) client (e.g. Putty) to open an SSH connection to the appliance.
- At a command prompt, type
shell. - At a command prompt, type
cd /var/nsinstallto change to the nsinstall directory. - To view the contents of the directory, type
ls. - To unpack the software, type
tar -xvzf build_X_XX.tgz, wherebuild_X_XX.tgzis the name of the build to which you want to upgrade. - To start the installation, at a command prompt, type
./installns. - When the installation is complete, restart NetScaler.
- When the NetScaler restarts, at a command prompt type
whatorshow versionto verify successful installation.
High Availability
Configure High Availability as soon as possible so almost all configurations are synchronized across the two appliances. The exceptions are mainly network interface configurations.
High Availability will also sync files between the two appliances. See CTX138748 File Synchronization in NetScaler High Availability Setup for more information.
- Prepare the secondary appliance:
- Configure a NSIP.
- Don’t configure a SNIP. You can click Do It Later to skip the wizard.
- Configure Hostname and Time Zone. Don’t configure DNS since you’ll get those addresses when you pair it.
- License the secondary appliance.
- Upgrade firmware on the secondary appliance. The firmware of both nodes must be identical.
- On the secondary appliance, go to System > High Availability, double-click the local node, and change High Availability Status to STAY SECONDARY. If you don’t do this, then you run the risk of losing your config when you pair the appliances. See Terence Luk Creating a Citrix NetScaler High Availability pair without wiping out an existing configuration for more information.
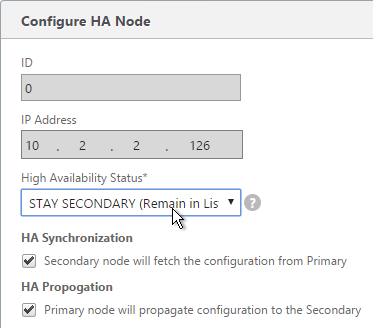
set ha node -hastatus STAYSECONDARY
- On the primary appliance, on the left, expand System, expand Network and click Interfaces.
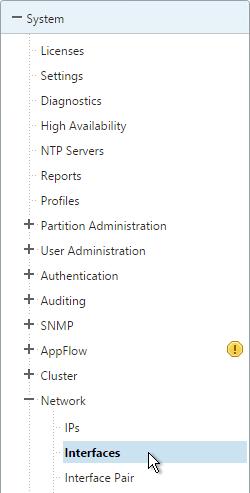
- On the right, look for any interface that is currently DOWN. You need to disable those disconnected interfaces before enabling High Availability. Right-click the disconnected interface, and click Disable. Repeat for the remaining disconnected interfaces.
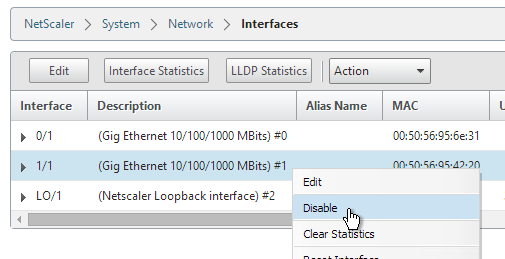
show interface
disable interface 1/1
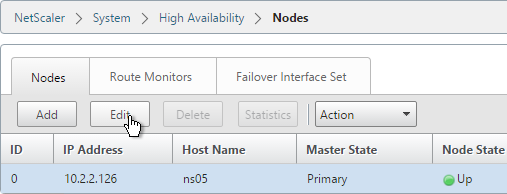
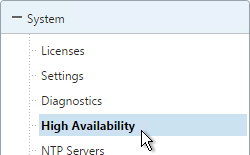
- On the left, expand System, and click High Availability.
- On the right, click Add.
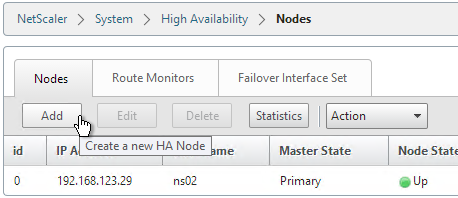
- Enter the other NetScaler’s IP address.
- Enter the other NetScaler’s login credentials, and click Create.
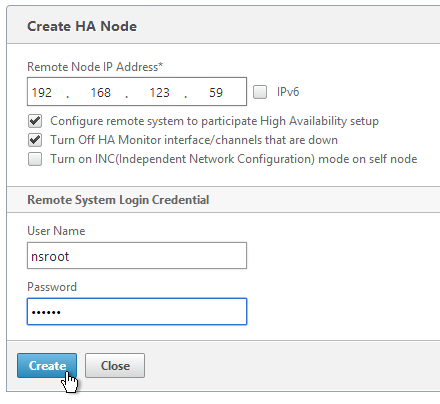
add ha node 1 192.168.123.14
Note: this command must be run separately on each appliance. - If you click the refresh icon near the top right, Synchronization State will probably say IN PROGRESS.
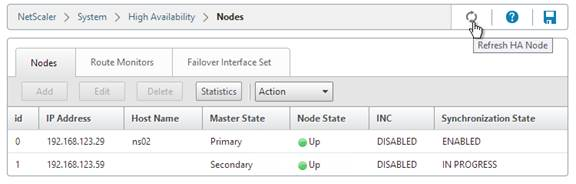
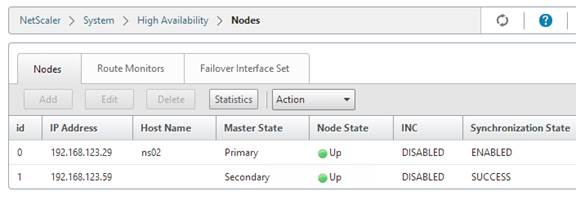
- Eventually it will say SUCCESS.
- To enable Fail-safe mode, on the right, edit Node ID 0 (the local appliance).
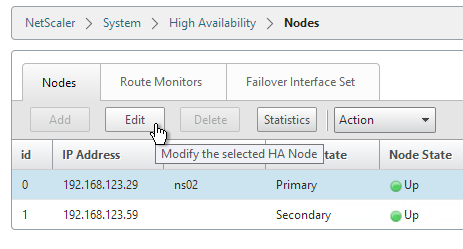
- Under Fail-safe Mode, check the box next to Maintain one primary node even when both nodes are unhealthy. Scroll down and click OK.
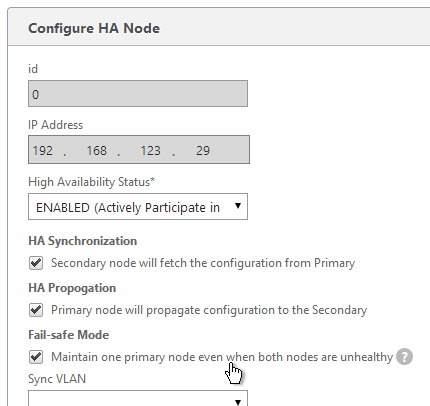
set ha node -failSafe ON
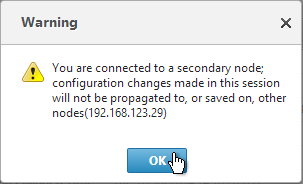
- If you login to the Secondary appliance, you might see a message warning you against making changes. Always apply changes to the Primary appliance.
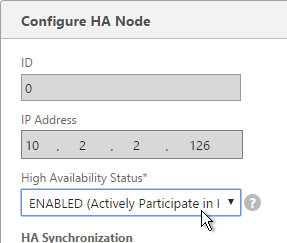
- On the secondary appliance, go to System > High Availability, edit the local node, and change it from STAY SECONDARY to ENABLED.
- From the CLI, run “sh ha node” to see the status. You should see heartbeats on all interfaces. If not, configure VLANs as detailed in the next section.

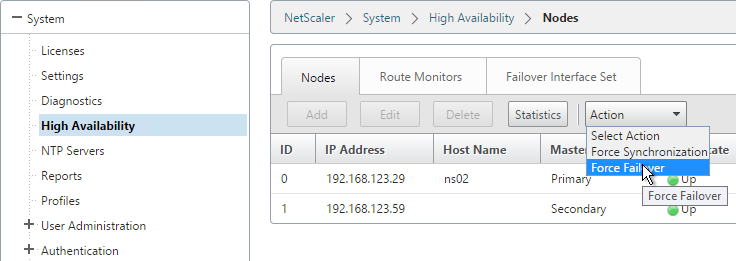
- You can Force Failover of the primary appliance by opening the Actions menu, and clicking Force Failover.
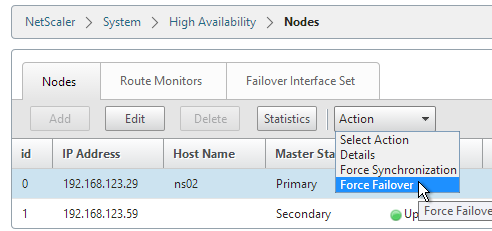
force ha failover
If your firewall (e.g. Cisco ASA) doesn’t like the Gratuitous ARP, see CTX112701 – The Firewall Does not Update the Address Resolution Protocol Table
Multiple Interfaces – VLANs
Citrix CTX214033 Networking and VLAN Best Practices for NetScaler discusses many of the same topics detailed in this section.
You should never connect multiple interfaces to a single VLAN unless you are bonding the interfaces using LACP, Channel, or the new Redundant Interface Set feature in 10.5.e. See Webinar: Troubleshooting Common Network Related Issues with NetScaler
NetScaler VPX defaults to two connected interfaces, so if you only have one subnet, disconnect one of those interfaces.
Common interface configuration: Here is a common NetScaler networking configuration for a NetScaler that is connected to both internal and DMZ.
Note: If the appliance is connected to both DMZ and internal then be aware that this configuration essentially bypasses (straddles) the DMZ-to-internal firewall. That’s because if a user connects to a public/DMZ VIP, then NetScaler could use an internal SNIP to connect to the internal server. A more secure approach is to have different appliances for internal and DMZ. Or use NetScaler SDX, partitioning, or traffic domains.
- 0/1 connected to a dedicated management network. NSIP is on this network.
- 0/1 is not optimized for high throughput so don’t put data traffic on this interface. If you don’t have a dedicated management network, then put your NSIP on one of the other interfaces (1/1, 10/1, etc.) and don’t connect any cables to 0/1.
- To prevent NetScaler from using this interface for outbound data traffic, don’t put a SNIP on this network, and configure the default gateway to use a different data network. However, if there’s no SNIP, and if default gateway is on a different network, then there will be asymmetric routing for management traffic since inbound is 0/1 but outbound is LA/1. To work around this problem, enable Mac Based Forwarding. Or create a Policy Based Route.
- It’s easiest if the switch port for this interface is an Access Port (untagged). If VLAN tagging is required, then NSVLAN must be configured on the NetScaler.
- 10/1 and 10/2 in a LACP port channel (LA/1) connected to internal VLAN(s). Static routes to internal networks through a router on one of these internal VLANs.
- If only one internal VLAN, configure the switch ports/channel as an Access Port.
- If multiple internal VLANs, configure the switch ports/channel as a Trunk Port. Set one of the VLANs as the channel’s Native VLAN so it doesn’t have to be tagged.
- If the networking team is unwilling to configure a Native VLAN on the Trunk Port, then NetScaler needs special configuration (tagall) to ensure HA heartbeat packets are tagged.
- 1/1 and 1/2 in a LACP port channel (LA/2) connected to DMZ VLAN(s). Default gateway points to a router on a DMZ VLAN so replies can be sent to Internet clients.
- If only one internal VLAN, configure the switch ports/channel as an Access Port.
- If multiple internal VLANs, configure the switch ports/channel as a Trunk Port. Set one of the VLANs as the channel’s Native VLAN so it doesn’t have to be tagged.
- If the networking team is unwilling to configure a Native VLAN on the Trunk Port, then NetScaler needs special configuration (tagall) to ensure HA heartbeat packets are tagged.
SNIPs: You will need one SNIP for each connected subnet. VLAN objects (tagged or untagged) bind the SNIPs to particular interfaces. NetScaler uses the SNIP’s subnet mask to assign IP addresses to particular interfaces.
NSIP: The NSIP subnet is special so you won’t be able to bind it to a VLAN. Use the following SNIP/VLAN method for any subnet that does not have the NSIP. The remaining interfaces will be in VLAN 1, which is the VLAN that the NSIP is in. VLAN 1 is only locally significant so it doesn’t matter if the switch is configured with it or not. Just make sure the switch has a native VLAN configured, or configure the interface as access port. If you require trunking of every VLAN, including the NSIP VLAN, then additional configuration is required (NSVLAN or Tagall).
To configure multiple connected subnets:
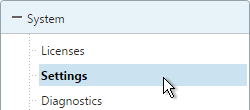
- On the left, expand System, and click Settings.
- On the right, in the left column, click Configure modes.
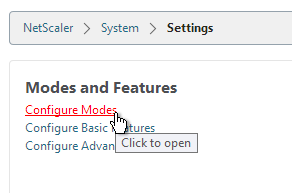
- Check the box next to MAC Based Forwarding and click OK. This configures the NetScaler to respond on the same interface the request came in on and thus bypasses the routing table. This setting can work around misconfigured routing tables. More info on MAC Based Forwarding can be found at Citrix CTX1329532 FAQ: Citrix NetScaler MAC Based Forwarding (MBF).

enable mode mbf
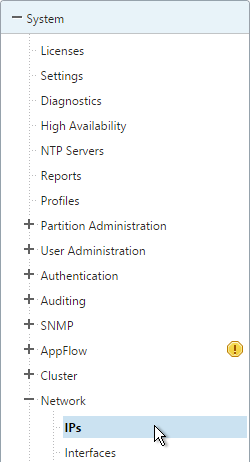
- Add a subnet IP for every network the NetScaler is connected to, except the dedicated management network. Expand System, expand Network, and click IPs.
- On the right, click Add.
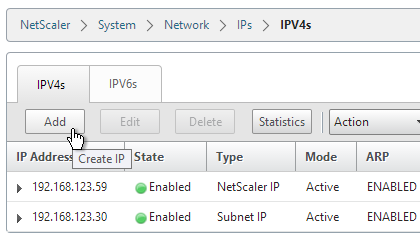
- Enter the Subnet IP Address for this network. This is the source address the NetScaler will use when communicating with any other service on this network. The Subnet IP can also be referred to as the Interface IP for the network. You will need a separate SNIP for each connected network (VLAN).
- Enter the netmask for this network. When you create a VLAN object later, all IPs on this subnet will be bound to an interface.
- Ensure the IP Type is set to Subnet IP. Scroll down.
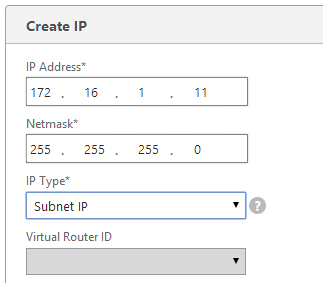
add ns ip 172.16.1.11 255.255.255.0 -type SNIP
- Under Application Access Controls decide if you want to enable GUI management on this SNIP. This is particularly useful for High Availability pairs, because when you point your browser to the SNIP only the primary appliance will respond. However, enabling management access on the SNIP can be a security risk, especially if this is a SNIP for the DMZ network.
- Click Create when done. Continue adding SNIPs for each connected network (VLAN).
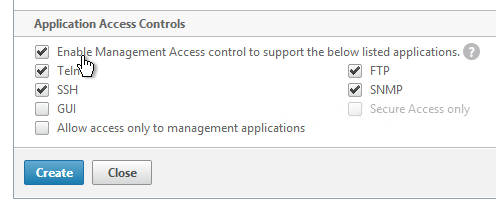
set ns ip 172.16.1.11 -mgmtAccess ENABLED -telnet DISABLED -ftp DISABLED
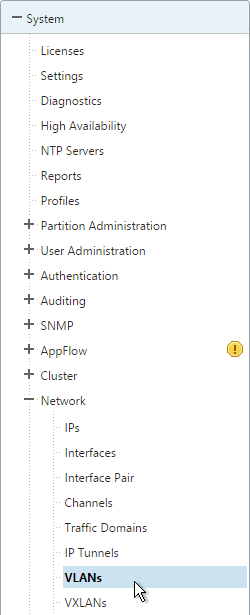
- On the left, expand System, expand Network and click VLANs.
- On the right, click Add.
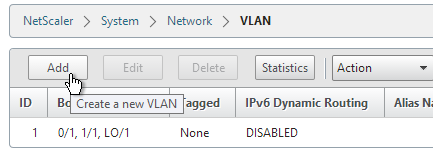
- Enter a descriptive VLAN ID. The actual VLAN ID only matters if you intend to tag the traffic. If not tagged then any ID will work.
- Check the box next to one physical interface or channel (e.g. LA/1) that is connected to the network.
- If this is a trunk port, select Tagged if the switch port/channel is expecting the VLAN to be tagged.
- If your switches do not allow untagged packets then you will need to use the tagall interface option to tag NetScaler High Availability heartbeat packets. See CTX122921 – Citrix NetScaler Interface Tagging and Flow of High Availability Packets
- If you don’t tag the VLAN, then the NetScaler interface/channel is removed from VLAN 1 and instead put in this VLAN ID.
- Switch to the IP Bindings tab.
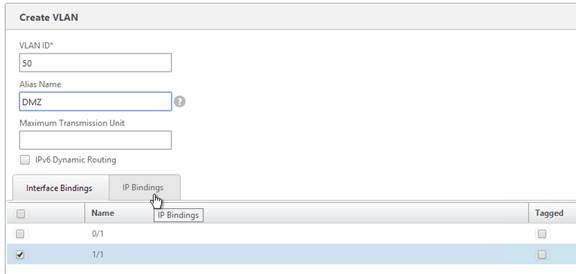
- Check the box next to the Subnet IP for this network. This lets NetScaler know which interface is used for which IP subnet. Click Create when done.
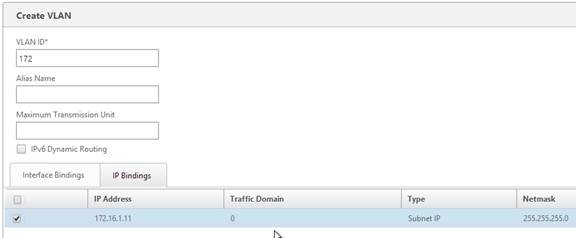
add vlan 50
bind vlan 50 -ifnum 1/1 -IPAddress 172.16.1.11 255.255.255.0
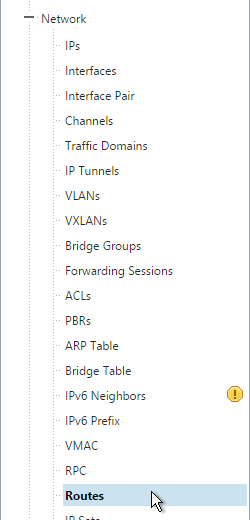
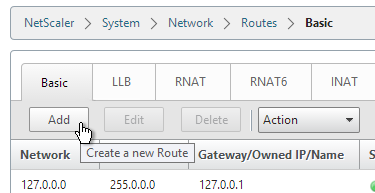
- The default route should use the router in the DMZ, not the internal router. Most likely the default route is set to an internal router. On the left, expand System, expand Network, and click Routes.
- On the right, click Add.
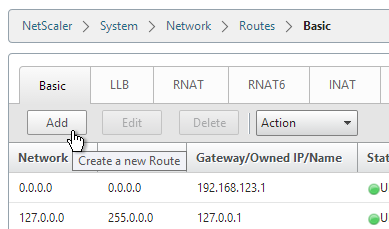
- Internal networks are only accessible through an internal router. Add a static route to the internal networks, and set the Gateway to an internal router. Then click Create.
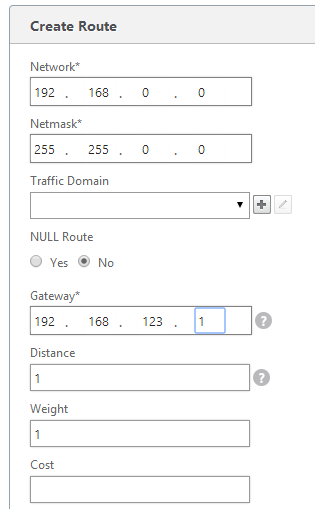
add route 192.168.0.0 255.255.0.0 192.168.123.1
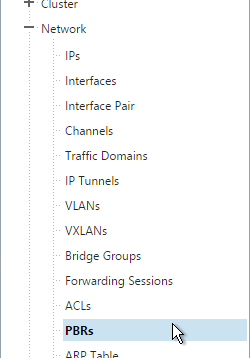
- Before deleting the existing default route, either enable Mac Based Forwarding, or create a Policy Based Route, so that the replies from NSIP can reach your machine. To create a PBR, go to System > Network > PBRs.
- The source IP is the NSIP, and next hop is a router on the same network as the NSIP. Destination is not needed.
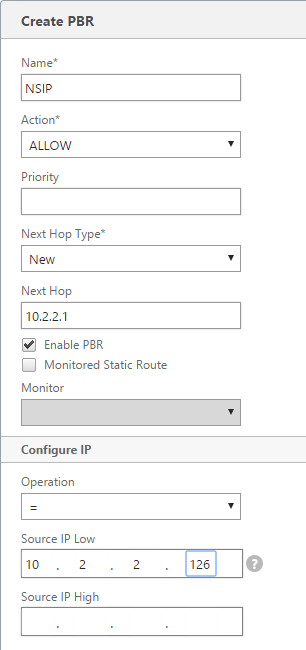
- Then open the Action menu, and click Apply.
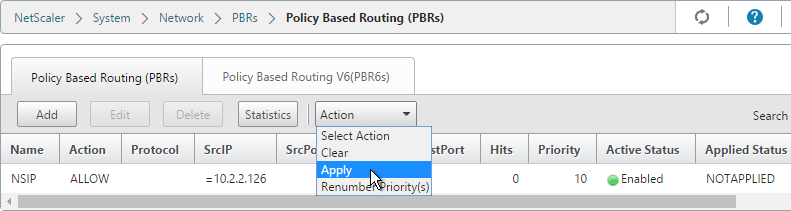
add ns pbr NSIP ALLOW -srcIP = 10.2.2.59 -nextHop 10.2.2.1
apply ns pbrs
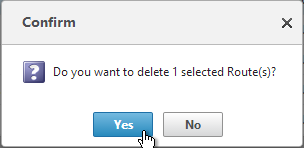
- Go back to System > Network > Routes. On the right, delete the 0.0.0.0 route. Don’t do this unless the NetScaler has a route to the IP address of the machine you are running the NetScaler Configuration Utility on.
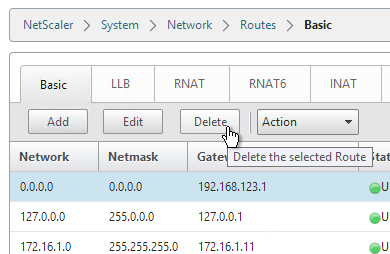
rm route 0.0.0.0 0.0.0.0 192.168.123.1
- Then click Add.
- Set the Network to 0.0.0.0, and the Netmask to 0.0.0.0.
- Make sure NULL Route is set to No.
- Enter the IP address of the DMZ (or data) router, and click Create.
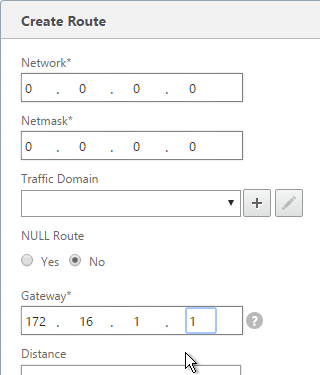
add route 0.0.0.0 0.0.0.0 172.16.1.1
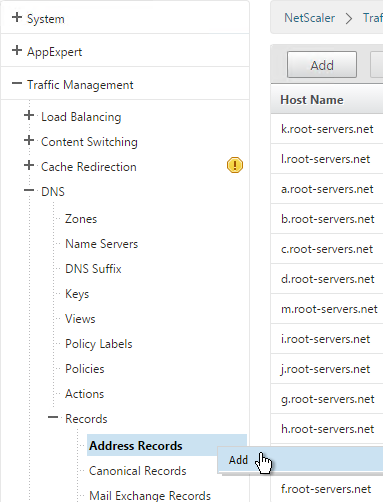
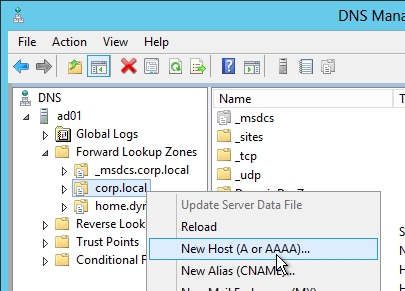
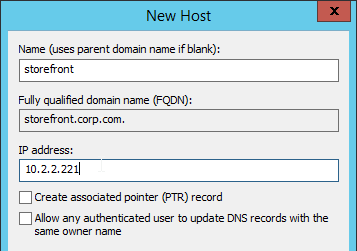
DNS Servers
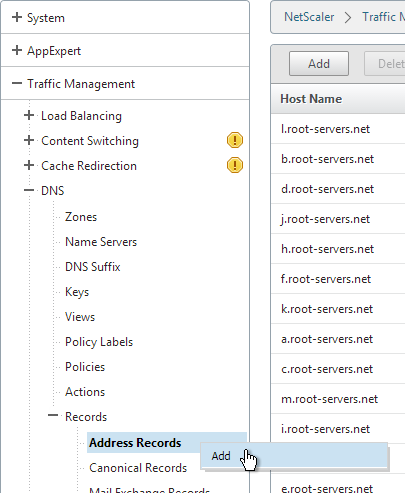
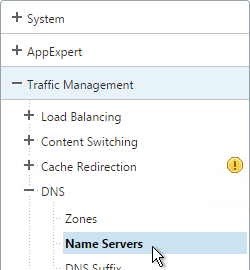
- To configure DNS servers, expand Traffic Management, expand DNS, and click Name Servers.
- On the right, click Add.
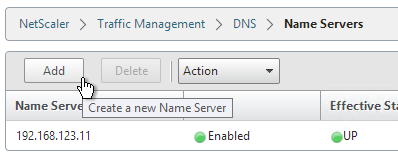
- Enter the IP address of a DNS server and click Create.
- Note: The NetScaler must be able ping each of the DNS servers or they will not be marked as UP. The ping originates from the SNIP.
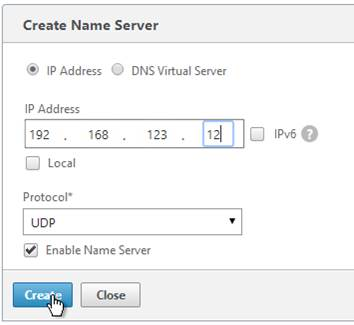
add dns nameServer 192.168.123.11
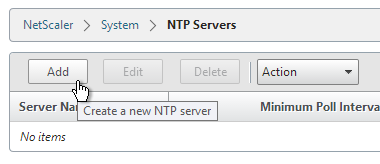
NTP Servers
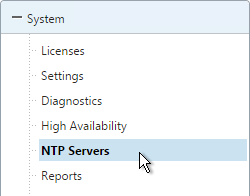
- On the left, expand System, and click NTP Servers.
- On the right, click Add.
- Enter the IP Address of your NTP Server (or pool.ntp.org) and click Create.
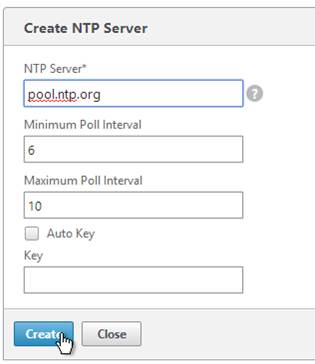
add ntp server pool.ntp.org - Open the Action menu and click NTP Synchronization.
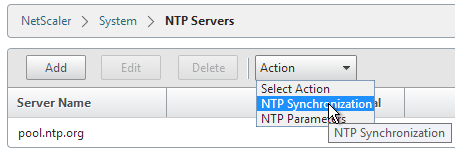
- Select ENABLED and click OK.
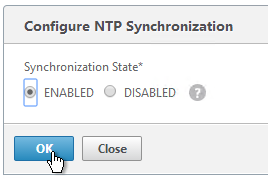
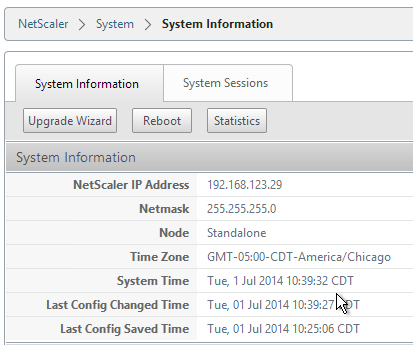
enable ntp sync - You can click the System node to view the System Time.
- If you need to manually set the time, SSH (Putty) to the NetScaler appliances. Run date to set the time. Run date –help to see the syntax.
- Ntpdate –u pool.ntp.org will cause an immediate NTP time update.
Citrix Knowledgebase article CTX200286 – NTP Configuration on NetScaler to Avoid Traffic Amplification Attack:
- Replace the following line in /etc/ntp.conf file, if it exists:
> restrict default ignore
- Add the following lines in file /etc/ntp.conf:
# By default, exchange time with everybody, but don't allow configuration:
restrict -4 default kod notrap nomodify nopeer noquery
restrict -6 default kod notrap nomodify nopeer noquery

# Local users may interrogate the ntp server more closely:

restrict 127.0.0.1
restrict ::1
- Restart NTP using the following commands:
> shell
root@ns# ps -aux |grep "ntp"
root@ns# kill <PID obtained from step above>
root@ns# /usr/sbin/ntpd -g -c /flash/nsconfig/ntp.conf
Citrix Knowledgebase Article CTX200355 – Citrix Security Advisory for NTP Vulnerabilities: By default, NTP is disabled on the NetScaler and, as such, is not vulnerable to CVE-2014-9293, CVE-2014-9294, CVE-2014-9295 and CVE-2014-9296. However, in deployments where customers have enabled NTP on the appliance, it is likely that these vulnerabilities will impact NetScaler.
We recommend that customers apply the following remediation:
Open the NetScaler’s ntp.conf file in /etc and add the following lines:
restrict -4 default notrap nopeer nomodify noquery
restrict -6 default notrap nopeer nomodify noquery
In addition to adding the above two lines, all other ‘restrict‘ directives should be reviewed to ensure that they contain both ‘nomodify‘ and ‘noquery‘ and that the file contains no ‘crypto‘ directives.
When this editing is complete, save the file and copy it to the /nsconfig directory. The NTP service must then be restarted for the changes to take effect. As with all changes, Citrix recommends that this is evaluated in a test environment prior to releasing to production.
SYSLOG Server
Citrix CTX120609 NetScaler Log Rotation and Configuration Using Newsyslog
The NetScaler will by default store a few syslogs on the local appliance. You can create a syslog policy to also send the syslog entries to an external server, like Citrix Command Center.
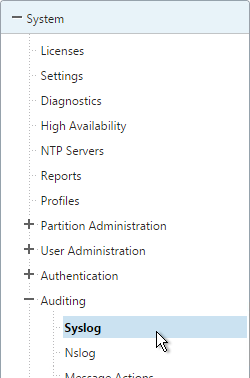
- On the left, expand System, expand Auditing, and click Syslog.
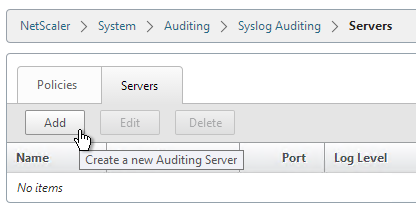
- On the right, switch to the Servers tab and click Add.
- Enter a name for the Syslog server.
- Specify the IP Address of the SYSLOG server, 514 as the port, and the Log Levels you’d like to send to it.
- Check the box for TCP Logging if you want the client IP. Note: TCP Logging requires significant disk space on the Syslog server.
- Select your desired Time Zone and then click Create.
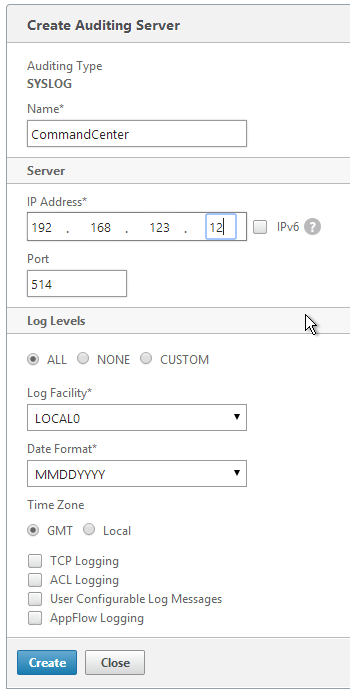
add audit syslogAction CommandCenter 192.168.123.12 -logLevel ALL -timeZone LOCAL_TIME
- On the right, switch to the Policies tab, and then click Add.

- Give the policy a descriptive name, select the Syslog server, and then click Create.
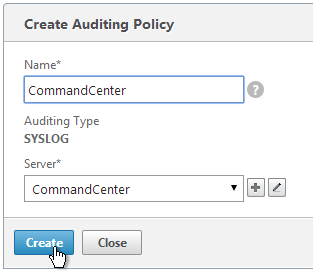
add audit syslogPolicy CommandCenter ns_true CommandCenter
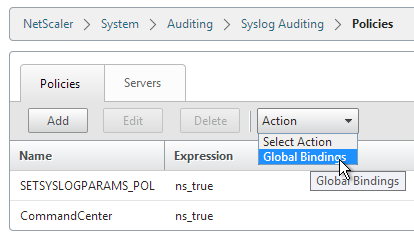
- While still on the Policies tab, open the Actions menu and click Global Bindings.
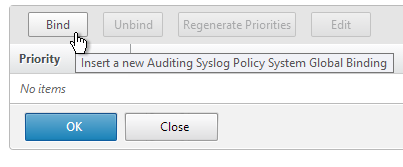
- Click Bind.
- Check the box next to the Syslog policy you want to bind and click Insert.
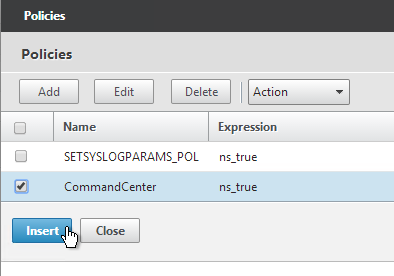
- Then click OK.
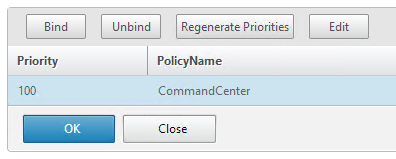
bind system global CommandCenter -priority 100
SNMP – MIB, Traps, and Alarms
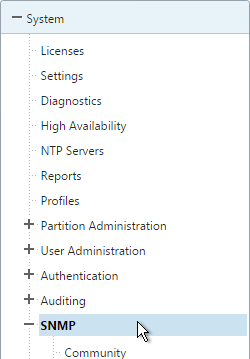
- On the left, expand System, and click SNMP.
- On the right, click Change SNMP MIB.
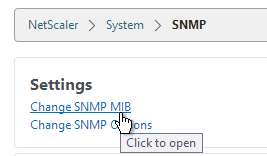
- Change the fields as desired. Your SNMP tool (e.g. NetScaler Management and Analytics System) will read this information. Click OK.
- This configuration needs to be repeated on the other node.
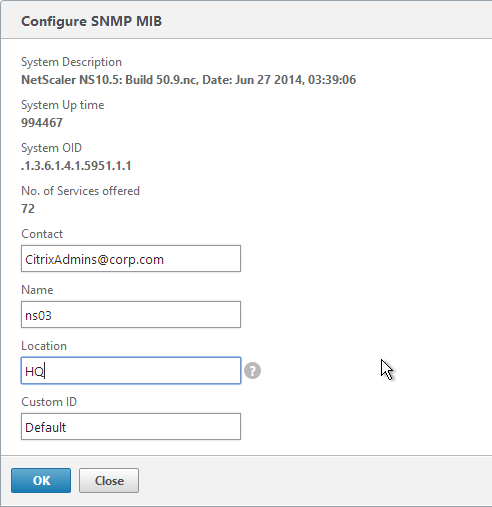
set snmp mib -contact NSAdmins@corp.com -name ns02 -location Corp
- Expand System, expand SNMP, and click Community.
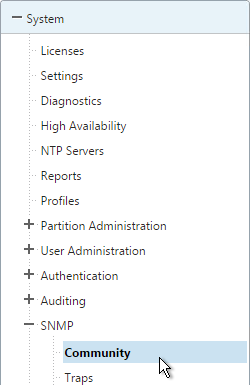
- On the right, click Add.

- Specify a community string and the Permission and click Create.
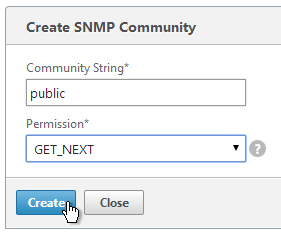
add snmp community public GET
- On the left, under SNMP, click Traps.
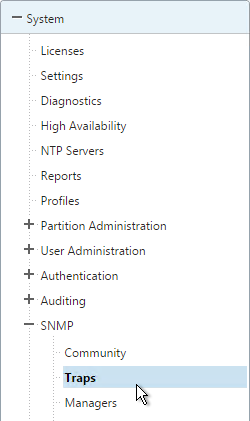
- On the right, click Add.

- Specify a trap destination and Community Name and click Create.
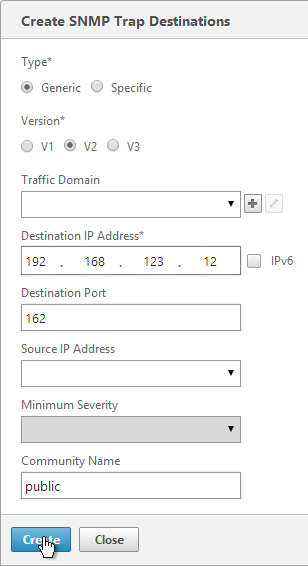
add snmp trap generic 192.168.123.12 -communityName public
add snmp trap specific 192.168.123.12 -communityName public
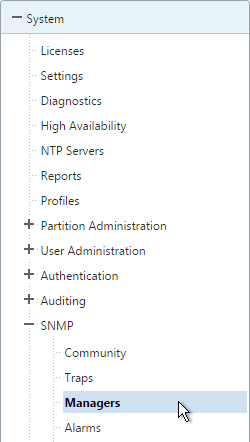
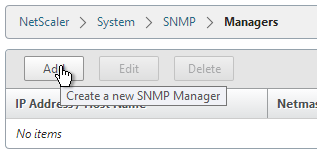
- On the left, under SNMP, click Managers.
- On the right, click Add. Note: if you do not add a manager then the NetScaler will accept SNMP queries from all SNMP Managers on the network.
- Change the selection to Management Network.
- Specify the IP of the Management Host and click Create.
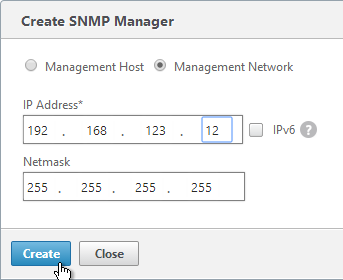
add snmp manager 192.168.123.12
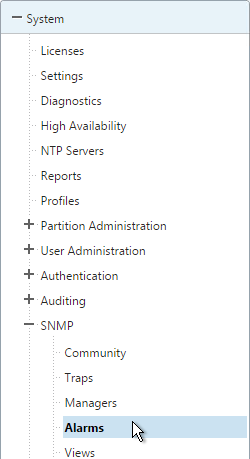
- The Alarms node allows you to enable SNMP Alarms and configure thresholds.
- You can open an alarm to set thresholds. For example, CPU-USAGE can be set to 90% alarm and 50% normal with a Critical severity.
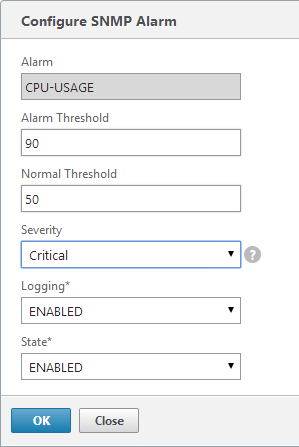
set snmp alarm CPU-USAGE -thresholdValue 90 -normalValue 50 -severity Critical
- You can also configure the MEMORY alarm.
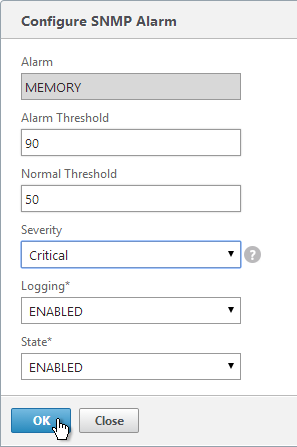
set snmp alarm MEMORY -thresholdValue 90 -normalValue 50 -severity Critical
From http://www.slideshare.net/masonke/net-scaler-tcpperformancetuningintheaolnetwork: In addition to the usual OIDs, we have found these very useful to warn of potential problems.
- ifTotXo?Sent – .1.3.6.1.4.1.5951.4.1.1.54.1.43
- ifnicTxStalls – .1.3.6.1.4.1.5951.4.1.1.54.1.45
- ifErrRxNoBu?s – .1.3.6.1.4.1.5951.4.1.1.54.1.30
- ifErrTxNoNSB – .1.3.6.1.4.1.5951.4.1.1.54.1.31
Call Home
Citrix Blog Post – Protect Your NetScaler From Disaster With Call Home!: If you have a physical NetScaler (MPX or SDX) with an active support contract, you many optionally enable Call Home to automatically notify Citrix Technical Support of hardware and software failures.
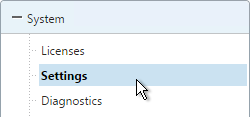
- On the left, expand System and click Diagnostics.
- On the right, in the left column, in the Technical Support Tools section, click Call Home.
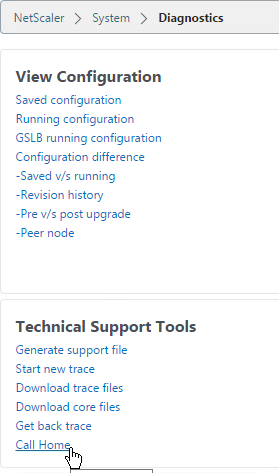
- Check the box next to Enable Call Home.
- Optionally enter an email address to receive notifications from Citrix Technical Support. Click OK.
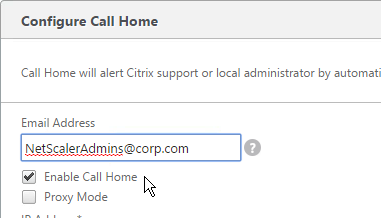
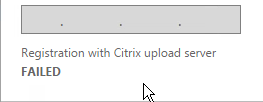
- If you go back into Call Home, it should indicate if registration succeeded or failed. Successful registration requires an active support contract.
Change nsroot Password
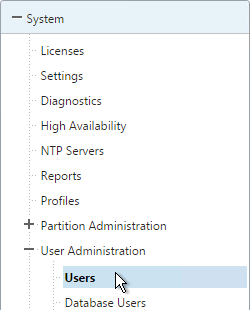
- Expand System, expand User Administration and click Users.
- On the right, select nsroot, and click Change Password.
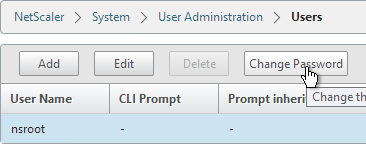
- Specify a new password and click OK.
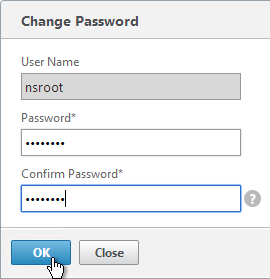
set system user nsroot Passw0rd
TCP, HTTP, SSL, and Security Settings
Citrix Knowledgebase articles:
- How to Configuring the Rate Limiting Feature of a NetScaler Appliance to Mitigate a DDoS Attack
- How to Use NetScaler Appliance to Avoid Layer 7 DDoS Attacks
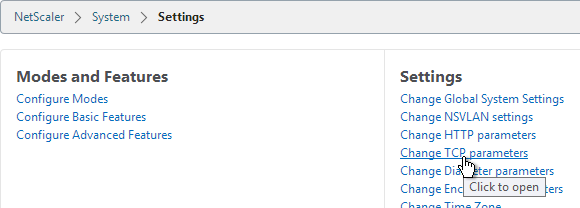
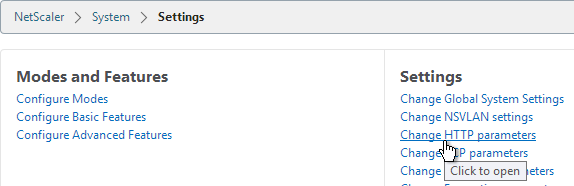
- On the left, expand System and click Settings.
- On the right side of the right pane, click Change TCP parameters.
- Check the box for Window scaling (near the top).
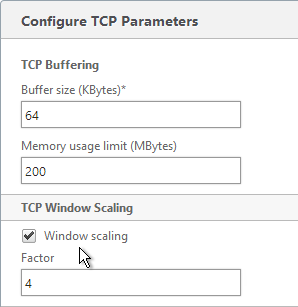
- Scroll down and check the box for Selective Acknowledgement. Click OK.
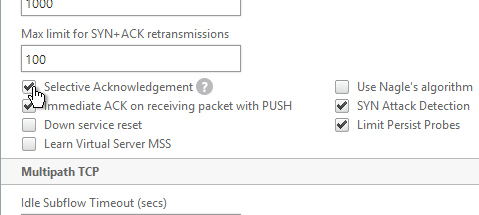
set ns tcpParam -WS ENABLED -SACK ENABLED
- On the right, click Change HTTP parameters.
- Under Cookie, change the selection to Version1. This causes NetScaler to set Cookie expiration to a relative time instead of an absolute time.

set ns param -cookieversion 1
- Check the box next to Drop invalid HTTP requests and click OK.
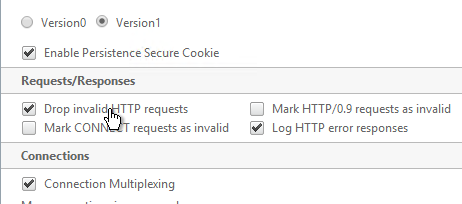
set ns httpParam -dropInvalReqs ON
- You can run the following command to see statistics on the dropped packets:
nsconmsg -g http_err_noreuse_ -d stats
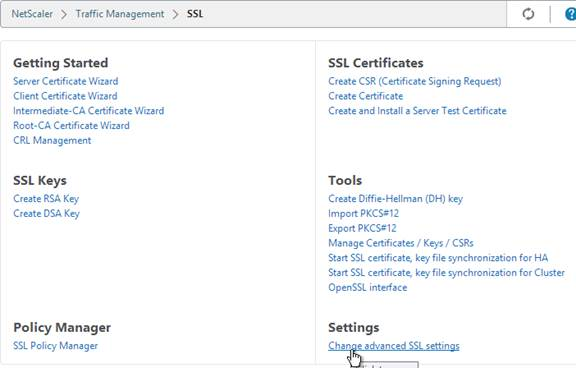
- On the left, under Traffic Management, click SSL.
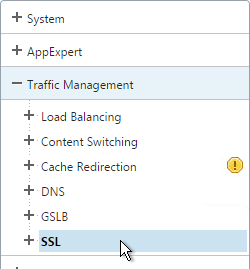
- On the right, in the right column, click Change advanced SSL settings.
- Change the Deny SSL Renegotiation selection to NONSECURE. Click OK.
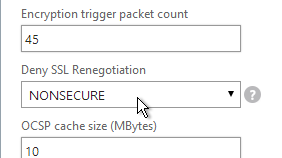
set ssl parameter -denySSLReneg NONSECURE
- See CTX209398 Addressing false positives from CBC and MAC vulnerability scans of SSHD to harden SSHD by editing /nsconfig/sshd_config with the following. Then run
kill -HUP `cat /var/run/sshd.pid`to restart SSHD.Ciphers aes128-ctr,aes192-ctr,aes256-ctr MACs hmac-sha1,hmac-ripemd160
- Implement Responder policies to prevent Shellshock attack against back-end web servers. See Citrix CTX200277 NetScaler Defends Against Shellshock Attack.
add audit messageaction ShellShock_Log CRITICAL "\"The request was sent from \" +CLIENT.IP.SRC + \" Bash Code Injection Vulnerability\"" -bypassSafetyCheck YES

add responder policy ShellShock_policy "HTTP.REQ.FULL_HEADER.REGEX_MATCH(re/\(\)\s*{/) || HTTP.Req.BODY(1000).REGEX_MATCH(re/\(\)\s*{/) || HTTP.REQ.URL.QUERY.REGEX_MATCH(re/\(\)(\s*|\++){/) || HTTP.REQ.BODY(1000).REGEX_MATCH(re#%28%29[+]*%7B#)" DROP ?logAction ShellShock_Log

bind responder global ShellShock_policy 10 END -type REQ_DEFAULT
The following security configurations are detailed by Jason Samuel at Mitigating DDoS and brute force attacks against a Citrix Netscaler Access Gateway:
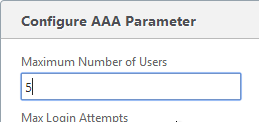
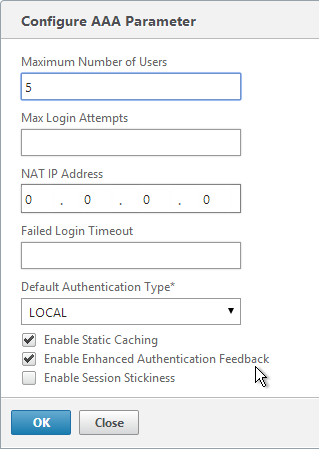
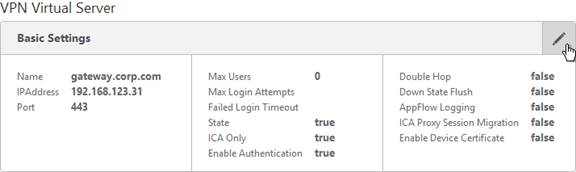
- Maximum logon attempts on NetScaler Gateway Virtual Server
- Rate Limiting for IP.SRC and HTTP.REQ.URL.
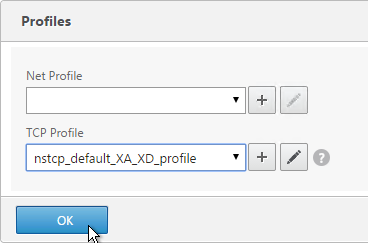
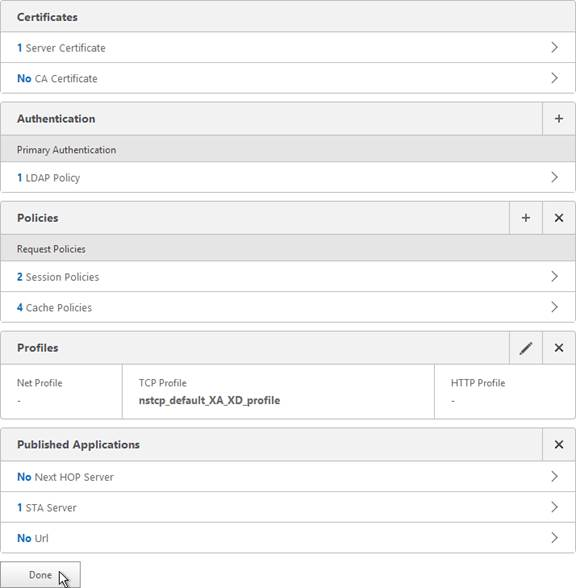
- nstcp_default_XA_XD_profile TCP profile on the NetScaler Gateway Virtual Server.
- Syslog logging
- External website monitoring
- Obfuscate the Server header in the HTTP response
- Disable management access on SNIPs
- Change nsroot strong password, use LDAP authentication, audit local accounts
- Don’t enable Enhanced Authentication Feedback
- SSL – disable SSLv3, deny SSL renegotiation, enable ECDHE ciphers, disable RC4 ciphers. Also see Anton van Pelt Make your NetScaler SSL VIPs more secure (Updated) .
- 2-factor authentication
- Command Center and Insight Center
- Review IPS/IDS & Firewall logs
Management Authentication
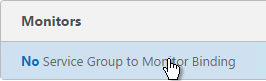
Load balancing of authentication servers is strongly recommended since during an authentication attempt only one LDAP server is chosen. If you instead bound multiple LDAP servers it would try all of them and for incorrect passwords will lock out the user sooner than expected.
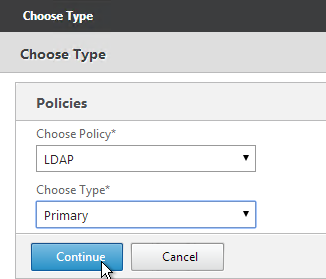
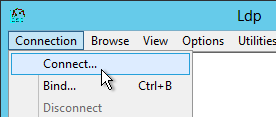
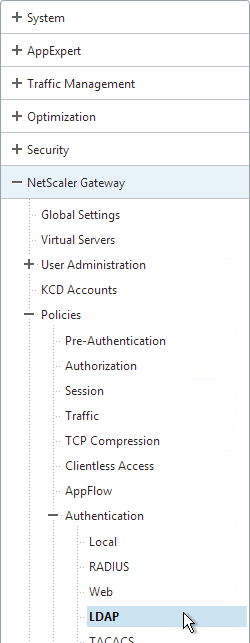
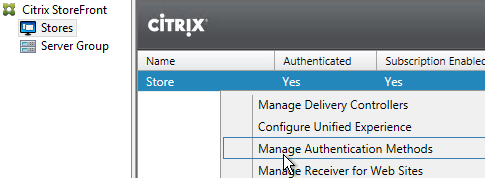
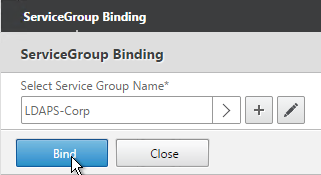
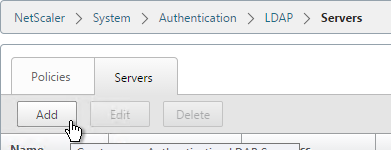
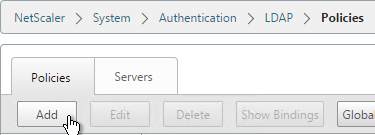
- Expand System, expand Authentication, and then click LDAP.

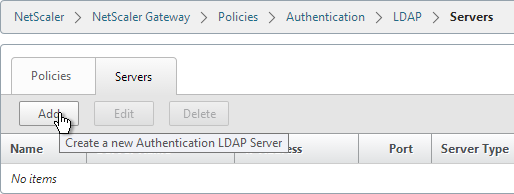
- On the right, switch to the Servers tab. Then click Add.
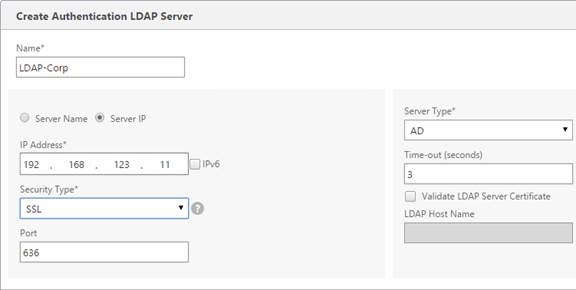
- Enter LDAPS-Corp-Mgmt or similar as the name. If you have multiple domains, you’ll need a separate LDAP Server per domain so make sure you include the domain name. Also, the LDAP policy used for management authentication will be different than the LDAP policy used for NetScaler Gateway.
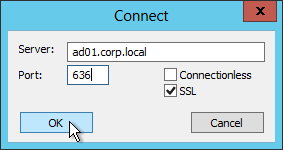
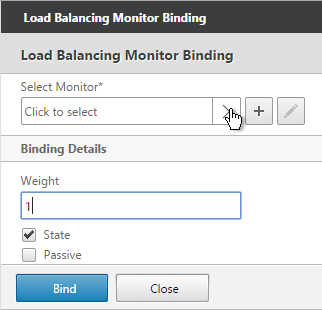
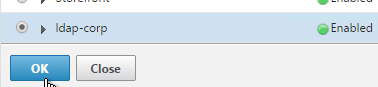
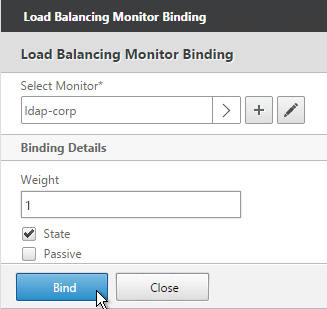
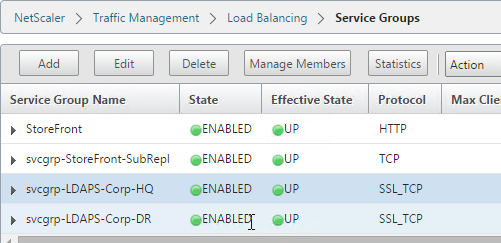
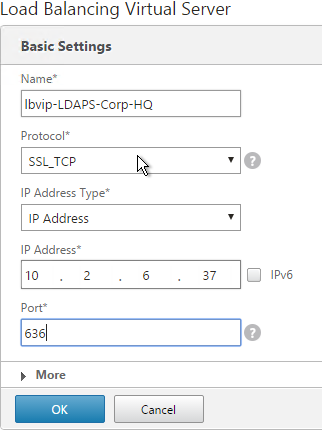
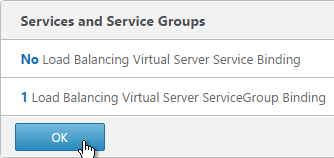
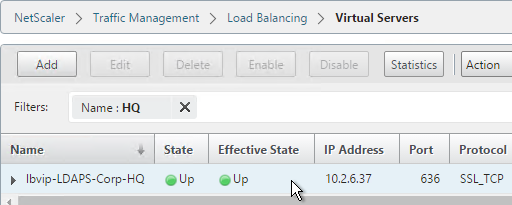
- Change the selection to Server IP. Enter the VIP of the NetScaler load balancing vServer for LDAP.
- Change the Security Type to SSL.
- Enter 636 as the Port. Scroll down.
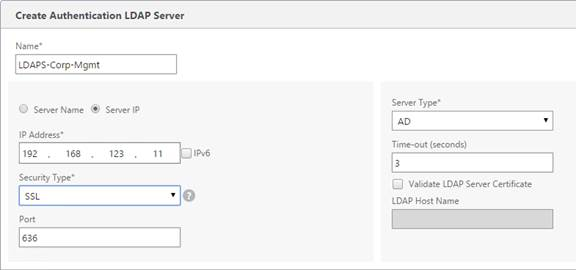
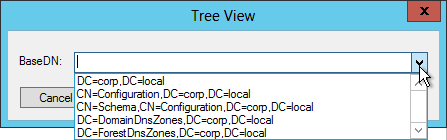
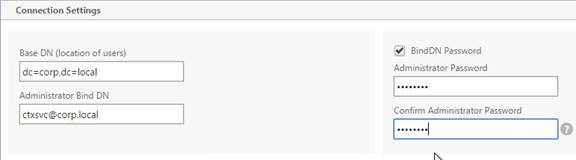
- In the Connection Settings section, enter your Active Directory DNS domain name in LDAP format as the Base DN.
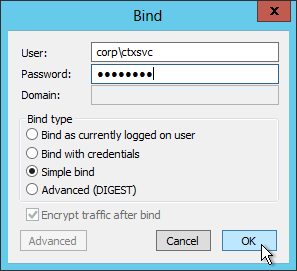
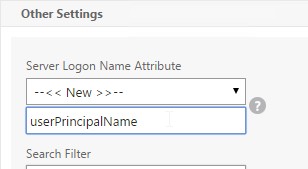
- Enter the credentials of the LDAP bind account in userPrincipalName format.
- Check the box next to BindDN Password and enter the password. Scroll down.

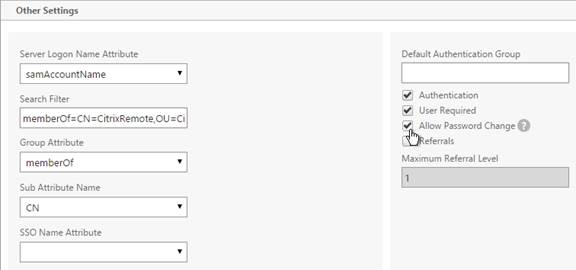
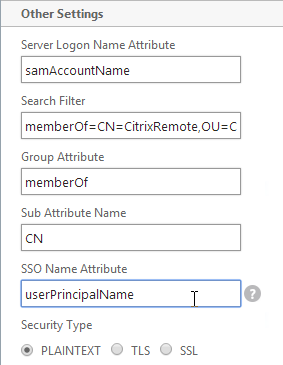
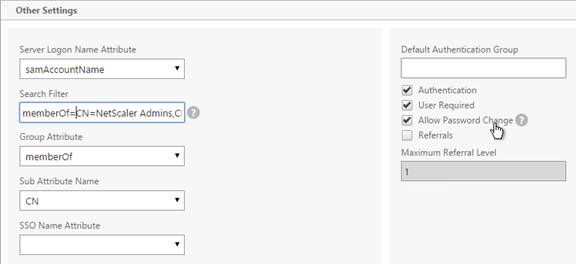
- In the Other Settings section, use the drop-down next to Server Logon Name Attribute, Group Attribute, and Sub Attribute Name to select the default fields for Active Directory.
- On the right, check the box next to Allow Password Change.
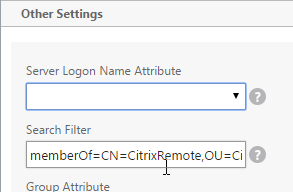
- It is best to restrict access to only members of a specific group. In the Search Filter field, enter memberOf=<GroupDN>. See the example below:
memberOf=CN=NetScaler Administrators,OU=Citrix,DC=corp,DC=localYou can add :1.2.840.113556.1.4.1941: to the query so it searches through nested groups. Without this users will need to be direct members of the filtered group.memberOf:1.2.840.113556.1.4.1941:=CN=NetScaler Administrators,OU=Citrix,DC=corp,DC=local
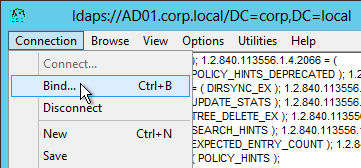
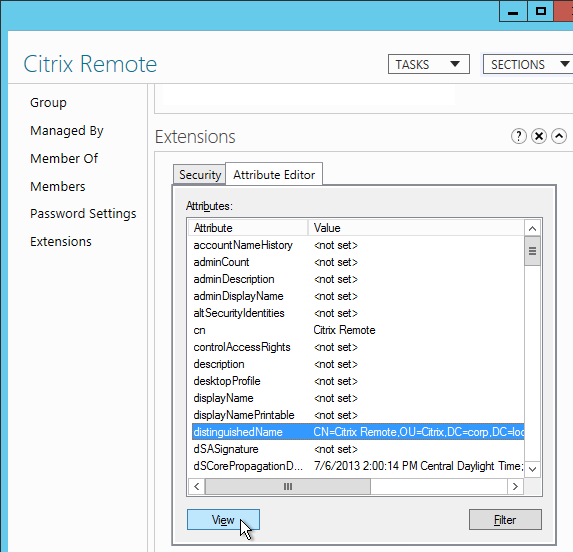
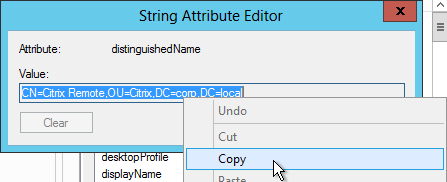
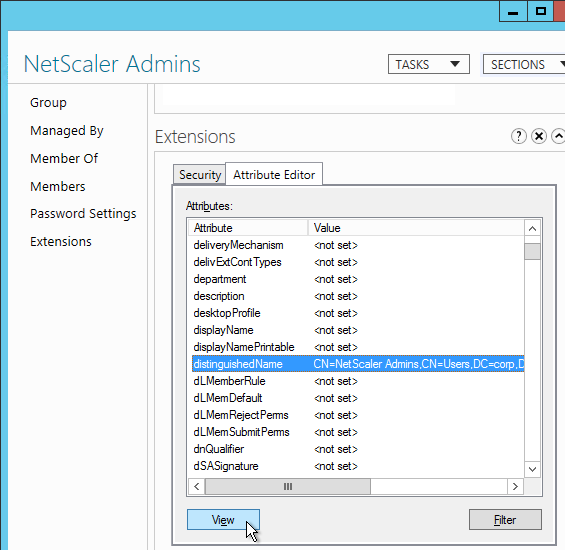
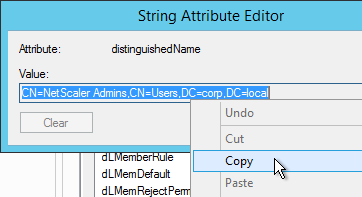
 Citrix 132802 How to Use the ldapsearch Utility on the NetScaler Gateway Enterprise Edition Appliance to Validate a Search FilterAn easy way to get the full distinguished name of the group is through Active Directory Administrative Center. Double-click the group object and switch to the Extensions page. On the right, switch to the Attribute Editor tab.Scroll down to distinguishedName, double-click it and then copy it to the clipboard.
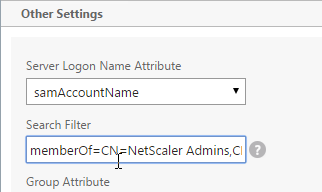
 Back on the NetScaler, in the Search Filter field, type in memberOf= and then paste the Distinguished Name right after the equals sign. Don’t worry about spaces.
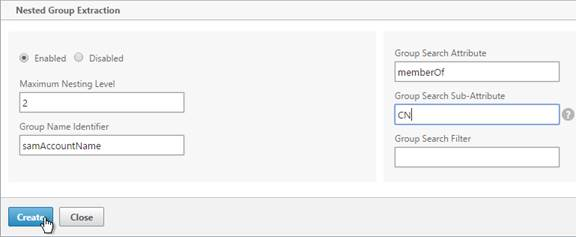
- Scroll down and click Nested Group Extraction to expand it.
- If desired, change the selection to Enabled.
- Set the Group Name Identifier to samAccountName.
- Set the Group Search Attribute to memberOf.
- Set the Group Search Sub-Attribute to CN.
- Example of LDAP Nested Group Search Filter Syntax

- Scroll down and click Create.

add authentication ldapAction Corp-Mgmt -serverIP 10.2.2.210 -serverPort 636 -ldapBase "dc=corp,dc=local" -ldapBindDn "corp\\ctxsvc" -ldapBindDnPassword Passw0rd -ldapLoginName samaccountname -searchFilter "memberOf=CN=NetScaler Admins,CN=Users,DC=corp,DC=local" -groupAttrName memberOf -subAttributeName CN -secType SSL -passwdChange ENABLED
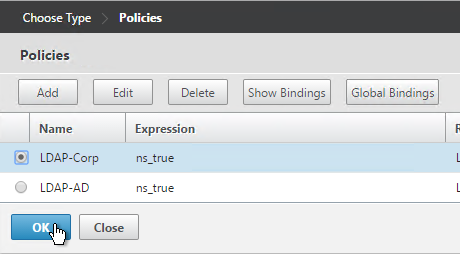
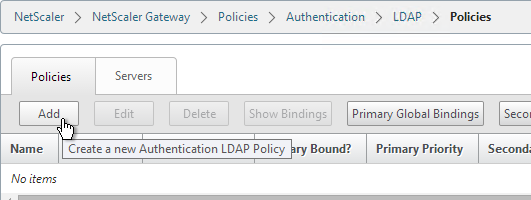
- Switch to the Policies tab and click Add.
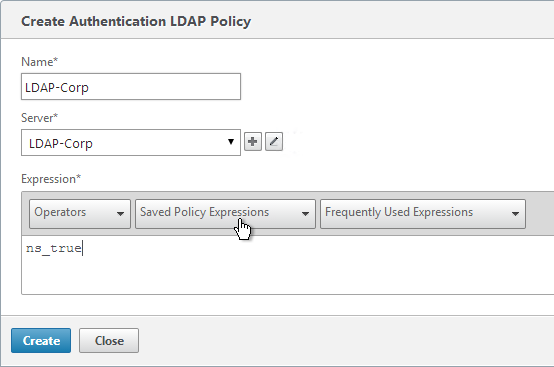
- Enter the name LDAPS-Corp-Mgmt or similar.
- Select the previously created LDAPS-Corp-Mgmt server.
- On the bottom, in the Expressions area, type in ns_true.
- Click Create.
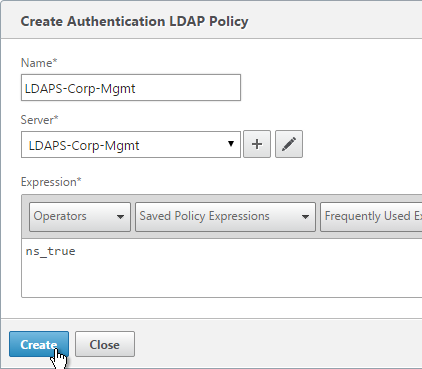
add authentication ldapPolicy Corp-Mgmt ns_true Corp-Mgmt
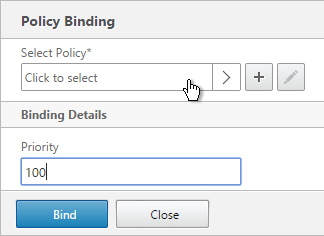
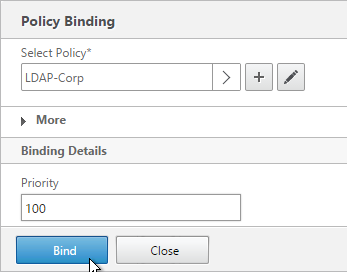
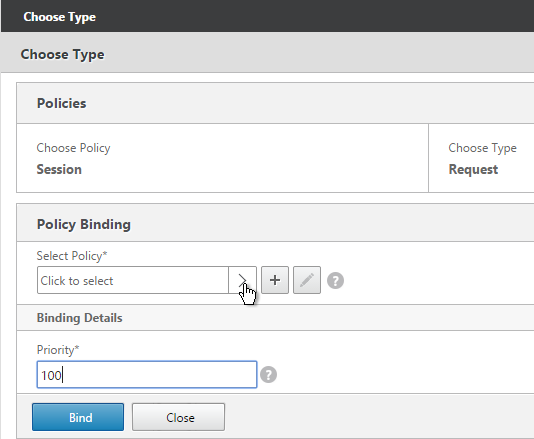
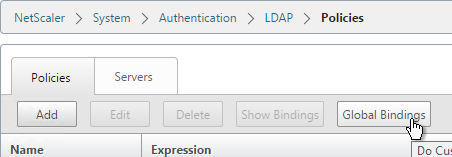
- Click Global Bindings in the right pane.
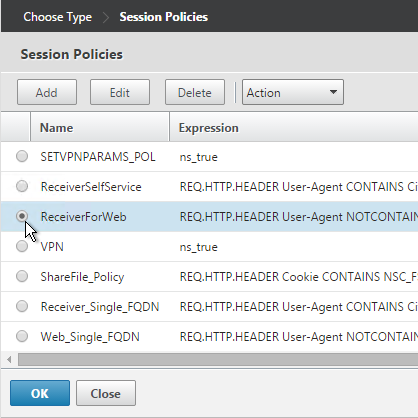
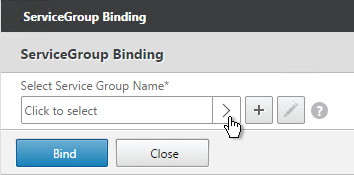
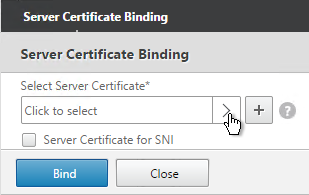
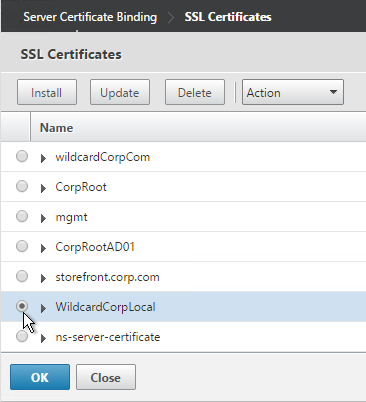
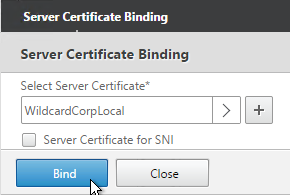
- Click where it says Click to select.
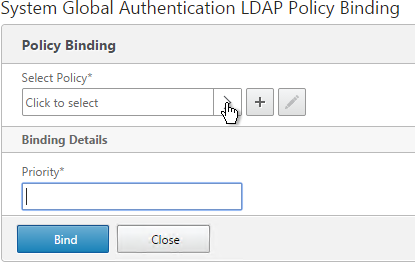
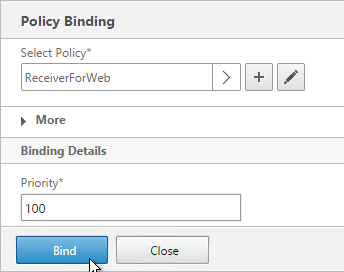
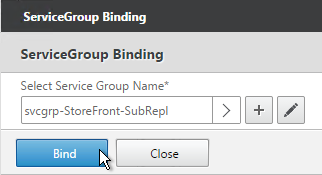
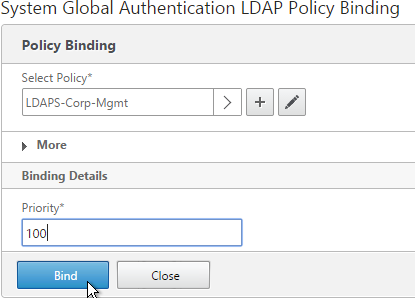
- Select the newly created LDAP policy, and click OK.
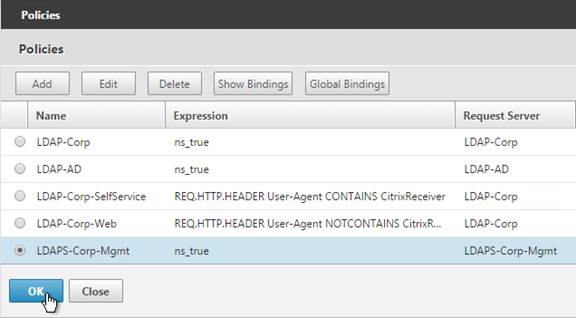
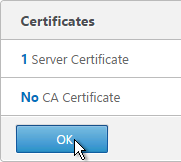
- Enter 100 for the priority, and click Bind.
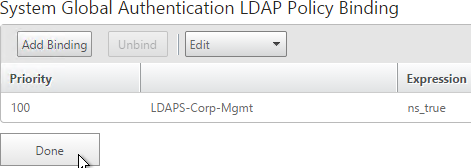
- Click Done.
bind system global Corp-Mgmt
- Under System, expand User Administration and click Groups.
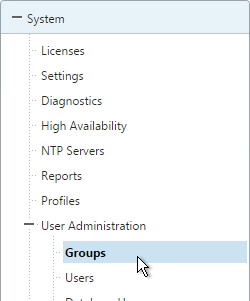
- On the right, click Add.
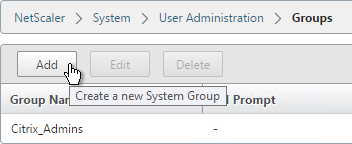
- In the Group Name field, enter the case sensitive name of the Active Directory group containing the NetScaler administrators.
- In the Command Policies section, click Insert.
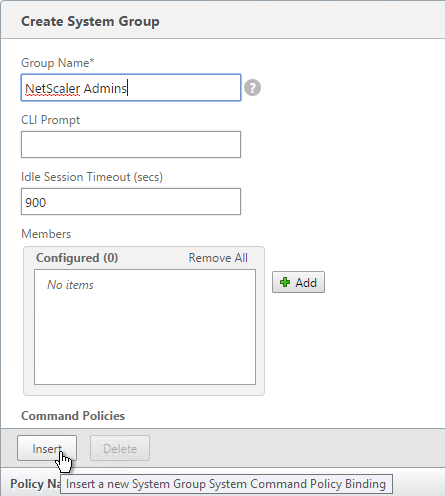
- Select the superuser policy, and click Insert.
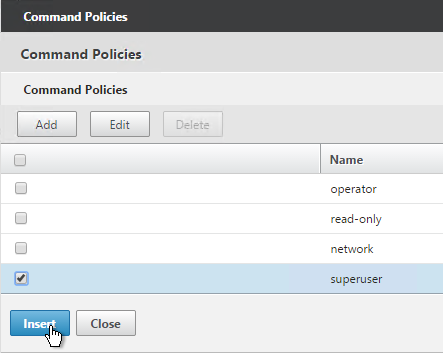
- Click Create.

add system group "NetScaler Admins" -timeout 900
bind system group "NetScaler Admins" -policyName superuser 100
- If you logout:

- You should be able to login to NetScaler using an Active Directory account.
CLI Prompt
- When you connect to the NetScaler CLI prompt, by default, the prompt is just a
>.

- You can run
set cli prompt %u@%hto make it the same as a UNIX prompt. See Citrix Docs for the cli prompt syntax.