Group Policy User Settings for VDAs

Last Modified: Oct 23, 2024 @ 3:28 pm

Navigation

💡 = Recently Updated

Change Log

User Lockdown

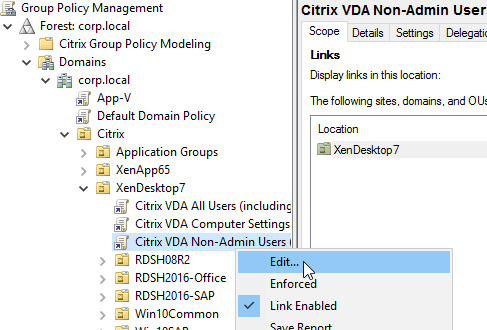
The following is a list of Group Policy Settings recommended by Microsoft to lockdown a Remote Desktop Session Host / Citrix Session. These settings should go in the Citrix VDA Non-Admin Users GPO. All settings are located at User Configuration > Policies.
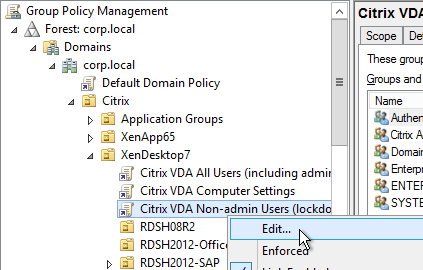
This page assumes the GPOs have already been created and Loopback Processing has already been enabled.

Some of the settings in this section might require the newer Windows Group Policy Templates.

Control Panel GPO Settings

  • User Configuration | Policies | Administrative Templates | Control Panel
    • Always open All Control Panel Items when opening Control Panel = enabled
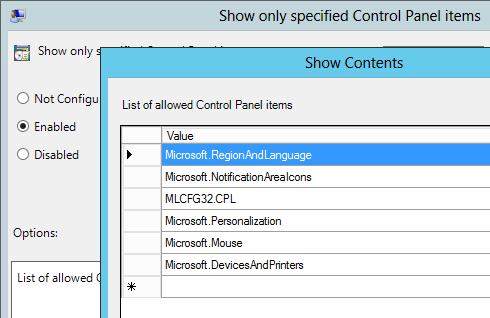
    • Show only specified Control Panel items = enabled, canonical names =
      • Microsoft.RegionAndLanguage
      • Microsoft.NotificationAreaIcons
      • MLCFG32.CPL
      • Microsoft.Personalization
      • Microsoft.Mouse
      • Microsoft.DevicesAndPrinters
      • Microsoft.System (lets users see the computer name)
  • User Configuration | Policies | Administrative Templates | Control Panel | Programs
    • Hide the Programs Control Panel = enabled
Settings Page Visibility

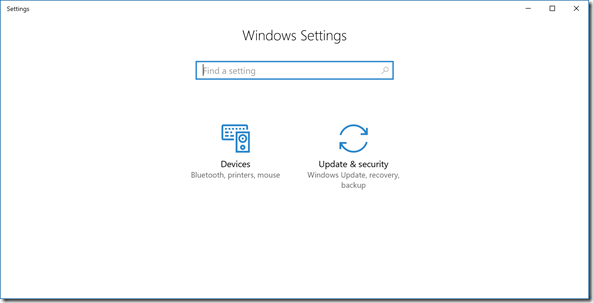
The September 2018 patches for Windows 2016 and Windows 10 add control of Settings Page Visibility in both the Computer half of the GPO (applies to all users), and now in the User half of the GPO (can apply to non-admin users).

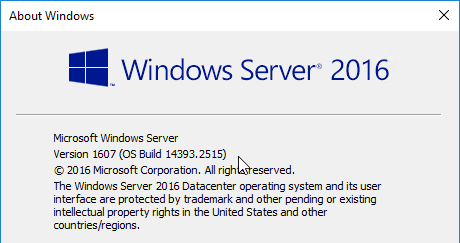
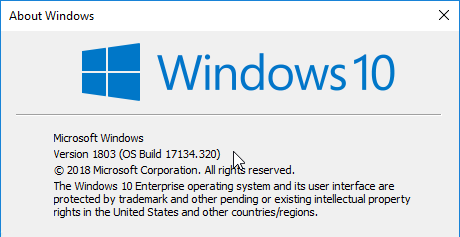
  1. Make sure the Windows 10 and Windows 2016 VDAs are patched to at least the September 2018 Cumulative Update.
    • For Windows 2016, winver should show OS Build 14393.2515 or higher.
    • For Windows 10 1803, winver should show OS Build 17134.320 or higher.
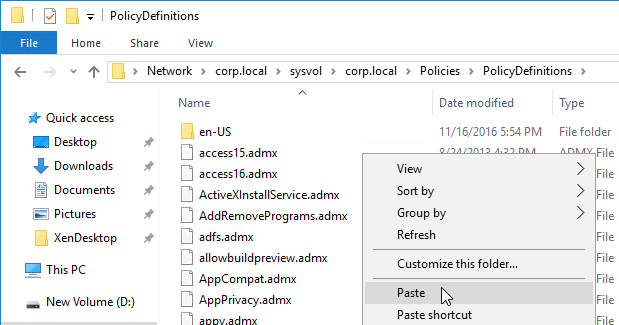
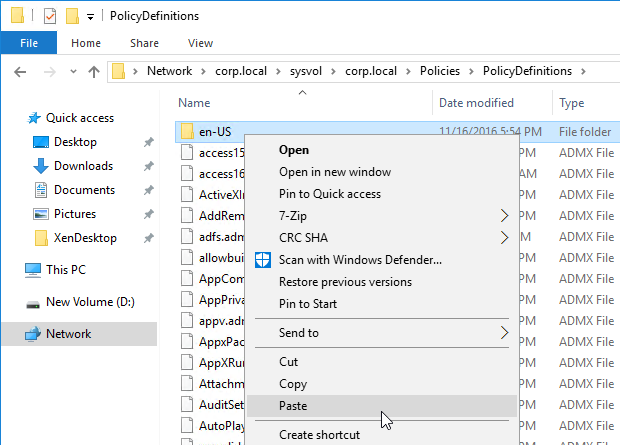
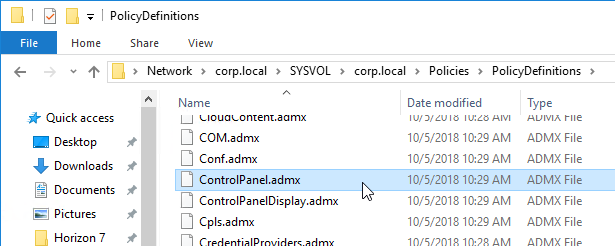
  2. Go to your \\domain.com\sysvol\domain.com\Policies\PolicyDefinitions and find the file ControlPanel.admx. If it is not dated August 30 or later, then you’ll need to copy the updated version.
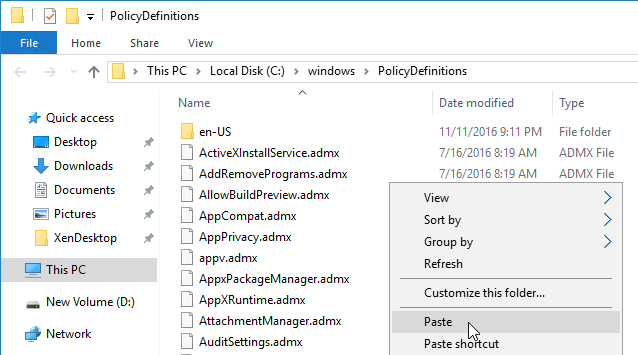
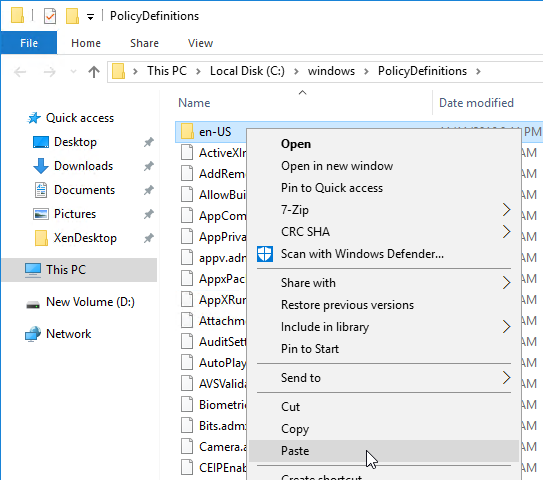
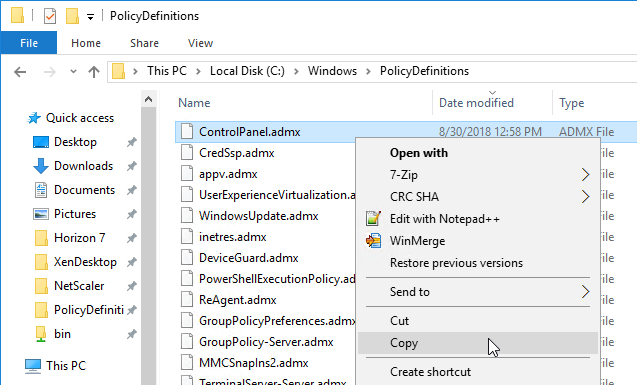
    1. On one of these newer VDAs, go to C:\Windows\PolicyDefinitions and copy the file ControlPanel.admx. The September 2018 patch updated this file.
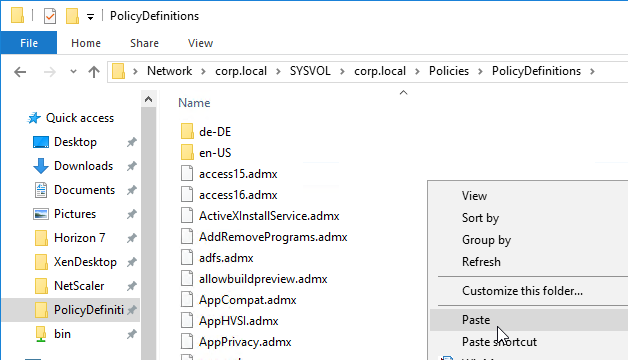
    2. Go to your \\domain.com\sysvol\domain.com\Policies\PolicyDefinitions and paste the .admx file. Overwrite the existing file.
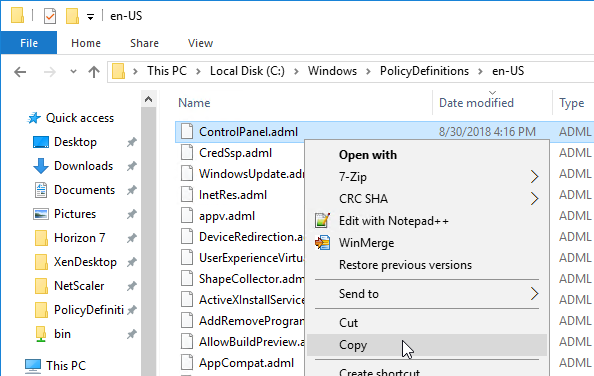
    3. On one of these newer VDAs, go to C:\Windows\PolicyDefinitions\en-US and copy the file ControlPanel.adml.
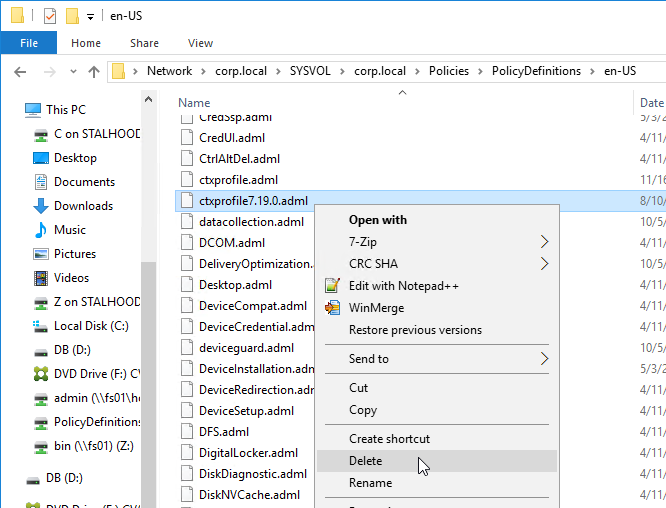
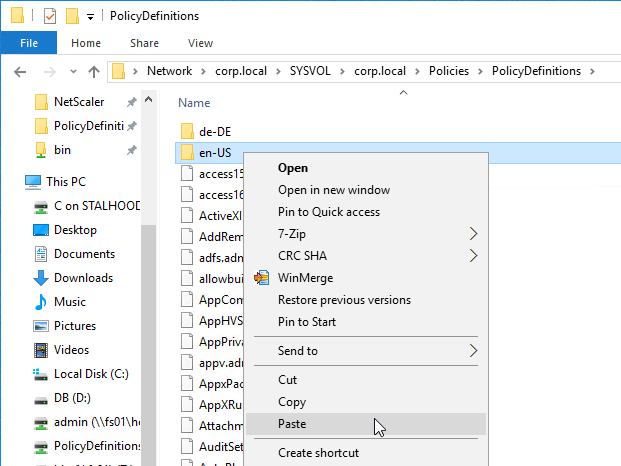
    4. Go to your \\domain.com\sysvol\domain.com\Policies\PolicyDefinitions\en-US and paste the .adml file. Overwrite the existing file.
  3. Edit the Non-Admin Users GPO.
  4. Go to User Configuration | Policies | Administrative Templates | Control Panel.
  5. On the right is Settings Page Visibility.
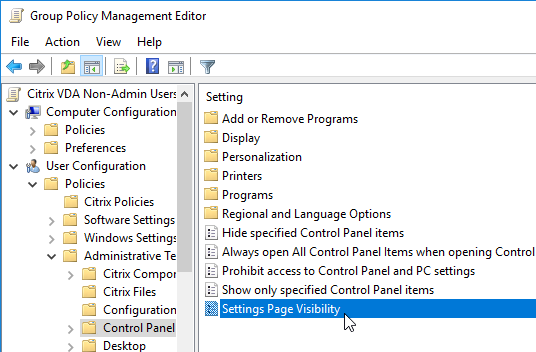
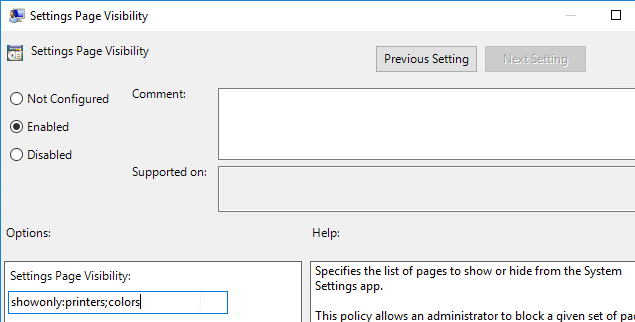
  6. Winaero How To Hide Settings Pages in Windows 10 describes this new setting. Also see TechNet Hiding pages in Settings with Windows 10 1703. A sample configuration is: showonly:printers;colors. According to Server 2016 & PC Settings/Immersive Control Panel at Citrix Discussions, the maximum length for this field is 255 characters.
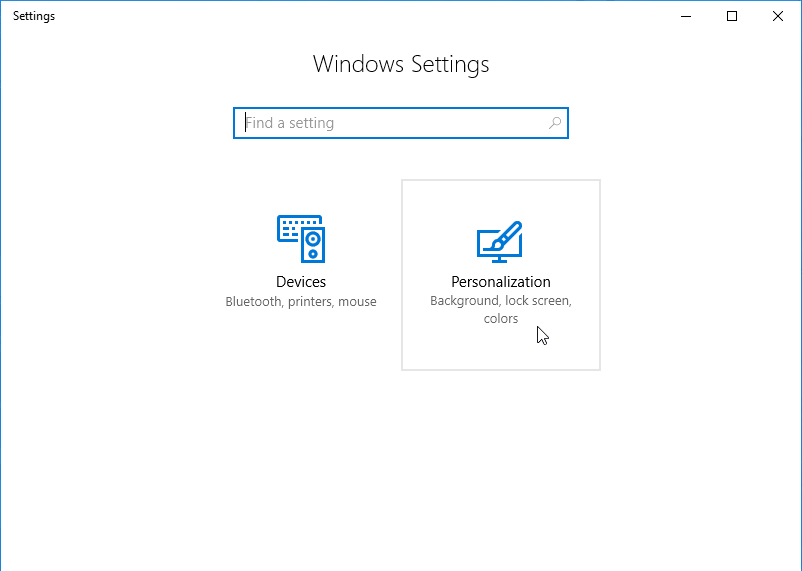
  7. When the non-admin user logs into a Windows 10 or Windows Server 2016 VDA that has the September update installed, the Settings pages are restricted based on the GPO configuration. Since this GPO setting is in the user half of the Non-admin users GPO, admins can still see all Settings pages.
Desktop GPO Settings

  • User Configuration | Policies | Administrative Templates | Desktop
    • Hide Network Locations icon on desktop = enabled
    • Remove Properties from the Computer icon context menu = enabled
    • Remove Properties from the Recycle Bin icon context menu = enabled

If you prevent access to the Properties of the Computer icon then users might not be able to determine the name of the machine they are connected to.

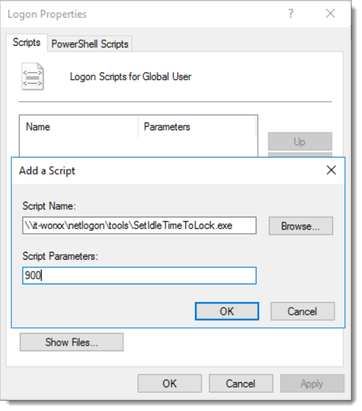
On Windows Server 2016, screen saver idle time does not work. Arjan Mensch developed a tool to lock the screen after a period of idle time. Launch the tool from a Group Policy login script. Download the tool from Enforcing lock screen after idle time Windows Server 2016 RDS Session Host.
Start Menu and Taskbar GPO Settings

  • User Configuration | Policies | Administrative Templates |  Start Menu and Taskbar
    • Clear the recent programs list for new users = enabled
    • Do not allow pinning Store app to the taskbar = enabled
    • Remove and prevent access to Shut Down, Restart, Sleep, and Hibernate commands = enabled
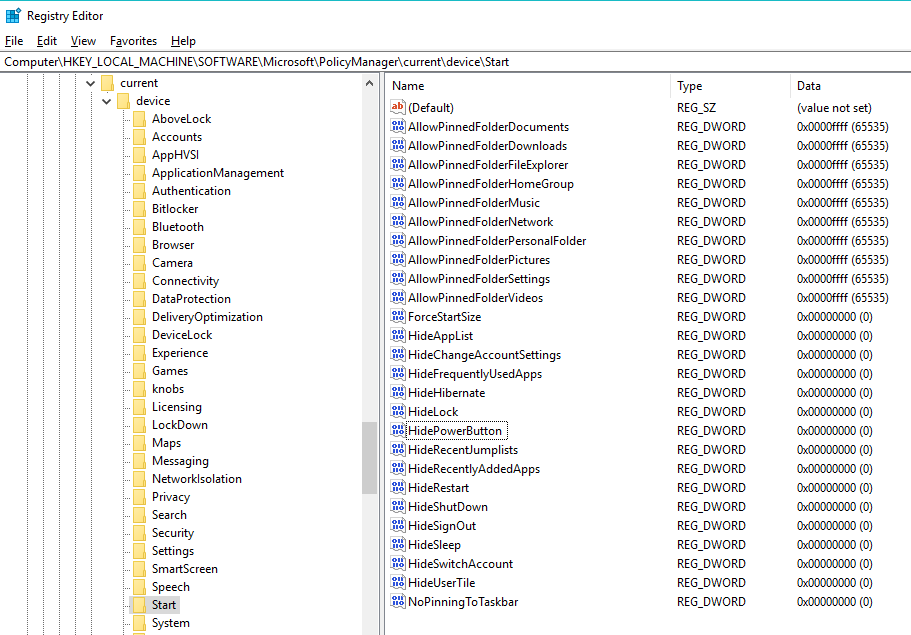
      • In Windows 10 1709, if you want to remove the Power Button, in the VDA, set HKLM\Software\Microsoft\PolicyManager\current\device\Start\HidePowerButton (DWORD) = 1. Source = Power Button Windows 10 VDI at Citrix Discussions.
    • Remove common program groups from Start Menu = enabled (only if you have some other means for putting shortcuts back on the user’s Start Menu/Desktop. Also, enabling this setting might prevent Outlook desktop alerts. Microsoft 3014833)
    • Remove Help menu from Start Menu = enabled (Windows 7 / 2008 R2 only)
    • Remove links and access to Windows Update = enabled
    • Remove Network icon from Start Menu = enabled (Windows 7 / 2008 R2 only)
    • Remove Run menu from Start Menu = enabled (not recommended)
    • Remove the Action Center icon = enabled (not in Windows 10)
    • Remove the networking icon = enabled
    • Remove the People Bar from the taskbar = enabled (Windows 10 1703 and later)
    • Remove the Security and Maintenance icon = enabled (Windows 10)
    • Remove user folder link from Start Menu = enabled (Windows 7 / 2008 R2 only)

If you hide common program groups, then you will need some other method of creating application shortcuts for each user. Group Policy Preferences Shortcuts is the typical method.

Removing the Run menu prevents users from entering UNC paths or drive letters in Internet Explorer.

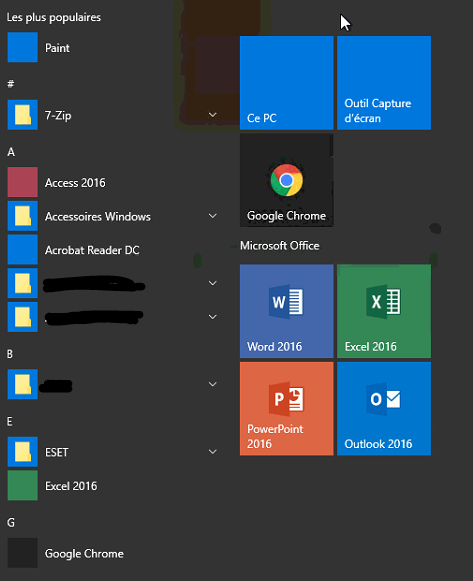
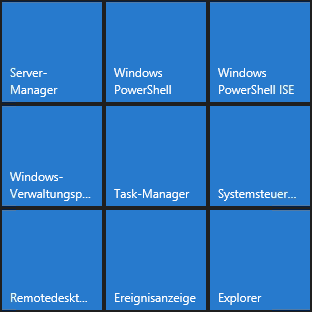
Start Menu pinned tiles

  • Configure Start Menu pinned tiles as desired
    • Remove Server Manager
    • Remove PowerShell
    • Etc.
  • Use Export-StartLayout to save to an .xml file.
  • Use Import-StartLayout to import to the Default User profile. All new users (new profiles) will get the customized Start Menu layout.

CTP James Rankin Dynamic Start Menu on Server 2016/2019 and Windows 10 using FSLogix App Masking

CTP James Kindon AppMasking The Windows Start Menu using FSLogix
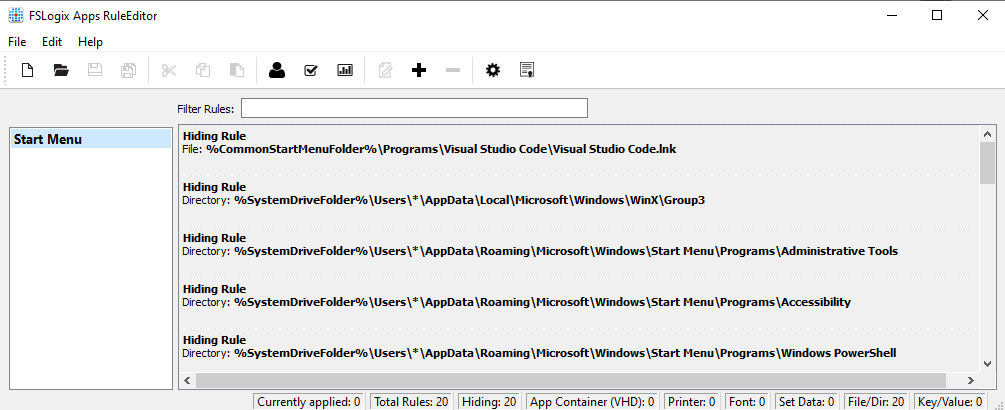
Kasper Johansen The Windows Server 2019 Start Menu Is Playing Nice:

  • Clean up the default Start Menu
  • Use AppLocker to prevent access to Windows Security

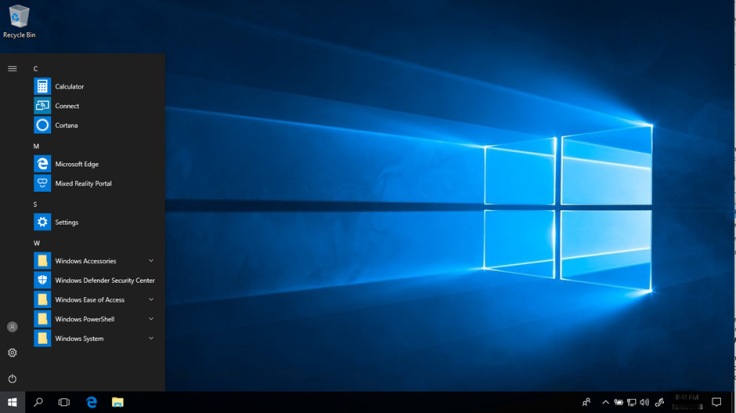
CTP James Kindon Windows 10 Start Menu: declutter the default:

  • To eliminate the Start Menu tiles, remove Store apps, and Edge.
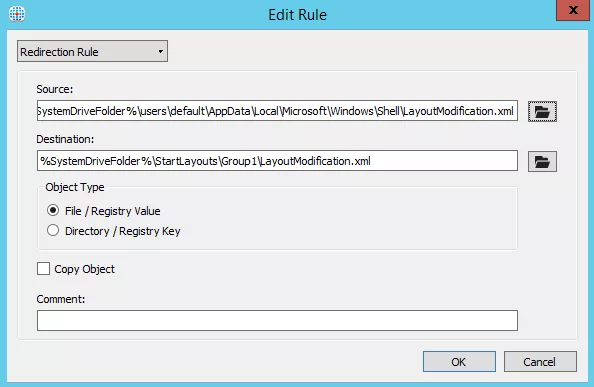
CTP James Rankin Management of Start Menu and Tiles on Windows 10 and Server 2016, part #1 contains the following:

  • LayoutModification.xml in Default User Profile
  • Start Screen Layout Group Policy setting
  • Partially-locked layout
  • FSLogix to apply a custom default layout for different user groups on the same device, and allowing users to customize all of it
CTP Eric Haavarstein Customize Windows 10 Start Screen and Optimize for Higher User Density contains the following:

  • Lock down a section of the Start Menu
  • Configure Citrix Profile Management to roam the Start Menu
  • Remove Provisioned Apps
  • Tune Windows using OS Optimization Tool
  • Disable Telemetry services

Microsoft Technet Customize Windows 10 Start with Group Policy.

System GPO Settings

  • User Configuration | Policies | Administrative Templates |  System
    • Prevent access to registry editing tools = enabled, Disable regedit from running silently = No
    • Prevent access to the command prompt = enabled, Disable command prompt script processing = No

Disabling registry editing tools also disables reg.exe. This is true even if silently is set to No.

Explorer GPO Settings

  • User Configuration | Policies | Administrative Templates |  Windows Components | File Explorer (Windows 8+) or Windows Explorer (Windows 7)
    • Hide these specified drives in My Computer = enabled, Restrict A, B, C, and D drives only
    • Hides the Manage item on the File Explorer context menu = enabled
    • Prevent access to drives from My Computer = enabled, Restrict A, B, C, and D drives only. If this setting is enabled, you can’t use Start Menu’s search to find programs.
    • Prevent users from adding files to the root of their Users Files folder = enabled
    • Remove “Map Network Drive” and “Disconnect Network Drive” = enabled
    • Remove Hardware tab = enabled
    • Remove Security Tab = enabled
    • Turn off caching of thumbnail pictures = enabled

Borders – Windows Server 2019 File Explorer does not show borders around File Explorer. To add borders, see Geir Dybbugt Microsoft Server 2019: No window border/allwhite issue

To hide specific drive letters:

  1. User Configuration => Preferences => Windows Settings => Drive Maps => New Mapped Drive
  2. Choose Action Update => Drive Letter Existing C => Hide this drive
  3. Common Tab: Run in logged-on users’ Security

Windows Update GPO Settings

  • User Configuration | Policies | Administrative Templates |  Windows Components | Windows Update
    • Remove access to use all Windows Update features = enabled, 0 – Do not show any notifications

File Explorer

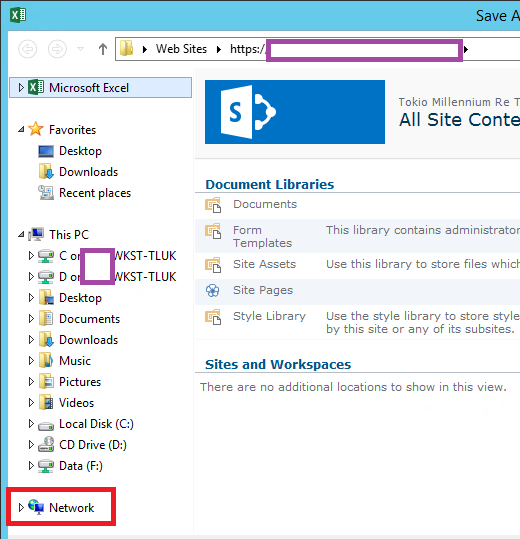
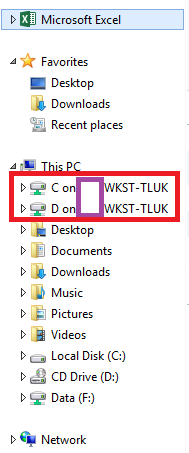
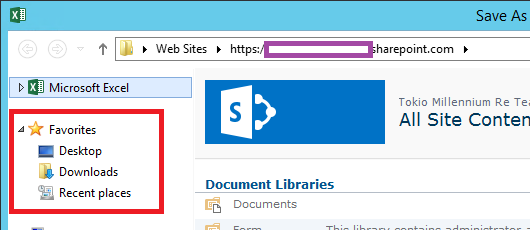
Hide Favorites, Libraries, Network and redirected local drives

Winhelponline Removing “Quick access” from Windows 10 File Explorer details the following registry value to remove Quick Access from File Explorer in Windows 10, or Windows Server 2016 and newer. (h/t Sean Bolding)

  • HKEY_LOCAL_MACHINE\SOFTWARE\Microsoft\Windows\CurrentVersion\Explorer
    • DWORD value HubMode = 1

Terence Luk Hide Favorites, Libraries, Network and redirected local drives for Citrix and RDS published RemoteApp applications: See the Blog Post for instructions to edit the registry on the VDA to hide these items. Similar instructions are provided by David Wilkinson at Remove Quick Access from File Explorer in Windows Server 2016.


Explorer Notifications

From TenForums How to Hide or Show Sync Provider Notifications within File Explorer in Windows 10: Windows 10 1607 adds notifications inside File Explorer.
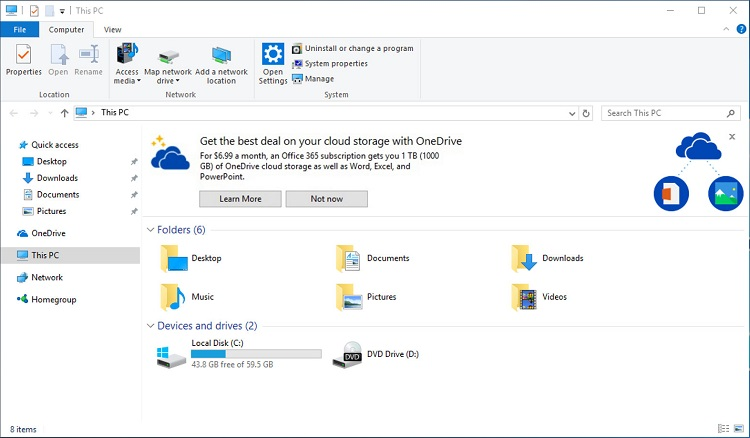
To stop these, use Group Policy Preferences to set the following registry value:

  • Key = HKEY_CURRENT_USER\SOFTWARE\Microsoft\Windows\CurrentVersion\Explorer\Advanced
    • Value = ShowSyncProviderNotifications (DWORD) = 0

Windows Spotlight

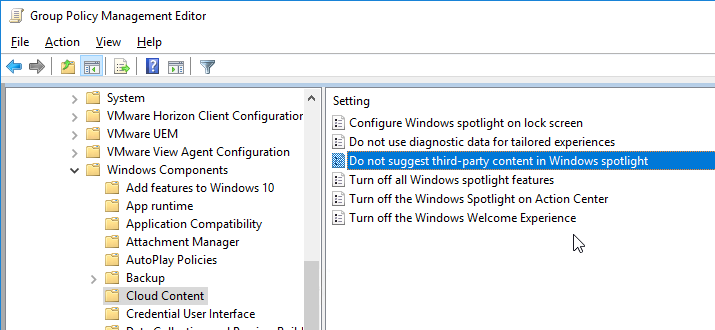
Windows 10 1703 and newer shows suggestions, tips and ads on various parts of Windows (Start Menu, lock screen, Action Center, Explorer, etc.). These notifications are configurable at User Configuration | Policies | Administrative Templates | Windows Components | Cloud Content. Also see Richard Hay Windows 10 Creators Update: Turn Off Suggestions, Tips, and Ads Throughout the Operating System and Chris Hoffman How to Disable All of Windows 10’s Built-in Advertising.
Explorer Replacement

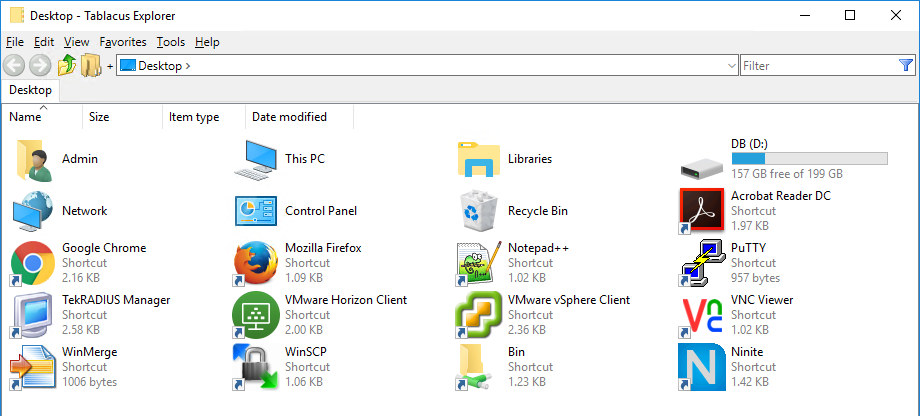
Instead of locking down Windows File Explorer, you can run a 3rd party Explorer like Tablacus Explorer. The tool is detailed by Marco Hofmann at Tablacus Explorer is an awesome replacement for explorer.exe as a #XenApp published Application!.
Flickering Icons

If you published a desktop on Windows Server 2016, and if you redirected the Desktop folder to a network share, then desktop icons might flicker. Helge Turk at XenApp 7.12/13, Server 2016 desktop icons flickering at Citrix Discussions resolved it be creating the following Registry Key using Group Policy Preferences:

  • HKEY_CURRENT_USER\SOFTWARE\Classes\CLSID\{031E4825-7B94-4dc3-B131-E946B44C8DD5}

Chrome

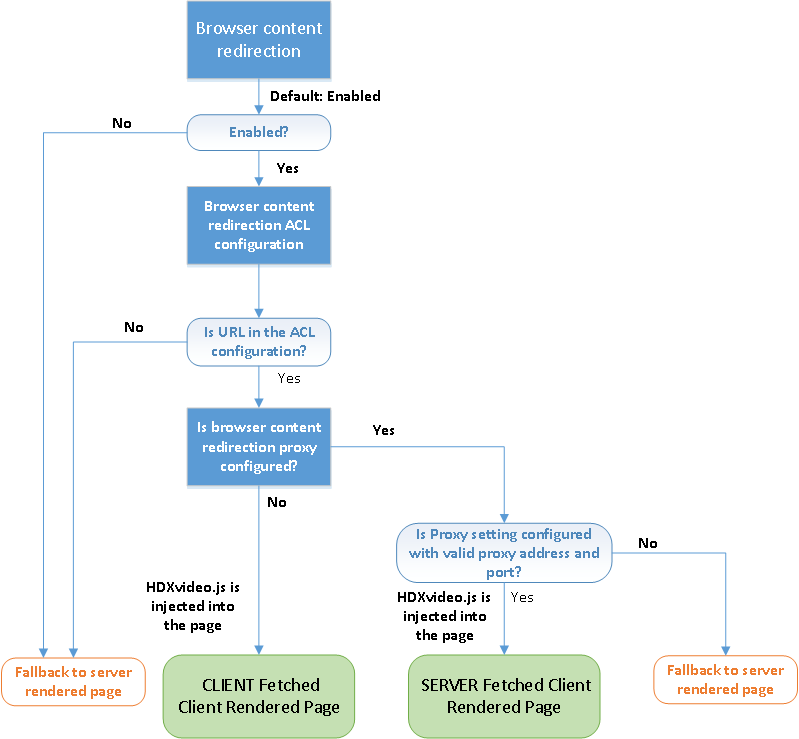
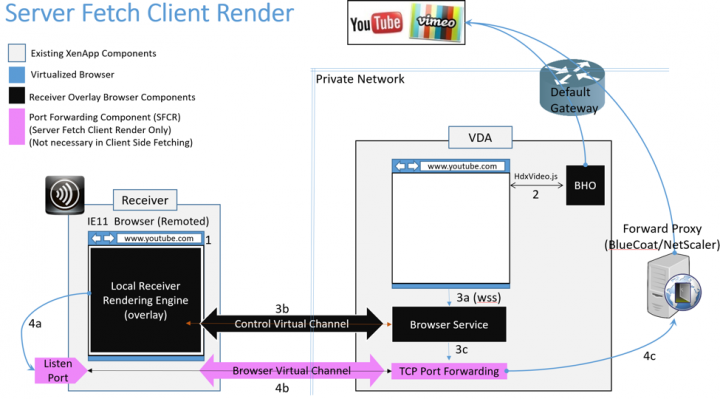
Use Chrome Group Policy to push the Chrome plug-in for Citrix’s Browser Content Redirection feature in Citrix Virtual Apps and Desktops (CVAD) 1808 and newer.

Chrome 77+ Audio Issue

No Audio on Google Chrome version 77.x and newer inside ICA session.

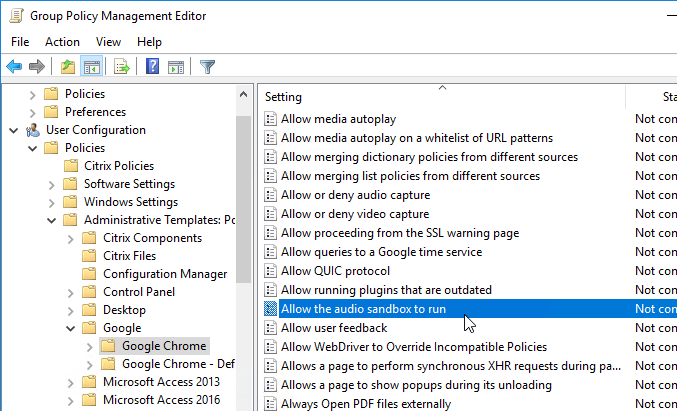
Newer Google Chrome ADMX templates let you disable the audio sandbox. User Configuration | Policies | Administrative Templates | Google | Google Chrome | Allow the audio sandbox to run = Disabled.
Another workaround is to use Group Policy Preferences to deploy the following registry value: (source = CTX261992 Citrix Virtual Apps and Desktops: No Audio on Google Chrome version 77.x inside ICA session)

If the new Chrome-based Microsoft Edge consumes 100% CPU, then CTP James Kindon Deploying Brave and Microsoft Edge Dev Browsers in Citrix CVAD environments says a similar registry value is needed for the new Edge.

  • Key = HKLM\SYSTEM\CurrentControlSet\services\CtxUvi
    • Value (String) = UviProcessExcludes = chrome.exe;msedge.exe;

GPO ADMX Templates

  1. Download the Google Chrome ADMX templates from Set Chrome Browser policies on managed PCs.
  2. Extract the .zip file.
  3. Go to the extracted files. In the \policy_templates\windows\admx folder, copy the chrome.admx and google.admx files.
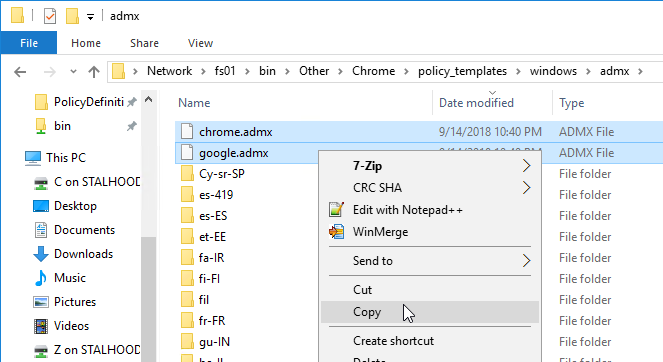
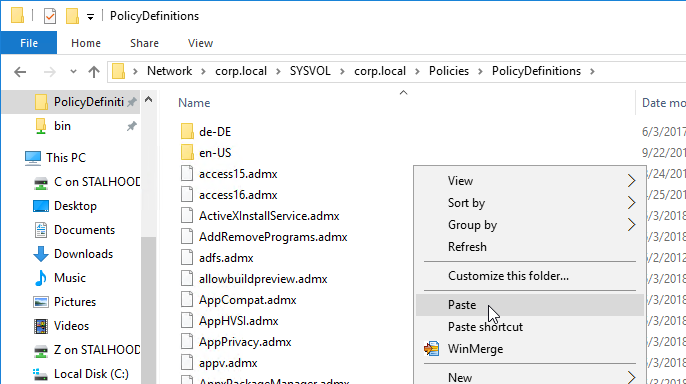
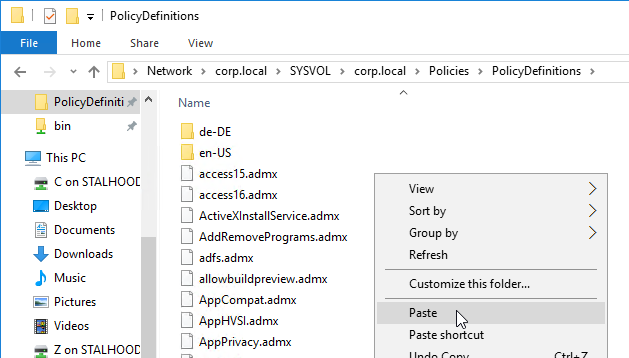
  4. Go to PolicyDefinitions in your SYSVOL (e.g. \\domain.com\sysvol\domain.com\Policies\PolicyDefinitions) and paste the .admx files.
  5. Go back to the extracted Google Chrome templates in the \policy_templates\windows\admx folder and copy the en-US folder.
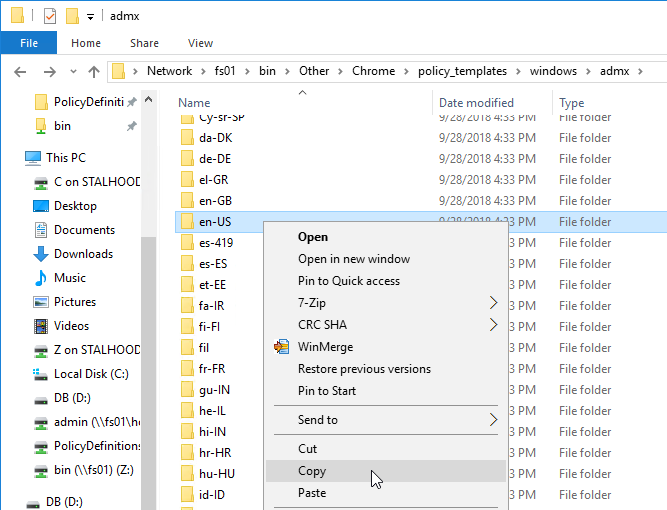
  6. Go to back to PolicyDefinitions in your SYSVOL and paste the en-US folder. It will add .adml files to the existing en-US folder.
Roam Chrome Settings

You can optionally enable Chrome’s roaming profile support. For details, see Use Chrome Browser with Roaming User Profiles at Google Help.

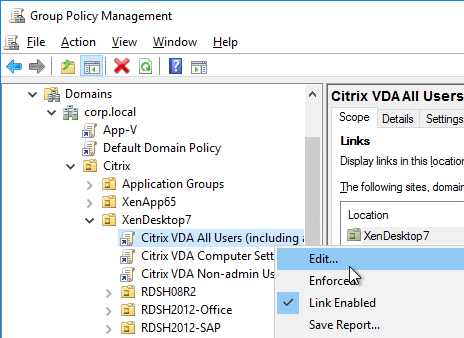
  1. Edit the Citrix All Users GPO.
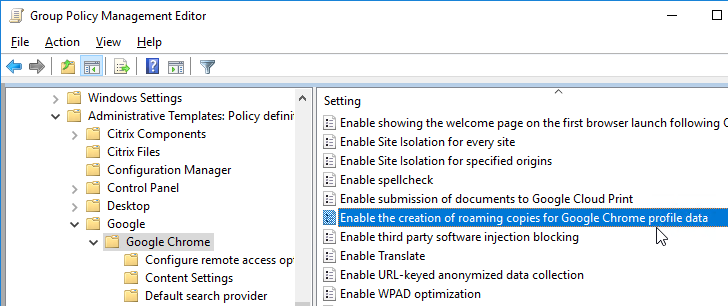
  2. Go to User Configuration | Policies | Administrative Templates | Google | Google Chrome.
  3. On the right, double-click Enable the creation of roaming copies for Google Chrome profile data and Enable it.
Browser Content Redirection Extension

To force install the Chrome Extension needed for Browser Content Redirection in Citrix Virtual Apps and Desktops (CVAD) 1808 and newer:

  1. Edit the Citrix All Users GPO.
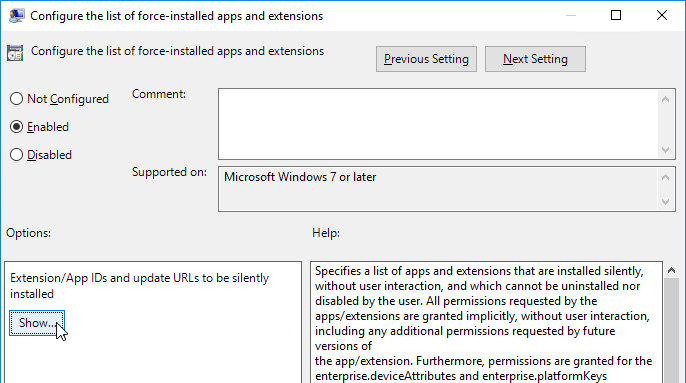
  2. Go to User Configuration | Policies | Administrative Templates | Google | Google Chrome | Extensions.
  3. On the right, double-click Configure the list of force-installed apps and extensions.
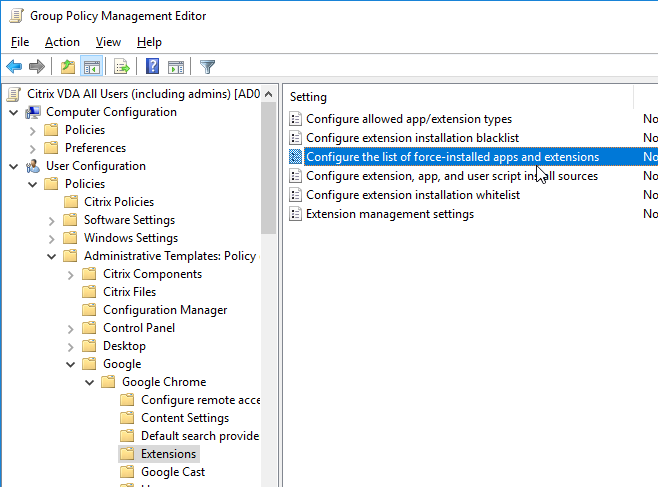
  4. Enable the setting and click Show.
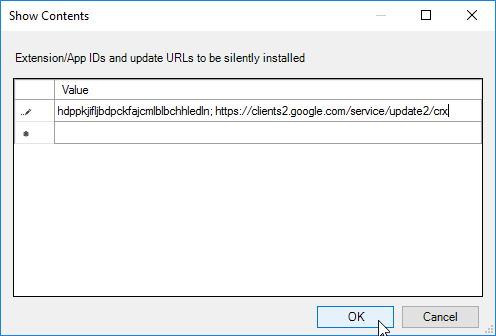
  5. In the box, enter the following text and click OK.
    hdppkjifljbdpckfajcmlblbchhledln; https://clients2.google.com/service/update2/crx
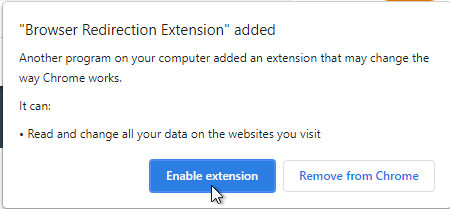
  6. When a user opens Chrome from inside a VDA, the Citrix Browser Content Redirection Extension is automatically installed.
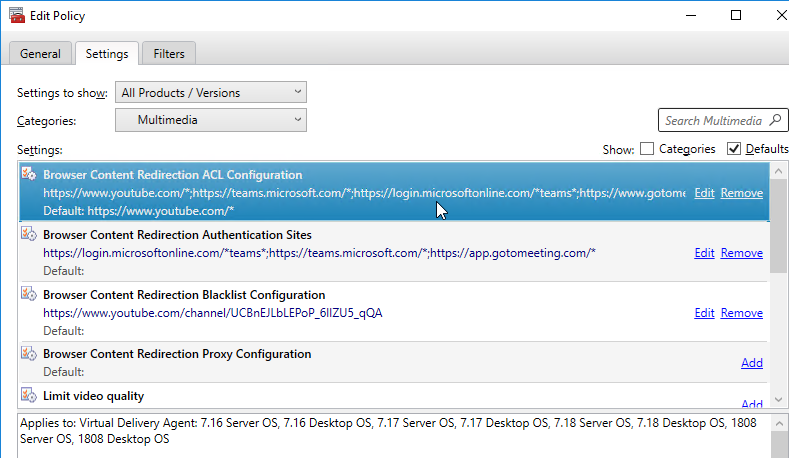
  7. Configure the Citrix Policy settings detailed at Browser Content Redirection.
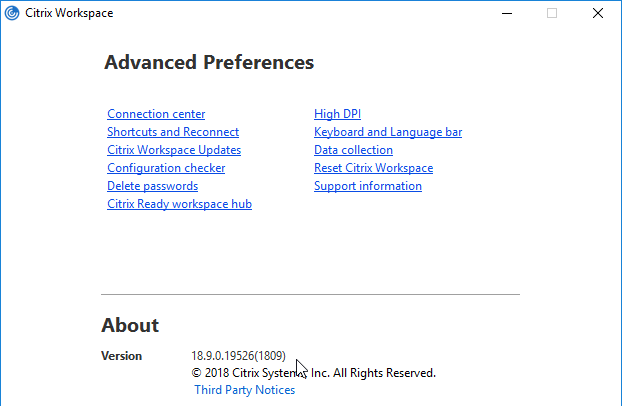
  8. Redirection of websites from Chrome requires Workspace app 1809 or newer on the client device.
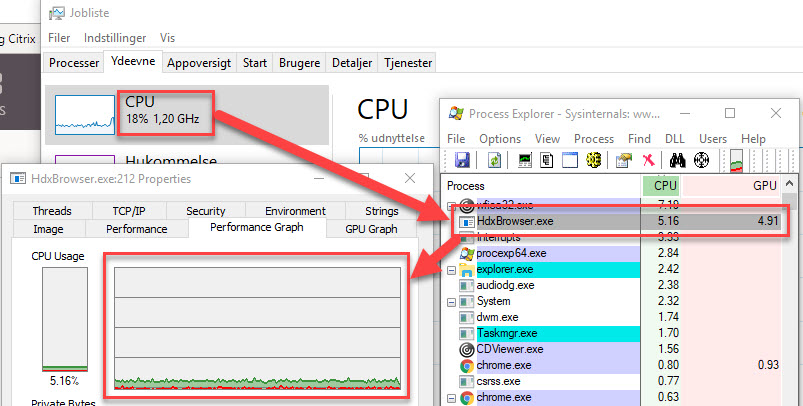
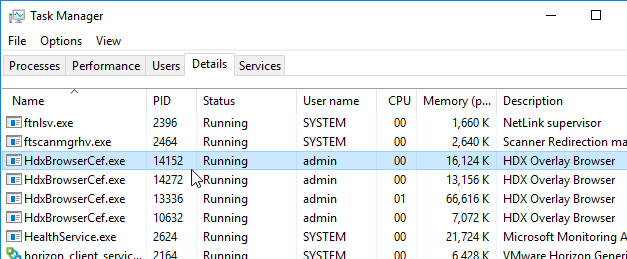
  9. When you visit a whitelisted (ACL) website, on the client side, you should see HdxBrowserCef.exe processes. These processes come from Workspace app, and does not use Chrome on the client side.
Edge / Internet Explorer Settings

This section assumes the GPOs have already been created.

Edge 

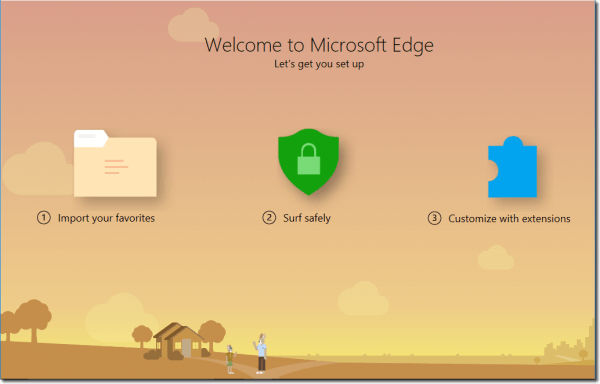
When a new user launches Edge, the first run wizard appears.

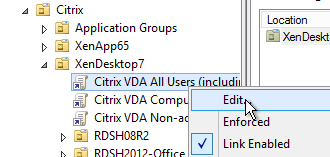
To prevent this from occurring, edit the Citrix VDA All Users GPO.
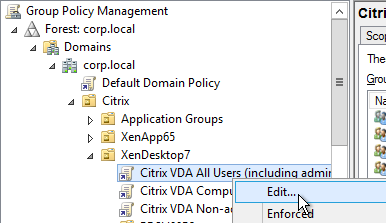
Edge First Run GPO Settings

  • User Config | Policies | Administrative Templates | Windows Components | Microsoft Edge
    • Hide the First-run experience and splash screen = enabled

Internet Explorer First Run Wizard

When a new user launches Internet Explorer, the first run wizard appears.
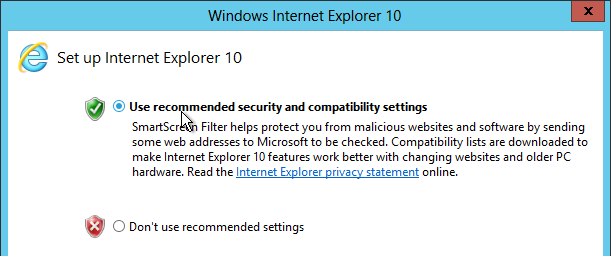
To prevent this from occurring, edit the Citrix VDA All Users GPO.

Internet Explorer First Run GPO Settings

  • User Config | Policies | Administrative Templates | Windows Components | Internet Explorer
    • Prevent managing SmartScreen Filter = enabled, on
    • Prevent running First Run Wizard = enabled, Go directly to home page
    • Specify default behavior for a new tab page = enabled, Home page
    • Turn on Suggested Sites = disabled
  • User Config | Policies | Administrative Templates | Windows Components | Internet Explorer | Compatibility View
    • Include updated Web site lists from Microsoft  = enabled
  • User Config | Policies | Administrative Templates | Windows Components | Internet Explorer | Internet Control Panel | Advanced Page
    • Turn on Enhanced Protected Mode  = disabled

Enhanced Protected Mode might disable Internet Explorer add-ons. Read the text to determine if it should be disabled.

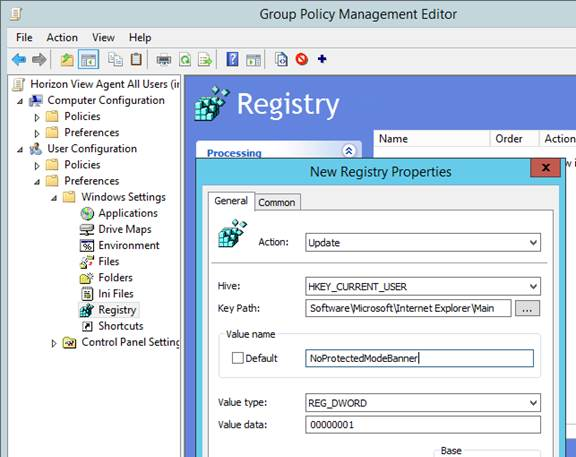
Users might see a message that Protected mode is turned off for the Local intranet zone.

To prevent this message, do the following:

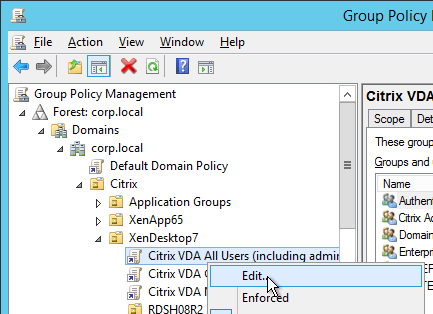
  1. Edit the Citrix VDA All Users GPO.
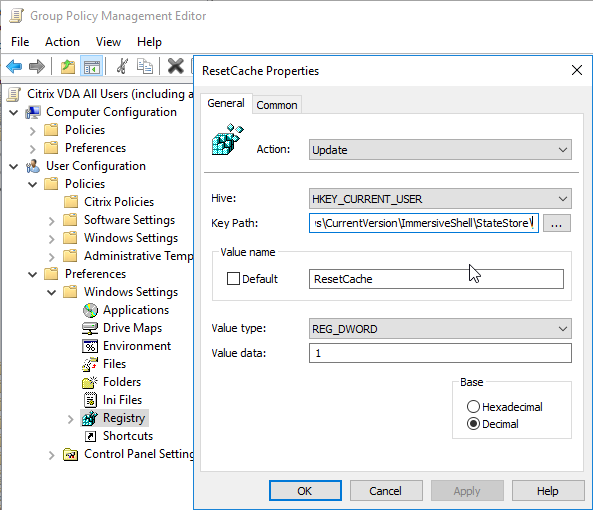
  2. Go to User Configuration > Preferences > Windows Settings > Registry.
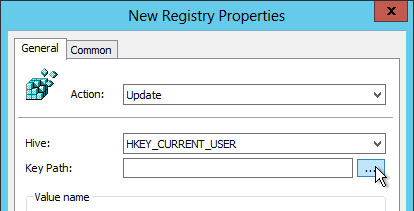
  3. Create a new Registry Item.
  4. Set the Hive to: HKEY_CURRENT_USER
  5. Set the Key Path to: Software\Microsoft\Internet Explorer\Main
  6. Set the Value name to: NoProtectedModeBanner
  7. Set the Value type to: REG_DWORD
  8. Set the Value data to: 1
  9. Click OK.

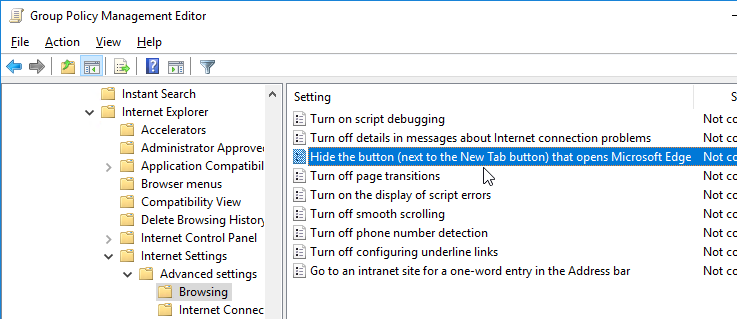
IE 11 in Windows 10 1703 and newer has a new button to open Edge.

  • To hide this button, edit a Group Policy that applies to users, go to User Configuration | Policies | Administrative Templates | Windows Components | Internet Explorer | Internet Settings | Advanced Settings | Browsing, and enable the setting Hide the button (next to the New Tab button) that opens Microsoft Edge. Source = René Bigler on Twitter.
4SysOps Disable Welcome to Microsoft Edge page and default browser prompt in Windows 10 1607: registry keys and PowerShell script to disable it.
Published Internet Explorer Settings – Runonce

If a user launches Internet Explorer as a published application, then Internet Explorer might not be fully configured and thus some websites won’t work. By default, Windows runs per-user configuration (ActiveSetup) of Internet Explorer only when the user connects to a full desktop, which doesn’t happen when only launching published apps. To override this behavior so it works with published IE even if the user never connects to a full desktop, do the following:

  1. Edit the Citrix VDA All Users GPO.
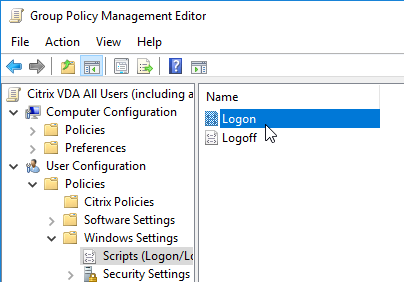
  2. Go to User Configuration > Policies > Windows Settings > Scripts (Logon/Logoff).
  3. Double-click Logon.
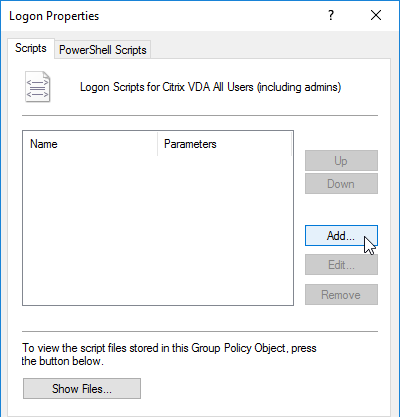
  4. Click Add.
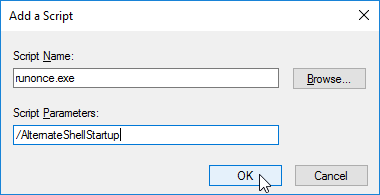
  5. In the Script Name field, enter runonce.exe.
  6. In the Script Parameters field, enter /AlternateShellStartup. Click OK.
  7. Note: running runonce.exe /AlternateShellStartup might cause black borders around windows in published applications.
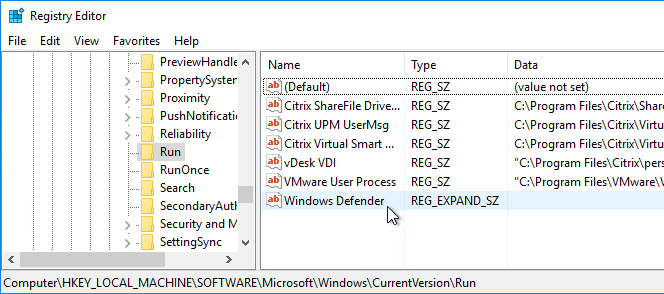
  8. Runonce.exe /AlternateShellStartup also causes the items in the HKEY_LOCAL_MACHINE\SOFTWARE\Microsoft\Windows\CurrentVersion\Run registry key to be executed when a published app is launched. Consider deleting the items (e.g. VMware Tools icon), or they might keep sessions open after users close their apps. Also see CTX891671 Graceful Logoff from a Published Application Renders the Session in Active State.
  9. An alternative to runonce.exe /AlternateShellStartup is to run the following commands provided by Steve Washburn at Active Receiver connection after app is closed at Citrix Discussions.
    @echo off
    "C:\Windows\System32\rundll32.exe" "C:\Windows\System32\iesetup.dll",IEHardenUser
    "C:\Windows\SysWOW64\rundll32.exe" "C:\Windows\SysWOW64\iesetup.dll",IEHardenUser
    start "" "C:\Program Files (x86)\Internet Explorer\iexplore.exe"
    exit


Windows 8.1/2012 R2 might not run the script at logon. Configure the following GPO computer settings to enable the script (configure these in the Citrix VDA Computer Settings GPO):

Logon Script GPO Settings

  • Computer Configuration | Policies | Administrative Templates | System | Group Policy
    • Configure Group Policy Caching = disabled. Windows 8.1/2012 R2 setting
    • Configure Logon Script Delay = enabled, 0 minutes. Windows 8.1/2012 R2 setting.
    • Configure User Group Policy loopback processing mode = Enabled, either Merge or Replace depending on the desired result

Internet Explorer Group Policy Preferences

The Internet Explorer Maintenance settings in group policy (User Configuration > Windows Settings > Internet Explorer Maintenance) have been removed in Internet Explorer 10 and Windows Server 2012.

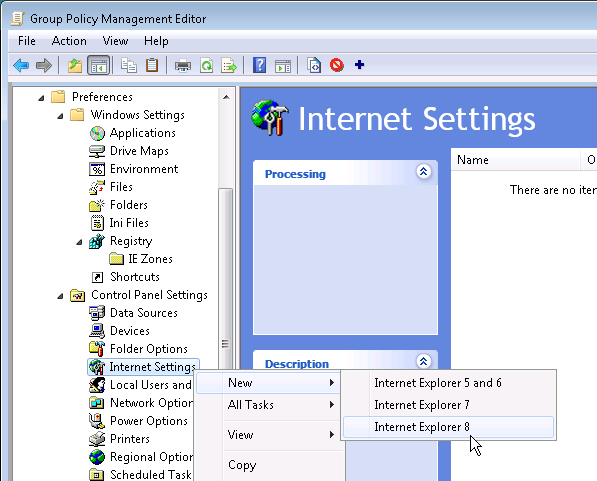
If you run group policy editor on Windows Server 2008 R2 and try to add an Internet Settings object using Group Policy Preferences, notice there is no option to configure Internet Settings for Internet Explorer 9 or Internet Explorer 10.
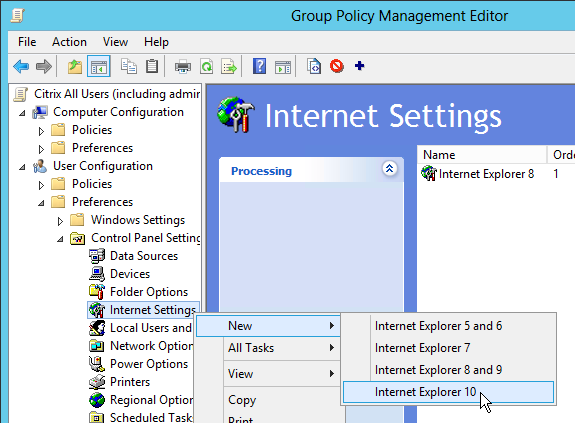
If you use group policy editor in Windows 8 or Windows 2012, then Internet Explorer 10 is an option.
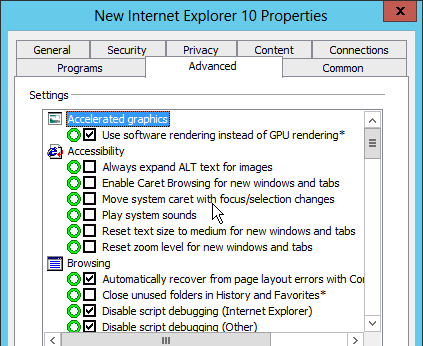
If you have access to Windows 8/2012, you can add an Internet Settings object for Internet Explorer 10. When configuring a setting, notice the red or green lines (and red or green circles). Only green settings are applied. To change a setting to green, press F6 on your keyboard. To disable a setting, press F7 on your keyboard.
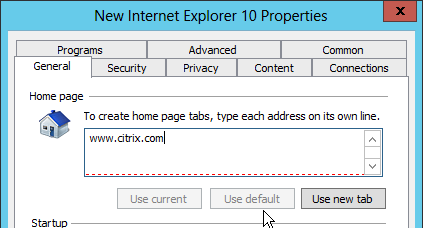
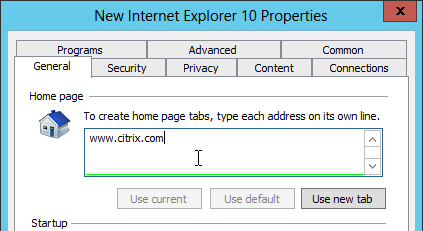
As you look through the tabs, you’ll see a bunch of green items. These green items will be applied and might not be the behavior you expect. To disable all settings on a particular tab, press F8. To turn them back on, press F5.
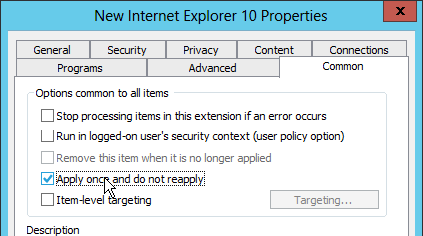
On the Common tab you can check the box to Apply once and do not reapply.
Internet Explorer Security Zone Configuration

There is a group policy setting at User Config | Policies | Administrative Templates | Windows Components | Internet Explorer | Internet Control Panel | Security Page |  Site to Zone Assignment List that can be used to put Internet sites in Internet Explorer security zones. However, users cannot add their own sites (the user interface in Internet Explorer is grayed out).

This section details an alternative procedure for administrator-configured zones while allowing users to add their own Trusted Sites.

Note: Zones can’t be configured using a Group Policy Preferences Internet Settings object so instead you’ll need to configure registry keys as detailed below.

  1. Run Internet Explorer and configure security zones as desired.
  2. If you are using Workspace Control in Receiver for Web or need pass-through authentication, make sure you add StoreFront as a Local Intranet Site.
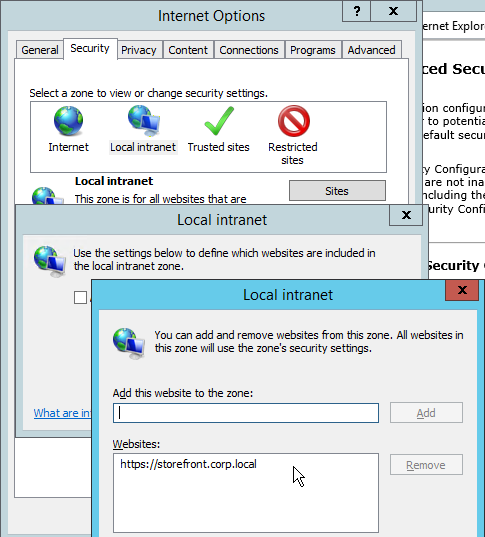
  3. Run Group Policy Management Console on the same machine where you have security zones configured.
  4. Edit the Citrix VDA All Users GPO.
  5. Go to User Configuration > Preferences > Windows Settings > Registry and create a new Collection Item. Name it IE Zones or similar.
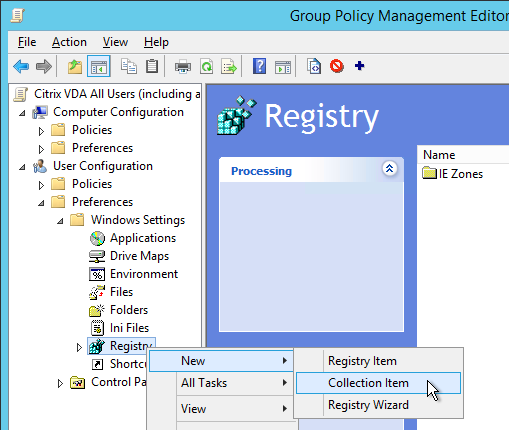
  6. Right-click the collection and click New > Registry Item.
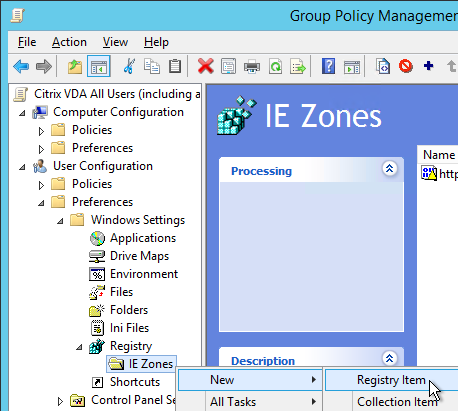
  7. Click the button next to Key Path.
  8. Navigate to HKEY_CURRENT_USER\Software\Microsoft\Windows\CurrentVersion\Internet Settings\ZoneMap\Domains. Click the key corresponding to the FQDN you’re adding. Then select the registry value on the bottom that corresponds to the protocol (e.g. * or https). Click Select. Note: 1 indicates Local Intranet zone.
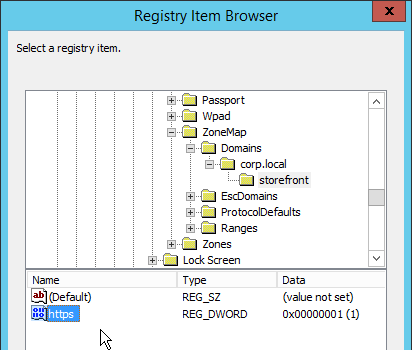
  9. Then click OK. Note: 1 indicates Local Intranet zone.
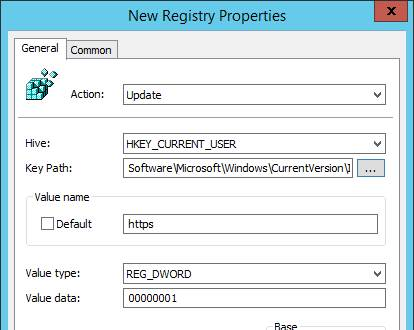
  10. Feel free to rename the Registry Item to reflect the actual zone.
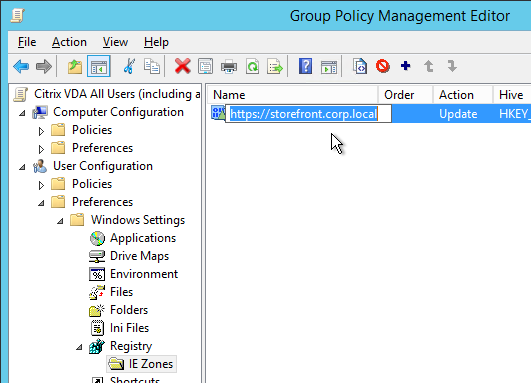
  11. Repeat these steps for additional zones.

Internet Explorer Home Page

If you don’t have access to Windows 8/2012 group policy editor, configure the default home page using a registry key.

  1. Run Internet Explorer and configure home page as desired.
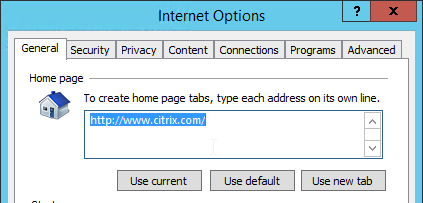
  2. Run Group Policy Management Console on the same machine where you have the home page configured.
  3. Edit the Citrix VDA All Users GPO.
  4. Go to User Configuration > Preferences > Windows Settings > Registry and create a new Registry Item.
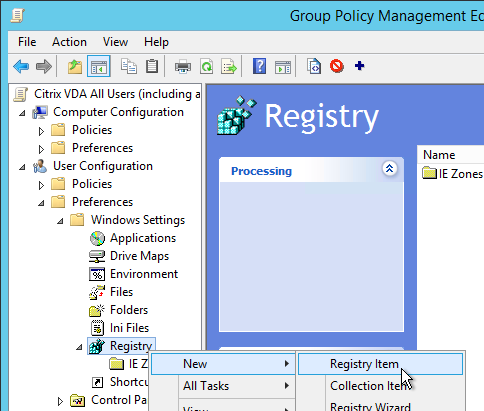
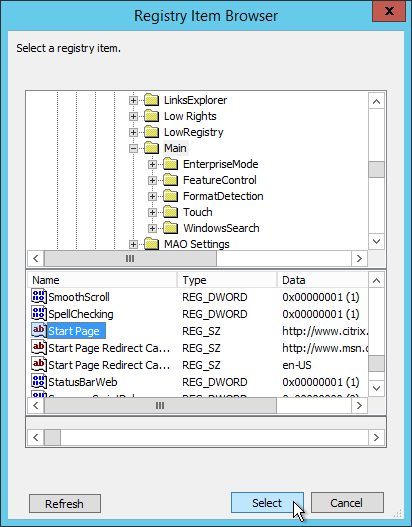
  5. Click the button next to Key Path.
  6. Navigate to HKEY_CURRENT_USER\Software\Microsoft\Internet Explorer\Main. On the bottom, select Start Page. Then click Select.
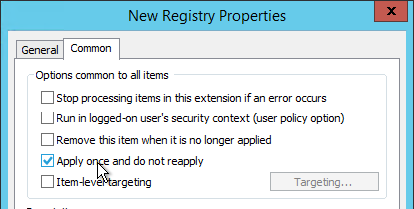
  7. On the Common tab, you can select Apply once and do not reapply. Then click OK.
Proxy Settings

If you don’t have access to Windows 8/2012 group policy editor, configure Proxy Settings using registry keys. Proxy Settings are stored under HKCU\Software\Microsoft\Windows\CurrentVersion\Internet Settings. Use Group Policy Preferences or similar to distribute the registry keys.
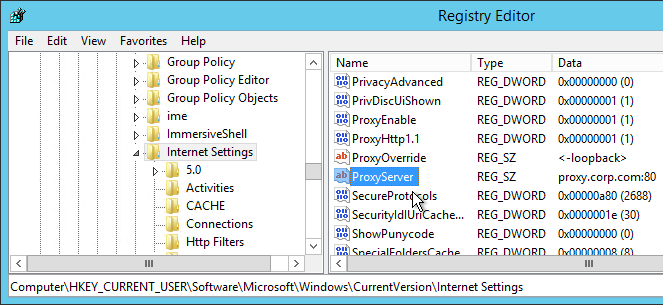
To prevent users from changing proxy settings, also configure the following group policy setting.

  • User Configuration | Policies | Administrative Templates | Windows Components | Internet Explorer | Internet Control Panel
    • Disable the Connections page = enabled

Internet Explorer Performance

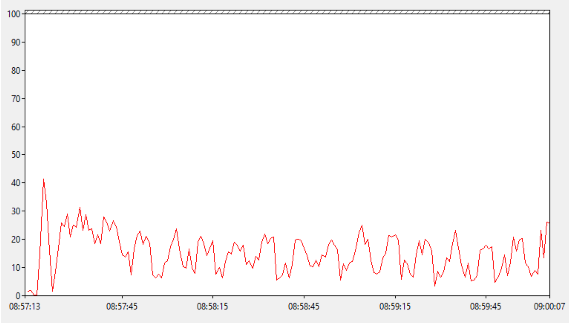
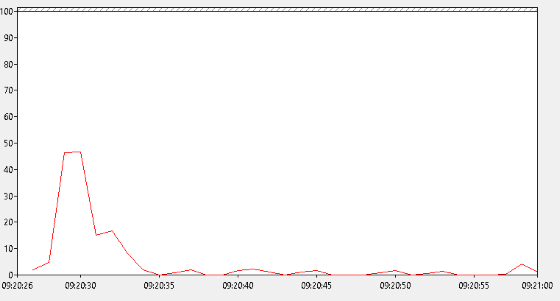
Julian Mooren at XenApp & Internet Explorer – Improving User Experience details how to enable Tracking Protection in Internet Explorer to reduce XenApp CPU. The procedure uses Group Policy Preferences to set registry keys, and adds a folder to Citrix Profile Management synchronization.
Microsoft 365 Apps / Office 365 / Office 2021 / Office 2019 / Office 2016

Microsoft 365 Apps (aka Office 365) Planning

Microsoft 365 Apps ProPlus is supported on Windows Server 2019.

Microsoft FSLogix can roam Office cache files (e.g. Outlook .ost file) and Search Index. FSLogix is free for most customers.

CTP Marius Sandbu Guide to Deploying Office 365 in RDSH and VDI Enviroment contains:

  • Common best-practices and guidelines
  • Identity Federation and sync
  • Licensing and Roaming
  • Deployment and managing updates
  • Vendors and Office 365 Optimization
  • Skype for Business
  • Teams
  • Outlook
  • OneDrive
  • Group Policy
  • Troubleshooting and general tips for tuning
  • Remote display protocols and when to use when.
  • Server 2019 and Office 365
  • Office 2019 / Office 365 ProPlus

Citrix Implementation Guide Microsoft Office 365 for Citrix XenApp and XenDesktop 7.x contains:

  • Considerations for Outlook Cached Mode
  • Group Policy settings for Outlook Cached Mode
  • For Lync Audio/Video – various options for delivering the Lync client
  • Caveats for OneDrive for Business
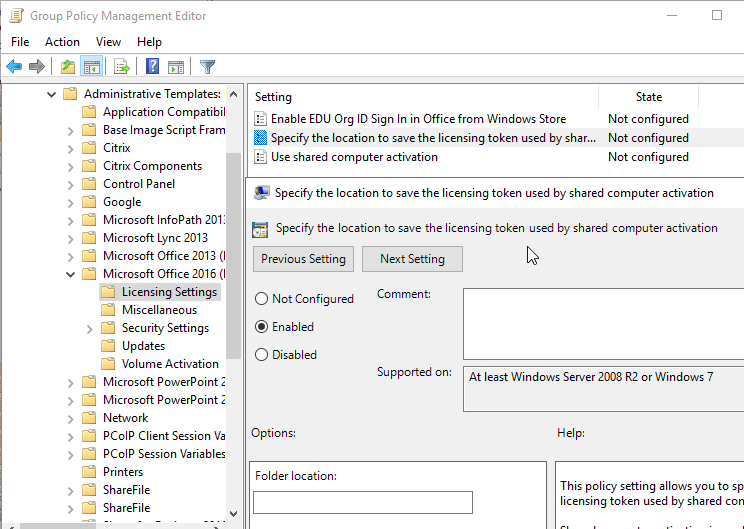
  • Licensing – shared computer activation

VMware Best Practices for Delivering Microsoft Office 365 in VMware Horizon 7 contains:

  • Requirements for Using Nonpersistent VDI and RDS with Office 365 ProPlus
  • Using the Office 2016 Deployment Tool to download and install Office
  • Enabling Shared Computer Activation on Nonpersistent VDI and RDS
  • Considerations for Deploying Office 365 ProPlus to a Horizon Environment – OneDrive, Outlook
  • Office Group Policy Settings

Office 2021 / 2019

Office 2021 and Office 2019 are Perpetual version of Office, which means no new features until the next Office LTSC is released.

  • By contrast, Microsoft 365 Apps ProPlus receives new features periodically (every few weeks).

Office 2021 and Office 2019 require volume licenses. See Microsoft Office 2019 Volume License Pack for KMS server or Active Directory activation.

There is no MSI installer for Office 2021 or Office 2019. Instead, you use Office Deployment Tool to download and install the Click-to-run version of Office 2021/2019 Volume License. See Deploy Office LTSC 2021 or Deploy Office 2019 (for IT Pros).

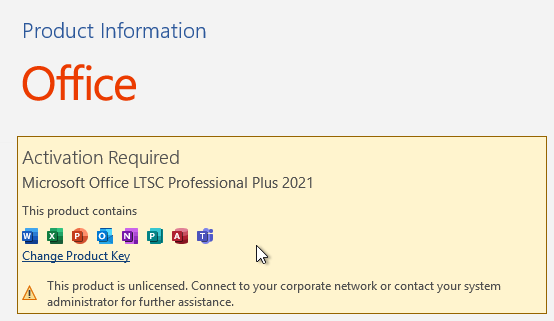
The Office 2021/2019 icons/shortcuts do not say 2021 or 2019 on the end. There’s no year designation.
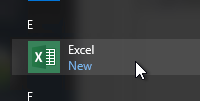
File > Account shows the version info. As does Apps and Features.
Office Group Policy Templates

Download the Microsoft 365 Apps / Office LTSC 2021 / Office 2019 / Office 2016 group policy templates. The same templates are used for all Office versions 2016 and newer.

Microsoft renamed Office 365 to Microsoft 365 Apps.

Choose the bitness that you installed. The default for Microsoft 365 Apps is x64.

Microsoft 365 Apps, Office 365, Office 2021, Office 2019, Office 2016

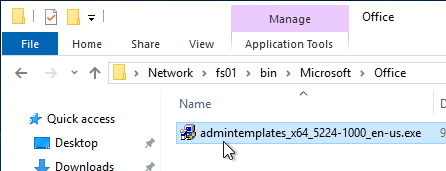
  1. Go to the downloaded Microsoft 365 Apps / Office 365 / Office 2021 / Office 2019 / Office 2016 group policy templates and run admintemplates_x64_5077-1000_en-us.exe.
    Note: Office 2016, Office 2019, Office 2021, and Office 365 use the same group policy templates.
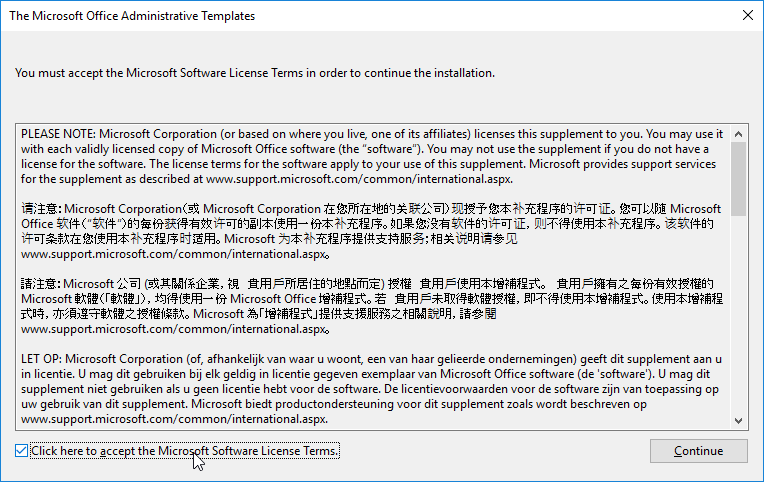
  2. Check the box next to Click here to accept and click Continue.
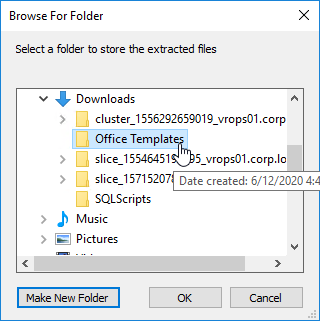
  3. Specify a folder to place the extracted templates in.
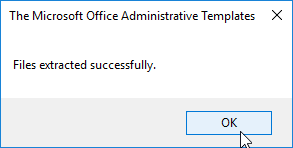
  4. Click OK to acknowledge that files extracted successfully.
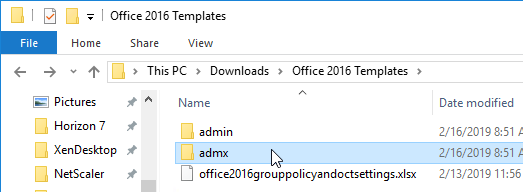
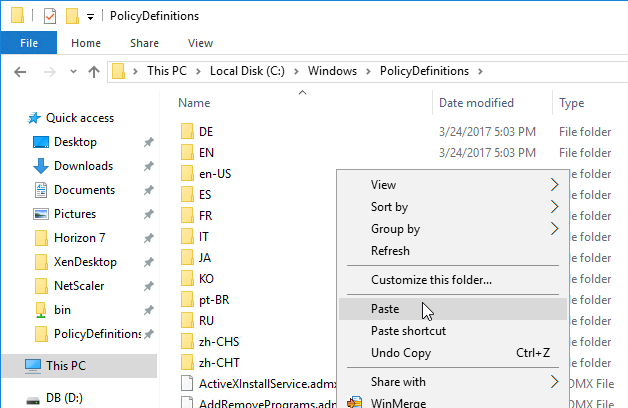
  5. Go to the folder where you extracted the files, and open the ADMX folder.
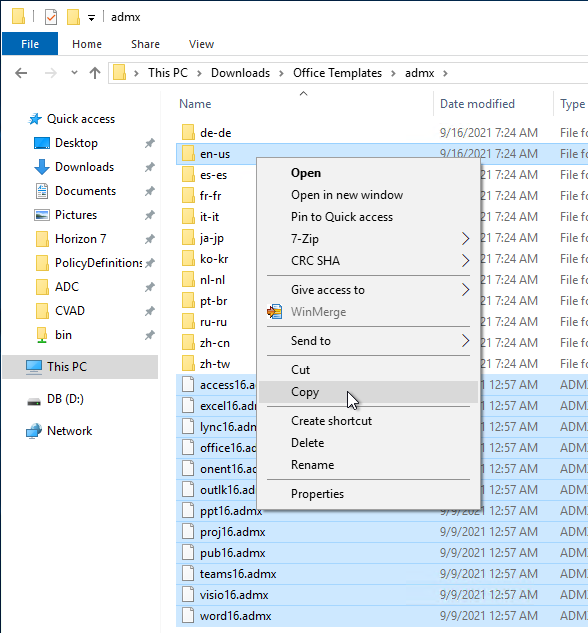
  6. Copy all .admx files, and the en-us folder, to the clipboard.
  7. Go to \\domain.com\sysvol\domain.com\Policies\PolicyDefinitions and paste the files.
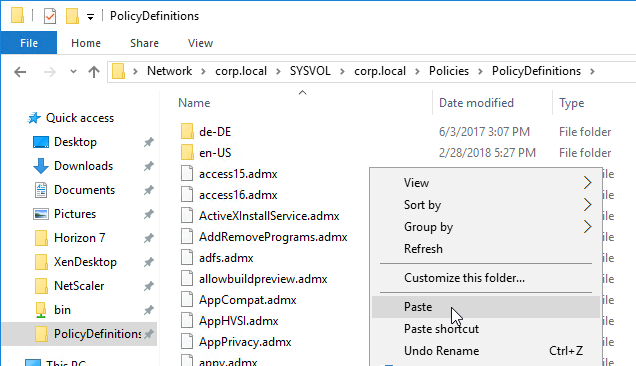
    • If you do not have PolicyDefinitions in your Sysvol, then instead go to C:\Windows\PolicyDefinitions and paste the files.
Group Policy and Tweaks

This section assumes the Group Policy Objects have already been created.

For Teams, edit the Citrix VDA Computer Settings GPO and enable the Group Policy settings shown below.

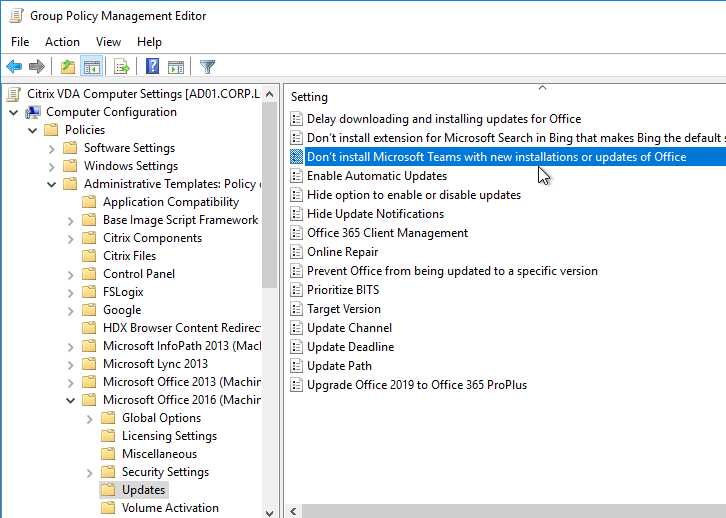
Prevent the per-user version of Teams from installing with Office 365 (aka Microsoft 365 apps). Configure this GPO setting before installing Office. Then you can later install the machine-wide version of Teams. More details at Microsoft Docs.

  • Updates – Computer Configuration | Policies | Administrative Templates | Microsoft Office 2016 (Machine) | Updates
    • Don’t install Microsoft Teams with new installations or updates of Office = enabled
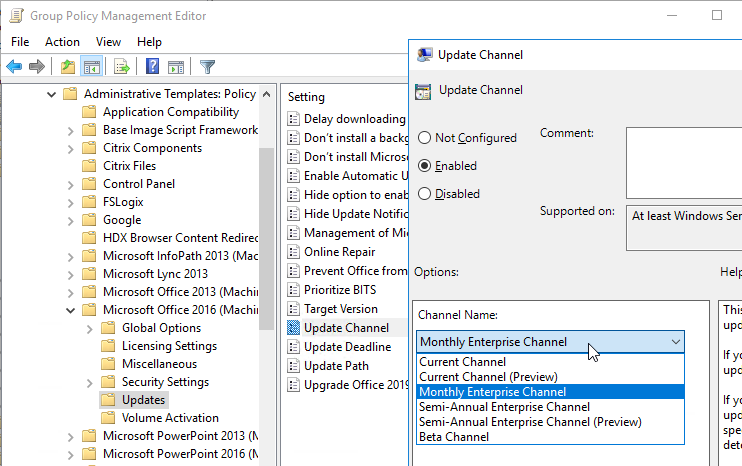
    • Update Channel – for Microsoft 365 Apps (aka Office 365) only
Edit the Citrix VDA All Users GPO and enable the Group Policy settings shown below. All are located under User Configuration > Policies.

Office 2013 group policy settings are different than the group policy settings for Office 2016, Office 2019, Office 365, and Microsoft 365 Apps. If you want to copy Office 2013 settings to Office 365 / 2019 / 2016 settings, see Microsoft’s Copy-OfficeGPOSettings PowerShell script.

Microsoft 365 Apps, Office 365, Office 2019, and Office 2016 are all version 16.0, thus the same GPO settings work for all of these versions. In Group Policy Editor, the GPO settings are under the Office 2016 folders.

  • Disable Office Telemetry
    • Key = HKCU\Software\Microsoft\Office\Common\ClientTelemetry
      • Value (DWORD) DisableTelemetry = 0xffffffff
  • User Configuration | Policies | Administrative Templates | Microsoft Office 2016 | First Run
    • Disable First Run Movie = enabled
    • Disable Office First Run on application boot = enabled
  • User Configuration | Policies | Administrative Templates | Microsoft Office 2016 | Global Options |Customize
    • Allow roaming of all user customizations = enabled
  • User Configuration | Policies | Administrative Templates | Microsoft Office 2016 | Miscellaneous
    • Block signing into office = enabled, Org ID only  Source = Microsoft Answers
    • Disable Office Animations = enabled
    • Do not use hardware graphics acceleration = enabled (if no GPU)
    • Hide file locations when opening or saving files = enabled, Hide OneDrive Personal
    • Suppress recommended settings dialog = enabled
  • User Configuration | Policies | Administrative Templates | Microsoft Office 2016 | Privacy | Trust Center
    • Automatically receive small updates to improve reliability = disabled
    • Disable Opt-in Wizard on first run = enabled
    • Enable Customer Experience Improvement Program = disabled
  • User Configuration | Policies | Administrative Templates | Microsoft Office 2016 | Tools | Options | General | Service Options… | Online Content
    • Online Content Options = enabled, Allow Office to connect to the Internet
  • User Configuration | Policies | Administrative Templates | Microsoft Outlook 2016 | Account Settings | Exchange
    • Automatically configure profile based on Active Directory Primary SMTP address = enabled
  • User Configuration | Policies | Administrative Templates | Microsoft Outlook 2016 | Account Settings | Exchange | Cached Exchange Mode
    • Use Cached Exchange Mode for new and existing Outlook profiles = disabled
    • If you prefer to use Cached Exchange Mode, set the above setting to enabled, and add below: Source = Citrix’s Office 365 Implementation Guide
      • Cached Exchange Mode Sync Settings = enabled, time-window of downloaded content
      • Install FSLogix to assist with roaming of the OST file.
  • User Configuration | Policies | Administrative Templates | Microsoft Outlook 2016 | Miscellaneous | PST Settings
    • Default location for PST files = enabled, user’s home directory
  • User Configuration | Policies | Administrative Templates | Microsoft Outlook 2016 | Outlook Options | Other | AutoArchive
    • AutoArchive Settings = enabled, uncheck box next to Turn on AutoArchive
  • User Configuration | Policies | Administrative Templates | Microsoft Outlook 2016 | Outlook Options | Preferences | Search Options
    • Prevent installation prompts when Windows Desktop Search component is not present = enabled
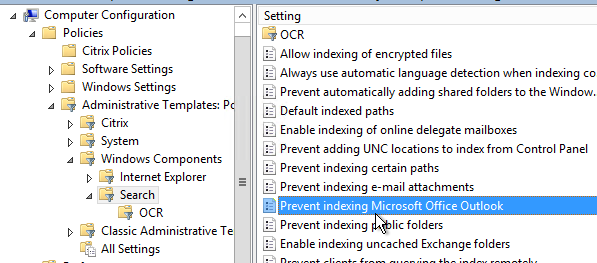
  • Computer Config | Policies | Administrative Templates | Windows Components | Search |
    • Prevent indexing Microsoft Office Outlook = enabled (see below)

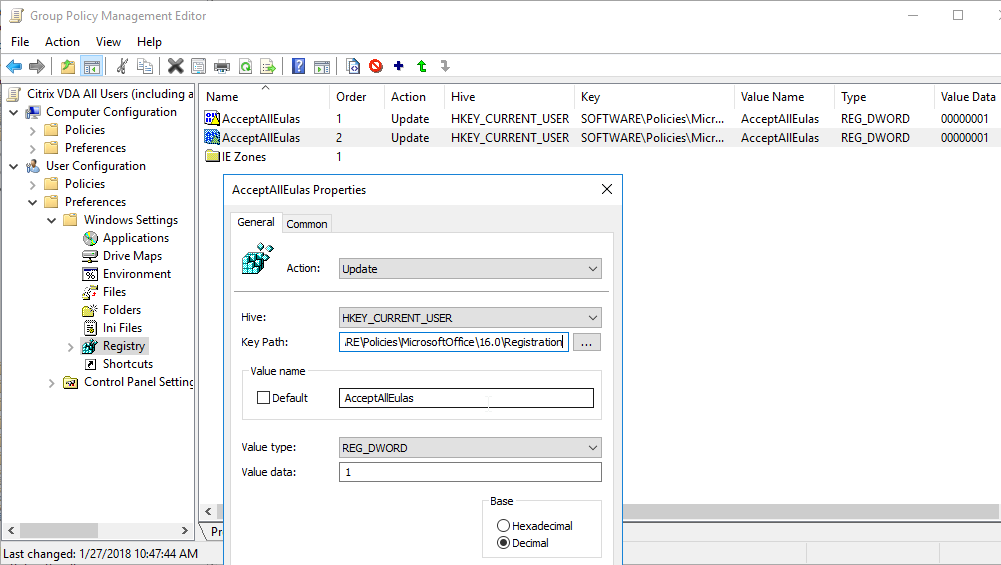
Office Click-to-Run Accept EULA Window

To get rid of the Accept Office License Agreement button/window…
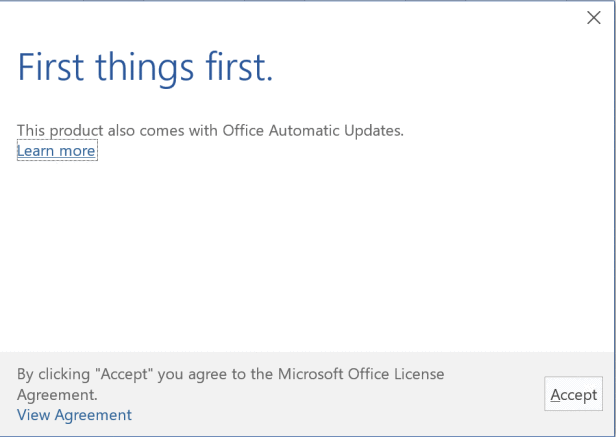
Use Group Policy Preferences to set the following registry values:

  • HKEY_CURRENT_USER\Software\Policies\Microsoft\Office\15.0\Registration
    • AcceptAllEulas (DWORD) = 1
  • HKEY_CURRENT_USER\Software\Policies\Microsoft\Office\16.0\Registration
    • AcceptAllEulas (DWORD) = 1

Office temp file errors

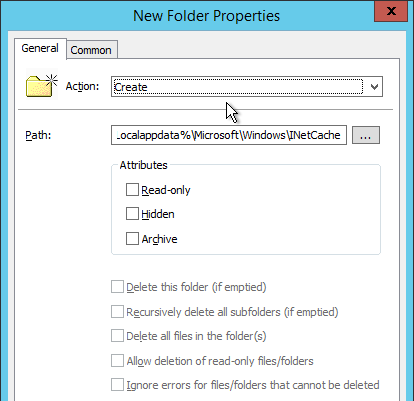
To prevent Office temp file errors:

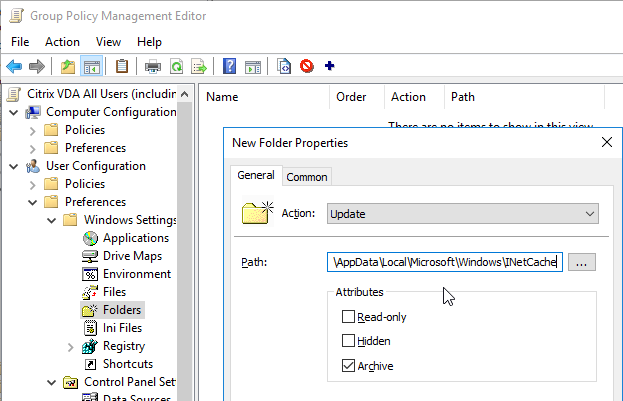
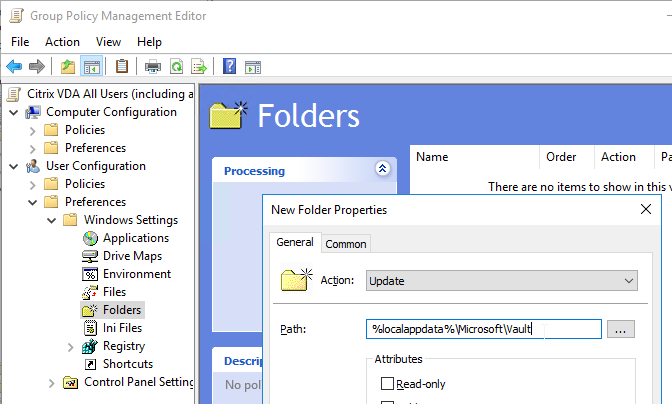
  • User Configuration | Preferences | Window Settings | Folders | New Folder
    • Action = Create
    • Path = %Localappdata%\Microsoft\Windows\INetCache
Outlook and Windows Search

When launching Outlook, you might see the message “Please wait while Windows configures Microsoft Office 64-bit Components”.
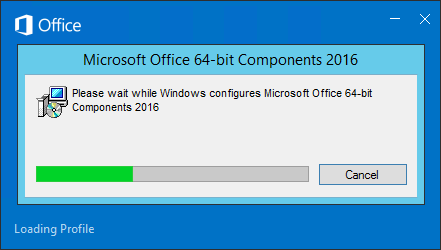
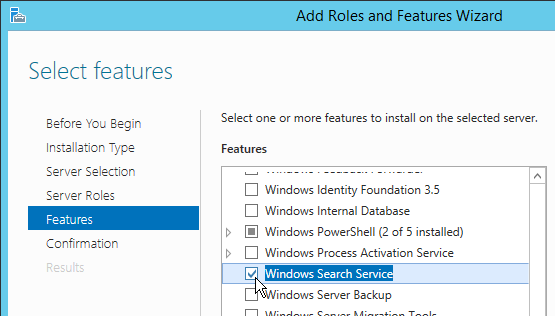
To fix the Outlook search problem, you can either install Windows Search Service (Windows Feature).
Or enable the GPO setting: Computer Config | Policies | Administrative Templates | Windows Components | Search | Prevent indexing Microsoft Office Outlook.
Office VL Activation not working

If Office 2016+ Volume License is not activating correctly, set the following registry value as detailed at Microsoft Office can’t find your license for this application at Citrix Discussions:

  • Key = HKEY_LOCAL_MACHINE\SYSTEM\CurrentControlSet\services\CtxUvi
    • Value = UviProcessExcludes (REG_SZ) = sppsvc.exe

Adobe Reader

Adobe Reader Group Policy

  1. Download the Adobe Reader XI Policy Templates from Reader XI Administrative Template
  2. Copy the .admx file and the en-us folder.
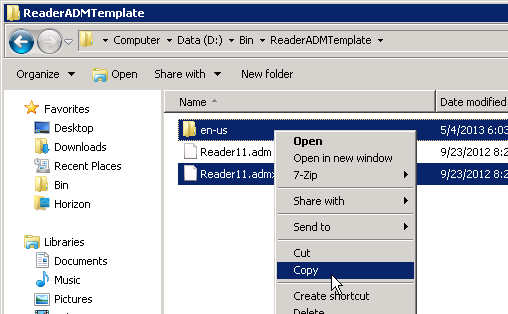
  3. Go to \\domain.com\SYSVOL\domain.com\Policies\PolicyDefinitions and paste the files. If this folder doesn’t exist, go to C:\Windows\PolicyDefinitions instead.
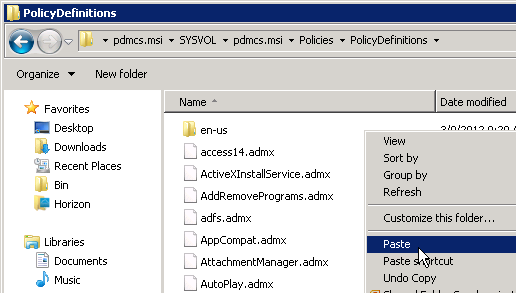
  4. Click Yes when asked to replace files.
  5. Now open a group policy that applies to all Citrix users.
  6. Go to User Configuration > Administrative Templates > Adobe Reader > Preferences > General.
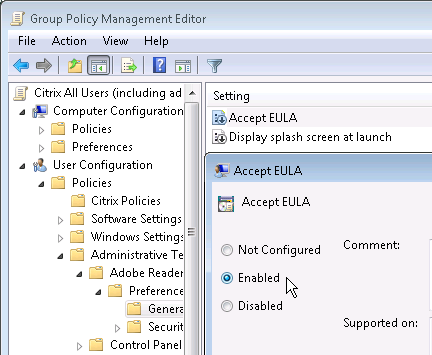
  7. Open the setting Accept EULA and Enable it.
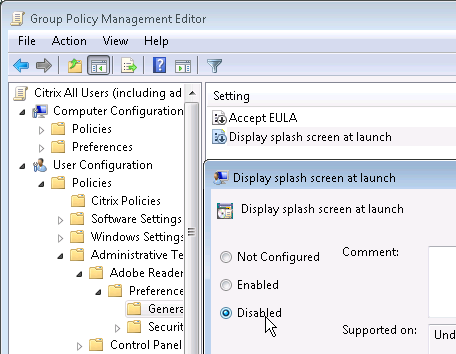
  8. Then open the Display splash screen at launch setting and Disable it.
Disable Repair

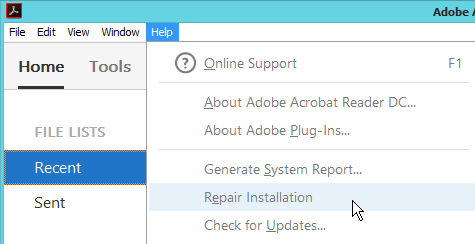
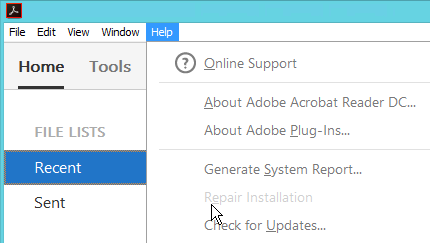
In Adobe Reader, users can open the Help menu and click Repair Adobe Reader Installation.
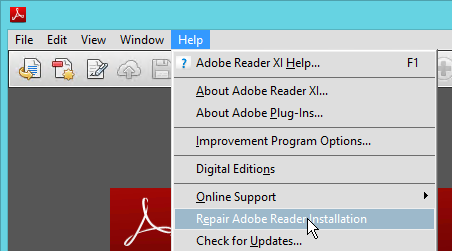
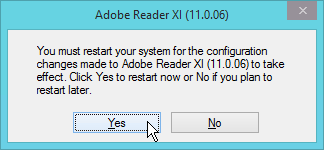
Then users are prompted to reboot. Obviously this is not good. Even non-admins can reboot.
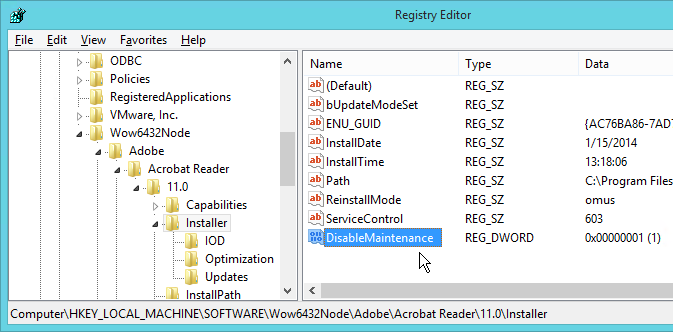
  1. In regedit, navigate to HKEY_LOCAL_MACHINE\SOFTWARE\Wow6432Node\Adobe\Acrobat Reader\11.0\Installer.
  2. Add the DWORD DisableMaintenance and set it to 1.
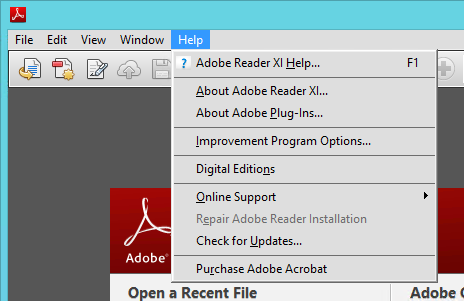
  3. Now the Repair option is grayed out on the Help menu.
Disable Updates

For Acrobat Reader DC, you must edit the registry to disable Updates. This also works for Adobe Reader XI.

  • HKEY_LOCAL_MACHINE\SOFTWARE\Wow6432Node\Adobe\Adobe ARM\Legacy\Reader\{AC76BA86-7AD7-1033-7B44-AC0F074E4100}
    • Mode = 0 (disables updates)


In Adobe Reader XI, there is a GUI method of disabling updates:

  1. Run Adobe Reader from the Start Menu.
  2. Open the Edit menu and click Preferences.
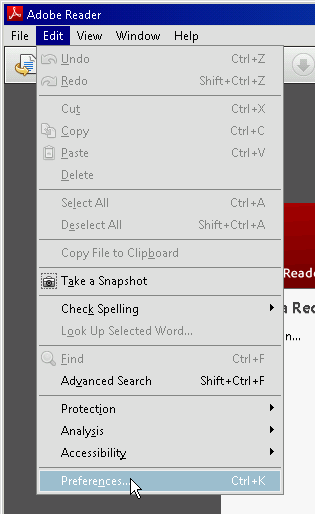
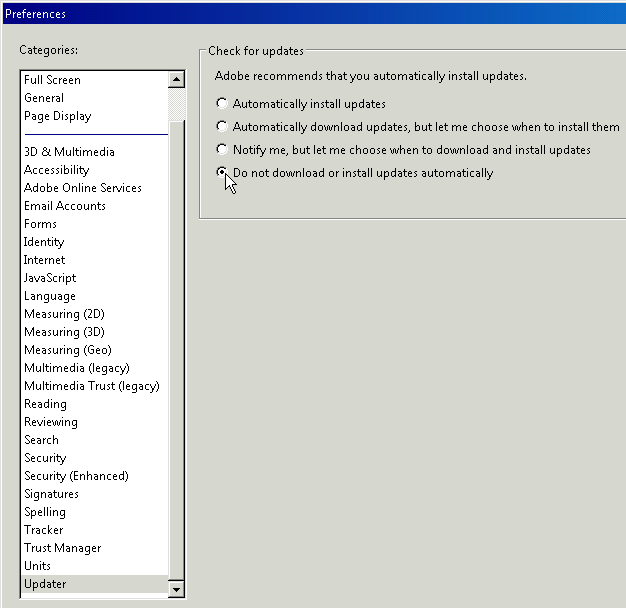
  3. On the Updater page, change the selection to Do not download or install updates automatically and click OK.
Other Optimizations

Rick van Soest Removing “The Cloud” from Adobe Acrobat Reader DC:

  • To remove tools, delete them from C:\Program Files (x86)\Adobe\Acrobat Reader DC\Reader\AcroApp\ENU
  • To remove the welcome screen, add the following registry dword value: HKLM\Software\Policies\Adobe\Acrobat Reader\DC\FeatureLockDown
    • bUsageMeasurement (REG_DWORD) = 0
  • To remove the “add account” button, HKLM\Software\Policies\Adobe\Acrobat Reader\DC\FeatureLockDown\cSharePoint
    • BDisableSharePointFeatures (REG_WORD) = 1
  • To remove the “Check for update” button, HKLM\Software\Adobe\Acrobat Reader\DC\Installer
    • DisableMaintenance (REG_DWORD) = 1


Adobe.com – Citrix Deployments: Before deployment, the product should be configured as needed. In particular, you will want to disable features and behaviors that should not be accessible to end users in an IT-managed environment. For example:

  • The Updater should be disabled as described in this guide and the Preference Reference.
  • Accept the EULA on behalf of all users by setting the appropriate registry key.
  • For multilanguage installations (MUI), set the preferred language for all users via the SUPPRESSLANGSELECTION property or registry settings described in the Preference Reference.
  • Deploy enterprise files to the product’s directories (rather than per-user directories) so they are available to all users.
  • There are over 500 documented settings. Refer to the Preference Reference for complete registry and plist details.


Scrolling performance

If scrolling performance is poor in graphic intensive documents, try the following:

  • Go toEdit > Preferences > Rendering.
  • UncheckSmooth line art and Smooth images. Alternatively, you can set these preferences during pre-deployment configuration:
    • HKCU\Software\Adobe\Adobe Acrobat\10.0\Originals\bAntialiasGraphics: 0x00000000
    • HKCU\Software\Adobe\Adobe Acrobat\10.0\Originals\bAntialiasImages: 0x00000000


Distiller performance

  • In some environments, Distiller performance may suffer if the messages.log file becomes too large after a number of Distiller operations. Delete this file periodically. It is located at \Application Data\Adobe\Acrobat\Distiller<version>\messages.log.
  • Remove unused fonts from the Windows installation.

Citrix Files

Citrix Files allows you to access your files in ShareFile directly through a mapped drive providing a native Windows Explorer experience. Citrix FIles replaces ShareFile Drive Mapper.

Citrix Files instructions:

To install Citrix Files:

  1. If Citrix ShareFile Drive Mapper is installed, uninstall it. Also see CTX238202 Upgrading from ShareFile Drive Mapper to Citrix Files for Windows.
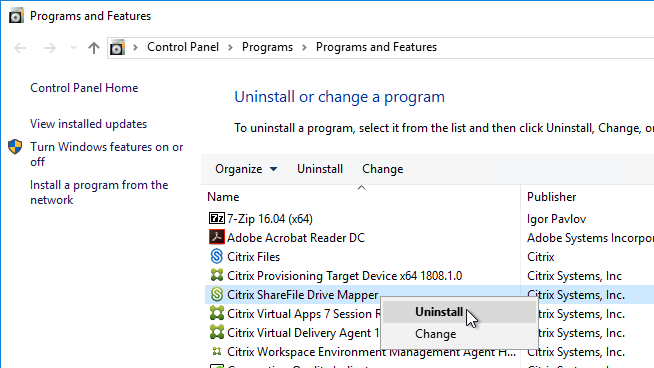
  2. In VDA 1808 and newer, Citrix Files is bundled with the VDA installer.
  3. Or, download Citrix Files. The downloaded version might be newer than the version included with the VDA installer.
  4. On a VDA, run CitrixFilesForWindows-v.exe.
  5. Check the box next to I agree to the license terms, and click Install.
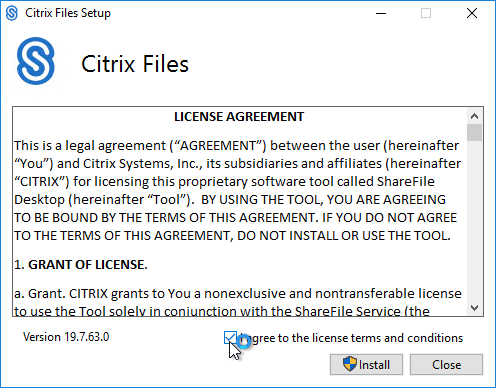
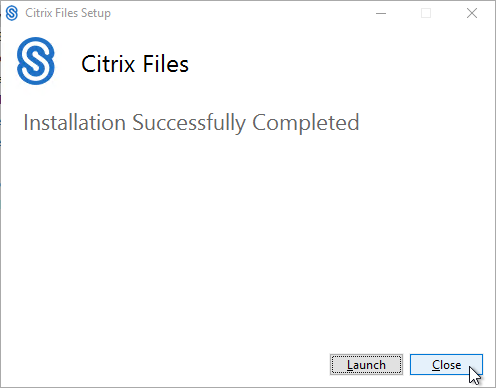
  6. In the Setup Successful page, click Close.
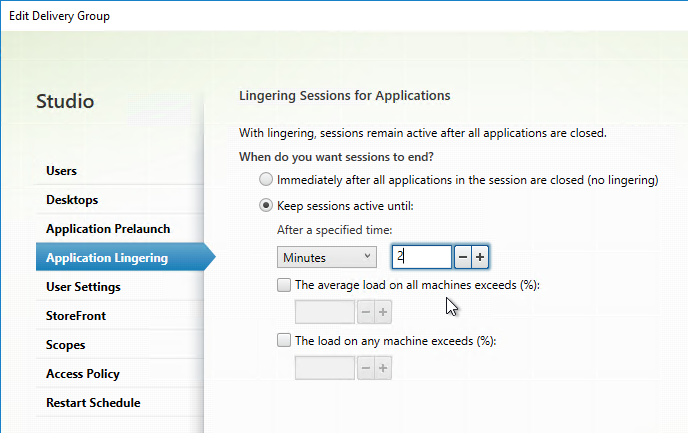
Session Lingering:

  • Citrix recommends editing your Delivery Group and enabling Application Lingering for a couple minutes so Citrix Files has time to upload files.
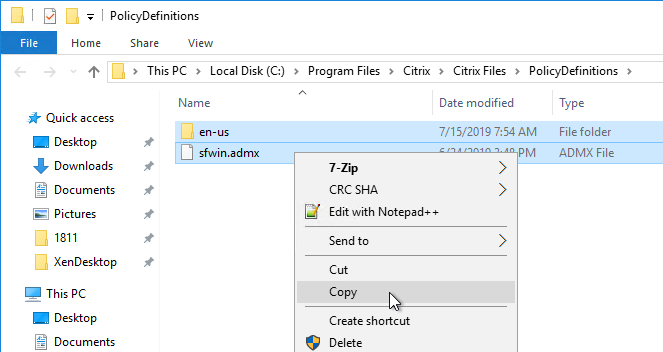
To configure Citrix Files:

  1. Go to C:\Program Files\Citrix\Citrix Files\PolicyDefinitions, and copy the file and folder.
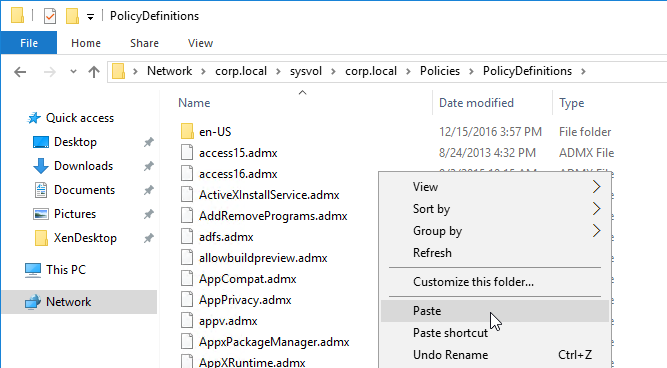
  2. Go to \\domain.com\SYSVOL\domain.com\Policies\PolicyDefinitions and paste the files and folder. If this path doesn’t exist, then paste the files in C:\Windows\PolicyDefinitions on your Group Policy editing machines instead.
  3. Edit a GPO that applies to all users.

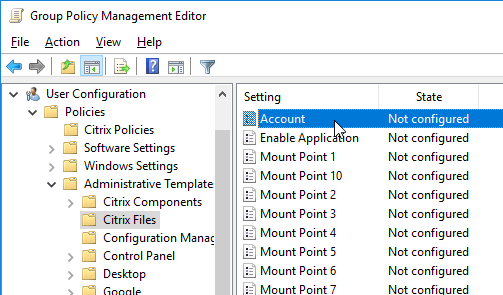
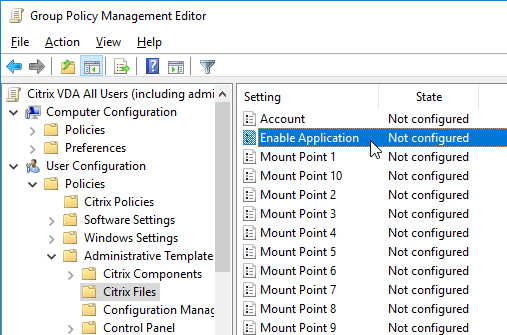
    1. Go to User Configuration > Policies > Administrative Templates > Citrix Files.
    2. Citrix Files is enabled by default. If you only want some users to use Citrix Files, then you can configure a GPO to disable Citrix Files, and then configure a different GPO that re-enables it. The GPO that enables Citrix Files would be targeted to an AD group, and the GPO would be higher priority than the GPO that disables it. The setting to disable and enable Citrix Files is called Enable Application.
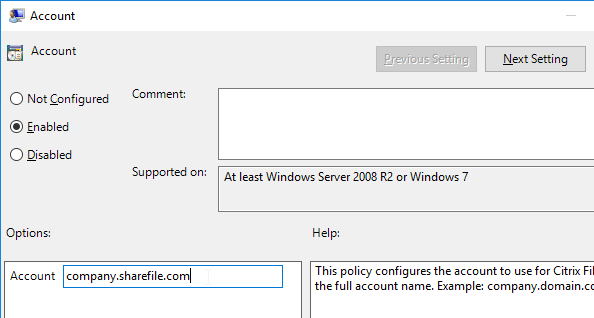
    3. Edit the Account setting.
    4. Enable the setting, and enter your ShareFile URL. Click OK.
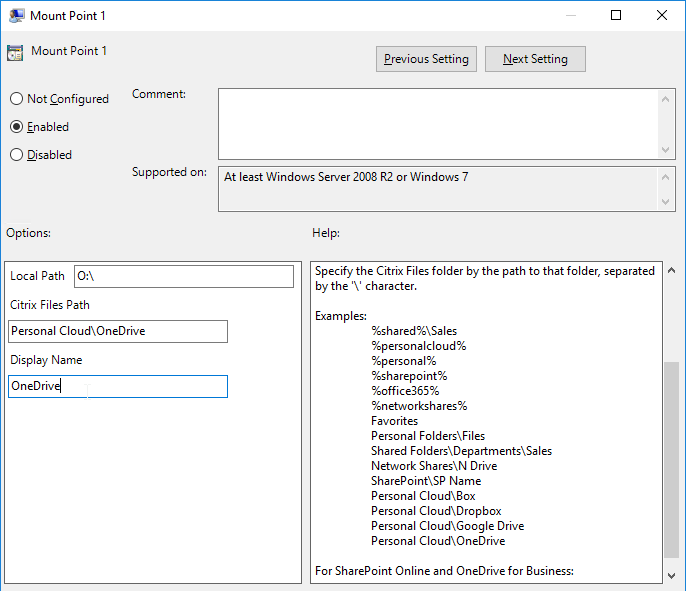
    5. The Mount Point settings let you map different parts of Citrix Files to different drive letters.
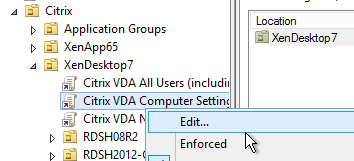
  4. Edit a GPO that applies to the computers that have Citrix Files installed.
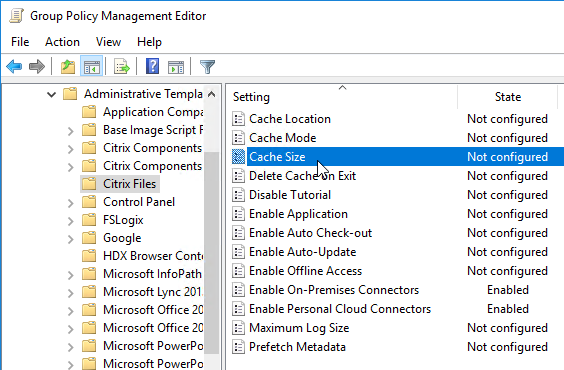
    1. Go to Computer Configuration > Policies > Administrative Templates > Citrix Files.
    2. The default Cache Location is AppData\Local\Citrix\Citrix Files\PartCache.
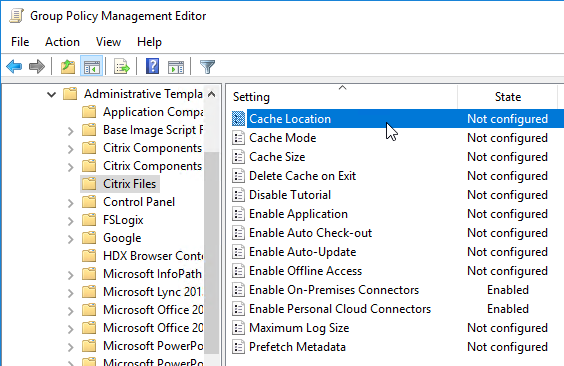
    3. Default Cache Size is 256 MB.
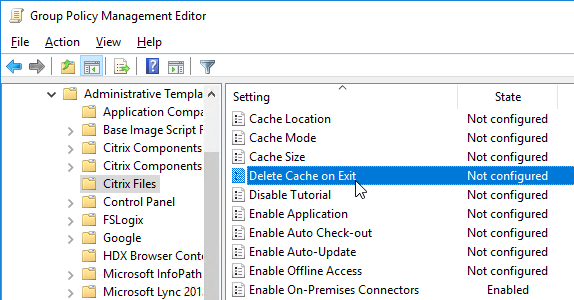
    4. Delete Cache on Exit is not needed on non-persistent machines, and not needed if the roaming profile cache is deleted on logoff. Make sure the Citrix Files cache is excluded from roaming profiles as detailed later.
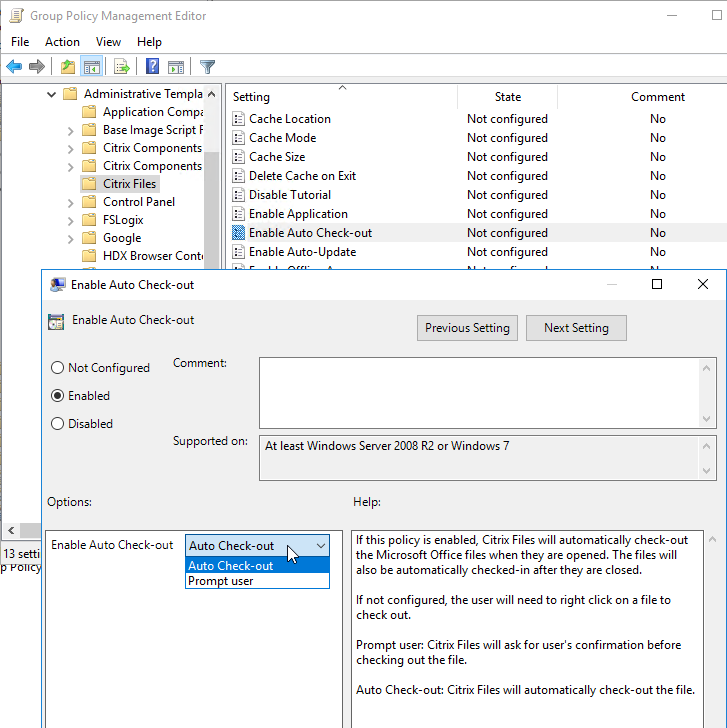
    5. Auto Check-out of Office files can be enabled here.
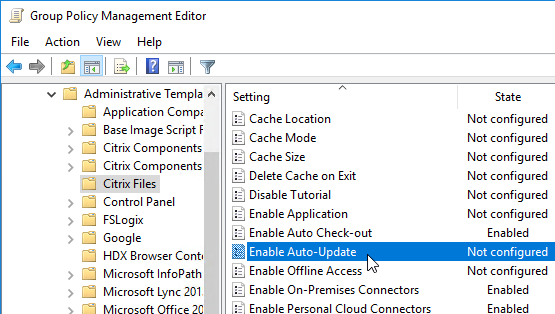
    6. Auto-Update does not apply to Remote Desktop Session Host, so you’ll have to update those machines manually.
    7. Offline Access is enabled (allowed) by default.
    8. Personal Cloud Connectors (e.g. OneDrive) and On-Premises Connectors can be enabled from here.
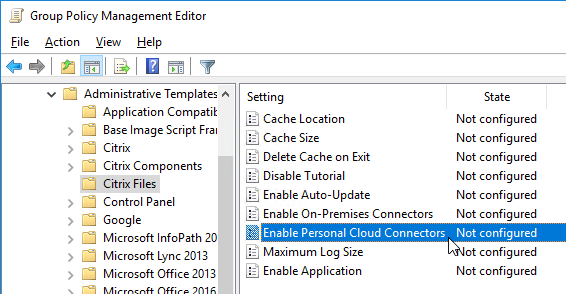
  5. Edit your Citrix Profile Management GPO.
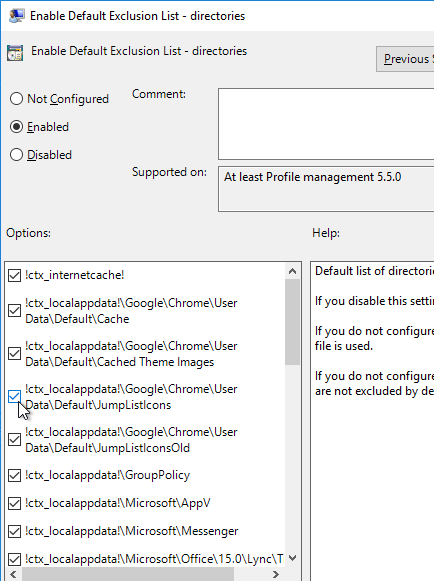
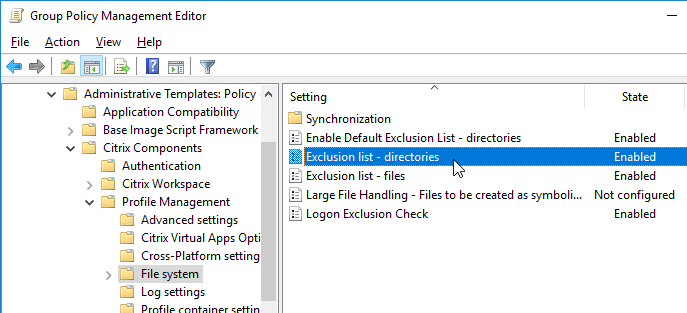
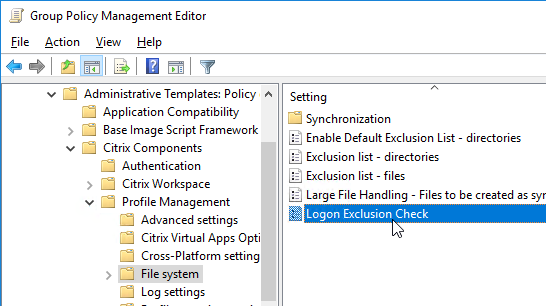
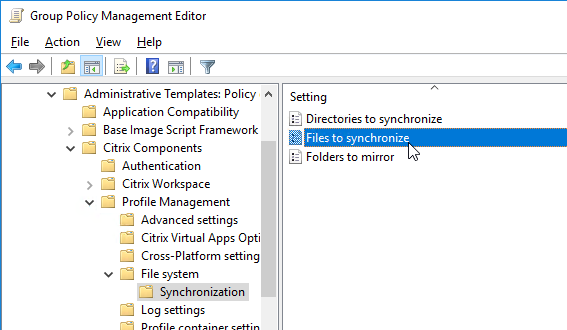
    1. Go to Computer Configuration > Policies > Administrative Templates > Citrix > Profile Management > File system.
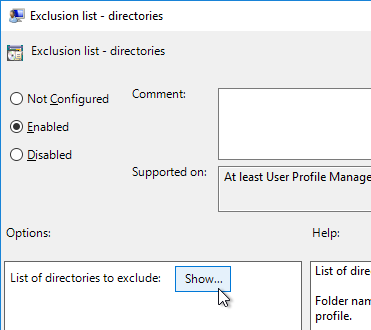
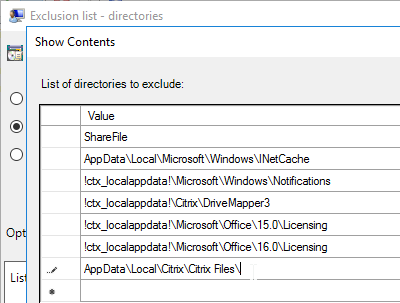
    2. Edit the setting Exclusion list – directories.
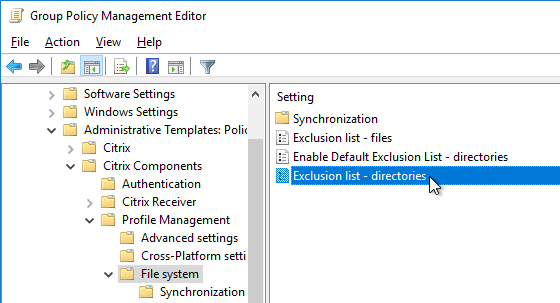
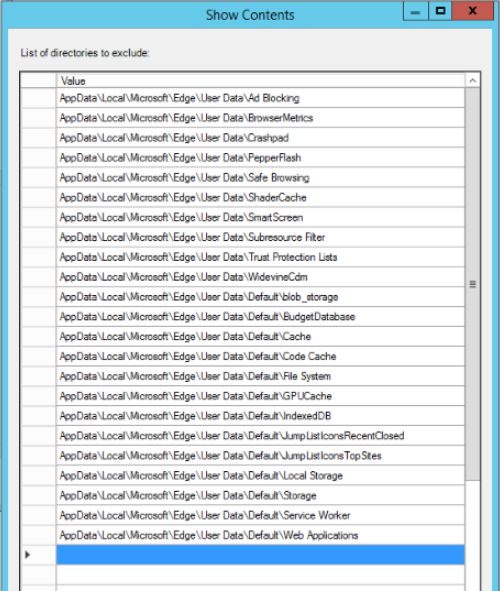
    3. Add AppData\Local\Citrix\Citrix Files\ to the list.
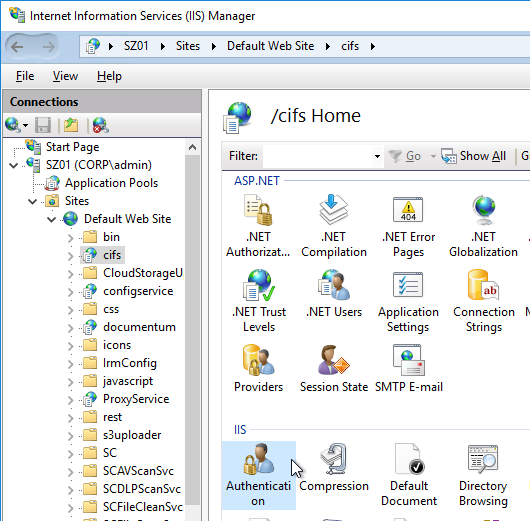
  6. If you have on-premises StorageZones Controllers, you can enable Single Sign-on by enabling Windows Authentication. On the StorageZones Controllers, run IIS Manager.
    1. Navigate to Default Web Site > cifs.
    2. In the middle, double-click Authentication.
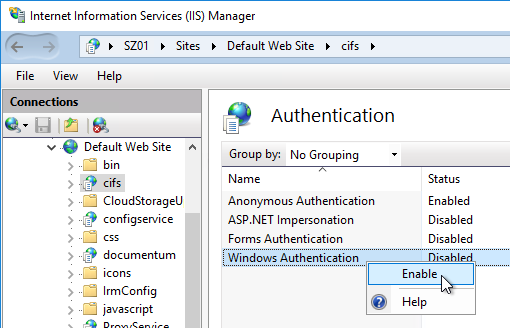
    3. Right-click Windows Authentication and Enable it. If you don’t see Windows Authentication in your list, you might have to install it using the Roles and Features wizard.
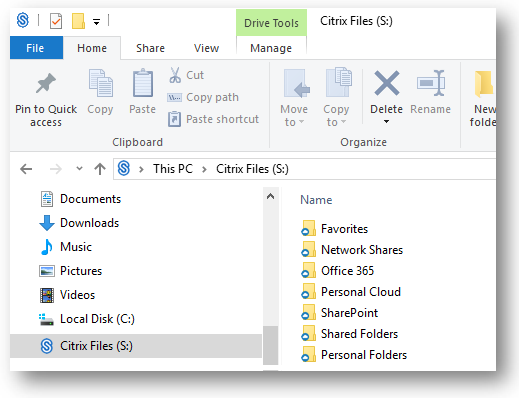
  7. After logging into Citrix and logging into Citrix Files, when you launch File Explorer, you’ll see Citrix Files on the left.
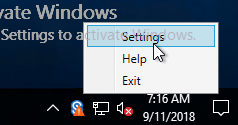
  8. If the Login Window doesn’t appear, the look for the icon in the system tray.
File Type Association

For the official Microsoft method of handling file type associations in Windows 10 and Windows Server 2016, see Windows 10 – How to configure file associations for IT Pros? at TechNet Blogs. This article details DISM, XML, and Group Policy.

Christoph Kolbicz at SetUserFTA: UserChoice Hash defeated – Set File Type Associations per User or Group on Windows 10 and 2016 developed a tool to set specific File Type Associations. No DISM or XML needed.
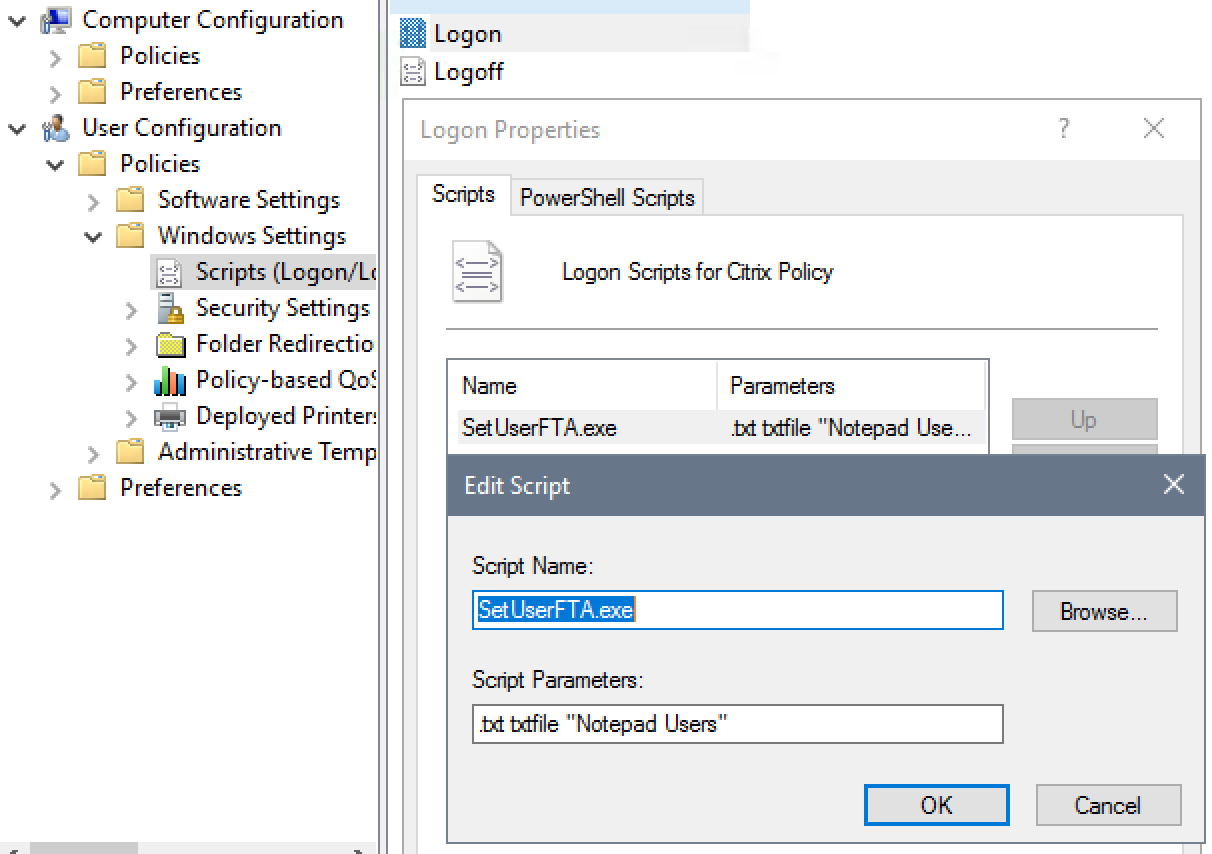
Also see the following:

Next Steps

Group Policy Computer Settings for VDAs

Last Modified: Nov 3, 2023 @ 1:17 pm

Navigation

💡 = Recently Updated

Change Log

Create Group Policy Objects

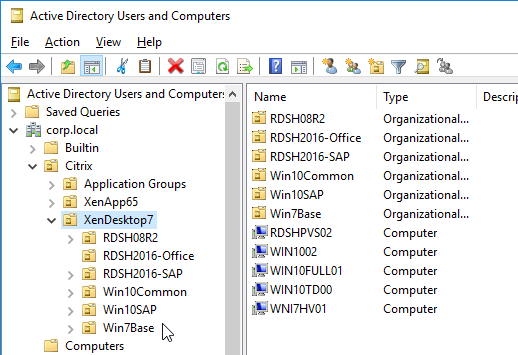
  1. Within Active Directory Users and Computers (dsa.msc), create a parent Organizational Unit (OU) to hold all VDA computer objects.
  2. Then create sub-OUs, one for each Delivery Group. The VDA computer objects for each Delivery Group should be placed in these sub-OUs. Notes:
    • The only objects that belong in these VDA OUs are the VDA computer accounts.
      • There’s no need to put any user accounts in these VDA OUs since Group Policy Loopback Processing mode will handle user settings.
      • The computer objects for the Citrix brokering infrastructure machines (Controllers, StoreFront, Director, etc.) should go in normal server OUs, and not in the VDA OUs.
    • Separate VDA sub-OUs for each Delivery Group lets you apply different GPO settings to each Delivery Group.
    • Grant Citrix Admins the permission to add computer objects to the VDA OUs.
    • Grant Citrix Admins the permission to link GPOs to the VDA OUs.
    • Master images should be placed in the VDA OUs so the VDA GPO Computer Settings can be burned into the master image. This avoids timing issues when non-persistent machines reboot and GPO settings haven’t applied yet.
  3. Move the VDAs from the Computers container to one of the Delivery Group OUs.
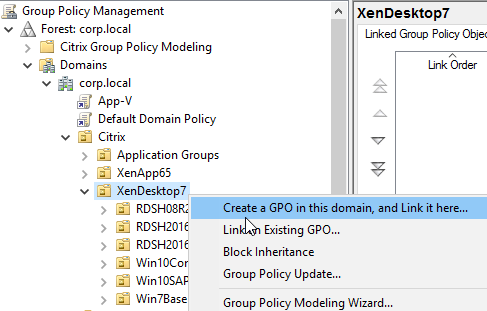
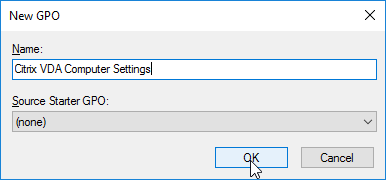
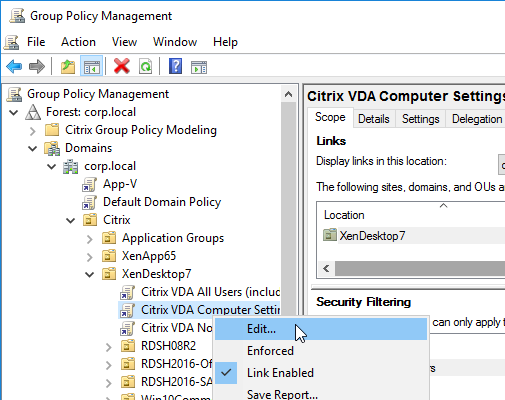
  4. Within Group Policy Management Console (gpmc.msc), create a Group Policy Object (GPO) called Citrix VDA Computer Settings, and link it to one of the Citrix OUs. This particular GPO usually applies to all Delivery Groups, and thus should be linked to the parent OU. Or you can link it to Delivery Group-specific sub-OUs.

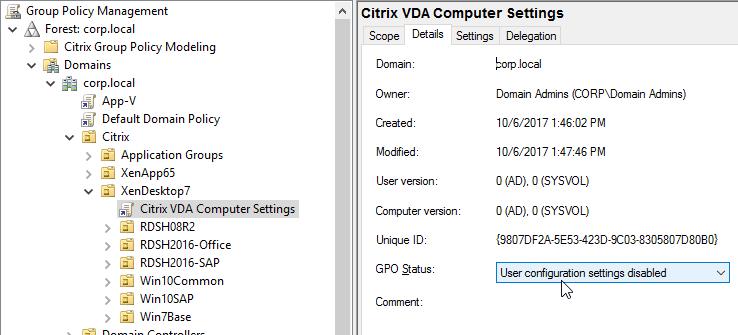
  5. On the left, click the new VDA Computer Settings GPO to highlight it.
  6. On the right, switch to the Details tab.
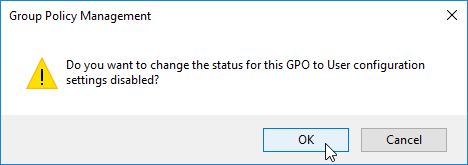
  7. Change the GPO Status drop-down to User configuration settings disabled. This GPO will only contain computer settings.

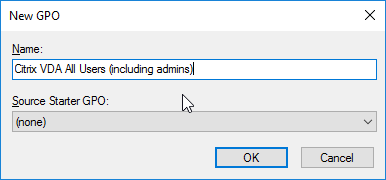
  8. Create and link two new Citrix-specific GPOs (in addition to the Citrix VDA Computer Settings GPO).
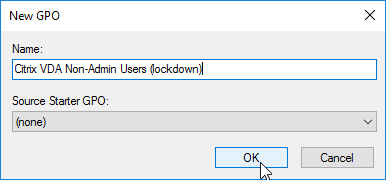
  9. One of the GPOs is called Citrix VDA All Users (including admins), and the other is called Citrix VDA Non-Admin Users (lockdown).


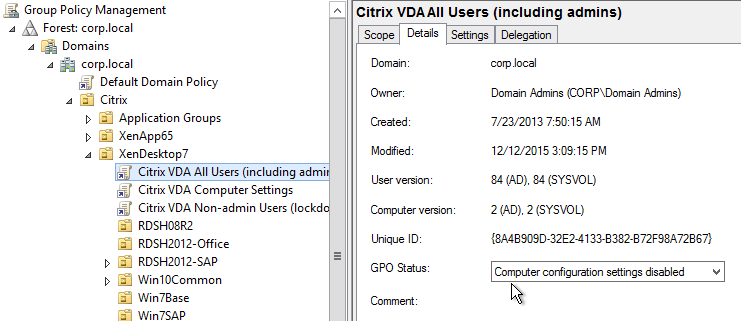
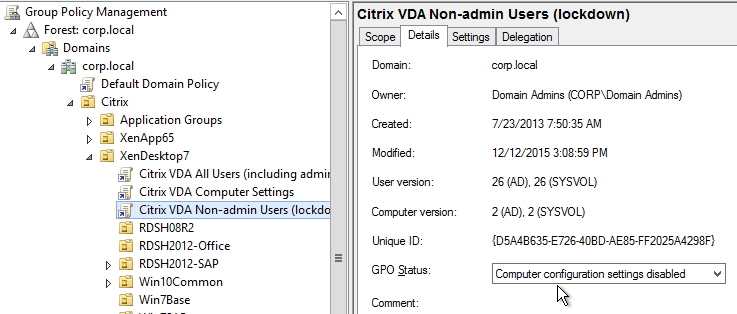
  10. Modify the Details page of both of these GPOs, and set GPO Status to Computer configuration settings disabled. These GPOs will only contain user settings.

  11. On the left, click the Citrix VDA Non-Admin Users GPO to highlight it.
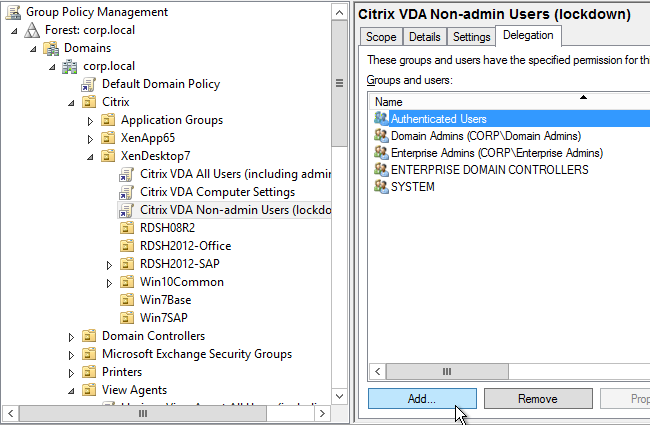
  12. To delegate administration of this GPO to Citrix Admins:
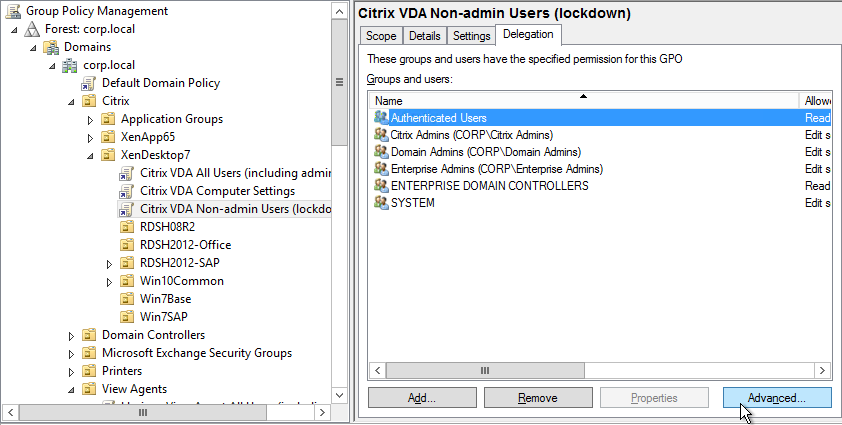
    1. On the right, switch to the Delegation tab, and click Add.
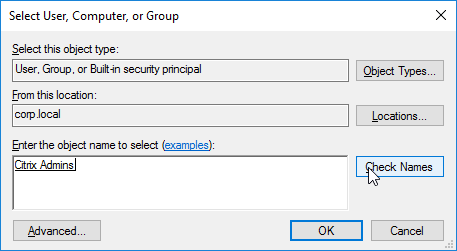
    2. Find your Citrix Admins group, and click OK.
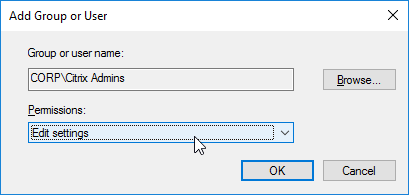
    3. In the Add Group or User window, change the Permissions to Edit settings, and click OK.
  13. To prevent the user lockdown GPO from applying to administrators:
    1. On the Delegation tab, click Advanced.
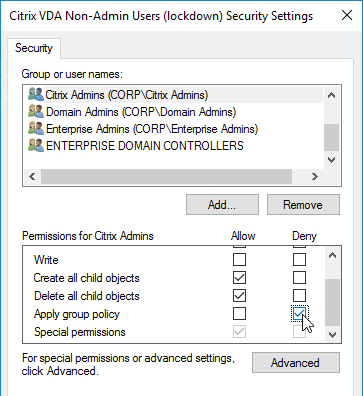
    2. On the top half, click the Citrix Admins group to highlight it.
    3. Scroll down to reveal the Apply Group Policy row, and then place a check mark in the Deny column.
    4. If desired, you can also deny the GPO to Domain Admins and Enterprise Admins.
    5. Click OK to close the Security Settings window.
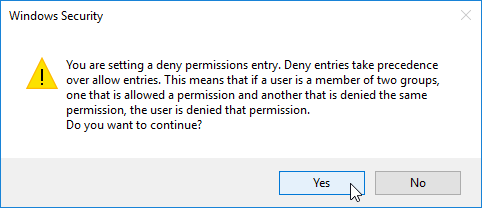
    6. Click Yes when asked to continue.
  14. To delegate the other two GPOs, add the Citrix Admins group with Edit Settings permission. But don’t deny Apply Group Policy. The deny entry is only needed on the Lockdown GPO.

Windows Group Policy Templates

The latest Windows 10 or Windows 11 GPO templates includes the GPO settings for Windows Server.

  1. Download the Administrative Templates (.admx) for Windows 10 2022 Update (22H2) or Administrative Templates (.admx) for Windows 11 2023 Update (23H2).

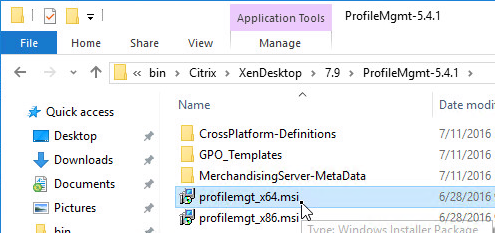
  2. Run the downloaded Administrative Templates (.admx) for Windows.msi file.

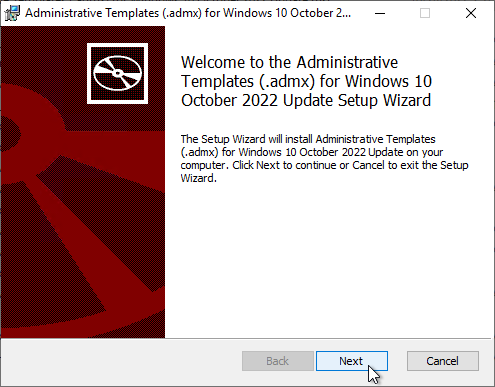
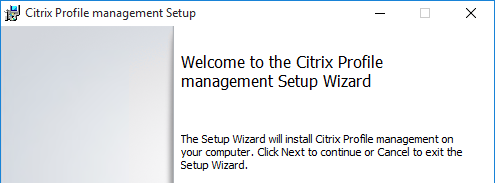
  3. In the Welcome to the Administrative Templates (.admx) for Windows Setup Wizard page, click Next.

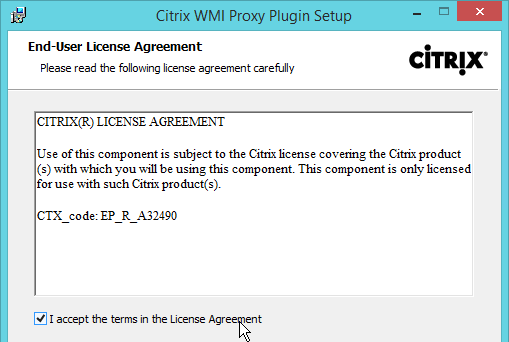
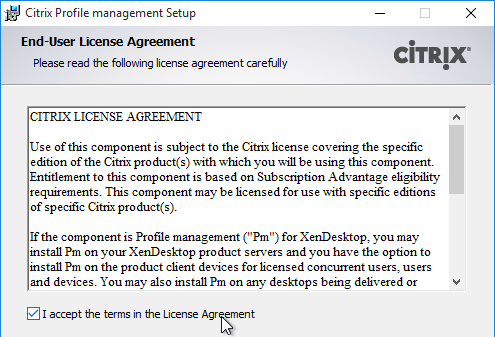
  4. In the End-User License Agreement page, check the box next to I accept the terms and click Next.
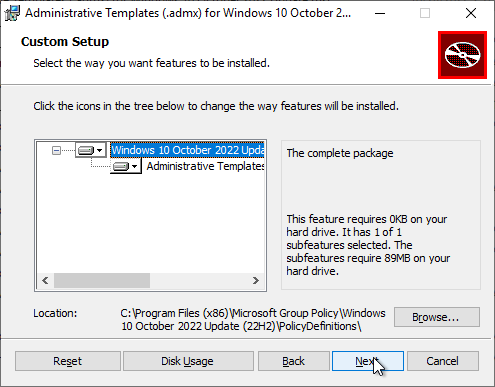
  5. In the Custom Setup page, record the Location field since you’ll need to go there later. Click Next.

  6. In the Ready to install Administrative Templates (.admx) for Windows page, click Next.
  7. In the Completed the Administrative Templates (.admx) for Windows Setup Wizard page, click Close.

  8. In File Explorer, go to C:\Program Files (x86)\Microsoft Group Policy\Windows 11 October 2023 Update (23H2) or C:\Program Files (x86)\Microsoft Group Policy\Windows 10 October 2022 Update (22H2).
  9. Copy the PolicyDefinitions folder.
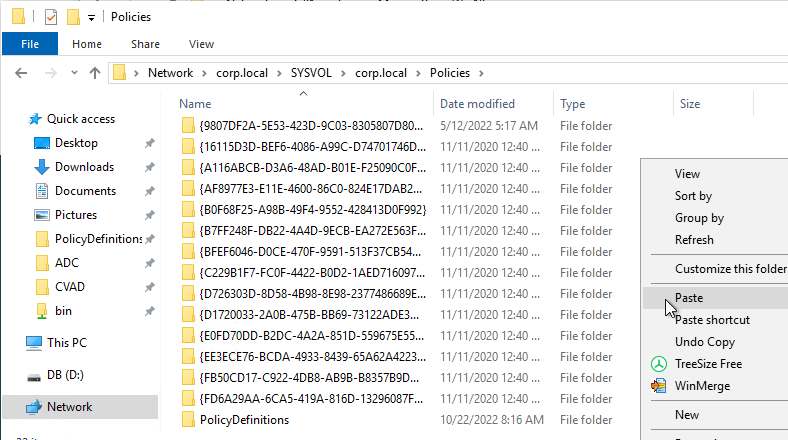
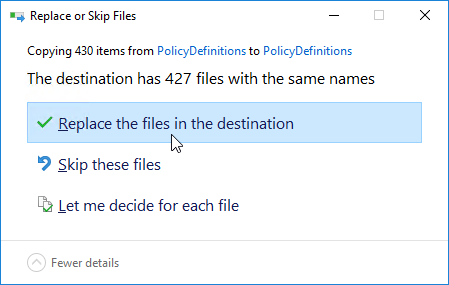
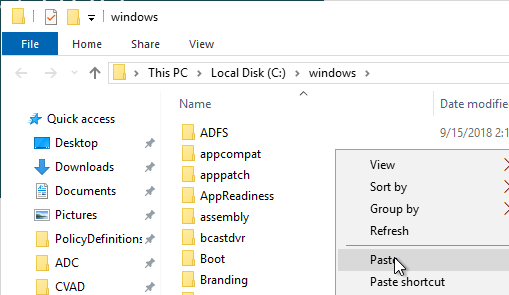
  10. Go to your domain’s sysvol (e.g., \\corp.local\sysvol) and in the corp.local\Policies folder, paste the PolicyDefinitions folder. If you don’t have this folder, then you can create it. Or copy the files to C:\Windows\PolicyDefinitions as detailed next.

    • If prompted, replace the existing files.
  11. If your Sysvol does not have a PolicyDefinitions folder, then instead go to C:\Windows\ and paste the folder. Overwrite the existing files.

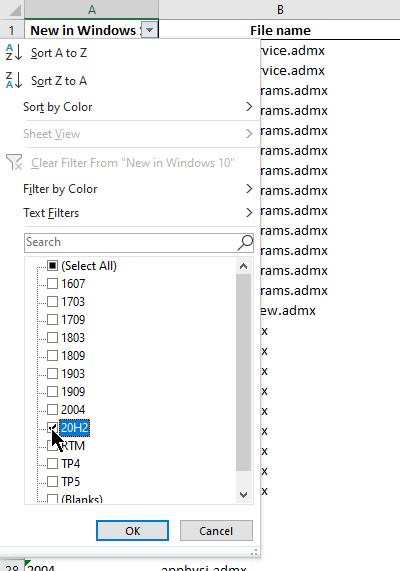
See Group Policy Settings Reference Spreadsheet for Windows 11 2023 Update (23H2) for a spreadsheet containing all GPO settings in Windows.

The spreadsheet can be filtered to only show the newest settings.

Microsoft Edge (Chromium)

Download and install Microsoft Edge for Business on your VDA machines or Horizon Agent machines.

Installation and Configuration instructions can be found at Kasper Johansen Microsoft Edge in Citrix – Revamped. The article details group policies for Edge.

Avanite Roaming Edge Chromium details the folders that should be roamed by Citrix Profile Management (UPM) or VMware Dynamic Environment Manager (DEM).

Microsoft Teams

Prevent the per-user version of Teams from installing with Office 365 (aka Microsoft 365 apps). Configure this GPO setting before installing Office. Then you can later install the machine-wide version of Teams. More details at Microsoft Docs.

This setting requires the latest Office GPO templates to be installed.

  • Edit a GPO that contains Computer Settings.
  • UpdatesComputer Configuration | Policies | Administrative Templates | Microsoft Office 2016 (Machine) | Updates
    • Don’t install Microsoft Teams with new installations or updates of Office = enabled

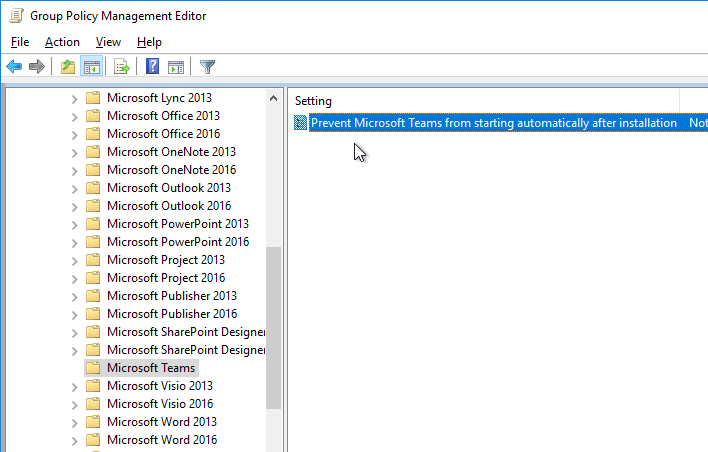
Prevent Microsoft Teams from starting automatically after installation. Set this GPO setting before you install Teams. This setting requires the latest Office GPO templates to be installed.

  • Edit a GPO that contains User Settings. These User Settings probably won’t apply unless you enable Group Policy Loopback Processing in a computer settings GPO.
  • TeamsUser Configuration | Policies | Administrative Templates | Microsoft Teams
    • Prevent Microsoft Teams from starting automatically after installation = enabled

Install Teams using the machine-based installer. See Manuel Winkel Install Teams & OneDrive in Citrix (Machine-Based) and CTP James Rankin Microsoft Teams on Citrix Virtual Apps and Desktops, part #1 – installing the damned thing.

  • The Machine-wide installer does not update itself. You must periodically download the latest version, uninstall the Machine-wide installer, and install the latest version.

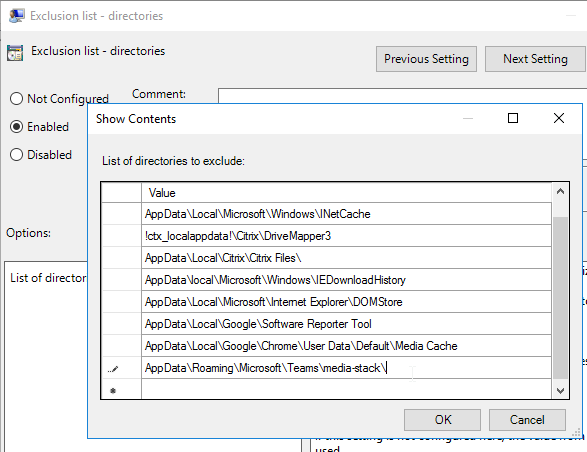
Microsoft recommends excluding the Media-Stack folder from roaming. Add the exclusion for AppData\Roaming\Microsoft\Teams\media-stack\ to Citrix Profile Management’s Exclusion List – Directories setting.

If your VDAs don’t have GPUs, then disable GPU in Teams to reduce CPU. Citrix has a PowerShell script that can disable this setting for each user. Also see:

Microsoft FSLogix

If you need to roam the user’s Outlook .OST file (Outlook Cached Mode), Outlook Search Index, OneDrive cache, OneNote data, SharePoint data, Skype data, and/or Teams data, then download, install, and configure Microsoft FSLogix. FSLogix has more Office roaming features than Citrix Profile Management. A common architecture is to enable FSLogix Office Container for the Office cache files and use Citrix Profile Management for all other roaming profile files and registry keys.

Microsoft FSLogix is free for all Microsoft RDS CALs, Microsoft Virtual Desktop Access per-user CALs, and all Microsoft Enterprise E3/E5 per-user licenses. Notice that per-device licenses are excluded. See Licensing Requirements at Microsoft Docs.

G0-EUC tested FSLogix Profile Container (not Office Container) and found that it reduces capacity by 27%. (source = The impact of managing user profiles with FSLogix)

Do the following to install Microsoft FSLogix on the VDA machine:

  1. Go to https://aka.ms/fslogix_download.
  2. Extract the downloaded .zip file.
  3. In the FSLogix \x64\Release folder, run FSLogixAppsSetup.exe.
  4. Check the box next to I agree to the license terms and conditions and click Install.
  5. In the Setup Successful page, click Restart.

FSLogix is configured through Group Policy or by editing registry values on each FSLogix Agent machine. Here is some info on group policy configuration:

  1. The FSLogix .zip file contains fslogix.admx and fslogix.adml files for configuration of FSLogix through Group Policy. Copy these files to your PolicyDefinitions folder. The .adml file goes in the en-US folder.

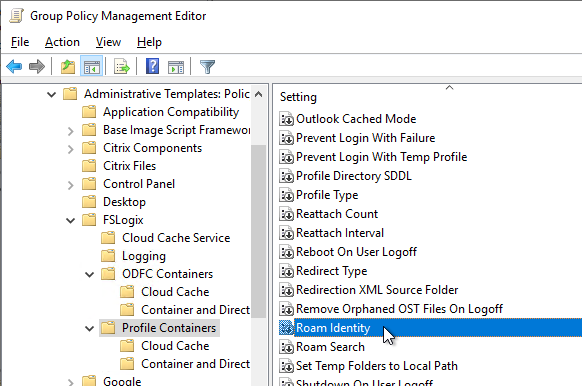
  2. Find the settings in Group Policy Editor at Computer Configuration | Policies | Administrative Templates | FSLogix
  3. Note that FSLogix 2210 Hotfix 2 (2.9.8612.60056) and newer have a different group policy structure than older versions.
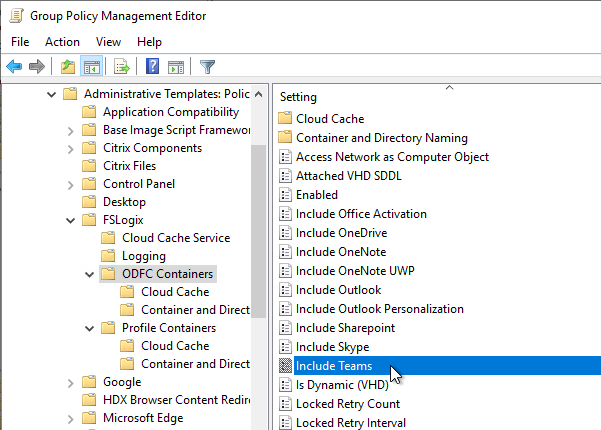
  4. The ODFC Containers node controls Office Containers only. The Profile Containers node lets you capture the entire profile and not just Office. You can also configure both as detailed at FAQ: How to use Office 365 Containers and Profile Containers together. Citrix environments typically combine FSLogix Office Containers with Citrix Profile Management. VMware Horizon environments typically use FSLogix Profile Container to replace DEM Personalization.
  5. You’ll need a file share with appropriate permissions to store the Office containers or Profile Containers.
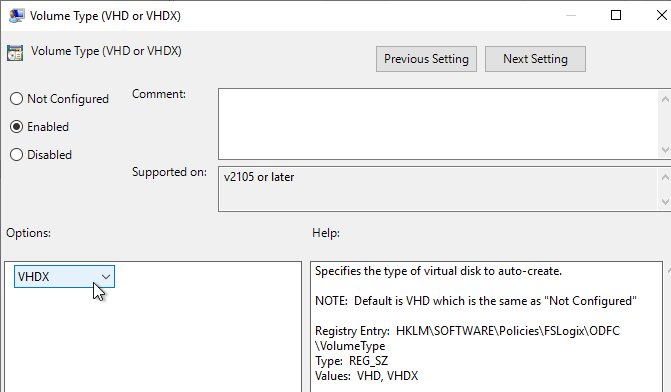
  6. Set Volume Type to VHDX.
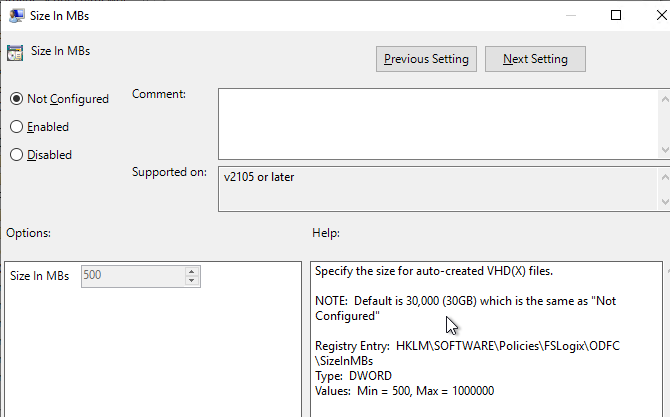
  7. The .vhdx files are thin provisioned and can grow up to the maximum Size in MBs, which defaults to 30 GB. Newer versions of FSLogix let you increase this size later.
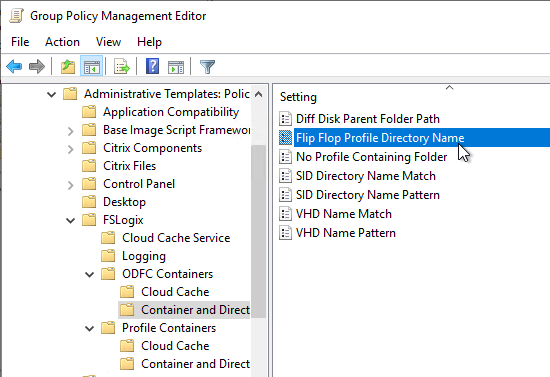
  8. Under Container and Directory Naming enable the setting Flip Flop Profile Directory Name.
  9. For Office Containers, back in the ODFC Containers node, review each of the Include settings and enable whichever data you want to include in the Office Container. More details at Configure ODFC Container at Microsoft Docs.
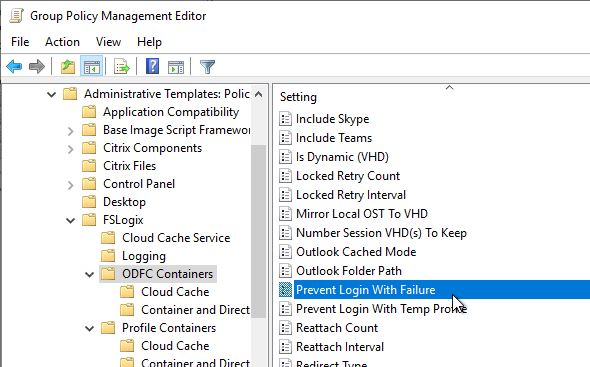
  10. Since an FSLogix Container can only be mounted on one machine, consider setting Prevent login with failure. This causes the user to see a window if the container is already mounted and the user will have to call the help desk to clear the other session.
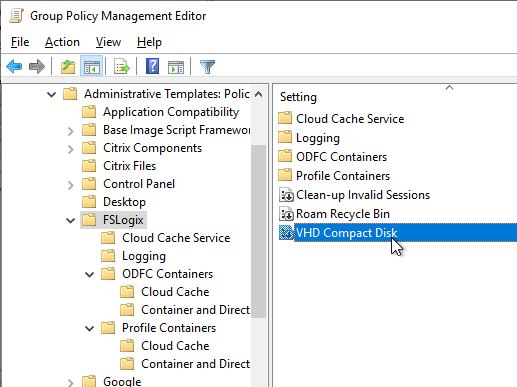
  11. FSLogix 2210 and newer automatically compact .vhdx files when they have free space. It’s enabled by default and is configurable on the left, directly under the FSLogix node. On the right, configure the VHD Compact Disk setting. 
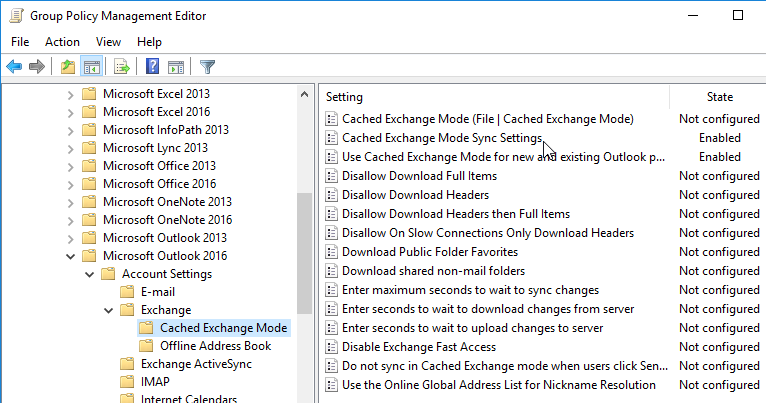
  12. In a Group Policy that applies to Citrix users, you might want to configure Cached Exchange Mode Sync Settings to reduce the size of the .ost files. You’ll need to install the Office GPO templates if you haven’t already. Then find the setting at User Configuration | Policies | Administrative Templates | Microsoft Outlook 2016 (also applies to 365 and 2019) | Account Settings | Exchange | Cached Exchange Mode.

Other FSLogix Configurations and Links

Full Profile Container (not just Office):

OneDrive ADMX Template

See CTP James Rankin Managing OneDrive on Citrix Virtual Apps and Desktops 💡

Microsoft has a per-machine installation of the OneDrive sync client. To reduce the size of your roaming profiles, the per-machine install is strongly recommended over the normal per-user install of OneDrive.

To enable Files-on-demand, you’ll need the OneDrive ADMX Template.

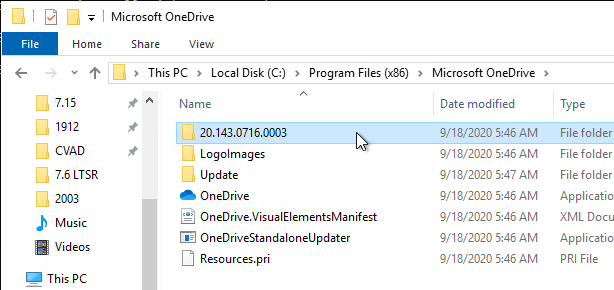
  1. Go to a Windows 10 1709 or Windows Server 2019 or newer machine that has OneDrive installed.
  2. If machine-wide installation, go to C:\Program Files (x86)\Microsoft OneDrive.
    • If per-user installation, go to %localappdata%\Microsoft\OneDrive.
  3. Double-click the latest version.
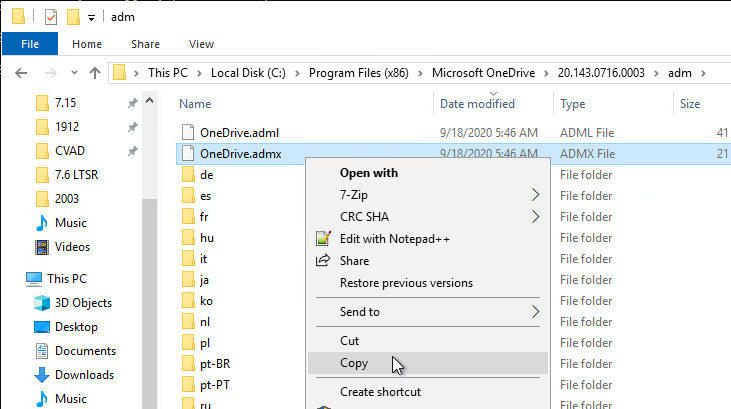
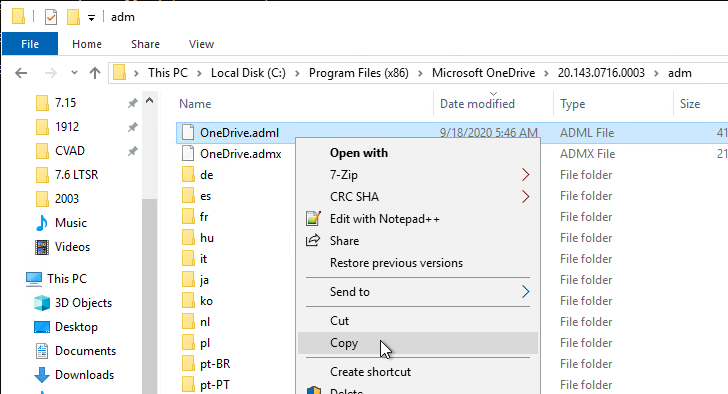
  4. Then open the adm folder.
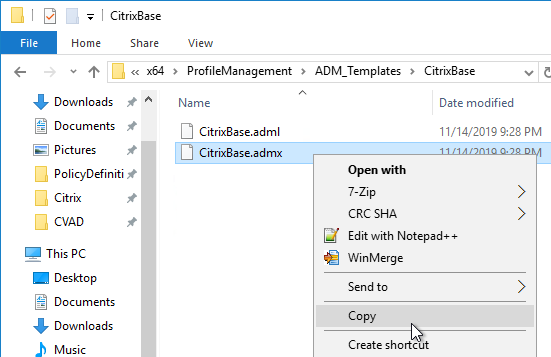
  5. Right-click the OneDrive.admx file and copy it.
  6. If your domain has PolicyDefinitions in SYSVOL (\\corp.local\sysvol\corp.local\Policies\PolicyDefinitions), paste the .admx file there.

    • If you don’t have SysVol PolicyDefinitions, then go to C:\Windows\PolicyDefinitions and paste the .admx file.
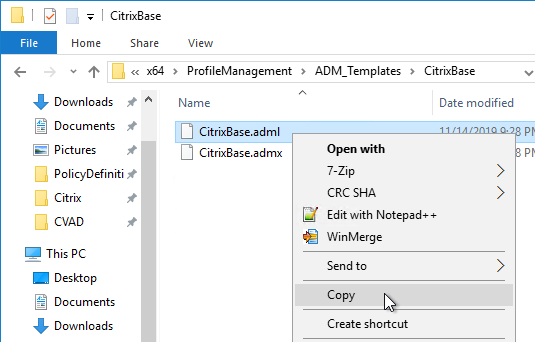
  7. Go back to the OneDrive files and copy OneDrive.adml.
  8. If your domain has a PolicyDefinitions central store in SYSVOL, paste the .adml file to the en-us folder in PolicyDefinitions in SYSVOL. en-US is a subfolder of the PolicyDefinitions folder.

    • If you don’t have SysVol PolicyDefinitions,, then go to C:\Windows\PolicyDefinitions\en-US and paste the .adml file. en-US is a subfolder of the PolicyDefinitions folder.

Group Policy Computer Settings

Edit the Citrix VDA Computer Settings GPO and enable the settings shown below. All settings are located under Computer Configuration > Policies.

Some of the settings in this section might require the newer Windows Group Policy Templates.

Process tracking for Director

  • Audit Policy – Computer Configuration | Policies | Windows Settings | Security Settings | Local Policies | Audit Policy

Idle Time to Lock Session

  • Security Options – Computer Configuration | Policies | Windows Settings | Security Settings | Local Policies | Security Options
    • Interactive logon: Machine inactivity limit – Windows 8/2012 and newer – published desktops only – seconds of idle time before session locks

Control Panel

Teams

Prevent the per-user version of Teams from installing with Office 365 (aka Microsoft 365 apps). Configure this GPO setting before installing Office. Then you can later install the machine-wide version of Teams. More details at Microsoft Docs.

This setting requires the Office GPO templates to be installed.

  • Updates – Computer Configuration | Policies | Administrative Templates | Microsoft Office 2016 (Machine) | Updates
    • Don’t install Microsoft Teams with new installations or updates of Office = enabled

Network

OneDrive Files-on-demand

For Windows 10 1709 and newer or Windows Server 2019 and newer. Make sure the OneDrive .admx file is installed first.

  • OneDrive – Computer Configuration | Policies | Administrative Templates | OneDrive
    • Use OneDrive Files On-Demand = enabled

Verbose Messages

  • System – Computer Configuration | Policies | Administrative Templates | System
    • Display highly detailed status messages = enabled. Windows 10. Shows what’s happening during logon.

Group Policy Settings

  • Group Policy – Computer Configuration | Policies | Administrative Templates | System | Group Policy
    • Configure Group Policy Caching = disabled. Windows 8.1/2012 R2 and newer setting
    • Configure Logon Script Delay = enabled, 0 minutes. Windows 8.1/2012 R2 and newer setting.
    • Configure User Group Policy loopback processing mode = Enabled, either Merge or Replace depending on the desired result

User Group Policy loopback processing mode changes in Windows Server 2008 R2. Make sure the VDA computer accounts have Read access to the loopback user GPOs, even if those GPOs only contain user settings.

Logon Settings

To get rid of the Windows 10 “we’re happy you’re here” message:

  • Logon – Computer Configuration | Policies | Administrative Templates | System | Logon
    • Show first sign-in animation = disabled
    • Show clear logon background = enabled – for Win10 1903 and newer – source = Citrix Discussions

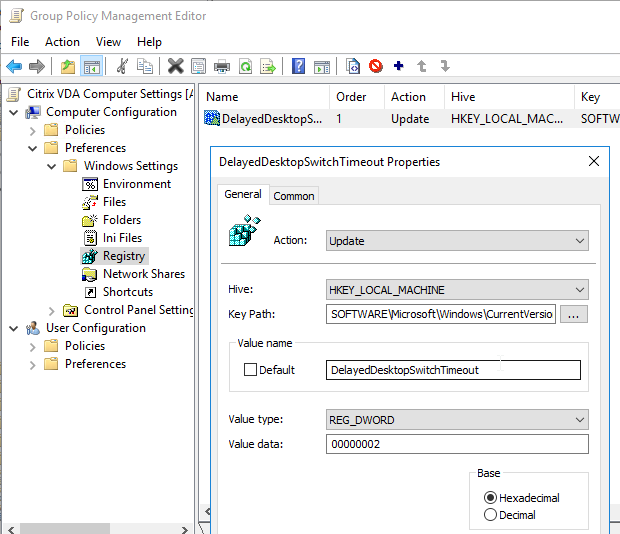
DelayedDesktopSwitchTimeout. Create a Group Policy Preferences Registry Item (Computer Configuration | Preferences | Windows Settings | Registry) to set HKEY_LOCAL_MACHINE\SOFTWARE\Microsoft\Windows\CurrentVersion\Policies\System\DelayedDesktopSwitchTimeout (REG_DWORD) = 2. On Windows 10, this might cause the desktop to appear sooner. (Source = VMware Communities)

Power Settings

The following are more applicable to virtual desktops than session hosts:

  • Hard Disk Settings – Computer Configuration | Policies | Administrative Templates | System | Power Management | Hard Disk Settings
    • Turn Off the hard disk (plugged in) = enabled, 0 seconds
  • Sleep Settings – Computer Configuration | Policies | Administrative Templates | System | Power Management | Sleep Settings
    • Specify the system hibernate timeout (plugged in) = enabled, 0 seconds
    • Specify the system sleep timeout (plugged in) = enabled, 0 seconds
    • Turn off hybrid sleep (plugged in) = enabled, 0 seconds
  • Video and Display Settings – Computer Configuration | Policies | Administrative Templates | System | Power Management | Video and Display Settings
    • Turn off the display (plugged in) = enabled, 0 seconds

Remote Assistance Settings

Configure the following so you can shadow users using Director:

  • Remote Assistance – Computer Configuration | Policies | Administrative Templates | System | Remote Assistance
    • Configure Solicited Remote Assistance = disabled
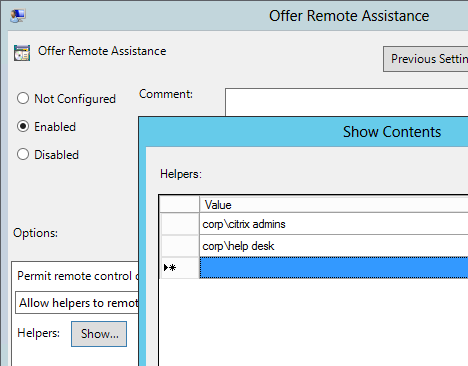
    • Configure Offer Remote Assistance = enabled, specify the Help Desk and Administrator groups that can offer remote assistance

User Profiles Settings

  • User Profiles – Computer Configuration | Policies | Administrative Templates | System | User Profiles
    • Add the Administrators security group to roaming user profiles = enabled
    • Delete cached copies of roaming profiles = enabled (only enable on persistent session hosts)
    • Do not check for user ownership of Roaming Profile Folders = enabled
    • Set maximum wait time for the network if a user has a roaming user profile or remote home directory = enabled, 0 seconds

Cloud Content

  • Cloud Content – Computer Configuration | Policies | Administrative Templates | Windows Components | Cloud Content   (Windows 10 1511 and newer)

File Explorer Settings

Citrix CTX203658 Start Menu Icons Set to Default (Blank Document) After Update to Receiver 4.3.100 – Windows 8 and newer

  • File Explorer – Computer Configuration | Policies | Administrative Templates | Windows Components | File Explorer
    • Allow the use of remote paths in file shortcut icons = enabled

Event Viewer Settings

If you are using Provisioning Services, it might be desirable to move the event logs to a persistent cache disk. This allows you to review the event logs even after the Target Device reboots. Use Group Policy Preferences to create the folder on the cache disk.

  • Application – Computer Configuration | Policies | Administrative Templates | Windows Components | Event Log Service | Application
    • Control the location of the log file = enabled, D:\EventLogs\Application.evtx
  • Security – Computer Configuration | Policies | Administrative Templates | Windows Components | Event Log Service | Security
    • Control the location of the log file = enabled, D:\EventLogs\Security.evtx
  • System – Computer Configuration | Policies | Administrative Templates | Windows Components | Event Log Service | System
    • Control the location of the log file = enabled, D:\EventLogs\System.evtx
  • Folder – Computer Configuration | Preferences | Folder
    • Action = update
    • Path = D:\EventLogs

Microsoft Account – Windows 10 (1703 and newer)

  • Microsoft account – Computer Configuration | Policies | Administrative Templates | Windows Components | Microsoft account
    • Block all consumer Microsoft account user authentication = Enabled

OneDrive Settings – Windows 10

  • OneDrive – Computer Configuration | Policies | Administrative Templates | Windows Components | OneDrive
    • Prevent the usage of OneDrive for file storage = enabled

Remote Desktop Services Settings

  • Connections – Computer Configuration | Policies | Administrative Templates | Windows Components | Remote Desktop Services | Remote Desktop Session Host | Connections
  • Device and Resource Redirection – Computer Configuration | Policies | Administrative Templates | Windows Components | Remote Desktop Services | Remote Desktop Session Host | Device and Resource Redirection
    • Allow time zone redirection = enabled
    • Do not allow smart card device redirection = enabled
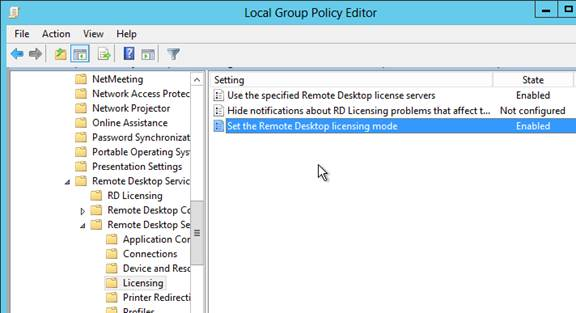
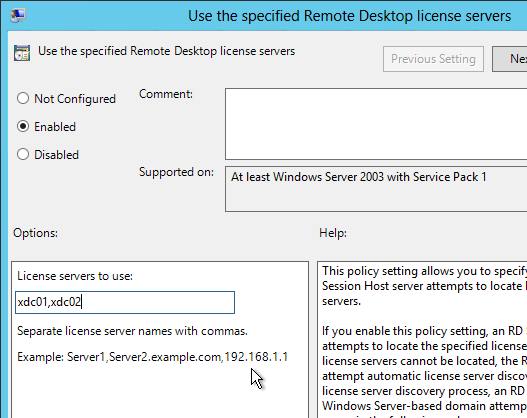
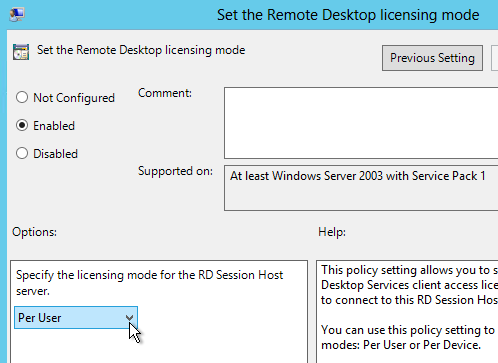
  • Licensing – Computer Configuration | Policies | Administrative Templates | Windows Components | Remote Desktop Services | Remote Desktop Session Host | Licensing
    • Set the Remote Desktop license mode = enabled, Per User
    • Use the specified Remote Desktop license servers = enabled, your RDS Licensing Servers (e.g. the XenDesktop Controllers)
  • Remote Session Environment – Computer Configuration | Policies | Administrative Templates | Windows Components | Remote Desktop Services | Remote Desktop Session Host | Remote Session Environment
  • Security – Computer Configuration | Policies | Administrative Templates | Windows Components | Remote Desktop Services | Remote Desktop Session Host | Security
    • Always prompt for password upon connection = disabled (to override other GPOs where it might be enabled)
  • Session Time Limits – Computer Configuration | Policies | Administrative Templates | Windows Components | Remote Desktop Services | Remote Desktop Session Host | Session Time Limits
    • Set a time limit for active but idle Terminal Services sessions = enabled, 3 hours or similar
    • Set time limit for disconnected sessions = enabled, 3 hours or similar
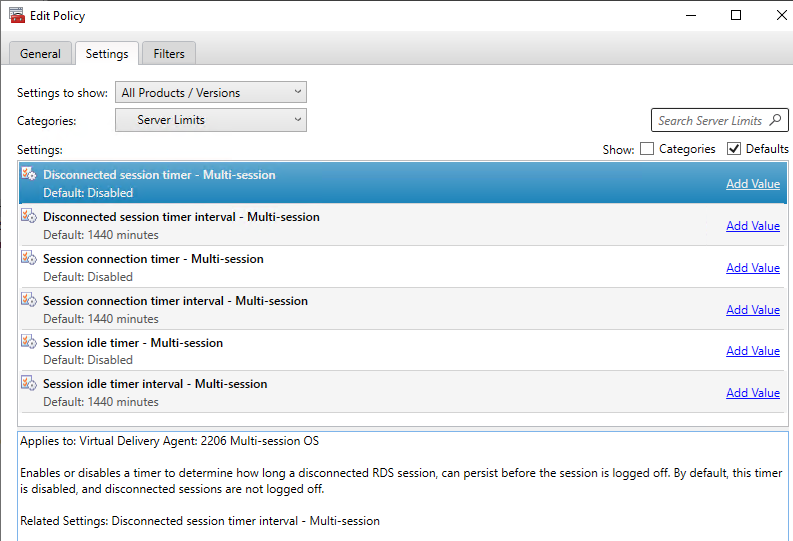
    • CVAD 2206 and newer also let you set RDSH timers in the user half of a Citrix Policy under the Server Limits category. Citrix Docs says: Timer settings for multi-session machines configured using Citrix policies are expected to override timer settings configured through Microsoft Group Policies. To avoid unexpected behavior, we recommend you configure timer settings using one of the two methods.

Search Settings – Windows 8.1 / 2012 R2, Windows 10

  • Search – Computer Configuration | Policies | Administrative Templates | Windows Components | Search
    • Allow Cortana = disabled (Windows 10)
    • Don’t search the web or display web results in search = enabled
    • Additional search settings can be found here

Store Settings – Windows 8.1 / 2012 R2, Windows 10

Windows Update Settings

  • Windows Update – Computer Configuration | Policies | Administrative Templates |  Windows Components | Windows Update
    • Allow non-administrators to receive update notifications = disabled
  • Windows Update for Business – Computer Configuration | Policies | Administrative Templates |  Windows Components | Windows Update | Windows Update for Business
    • Select when Preview Builds and Feature Updates are received = Enabled, Semi-Annual Channel, 365 day deferral

Additional Settings

Windows 10 group policy settings for controlling Internet connectivity and Privacy Settings can be found at Microsoft Technet Manage connections from Windows operating system components to Microsoft services.

James Rankin Five tips for dealing with Windows 10 telemetry: disable Modern apps, disable Cortana, disable services, block DNS domains.

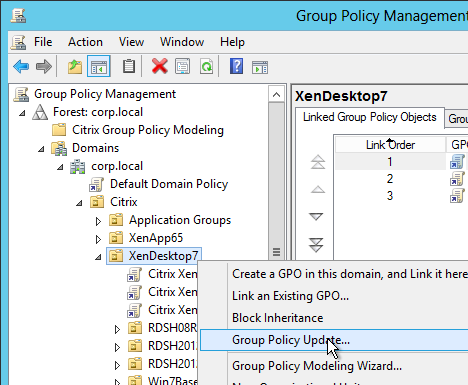
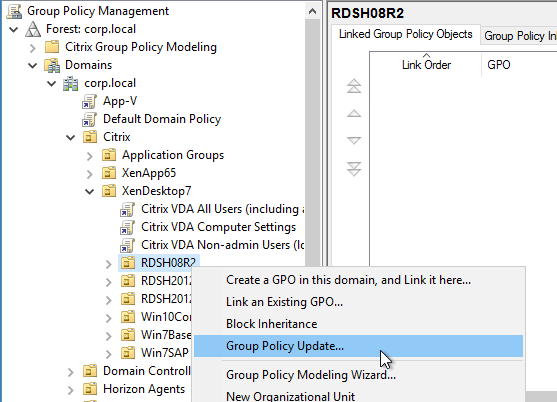
After modifying the GPO, use Group Policy Management Console to update the VDA machines.

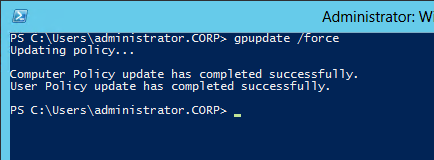
Or run the command gpupdate /force. Or wait 90 minutes.

Citrix Receiver

If you want pass-through authentication for the Citrix Receiver that is installed on your VDAs, use receiver.admx to enable pass-through authentication.

  1. See the instructions at https://www.carlstalhood.com/receiver-for-windows/#admx to copy the receiver.admx file to PolicyDefinitions.
  2. Edit the Citrix Computer Settings GPO.
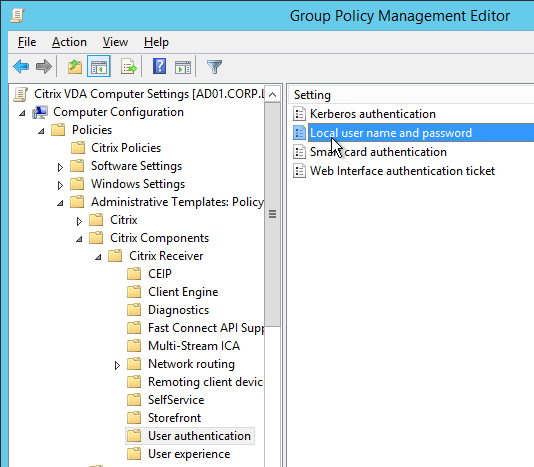
  3. Go to Computer Configuration > Policies > Administrative Templates > Citrix Components > Citrix Receiver > User Authentication. On the right, open Local user name and password.
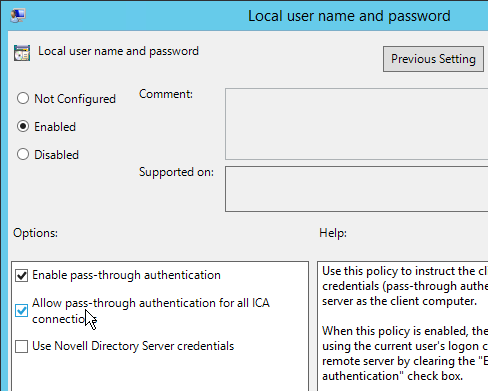
  4. Enable the setting.
  5. Check the top two boxes and click OK.


Next Steps

Group Policy Objects – VDA User Settings

Catalogs, Delivery Groups, Zones

Last Modified: Dec 5, 2024 @ 3:12 am

Navigation

💡 = Recently Updated

Change Log

 Persistent vs Non-persistent

VDA design – One of the tasks of a Citrix Architect is VDA design. There are many considerations, including the following:

  • Machine type – single user (virtual desktop), or multi-user (Remote Desktop Session Host). RDSH is more hardware efficient.
  • Machine operating system – Windows 7, Windows 10, Windows Server 2008 R2, Windows Server 2012 R2, Windows Server 2016
  • Machine persistence – persistent, non-persistent
  • Number of new machines – concurrent vs named-users
  • Machine provisioning – full clones, Machine Creation Services (MCS), Citrix Provisioning
  • Hardware for the new machines – hypervisor clusters, storage
  • How the machines are updated – SCCM, MCS, Citrix Provisioning etc.
  • Application integration – locally installed, App-V, Layering, Virtual Apps or XenApp published, leave on local endpoint machine, cloud apps, etc.
  • User Profiles – roaming, mandatory, home directories
  • Group Policies – session lockdown, automation
  • Disaster Recovery – replication. VDAs running in a warm site. DR for profiles and home directories too.

Desktop Management in a Citrix environment – Some environments try to use Citrix to improve desktop management. Here are some desktop management aspects of Citrix that aren’t possible with distributed physical desktops:

  • Datacenter network speeds – The VDAs have high speed connectivity to the desktop management tools, which eliminates WAN bandwidth as a desktop management consideration. For example, you can use Microsoft App-V to stream apps to VDAs. And SCCM deployments have much greater success rates than PCs that are frequently offline.
  • Non-persistence – Non-persistent VDAs revert at every reboot. To update non-persistent VDAs, simply update your master image, and push it out.
  • Layering – The VDA VMs can be composed of multiple layers that are combined during machine boot, or when the user logs in. Citrix App Layering is an example of this technology. A single layer can be shared by multiple VDAs. The layers are updated once, and all machines using the layer receive the updated layer at next boot/login.
  • See the Reddit thread Citrix at scale.

Non-persistent VDAs – Probably the easiest of these desktop-management technologies is non-persistence. That’s because you install your applications once into a master image, and you can easily create a pool of identical machines based on that master image. Whenever an update is needed, you install the update once into your master image and push it out.

However, there are several drawbacks to non-persistence:

  • Multiple Master Images – it’s extremely rare for there to only be one master image. You’ll probably have a number of master images, each with different application sets. The more master images you have, the more effort is required to maintain them.
    • Same apps in multiple images – Some apps are common to multiple images. For example, Office and Adobe Reader. How do you update these common apps identically on multiple master images?
    • Multi-datacenter – how do you perform the same master image updates in multiple datacenters? Replicate the master images? Perform the same change multiple times?
    • Automation – You’ll need new automation for managing the multiple master images and updating Catalogs. Automation complicates the simple management you were hoping to achieve.
  • Master Images must be designed – Which apps go on which master image? Do you install the same app on multiple master images?
    • How do you know which apps a user needs? – Most Citrix admins, and even desktop teams, don’t know every app that a user needs. You can use tools like Liquidware Labs or Lakeside Software to discover app usage, but it’s a very complicated process to find commonality across multiple users.
    • How are One-off apps handled? – If you have an app used by only a small number of users, do you add it to one of your master images? Do you create a new master image? Do you publish it from Virtual Apps or XenApp (double hop)? Do you stream it using App-V? Layering is another option.
    • Application Licensing – for licensed apps, do you install the licensed app into the master image and try to hide it from non-licensed users? Or do you create a new master image for the licensed users?
    • Patching multiple images – when a new OS patch needs to be deployed, you have to update every master image running that OS version. Thus Citrix admins usually try to limit the number of master images, which makes image design more complicated.
    • How do you manage an app that is installed on multiple master images? – Layering might help with this.
  • Who manages the master images? – Citrix admins? Desktop team? It’s unlikely that traditional desktop management will ever be completely removed from an enterprise environment, which means that master image management is an additional task that was not performed before. Does the Citrix admin team have the staff to take on this responsibility? Would the desktop management team be willing to perform this new process?
    • Politically feasible? – Large enterprises usually have mature desktop management practices. Would this new process interfere with existing desktop management requirements?
    • Responsibility – if the Citrix admins are not maintaining the master images, and if a Catalog update causes user problems, who is responsible?
    • Compliance – template machines usually go through a security and licensing compliance process. If the Citrix team is managing the master images, who checks them for compliance?
    • RDSH Apps are complicated – who is responsible for integrating apps into Remote Desktop Session Host (Virtual Apps or XenApp)? Does the desktop team have the skills to perform the additional RDSH testing?
  • Change Control – Longer Deployment Times – Any change to a master image would affect every machine/user using that image, thus dev/QA testing is recommended for every change, which slows down app update deployment. And once a change is made to the master, it doesn’t take effect until the user’s VDA is rebooted.
  • Roaming Profiles – some apps (e.g. Office) save user settings in user profiles. Since the machines are non-persistent, the profiles would be lost on every reboot unless roaming profiles are implemented. This adds a dependency on roaming profile configuration, and the roaming profile file share.
    • How is the Outlook OST file handled? – With Cloud Hosted Exchange, for best performance, Outlook needs to run in Cached Exchange mode, which creates a large OST file in the user’s profile.
      • OST files are large (multiple gigabytes). One option is to use group policy to minimize the size of the OST file.
      • How is the large OST file roamed? If you leave the OST in the default location, then the OST is copied back and forth every time the user logs on and logs off. You usually want to put the OST file on a file share, or in a mounted VHDX file that is stored on a file share.
      • Search indexes are rebuilt every time the user starts a new session. This takes time and performance.
      • Citrix Profile Management 7.18 has an Outlook OST and Search roaming capability.
      • Another option is to purchase a 3rd party OST handling product like FSLogix.
  • IT Applications (e.g. antivirus) on non-persistent machines – Many IT apps (antivirus, asset mgmt, security, etc.) have special instructions to work on non-persistent machines. Search the vendor’s knowledgebase for “VDI”, “non-persistent”, “Citrix”, etc.
    • Antivirus in particular has a huge impact on VDA performance. The special antivirus instructions for non-persistent VDAs are in addition to normal antivirus configuration.
  • Local Host Cache does not easily support non-persistent virtual desktops – if the Citrix Virtual Apps and Desktops (CVAD) SQL database is down, and if users need to connect to non-persistent random desktops, then Local Host Cache won’t help you. It’s not possible to connect to non-persistent virtual desktops until the Citrix Virtual Apps and Desktops (CVAD) SQL database connection is recovered.

Application Integration Technologies – Additional technologies can be used to overcome some of the drawbacks of non-persistent machines:

  • Microsoft App-V – this technology can dynamically stream apps to a non-persistent image. Different users get different apps. And the apps run in isolated bubbles. However:
    • App-V is an additional infrastructure that must be built and maintained.
    • App-V requires additional skills for the people packaging the apps, and the people troubleshooting the apps.
    • Since the apps are isolated, app interaction is configured manually.
    • Because of application isolation, not every app can run in App-V. Maybe 60-80% of apps might work. How do you handle apps that don’t work?
  • Layering – each application is a different layer (VHD file). The layering tool combines multiple layers into a single unified image. Layers are updated in one place, and all images using the layer are updated, which solves the issue of a single app in multiple images. Layering does not use application isolation, so almost 100% of apps should work with layering. Layers can be mounted dynamically based on who’s logging in. There’s also a persistent user layer that lets users install apps, or admins can install one-off apps. Citrix has an App Layering feature. Notes:
    • Citrix App Layering is a separate infrastructure that must be built and maintained.
    • Somebody has to create the layers. This is an additional task on top of normal desktop management packaging duties.
    • It takes time to update a layer and publish it to multiple images.
      • Citrix App Layering captures the OS Layer. So OS patches are handled by Citrix App Layering. It takes time to push an OS security update to every image based on the same OS Layer.
      • Other Layering products don’t capture the OS Layer. As a result, they can’t achieve 100% app compatibility like Citrix App Layering can.
    • With Layers, it’s very easy to remove a layer from an image. There’s no need to completely rebuild an image because one app is corrupted.
    • Citrix’s App Layering does not have a supported API, so you can’t automate it.

Persistent virtual desktops – Another method of building VDAs is by creating full clone virtual desktops that are persistent. Each virtual desktop is managed separately using traditional desktop management tools. If your storage is an All Flash Array with inline deduplication and compression, then full-clone, persistent virtual desktops probably take no more disk space than non-persistent linked clones. Here are some advantages of full-clone, persistent virtual desktops as opposed to non-persistent VDAs:

  • Skills and Processes – No new skills to learn. No new desktop management processes. Use existing desktop management tools (e.g. SCCM). The existing desktop management team can manage the persistent virtual desktops, which reduces the workload of the Citrix admins. Just treat the persistent virtual desktops like that are more PCs.
    • The persistent virtual desktops are usually powered on and in the datacenter, thus improving the success rate of package deployment.
    • However, pushing a package to many desktops at once can result in a “patch storm”, which reduces performance while the patches are being installed.
  • One-off applications – If a user needs a one-off application, simply install it on the user’s persistent desktop. The application can be user-installed, SCCM self-service installed, or administrator installed.
  • User Profile – Outlook’s OST file is no longer a concern since the user’s profile persists on the user’s virtual desktop. It’s not necessary to implement roaming profiles when using persistent virtual desktops. If you want a process to move a user profile from one persistent virtual desktop to another, how do you do it on physical desktops today?
  • API integration – a self-service portal can use VMware PowerCLI and Citrix’s PowerShell SDK to automatically create a new persistent virtual desktop for a user. Chargeback can also be implemented.
  • Offline Citrix Virtual Apps and Desktops (CVAD) SQL Database – if the Citrix Virtual Apps and Desktops (CVAD) SQL database is not reachable, then Citrix Local Host Cache can still broker sessions to persistent virtual desktops that have already been assigned to users. This is not possible with non-persistent virtual desktops.

Concurrent vs Named User – one advantage of non-persistent virtual desktops is that you only need enough virtual desktops to handle the concurrent user load. With persistent virtual desktops, you need a separate machine for each named user, whether that user is using it or not.

Disaster Recovery – for non-persistent VDAs, one option is to replicate the master images to the DR site, and then create a Catalog of machines either before the disaster, or after. If before the disaster, the VDAs will already be running and ready for connections; however, the master images must be maintained separately in each datacenter.

Persistent virtual desktops have several disaster recovery options:

  • Immediately after the disaster, instruct the persistent users to connect to a pool of non-persistent machines.
  • In the DR site, create new persistent virtual desktops for the users. Users would then need to use SCCM or similar to reinstall their apps. Scripts can be used to backup the user’s profile and restore it on the DR desktops. This method is probably closest to how recovery is performed on physical desktops.
  • The persistent virtual desktops can be replicated and recovered in the DR site. When the machines are added to Citrix Studio in DR, each recovered machine needs to be assigned to specific users. This process is usually scripted.

Zones

Caveats – Zones let you stretch a single Citrix Virtual Apps and Desktops (CVAD) site/farm across multiple datacenters. However, note these caveats:

  • Studio – If all Delivery Controllers in the Primary Zone are down, then you can’t manage the farm/site. This is true even if SQL is up, and Delivery Controllers are available in Satellite Zones. It’s possible to designate an existing zone as the Primary Zone by running Set-ConfigSite -PrimaryZone <Zone>, where <Zone> can be name, UID, or a Zone object.
  • Version/Upgrade – All Delivery Controllers in the site/farm must be the same version. During an upgrade, you must upgrade every Delivery Controller in every zone.
  • Offline database – There’s Local Host Cache (LHC). However, the LHC in 7.12 and newer has limitations: no non-persistent desktops (dirty desktops are an option), maximum of 5,000 VDAs per zone (10,000 per zone, 40K per site, in 7.14 and newer), has issues if Delivery Controller is rebooted, etc. Review the Docs article for details.
  • Complexity – Zones do not reduce the number of servers that need to be built. And they increase complexity when configuring items in Citrix Studio.
  • Zone Preference – to choose a VDA in a particular zone, your load balancer needs to include a special HTTP header (X-Citrix-ZonePreference) that indicates the zone name.

The alternative to zones is to build a separate site/farm in each datacenter and use StoreFront to aggregate the published icons. Here are benefits of multiple sites/farms as compared to zones:

  • Isolation – Each datacenter is isolated. If one datacenter is down, it does not affect any other datacenter.
  • Versioning – Isolation lets you upgrade one datacenter before upgrading other datacenters. For example, you can test upgrades in a DR site before upgrading production.
  • SQL High Availability – since each datacenter is a separate farm/site with separate databases, there is no need to stretch SQL across datacenters.
  • Home Sites – StoreFront can prioritize different farms/sites for different user groups. No special HTTP header required.

Citrix Consulting recommends separate Citrix Virtual Apps and Desktops (CVAD) sites/farms in each datacenter instead of using zones. See Citrix Blog Post XenApp 7.15 LTSR – Now Target Platform for Epic Hyperspace!.

Here are some general design suggestions for Citrix Virtual Apps and Desktops (CVAD) in multiple datacenters:

  • For multiple central datacenters, build a separate Citrix Virtual Apps and Desktops (CVAD) site/farm in each datacenter. Use StoreFront to aggregate the icons from all farms. Use NetScaler GSLB to distribute users to StoreFront. This provides maximum flexibility with minimal dependencies across datacenters.
  • For branch office datacenters, zones with Local Host Cache (7.12 and newer) is an option. Or each branch office can be a separate farm.

Create Zones – This section details how to create zones and put resources in those zones. In 7.9 and older, there’s no way to select a zone when connecting. In 7.11 and newer, NetScaler and StoreFront can now specify a zone and VDAs from that zone will be chosen. See Zone Preference for details.

Citrix Links:

There is no SQL in Satellite zones. Instead, Controllers in Satellite zones connect to SQL in Primary zone. Here are tested requirements for remote SQL connectivity. You can also set HKLM\Software\Citrix\DesktopServer\ThrottledRequestAddressMaxConcurrentTransactions to throttle launches at the Satellite zone.

From Mayunk Jain: “I guess we can summarize the guidance from this post as follows: the best practice guidance has been to recommend a datacenter for each continental area. A typical intra-continental latency is about 45ms. As these numbers show, in those conditions the system can handle 10,000 session launch requests in just under 20 minutes, at a concurrency rate of 36 requests.”

The following items can be moved into a satellite zone:

  • Controllers – always leave two Controllers in the Primary zone. Add one or two Controllers to the Satellite zone.
  • Hosting Connections – e.g. for vCenter in the satellite zone.
  • Catalogs – any VDAs in satellite catalogs automatically register with Controllers in the same zone.
  • NetScaler Gateway – requires StoreFront that understands zones (not available yet). StoreFront should be in satellite zone.

Do the following to create a zone and move items into the zone:

  1. In Citrix Studio 7.7 or newer, expand the Configuration node, and click Zones.
  2. Right-click Zones and click Create Zone.
  3. Give the zone a name. Note: Citrix supports a maximum of 10 zones.
  4. You can select objects for moving into the zone now, or just click Save.
  5. Select multiple objects, right-click them, and click Move Item.
  6. Select the new Satellite zone and click Yes.
  7. To assign users to the new zone, create a Delivery Group that contains machines from a Catalog that’s in the new zone.
  8. If your farm has multiple zones, when creating a hosting connection, you’ll be prompted to select a zone.
  9. If your farm has multiple zones, when creating a Manual catalog, you’ll be prompted to select a zone.
  10. MCS catalogs are put in a zone based on the zone assigned to the Hosting Connection.
  11. The Citrix Provisioning Citrix Virtual Desktops Setup Wizard ignores zones so you’ll have to move the Citrix Provisioning Machine Catalog manually.
  12. New Controllers are always added to the Primary zone. Move it manually.

Zone Preference

Zone Preference, which means NetScaler and StoreFront can request Delivery Controller to provide a VDA in a specific zone.

Citrix Blog Post Zone Preference Internals details three methods of zone preference: Application Zone, User Zone, and NetScaler Zone.


To configure zone preference:

  1. Create separate Catalogs in separate zones, and add the machines to a single Delivery Group.
  2. You can add users to one zone by right-clicking the zone, and clicking Add Users to Zone. If there are no available VDAs in that preferred zone, then VDAs are chosen from any other zone.
  3. Note: a user can only belong to one home zone.
  4. You can delete users from a zone, or move users to a different zone.
  5. If you edit the Delivery Group, on the Users page, you can specify that Sessions must launch in a user’s home zone. If there are no VDAs in the user’s home zone, then the launch fails.
  6. For published apps, on the Zone page, you can configure it to ignore the user’s home zone.
  7. You can also configure a published app with a preferred zone, and force it to only use VDAs in that zone. If you don’t check the box, and if no VDAs are available in the preferred zone, then VDAs can be selected from any other zone.
  8. Or you can Add Applications to Zone, which allows you to add multiple Applications at once.

  9. NetScaler can specify the desired zone by inserting the X-Citrix-ZonePreference header into the HTTP request to the StoreFront 3.7 server. This header can contain up to 3 zones. The first Zone in the header is the preferred Zone, and the next 2 are randomised such as EMEA,US,APAC or EMEA,APAC,US. StoreFront 3.7 will then forward the zone names to Delivery Controller 7.11, which will select a VDA in the desired zone. This functionality can be combined with GSLB as detailed in the 29 page document Global Server Load Balancing (GSLB) Powered Zone Preference. Note: only StoreFront 3.7 and newer will send the zone name to the Delivery Controller.
  10. Delivery Controller entries in StoreFront can be split into different entries for different zones. Create a separate Delivery Controller entry for each zone, and associate a zone name with each. StoreFront uses the X-Citrix-ZonePreference header to select the Delivery Controller entry so the XML request is sent to the Controllers in the same zone. HDX Optimal Gateways can also be associated to zoned Delivery Controller entries. See The difference between a farm and a zone when defining optimal gateway mappings for a store at Citrix Docs.
  11. Citrix Blog Post Zone Preference Internals indicates that there’s a preference order to zone selection. The preference order can be changed.
    1. Application’s Zone
    2. User’s Home Zone
    3. The Zone specified by NetScaler in the X-Citrix-ZonePreference HTTP header sent to StoreFront.

Machine Creation Services (MCS)

MCS – Machine Profile

CVAD 2402 and newer support selecting a Machine Profile when creating a MCS Catalog on vSphere. MCS copies the VM specification (e.g., TPM) from the Machine Profile to the new MCS machines.

  1. Create a VM with your desired specs (e.g., TPM) and then Convert to Template. It must be a Template and not a VM.
  2. When creating a Catalog, on the Image page, there’s an option to Use a machine profile. Select the template.

MCS – Image Management

CVAD 2402 and newer have an MCS Image Management feature that lets you prepare your images prior to pushing them to your Catalogs.

  1. Make sure your gold image VMs have MCS storage optimization (MCSIO) installed.
  2. Take a snapshot of the gold image VM. The MCS Image Management feature will not create snapshots for you. When naming your snapshot, include the name of the gold image and version info (e.g. date).
  3. In Web Studio, on the left, click Images. On the right, click Create Image Definition.
  4. In the Introduction page, click Next.
  5. In the Image Definition page, choose the Session type and click Next.
  6. In the Image page, select a Hosting Resource. Select a master image snapshot. Select a VM template to use as the machine profile. If you don’t select a machine profile here, then you can’t select one later when creating the Catalog. Click Next.
  7. The Machine Specifications are copied from the machine profile. Click Next.
  8. The NICs are copied from the machine profile. Click Next.
  9. In Version Description, enter a description. Each Image Definition will have multiple Image Versions. Each Image Version is a different snapshot of the master image. Describe the Version accordingly.
  10. In the Summary page, click Finish.
  11. The gold image snapshot is copied to the target datastore as a baseDisk.
  12. You can then use the completed Image Version to create or update a Catalog. This happens very quickly because the image has already been prepared.
  13. The Machine Catalog wizard shows you the Prepared Image Version and the Machine Profile.
  14. You can add Image Versions to the existing Image Definition.
  15. To update a Catalog, right-click the Catalog and click Change Prepared Image.
  16. Select a new version of the image and then finish the wizard like normal.
  17. If you select the Catalog, in the bottom, you can select the tab named Template Properties to see info about the Prepared Image. There’s also a link to View image history.
  18. CVAD 2411 and newer let you share the image with multiple Hosting Resources under the same Hosting Connection.

MCS – Full Clones

In Citrix Virtual Apps and Desktops (CVAD), for dedicated (persistent) Desktop OS (aka Single session OS) Catalogs, MCS can create Full Clones instead of Linked Clones. Linked Clones can’t be moved, but Full Clones are regular virtual machines that can be moved without impacting MCS.

  • CVAD 2407 and newer support Persistent Multi-session machines.
  • Full Clones is only an option for Desktop OS (aka Single session OS). It’s not an option for Server OS (aka Multi-session OS).

In Citrix Virtual Apps and Desktops (CVAD), you can use MCS to create Full Clones. Full Clones are a full copy of a template (master) virtual machine. The Full Clone can then be moved to a different datastore (including Storage vMotion), different cluster, or even different vCenter. You can’t do that with Linked Clones.

For Full Clones, simply prepare a Master Image like normal. There are no special requirements. There’s no need to create Customization Specifications in vCenter since Sysprep is not used. Instead, MCS uses its identity technology to change the identity of the Full Clone. That means every Full Clone has two disks: one for the actual VM, and one for identity (machine name, machine password, etc).

In Citrix Virtual Apps and Desktops (CVAD), during the Create Catalog wizard, if you select Yes, create a dedicated virtual machine

After you select the master image, there’s a new option for Use full copy for better data recovery and migration support. This is the option you want. The Use fast clone option is the older, not recommended, option.

During creation of a Full Clones Catalog, MCS still creates the master snapshot replica and ImagePrep machine, just like any other linked clone Catalog. The snapshot replica is then copied to create the Full Clones.

When you add machines to the MCS Full Clone Catalog, it uses the Master Image snapshot selected when you initially ran the Create Catalog Wizard. There is no function in Citrix Studio to change the Master Image. Instead, use the PowerShell commands detailed at CTX129205 How to Update Master Image for Dedicated and Pooled Machine Types using PowerShell SDK Console.

Since these are Full Clones, once they are created, you can do things like Storage vMotion.

During Disaster Recovery, restore the Full Clone virtual machine (both disks). You might have to remove any Custom Attributes on the machine, especially the XdConfig attribute.

Inside the virtual machines, you might have to change the ListOfDDCs registry value to point to your DR Delivery Controllers. One method is to use Group Policy Preferences Registry.

In the Create Catalog wizard, select Another Service or technology.

And use the Add VMs button to add the Full Clone machines. The remaining Catalog and Delivery Group steps are performed normally.

MCS – Machine Naming

Once a Catalog is created, you can run the following commands to specify the starting count:

Get-AcctIdentityPool
Set-AcctIdentityPool -IdentityPoolName "NAME" -StartCount VALUE

MCS – Storage Optimization Memory Caching

Memory caching (aka MCSIO, aka Storage Optimization) in MCS is very similar to Memory caching in Citrix Provisioning. All writes are cached to memory instead of written to disk. With memory caching, some benchmarks show 95% reduction in IOPS.

In CVAD 1903 and newer, MCS now uses the exact same Memory Caching driver as Citrix Provisioning. If you want to use the MCSIO feature, upgrade to CVAD 1903 or newer. Older versions of CVAD, including 7.15, have performance problems.

Here are some notes:

  • You configure a size for the memory cache. If the memory cache is full, it overflows to a cache disk.
  • Whatever memory is allocated to the MCS memory cache is no longer available for normal Windows operations, so make sure you increase the amount of memory assigned to each virtual machine.
  • The overflow disk (temporary data disk) can be stored on shared storage, or on storage local to each hypervisor host. Since memory caching dramatically reduces IOPS, there shouldn’t be any problem placing these overflow disks on shared storage. If you put the overflow disks on hypervisor local disks then you won’t be able to vMotion the machines.
  • In CVAD 1811 and older, the overflow disk is uninitialized and unformatted. Don’t touch it. Don’t format it.
  • In CVAD 1903 and newer, the overflow disk is formatted, and you can put logs (e.g. Event Logs) and other persistent files on it just like you do in Citrix Provisioning. See Andy McCullough MCSIO Reborn!

Memory caching requirements:

  • Random Catalogs only (no dedicated Catalogs)

When installing the VDA software, on the Features page, make sure you select the MCS IO option. VDA 1903 and newer are the recommended versions.

Studio needs to be configured to place the temporary overflow disks on a datastore. You can configure this datastore when creating a new Hosting Resource, or you can edit an existing Hosting Resource.

To create a new Hosting Resource:

  1. In Studio, go to Configuration > Hosting, and click the link to Add Connection and Resources.
  2. In the Storage Management page, select shared storage.
  3. You can optionally select Optimize temporary data on local storage, but this might prevent vMotion. The temporary data disk is only accessed if the memory cache is full, so placing the temporary disks on shared storage shouldn’t be a concern.
  4. Select a shared datastore for each type of disk.

Or you can edit an existing Hosting Resource:

  1. In Studio, go to Configuration > Hosting, right-click an existing resource, and click Edit Storage.
  2. On the Temporary Storage page, select a shared datastore for the temporary overflow disks.

Memory caching is enabled when creating a new Catalog.

  1. In the Desktop Experience page, select random.
  2. Master Image VDA must be 7.9 or newer.
  3. In the Virtual Machines page
    • CVAD 1903 and newer require you to specify a Disk cache size first. It needs to be large enough for memory write cache overflow, pagefile, and logs.
    • Then allocate some memory to the cache. For virtual desktops, 256 MB is typical. For RDSH, 4096 MB is typical. More memory = less IOPS.
    • CVAD 2407 and newer let you specify the drive letter for the disk cache.
  4. Whatever you enter for cache memory, also add it to the Total memory on each machine. Any memory allocated to the cache is no longer available for applications so you should increase the total memory to account for this.
  5. Once the machines are created, add them to a Delivery Group like normal.
  6. In CVAD 1903 and newer, the Write Cache Disk is formatted and has a drive letter, just like Citrix Provisioning.
  7. In CVAD 1811 and older, the temporary overflow disk is not initialized or formatted. From Martin Rowan at discussions.citrix.com: “Don’t format it, the raw disk is what MCS caching uses.”

MCS – Image Prep

When a Machine Creation Services catalog is created or updated, a snapshot of the master image is copied to each LUN. This Replica is then powered on and a few tasks are performed like KMS rearm.


From Citrix Blog Post Machine Creation Service: Image Preparation Overview and Fault-Finding and CTX217456 Updating a Catalog Fails During Image Preparation: if you are creating a new Catalog, here are some PowerShell commands to control what Image Prep does: (run asnp citrix.* first). These commands do not affect existing Catalogs.

  • Set-ProvServiceConfigurationData -Name ImageManagementPrep_Excluded_Steps -Value EnableDHCP
  • Set-ProvServiceConfigurationData -Name ImageManagementPrep_Excluded_Steps -Value OsRearm
  • Set-ProvServiceConfigurationData -Name ImageManagementPrep_Excluded_Steps -Value OfficeRearm
  • Set-ProvServiceConfigurationData -Name ImageManagementPrep_Excluded_Steps -Value "OsRearm,OfficeRearm"
  • Set-ProvServiceConfigurationData -Name ImageManagementPrep_DoImagePreparation -Value $false

If you are troubleshooting an existing Catalog, here are some PowerShell commands to control what Image Prep does: (run asnp citrix.* first)

  • Get-ProvScheme – Make a note of the “ProvisioningSchemeUid” associated with the catalog.
  • Set-ProvSchemeMetadata -ProvisioningSchemeUid xxxxxxx -Name ImageManagementPrep_Excluded_Steps -Value EnableDHCP
  • Set-ProvSchemeMetadata -ProvisioningSchemeUid xxxxxxx -Name ImageManagementPrep_Excluded_Steps -Value OsRearm
  • Set-ProvSchemeMetadata -ProvisioningSchemeUid xxxxxxx -Name ImageManagementPrep_Excluded_Steps -Value OfficeRearm
  • Set-ProvSchemeMetadata -ProvisioningSchemeUid xxxxxxx -Name ImageManagementPrep_DoImagePreparation -Value $false

If multiple excluded steps, separate them by commas: -Value "OsRearm,OfficeRearm"

To remove the excluded steps, run Remove-ProvServiceConfigurationData -Name ImageManagementPrep_Excluded_Steps or Remove-ProvSchemeMetadata -ProvisioningSchemeUid xxxxxxx -Name ImageManagementPrep_Excluded_Steps.


A common issue with Image Prep is Rearm. Instead of the commands shown above, you can set the following registry key on the master VDA to disable rearm. See Unable to create new catalog at Citrix Discussions.

  • HKEY_LOCAL_MACHINE/SOFTWARE/Microsoft/Windows NT/CurrentVersion/SoftwareProtectionPlatform
    • SkipRearm (DWORD) = 1

Mark DePalma at XA 7.6 Deployment Failure Error : Image Preparation Office Rearm Count Exceeded at Citrix Discussions had to increase the services timeout to fix the rearm issue:

  • HKLM\SYSTEM\CurrentControlSet\Control
    • ServicesPipeTimeout (DWORD) = 180000


From Mark Syms at Citrix Discussions: You can add one (or both) of the following MultiSZ registry values

  • HKLM\Software\Citrix\MachineIdentityServiceAgent\ImagePreparation\Before
  • HKLM\Software\Citrix\MachineIdentityServiceAgent\ImagePreparation\After

The values are expected to be an executable or script (PoSh or bat), returning 0 on success


Citrix CTX140734 Error: “Preparation of the Master VM Image failed” when CREATING MCS Catalog: To troubleshoot image prep failures, do the following:

  1. In PowerShell on a Controller, for a new Catalog, run:
    asnp citrix.*
    
    Set-ProvServiceConfigurationData -Name ImageManagementPrep_NoAutoShutdown -Value $True
    
  2. For an existing Catalog, run the following:
    asnp citrix.*
    Get-ProvScheme
    Set-ProvSchemeMetadata -ProvisioningSchemeUid xxxxxxx -Name ImageManagementPrep_NoAutoShutdown -Value $True
  3. On the master image, set the DWORD registry value HKLM\Software\Citrix\MachineIdentityServiceAgent\LOGGING to 1
  4. If you now attempt catalog creation, an extra VM will be started; log into this VM (via the hypervisor console, it has no network access) and see if anything is obviously wrong (e.g. it’s bluescreened or something like that!). If it hasn’t there should be two log files called “image-prep.log” and “PvsVmAgentLog.txt” created in c:\ – scan these for any errors.
  5. When you’ve finished doing all this debugging, remember to run one of the following:
    Remove-ProvServiceConfigurationData -Name ImageManagementPrep_NoAutoShutdown
    Remove-ProvSchemeMetadata -ProvisioningSchemeUid xxxxxxx -Name ImageManagementPrep_NoAutoShutdown

MCS – Base Disk Deletion

Citrix CTX223133 How to change the disk deletion interval to delete unused base disks on the VM storage. Every 6 hours, Citrix Virtual Apps and Desktops (CVAD) runs a task to delete unused base disks.

The Disk Reaper interval is configured using PowerShell. The default values are shown below:

Set-ProvServiceConfigurationData -Name DiskReaper_retryInterval -Value 6:0:0 | Out-Null
Set-ProvServiceConfigurationData -Name DiskReaper_heartbeatInterval -Value 1:0:0 | Out-Null

MCS – Static (Dedicated) Catalog Master Image

If you create a Machine Catalog of Dedicated Machines (aka Static Catalog), then it’s not possible to update the Master Image using Citrix Studio.

You might want to change the Master Image so that machines added to this Static Catalog are cloned from a new Master Image instead of the Master Image that was originally selected with the Catalog was created.

Official instructions are at CTX129205 How to Update Master Image for Dedicated and Pooled Machine Types using PowerShell SDK Console.

If vSphere, Chaitanya at Machine Catalog Update Tool at knowcitrix.com created a GUI for these Citrix and vSphere PowerShell commands.

MCS – Hybrid Azure AD Join

CVAD 2305 and newer support Hybrid Azure AD Join when creating a Catalog. See Hybrid Azure Active Directory joined at Citrix Docs. VDA Registration is delayed until the computer is synced to Azure AD, which can take 30 minutes or longer.

Controller – Name Caching

George Spiers in Active Directory user computer name caching in XenDesktop explains how the Broker Service in Delivery Controller caches Active Directory user and computer names. The cache can be updated by running Update-BrokerNameCache -Machines or Update-BrokerNameCache -Users. Also see Update-BrokerNameCache at Citrix SDK documentation.

Delivery Group License Type

Citrix Virtual Apps and Desktops (CVAD) supports multiple license types (e.g. Concurrent and User/Device) within a Single farm/site. However, a farm/site only supports a single Edition (i.e. Enterprise or Platinum, but not both). The license model and product are configured at the Delivery Group. See CTX223926, and Multi-type licensing at Citrix Docs.

To configure license model and product, run the following PowerShell commands (run asnp citrix.* first):

Set-BrokerDesktopGroup –Name "DeliveryGroupName" –LicenseModel LicenseModel
Set-BrokerDesktopGroup –Name "DeliveryGroupName" –ProductCode ProductCode

LicenseModel can be UserDevice, or Concurrent. ProductCode can be XDT (Citrix Virtual Apps and Desktops [CVAD]) or MPS (Citrix Virtual Apps [CVA]).

Delivery Groups

In Citrix Virtual Apps and Desktops (CVAD), when creating a Delivery Group, there are options for publishing applications and publishing desktops.

On the Applications page of the Create Delivery Group wizard, From start menu reads icons from a machine in the Delivery Group and lets you select them. Manually lets you enter file path and other details manually. These are the same as in prior releases.

Existing is the new option. This lets you easily publish applications across multiple Delivery Groups.

You can also go to the Applications node, edit an existing application, change to the Groups tab, and publish the existing app across additional Delivery Groups.

Once multiple Delivery Groups are selected, you can prioritize them by clicking the Edit Priority button.

On the Desktops page of the Create Delivery Group wizard, you can now publish multiple desktops from a single Delivery Group. Each desktop can be named differently. And you can restrict access to the published desktop.

There doesn’t seem to be any way to publish a Desktop across multiple Delivery Groups.

To publish apps and desktops across a subset of machines in a Delivery Group, see Tags.

Maximum Desktop Instances in Site/Farm

Citrix Virtual Apps and Desktops (CVAD) 1808 and newer lets you restrict the maximum instances of a published desktop in the Site. This feature is configured using PowerShell.

asnp citrix.*
Get-BrokerEntitlementPolicyRule | Select-Object Name,PublishedName
Set-BrokerEntitlementPolicyRule -Name RDSH16_1 -MaxPerEntitlementInstances 1

If too many instances are launched, the user sees Cannot start desktop in StoreFront.

And StoreFront Server > Event Viewer > Applications and Services > Citrix Delivery Services shows session-limit-reached.

To revert to unlimited instances of the published desktop, set MaxPerEntitlementInstances to 0.

Logoff Closed Desktop

In Citrix Workspace app 2309 version onwards, when users close a desktop session, users can be asked to Sign out instead of Disconnect. This feature is called Save energy or Logoff on Close.

To enable the feature, edit a published desktop, find the Description field, and enter something similar to the following:

KEYWORDS:LogoffOnClose=true PromptMessage="Do you want to Log off?"

Tags

In Citrix Virtual Apps and Desktops (CVAD), you can assign tags to machines. Then you can publish apps and/or desktops to only those machines that have the tag. This means you can publish icons from a subset of the machines in the Delivery Group, just like you could in XenApp 6.5.

Tags also allow different machines to have different restart schedules.

  1. In Citrix Studio, find the machines you want to tag (e.g. double-click a Delivery Group). You can right-click one machine, or select multiple machines and right-click them. Then click Manage Tags.
  2. Click Create.
  3. Give the tag a name and click OK. This tag could be assigned to multiple machines.
  4. After the tag is created, check the box next to the tag to assign it to these machines. Then click Save.
  5. Edit a Delivery Group that has published desktops. On the Desktops page, edit one of the desktops.
  6. You can use the Restrict launches to machines with tag checkbox and drop-down to filter the machines the desktop launches from. This allows you to create a new published desktop for every machine in the Delivery Group. In that case, each machine would have a different tag. Create a separate published desktop for each machine, and select one of the tags.
  7. A common request is to create a published desktop for each Citrix Virtual Apps (CVA) server. See Citrix Blog Post How to Assign Desktops to Specific Servers in XenApp 7 for a script that can automate this configuration.
  8. When you create an Application Group, on the Delivery Groups page, there’s an optional checkbox to Restrict launches to machines with tag. Any apps in this app group only launch on machines that have the selected tag assigned. This lets you have common apps across all machines in the Delivery Group, plus one-off apps that might be on only a small number of machines in the Delivery Group. In that case, you’ll have one app group with no tag restrictions for the common apps. And a different app group with tag restriction for the one-off apps.

RDSH Scheduled Restart

If you create a Scheduled Restart inside Citrix Studio, it applies to every machine in the Delivery Group. Alternatively, you can use the 7.12 tags feature to allow different machines to have different restart schedules.

To configure a scheduled reboot on RDSH machines:

  1. Right-click an RDSH Delivery Group and click Edit Delivery Group.
  2. On the User Settings page, make sure the Time zone is configured correctly. Scheduled restarts use this time zone. (Source = CTX234892 Scheduled Restart Happen At Incorrect Time For A Specific Delivery Group)
  3. In Citrix Virtual Apps and Desktops (CVAD) 1811 and newer, you can create multiple Restart Schedules from the GUI. First, tag your machines. Then create a restart schedule for each tag.

  4. The Restart Schedule page lets you schedule a restart of the session hosts.
  5. Citrix Virtual Apps and Desktops (CVAD) and XenApp 7.7 and newer lets you send multiple notifications.
  6. Restart after drain – in CVAD 2103 and newer, you can configure a Restart Schedule to wait for all users to log off of the machine. Use the -UseNaturalReboot $true parameter with the New-BrokerRebootScheduleV2 and Set-BrokerRebootScheduleV2 cmdlets. Run Get-BrokerRebootScheduleV2 to see the existing schedules. Then run Set-BrokerRebootScheduleV2 to modify the schedule. This feature is not available in Citrix Studio.
  7. Restart after database outage – If a site database outage occurs before a scheduled restart begins for machines (VDAs) in a Delivery Group, the restarts begin when the outage ends. This can have unintended results. To help avoid this situation, you can use the MaxOvertimeStartMins parameter for the New-BrokerRebootScheduleV2 and Set-BrokerRebootScheduleV2 cmdlets in CVAD 1909 and newer. See Scheduled restarts delayed due to database outage at Citrix Docs.
  8. Maintenance mode and restarts – VDAs in Maintenance Mode will not restart automatically.
    1. In CVAD 2006 and newer, the Set-Brokerrebootschedulev2 cmdlets have -IgnoreMaintenanceMode $true. This setting is not available in Citrix Studio. See Scheduled restarts for machines in maintenance mode at Citrix Docs.
    2. Or see Matthias Schlimm at Reboot Schedule – VM’s in Maintenance Mode … do it at CUGC provides a script that reboots maintenance mode VDAs.
  9. If all the user sessions on the VDA are not logged off within 10 minutes, and if machine is not shutdown gracefully, then the Delivery Controller sends a force shutdown of the VDA, and machine does not power on. The following Delivery Controller registry values can be tweaked. Source = Citrix CTX237058 Schedule reboot does not restart machines and it stays in Shutdown state
    • HKLM\Software\Citrix\DesktopServer\SiteServices\MaxShutdownTimeSecs
    • HKLM\Software\Citrix\DesktopServer\RebootSchedule\MaxShutdownDelayMin 

Or use a reboot script/tool:

Autoscale

In CVAD 2305 and newer, Web Studio supports Autoscale. Right-click a Delivery Group and click Manage Autoscale. See Getting started with Autoscale at Citrix Docs.

In CVAD 2407 and newer, in Static (dedicated) Single-session Delivery Groups, in Autoscale > Load-based Settings, you can power off machines that nobody logged on to.

For schedule-based autoscale, edit the Delivery Group and set the Time Zone on the User Settings page.

Web Studio 2308+ on the Settings page has an option for Vertical load balancing.

CVAD 2311 and newer let you set Vertical load balancing at the Delivery Group instead of only at the Site.

Multiple Sessions

From Configure session roaming at Citrix Docs: By default, users can only have one session. Citrix Web Studio in CVAD 2303 and newer lets you configure session roaming by editing the delivery group. For published apps, disable it on the Users page. For published desktops, edit a published desktop and disable it on the bottom of the window.

Or you can configure the SessionReconnection setting available via PowerShell.  On any Server OS delivery group, run:

Set-BrokerEntitlementPolicyRule <Published Desktop Name> -SessionReconnection <Value>

For <Published Desktop Name>, run Get-BrokerEntitlementPolicyRule and look for the Name field.

<Value> can be:

  • Always – This is the default and matches the behavior of a VDI session. Sessions always roam, regardless of client device.
  • DisconnectedOnly – This reverts back to the XenApp 6.x and earlier behavior. Sessions may be roamed between client devices by first disconnecting them (or using Workspace Control) to explicitly roam them. However, active sessions are not stolen from another client device, and a new session is launched instead.
  • SameEndpointOnly – This matches the behavior of the “ReconnectSame” registry setting in XenApp 6.x. Each user will get a unique session for each client device they use, and roaming between clients is completely disabled.

For app sessions, use:

Set-BrokerAppEntitlementPolicyRule <App Entitlement Rule Name> -SessionReconnection <Value>

For <App Entitlement Rule Name>, run Get-BrokerAppEntitlementPolicyRule and look for the Name field.

Static Catalog – Export/Import Machine Assignments

It is sometimes useful (e.g. DR) to export machine assignments from one Catalog/Delivery Group and import to another.

  1. In Studio, click Delivery Groups on the lefthand menu
  2. Right click Edit delivery group
  3. Select Machine allocation tab on the left
  4. Click Export list
  5. Select a file name > Click Save
  6. Create the new machine catalog
  7. Right click the delivery group > Click Edit
  8. Select Machine allocation tab on the left
  9. Click Import list..
  10. Select the list you exported in step 4
  11. Click Apply

Your clients will now have users re-assigned to machines.

Monitor the Number of Free Desktops

Sacha Thomet wrote a script at victim of a good reputation – Low free pooled XenDesktops that polls Director to determine the number of free desktops in a Delivery Group. If lower than the threshold, an email is sent.

List Desktops Not Used for x Days

CTP Kees Baggerman has a script at Making sure your Citrix Desktops are utilized with Powershell v2 that does the following:

  • Grab all the desktops that haven’t been used within x amount of days
  • Notify the user
  • Set the desktop to maintenance mode
  • Uses the Office 365 SMTP servers for notifications

Related Topics

Published Applications

Last Modified: Dec 22, 2023 @ 5:02 am

Navigation

💡 = Recently Updated

Change Log

RDSH Application Testing

Installing apps on Remote Desktop Session Host (Virtual Apps or XenApp) is more complicated than installing apps on a single-user operating system (virtual desktop). Here are some RDSH-specific considerations that must be tested before integrating a new application into RDSH. These considerations usually don’t apply to virtual desktops.

  •  Multi-user Capable – can the application run multiple times on the same machine by different users? Most applications don’t have a problem, but a few do, especially applications that put temporary files or other writable files in global locations. For example, the first user of an app could write temporary files to C:\Temp. The second user writes to the same location, overwriting the temp files needed by the first user. Test the app with multiple users running the app on the same RDSH machine.
  • Lockdown to prevent one user from affecting another – What restrictions are needed to prevent one user from affecting another? For example, if an app’s configuration files are stored in a global location, you don’t want one user to edit the configuration file, and thus affect a different user. Test the app with multiple users running the app on the same RDSH machine.
  • Permission Relaxations – what relaxations (e.g. NTFS) are needed to allow non-administrators and GPO locked-down users to run the application? Test the application as a non-administrator with GPO lock down policies applied.
  • First Time Use – when a user launches an application the first time, the application should be automatically fully configured with default settings (e.g. back-end server connections). Use group policy to apply application settings. Automated FTU also helps with a user whose profile is reset. Test the RDSH app with a user that has a new (clean) profile.
  • Roaming – users could connect to a different RDSH machine every day, and thus user settings need to roam across machines. Test running the app on one RDSH, make changes, then login to a different RDSH machine to ensure the changes are still there.
  • Application Licensing – if an application requires licensing, can licensed and non-licensed users connect to the same machine? Can it be guaranteed that non-licensed users can’t run the application that requires licensing? Adobe Acrobat is an example of a challenging application because of the global .pdf file-type association, and the global PDF printer.
  • Client Devices (USB, printers, COM ports) – the client device mapping capabilities on RDSH are not as extensive as virtual desktops. For example, generic USB wasn’t added until Windows Server 2012 R2. When the application prints, does it show printers from every user, instead of just the user running the app? Does the app need COM port mapping?
  • Shared IP – does the app have any problems with multiple users sharing the same IP address? If so, you might have to configure RDS IP Virtualization.
  • Fair Sharing of Hardware Resources– does the app sometimes consume a disproportionate amount of hardware resources? For example, can the app be used to launch a task that consumes 100% CPU for some time? One option is to put this app on its own Delivery Group. Or you can use Citrix Workspace Environment Manager to ensure fair sharing of hardware resources.
  • Published Application – can the app run as a published application that doesn’t have Explorer running in the background? Does the app (e.g. Internet Explorer web apps) need RunOnce.exe /AlternateShellStartup to fully initialize before it will run correctly as a published application? Some apps work without issue in a published desktop, but don’t work properly as published applications. When testing a published app, test it with a user that has a new (clean) profile. Connecting to the published desktop once will cause Active Setup to run, changing the user’s profile, thus distorting the published app testing results.
  • Integration Testing – when installing a new app on a RDSH server, don’t forget to test the other apps already on the RDSH server, because the new app might have broken the other apps. The more apps you put on an RDSH server, the longer it takes to perform integration testing.

Also see MSDN Remote Desktop Services programming guidelines.

Some of the issues in this list can be overcome by using an application virtualization tool (e.g. Microsoft App-V) that runs apps in isolated bubbles.

Application Groups

Citrix Blog Post Introducing Application Groups in XenApp and XenDesktop 7.9

Citrix Virtual Apps and Desktops and XenApp 7.9 and newer has an Application Group feature. This feature lets you group published apps together so you can more easily apply properties to every app in the group. Today, you can do the following:

  • Control visibility of every app in the app group (Users page).
  • Publish every app on the same Delivery Groups.
  • Prevent or allow apps in different Application Groups from running in the same session.
  • With one published app icon, test users launch from test Delivery Group, while production users launch from production Delivery Group.

To create an Application Group:

  1. In Citrix Studio, right-click Applications, and click Create Application Group.

    1. In the Getting Started page, click Next.
    2. In the Delivery Groups page, select the delivery groups you want these apps published from.
    3. In the Users page, select the users that can see the apps in this app group.
    4. Note: there are three levels of authorization. An app is only visible to a user if the user is assigned to all of the following:
      • Delivery Group
      • Application Group
      • Individual Published Apps in the Application Group
    5. Click Next.
    6. In the Applications page, publish applications like normal. The Existing option lets you select an app that’s already been published to a different Application Group or Delivery Group. Click Next.
    7. In the Summary page,  give the Application Group a name, and click Finish.
  2. In the Applications node in Studio, there’s a new Application Groups section.
  3. If you highlight your Application Group, on the right is the list of apps in the group. You can edit each of these published apps like normal.
  4. You can drag applications into an Application Group.

  5. However, this more of a copy than a move. To actually move the app exclusively into the Application Group, edit the individual app, and on the Groups page, remove all Delivery Groups (or other Application Groups). The app will instead inherit the Delivery Groups from the app group.
  6. If you edit the Application Group:
  7. The Settings page has an option for session sharing between Application Groups. Clearing this checkbox allows you to force applications in different Application Groups to run in different sessions.
  8. The Delivery Groups tab lets you set Delivery Group priority. If priority is identical, then sessions are load balanced. If priorities are different, then sessions are launched on Delivery Groups in priority order.
  9. The checkbox for Restrict launches to machines with tag lets you restrict the apps to only run on VDAs with the selected tag.
  10. In Citrix Virtual Apps and Desktops and XenApp/XenDesktop 7.13 and newer, you can use PowerShell to cause an Application Group to launch multiple app instances in separate sessions. Citrix Blog Post XenApp and XenDesktop 7.13: Launching an Application in Multiple Sessions.

Limit Icon Visibility

For Published Applications, there are three levels of application authorization: Delivery Group, Application Groups, and Published App Limit Visibility. A published app icon is only visible if the user is added to all three levels.

  1. Delivery Group (Users page). If the user is not assigned to the Delivery Group, then the user won’t see any application or desktop icon published from that Delivery Group.

  2. Limit Visibility – You can use the published app’s Limit Visibility page to restrict an icon to a subset of Delivery Group users.

  3. In Citrix Virtual Apps and Desktops (CVAD) and XenApp/XenDesktop 7.9 and newer, you can use Application Groups to restrict access to published icons.

  4. App Icons won’t appear unless users are added to all three of the above locations.

Published Desktops have separate authorization configuration:

  1. Citrix Virtual Apps and Desktops (CVAD) and XenApp/XenDesktop 7.8 and newer have a Desktops page in Delivery Group properties where you can publish multiple desktops and restrict access to those individual published desktops.

  2. In XenApp/XenDesktop prior to version 7.8, if a desktop is published from the Delivery Group, by default, every user assigned to the Delivery Group can see the icon. You can use the PowerShell command Set-BrokerEntitlementPolicyRule to limit the desktop icon to a subset of the users assigned to the Delivery Group.
    1. Run asnp citrix.*
    2. Run Get-BrokerEntitlementPolicyRule to see the published desktops.
    3. Then run Set-BrokerEntitlementPolicyRule to set the IncludedUsers or ExcludedUsers filters.

Published Content

Citrix Virtual Apps and Desktops (CVAD) and XenApp 7.11 and newer have Published Content where you can publish URLs that are opened in the user’s local browser. You can also publish UNC paths, which are opened with local Explorer or local application.

It’s not possible to publish content using Citrix Studio. Instead, use PowerShell.

The New-BrokerApplication cmdlet requires you to specify a Delivery Group which must have at least one registered machine in it. However, the published content does not actually launch from the Delivery Group since the URLs and/or UNCs open locally.

First run asnp citrix.*

Then run New-BrokerApplication -ApplicationType PublishedContent. Here is a sample PowerShell command:

New-BrokerApplication -Name "CitrixHomePage" -PublishedName "Citrix Home Page" -ApplicationType PublishedContent -CommandLineExecutable https://www.citrix.com -DesktopGroup RDSH12R2

Instead of publishing to a Delivery Group, you can publish to an Application Group by using the -ApplicationGroup switch. The Application Group must have Delivery Group(s) assigned to it.

Once the Published Content is created, you can see it in Citrix Studio. You can also edit it from Citrix Studio, including Limit Visibility and Groups (to move it to an Application Group).

Published Content can be placed in Application Groups, which supports properties to restrict access to the shortcut.

It does not appear to be possible to set the icon from Studio, but you can do it using PowerShell. See Citrix Blog Post @XDtipster – Changing Delivery Group Icons Revisited (XD7) for instructions to convert an icon to a base64 string, and import to Citrix Virtual Apps or XenApp using New-BrokerIcon -EnCodedIconData "Base64 String".  Then you can link the icon to the Published Content using Set-BrokerApplication "App Name" -IconUid.

In StoreFront 3.7, you can click the icon and URLs will open in a new browser tab.

HTTP/HTTPS Published Content should open in Receiver. Other URLs (e.g. file:// or UNC path) will probably show an error message.

You can override this restriction by enabling the group policy setting Allow/Prevent users to publish unsafe content at Computer Configuration | Policies | Administrative Templates | Citrix Components | Citrix Receiver | SelfService. This assumes you’ve installed the Receiver .admx files. (h/t David Prows at CUGC forums).

Application Usage Limits

In Citrix Virtual Apps and Desktops (CVAD) and XenApp/XenDesktop 7.7 or newer, if you edit an application’s Properties, on the Delivery page, you can restrict the number of concurrent instances of the application. You can also Limit to one instance per user.

Citrix Virtual Apps and Desktops (CVAD) 1808 and newer support limiting the number of application instances per machine. This setting is configured using PowerShell. See Configure application limits at Citrix Docs.

asnp citrix.*
Set-BrokerApplication MyApplication -MaxPerMachineInstances 2

To revert to unlimited per-machine instances of the published application, set MaxPerMachineInstances to 0.

Keywords for StoreFront

In a published application’s Properties, on the Identification page, in the Description and keywords field, you can enter KEYWORDS to control how the app behaves when displayed by StoreFront.

  • Enter KEYWORDS:Mandatory or KEYWORDS:Auto to cause the application to automatically be subscribed or favorited in Citrix Receiver.
    • In StoreFront 3.0 and newer, the user can go to the Apps tab, click an App’s Details button, and mark the app as a Favorite. 
    • In the older StoreFront interface, users subscribe to applications by clicking the plus icon to add the application to the middle of the screen. 
    • Mandatory means the app can’t be removed from Favorites or unsubscribed.
    • Auto means the app is automatically favorited or subscribed, and can be un-favorited or unsubscribed by the user.
  • Enter KEYWORDS:Featured to make the application show up in the Featured list.
  • You can separate multiple keywords with a space. KEYWORDS:Mandatory Featured.
  • See the StoreFront 3.7 Keywords documentation at Citrix Docs for more information.

Users will have a better experience with StoreFront if applications are published into folders. The folder name is specified in the Delivery page in the Category field. Note: Add shortcut to user’s desktop works in newer versions of Receiver assuming the app is marked as a Favorite.

Secure Browser

Citrix has a deployment guide for publishing a browser from XenApp. Here’s an overview of the configuration:

  • Install Chrome on an RDSH VDA.
  • In Studio, publish IE and/or Chrome in Kiosk Mode to anonymous users.
    • Create a different published app for each website.
  • In StoreFront, create a Store for Unauthenticated Users.
  • In StoreFront, enable Receiver for HTML5.
  • In StoreFront, enable web links so you can link to the published browser from a different website.

When a user launches the published browser, the HTML5 client opens the published app in a local browser tab. The published browser runs in kiosk mode so that the published browser’s user interface is hidden. It looks like the website is running on the local browser but actually it’s running from a published browser.

App-V

App-V GPO ADMX templates

The latest GPO ADMX templates for App-V can be downloaded from Microsoft Desktop Optimization Pack Group Policy Administrative Templates.

App-V and Logon Times

Links:

App-V Dual Admin

In Dual Admin mode, you configure Citrix Studio to connect to App-V Management Server(s) and Publishing Server(s).

See Citrix Blog Post Load Balancing Microsoft App-V Servers with a Citrix Virtual Apps deployment for supported App-V server load balancing configurations.

  • Connecting to Management Servers using a load balancing VIP is not supported.
    • Use DNS Round Robin instead. Or use Citrix PowerShell to specify multiple Management Servers.
  • You can connect to Publishing Servers load balanced through a VIP, but Studio will show an error. Just ignore it.

App-V Single Admin

Citrix Virtual Apps and Desktops (CVAD) and XenApp 7.8 no longer requires App-V management infrastructure and can instead pull the App-V packages directly from an SMB share as detailed at App Packages at Citrix Docs.

The computer accounts for Delivery Controllers and VDAs must have read access to the share. An easy method is to add Domain Computers. See CTX221296 Citrix App-V Integration Minimum Permission Requirements.

In CVAD 2311 or newer, in Web Studio, go to App Packages to add App-V packages. See Publish packaged applications on single-session or shared desktop VDAs at Citrix Docs.

In older Citrix Studio, go to Configuration > Hosting, right-click App-V Publishing, click Add Packages, and browse to the .appv file.

Citrix Virtual Apps and Desktops (CVAD) and XenApp 7.11 adds an Isolation Groups tab.

Once App-V packages are added to Citrix Studio, you can publish an app, and select App-V from the drop-down.

The App-V apps show up as AppLibrary App-V and support the same options as other published applications.

Make sure the App-V Components are installed on your VDA. It’s not checked by default in 7.12 and newer.

On your VDA Windows 10/2016 or newer, in PowerShell, run Enable-Appv. For older OS, install the App-V client.

There appears to be some limitations to the package share method as detailed by Joe Robinson at Citrix Discussions:

Joe Robinson provided a script to force the App-V client to sync before launching the user’s App-V application.

If you run Citrix Workspace app inside a VDA machine and attempt to launch an App-V published app, it will launch from a different VDA session instead of the VDA session you’re already connected to.

Launch App Inside App-V Bubble

From Citrix Blog Post Process Launching in an App-V V5 Virtual Environment:

  • On any executable, add the /appvve:<PackageID>_<VersionID> of the package in which one would like the executable to run
  • If the App-V process is already running then use the /appvpid:<ProcessId> to inject into a running App-V virtual environment
  • If you want something more permanent, you can set the HKEY_LOCAL_MACHINE\SOFTWARE\Microsoft\AppV\Client\RunVirtual\<YourApplicationName> with a default REG_SZ key that has the executable name in it.

Also see Microsoft Knowledgebase article How to launch processes inside the App-V 5.0 virtualized environment.

AppDisks

See https://www.carlstalhood.com/appdisks/

Change Published Desktop Icon

Citrix Blog Post Changing Delivery Group Icons Revisited (XD7) has instructions on how to use PowerShell to import a Base-64 icon and then link it to the published desktop.

StoreFront overrides custom desktop icons. Run the following PowerShell commands to restore custom desktop icons: (h/t CTP Sam Jacobs)

& 'C:\Program Files\Citrix\Receiver StoreFront\Scripts\ImportModules.ps1'

$store = Get-STFStoreService /Citrix/Store
Set-STFStoreService -StoreService $store -SubstituteDesktopImage $false -Confirm:$false

Other Published App Tips

CTX209199 Published 64 bit Aps Can’t Be Started With %ProgramFiles% in Command Line If It’s Not the first Application to Start: You can try the following methods to address this issue:

  1. Use the absolute path to publish the application.
    2. Use %ProgramW6432% for 64-bit applications instead of %ProgramFiles%.

Google Chrome

Links detailing installation, configuration, roaming profiles, and publishing.

CTX132057 Google Chrome Becomes Unresponsive when Started as Published Application: add the parameters --allow-no-sandbox-job --disable-gpu in the published app command line. According to Dennis Span, this is no longer needed in Chrome 58 and newer.

CTX205876 Non-published Google Chrome browser on XenApp server, called and launched from any published app, is seen in black/grey screen: The command line parameter has to be added to registry shell open command for the Chrome browser:

  1. In Regedit, navigate to HKEY_CLASSES_ROOT\http\shell\open\command
  2. Edit the Default value as follows:
    "C:\Program Files (x86)\Google\Chrome\Application\chrome.exe" --allow-no-sandbox-job --disable-gpu -- "%1"

Disable Application and Hide It

  1. In Studio, you can disable a published application by right-clicking it, and clicking Disable.
  2. In older versions of XenApp/XenDesktop, when you disable the application, it leaves the application visible but it is grayed out thus preventing users from launching it. In 7.8, the disabled app is automatically hidden (no longer shown in the apps list).
  3. If desired, you can hide or unhide the disabled application icon by running a PowerShell command:
    asnp citrix.*
    Set-BrokerApplication MyApp -Visible $false
    

  4. When you re-enable the application, Visibility is automatically set back to true.

Browser Content Redirection

Browser Content Redirection prevents the rendering of whitelisted webpages on the VDA side, and instead renders them on the client side. Only the browser viewport is redirected. The intent of this feature is to redirect HTML5 Video (e.g .youtube).

Browser Content Redirection requirements:

  • Citrix Virtual Apps and Desktops (CVAD) or XenApp/XenDesktop 7.16 and newer
  • Receiver 4.10 or newer
  • Chrome support is available in Citrix Virtual Apps and Desktops (CVAD) 1808 and newer
    • In the VDA, install the Chrome Browser Extension named Browser Content Redirection Extension. You can use Google Chrome Group Policy templates to force installation of the extension. See Browser content redirection Chrome extension at Citrix Docs.
    • You do not need any client software other than Workspace app 1809 or newer. The client-side rendering engine is included in Workspace app 1809 and newer.
      • HDX Browser Content Redirection feature will not work with Citrix Workspace app for Windows 1912 LTSR due to removal of the embedded browser from LTSR versions. But it does work in Workspace app 2006.
  • Internet Explorer 11– IE 11 on both the VDA, and on the client.
    • On the VDA, Enhanced Protected Mode must be disabled under Internet Explorer: Internet Options > Advanced
    • On the VDA, an IE 11 Browser Helper Object (BHO) named Citrix HDXJsInjector facilitates the redirection.
    • In Internet Explorer > Tools > Internet Options > Advanced > Browsing, ensure that Enable third-party browser extensions is checked. Source = Content Browser Redirection at Citrix Discussions.
  • Internet access from Client – By default, the client (Receiver) tries to fetch the redirected content. If client is not able to fetch, then the content falls back to server rendering.
  • When redirection is working, the client machine has a HdxBrowser.exe process.

    • See Kasper Johansen Citrix Xenapp And Desktop 7.16 Browser Content Redirection for some videos of this feature.
    • Kasper and Rasmus detail client-side registry keys to enable HdxBrowser.exe to use client-side GPU. These keys/values might already be configured in Receiver 4.11 and newer.
      • HKEY_LOCAL_MACHINE\Software\Microsoft\Internet Explorer\Main\FeatureControl\FEATURE_GPU_RENDERING
        • HdxBrowser.exe (DWORD) = 1
      • HKEY_LOCAL_MACHINE\Software\Microsoft\Internet Explorer\Main\FeatureControl\FEATURE_BROWSER_EMULATION
        • HDXBrowser.exe (DWORD) = 11000 (Decimal)
      • HKEY_CURRENT_USER\Software\Microsoft\Internet Explorer\Main\FeatureControl\FEATURE_GPU_RENDERING
        • HdxBrowser.exe (DWORD) = 1
      • HKEY_CURRENT_USER\Software\Microsoft\Internet Explorer\Main\FeatureControl\FEATURE_BROWSER_EMULATION
        • HDXBrowser.exe (DWORD) = 11000 (Decimal)
    • Rasmus Raun-Nielsen at Browser Content Redirection?! at LinkedIn has some CPU analysis, including client-side GPU.

Browser Content Redirection is configured using Citrix Policies, in the User half, under the Multimedia category.

Browser Content Redirection is enabled by default, but only for the specified whitelist URLs (ACL Configuration). Note that wildcards can be used in the path, but not in the DNS name. To configure Microsoft Teams and GoToMeeting, see CTX238236 Browser Content Redirection: whitelisting websites.

Citrix Virtual Apps and Desktops (CVAD)  and XenDesktop 7.18 and newer have a setting named Browser Content Redirection Authentication Sites. Add URLs that are redirected from the main ACL URL. To configure Microsoft Teams and GoToMeeting, see CTX238236 Browser Content Redirection: whitelisting websites. Also see See CTX230052 How to Troubleshoot Browser Content Redirection.

Citrix Virtual Apps and Desktops (CVAD) and XenDesktop 7.17 and newer have a Blacklist setting. Any address added here will not be redirected to the client. You typically configure this setting to override the ACL setting (e.g. ACL setting has a generic URL, but the Blacklist has a more specific URL)

7.18 adds a Browser Content Redirection Authentication Sites setting. Configure a list of URLs that sites redirected via Browser Content Redirection can use to authenticate a user. E.g. iDP URLs.

Registry keys for Browser Content Redirection are detailed at Browser content redirection policy settings at Citrix Docs.

Bidirectional Content Redirection

You can redirect URLs from client to a published browser, or from VDA to the client. See Bidirectional content redirection policy settings at Citrix Docs for requirements and limitations.

  1. Make sure Local App Access is not enabled on the VDAs.
  2. Make sure a browser is published. Chrome and Edge require Workspace app 2106 and newer connecting to VDA 2106 and newer.
  3. Edit a GPO that applies to VDA users.
  4. Go to User Config | Policies | Citrix Policies and edit a Citrix Policy.
  5. Find the setting Allow Bidirectional Content Redirection and enable it (Allowed).

  6. In CVAD 2311 and newer, use the setting Bidirectional content redirection configuration to insert a JSON string containing the list of URLs to redirect from client or VDA. The older setting for Allowed URLs has been deprecated. See Bidirectional content redirection at Citrix Docs.


  7. Prior to CVAD 2311, also configure the Allowed URLs policy settings (VDA to client, or client to VDA) to indicate which URLs should be redirected in either direction.

    • VDA 2206 adds support for wildcards in the Allowed URLs to be redirected to Client policy setting, but not from Client to VDA.
    • VDA 2206 adds support for custom protocols other than HTTP and HTTPS in the Allowed URLs to be redirected to Client policy setting. These custom protocols don’t work from Edge/Chrome.
    • More details at Citrix Docs.
  8. In CVAD 2311 and newer, it is no longer necessary to configure Bidirectional Content Redirection on the client side. For older CVAD:
    1. Copy the receiver.admx file from Receiver 4.7 or newer to PolicyDefinitions (SYSVOL or C:\Windows\PolicyDefinitions).
    2. Edit a GPO that applies to client devices (endpoints).
    3. Go to User Configuration | Policies | Administrative Templates | Citrix Workspace | User experience.
    4. Double-click the setting Bidirectional Content Redirection.
    5. Enable the setting.
    6. In the Published Application field, enter the name of the Internet Explorer published application.
    7. In the Allowed URLs fields, configure the URLs you want to redirect in either direction.
  9. On the VDA, run one or more the following commands to register the browser add-on. Chrome and Edge require Workspace app 2106 and newer connecting to VDA 2106 and newer.
    "C:\Program Files (x86)\Citrix\System32\VDARedirector.exe" /regIE
    "C:\Program Files (x86)\Citrix\System32\VDARedirector.exe" /regChrome
    "C:\Program Files (x86)\Citrix\System32\VDARedirector.exe" /regEdge
    "C:\Program Files (x86)\Citrix\System32\VDARedirector.exe" /regall

  10. CTX232277 Unable to Logoff When Bidirectional Content Redirection is Configured says that the following registry value should be configured on the VDA. If you already have LogoffCheckSysModules, then add the below processes names to the existing value.
    • HKEY_LOCAL_MACHINE\SYSTEM\CurrentControlSet\Control\Citrix\wfshell\TWI
      • LogoffCheckSysModules (REG_SZ) = wfcrun32.exe,Concentr.exe,SelfServicePlugin.exe,redirector.exe
  11. In Workspace app 2106 and newer connecting to VDA 2106 and newer, do the following to enable redirection for Chrome and/or Edge:
    "%ProgramFiles(x86)%\Citrix\ICA Client\redirector.exe" /regChrome /verbose

  12. Chrome might display an Error indicating New extension added.

  13. For Internet Explorer, do the following:
    "C:\Program Files (x86)\Citrix\ICA Client\redirector.exe" /regIE

  14. When you run Internet Explorer on the VDA or client device, you’ll be prompted to enable the add-on. You can configure a GPO to enable this add-on automatically. Redirection won’t work unless the add-on is enabled.

Host to client Redirection

This feature causes Citrix VDA to redirect http links in applications to the client machine, so they are opened using the client’s browser. The feature is disabled by default.

James Rankin at Using host-to-client redirection in Citrix XenApp explains the feature in detail, including:

  • Limitations of the feature
  • Registry values to control the URL Schemes that can be redirect to the client
  • Group Policy and XML file to handle the File Type Associations in Windows 2012 and newer

Local App Access

Some applications are not suitable for centralization and instead should run on endpoint devices. These applications include: phone software, applications needing peripherals, etc. Citrix Local App Access lets you access these endpoint-installed applications from inside a published desktop. This is sometimes called Reverse Seamless.

Local App Access has three modes of functionality:

  • User-managed local applications. Any shortcuts in the endpoint’s local Start Menu and local Desktop are made available from inside the published desktop.
  • Administrator-managed local applications. Use Studio to publish a local application, which is created as a shortcut inside the published desktop. When the shortcut is launched, it is actually running from the endpoint device (reverse seamless) instead of the centralized desktop. If you enable administrator-managed local applications then user-managed local applications are disabled.
  • URL Redirection. Administrators define some URLs that should be opened in a local endpoint browser instead of a VDA browser, and then display the local browser inside the published desktop (reverse seamless).

Local App Access requires Platinum Licensing.

Do the following to configure Local App Access:

  1. In a Citrix Policy that applies to the VDAs, enable the Allow local app access policy setting. It’s in the Computer Half.
  2. The URL redirection black list setting lets you define a list of URLs that should be opened on the endpoint’s browser instead of the VDA browser. Alternatively, you can instead configure Bidirectional Content Redirection.
  3. On the Endpoints, install Receiver using the ALLOW_CLIENTHOSTEDAPPSURL=1 switch. Feel to add /includeSSON too. Run the installer from an elevated (Administrator) command prompt. This switch automatically enables both Local App Access and URL Redirection. Note: the URL Redirection code does not install on VDAs so URL Redirection might not work if your endpoint has VDA software for Remote PC.
  4. After installation of Receiver, launch Internet Explorer. You should see a prompt to enable the Citrix URL-Redirection Helper add-on.
  5. You can also go to Tools > Manage Add-ons to verify the Browser Helper Object.
  6. By default, Local App Access redirects the endpoint’s Start Menu and Desktop. You can control which folders are redirected by editing the endpoint’s registry at HKCU\Software\Citrix\ICA Client\CHS. You might have to create the CHS key. Create the Multi-String Values named ProgramsFolders and DesktopFolders, and point them to folders containing shortcuts that you want to make available from inside the published desktop.

  7. When you connect to a published desktop, by default, there will be a Local Programs folder in the Start Menu containing shortcuts to programs on the endpoint’s Start Menu. These are user-managed shortcuts. Note: Windows 8 and newer only supports one level of Start Menu folders. This means that all local shortcuts are placed into the single Local Programs folder without any subfolders.
  8. On the VDA Desktop there will be a Local Desktop folder containing shortcuts from the endpoint’s desktop. These are user-managed shortcuts.
  9. Note: the following doesn’t seem to work in LTSR 7.15. The VDA seems to overwrite these registry values.
    1. The Local Desktop and Local Programs folders on the VDA can be renamed by editing the VDA’s registry at HKCU\Software\Citrix\Local Access Apps. You might have to create the Local App Access registry key. Create String values ProgramsCHSFolderName and DesktopCHSFolderName as detailed at Citrix Docs.

  10. To enable administrator-managed local applications, login to a machine that has Citrix Studio installed, and edit the registry. Go to HKLM\Software\Wow6432Node\Citrix\DesktopStudio, and create the DWORD value named ClientHostedAppsEnabled, and set it to 1.
  11. When you open Studio, and right-click the Applications node, there is a new entry Add Local App Access Application.

    1. In the Getting Started with Local Access Applications page, click Next.
    2. In the Groups page, select the Delivery Group or Application Group whose published desktop will receive the shortcut, and click Next.
    3. In the Location page, enter the path to the executable. This is the path on the endpoint. Also enter a Working Directory. You can get this information from the properties of the shortcut on the endpoint device. Click Next.
    4. In the Identification page, enter a name for the shortcut, and click Next.
    5. In the Delivery page, these options work as expected. Click Next.
    6. In the Summary page, click Finish.
    7. If you open the Properties of the Local App, there’s a Limit Visibility page.
  12. When you login to the desktop, you’ll see the administrator-managed local application. If any administrator-managed Client Hosted Applications are delivered to the user, then the default Local Programs and Local Desktop folders no longer appear.
  13. To enable URL Redirection, login to the VDA, and run "C:\Program Files (x86)\Citrix\System32\VDARedirector.exe" /regall. This registers the browser helpers.

  14. In Internet Explorer, if you go to Tools > Manage Add-ons, you’ll see the Citrix VDA-URL-Redirection Helper add-on.
  15. From inside the published desktop, if you go to a website on the blacklist, the VDA browser will close and a local browser will open in Reverse Seamless mode. If you then go to a website that is not on the blacklist, the local browser will close and the VDA browser will open again.

Citrix TV – Local App Access in XenDesktop 7

Anonymous Apps

Citrix Virtual Apps and Desktops (CVAD) and XenApp 7.6 and newer supports publishing apps to anonymous users. Edit the Delivery Group, and on the Users page, check the box next to Give access to unauthenticated (anonymous) users.

Anonymous Users are managed differently than regular Domain Users. See VDA Anon instructions for adding anon accounts, configuring session timeouts, and configuring local group policy.

Anonymous published apps should show up for all authenticated users. However, you can also create a StoreFront store that does not require any authentication.

Export/Import Published Applications

If your destination CVAD farm is version 2212 or newer with Web Studio, then you can use Citrix’s Automated Configuration Tool to export and import the configuration. See Citrix Docs PoC Guide: Automated Configuration Tool – On-Premises to On-Premises Migration

Links:

Related Topics

Web Interface Load Balancing – NetScaler 10.5

Last Modified: Nov 6, 2020 @ 6:56 am

Navigation

This procedure is only needed if you are running Web Interface instead of StoreFront.

Monitor

  1. On the left, expand Traffic Management, expand Load Balancing, and click Monitors.
  2. On the right, click Add.
  3. Name it Web Interface or similar.
  4. Change the Type drop-down to CITRIX-WEB-INTERFACE.
  5. If you will use SSL to communicate with the Web Interface servers, then scroll down and check the box next to Secure.
  6. Switch to the Special Parameters tab.
  7. In the Site Path field, enter the path of a XenApp Web site (e.g. /Citrix/XenApp/).
    • Make sure you include the slash (/) on the end of the path or else the monitor won’t work.
    • The site path is also case sensitive.
  8. Click Create.

Servers

  1. On the left, expand Traffic Management, expand Load Balancing, and click Servers.
  2. On the right, click Add.
  3. Enter a descriptive server name, usually it matches the actual server name.
  4. Enter the IP address of the server.
  5. Enter comments to describe the server. Click Create.
  6. Continue adding Web Interface servers.

Service Group

  1. On the left, expand Traffic Management, expand Load Balancing, and click Service Groups.

  2. On the right, click Add.
  3. Give the Service Group a descriptive name (e.g. svcgrp-WI-SSL).
  4. Change the Protocol to HTTP or SSL. If the protocol is SSL, ensure the Web Interface Monitor has Secure enabled.
  5. Scroll down and click OK.
  6. On the right, under Advanced, click Members.
  7. Click where it says No Service Group Member.
  8. If you did not create server objects then enter the IP address of a Web Interface Server. If you previously created a server object then change the selection to Server Based and select the server object.
  9. Enter 80 or 443 as the port. Then click Create.

  10. To add more members, click where it says 1 Service Group Member and then click Add. Click Close when done.

  11. On the right, under Advanced, click Monitors.
  12. On the left, in the Monitors section, click where it says No Service Group to Monitor Binding.
  13. Click the arrow next to Click to select.
  14. Select the Web Interface monitor and click OK.
  15. Then click Bind.
  16. To verify if the monitor is working or not, on the left, in the Service Group Members section, click the Service Group Members line.
  17. Highlight a member and click Monitor Details.
  18. The Last Reponse should indicate that Set-Cookie header was found. Click Close twice when done.
  19. Then click Done.

Load Balancing Virtual Server

  1. Create or install a certificate that will be used by the SSL Virtual Server. This certificate must match the DNS name for the load balanced Web Interface servers.
  2. On the left, under Traffic Management > Load Balancing, click Virtual Servers.

  3. On the right click Add.
  4. Name it Web Interface-SSL-LB or similar.
  5. Change the Protocol to SSL.
  6. Specify a new internal VIP.
  7. Enter 443 as the Port.
  8. Click OK.
  9. On the left, in the Services and Service Groups section, click where it says No Load Balancing Virtual Server ServiceGroup Binding.
  10. Click the arrow next to Click to select.
  11. Select your Web Interface Service Group and click OK.
  12. Click Bind.
  13. Click OK.
  14. Click where it says No Server Certificate.
  15. Click the arrow next to Click to select.
  16. Select the certificate for this Web Interface Load Balancing Virtual Server and click OK.
  17. Click Bind.
  18. Click OK.
  19. On the right, in the Advanced column, click Persistence.
  20. Select SOURCEIP persistence. Note: COOKIEINSERT also works with Web Interface. However, it doesn’t work with StoreFront.
  21. Set the timeout to match the timeout of Web Interface.
  22. The IPv4 Netmask should default to 32 bits.
  23. Click OK.
  24. On the right, in the Advanced column, click SSL Parameters.
  25. If the NetScaler communicates with the Web Interface servers using HTTP (aka SSL Offload), at the top right, check the box next to SSL Redirect. Otherwise the Web Interface page will never display.
  26. Uncheck the box next to SSLv3 and click OK. This removes a security vulnerability.
  27. NetScaler VPX 10.5 build 57 and newer lets you enable TLSv11 and TLSv12. See Citrix Blog – Scoring an A+ at SSLlabs.com with Citrix NetScaler – 2016 update. Click OK.
  28. On the right, in the Advanced column, click SSL Ciphers.
  29. On the left, in the SSL Ciphers section, remove all RC4 ciphers. See Anton van Pelt Make your NetScaler SSL VIPs more secure (Updated) for recommended ciphers.

    You can also run the following from the command line as described by Heikki Harsunen in Citrix Discussions:
    unbind ssl vserver <oursslvservername> -cipherName DEFAULTbind ssl vserver <oursslvservername> -cipherName TLS1-ECDHE-RSA-AES256-SHAbind ssl vserver <oursslvservername> -cipherName TLS1-ECDHE-RSA-AES128-SHAbind ssl vserver <oursslvservername> -cipherName TLS1-ECDHE-RSA-DES-CBC3-SHAbind ssl vserver <oursslvservername> -cipherName TLS1-AES-256-CBC-SHAbind ssl vserver <oursslvservername> -cipherName TLS1-AES-128-CBC-SHAbind ssl vserver <oursslvservername> -cipherName TLS1-DHE-RSA-AES-256-CBC-SHAbind ssl vserver <oursslvservername> -cipherName TLS1-DHE-RSA-AES-128-CBC-SHA
    
  30. Click OK.
  31. Then click Done.
  32. Consider enabling Strict Transport Security by creating a rewrite policy and binding it to this SSL Virtual Server. See Anton van Pelt Make your NetScaler SSL VIPs more secure (Updated).

SSL Redirect – Down vServer Method

If you created an SSL Virtual Server that only listens on SSL 443, users must enter https:// when navigating to the website. To make it easier for the users, create another load balancing Virtual Server on the same VIP that listens on HTTP 80 and then redirects the user’s browser to reconnect on SSL 443.

  1. On the left, under Traffic Management > Load Balancing, click Virtual Servers.

  2. On the right, find the SSL Virtual Server you’ve already created, right-click it and click Add. Doing it this way copies some of the data from the already created Virtual Server.
  3. Change the name to indicate that this new Virtual Server is an SSL Redirect.
  4. Change the Protocol to HTTP on Port 80.
  5. The IP Address should already be filled in. It must match the original SSL Virtual Server. Click OK.
  6. Don’t select any services. This vServer must intentionally be marked down so the redirect will take effect. Click OK.
  7. On the right, in the Advanced column, click Protection.
  8. In the Redirect URL field, enter the full URL including https://. For example: https://citrix.company.com/Citrix/XenApp. Click OK.
  9. Click Done.
  10. When you view the SSL redirect Virtual Server in the list, it will have a state of DOWN. That’s OK. The Port 80 Virtual Server must be DOWN for the redirect to work.

Delivery Controller 7.6 / LTSR

Last Modified: Nov 7, 2020 @ 6:34 am

Navigation

Preparation

Citrix Licensing – If you are going to use an existing Citrix Licensing Server, upgrade it to 11.13.1.2 build 16002.

 SQL Databases

  • Citrix blog post Database Sizing Tool for XenDesktop 7 and Bugfix for Database Sizing Tool
  • Citrix article CTX114501 – Supported Databases for Citrix Products
  • There are typically three databases: one for the Site (aka farm), one for Logging (audit log) and one for Monitoring (Director).
    • The monitoring database name must not have any spaces in it. See CTX200325 Database Naming Limitation when Citrix Director Accesses Monitoring Data Using OData APIs
    • If you want Citrix Studio to create the SQL databases automatically, then the person running Studio must be a sysadmin on the SQL instances. No lesser role will work.
    • As an alternative, you can use Citrix Studio to create SQL scripts and then run those scripts on the SQL server. In that case you only need the dbcreator and securityadmin roles.
    • It is possible to create the databases in advance. However, you must use the non-default Latin1_General_100_CI_AS_KS collation. Then use Citrix Studio to configure the database tables.
  • Citrix recommends SQL Mirroring because it has the fastest failover.
    • SQL Mirroring requires two SQL Standard Edition servers and one SQL Express for the witness server.
    • You can setup SQL Mirroring either before installing XenDesktop or after installing XenDesktop. If after, then see Citrix CTX140319 to manually change XenDesktop’s database connection strings How to Migrate XenDesktop Database to New SQL Server.
    • To setup SQL Mirroring, see Rob Cartwright: Configure SQL Mirroring For Use With XenDesktop, XenApp, and PVS Databases.
    • If you try to stretch the mirror across datacenters, the SQL witness must be placed in a third datacenter that has connectivity to the other two datacenters. However, stretching a single XenApp/XenDesktop site/farm and corresponding SQL mirror across datacenters is not recommended.
  • AlwaysOn Availability Groups and SQL Clustering are also supported. However, these features require the much more expensive SQL Enterprise Edition.

 Windows Features

  • Installing Group Policy Management on the Delivery Controller lets you edit GPOs and have access to the Citrix Policies node in the GPO Editor. Or you can install Studio on a different machine that has GPMC installed.
  • vSphere Web Client – if you will connect to vSphere Web Client from the Controller machine, Flash Player is only available for IE if you install the Desktop Experience feature. Or you can use Google Chrome.

 vSphere

Delivery Controller Install

  1. A typical size for the Controller VMs is 2-4 vCPU and 8 GB of RAM.
  2. On two Controllers, install the Delivery Controller software from the XenApp/XenDesktop 7.6 media. Go to the downloaded XenDesktop 7.6 ISO and run AutoSelect.exe.
  3. Click Start next to either XenApp or XenDesktop. The only difference is the product name displayed in the installation wizard.
  4. On the left, click Delivery Controller.
  5. You can install all components on one server or on separate servers. Splitting them out is only necessary in large environments or if you want to share the components (e.g. Licensing, StoreFront, Director) across multiple farms.
  6. In the Features page, uncheck the box next to Install Microsoft SQL Server 2012 SP1 Express and click Next.
  7. In the Summary page, click Install.
  8. In the Installation Successful page, click Finish. Studio will automatically launch.
  9. Ensure the two Controller VMs do not run on the same hypervisor host. Create an anti-affinity rule.

Create Site

There are several methods of creating the databases for XenApp/XenDesktop:

  • If you have sysadmin permissions to SQL, let Citrix Studio create the databases automatically.
  • If you don’t have sysadmin permissions to SQL then do one of the following:
    • Use Citrix Studio to generate SQL scripts and send them to a DBA.
    • Use PowerShell to generate SQL scripts and send them to a DBA.

Database Mirroring

If you are not using database mirroring then skip to the next section.

You can setup SQL Mirroring either before configuring XenDesktop or after configuring XenDesktop.

  • If before, then the empty databases (Site, Logging, Monitoring) must use the Latin1_General_100_CI_AS_KS collation, which is not the default.
  • If SQL Mirroring is already setup then XenDesktop will detect it and set the database connection strings accordingly. Or you can manually change the database connection strings later as detailed at Citrix CTX140319 How to Migrate XenDesktop Database to New SQL Server.
  • If you use Citrix Studio to create SQL scripts that populate the databases, then there will be separate SQL scripts for the Primary and Partner.

To verify mirroring after the XenDesktop configuration has completed, run the PowerShell cmdlet get-configdbconnection and ensure that the Failover Partner has been set in the connection string to the mirror.


Use PowerShell to Create SQL Scripts

From Sinisa Sokolic XenDesktop 7.x DB creation with locked SQL Servers: The PowerShell Commands to generate the SQL scripts that create the databases are shown below:

Get-XDDatabaseSchema -SiteName SITENAME -DataStore Site -DatabaseName DBNAME -DatabaseServer DBSERVERNAME -ScriptType FullDatabase > c:\prep\dev_create_site_script.sql

Get-XDDatabaseSchema -SiteName SITENAME -DataStore Logging -DatabaseName DBNAME -DatabaseServer DBSERVERNAME -ScriptType FullDatabase > c:\prep\dev_create_logging_script.sql

Get-XDDatabaseSchema -SiteName SITENAME -DataStore Monitor -DatabaseName DBNAME -DatabaseServer DBSERVERNAME -ScriptType FullDatabase > c:\prep\dev_create_monitor_script.sql

Use Studio to Create the Database

Or use Citrix Studio to create the SQL Scripts:

  1. Launch Citrix Studio. After it loads, click Deliver applications and desktops to your users.
  2. In the Introduction page, select An empty, unconfigured site. This reduces the number of pages in this Setup wizard. The other pages will be configured later.
  3. Enter a Site Name (aka farm name) and click Next. Only administrators see the farm name.
  4. In the Database page, enter the name of the SQL server where the database will be created. Enter a name for the new Database. No spaces in the database name.
  5. If the person running Studio is a sysadmin on the SQL server then you can click Test Connection and click Yes when asked to automatically create the database.
  6. If you are not a sysadmin then click Generate database script.
  7. A folder will open with two scripts. The top script needs to be sent to a DBA.
  8. On the Principal SQL Server, open the query (Script_For_Database…sql).

  9. At the top of the script, is a commented line that creates the database. Either uncomment it or copy it to a second query window and execute it. Or in the case of mirroring, the database is already created so there’s no need to create the database again.
  10. Open the Query menu and click SQLCMD Mode.
  11. Then execute the rest of the script.
  12. If SQLCMD mode was enabled properly then the output should look something like this:
  13. If you have a mirrored database, run the second script on the mirror SQL instance. Make sure SQLCMD mode is enabled.
  14. The person running Citrix Studio must be added to the SQL Server as a SQL Login and granted the public server role.

  15. Back in Citrix Studio, click the Test connection button.
  16. Click Close once the tests have passed. Then click Next.
  17. On the Licensing page, enter the name of the Citrix License Server and click Connect.
  18. If the Certificate Authentication appears, select Connect me and click Confirm.
  19. Then select your license and click Next.
  20. In the Summary page, make your selection for Customer Experience Improvement Program and click Finish.

Verify Database Mirroring

If your database is mirrored, when you run get-brokerdbconnection, you’ll see the Failover Partner in the database connection string.

Second Controller

There are several methods of adding a second Controller to the databases for XenApp/XenDesktop:

  • If you have sysadmin permissions to SQL, let Citrix Studio modify the databases automatically.
  • If you don’t have sysadmin permissions to SQL then do one of the following:
    • Use Citrix Studio to generate SQL scripts and send them to a DBA.
    • Use PowerShell to generate SQL scripts and send them to a DBA.

From Sinisa Sokolic XenDesktop 7.x DB creation with locked SQL Servers: The PowerShell Commands to generate the SQL scripts that add a Controller to the databases are shown below:

Get-XDDatabaseSchema -AdminAddress CONTROLLERNAME-SiteName SITENAME -DataStore Site -DatabaseName DBNAME-DatabaseServer DBSERVERNAME -ScriptType AddController > C:\prep\dev_add_controller_site_script.sql

Get-XDDatabaseSchema -AdminAddress CONTROLLERNAME-SiteName SITENAME -DataStore Logging -DatabaseName DBNAME-DatabaseServer DBSERVERNAME -ScriptType AddController > C:\prep\dev_add_controller_logging_script.sql

Get-XDDatabaseSchema -AdminAddress CONTROLLERNAME-SiteName SITENAME -DataStore Monitor -DatabaseName DBNAME-DatabaseServer DBSERVERNAME -ScriptType AddController > C:\prep\dev_add_controller_monitor_script.sql

Or use Citrix Studio to create the SQL Scripts:

  1. On the 1st Delivery Controller, if desired, delete the default StoreFront store (/Citrix/Store) and recreate it with your desired Store name (e.g. /Citrix/CompanyStore).
  2. On the 2nd Delivery Controller, install XenDesktop as detailed earlier.
  3. After running Studio, click Connect this Delivery Controller to an existing Site.
  4. Enter the name of the first Delivery Controller and click OK.
  5. If you don’t have elevated SQL permissions, click No when asked if you want to update the database automatically.
  6. Click Generate scripts.
  7. A folder will open with two scripts. The top script needs to be sent to a DBA.
  8. On the SQL Server, open the query (Script_For_Database…sql).

  9. Open the Query menu and click SQLCMD Mode.
  10. Then execute the XenDesktop script.
  11. If SQLCMD mode was enabled properly then the output should look something like this:
  12. Back in Citrix Studio, click OK.
  13. In the Studio, under Configuration > Controllers, you should see both controllers.
  14. You can also test the site again if desired.

Delivery Controller Updates

Install the following updates on both Controllers.

The updates detailed below are the same that are included in the Long Term Service Release.

Delivery Controller Hotfixes Update 3

Install Delivery Controller Hotfixes Update 3. If you are upgrading a production installation of multiple Controllers, see Citrix CTX205921 How to Install XenDesktop/XenApp 7.x Controller Hotfixes

  1. Make sure the site is configured (database is created and populated) before installing these updates.
  2. After installing these updates Studio will prompt you to upgrade the database. Coordinate schedules with a DBA before installing these updates. Install the updates on one Controller, upgrade the database, and then install the updates on the remaining Controllers.
  3. On half of the Controllers, install all of the hotfix files. You can delay the reboot until all of them are installed. Don’t install the hotfixes on the remaining Controllers until you’ve used Studio on this Controller to upgrade the database.
  4. Note: if you installed the Controller software in a non-default path, and if UAC is enabled, you will need to run command prompt as administrator and run the MSP files from there. Otherwise the Citrix services will revert to the default path.

  5. Once all of the hotfixes are installed on one Controller, launch Studio.
  6. You’ll be asked if License Server is compatible. Check the box and click Continue.
  7. Choose one of the database upgrade options depending on what your DBA allows you to do.

PowerShell Module 7.6 Hotfix 3

Install XenDesktop PowerShell Module 7.6 Hotfix 3 on all Controllers and Studio machines.


Citrix Studio 7.6 Hotfix 3

Citrix CTX213045 Vulnerability in Citrix Studio Could Result in Insecure Access Policy Configuration – fixed in Citrix Studio 7.6.2000 from XenApp/XenDesktop 7.6 LTSR CU2 (7.6.2000). Use the script at CTX213417 Insecure Access Policy Rules to verify the presence of the vulnerability.  💡

If you’re not concerned about the vulnerability, install Citrix Studio 7.6 Hotfix 3.

Citrix Group Policy Management 2.5 (aka 7.6.300)

Install Citrix Group Policy Management 2.5 (aka 7.6.300) on every machine that has Studio, Director, and/or Microsoft Group Policy Management installed. Download it from XenDesktop Platinum, XenDesktop Enterprise, XenApp Platinum, or XenApp Enterprise, depending on your license.

Director 7.6.300

  1. If Director is installed on the Controller, upgrade it to Director 7.6.300. Download from XenDesktop Platinum, XenDesktop Enterprise, XenApp Platinum, or XenApp Enterprise, depending on your license.

  2. After installing the upgraded Director, run the following command from an elevated command prompt:
    C:\inetpub\wwwroot\Director\tools\DirectorConfig.exe /upgrade

StoreFront 3.0.1

If StoreFront is installed on the Controller, upgrade it to StoreFront 3.0.1.


Citrix Licensing 11.13.1.2 build 16002

If Citrix Licensing is installed on the Controller, upgrade it to Citrix Licensing 11.13.1.2 build 16002 by running CitrixLicensing.exe.

Studio – Slow Launch

Install Citrix Studio 7.6 Hotfix 3.

From B.J.M. Groenhout at Citrix Discussions: The following adjustments can be made if Desktop Studio (and other Citrix management Consoles) will start slowly:

  • Within Internet Explorer, go to Tools – Internet Options – Tab Advanced – Section Security and uncheck the option Check for publisher’s certificate revocation

After adjustment Desktop Studio (MMC) will be started immediately. Without adjustment it may take some time before Desktop Studio (MMC) is started.

Registry setting (can be deployed using Group Policy Preferences):

  • HKEY_CURRENT_USER\Software\Microsoft\Windows\CurrentVersion\WinTrust\Trust Providers\Software Publishing
    • State“=dword:00023e00

Database Maintenance

Split the Databases

Once the site is configured, split the Monitoring and Log data into separate databases.

  1. In Citrix Studio, on the left click the Configuration node.
  2. In the middle, click the Monitoring datastore to highlight it. On the right, click Change Database.
  3. Repeat for the Logging datastore.

 View Logging Database

To view the contents of the Logging Database, in Studio, click the Logging node. On the right is Create Custom Report. See Citrix article CTX138132 Viewing Configuration Logging Data Not Shown for more info.

 Enable Read-Committed Snapshot

The XenDesktop Database can become heavily utilized under load in a large environment. Therefore Citrix recommends enabling the Read_Committed_Snapshot option on the XenDesktop databases to remove contention on the database from read queries. This can improve the interactivity of Studio and Director. It should be noted that this option may increase the load on the tempdb files. See Citrix article CTX137161 How to Enable Read-Committed Snapshot in XenDesktop for configuration instructions.

 Change Database Connection Strings

Sometimes the database connection strings need to be modified:

  • When moving the SQL databases to a different SQL server
  • When enabling mirroring after the databases have already been configured in Studio.

Citrix blog post Updating Database Connection Strings in XenDesktop 7.x has PowerShell scripts to update the database connection strings.

Director Grooming

If XenDesktop is not Platinum Edition then all historical Director data is groomed at 7 days.

For XenDesktop/XenApp Platinum Edition, by default, most of the historical Director data is groomed at 90 days. This can be adjusted up to 367 days by running a PowerShell applet.

  1. On a Delivery Controller, run PowerShell and run asnp Citrix.*

  2. Run Get-MonitorConfiguration to see the current grooming settings.
  3. Run Set-MonitorConfiguration to change the grooming settings.

Studio Administrators

Full Administrators

  1. In the Studio, under Configuration, click the Administrators node. The first time you access the node you’ll see a Welcome page. Feel free to check the box and then click Close.
  2. On the Administrators tab, right-click and click Create Administrator.
  3. In the Administrator and Scope page, specify a group (e.g. Citrix Admins or Help Desk) that will have permissions to Studio and Director. Click Next.
  4. On the Role page, select a role and then click Next. For example:
    • Full Administrator for the Citrix Admins group
    • Help Desk Administrator for the Help Desk group
    • Machine Catalog Administrator for the desktop team
  5. In the Summary page, click Finish.

Help Desk

  1. In the Studio, under Configuration, click the Administrators node. On the Administrators tab, right-click and click Create Administrator.
  2. In the Administrator and Scope page, specify a Help Desk group that will have permissions to Studio and Director. Click Next.
  3. On the Role page, select the Help Desk Administrator role and then click Next.
  4. In the Summary page, click Finish.
  5. When administrators in the Help Desk role log into Director, all they see is this.

    To jazz it up a little, add the Help Desk group to the read-only role.
  6. Right-click the Help Desk Administrator and click Edit Administrator.
  7. Click Add.
  8. In the Scope page, select a scope and click Next.
  9. In the Role page, select Read Only Administrator and click Next.
  10. In the Summary page, click Finish.
  11. Then click OK. Now Director will display the dashboard.

Provisioning Services w/Personal vDisk

From Citrix docs.citrix.com: The Provisioning Services Soap Service account must be added to the Administrator node of Studio and must have the Machine Administrator or higher role. This ensures that the PvD desktops are put into the Preparing state when the Provisioning Services (PVS) vDisk is promoted to production.

vCenter Connection

XenDesktop uses an Active Directory service account to log into vCenter. This account needs specific permissions in vCenter. To facilitate assigning these permissions, create a new vCenter role and assign it to the XenDesktop service account. The permissions should be applied at the datacenter or higher level.

Import vCenter Certificate

If you replaced the certificates on your vCenter server, then skip this section.

If vCenter is using a self-signed certificate, in order for Delivery Controller to trust the vCenter certificate, you must import the vCenter certificate on both Delivery Controllers.

  1. On each Delivery Controller, run mmc.exe. Open the File menu and click Add/Remove Snap-in.
  2. Move the Certificates snap-in to the right by highlighting it and clicking Add.
  3. Select Computer account and click Next.
  4. Select Local computer and click Finish.
  5. Click OK.
  6. After adding the snap-in, right-click the Trusted People node, expand All Tasks and click Import.
  7. In the Welcome to the Certificate Import Wizard page, click Next.
  8. In the File to Import page, browse to \\vcenter01\c$\ProgramData\VMware\VMware VirtualCenter\SSL and select crt. Click Next.
  9. In the Certificate Store page, click Next.
  10. In the Completing the Certificate Import Wizard page, click Finish.
  11. Click OK to acknowledge that the import was successful.
  12. Repeat these steps on the second Controller. It is important that you do both Controllers before adding the vCenter connection.

Hosting Resources

A Hosting Resource = vCenter + Cluster (Resource Pool) + Storage + Network. When you create a machine catalog, you select a previously defined Hosting Resource and the Cluster, Storage, and Network defined in the Hosting Resource object are automatically selected. If you need some desktops on a different Cluster+Storage+Network then you’ll need to define more Hosting Resources in Studio.

  1. In Studio, expand Configuration and click Hosting. Right-click it and click Add Connection and Resources.
  2. In the Connection page, select VMware vSphere as the Host type.
  3. Enter https://vcenter01.corp.local/sdk as the vCenter URL. The URL must contain the FQDN of the vCenter server. If the vCenter certificate is self-signed, ensure it is added to the Trusted People certificate store on all Delivery Controllers. Ensure the entered URL has /sdk on the end.
  4. Enter credentials of a service account. Click Next.
  5. Enter a name for the hosting resource. Since each hosting resource is a combination of vCenter, Cluster, Network, and Datastore, include those names in this field (e.g. vCenter01-Cluster01-Network01-Datastore01).
  6. In the Cluster page, click Browse and select a cluster or resource pool.
  7. Select a network and click Next.
  8. On the Storage page, select a datastore for the virtual machines.
  9. If desired, change the selection for personal vDisk to use a different storage. Click Next.
  10. In the Summary page, click Finish.

Citrix Director

Director on Standalone Server

If you are installing Director 7.6.300 on a standalone server, see Citrix CTX142260 Installing or Upgrading to Citrix Director 7.6.200

  1. If you intend to install Director on a standalone server, start with running AutoSelect.exe from the XenApp/XenDesktop 7.6 media.
  2. On the right, click Citrix Director.
  3. It will ask you for the location of one Controller in the farm. Then finish the installation wizard.
  4. Then upgrade it to Director 7.6.300. Director 7.6.300 is contained in the Framehawk components from XenApp/XenDesktop 7.6 Feature Pack 2. Download Framehawk from XenApp Platinum, XenApp Enterprise, XenDesktop Platinum, or XenDesktop Enterprise, depending on your license.

  5. After installing the upgrade, run the following command from an elevated command prompt:
    C:\inetpub\wwwroot\Director\tools\DirectorConfig.exe /upgrade

  6. Also install Citrix Group Policy Management 2.5 (aka 7.6.300) on the Director server. Download from XenDesktop Platinum, XenDesktop Enterprise, XenApp Platinum, or XenApp Enterprise, depending on your license.

Director Tweaks

Prepopulate the domain field

From http://www.xenblog.dk/?p=33: On the Controllers having the Director role installed, locate and edit the ‘LogOn.aspx’ file. By default you can find it at “C:\inetpub\wwwroot\Director\Logon.aspx”

In line 328 or line 358 you will have the following. To find the line, search for ID=”Domain”. Note: onblur and onfocus attributes were added in newer versions of Director.

<asp:TextBox ID="Domain" runat="server" CssClass="text-box" onfocus="showIndicator(this);" onblur="hideIndicator(this);"></asp:TextBox>

In the ID=”Domain” element, insert a Text attribute and set it to your domain name. Don’t change or add any other attributes. Save the file.

<asp:TextBox ID="Domain" runat="server" Text="Corp" CssClass="text-box" onfocus="showIndicator(this);" onblur="hideIndicator(this);"></asp:TextBox>

This will prepopulate the domain field text box with your domain name and still allow the user to change it, if that should be required.

Session timeout

By default the idle time session limit of the Director is 245 min. If you wish to change the timeout, here is how to do it.

  1. Log on to the Director Server as an administrator
  2. Open the ‘IIS Manager’
  3. Browse to ‘\Sites\Default Web Site\Director’ in the left hand pane.
  4. Open ‘Session State’ in the right hand pane
  5. Change the ‘Time-out (in minutes)’ value under ‘Cookie Settings’
  6. Click ‘Apply’ in the Actions list

SSL Check

From http://euc.consulting/blog/citrix-desktop-director-2-1: If you are not securing Director with an SSL certificate you will get this error at the logon screen.

To stop this:

  1. Log on to the Director Server as an administrator
  2. Open the ‘IIS Manager’
  3. Browse to ‘\Sites\Default Web Site\Director’ in the left hand pane.
  4. Open ‘Application Settings’ in the right hand pane
  5. Set EnableSslCheck to false.

Disable Activity Manager

From docs.citrix.com: By default, the Activity Manager in Director displays a list of all the running applications and the Windows description in the title bars of any open applications for the user’s session. This information can be viewed by all administrators that have access to the Activity Manager feature in Director. For Delegated Administrator roles, this includes Full administrator, Delivery Group administrator, and Help Desk Administrator.

To protect the privacy of users and the applications they are running, you can disable the Applications tab from listing running applications.

  • On the VDA, modify the registry key located at HKLM\Software\Citrix\Director\TaskManagerDataDisplayed. By default, the key is set to 1. Change the value to 0, which means the information will not be displayed in the Activity Manager.
  • On the server with Director installed, modify the setting that controls the visibility of running applications. By default, the value is true, which allows visibility of running applications in the Applications Change the value to false, which disables visibility. This option affects only the Activity Manager in Director, not the VDA. Modify the value of the following setting:
    UI.TaskManager.EnableApplications = false

Large Active Directory

From CTX133013 Desktop Director User Account Search Process is Slow or Fails: By default, all the Global Catalogs for the Active Directory Forest are searched using Lightweight Directory Access Protocol (LDAP). In a large Active Directory environment, this query can take some time or even time out.

  1. In Information Server (IIS) Management, under the Desktop Director site, select Application Settings and add a new value called ActiveDirectory.ForestSearch. Set it to False. This disables searching any domain except the user’s domain and the server’s domain.
  2. To search more domains, add the searchable domain or domains in the ActiveDirectory.Domains field.

Site Groups

From Citrix Blog Post Citrix Director 7.6 Deep-Dive Part 4: Troubleshooting Machines:

If there are a large number of machines, the Director administrator can now configure site groups to perform machine search so that they can narrow down searching for the machine inside a site group. The site groups can be created on the Director server by running the configuration tool via command line by running the command:

C:\inetpub\wwwroot\Director\tools\DirectorConfig.exe /createsitegroups

Then provide a site group name and IP address of the delivery controller of the site to create the site group.

Director – Multiple XenDesktop Sites

  1. Run IIS Manager. You can launch it from Server Manager (Tools menu) or from the Start Menu or by running inetmgr.
  2. On the left, expand Sites, expand Default Web Site, and click Director.
  3. In the middle pane, double-click Application Settings.
  4. Find the entry for AutoDiscoveryAddresses and double-click it.
  5. If Director is installed on a Controller, localhost should already be entered.
  6. Add a comma and the NetBIOS name of one of the controllers in the 2nd XenDesktop Site (farm). Only enter one Controller name. If you have multiple Director servers, you can point each Director server to a different Controller in the 2nd XenDesktop Site (farm).
  7. According to Citrix CTX200543 Desktop Director Access Fails After XenDesktop 7.5 is Upgraded to 7.6, the addresses should be NetBIOS names, not FQDN. Click OK.

Director – Saved Filters

From Scott Osborne and Jarian Gibson at Citrix Discussions: In Director, you can create a filter and save it.

The saved filter is then accessible from the Filters menu structure.

The saved filters are stored on each Director server at C:\Inetpub\wwwroot\Director\UserData. Observations:

  • Each user has their own saved filters.
  • The saved filters are not replicated across Director servers. You can schedule a robocopy script to do this automatically.
  • When upgrading Director, the saved filters are deleted?

Director – Custom and Scheduled Reports

The Monitoring database contains more data than is exposed in Director. To view this data, the Monitoring service has an OData Data Feed that can be queried.

You can use Excel to pull data from the OData Data feed. See Citrix Blog Post – Citrix Director – Analyzing the Monitoring Data by Means of Custom Reports. This particular blog post shows how to use an Excel PivotChart to display the connected Receiver versions.

Or for Linqpad, see Citrix Blog Post – Creating Director Custom reports for Monitoring XenDesktop using Linqpad

Go to Citrix Blog Post Obtain XenDesktop Custom report through Citrix Director and download the tool. Once installed you can create custom reports from within Director.

Citrix Licensing Server

Upgrade

If you installed the Licensing Server that came with XenApp 7.6, upgrade it to 11.13.1.2.

  1. Go to the downloaded Citrix Licensing 11.13.1.2 build 16002 and run CitrixLicensing.exe.
  2. Click Upgrade.
  3. Click Finish.
  4. If you go to Programs and Features, it should now show version 11.1.0.16002.
  5. If you login to the license server web console, on the Administration tab, it shows it as version 11.13.1 build 16002.
  6. You can also view the version in the registry at HKLM\Software\Wow6432Node\Citrix\LicenseServer\Install.

Licensing Server HA using GSLB

From Dane Young – Creating a Bulletproof Citrix Licensing Server Infrastructure using NetScaler Global Server Load Balancing (GSLB) and CtxLicChk.ps1 PowerShell Scripts. Here is a summary of the configuration steps. See the blog post for detailed configuration instructions.

  1. Build two License Servers in each datacenter with identical server names. Since server names are identical, they can’t be domain-joined.
  2. Install identical licenses on all License Servers.
  3. Set the DisableStrictNameChecking registry key on all Citrix Licensing servers.
  4. Synchronize the certificate files located at C:\Program Files (x86)\Citrix\Licensing\WebServicesForLicensing\Apache\conf. They must be identical on all Licensing Servers.
  5. Download CtxLicChk.exe from http://support.citrix.com/article/CTX123935 and place on all Licensing Servers.
  6. Schedule the PowerShell script CtxLicChk.ps1 on all Licensing Servers. Get this script from the blog post linked above.
  7. Configure NetScaler:
    1. Configure GSLB ADNS services.
    2. Add wildcard Load Balancing service for each Citrix Licensing Server.
    3. Configure service TCP monitoring for ports 27000, 7279, 8082, and 8083.
    4. Create Load Balancing Virtual Server for each Licensing Server.
    5. Set one Load Balancing Virtual Server as backup for the other.
    6. Repeat in second datacenter.
    7. Configure GSLB Services and GSLB Monitoring.
    8. Configure GSLB Virtual Servers. Set one GSLB Virtual Server as backup for the other.
  8. Delegate the Citrix Licensing DNS name to the ADNS services on the NetScaler appliances.
  9. Configure Citrix Studio to point to the GSLB-enabled DNS name for Citrix Licensing.

Citrix License Server Monitoring

Citrix Licensing 11.13.1 and newer has historical usage reporting:  💡

  1. Run Citrix Licensing Manager from the Start Menu. Or use a browser to connect to https://MyLicenseServer:8083
  2. Use the drop-down menus to select a license type, select dates, and export to a .csv file.
  3. On the top right is a gear icon where you can set the historical retention period.

http://www.jonathanmedd.net/2011/01/monitor-citrix-license-usage-with-powershell.html.

Lal Mohan – Citrix License Usage Monitoring Using Powershell

Jaroslaw Sobel – Monitoring Citrix Licenses usage – Graphs using WMI, Powershell and RRDtool. This script generates a graph similar to the following:

CtxLicUsage-1d_

Remote Desktop Licensing Server

Install Remote Desktop Licensing Server

Do the following on your XenDesktop Controllers:

  1. In Server Manager, open the Manage menu and click Add Roles and Features.
  2. Click Next until you get to the Server Roles Check the box next to Remote Desktop Services and click Next.
  3. Click Next until you get to the Role Services Check the box next to Remote Desktop Licensing and click Next.
  4. Click Add Features if prompted.
  5. Then finish the wizard to install the role service.

Activate Remote Desktop Licensing

  1. After RD Licensing is installed, in Server Manager, open the Tool menu, expand Terminal Services and click Remote Desktop Licensing Manager.
  2. The tool should find the local server. If it does not, right-click All servers, click Connect and type in the name of the local server. Once the local server can be seen in the list, right-click the server and click Activate Server.
  3. In the Welcome to the Activate Server Wizard page, click Next.
  4. In the Connection Method page, click Next.
  5. In the Company Information page, enter the required information and click Next.
  6. All of the fields on the Company Information page are optional so you do not have to enter anything. Click Next.
  7. In the Completing the Activate Server Wizard page, uncheck the box next to Start Install Licenses Wizard now and click Finish. Since the session hosts will be configured to pull Per User licenses, there is no need to install licenses on the RD Licensing Server.
  8. In RD Licensing Manager, right-click the server and click Review Configuration.
  9. Ensure you have green check marks. If the person installing Remote Desktop Licensing does not have permissions to add the server to the Terminal Server License Servers group in Active Directory, ask a domain admin to do it manually. If you have the proper permissions, click Add to Group.
  10. Click Continue when prompted that you must have Domain Admins privileges.
  11. Click OK when prompted that the computer account has been added.
  12. Click OK to close the window.

Health Check

Andrew Morgan – New Free Tool: Citrix Director Notification Service: The Citrix Director Notification service sits on an edge server as a service (or local to the delivery controller) and periodically checks the health of:

  • Citrix Licensing.
  • Database Connections.
  • Broker Service.
  • Core Services.
  • Hypervisor Connections.

And if any of these items fall out of bounds, an SMTP alert is sent to the mailbox of your choice for action. The tool will also send “All Clear” emails when these items are resolved, ensuring you are aware when the service has resumed a healthy state.

Related Pages

Virtual Delivery Agent (VDA) 7.6.0 / 7.6.300

Last Modified: Jan 4, 2021 @ 4:22 am

Navigation:

💡 = Recently Updated

Hardware

  1. If vSphere 6, don’t use hardware version 11 unless you have NVIDIA GRID. VMware 2109650 – Video playback performance issue with hardware version 11 VMs in 2D mode
  2. For virtual desktops, give the virtual machine: 2+ vCPU and 2+ GB of RAM
  3. For Windows 2008 R2 RDSH, give the virtual machine 4 vCPU and 12-24 GB of RAM
  4. For Windows 2012 R2 RDSH, give the virtual machine 8 vCPU, and 24-48 GB of RAM
  5. Remove the floppy drive
  6. Remove any serial or LPT ports
  7. If vSphere:
    1. To reduce disk space, reserve memory. Memory reservations reduce or eliminate the virtual machine .vswp file.
    2. The NIC should be VMXNET3.
  8. If this VDA will boot from Provisioning Services:
    1. Give the VDA extra RAM for caching.
    2. Do not enable Memory Hot Plug
    3. For vSphere, the NIC must be VMXNET3.
    4. For vSphere, configure the CD-ROM to boot from IDE instead of SATA. SATA comes with VM hardware version 10. SATA won’t work with PvS.
  9. Install the latest version of drivers (e.g. VMware Tools)
    1. If Windows 7 on vSphere, don’t install the VMware SVGA driver. For more details, see CTX201804 Intermittent Connection Failures/Black Screen Issues When Connecting from Multi-Monitor Client Machines to Windows 7 VDA with VDA 7.x on vSphere/ESXi.

If vSphere, disable NIC Hotplug

  1. Users could use the systray icon to Eject the Ethernet Controller. Obviously this is bad.
  2. To disable this functionality, power off the virtual machine.
  3. Once powered off, right-click the virtual machine and click Edit Settings.
  4. On the VM Options tab, expand Advanced and then click Edit Configuration.
  5. Click Add Row.
  6. On the left, enter devices.hotplug. On the right, enter false.
  7. Then click OK a couple times to close the windows.
  8. The VM can then be powered on.

Windows Preparation

  1. If RDSH, disable IE Enhanced Security Config
  2. Optionally, go to Action Center (Windows 8.1 or 2012 R2) or Security and Maintenance (Windows 10) to disable User Account Control and enable SmartScreen .
  3. Run Windows Update.
  4. If Windows Firewall is enabled:
    1. Enable File Sharing so you can access the VDA remotely using SMB
    2. Enable COM+ Network Access and the three Remote Event Log rules so you can remotely manage the VDA.

  5. Add your Citrix Administrators group to the local Administrators group on the VDA.
  6. The Remote Desktop Services “Prompt for Password” policy prevents Single Sign-on to the Virtual Delivery Agent. Check registry key HKEY_LOCAL_MACHINE\SOFTWARE\Policies\Microsoft\Windows NT\Terminal Services. If fPromptForPassword = 1 then you need to fix group policy. The following GPO setting will prevent Single Sign-on from working.
    Computer Configuration \ Policies \ Administrative templates \ Windows Components \ Remotes Desktop Services \ Remote desktop Session Host \ Security \ Always prompt for password upon connection
    Or install VDA hotfix 4 and set the registry value HKEY_LOCAL_MACHINE\SOFTWARE\Citrix\ PorticaAutoLogon (DWORD) = 0x10.
  7. For Windows 7 VDAs that will use Personal vDisk, install Microsoft hotfix 2614892 – A computer stops responding because of a deadlock situation in the Mountmgr.sys driver. This hotfix solved a Personal vDisk Image update issue detailed at Citrix Discussions.
  8. If this VDA is Windows Server 2008 R2, request and install the Windows hotfixes recommended by Citrix CTX129229. Scroll down to see the list of recommended Microsoft hotfixes for Windows Server 2008 R2. Ignore the XenApp 6.x portions of the article. Also see https://www.carlstalhood.com/windows-server-2008-r2-post-sp1-hotfixes/.
  9. To remove the built-in apps in Windows 10, see Robin Hobo How to remove built-in apps in Windows 10 Enterprise.
  10. For Remote Assistance in Citrix Director, configure the GPO setting Computer Configuration\Policies\Administrative Templates\System\Remote Assistance\Offer Remote Assistance. See Jason Samuel – How to setup Citrix Director Shadowing with Remote Assistance using Group Policy for more details.

Install Virtual Delivery Agent 7.6.300

VDA 7.6.300 is newer than what’s on the base XenApp/XenDesktop 7.6 ISO. If you install 7.6.300 then you don’t need to install most of the updates listed later.

  1. For virtual desktops, make sure you are logged into the console. The VDA won’t install if you are connected using RDP.
  2. For Windows 10, you’ll need Citrix Profile Management 5.4 or newer.
  3. Make sure 8.3 file name generation is not disabled. If so, see CTX131995 – User Cannot Launch Application in Seamless Mode to fix the AppInit_DLLs registry keys.
  4. Make sure .NET Framework 4.5.1 is installed.
  5. Go to the downloaded Virtual Delivery Agent 7.6.300 (XenDesktop Platinum, XenDesktop Enterprise, XenApp Platinum, or XenApp Enterprise) and run VDAServerSetup_7.6.300.exe or VDAWorkstationSetup_7.6.300, depending on which type of VDA you are building. If UAC is enabled then you must right-click the installer and click Run as administrator.
  6. In the Environment page, select Create a Master Image and click Next.
  7. For virtual desktops, in the HDX 3D Pro page, click Next.
  8. In the Core Components page, if you don’t need Citrix Receiver installed on your VDA then uncheck the box. Click Next.
  9. In the Delivery Controller page, select Do it manually. Enter the FQDN of each Controller. Click Test connection. And then make sure you click Add. Click Next when done.
  10. In the Features page, click Next. If this is a virtual desktop, you can leave Personal vDisk unchecked now and enable it later.
  11. In the Firewall page, click Next.
  12. In the Summary page, click Install.
  13. For RDSH, click Close when you are prompted to restart.
  14. After the machine reboots twice, login and installation will continue.
  15. After installation, click Finish to restart the machine again.
  16. If 8.3 file name generation is disabled, see CTX131995 – User Cannot Launch Application in Seamless Mode to fix the AppInit_DLLs registry keys.

Virtual Delivery Agent 7.6.300 Hotfixes

  1. Download Virtual Delivery Agent 7.6.300 hotfixes. There are DesktopVDACore hotfixes and ServerVDACore hotfixes, depending on which type of VDA you are building.
  2. Install each hotfix by double-clicking the .msp file.
  3. In the Welcome to the Citrix HDX TS/WS Setup Wizard page, click Next.
  4. In the Ready to update page, click Update.
  5. In the Completed the Citrix HDX TS/WS Setup Wizard page, click Finish.
  6. When prompted to restart, if you have multiple hotfixes to install, click Cancel.
  7. Continue installing hotfixes. Restart when done.

Broker Agent 7.6.300 Hotfix 1

  1. Go to the downloaded Broker Agent 7.6.300 Hotfix 1 and run BrokerAgentWX64_7_6_301.msp.
  2. Install the hotfix. Reboot when prompted.
  3. The file C:\Program Files\Citrix\Virtual Desktop Agent\BrokerAgent.exe is updated to version 7.6.301.

Controller Registration Port

Some environments will not accept the default port 80 for Virtual Delivery Agent registration. To change the port, do the following on the Virtual Delivery Agent:

  1. Open Programs and Features.
  2. Find Citrix Virtual Delivery Agent and click Change.
  3. Click Customize Virtual Delivery Agent Settings.
  4. Edit the Delivery Controllers and click Next.
  5. On the Configure Delivery Controller page, change the port number and click Next.
  6. In the Summary page, click Reconfigure.
  7. In the Finish Reconfiguration page, click Finish. The machine automatically restarts.
  8. You must also change the VDA registration port on the Controllers by running BrokerService.exe /VDAPort.

Controller Registration – Verify

  1. If you restart the Virtual Delivery Agent machine or restart the Citrix Desktop Service
  2. In Windows Logs \ Application, you should see an event 1012 from Citrix Desktop Service saying that it successfully registered with a controller. If you don’t see this then you’ll need to fix the ListOfDDCs registry key.
  3. You can also run Citrix’s Health Assistant on the VDA.

Updates for Base VDA 7.6.0 (not 7.6.300)

If you are installing VDA 7.6.300, then skip to the Citrix Profile Management 5.4.1.

Virtual Delivery Agent Hotfixes

These hotfixes are already included in VDA 7.6.300. Only install these on a base VDA 7.6.0.

Citrix CTX142357 Recommended Hotfixes for XenApp 7.x

  1. For RDSH, download Virtual Delivery Agent hotfixes for Server OS. These hotfixes will have the letters TS in the name.
  2. For virtual desktops, download Virtual Delivery Agent hotfixes for Desktop OS. These hotfixes will have the letters WS in the name.
  3. Install each hotfix by double-clicking the .msp file.
  4. At a minimum, install VDA 7.6 Hotfix 32 for TS, or 26 for WS x86, or 26 for WS x64. This is required for Framehawk and the Receiver for HTML5 File Transfer functionality.
  5. In the Welcome to the Citrix HDX TS/WS Setup Wizard page, click Next.
  6. In the Ready to update page, click Update.
  7. In the Completed the Citrix HDX TS/WS Setup Wizard page, click Finish.
  8. When prompted to restart, if you have multiple hotfixes to install, click Cancel.
  9. Continue installing hotfixes. Restart when done.

Framehawk

VDA 7.6.300 includes these updates. Only install these on a base VDA 7.6.0.

  1. Download Framehawk Components from XenApp Platinum, XenApp Enterprise, XenDesktop Platinum, or XenDesktop Enterprise, depending on your license.
  2. Framehawk also requires installation of VDA 7.6 Hotfix 32 for TS, or 26 for WS x86, or 26 for WS x64.

HDX WMI Provider

VDA 7.6.300 includes this update. Only install this on a base VDA 7.6.0.

  1. Go to the downloaded HDX WMI Provider 2.2 Hotfix 1 and run HDXWMIPROV220WX64001.msi.

  2. In the Please read the Citrix HDX WMI Provider- x64 2.2.1.0 License Agreement page, check the box next to I accept the terms and click Install.
  3. In the Completed the Citrix HDX WMI Provider – x64 2.2.1.0 Setup Wizard page, click Finish.

WMI Proxy

VDA 7.6.300 includes this update. Only install this on a base VDA 7.6.0.

  1. In the Framehawk Components folder (Framehawk7.6FP2), run WMIProxy_x64.msi.
  2. In the Welcome to the Citrix WMI Proxy Plugin Setup Wizard page, click Next.
  3. In the End-User License Agreement page, check the box next to I accept the terms and click Next.
  4. In the Destination Folder page, click Next.
  5. In the Ready to install Citrix WMI Proxy Plugin page, click Install.
  6. If you see Files in Use select Close the applications and attempt to restart them and click OK.
  7. Click OK when prompted that a reboot is required.
  8. In the Completed the Citrix WMI Proxy Plugin Setup Wizard page, click Finish.

HDX Flash 15.2 Hotfix 1

VDA 7.6.300 includes this update. Only install this on a base VDA 7.6.0.

  1. If this VDA is RDSH, go to the downloaded HDX Flash 15.2 Hotfix 1 and run CitrixHDXMediaStreamForFlash-ServerInstall-x64.msi.
  2. In the Please read the Citrix HDX MediaStream for Flash – Server License Agreement page, select I accept the terms and click Install.
  3. In the Completed the Citrix HDX MediaStream for Flash – Server Setup Wizard page, click Finish.

Universal Print Client 7.6 Hotfix 1

VDA 7.6.300 includes this update. Only install this on a base VDA 7.6.0.

If you intend to use the Universal Print Server, then update the client on the VDA.

  1. Go to the downloaded Universal Print Client 7.6 Hotfix 1 and run UpsClient760WX64001.msi.
  2. In the Please read the Citrix Universal Print Client License Agreement page, check the box next to I accept the terms in the License Agreement and click Install.
  3. If you see the Files in Use page, click OK.
  4. In the Completed the Citrix Universal Print Client Setup Wizard page, click Finish.

Broker Agent 7.6 Hotfix 2

VDA 7.6.300 includes this update. Only install this on a base VDA 7.6.0.

  1. Go to the downloaded Broker Agent 7.6 Hotfix 2 x64 (or x86) and run BrokerAgent760WX64002.msi. Note: this is a Limited Release hotfix and regular Citrix Customers can’t see it. If you want it, contact a Citrix Partner or Citrix Support.
  2. In the Welcome to the Citrix Virtual Delivery Agent Core Services Hotfix BrokerAgent760WX64002 Update Wizard page, click Next.
  3. In the Ready to update Citrix Virtual Delivery Agent – x64 page, click Update.
  4. In the Completed the Citrix Virtual Delivery Agent – x64 Setup Wizard page, click Finish.
  5. Click OK to restart.

Group Policy Client Side Extension 2.4 Hotfix 1

VDA 7.6.300 includes this update. Only install this on a base VDA 7.6.0.

  1. Go to the downloaded Group Policy Client Side Extension 2.4 Hotfix 1 and run GPCSExt240WX64001.msi.
  2. In the Please read the Citrix Group Policy Client-Side Extension 2.4.1.0 License Agrement page, check the box next to I accept the terms in the License Agreement and click Install.
  3. In the Completed the Citrix Group Policy Client-Side Extension 2.4.1.0 Setup Wizard page, click Finish.

Personal vDisk 7.6.1

VDA 7.6.300 includes this update. Only install this on a base VDA 7.6.0.

  1. Go to the downloaded Personal vDisk 7.6.1 and run personalvDisk_x64.msi.
  2. In the Please read the Citrix personal vDisk License Agreement page, check the box next to I accept the terms in the License Agreement and click Install.
  3. In the Completed the Citrix personal vDisk Setup Wizard page, click Finish.
  4. Click Yes to restart.

Profile Management 5.4.1  💡

Upgrade this on all VDAs that use Citrix Profile Management.

Warning: If you are upgrading and have existing Windows 2012 R2 profiles based on the !CTX_OSNAME! variable, see http://discussions.citrix.com/topic/374111-psa-upm-54-ctx-osname-server-2012-value-change/ for why your profiles might stop working.

  1. Go to the downloaded Profile Management 5.4.1 and run profilemgt_x64.msi.
  2. In the Welcome to the Citrix Profile Management Setup Wizard page, click Next.
  3. In the End-User License Agreement page, check the box next to I accept the terms in the License Agreement and click Next.
  4. In the Destination Folder page, click Next.
  5. In the Ready to install Citrix Profile Management page, click Install.
  6. If you see Files in Use, click OK.
  7. Click OK to continue the installation.
  8. In the Completed the Citrix Profile Management Setup Wizard page, click Finish.
  9. Click Yes when prompted to restart.
  10. UPM 5.4.1 breaks Logon Duration in Citrix Director. To fix it, run the following commands:
    C:\Windows\Microsoft.NET\Framework64\v4.0.30319\installutil.exe "C:\Program Files\Citrix\Virtual Desktop Agent\upmWmiMetrics.dll"
    
    C:\Windows\Microsoft.NET\Framework64\v4.0.30319\installutil.exe "C:\Program Files\Citrix\Virtual Desktop Agent\upmWmiAdmin.dll"


  11. See the Profile Management page for configuration instructions.

Upgrade to Receiver 4.4.1000

VDA 7.6.300 does not include this update.

If Receiver is installed on your VDA, upgrade it to version 4.4.5000

  1. Go to the downloaded 4.4.5000, and run CitrixReceiver.exe.
  2. In the Welcome to Citrix Receiver page, click Start.
  3. In the License Agreement page, check the box next to I accept the license agreement and click Next.
  4. If you see the Enable Single Sign-on page, check the box next to Enable Single Sign-on and click Next.
  5. In the Help make our products better page, make your selection and click Install.
  6. After installation, click Finish.
  7. See the Receiver page for configuration instructions.

HTML5 App Switcher 2.0.2

VDA 7.6.300 does not include this update.

This tool is no longer needed for Receiver for HTML5 2.0 and newer.

  1. .NET Framework 4.0.3 or newer is required.
  2. Go to the downloaded Receiver for HTML5 App Switcher (Citrix_AppSwitcher_2.0.2) and run AppSwitcher.msi.
  3. Check the box next to I accept the terms and click Install.
  4. In the Completed the App Switcher Setup Wizard page, click Finish.
  5. In Programs and Features, it is shown as version 2.0.2.25.

Citrix PDF Printer 7.8.0

VDA 7.6.300 does not include this update.

This tool is only used by Receiver for HTML5.

  1. Go to the downloaded Receiver for HTML5 Citrix PDF Printer 7.8.0 (Citrix_PDFPrinter_7.8.0) and run CitrixPDFPrinter64.msi.
  2. In the Please read the Citrix PDF printer License Agreement page, check the box next to I accept the terms and click Install.
  3. In the Completed the Citrix PDF Universal Driver Setup Wizard page, click Finish.
  4. In Programs and Features, it is shown as version 7.8.0.10.
  5. Configure a Citrix Policy to enable the PDF printer. The setting is called Auto-create PDF Universal Printer.

Framehawk Configuration

To enable Framehawk, see https://www.carlstalhood.com/citrix-policy-settings/#framehawkconfig

Remote Desktop Licensing Configuration

On 2012 R2 RDSH, the only way to configure Remote Desktop Licensing is using group policy (local or domain). This procedure also works for 2008 R2 RDSH. This procedure is not needed on virtual desktops.

  1. For local group policy, run gpedit.msc.
  2. Go to Computer Configuration > Administrative Templates > Windows Components > Remote Desktop Services > Remote Desktop Session Host > Licensing.
  3. Double-click Use the specified Remote Desktop license servers. Change it to Enabled and enter the names of the RDS Licensing Servers (typically installed on XenDesktop Controllers). Click OK.
  4. Double-click Set the Remote Desktop licensing mode. Change it to Enabled and select Per User. Click OK.
  5. In Server Manager, open the Tools menu, expand Terminal Services and click RD Licensing Diagnoser.
  6. The Diagnoser should find the license server and indicate the licensing mode. It’s OK if there are no licenses installed on the Remote Desktop License Server.

Several people in Citrix Discussions reported the following issue: If you see a message about RD Licensing Grace Period has expired even though RD Licensing is properly configured, see Eric Verdumen No remote Desktop Licence Server availible on RD Session Host server 2012. The solution was to delete the REG_BINARY in HKEY_LOCAL_MACHINE\SYSTEM\CurrentControlSet\Control\Terminal Server\RCM\GracePeriod only leaving the default. You must take ownership and give admin users full control to be able to delete this value.

C: Drive Permissions

This section is more important for shared VDAs like Windows 2008 R2 and Windows 2012 R2.

The default permissions allow users to store files on the C: drive in places other than their profile.

  1. Open the Properties dialog box for C:\.
  2. On the Security tab, click Advanced.
  3. Highlight the line containing Users and Create Folders and click Remove.
  4. Highlight the line containing Users and Special and click Remove. Click OK.
  5. Click Yes to confirm the permissions change.
  6. If you see any of these Error Applying Security windows, click Continue.
  7. Click OK to close the C: drive properties.

Pagefile

If this image will be converted to a Provisioning Services vDisk, then you must ensure the pagefile is smaller than the cache disk. For example, if you allocate 20 GB of RAM to your Remote Desktop Session Host, and if the cache disk is only 15 GB, then Windows will have a default pagefile size of 20 GB and Provisioning Services will be unable to move it to the cache disk. This causes Provisioning Services to cache to server instead of caching to your local cache disk (or RAM).

  1. Open System. In 2012 R2, you can right-click the Start button and click System.
  2. Click Advanced system settings.
  3. On the Advanced tab, click the top Settings button.
  4. On the Advanced tab, click Change.
  5. Either turn off the pagefile or set the pagefile to be smaller than the cache disk. Don’t leave it set to System managed size. Click OK several times.

Direct Access Users

When Citrix Virtual Delivery Agent is installed on a machine, non-administrators can no longer RDP to the machine. A new local group called Direct Access Users is created on each Virtual Delivery Agent. Add your non-administrator RDP users to this local group so they can RDP directly to the machine.

Windows Profiles v3/v4/v5

Roaming Profiles are compatible only between the following client and server operating system pairs. The profile version is also listed.

  • v5 = Windows 10 and Windows Server 2016
  • v4 = Windows 8.1 and Windows Server 2012 R2
  • v3 = Windows 8 and Windows Server 2012
  • v2 = Windows 7 and Windows Server 2008 R2
  • v2 = Windows Vista and Windows Server 2008

Windows 8.1 and 2012 R2 don’t properly set the profile version. To fix this, ensure update rollup 2887595 is installed. http://support.microsoft.com/kb/2890783. After you apply this update, you must create a registry key before you restart the computer.

  1. Run regedit.
  2. Locate and then tap or click the following registry subkey:
    HKEY_LOCAL_MACHINE\System\CurrentControlset\Services\ProfSvc\Parameters
  3. On the Edit menu, point to New, and then tap or click DWORD Value.
  4. Type UseProfilePathExtensionVersion.
  5. Press and hold or right-click UseProfilePathExtensionVersion, and then tap or click Modify.
  6. In the Value data box, type 1, and then tap or click OK.
  7. Exit Registry Editor.

Then, Windows 8.1 creates a user profile and appends the suffix “.v4” to the profile folder name to differentiate it from version 2 of the profile in Windows 7 and version 3 of the profile in Windows 8.

Registry

HDX Flash

From Citrix Knowledgebase article CTX139939 – Microsoft Internet Explorer 11 – Citrix Known Issues: The registry key value IEBrowserMaximumMajorVersion is queried by the HDX Flash service to check for maximum Internet Explorer version that HDX Flash supports. For Flash Redirection to work with Internet Explorer 11 set the registry key value IEBrowserMaximumMajorVersion to 11 on the machine where HDX flash service is running. In case of XenDesktop it would be the machine where VDA is installed.

  • Key = HKLM\SOFTWARE\Wow6432Node\Citrix\HdxMediaStreamForFlash\Server\PseudoServer
    • Value = IEBrowserMaximumMajorVersion (DWORD) = 00000011 (Decimal)

From Citrix Discussions: Add the DWORD ‘FlashPlayerVersionComparisonMask=0’ on the VDA under HKLM\Software\Wow6432Node\Citrix\HdxMediaStreamForFlash\Server\PseudoServer.  This disables the Flash major version checking between the VDA and Client Device.

Published Explorer

This section applies if you intend to publish apps from this VDA.

From Citrix Knoweldgebase article CTX128009 – Explorer.exe Fails to Launch: When publishing the seamless explorer.exe application, the session initially begins to connect as expected. After the loading, the dialog box disappears and the explorer application fails to appear. On the VDA, use the following registry change to set the length of time a client session waits before disconnecting the session:

  • Key = HKLM\SYSTEM\CurrentControlSet\Control\Citrix\wfshell\TWI
    • Value = LogoffCheckerStartupDelayInSeconds (DWORD) = 10 (Hexadecimal)

Mfaphook – 8.3 File Names

  1. Open a command prompt.
  2. Switch to C:\ by running cd \
  3. Run dir /x program*
  4. If you don’t see PROGRA~1 then 8.3 is disabled. This will break Citrix.
  5. If 8.3 is disabled, open regedit and go to HKLM\Software\Microsoft\Windows NT\CurrentVersion\Windows.
  6. On the right is AppInit_DLLs. Edit it and remove the path in front of MFAPHOOK64.DLL.


Logon Disclaimer Window Size

From Xenapp 7.8 – Session Launch Security/Warning Login Banner at Citrix Discussions: If your logon disclaimer window has scroll bars, set the following registry values:

HKLM\Software\Wow6432node\Citrix\CtxHook\AppInit_DLLS\Multiple Monitor Hook\LogonUIWidth = DWORD:300
HKLM\Software\Wow6432node\Citrix\CtxHook\AppInit_DLLS\Multiple Monitor Hook\LogonUIHeight = DWORD:200

Login Timeout

Citrix CTX203760 VDI Session Launches Then Disappears: XenDesktop, by default, only allows 180 seconds to complete a logon operation. The timeout can be increased by setting the following:

HKLM\SOFTWARE\Citrix\PortICA

Add a new DWORD AutoLogonTimeout and set the value to decimal 240 or higher (up to 3600).

Also see Citrix Discussions Machines in “Registered” State, but VM closes after “Welcome” screen.

Receiver for HTML5 Enhanced Clipboard

From About Citrix Receiver for Chrome 1.9 at docs.citrix.com: To enable enhanced clipboard support, set registry value HKEY_LOCAL_MACHINE\SYSTEM\CurrentControlSet\Control\Citrix\wfshell\Virtual Clipboard\Additional Formats\HTML Format\Name=”HTML Format”. Create any missing registry keys. This applies to both virtual desktops and Remote Desktop Session Hosts.

4K Monitors

Citrix CTX201696 – Citrix XenDesktop and XenApp – Support for Monitors Including 4K Resolution and Multi-monitors: Up to eight 4K monitors are supported with the Std-VDA and RDS VDA irrespective of underlying GPU support, provided the required policies and/or registry keys are correctly configured. Currently the Std-VDA for XenDesktop and RDS-VDA for XenApp does not support resolutions higher than 4094 in any dimension.

Framehawk currently does not support 4K monitors. At the time of writing, the number of monitors supported is 1, the use of more monitors will cause the graphics mode to change from Framehawk to Thinwire to support multi-monitor.  The maximum resolution supported by Framehawk is currently 2048×2048.

From CTX200257 – Screen Issues Connecting to 4K Resolution Monitors: Symptom: A blank or corrupt screen is displayed when connecting to Windows 7 or 8.1 Standard XenDesktop Virtual Delivery Agents on a client which has one or more 4K resolution monitors.

  1. Calculate the video memory that is required for 4K monitor using the following formula:
    Sum of total monitors (Width * height * 4 * X) where width and height are resolution of the monitor.
    X = 2 if VDA is Windows 7 OR X = 3 if VDA is Windows 8\8.1
    Suppose a Windows 7 VDA is connecting to a client that has dual 4K monitors (3840×2160), then video buffer should be: (3840 x 2160 x 4 x 2) + (3840 x 2160 x 4 x 2) = ~132MB
  2. Open the registry (regedit) and navigate to: HKEY_LOCAL_MACHINE\SYSTEM\CurrentControlSet\services\vd
  3. Increase the value of “MaxVideoMemoryBytes” REG_DWORD value to the above calculated memory.
  4. Reboot the VDA.

When using Thinwire, Compatibility, Thinwire Plus or Legacy modes, the Display memory Limit policy needs to be configured appropriately for Std-VDA, as per Graphics Policy Settings at docs.citrix.com. The Default value for Display memory Limit is 65536KB and this is sufficient up to 2x4K monitors (2x32400KB). You can find more information on Graphics modes at Citrix Blogs – Site Wide View of HDX Graphics Modes.

Legacy Client Drive Mapping

Citrix Knowledgebase article How to Enable Legacy Client Drive Mapping Format on XenAppCitrix Client Drive Mapping no longer uses drive letters and instead they appear as local disks. This is similar to RDP drive mapping.

The old drive letter method can be enabled by setting the registry value:

  • Key = HKEY_LOCAL_MACHINE\SOFTWARE\Citrix\UncLinks (create the key)
    • Value = UNCEnabled (DWORD) = 0

When you reconnect, the client drives will be mapped as drive letters (starts with V: and goes backwards).

COM/LPT Port Redirection

To signal Citrix’ intention to deprecate COM and LPT support in a future major release, policy settings for COM Port and LPT Port Redirection have moved from Studio to the registry, and are now located under HKLM\Software\Citrix\GroupPolicy\Defaults\Deprecated on either your Master VDA image or your physical VDA machines. The registry values are detailed in docs.citrix.com.

Print Driver for Non-Windows Clients

This section applies to Windows 2012 R2, Windows 8.1, and Windows 10 VDAs.

From Mac Client Printer Mapping Fix for Windows 8/8.1 and Windows Server 2012/2012R2. By default, Non-Windows clients cannot map printers due to a missing print driver on the VDA machine.

  1. Requirements:
    • Internet Access
    • Windows Update service enabled
  2. Click Start and run Devices and Printers.
  3. In the Printers section, highlight a local printer (e.g. Microsoft XPS Document Writer). Then in the toolbar click Print server properties.
  4. Switch to the Drivers tab. Click Change Driver Settings.
  5. Then click Add.
  6. In the Welcome to the Add Printer Driver Wizard page, click Next.
  7. In the Processor Selection page, click Next.
  8. In the Printer Driver Selection page, click Windows Update. The driver we need won’t be in the list until you click this button. Internet access is required.
  9. Once Windows Update is complete, highlight HP on the left and then select HP Color LaserJet 2800 Series PS (Microsoft) on the right. Click Next.
  10. In the Completing the Add Printer Driver Wizard page, click Finish.
  11. Repeat these instructions to install the following additional drivers:
    • HP LaserJet Series II
    • HP Color LaserJet 4500 PCL 5

SSL for VDA

If you intend to use HTML5 Receiver internally, install certificates on the VDAs so the WebSockets (and ICA) connection will be encrypted. Internal HTML5 Receivers will not accept clear text WebSockets. External users don’t have this problem since they are SSL-proxied through NetScaler Gateway. Notes:

  • Each Virtual Delivery Agent needs a machine certificate that matches the machine name. This is feasible for a small number of persistent VDAs. For non-persistent VDAs, you’ll need some automatic means for creating machine certificates every time they reboot.
  • As detailed in the following procedure, use PowerShell on the Controller to enable SSL for the Delivery Group. This forces SSL for every VDA in the Delivery Group, which means every VDA in the Delivery Group must have SSL certificates installed.

The Citrix blog post How To Secure ICA Connections in XenApp and XenDesktop 7.6 using SSL has a method for automatically provisioning certificates for pooled virtual desktops by enabling certificate auto-enrollment and setting up a task that runs after the certificate has been enrolled. Unfortunately this does not work for Remote Desktop Session Host.

The following instructions can be found at Configure SSL on a VDA using the PowerShell script at docs.citrix.com.

  1. On the VDA machine, run mmc.exe.
  2. Add the Certificates snap-in.
  3. Point it to Local Computer.
  4. Request a certificate from your internal Certificate Authority. You can use either the Computer template or the Web Server template.

    You can also use group policy to enable Certificate Auto-Enrollment for the VDA computers.
  5. Browse to the XenApp/XenDesktop 7.6 ISO. In the \Support\Tools\SslSupport folder, shift+right-click the Enable-VdaSSL.ps1 script and click Copy as path.
  6. Run PowerShell as administrator (elevated).
  7. In the PowerShell prompt, type in an ampersand (&), and a space.
  8. Right-click the PowerShell prompt to paste in the path copied earlier.
  9. At the end of the path, type in -Enable
  10. If there’s only one certificate on this machine, press Enter.
  11. If there are multiple certificates, you’ll need to specify the thumprint of the certificate you want to use. Open the Certificates snap-in, open the properties of the machine certificate you want to use, and copy the Thumbprint from the Details tab.

    In the PowerShell prompt, at the end of the command, enter ?CertificateThumbPrint, add a space, and type quotes (").
    Right-click the PowerShell prompt to paste the thumbprint.
    Type quotes (") at the end of the thumbprint. Then remove all spaces from the thumbprint. The thumbprint needs to be wrapped in quotes.
  12. If this VDA machine has a different service already listening on 443 (e.g. IIS), then the VDA needs to use a different port for SSL connections. At the end of the command in the PowerShell prompt, enter -SSLPort 444 or any other unused port.
  13. Press <Enter> to run the Enable-VdaSSL.ps1 script.
  14. Press <Y> twice to configure the ACLs and Firewall.
  15. You might have to reboot before the settings take effect.
  16. Login to a Controller and run PowerShell as Administrator (elevated).
  17. Run the command asnp Citrix.*
  18. Enter the command:
    Get-BrokerAccessPolicyRule -DesktopGroupName '<delivery-group-name>' | Set-BrokerAccessPolicyRule ?HdxSslEnabled $true

    where <delivery-group-name> is the name of the Delivery Group containing the VDAs.

  19. You can run Get-BrokerAccessPolicyRule -DesktopGroupName '<delivery-group-name>' to verify that HDX SSL is enabled.
  20. Also run the following command:
    Set-BrokerSite –DnsResolutionEnabled $true

You should now be able to connect to the VDA using the HTML5 Receiver from internal machines.

Anonymous Accounts

If you intend to publish apps anonymously then follow this section.

  1. Anonymous accounts are created locally on the VDAs. When XenDesktop creates Anon accounts it gives them an idle time as specified at HKEY_LOCAL_MACHINE\SYSTEM\CurrentControlSet\Control\Citrix\AnonymousUserIdleTime. The default is 10 minutes. Adjust as desired.
  2. You can pre-create the Anon accounts on the VDA by running “C:\Program Files\Citrix\ICAConfigTool\CreateAnonymousUsersApp.exe”. If you don’t run this tool then Virtual Delivery Agent will create them automatically when users log in.
  3. You can see the local Anon accounts by opening Computer Management, expanding System Tools, expand Local Users and Groups and clicking Users.
  4. If you open one of the accounts, on the Sessions tab, notice that idle timeout defaults to 10 minutes. Feel free to change it.

Group Policy for Anonymous Users

Since Anonymous users are local accounts on each Virtual Delivery Agent, domain-based GPOs will not apply. To work around this limitation, you’ll need to edit the local group policy on each Virtual Delivery Agent.

  1. On the Virtual Delivery Agent, run mmc.exe.
  2. Open the File menu and click Add/Remove Snap-in.
  3. Highlight Group Policy Object Editor and click Add to move it to the right.
  4. In the Welcome to the Group Policy Wizard page, click Browse.
  5. On the Users tab, select Non-Administrators.
  6. Click Finish.
  7. Now you can configure group policy to lockdown sessions for anonymous users. Since this is a local group policy, you’ll need to repeat the group policy configuration on every Virtual Delivery Agent image. Also, Group Policy Preferences is not available in local group policy.

Antivirus

Install antivirus using your normal procedure. Instructions vary for each Antivirus product.

Microsoft’s virus scanning recommendations (e.g. exclude group policy files) – http://support.microsoft.com/kb/822158.

Citrix’s Recommended Antivirus Exclusions

Citrix CTX127030 Citrix Guidelines for Antivirus Software Configuration: Based on Citrix Consulting’s field experience, organizations might wish to consider configuring antivirus software on session hosts with the settings below.

  • Scan on write events or only when files are modified. It should be noted that this configuration is typically regarded as a high security risk by most antivirus vendors. In high-security environments, organizations should consider scanning on both read and write events to protect against threats that target memory, such as Conficker variants.
  • Scan local drives or disable network scanning. This assumes all remote locations, which might include file servers that host user profiles and redirected folders, are being monitored by antivirus and data integrity solutions.
  • Exclude the pagefile(s) from being scanned.
  • Exclude the Print Spooler directory from being scanned.
  • Remove any unnecessary antivirus related entries from the Run key (HKLM\Software\Microsoft\Windows\Current Version\Run).
  • If using the streamed user profile feature of Citrix Profile management, ensure the antivirus solution is configured to be aware of Hierarchical Storage Manager (HSM) drivers. For more information, refer to Profile Streaming and Enterprise Antivirus Products.

Symantec

Symantec links:

Non-persistent session hosts:

After you have installed the Symantec Endpoint Protection client and disabled Tamper Protection, open the registry editor on the base image.

  1. Navigate to HKEY_LOCAL_MACHINE\SOFTWARE\Symantec\Symantec Endpoint Protection\SMC\.
  2. Create a new key named Virtualization.
  3. Under Virtualization, create a key of type DWORD named IsNPVDIClient and set it to a value of 1.

To configure the purge interval for offline non-persistent session host clients:

  1. In the Symantec Endpoint Protection Manager console, on the Admin page, click Domains.
  2. In the Domains tree, click the desired domain.
  3. Under Tasks, click Edit Domain Properties.
  4. On the Edit Domain Properties > General tab, check the Delete non-persistent VDI clients that have not connected for specified time checkbox and change the days value to the desired number. The Delete clients that have not connected for specified time option must be checked to access the option for offline non-persistent VDI clients.
  5. Click OK.

Make the following changes to the Communications Settings policy:

  1. Configure clients to download policies and content in Pull mode
  2. Disable the option to Learn applications that run on the client computers
  3. Set the Heartbeat Interval to no less than one hour
  4. Enable Download Randomization, set the Randomization window for 4 hours

Make the following changes to the Virus and Spyware Protection policy:

  1. Disable all scheduled scans
  2. Disable the option to “Allow startup scans to run when users log on” (This is disabled by default)
  3. Disable the option to “Run an ActiveScan when new definitions Arrive”

Avoid using features like application learning which send information to the SEPM and rely on client state to optimize traffic flow

Linked clones:

To configure Symantec Endpoint Protection to use Virtual Image Exception to bypass the scanning of base image files

  1. On the console, open the appropriate Virus and Spyware Protection policy.
  2. Under Advanced Options, click Miscellaneous.
  3. On the Virtual Images tab, check the options that you want to enable.
  4. Click OK


Trend Micro

Citrix CTX136680 – Slow Server Performance After Trend Micro Installation. Citrix session hosts experience slow response and performance more noticeable while users try to log in to the servers. At some point the performance of the servers is affected, resulting in issues with users logging on and requiring the server to be restarted. This issue is more noticeable on mid to large session host infrastructures.

Trend Micro has provided a registry fix for this type of issue. Create the following registry on all the affected servers. Add new DWORD Value as:

[HKEY_LOCAL_MACHINE\SYSTEM\CurrentControlSet\Services\TmFilter\Parameters] “DisableCtProcCheck”=dword:00000001

Trend Micro Links:

Optimize Performance

VDA Optimizer

Installation of the VDA might have already done this but there’s no harm in doing it again. This tool is only available if you installed VDA in Master Image mode.

  1. On the master VDA, go to C:\Program Files\Citrix\PvsVm\TargetOSOptimizer and run TargetOSOptimizer.exe.
  2. Then click OK. Notice that it disables Windows Update.

RDSH

Citrix CTX131577 XenApp 6.x (Windows 2008 R2) – Optimization Guide is a document with several registry modifications that are supposed to improve server performance. Ignore the XenApp 6 content and instead focus on the Windows content.

Citrix CTX131995 User Cannot Launch Application in Seamless Mode in a Provisioning Services Server when XenApp Optimization Best Practices are Applied. Do not enable NtfsDisable8dot3NameCreation

Norskale has Windows 2008 R2 Remote Desktop and XenApp 6 Tuning Tips Update.

Windows 7

Microsoft has compiled a list of links to various optimization guides.

It’s a common practice to optimize a Windows 7 virtual machine (VM) template (or image) specifically for VDI use. Usually such customizations include the following.

  • Minimize the footprint, e.g. disable some features and services that are not required when the OS is used in “stateless” or “non-persistent” fashion. This is especially true for disk-intensive workloads since disk I/O is a common bottleneck for VDI deployment. (Especially if there are multiple VMs with the same I/O patterns that are timely aligned).
  • Lock down user interface (e.g. optimize for specific task workers).

With that said the certain practices are quite debatable and vary between actual real-world deployments. Exact choices whether to disable this or that particular component depend on customer requirements and VDI usage patterns. E.g. in personalized virtual desktop scenario there’s much less things to disable since the machine is not completely “stateless”. Some customers rely heavily on particular UI functions and other can relatively easily trade them off for the sake of performance or standardization (thus enhance supportability and potentially security). This is one of the primary reasons why Microsoft doesn’t publish any “VDI Tuning” guide officially.

Though there are a number of such papers and even tools published either by the community or third parties. This Wiki page is aimed to serve as a consolidated and comprehensive list of such resources.

Daniel Ruiz XenDesktop Windows 7 Optimization and GPO’s Settings

Microsoft Whitepaper Performance Optimization Guidelines for Windows 7 Desktop Virtualization

Windows 10 / Windows 8.1 / Windows 2012 R2

Optimization Notes:

  • If this machine is provisioned using Provisioning Services, do not disable the Shadow Copy services.
  • Windows 8 detects VDI and automatically disables SuperFetch. No need to disable it yourself.
  • Windows 8 automatically disables RSS and TaskOffload if not supported by the NIC.

Seal and Shut Down

If this session host will be a master image in a Machine Creation Services or Provisioning Services catalog, after the master is fully prepared (including applications), do the following:

  1. Go to the properties of the C: drive and run Disk Cleanup.
  2. On the Tools tab, click Optimize to defrag the drive.
    `
  3. Run slmgr.vbs /dlv and make sure it is licensed with KMS and has at least one rearm remaining. It is no longer necessary to manually rearm licensing. XenDesktop will do it automatically.
  4. Run Delprof2 to clean up local profiles. Get it from http://helgeklein.com/download/.
  5. Machine Creation Services and Provisioning Services require DHCP.

Session hosts commonly have DHCP reservations.

  • Shut down the master image. You can now use Studio or Provisioning Services to create a catalog of linked clones.

Troubleshooting – Graphics

For an explanation of Citrix’s graphics policy settings, see A graphical deep dive into XenDesktop 7 and What’s new with HDX display in XenDesktop & XenApp 7.x?

Citrix Knowledgebase article CTX200370 – How to Determine HDX Display Mode: Use wmic or HDX Monitor as described in the article to determine which of the following display mode options is being used:

  • DCR (Desktop Composition Redirection)
  • H.264 / H.264 Compatibility Mode
  • Legacy Graphics Mode

Citrix Blog Post – Site Wide View of HDX Graphics Modes; PowerShell script to display graphics mode of currently connected sessions.

From Citrix Discussions: If you experience graphics performance problems in XenDesktop 7.6, consider configuring the following settings:

  • ICA \ Desktop UI \ Desktop Composition Redirection = Disabled
  • ICA \ Graphics \ Legacy Graphics Mode = Enabled

Citrix Blog post – Optimising the performance of HDX 3D Pro – Lessons from the field

From Citrix Tips – Black Screen Issues with 7.x VDA: Users would make a successful ICA connection but the screen would stay totally black.

[HKEY_LOCAL_MACHINE\SYSTEM\CurrentControlSet\services\vbdenum]

  • “Start”=dword:00000001
  • “MaxVideoMemoryBytes”=dword:06000000
  • “Group”= “EMS”

[HKEY_LOCAL_MACHINE\SYSTEM\CurrentControlSet\services\vd3d]

  • “MaxVideoMemoryBytes”=dword:00000000

From Citrix Knowledgebase article CTX200257 – Screen Issues Connecting to 4K Resolution Monitors in DCR Mode:

  1. Calculate the video memory that is required for 4K monitor using the following formula:
    Sum of total monitors (Width * height * 4 * X) where width and height are resolution of the monitor.
    X = 2 if VDA is Windows 7 OR X = 3 if VDA is Windows 8\8.1\10
    Example: Suppose a Windows 7 VDA is connecting to a client that has dual 4K monitors (3840×2160), then video buffer should be: (3840×160 x 4 x 2) + (3840 x 2160 x 4 x 2) = ~115MB
  2. Open the registry (regedit) and navigate to:
    HKEY_LOCAL_MACHINE\SYSTEM\CurrentControlSet\services\vd3v
  3. Increase the value of “MaxVideoMemoryBytes” REG_DWORD value to the above calculated memory.
  4. Reboot the VDA

From Citrix Discussions: To exclude applications from Citrix 3D rendering, create a REG_DWORD registry value “app.exe” with value 0 or a registry value “*” with value 0.

  • XD 7.1 and XD 7.5:
    • x86: reg add hklm\software\citrix\vd3d\compatibility /v * /t REG_DWORD /f /d 0
    • x64: reg add hklm\software\Wow6432Node\citrix\vd3d\compatibility /v * /t REG_DWORD /f /d 0
  • XD 7.6 both x86 and x64:
    • reg add hklm\software\citrix\vd3d\compatibility /v * /t REG_DWORD /f /d 0

Wildcards are not supported. The asterisk * here has a special meaning “all apps” but is not a traditional wildcard. To blacklist multiple apps e.g. both appa.exe and appb.exe must be done by creating a registry value for each app individually.

This is most problematic in Remote PC since most physical PCs have GPUs. I recently had to blacklist Internet Explorer to prevent lockup issues when switching back to physical.

Uninstall VDA

Uninstall the VDA from Programs and Features.

Then see CTX209255 VDA Cleanup Utility.

Related Pages

Citrix Profile Management 2411

Last Modified: Dec 7, 2024 @ 3:22 am

Navigation

This article applies to all versions of Profile Management: 2411, 2402 LTSR CU1, 2203 LTSR CU5, 1912 LTSR CU9, etc.

💡 = Recently Updated

Change Log

Planning

Profile Management Versions

Profile Management is included with the installation of Virtual Delivery Agent. To upgrade Profile Management, simply upgrade your VDA software. Here are the currently supported versions of VDA:

Or you can download the individual Profile Management component and install/upgrade it separately from the VDA software. You can even install it on non-VDA machines (e.g., PCs accessed by licensed Citrix users).

For LTSR VDAs, for LTSR support compliance, only install the Profile Management version that is included with your VDA installer. Don’t upgrade to a newer Current Release version.

The latest release of Citrix Profile Management is version 2411, which can be downloaded from Citrix Virtual Apps and Desktops 2411. To find it, click Components that are on the product ISO but also packaged separately.

Profile Management Configuration Options

Profile Management consists of a Service (installed on the VDAs), a file share, and configuration settings.

There are four methods of delivering configuration settings to the Citrix Profile Management service:

If a UPM setting is not configured in GPO, Citrix Policy, or WEM, then the default setting in the UPMPolicyDefaults.ini file takes effect. The .ini file is located in C:\Program Files\Citrix\User Profile Manager on every machine that has Profile Management service installed.

Microsoft Group Policy (ADMX file) is probably the most reliable method of delivering configuration settings to the Profile Management services. This method uses the familiar Group Policy registry framework. Just copy the Profile Management ADMX files to PolicyDefinitions and start configuring. The configuration instructions in this article use the GPO ADMX method.

The Citrix Policies configuration method requires Citrix Studio, or Citrix Group Policy Management Plug-in. On the Profile Management service side, only VDAs can read the Citrix Policies settings.

  • Citrix Policies has settings for Folder Redirection. If you use Citrix Policy to configure Folder Redirection, then the Folder Redirection settings only apply to VDAs that can read Citrix Policies. To apply to Folder Redirection to more than just VDAs, configure Folder Redirection using normal Microsoft Group Policy as detailed below.
  • If you’re going to use Microsoft Group Policy to configure Folder Redirection, then you might as well use Microsoft Group Policy to also configure Citrix Profile Management.

Citrix Workspace Environment Management can also deliver configuration settings to the Profile Management services. This option requires the WEM Agent to pull down the settings from the WEM Brokers and apply them to Profile Management. It can sometimes be challenging to troubleshoot why WEM is not applying the settings.

Try not to mix configuration options. If you use both WEM and GPO, which one wins?

Multiple Datacenters

For optimum performance, users connecting to Citrix in a particular datacenter should retrieve their roaming profiles from a file server in the same datacenter. If you have Citrix in multiple datacenters, then you will need file servers in each datacenter.

DFS active/active replication of roaming profiles is not supported. This limitation complicates multi-datacenter designs.

For active/active datacenters, split the users such that different users have different home datacenters. Whenever a particular user connects, that user always connects to the same datacenter, and in that datacenter is a file server containing the user’s roaming profile. StoreFront uses Active Directory group membership to determine a user’s home datacenter.

For users that connect to Citrix in multiple datacenters, there are a couple options:

  • The user’s roaming profile is located in only one datacenter – If the user connects to a remote datacenter, then the roaming profile must be transmitted across the WAN. To optimize performance, disable Active Write Back, and make sure Profile Streaming is enabled.
  • The user has separate profiles for each datacenter – There is no replication of profiles between datacenters. This scenario is best for deployments where different applications are hosted in different datacenters.

Disaster Recovery – For disaster recovery scenarios, the user’s roaming profile data (and home directories) must be recovered in a different datacenter. Here are some considerations:

  • Use DFS One-way replication. After the disaster, edit the DFS Namespace folder target to point to the file server in the DR datacenter. You must avoid multi-master DFS replication/namespace.
  • Use VMware SRM or similar to recover the entire file server in the DR datacenter.
  • A datacenter failover might result in multiple file servers accessed from a single VDA, especially if you have users split across datacenters. Use DFS Namespaces as detailed below.

DFS Namespace

DFS Namespace for central user store – The Citrix Profile Management user store path is a computer-level setting, meaning there can only be one path for every user that logs into a particular VDA. If you have different users with roaming profiles on different file servers, then you must use Active Directory user attributes and DFS namespaces to locate the user’s file server. Here is an overview of the configuration:

  • Create a domain-based DFS namespace with folder targets on different file servers. See Scenario 1 – Basic setup of geographically adjacent user stores and failover clusters at Citrix Docs for more information.
  • Do not enable two-way DFS Replication for the roaming profile shares. But you can do One-way DFS replication. See Scenario 2 – Multiple folder targets and replication at Citrix Docs for more information.
  • Edit each user in Active Directory with a location (l) attribute that matches the DFS folder name.
  • Set the Profile Management user store path to \\corp.local\CtxProfiles\#l#\#SAMAccountName#\!CTX_OSNAME!!CTX_PROFILEVER!. This pulls the user’s l attribute from Active Directory and appends that to the DFS share. The folder that matches the attribute value is linked to a file server. For example, if the user’s l attribute is set to Omaha, then the user’s profile will be located at \\corp.local\CtxProfiles\Omaha\user01\Win2016v6. The Omaha folder is linked to a file server in the Omaha datacenter.

Create User Store

This procedure could also be used to create a file share for redirected profile folders.

Create and Share the Folder

  1. Make sure file and printer sharing is enabled.
  2. On the file server that will host the file share, create a new folder and name it CtxProfiles or similar.

  3. Right-click the folder, expand Give Access to (Windows Server 2019) or expand Share with (Windows Server 2016) and select Specific people.

  4. Give Everyone (or some other group that contains all Citrix Users) Full Control (Read/Write). Click Share, and then click Done.
  5. Go to the Properties of the folder.
  6. On the Sharing tab, click Advanced Sharing.
  7. Click Caching.
  8. Select No files or programs. Click OK, and then click Close.

Folder NTFS Permissions

  1. Open the properties of the new shared folder.
  2. On the Security tab, click Edit.
  3. For the Everyone entry, remove Full Control and Modify. Make sure Write is enabled so users can create new folders.
  4. Add CREATOR OWNER and give it Full Control. This grants users Full Control of the folders they create. Click OK.
  5. Now click Advanced.
  6. Highlight the Everyone permission entry, and click Edit.
  7. Change the Applies to selection to This folder only. Click OK three times. This prevents the Everyone permission from flowing down to newly created profile folders.

Access Based Enumeration

With this setting enabled, users can only see folders to which they have access:

  1. In Server Manager, on the left, click File and Storage Services.
  2. If you don’t see Shares then you probably need to close Server Manager and reopen it. Or perform a refresh.
  3. Right-click the new share and click Properties.
  4. On the Settings page, check the box next to Enable access-based enumeration.

GPO ADMX Policy Template

  1. You can find the GPO ADMX templates on the main Citrix Virtual Apps and Desktops 2411 ISO in the \x64\ProfileManagement\ADM_Templates\en folder.

    • Or they are included in the standalone Profile Management download in the \Group Policy Templates\en folder.
  2. Copy the file ctxprofile.admx to the clipboard.
  3. If your domain has PolicyDefinitions copied to SYSVOL, paste the file there.

    • If you don’t have SysVol PolicyDefinitions, then go to C:\Windows\PolicyDefinitions and paste the file.
  4. If you have an older version of the ctxprofile.admx file in either location, delete it. Note: replacing the .admx file does not affect your existing Profile Management configuration. The template only defines the available settings, not the configured settings.
  5. Go back to the Citrix Profile Management Group Policy Template files.
  6. Copy ctxprofile.adml to the clipboard.
  7. If your domain has a PolicyDefinitions central store in SYSVOL, copy it to the en-us folder in SYSVOL. This is a subfolder of the PolicyDefinitions folder.

    • If you don’t have SysVol PolicyDefinitions,, then go to C:\Windows\PolicyDefinitions\en-US and paste the file. This is a subfolder of the PolicyDefinitions folder.
  8. If you have an older version of the ctxprofile.adml file in the en-US folder in either location, delete it.

CitrixBase:

  1. Go up a folder and then open the CitrixBase folder.
  2. In the CitrixBase folder, copy the file CitrixBase.admx to the clipboard.
  3. If your domain has PolicyDefinitions copied to SYSVOL, paste the file there.

    • If you don’t have SysVol PolicyDefinitions, then go to C:\Windows\PolicyDefinitions and paste the file.
  4. Go back to the Citrix Profile Management Group Policy Templates and copy CitrixBase.adml to the clipboard.
  5. If your domain has a PolicyDefinitions central store in SYSVOL, copy it to the en-us folder in SYSVOL. This is a subfolder of the PolicyDefinitions folder.

    • If you don’t have SysVol PolicyDefinitions,, then go to C:\Windows\PolicyDefinitions\en-US and paste the file. This is a subfolder of the PolicyDefinitions folder.

Group Policy Settings

  1. Edit a GPO that applies to all machines (VDAs) that have the Profile Management service installed.
  2. Go to Computer Configuration | Policies | Administrative Templates | Citrix Components | Profile Management.
    • Note: if you did not install the CitrixBase.admx file, then you can find Profile Management directly under the Administrative Templates node instead of under Citrix Components.
  3. Enable the setting Enable Profile management. Profile Management will not function until this setting is enabled.
  4. If desired, enable the setting Process logons of local administrators.
  5. Enable Path to user store.
  6. Specify the UNC path to the folder share. An example path = \\server\share\#SAMAccountName#\!CTX_OSNAME!!CTX_PROFILEVER!

    1. Profile Versions– Different OS versions have different profile versions. Each profile version only works on specific OS versions. For example, you cannot use a Windows 7 profile (v2) on Windows 10 1607 (v6). The variables in the path above ensure that every unique profile version is stored in a unique folder. If users connect to multiple operating system versions, then users will have multiple profiles.
      1. Windows 10 Profile Versions – Windows 10 has two different profile versions. Windows 10 build 1511 and older use v5 profiles. Windows 10 build 1607 and newer use v6 profiles. v5 and v6 profile versions are incompatible so they should be separated.
      2. Resolved variables – With the example user store path shown above, if the user logs into Windows 2012 R2 RDSH, the profile folder will be \\server\share\user01\Win2012R2v4. If the user logs into 64-bit Windows 10 build 1607, the profile folder will be \\server\share\user01\Win10RS1v6.
      3. Windows 10 v6 vs Windows 2016 v6 – Both Windows 10 (1607 and newer) and Windows Server 2016 use v6 profiles. Do you want to use the same profile for both platforms? If so, remove !CTX_OSNAME! from the Path. Note: Windows 10 supports Store apps while Windows 2016 does not. If you’re allowing Store apps, then it’s probably best to use different profiles for both OS platforms.
      4. Windows 2012 R2 warning: in older versions of Citrix Profile Management, !CTX_PROFILEVER! recognizes Windows 2012 R2 as v2, which isn’t correct. v2 is Windows Server 2008 R2, while Windows Server 2012 R2 is v4. The profile version bug was fixed in Profile Management 5.4 and newer. If you have existing Windows 2012 R2 profiles based on the !CTX_PROFILEVER! variable set to v2, after upgrading to 5.4 or newer, then your profiles might stop working . See http://discussions.citrix.com/topic/374111-psa-upm-54-ctx-osname-server-2012-value-change/ for more details.
    2. Windows 10 and !CTX_OSNAME!: Profile Management sets !CTX_OSNAME! to different strings for different Windows operating system versions, especially different versions of Windows 10: (RS = Redstone, which is a Microsoft codeword)
      • Windows Server 2019 sets !CTX_OSNAME! to Win2019v6.
      • Windows Server 2016 sets !CTX_OSNAME! to Win2016v6.
      • Windows 10 version 1903 and 1909 set !CTX_OSNAME! to Win10RS6.
      • Windows 10 version 1809 sets !CTX_OSNAME! to Win10RS5.
      • Windows 10 version 1803 sets !CTX_OSNAME! to Win10RS4.
      • Windows 10 version 1709 sets !CTX_OSNAME! to Win10RS3.
      • Windows 10 version 1703 sets !CTX_OSNAME! to Win10RS2.
      • Windows 10 version 1607 sets !CTX_OSNAME! to Win10RS1.
    3. If you use !CTX_OSNAME! in your profile store path, then different CTX_OSNAMEs will have different profiles, which means users will lose their profile settings whenever you upgrade Windows 10.
      • Profile Management 1909 and newer have a setting called Automatic migration of existing application profiles under Profile Handling that can alleviate this problem.
    4. Multiple Domains – If you have multiple domains, in the user profile store path, change #SAMAccountName# to %username%.%userdomain% (e.g. \\server\share\%username%.%userdomain%\!CTX_OSNAME!!CTX_PROFILEVER!). That way you can have the same account name in multiple domains and each account will have a different profile.
    5. Hard Code Store Path – Instead of using variables, you can specify a hard coded path. However, the profile incompatibility restrictions listed above still apply. To avoid applying a single profile across multiple operating system versions, place VDAs with different OS versions in different OUs, and then use different Profile Management GPOs on those OUs to specify different Profile Management user store paths.
    6. Migrate User Store – Profile Management 1909 and newer can move profiles from an old profile path to a new profile path.

    7. User-level overrides – Profile Management 2305 and newer support user-level overrides. First, configure Enable user-level policy settings under Advanced Settings. Then add registry keys for user group SIDs with override settings. See Enable and configure user-level policy settings at Citrix Docs.

  7. Disable Active write back. This feature places additional load on the file server and is only needed if users login to multiple machines concurrently and need mid-session changes to be saved, or if users never log off from their sessions. Note: if you don’t disable this, then it is enabled by default.

    1. Profile Management 2303 and newer have an option to only perform Active write back on session lock and disconnection.
  8. On the left, go to the Advanced settings node.
  9. If Microsoft Teams 2.1 or newer, and if Teams is installed per machine, then simply make sure Profile Management is version 2402 or newer. See Enable roaming for the new Microsoft Teams at Citrix Docs.
    • If Teams 2.1 is installed per-user, then enable UWP app roaming, which requires Profile Management 2308 or newer. See CTX585013 Microsoft Teams 2.1 supported for VDI/DaaS.
    • Profile Management 2411 and newer have the setting named Enable AppX package load acceleration. It requires a file share to store the VHDX files.

  10. Enable the setting Process Internet cookie files on logoff. This is probably only for Internet Explorer.
  11. The Replicate user stores setting replicates to multiple file shares. Note: this slows down logoffs. Profile Management 2209 and newer supports replicating profile containers, which seems to use robocopy.exe.

    • In Profile Management 2407 and newer, for the container-based profile solution, the Enable in-session policy container failover among user stores policy is automatically enabled to ensure profile redundancy for the entire session.
  12. Customer Experience Improvement Program (CEIP) is enabled by default. It can be disabled here.
  13. See https://www.carlstalhood.com/delivery-controller-cr-and-licensing/#ceip for additional places where CEIP is enabled.
  14. Profile Management 2206 adds Enable asynchronous processing for user Group Policy on logon. This might speed up logons. This feature requires you to disable Always wait for the network at computer startup and logon and enable Allow asynchronous user Group Policy processing when logging on through Remote Desktop Services. More details at Citrix Docs.
  15. Profile Management 2311 and newer support Enable OneDrive container. It works the same way as search index roaming as detailed next. See Citrix Tech Zone Deployment Guide: Citrix Profile Management – OneDrive Container.
  16. Profile Management 7.18 and newer have Enable search index roaming for Outlook.

Notes on Outlook OST and Search roaming:

  1. Microsoft FSLogix is another Outlook search index roaming product that is now free. For details, see the FSLogix section in the computer group policy article.
  2. Profile Management 1906 and newer support 64-bit Outlook 2016 and Office 2019.
  3. VDA 1906 or newer are recommended for the bug fixes for this feature. You can upgrade the VDA without upgrading your Delivery Controllers.
  4. After the first user logon, Profile Management 1811 and newer creates a template VHDX file in a folder named UpmVhd at the root of the user store. The template file is copied to new users, thus speeding up VHDX creation.

  5. In the user’s profile location, a new folder called VHD is created.

    • You can override the VHDX path by configuring Customize storage path for VHDX files as detailed at Citrix Docs.
  6. Inside the \VHD\Win2016 folder are two new thin provisioned .vhdx files – one for OST, one for Search. The per-user .vhdx files are copied from the parent template.
  7. UPM grants Domain Computers Full Control of the VHDX files. Users must have Full Control to the Profile Share, and UPM Folder to be able to grant this permission. Modify permissions are not sufficient. (Source = Robert Steeghs The Citrix Profile management could not mount virtual disk)
  8. When the user logs into a Citrix session, the two VHDXs are mounted to %localappdata%\Microsoft\Outlook and %appdata%\Citrix\Search. This means that OST files and Search Indexes are stored in the VHDX instead of in the user’s profile.


  9. eastwood357 at Outlook OST and Search vhdx not unmounting after log off at Citrix Discussions says that the Profile Management Path to User Store must be all lower case or else the VHDX files will not unmount at logoff.
  10. Only enable this feature for users with new Outlook profiles. If the user already has an .ost file, then you’ll see an error about missing .ost when Outlook is launched.
  11. The Search roaming feature is only supported with specific versions of Windows Search service. Event Log will tell you if your Windows patches are too new.
  12. Profile Management 2206 and newer have an option for Enable concurrent session support for Outlook search data roaming.

    • In older Profile Management, VHDX files can only be mounted on one machine at a time. If you login to two VDAs, and if both try to mount the same VHDX files, then you’ll see errors in Event Viewer.
  13. Search Index Backup – Profile Management 1909 and newer have a GPO setting named Outlook search index database – backup and restore that can provide automatic recovery of the search index if it becomes corrupted. The backup consumes more of the available storage space of the VHDX files.
  14. For a detailed explanation of how the per-user Search Index works, see CTX235347 Citrix Profile Management: VHDX-based Outlook cache and Outlook search index on a user basis.
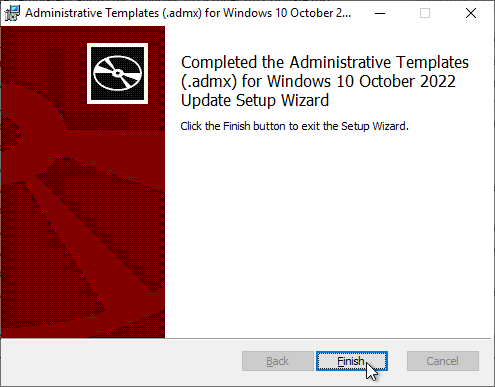
  15. Profile Management 2109 and newer can Automatically reattach detached VHDX disks. In Profile Management 2203 and newer, it’s available as a group policy setting under the Profile Management | Advanced Settings node.
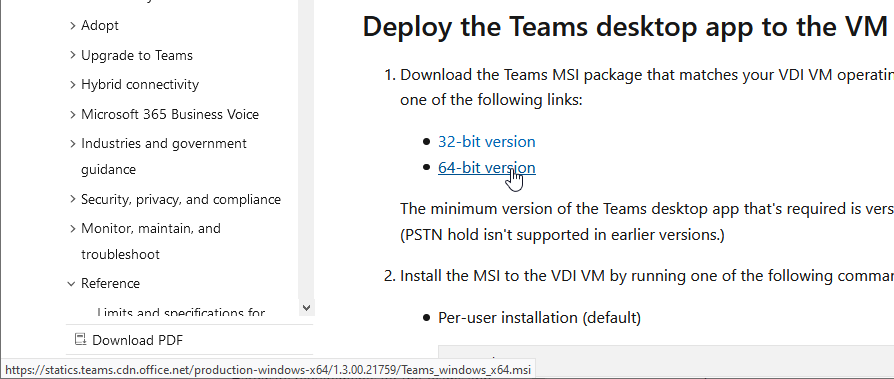
  16. Profile Management 2303 and newer have a Profile Container GPO setting to Enable VHD disk compaction on user logoff. See Citrix Docs.

    • Additional disk compaction settings can be found under Advanced Settings.

Exclusions, Synchronization, and Mirroring

  1. Profile Management 2209 and newer have File Deduplication > Files to include in the shared store for deduplication. You must specify which files to delete from each user’s profile and instead store in a shared location. See Citrix Docs. Profile Management 2311 support Files deduplication of profile containers.
  2. Under the File system node in the Group Policy Editor, enable the setting Enable Default Exclusion List – directories.
  3. You can use checkboxes to not exclude some folders.
  4. Then edit Exclusion list – directories.
  5. Enable the setting, and click Show.

  6. For Edge Chromium, see Avanite Roaming Edge Chromium.
  7. For Chrome, use the same list as Edge but change \Microsoft\Edge to \Google\Chrome.
  8. Add the following to the list.
    AppData\Local\Microsoft\Windows\INetCache
    AppData\local\Microsoft\Windows\IEDownloadHistory
    AppData\Local\Microsoft\Internet Explorer\DOMStore
    AppData\Local\Google\Software Reporter Tool
    AppData\Roaming\Microsoft\Teams\media-stack
    AppData\Roaming\Microsoft\Teams\Logs
    AppData\Roaming\Microsoft\Teams\Service Worker\CacheStorage
    AppData\Roaming\Microsoft\Teams\Application Cache
    AppData\Roaming\Microsoft\Teams\Cache
    AppData\Roaming\Microsoft\Teams\GPUCache
    AppData\Roaming\Microsoft\Teams\meeting-addin\Cache
  9. Newer versions of Office Click-to-run let you roam the shared computer activation licensing token. See Overview of shared computer activation for Office 365 ProPlus and search for “roam”. The licensing tokens also last 30 days instead of 2-3 days. Source = Rick Smith in the comments. Ideally you should have ADFS integration so users can seamlessly re-activate Office.
  10. James Rankin has a much longer list of exclusions and synchronizations at Everything you wanted to know about virtualizing, optimizing and managing Windows 10…but were afraid to ask – part #6: ROAMING.
  11. Nick Panaccio at IE11 Enterprise Mode and UPM at Citrix Discussions has a list of exclusions for IE in Enterprise Mode.
    appdata\local\microsoft\internet explorer\emieuserlist
    appdata\local\microsoft\internet explorer\emiesitelist
    appdata\local\microsoft\internet explorer\emiebrowsermodelist
  12. Then click OK twice to return to the Group Policy Editor.
  13. usrclass.dat*.
    1. Profile Management 1909 and newer automatically include usrclass.dat* in the Files to Synchronize. UPM 2103 and newer add it for Windows 10 but not for RDSH. If added to the exclusion list, then Profile Management 1909 and newer automatically removes it from the exclusion list. See Start menu roaming at Citrix Docs.
    2. usrclass.dat* contains file type associations. For roaming file type associations, you can export/import HKCU\SOFTWARE\Classes\Applications as described by Christoph Kolbicz at User File Type Association Roaming on Server 2016 with Citrix User Profile Manager.
  14. Clean up excluded folders –  If you add to the exclusions list after profiles have already been created, Profile Management 5.8 has a feature that can delete the excluded folders at next logon. See To enable logon exclusion check at Citrix Docs. In Profile Management 7.15 and newer, Logon Exclusion Check is configurable in group policy under the File System node.

    1. Also see Muralidhar Maram’s post at Citrix Discussions for a tool that will clean up the existing profiles.
    2. Also see Jeremy Sprite Clean Citrix UPM Profiles.

Directories to Synchronize

  1. Under the File System\Synchronization node in the Group Policy Editor you can configure which profile folders should be synchronized that have otherwise been excluded.
  2. Edit the setting Directories to synchronize.
  3. Enable the setting, and click Show.
  4. Profile Management 7.16 Fixed Issues says that AppData\Local\Microsoft\Windows\Caches should be synchronized. Also see CTX234144 Start Menu Shows Blank Icons on VDA 7.15 LTSR CU1/7.16/7.17 with UPM Enabled.
  5. CTX489573Office 365 – Account Error: Sorry, we can’t get to your account right now says that Appdata\local\microsoft\identitycache should be synchronized.
  6. To configure Profile Management to sync Saved Passwords in Internet Explorer, add the following directories as detailed by gtess80 at Internet Explorer 11 Saved Passwords Not Retaining Between Sessions at Citrix Discussions. However, if Microsoft Credentials Roaming is enabled, then you should instead exclude these folders from roaming as detailed at CTX124948 How to Configure Citrix Profile Manager when Microsoft Credentials Roaming is Used in the Environment.
    AppData\Local\Microsoft\Windows\Caches
    AppData\Local\Microsoft\Credentials
    Appdata\local\Microsoft\identitycache
    Appdata\Roaming\Microsoft\Credentials
    Appdata\Roaming\Microsoft\Crypto
    Appdata\Roaming\Microsoft\Protect
    Appdata\Roaming\Microsoft\SystemCertificates

  7. Start Menu and File Type Associations:
    1. If Windows 10 1703 or newer, see James Rankin Roaming profiles and Start Tiles (TileDataLayer) in the Windows 10 1703 Creators Update for information on the new location for Tile data. Citrix Profile Management 5.8 and newer should handle this automatically.
    2. See David Ott’s list of UPM exclusions for Windows 10. This blog post also details how to roam the Windows 10 Start Menu and prevent file share locks.
    3. To roam Start Menu and/or File Type Associations in Windows 10 or Windows Server 2016, see CTX214754 Error “An app default was reset” after signout and Logon in Citrix UPM for info on why this is difficult.
    4. Instead of roaming usrclass.dat, you can export/import HKCU\SOFTWARE\Classes\Applications as described by Christoph Kolbicz at User File Type Association Roaming on Server 2016 with Citrix User Profile Manager.
    5. Daniel Feller at Sync the Windows 10 Start Menu in VDI says that configuring SettlementPeriodBeforeAutoShutdown might improve reliability of Start Menu roaming, assuming users log out of the virtual desktop instead of rebooting the virtual desktop. On a Delivery Controller, open PowerShell, and run the following:
      asnp citrix.*
      Set-BrokerDesktopGroup -Name "NAME_OF_DESKTOP_GROUP" -SettlementPeriodBeforeAutoShutdown 00:00:15
    6. With VDA 7.15 Update 1, the icons on the Start Menu of Windows 2012 R2 and Windows 2016 are sometimes blank.

  8. Click OK twice.

Files to Synchronize

  1. Edit Files to synchronize.
  2. Enable the setting, and click Show

  3. Add the following three entries so Java settings are saved to the roaming profile:
    AppData\LocalLow\Sun\Java\Deployment\security\exception.sites
    AppData\LocalLow\Sun\Java\Deployment\security\trusted.certs
    AppData\LocalLow\Sun\Java\Deployment\deployment.properties
    
  4. Bob Bair at Citrix Discussions recommends these additional files for Chrome:
    AppData\Local\Google\Chrome\User Data\First Run
    AppData\Local\Google\Chrome\User Data\Local State
    AppData\Local\Google\Chrome\User Data\Default\Bookmarks
    AppData\Local\Google\Chrome\User Data\Default\Favicons
    AppData\Local\Google\Chrome\User Data\Default\History
    AppData\Local\Google\Chrome\User Data\Default\Preferences
  5. Citrix’s Start Menu Roaming documentation says that Appdata\Local\Microsoft\Windows\UsrClass.dat* should be added to the list. Profile Management 1909 and newer automatically add Appdata\Local\Microsoft\Windows\UsrClass.dat* to the Files to Synchronize list.

    • You can disable the automatic inclusion of these folders by enable the setting Disable automatic configuration located under Advanced Settings.
  6. Then click OK twice to return to the Group Policy Editor.

Folders to mirror

  1. Under File System, in the Synchronization node, enable the setting Folders to mirror.
  2. Enable the setting, and click Show.

  3. Add the following:
    AppData\Roaming\Microsoft\Windows\Cookies
    AppData\Local\Microsoft\Windows\INetCookies
    AppData\Local\Microsoft\Windows\WebCache
    AppData\Local\TileDataLayer
    AppData\Local\Microsoft\Vault
    AppData\Local\Microsoft\Windows\Caches
    AppData\Local\Packages
    AppData\Local\Google\Chrome\User Data\Default
  4. Click OK.
  5. Profile Management 2106 and newer have a setting called Accelerate folder mirroring that stores the mirrored folders in a VHDX file instead of copying back and forth at login and logoff.

    • UPM creates a folder named MirrorFolders in the user’s UPM path and creates a couple thin-provisioned VHDX files in that path.
    • Disk Management shows that the mounted Diff disk has a 50 GB capacity limit.
    • Logging into multiple sessions concurrently results in multiple Diff disks.
    • If the file server is unavailable then unpredictable behavior occurs. After the file server is back up, the session continues to misbehave and won’t recover until users log off and log back on. Plan for file server high availability that can handle always-open VHDX files. DFS won’t help you.
    • Profile Management 2109 and newer can Automatically reattach detached VHDX disks.
  6. According to CTX213190 Configure UPM to save password in Internet Explorer, you’ll also need a User Configuration > Preferences > Windows Settings > Folders item to create the %localappdata%\Microsoft\Vault folder.

Profile Container

Profile Management 2407 and newer have new Container features, including:

  • In-session profile container failover among multiple user stores – Citrix Docs
  • Registry exclusion and inclusion support extended to container-based profile solution – Citrix Docs
  • Reset container-based profiles without the risk of losing user data – Citrix Docs
  • Collects statistical data on VHD compaction actions and provides it to Workspace Environment Management (WEM) for reporting

To configure profile container:

  1. Profile Management 1903 and newer have a Profile container setting.
    • In Profile Management 2009 and newer, the Profile container setting moved to its own node.
    • In older versions of Profile Management, Profile Container is located under File System | Synchronization.
  2. Click the Show button to specify profile paths that should be placed in the mounted file share profile disk (VHDX file) instead of copied back and forth at logon and logoff.
    • In Profile Management 2009 and newer, you can specify * to put the entire profile in the Container. Then use the other two settings to exclude folders from the Container. See Profile Container at Citrix Docs.

    • In Profile Management older than version 2009, this setting is for large cache files (e.g. Citrix Files cache) and is not intended for the entire profile.
  3. Profile Management 2103 and newer have a setting to Enable local caching for profile containers. Combine this with Profile Streaming for faster logons. The entire profile should be stored in the profile container.
  4. Profile Management 2311 and newer can Log off users when profile container is not available during logon.
  5. On the left, under Advanced Settings, Profile Management 2103 and newer have a setting to Enable multi-session write-back for profile containers. This setting applies to both UPM Profile Container and Microsoft FSLogix Profile Container. If the same user launches multiple sessions on different machines, changes made in each session are synchronized and saved to the user’s profile container disk.
  6. Profile Management 2109 and newer can Automatically reattach detached VHDX disks.
  7. Citrix recommends using Profile Container for Microsoft Teams.
  8. See CTX247569 Citrix Profile Management: Troubleshooting Profile Containers.
  9. Profile Management 2209 and newer can replicate the profile container to multiple shares. 

    • In Profile Management 2407 and newer, for the container-based profile solution, the Enable in-session policy container failover among user stores policy is automatically enabled to ensure profile redundancy for the entire session.
  10. Profile Management 2308 and newer can auto-expansion the container.

    • Advanced settings node has additional auto-expansion settings.
  11. On the CVAD 2311 and newer ISO, at \x64\ProfileManagement\Tools is a script that can migrate profiles from FSLogix to Citrix Profile Container. Prior to CVAD 2311 the Tools folder is not on the CVAD ISO but is instead included with the separately downloaded Profile Management. See Migrate user profiles at Citrix Docs.

Registry Exclusions

  1. On the left, under Profile Management, click Registry.
  2. On the right, open Enable Default Exclusion List.
  3. Enable the setting. You can use the checkboxes to control which registry keys you don’t want to exclude.
  4. According to Citrix CTX221380 Occasionally, File Type Association (FTA) Fails to Roam with Profile Management 5.7 on Windows 10 and Windows Server 2016, Software\Microsoft\Speech_OneCore should be unchecked. Click OK.
  5. The setting Exclusion List under Registry lets you exclude registry keys from the roaming profile.
  6. Nick Panaccio in the comments says that if Office with ADFS constantly prompts for login, then you should exclude the following:
    Software\Microsoft\Office\16.0\Common\Identity
  7. Nick Panaccio at IE11 Enterprise Mode and UPM at Citrix Discussions has a list of registry exclusions for IE in Enterprise Mode.
    Software\Microsoft\Windows\CurrentVersion\Internet Settings\5.0\Cache\Extensible Cache\EmieUserList
    Software\Microsoft\Windows\CurrentVersion\Internet Settings\5.0\Cache\Extensible Cache\EmieSiteList
  8. Click OK when done.
  9. For the NTUSER.DAT backup setting, which is disabled by default, you can enable it to provide some resiliency against profile corruption.

Log Settings

  1. In the Log Settings node, enable the Enable logging setting. This will make it easy to troubleshoot problems with Profile Management. The logfile is located in C:\Windows\System32\LogFiles\UserProfileManager.
  2. Edit the Log settings setting.
  3. Enable the setting and check the boxes next to Logon and Logoff. Click OK.
  4. If your VDA is a Provisioning Services Target Device and/or non-persistent, consider moving the log file to the local persistent disk (e.g. D:\Logs), or to a central share. If a central share, the VDA computer accounts (e.g. Domain Computers) will need Modify permission to the log file path. To change the log file path, edit the Path to log file setting.


  5. CTX123005 Citrix UPM Log Parser
  6. CTX200674 How To: Review Profile Management Log Files using Microsoft Excel 

Profile Streaming

  1. Go to the Profile handling node under Profile Management.
  2. Profile Management 1909 and newer have a setting called Automatic migration of existing application profiles under Profile Handling that can migrate existing profiles when you upgrade the version of Windows 10. This setting requires the !CTX_OSNAME! variable in your profile store path.
  3. Enable the setting Delete locally cached profiles at logoff. Note: this might cause problems in Windows 10.

    Helge Klein has a tool to delete locally cached profiles on a session host. http://helgeklein.com/free-tools/delprof2-user-profile-deletion-tool/. This tool should only be needed if profiles are not deleting properly.
  4. For Windows 10/2016 machines, CTX216097 Unable to Delete NTUSER.DAT* Files When a User Logs off recommends setting Delay before deleting cached profiles to 40 seconds.

  5. Enable the setting Migration of existing profiles and set it to Local and Roaming.  Citrix CTX221564 UPM doesn’t migrate local user profile since version 5.4.1.

  6. Enable the setting Local profile conflict handling, and set it to Delete local profile. Note: this might cause problems on Windows 10.

  7. For fastest logons, Citrix recommends Profile streaming + Enable profile streaming for folders + Accelerate folder mirroring all enabled, or only enable Profile Container for the entire user profile. More details at CTX463658 Reduce logon time with Profile Management.
    1. Under Profile Management > Streamed user profiles is Profile streaming. Enable this setting to speed up logons.
    2. Profile Management 2103 and newer have a setting to Enable profile streaming for folders, which should speed up logons. In Profile Management 2402 and newer, profile streaming for folders is enabled by default.
    3. Profile Management 2106 and newer have a setting under File System > Synchronization called Accelerate folder mirroring that stores the mirrored folders in a VHDX file instead of copying back and forth at login and logoff.
    4. Profile Management 2206 adds Enable profile streaming for pending area. Enable this setting if users run multiple Citrix sessions concurrently and you have Active Write Back enabled.
  8. Profile Management 7.16 and newer have XenApp Optimization (aka Citrix Virtual Apps Optimization) feature, which uses Microsoft UE-V templates to define specific settings that should be saved and restored at logoff and logon. See George Spiers XenApp Optimization (new in CPM 7.16+) for details.

  9. After modifying the GPO, use Group Policy Management Console to update the VDAs.
  10. Or run gpupdate /force on the VDAs, or wait 90 minutes.

App Access Control

Profile Management 2303 and newer support app access control. This is similar to FSLogix App Masking.

Citrix WEM Tool Hub has a GUI-based Rule Generator.

  1. In Workspace Environment Management Web Console, various places in the console have a link to download the WEM Tool Hub. For example, in a Configuration Set > Printers, click Add from print server.
  2. Extract the WEM Tool Hub and run Citrix.WEM.AdminToolHub.exe.
  3. Click Rule Generator for App Access Control.
  4. Click Create app rule. WEM 2411 adds Redirect as an option. Otherwise choose Hide.
  5. Redirect lets you redirect Files, Folders, Registry keys or Registry values.
  6. If Hide:
    1. Click Scan to select an app installed on the local machine.
    2. The tool scans the selected app and automatically adds rules for the app. Click Add when done.
    3. Give the app a name and click Next.
    4. Assign the rule to users, computers, or processes. 2411 and newer let you specify Exclusions. Click Done.
  7. Select the app rules and click Generate raw data.
  8. Click Save to file.
  9. Use WEM or Group Policy to push the string to the VDAs. App Access Control is currently a preview feature. Enable it in Citrix Cloud > Workspace Environment Management > Manage > Web Console > Home page > Preview features.

  10. Then edit a Configuration Set. Go to Profiles > Profile Management Settings and find App access control. Browse to the .rule file saved earlier.

If you don’t have access to WEM Cloud, then the PowerShell Rule Generator is on the CVAD 2311 or newer ISO under \x64\ProfileManagement\Tools. Prior to CVAD 2311, the Tools folder is in the downloaded standalone Profile Management.

  1. The CPM_App_Access_Control_Config.ps1 PowerShell script is in the Tools folder.
  2. The Rule Generator script lists all locally installed apps and asks you choose one.
  3. The tool auto-generates some rules for the app and asks you to edit the rules or go to the next step to manage assignments.
  4. You can assign groups that can view the app. When done, press 4 to generate the rules for deployment.
  5. The script can push the rules to a GPO. Or you can press 3 to generate the string that you then must configure yourself in the GPO.
  6. The GPO setting is at Computer Configuration | Policies | Administrative Templates | Citrix Components | Profile Management | App Access Control. Enable the setting named App access control and paste the string that the Rule Generator provided. 

Also see CTP James Rankin QuickPost – Citrix UPM App Access Control

Mandatory Profile – Citrix Method

Profile Management 5.0 and newer has a mandatory profile feature. Alternatively, use the Microsoft method. Also see CTP James Rankin How to create mandatory profiles in Windows 10 Creators Update (1703).

  1. Create a file share (e.g. \\fs01\profile). Give Read permission to Users and Full Control to Administrators.
  2. Login to the VDA machine as a template account. Do any desired customizations. Logoff.
  3. Make sure you are viewing hidden files and system files.
  4.  
  5. Copy C:\Users\%username% to your fileshare. Name the folder Mandatory or something like that. Citrix Profile Management does not need .v2 or .v4 or .v6 on the end.

    1. You can copy C:\Users\Default instead of copying a template user. If so, remove the Hidden attribute. If you use Default as your mandatory, be aware that Active Setup will run every time a user logs in.
  6. Open the AppData folder and delete the Local and LocalLow folders.
  7. Java settings are stored in LocalLow so you might want to leave them in the mandatory profile. The only Java files you need are the deployment.properties file, the exception.sites file, and the security/trusted.certs file. Delete the Java cache, tmp and logs.
  8. Open regedit.exe.
  9. Click HKEY_LOCAL_MACHINE to highlight it.
  10. Open the File menu and click Load Hive.
  11. Browse to the mandatory profile and open NTUSER.DAT. Note: Citrix Profile Management does not use NTUSER.MAN and instead the file must be NTUSER.DAT.
  12. Name it a or similar.
  13. Go to HKLM\a, right-click it, and click Permissions.
  14. Add Authenticated Users and give it Full Control. Click OK.
  15. With the hive still loaded, you can do some cleanup in the registry keys. See http://www.robinhobo.com/how-to-create-a-mandatory-profile-with-folder-redirections/ and http://appsensebigot.blogspot.ru/2014/10/create-windows-mandatory-profiles-in.html?m=1 for some suggestions.
  16. Citrix CTX212784 Slow User Logon When Using Mandatory Profiles – set HKCU\a\Software\Citrix\WFSHELL\SpecialFoldersIntialized (DWORD) = 1
  17. Highlight HKLM\a.
  18. Open the File menu, and click Unload Hive.
  19. Go back to the file share and delete the NTUSER.DAT log files.
  20. Create/Edit a GPO that appplies to the VDAs. Make sure the Citrix Profile Management policy template is loaded.
  21. Go to Computer Configuration > Policies > Administrative Templates > Citrix Components > Profile Management > Profile handling. Edit the setting Template profile.
  22. Enable the setting and enter the path to the Mandatory profile.
  23. Check all three boxes. Then click OK.

Redirected Profile Folders

  1. Make sure loopback processing is enabled on your VDAs.
  2. Edit a GPO that applies to all VDA users, including Administrators.
  3. Go to User Configuration\Policies\Windows Settings\Folder Redirection. Right-click Documents, and click Properties.
  4. In the Setting drop down, select Basic.
  5. In the Target folder location drop down, select Redirect to the user’s home directory.
  6. Switch to the Settings tab.
  7. On the Settings tab, uncheck the box next to Grant the user exclusive rights. Click OK. Note: Move the contents to the new location might cause issues in some deployments.
  8. Click Yes to acknowledge this message.
  9. Right-click Desktop and click Properties.
  10. Change the Setting drop-down to Basic.
  11. Change the Target folder location to Redirect to the following location.
  12. In the Root Path box, enter %HOMESHARE%%HOMEPATH%\Desktop. It is critical that this is a UNC path and not a mapped drive. Also, since we’re using home directory variables, all users must have home directories defined in Active Directory.
  13. Switch to the Settings tab.
  14. Uncheck the box next to Grant the user exclusive rights to Desktop and click OK.
  15. Click Yes when prompted that the target is not a UNC path. You get this error because of the variable. It doesn’t affect operations.
  16. Repeat for the following folders:
    • Documents = Redirect to the User’s Home Directory
    • Desktop = %HOMESHARE%%HOMEPATH%\Desktop
    • Favorites = %HOMESHARE%%HOMEPATH%\Windows\Favorites
    • Downloads = %HOMESHARE%%HOMEPATH%\Downloads
  17. Redirect the following folders but set them to Follow the Documents folder.
    • Pictures
    • Music
    • Videos

Folders not redirected will be synchronized by Citrix Profile Management.

Verify Profile Management

  1. Once Profile Management is configured, login to a Virtual Delivery Agent and run gpupdate /force.
  2. Logoff and log back in.
  3. Go to C:\Windows\System32\LogFiles\UserProfileManager and open the pm.log file. Look in the log for logon and logoff events.

Profile Management Troubleshooting

UPM Troubleshooter

Citrix Blog Post – UPM Troubleshooter: UPM Troubleshooter is a Windows-based standalone application that examines the live User Profile Management-enabled system in a single click, gives Profile Management Configurations, information on the Citrix products installed, facility to collect and send the logs along with system utilities dashboard to analyze the issue in an effective, simplified, quick and easier manner. See the blog post for more details.

Profile Management Configuration Check Tool

UPMConfigCheck is a PowerShell script that examines a live Profile management system and determines whether it is optimally configured. UPMConfigCheck is designed to verify that Profile management has been configured optimally for the environment in which it is being run, taking into account:

  • Hypervisor Detection– The presence or absence of supported hypervisors (for example, Citrix XenServer, VMware vSphere, or Microsoft Hyper-V)
  • Provisioning Detection– The presence or absence of a supported machine-provisioning solution (for example, Machine Creation Services or Provisioning Services)
  • XenApp or XenDesktop– Whether it is running in a XenApp or a XenDesktop environment
  • User Store – Determines that the expanded Path to User Store exists.
  • WinLogon Hooking Test – Verifies that Profile management is correctly hooked into WinLogon processing. This test is for Windows Vista, Windows 7, Windows Server 2008, Windows Server 2008 R2 and requires the user running the Configuration Check Tool to have permission to access the relevant registry keys, or an error may be returned.
  • Verify Personal vDisk enabled / disabled – Whether the Personal vDisk feature of XenDesktop is enabled
  • Miscellaneous – Other factors that it is able to determine through registry or WMI queries, such as whether the computer running Profile management is a laptop

Profile Size

Sacha Thomet at Monitor you Profile directories has a script that displays the size of profiles in a profile share.

Log Parser

CTX123005 Citrix UPM Log Parser

View Log Files using Excel

CTX200674 How To: Review Profile Management Log Files using Microsoft Excel 

NetScaler Insight Center

Last Modified: Nov 6, 2020 @ 7:12 am

This article is for Insight Center 11.0 and older. Consider Insight Center 11.1, which works with older NetScaler appliances.

Navigation

💡 = Recently Updated

Planning

Note: HDX Insight only works with Session Reliability on NetScaler 10.5 build 54 or newer. Older builds, including NetScaler 10.1, do not support Session Reliability with HDX Insight. Read the release notes for your NetScaler firmware build to see the latest known issues with AppFlow, Session Reliability, and High Availability.

Requirements for HDX Insight:

  • Your NetScaler appliance must be running Enterprise Edition or Platinum Edition.
  • NetScaler must be 10.1 or newer. Insight Center 11 does work with NetScaler 10.5.
  • HDX Insight works with the following Receivers:
    • Receiver for Windows must be 3.4 or newer.
    • Receiver for Mac must be 11.8 or newer.
    • Receiver for Linux must be 13 or newer.
    • Notice no mobile Receivers. See the Citrix Receiver Feature Matrix for the latest details.
  • ICA traffic must flow through a NetScaler appliance:


For ICA round trip time calculations, in a Citrix Policy, enable the following settings:

  • ICA > End User Monitoring > ICA Round Trip Calculation
  • ICA > End User Monitoring > ICA Round Trip Calculation Interval
  • ICA > End User Monitoring > ICA Round Trip Calculation for Idle Connections

Citrix CTX204274 How ICA RTT is calculated on NetScaler Insight: ICA RTT constitutes the actual application delay. ICA_RTT = 1 + 2 + 3 + 4 +5 +6:  💡

  1. Client OS introduced delay
  2. Client to NS introduced network delay (Wan Latency)
  3. NS introduced delay in processing client to NS traffic (Client Side Device Latency)
  4. NS introduced delay in processing NS to Server (XA/XD) traffic (Server Side Device Latency)
  5. NS to Server network delay (DC Latency)
  6. Server (XA/XD) OS introduced delay (Host Delay)


For Web Insight, HTML Injection for NetScaler 10.0 is only available in Platinum Edition. In NetScaler 10.1, HTML Injection is available in all editions.

The version/build of Insight Center must be the same or newer than the version/build of the NetScaler appliances.

Insight Center 11 lets you scale the deployment by building multiple nodes. After building the first Insight Center Server, you can go to Configuration > NetScaler Insight Center > Insight Deployment Method to enter some planning data (e.g. # of concurrent ICA connections) and it will tell you the number of Insight Center nodes you should build. The number of nodes is based on the VM specs shown at the top of the page.

In this example, it recommends two Database Nodes and two Connectors. Agents are only used for HTTP traffic. There’s more information at NetScaler Insight Center Deployment Management at docs.citrix.com.

Import Appliance

You can use either the vSphere Client or the vSphere Web Client to import the appliance. In vSphere Client, open the File menu and click Deploy OVF Template. vSphere Web Client instructions are shown below.

You might see this operating system error when not using the vSphere Web Client. Click Yes and proceed. It seems to work.

  1. Download Insight Center for ESX and then extract the .zip file.
  2. In vSphere Web Client, navigate to the vCenter object. Open the Actions menu and click Deploy OVF Template.
  3. In the Select source page, if you see a message regarding the Client Integration Plug-in, download the installer, run it, and then return to this wizard.
  4. In the Select source page, select Local file and browse to the NetScaler Insight .ovf file. Click Next.
  5. In the Review details page, click Next.
  6. In the Select name and folder page, enter a name for the virtual machine and select an inventory folder. Then click Next.
  7. In the Select a resource page, select a cluster or resource pool and click Next.
  8. In the Select storage page, change it to Thin Provision.
  9. Select a datastore and click Next.
  10. In the Setup networks page, choose a valid port group and click Finish.
  11. In the Ready to Complete page, click Finish.
  12. View the progress of the import in the Recent Tasks pane at the top-right of the window.
  13. After the appliance is imported, power it on.

IP Configuration and Multi-Node

  1. Open the console of the virtual machine and configure an IP address.
  2. Insight Center 11 lets you configure a DNS server.
  3. Enter 6 when done.
  4. When prompted for Insight Deployment Type, enter 1 for NetScaler Insight Server. The first appliance must always be NetScaler Insight Server.
  5. Enter Yes to reboot.
  6. Subsequent nodes can be Database Node, Connector node, etc. If you choose one of the other node types it asks you for the IP address of the NetScaler Insight Server node.
  7. Once you’ve built all of the nodes, in the NetScaler Insight Server webpage, go to NetScaler Insight Center > Insight Deployment Management.
  8. Scroll down and click Get.
  9. It should show you the nodes. Then click Deploy.

  10. After it reboots you’ll see the performance of each node.
  11. Since the database is on a separate node, you might want to enable database caching. Go to System > Change Database Cache Settings.
  12. Check the box next to Enable Database Cache.

Initial Web Configuration

  1. Point your browser to the Insight IP address and login as nsroot/nsroot.
  2. Click Get Started

  3. Enter the IP address and credentials of a NetScaler appliance and click Add.

    Note: if your NetScaler appliances require https for management communication then this won’t work. Click Cancel. On the Configuration tab, click System. On the right, in the left column, click Change System Settings.
    Change the drop-down to https and click OK.
    On the left, click Inventory. On the right, click Add.
    Enter the NSIP and nsroot credentials again. This time it should work.
  4. At the top of the page, if desired, check the box next to Enable Geo data collection for Web and HDX Insight.
  5. With Load Balancing selected in the View list, right-click your StoreFront load balancer and click Enable AppFlow.

  6. Type in true and click OK.
  7. Note: if your StoreFront Load Balancing vServer uses Service Groups, you might need to enable AppFlow logging on the Service Group. In the NetScaler GUI, edit the Service Group. In the Basic Settings section, check the box next to AppFlow Logging.
  8. Back in Insight Center, use the View drop-down to select VPN.
  9. Right-click a NetScaler Gateway Virtual Server and click Enable AppFlow.
  10. In the Select Expression drop-down, select true.
  11. For Export Option select ICA and HTTP and click OK. The HTTP option is for Gateway Insight.
  12. The TCP option is for the second appliance in double-hop ICA. If you need double-hop then you’ll also need to run set appflow param -connectionChaining ENABLED on both appliances. See Enabling Data Collection for NetScaler Gateway Appliances Deployed in Double-Hop Mode at docs.citrix.com for more information.
  13. New in NetScaler 11 is the ability to use SOCKS proxy (Cache Redirection) for ICA traffic without requiring users to use NetScaler Gateway and without making any routing changes. You configure this on the NetScaler appliance. See Enabling Data Collection for Monitoring NetScaler ADCs Deployed in LAN User Mode at docs.citrix.com for more information.
  14. If you want to add more appliances, click the Configuration tab. The Inventory node will be selected by default.
  15. On the right, click Add.

Citrix Blog PostNetScaler Insight Center – Tips, Troubleshooting and Upgrade

Nsroot Password

  1. On the Configuration tab, expand System, expand User Administration and click Users.
  2. On the right, highlight the nsroot account and click Edit.
  3. Enter a new password.
  4. You can also specify a session timeout. Click OK.

Management Certificate

The certificate to upload must already be in PEM format. If you have a .pfx, you must convert it to PEM (separate certificate and key files). You can use NetScaler to convert the .pfx and then download the converted certificate from the appliance.

  1. On the left, switch to the System node.
  2. In the right pane, in the left column, click Install SSL Certificate.
  3. Browse to the PEM format certificate and key files. If the keyfile is encyrpted, enter the password. Click OK.
  4. Click Yes to reboot the system.

System Configuration

  1. Click the Configuration tab on the top of the page.
  2. On the left, click the System node.
  3. On the right, modify settings (e.g.Time Zone) as desired.

  4. To set the hostname, click Change Host name.

  5. To change the Session Timeout, click Change System Settings.

  6. The ICA Session Timeout can be configured by clicking the link. Two minutes of non-existent traffic must occur before the session is considered idle. Then this idle timer starts. See Managing ICA Sessions at docs.citrix.com for more information

  7. On the left, expand System and click NTP Servers.
  8. On the right, click Add.

  9. After adding NTP servers, click NTP Synchronization.
  10. Check the box next to Enable NTP Sync and click OK.
  11. On the left, expand Auditing and click Syslog Servers.

  12. On the right, click Add.
  13. Enter the syslog server IP address and select Log Levels. Click Create.
  14. In the Action menu you can click Syslog Parameters to change the timezone and date format.

Email Notifications

  1. On the left, expand System, expand Notifications and click Email.
  2. On the right, on the Email Servers tab, click Add.
  3. Enter the SMTP server address and click Create.
  4. On the right, switch to the Email Distribution List tab and click Add.
  5. Enter an address for a destination distribution list and click Create.

Authentication

  1. On the left, expand System¸ expand Authentication and click LDAP.
  2. On the right, click Add.
  3. This is configured identically to NetScaler. Enter a Load Balancing VIP for LDAP. Change the Security Type to SSL and Port to 636. Scroll down.
  4. Enter the bind account.
  5. Check the box for Enable Change Password.
  6. Click Retrieve Attributes and scroll down.
  7. For Server Logon Attribute select sAMAccountName.
  8. For Group Attribute select memberOf.
  9. For Sub Attribute Name select cn.
  10. To prevent unauthorized users from logging in, configure a Search Filter. Scroll down.
  11. If desired configure Nested Group Extraction.
  12. Click Create.
  13. On the left, expand User Administration and click Groups.
  14. On the right, click Add.
  15. Enter the case sensitive name of your NetScaler Admins group.
  16. Select the admin Permission.
  17. If desired, configure a Session Timeout. Click Create.

  18. On the left, under System, click User Administration.
  19. On the right click User Lockout Configuration.
  20. If desired, check the box next to Enable User Lockout and configure the maximum logon attempts. Click OK.
  21. On the left, under System, click Authentication.
  22. On the right, click Authentication Configuration.
  23. Change the Server Type to LDAP.
  24. Select the LDAP server you created and click OK.

Thresholds

  1. Go to NetScaler Insight Center > Thresholds.
  2. On the right, click Add.
  3. Enter a name.
  4. In the Entity field select a category of alerts. What you choose here determines what’s available in the Rule section.
  5. Check the box to Notify through Email.
  6. In the Rule section, select a rule and enter threshold values. Click Create.

Geo Map

  1. Download the Maxmind database from http://geolite.maxmind.com/download/geoip/database/GeoLiteCity.dat.gz.
  2. Extract the .gz file.
  3. On the Configuration tab, expand NetScaler Insight Center and click Geo Database Files.
  4. On the right, click the Action drop-down and click Upload.
  5. Browse to the extracted GeoLiteCity.dat file and click Upload.
  6. Click the Inventory node.
  7. Click the IP address for a device in the inventory.
  8. Check the box to Enable Geo data collection for Web and HDX Insight.
  9. You can define Geo locations for internal subnets. Go to NetScaler Insight Center > Private IP Block.
  10. On the right, click Add.
  11. Enter a name.
  12. Enter the starting and ending IP address.
  13. Select a Geo Location. Note that these are not necessarily alphabetical.
  14. Click Create.

Director Integration

Integrating Insight Center with Director requires XenApp/XenDesktop to be licensed for Platinum Edition. The integration adds Network tabs to the Trends and Machine Details views.

If using HTTPS to connect to Insight Center then the Insight Center certificate must be valid and trusted by both the Director Server and the Director user’s browser.

To link Citrix Director with NetScaler HDX Insight, on the Director server run C:\inetpub\wwwroot\Director\tools\DirectorConfig.exe /confignetscaler. Do this on both Director servers.

Use Insight Center

HDX Insight

HDX Insight Dashboard displays ICA session details including the following:

  • WAN Latency
  • DC Latency
  • RTT (round trip time)
  • Retransmits
  • Application Launch Duration
  • Client Type/Version
  • Bandwidth
  • Licenses in use

HDX Insight can also display Geo Maps. Configure Insight Center with Private IP Blocks.

More info at HDX Insight Reports and Use Cases: HDX Insight at docs.citrix.com

Gateway Insight

Insight Center 11.0 build 65 adds a new Gateway Insight dashboard.

This feature displays the following details:

  • Gateway connection failures due to failed EPA scans, failed authentication, failed SSON, or failed application launches.
  • Bandwidth and Bytes Consumed for ICA and other applications accessed through Gateway.
  • # of users
  • Session Modes (clientless, VPN, ICA)
  • Client Operating Systems
  • Client Browsers

More details at Gateway Insight at docs.citrix.com.

Security Insight

The new Security Insight dashboard in 11.0 build 65 and newer uses data from Application Firewall to display Threat Index (criticality of attack), Safety Index (how securely NetScaler is configured), and Actionable Information. More info at Security Insight at docs.citrix.com.
localized image

Troubleshooting

Citrix CTX215130 HDX Insight Diagnostics and Troubleshooting Guide: Syslog messages; Error counters; Troubleshooting checklist, Logs

Citrix Blog PostNetScaler Insight Center – Tips, Troubleshooting and Upgrade

See docs.citrix.com Troubleshooting Tips. Here are sample issues covered in docs.citrix.com:

  • Can’t see records on Insight Center dashboard
  • ICA RTT metrics are incorrect
  • Can’t add NetScaler appliance to inventory
  • Geo maps not displaying

Upgrade Insight Center

  1. Download the latest Upgrade Pack for Insight Center.
  2. Login to Insight Center.
  3. If you are running Insight Center 10.5 or older, on the Configuration tab, go to NetScaler Insight Center > Software Images and upload the file. If running Insight Center 11.0 or newer, you can skip this step.
  4. On the Configuration tab, on the left, click the System node.
  5. On the right, in the right pane, click Upgrade NetScaler Insight Center.
  6. Browse to the build-analytics-11.0.tgz Software Image Upgrade Pack and click OK.
  7. Click Yes to reboot the appliance.

  8. After it reboots, login. The new firmware version will be displayed in the top right corner.

Citrix Command Center

Last Modified: Nov 6, 2020 @ 7:12 am

Navigation

This page contains the following topics:

💡 = Recently Updated

Command Center Overview

Command Center can be used to monitor, alert, and report on the following devices:

  • NetScaler
  • NetScaler VPX
  • NetScaler SDX
  • NetScaler Gateway Enterprise Edition
  • CloudBridge
  • CloudBridge VPX
  • Citrix Repeater

Command Center is free for all editions of NetScaler so there’s no excuse to not install it.

Citrix whitepaper – Citrix Command Center – Deployment Sizing Guide: database sizing for scalar counters, vector counters, and Syslog.

SQL Express

If using SQL Express to store the Command Center database, do the following to enable TCP/IP:

  1. When downloading SQL Server 2012 Express, either select the option With Tools or download SQL Server Management Studio and install it separately.
  2. When installing SQL Express, feel free to use the default instance instead of a named instance.
  3. In SQL Server Configuration Manager, expand SQL Server Network Configuration and click the Protocols node.
  4. On the right, right-click TCP/IP and enable it. Then double-click TCP/IP.
  5. On the IP Addresses tab, scroll all the way down and in the IPAll section, remove any TCP Dynamic Ports and instead enter a static TCP Port. 1433 is the typical default port.
  6. On the left, click SQL Server Services.
  7. On the right, right-click SQL Server and click Restart.

Create SQL Database and SQL Account

SQL 2005, SQL 2008, and SQL 2012 are supported.

  1. In SQL Server Management Studio, go to the Properties of the SQL server and ensure that SQL authentication is enabled.

  2. Create a database and call it CitrixCommandCenter or similar. Configure the Recovery model as desired.


  3. Create a SQL Login (SQL Server authentication) for Command Center. Set the default database to the Command Center database.

  4. Add the SQL account to the db_owner database role in the Command Center database.

Install Command Center

  1. Command Center is supported on Windows Server 2008 R2, and Windows Server 2012 R2.
  2. On the Command Center server, run the downloaded Command Center 5.2.46.7 CC_Setup_5.2_46_7.exe.  💡
  3. If the installer refuses to launch without error then you’ll need to uninstall all previously installed Java. Command Center comes with its own Java.
  4. In the Introduction page, click Next.
  5. In the License Agreement page, select I accept the terms and click Next.
  6. In the Choose Install Folder page, click Next.
  7. In the Choose Installation Type page, select Typical and click Next.
  8. In the Database Settings page, change the selection to MSSQL and fill in the details. Notice that SQL 2012 and SQL 2014 are now supported. Then click Test Connection.
  9. Click OK to acknowledge that the connection is successful and then click Next.
  10. In the Security Settings page, make your selection and click Next.
  11. In the Pre-Installation Summary page, click Install.
  12. In the Install Complete page, notice the URL. Click Done.

Windows Firewall

Windows Firewall must be configured to allow UDP 162 for SNMP Traps, UDP 514 for SYSLOG, and 8443 for the Command Center management console.


Weak Ciphers

  1. Point your browser to https://<Server_Name>:8443. If you see a message about weak ephemeral Diffie-Hellman then you’ll need to follow Citrix CTX202036 Error:”ssl_error_weak_server_ephemeral_dh_key” When Launching Citrix Command Center Website.
  2. Go to C:\Program Files (x86)\Citrix\Citrix Command Center\apache\tomcat\conf\backup and edit the file server.xml. You want the one in the backup folder.
  3. Near line 102, change the ciphers to the ones listed in the article.
  4. Go to C:\Program Files (x86)\Citrix\Citrix Command Center\conf and edit the file transportProvider.conf.
  5. Near line 45, change the ciphers to the ones listed in the article.
  6. Go to Services and restart the Citrix Command Center service.

Welcome Wizard

  1. Go to https://<Server_Name>:8443 and login as root and public.
  2. In the Change Command Center User Password section, enter a new root password and click Save.
  3. In the Add Device section, enter the NSIP of a NetScaler device. For a High Availability pair, only enter the NSIP of the primary device.
  4. Click the plus icon next to Device Profile.
  5. Give the Device Profile a name. The device profile contains the nsroot password so name the profile something that reflects the team that manages the devices.
  6. In the Device Login section, enter nsroot as the User Name and the password configured on the NetScaler appliances. Scroll down.
  7. In the SNMP section, enter a SNMP community name. Command Center will configure this on the appliances. Click Create.
  8. Back in the Add Device section, click Continue.
  9. Command Center will then begin discovery for the device. If Discovery fails, see CTX200377 – Command Center is Unable to Discover NetScaler
  10. After discovery is complete, click Continue.
  11. Don’t click Done yet.
  12. On the right, in the Advanced column, click Mail Server Settings.
  13. Enter the mail server information and click Save.
  14. On the right, in the Advanced column, click Disk Management.
  15. Adjust the grooming settings as desired and click Save.
  16. Then click Done.

Administration Configuration

  1. Switch to the Administration tab.
  2. Click Settings on the left. On the right, click Inventory Settings.
  3. In the Configure Inventory Settings window, decide if you want to Archive on “Save Config” trap. Click OK when done.
  4. Click Server Settings.
  5. Command Center defaults to displaying devices based on their IP address. This can be changed to Host Name. Click OK when done.
  6. In the Settings node, click Email Server Settings.
  7. Fill out the mail server information so you can receive email alerts and click OK.
  8. In the Settings section is Access Settings.
  9. You can change the Session Timeout.
  10. On the left, click Database Management. On the right, notice the Purge Settings links. Use those links to control the size of the database.
  11. In the Database Management node, click Database Monitor Settings.
  12. Specify a database size threshold. If your database automatically grows, then it’s probably best to configure an absolute database size instead of a size percentage.
  13. When the Threshold is reached, you can configure it to automatically purge data.
  14. You can also receive an email notification when the size limit is reached. Click OK when done.
  15. On the left, expand Authentication and click LDAP.
  16. On the right, click Add.
  17. Enter the IP Address of load balanced LDAP (or one Domain Controller).
  18. Change the Security Type to SSL.
  19. To support SSL and/or TLS, you need to install the LDAP root certificate on Command Center. Copy the root cert to C:\Program Files (x86)\Citrix\Citrix Command Center\Certs.
  20. Open an elevated command prompt and cd to C:\Program Files (x86)\Citrix\Citrix Command Center\bin.
  21. Run importLDAPSCertificate.bat. The first parameter is the name of the root certificate file. The second parameter is commandcenter, which is the password to the trust store.
  22. After importing the root cert, restart the Citrix Command Center service.
  23. Back in Command Center adding an LDAP server, enter a Base DN and Bind DN.
  24. Check the box next to Enable Group Extraction. This will cause more fields to appear.
  25. Enter the fields shown below. Use the question mark to see examples. Click Create.
  26. On the left, click the Authentication node. On the right, click Authentication Settings.
  27. Change the Authentication Server to External.
  28. Move your LDAP server to the right by clicking the plus icon or the right-arrow icon.
  29. Ensure Enable fallback local authentication is enabled and click OK..
  30. On the left, expand Security, and click Groups. On the right, click Add.
  31. Type in the case sensitive group name.
  32. Use the checkboxes to grant your desired permissions and click OK.
  33. Once the group is added to Command Center, you can right-click it and click Advanced Settings to restrict the entities that are accessible to the user.

  34. The Apply on bound entities also checkbox lets the group see the entities that are bound to the restricted object (e.g. services bound to a Virtual Server).
  35. On the left, expand Security and click Syslog Servers. On the right, click Add.
  36. Enter information for your syslog server and click Add.
  37. On the right, click Syslog Parameters.
  38. Set your desired parameters and click Modify.
  39. On the left, under Security, cilck SNMP Agent Configuration. On the right, click Add.
  40. Enter your SNMP information and click Create.

Command Center Certificate

  1. Use IIS or the certificates snap-in to create a certificate that matches the FQDN of the Command Center server.
  2. Export the certificate including private key to a .pfx file.
  3. In the Command Center console, on the Administration tab, click Tools on the left.
  4. On the right, click Install Certificate.
  5. Click Choose File to and browse to the PFX file.
  6. Enter the PFX password and click OK.
  7. Click OK

  8. Restart the Citrix Command Center service.

Discover Devices

Command Center to/from appliance communication:

  • Command Center uses SNMP and SSH to communicate with an appliance.
  • Appliances use SNMP traps to communicate with Command Center.
  • After Command Center discovers an appliance, it will configure the appliance with the correct SNMP settings. You can also configure the SNMP Traps on the appliance manually.
  • SFTP is used for file transfer.
  • Devices can be configured to send Syslog to Command Center.

The Command Center server supports two types of devices:

  • Standalone: A standalone device functions independently and is not configured in an HA setup.
  • HA pair: This represents a pair of devices configured in an HA setup. The primary device in an HA setup processes the traffic. The secondary device monitors the primary and takes over the functions of the primary device if that device is unable to continue processing traffic.

You can add devices by specifying the host names of the devices, the IP addresses of each device, a range of IP addresses, and NAT HA devices. You can also add devices by importing the device names from a file. Note that when you specify a range, the first three octets of the low and high addresses must be the same. Command Center can discover only 254 devices in an IP address range.

The Command Center discovery process involves the following steps:

  1. SNMP ping:The Command Center server sends a Simple Network Management Protocol (SNMP) GET request to a Citrix system-specific object identifier (OID) (for example, 1.3.6.1.4.1.5951.1.1). If the server successfully pings the device, it sets the status of step 2 to SUCCESS and proceeds to step 3. If the GET request fails, the device is not a Citrix device, or it is a Citrix device but SNMP is disabled on it. In either fail case, the Command Center server proceeds to step 2.
  2. Find Citrix device: The Command Center server attempts to open an SSH session to the device based on the user credentials configured when adding a map. If the SSH session fails, the device is discarded as a non-Citrix device. If the SSH session succeeds, the server issues a CLI command to check whether the device is a Citrix device. A positive result moves the device to the next step. Otherwise, Command Center discards the device as a non-Citrix device. To check the cause of failure of this step, on the Citrix Networktab, click the >>> icon next to the device, and select Status. You can also view the cause of failure on the Device Status page.
  3. Enable SNMP:On the discovered Citrix device, Command Center executes a command to configure an SNMP community based on the details entered when configuring the map or when adding a device. This step may fail for various reasons, such as network issues or if another SNMP manager is already configured on the device. To check the cause of failure, on the Citrix Network tab, click the >>> icon next to the device, and select Status. You can also view the cause of failure on the Device Status page.
  4. Add trap destination: Devices communicate with Command Center by sending trap notifications. The Command Center server adds its IP address to the list of trap destinations on the discovered device. This allows Command Center to receive all events/traps generated on the Citrix device. However, this step may fail if the number of trap destinations exceeds the maximum limit of trap destinations on the Citrix device. The limit on Citrix NetScaler devices is 10. If an error occurs you must take corrective measures before you initiate rediscovery of this device. To check the cause of failure, on the Citrix Networktab, click the >>> icon next to the device, and select Status. You can also view the cause of failure on the Device Status page.
  5. Collect inventory:The Command Center server collects the basic system information for the discovered devices using SNMP. You can view this information on the Device Properties page. For more information, see “Viewing Device Properties” in the Citrix Command Center Online Help. This step may fail if the SNMP manager configured on the Citrix device is not that of the server. It may also fail because of network issues or because the SNMP ports are not configured properly on the firewall. To check the cause of failure, on the Citrix Network tab, click the >>> icon next to the device, and select Status. You can also view the cause of failure on the Device Status page. If an error occurs you must take corrective measures, and then initiate rediscovery of the device.
  6. Download files: The Command Center server initiates a Secure File Transfer Protocol (SFTP) session based on the user credentials defined while configuring the map. Then, it downloads the configuration and license files of the device. For Repeater devices, it downloads only the configuration files. The Command Center server stores these files in the database. This step may fail because of the following reasons:
    • Incorrectly specified user credentials
    • Incorrectly configured SFTP ports in the firewall
    • Network issues

To check the cause of failure, on the Citrix Network tab, click the >>> icon next to the device, and select Status. You can also view the cause of failure on the Device Status page. If an error occurs, you must take corrective measures, and then initiate rediscovery of this device.

Upon successful discovery, the devices appear on the corresponding maps as icons with their IP addresses or device names. If the server is unable to successfully discover the devices, it marks the devices as inaccessible, generates an event, and groups the devices under the Inaccessible Systems node.

To add more devices to Command Center:

  1. Click the Citrix Network
  2. Under Device Inventory, click NetScaler and on the right click Add.
  3. Enter the NSIP of the NetScalers, select a device profile and click Continue.
  4. You can click Discovery Status on the left of the page to check the status of the discovery.
  5. Click the Refresh button on the top right to update the display. If Discovery fails, see CTX200377 – Command Center is Unable to Discover NetScaler
  6. Once discovery is complete, you’ll see the devices on the Citrix Network tab in the Device Inventory node. Consult docs.citrix.com (http://docs.citrix.com/en-us/command-center/5-2.html) for more info on what you can do in Command Center.

Configure Device Syslog

By default, a discovered device is only configured for SNMP. Additional reporting can be enabled by configuring the devices to send Syslog to Command Center.

  1. In Command Center, switch to the Configuration
  2. On the left, under Configuration, click Built-in Tasks.
  3. On the right, select the NSConfigureSyslogServer task and click Execute.
  4. In the Devices page, move the devices to the right and click Next.
  5. In the User Input page, enter the IP address of the Command Center server and enter an Annotation. Click Next.
  6. In the Summary page, click Finish.
  7. Click OK to acknowledge that Task execution in progress.
  8. Review the Execution Log to ensure configuration was completed successfully.
  9. Or you can configure Syslog directly on the NetScaler appliance. Configure a Syslog action, a Syslog policy, and bind the Syslog policy globally. The Syslog action should point to the Command Center IP address on port UDP 514.

Alerts

  1. Switch to the Fault tab.
  2. On the left, expand SNMP, expand Alarms, and click Triggers. On the right, click Add.
  3. Give the filter a name. Indicate the alarms for which you wish to receive an email. For example, check the boxes next to Critical and Major. You can restrict the alarms to specific devices.
  4. Click Add Action.
  5. Enter a name for the action.
  6. Enter the email information including From and To addresses and the mail server name. You can click Test Email. Click OK when done.
  7. Click OK when done adding actions.
  8. If you have scheduled maintenance, you can schedule the triggers to disable and re-enable. Select the trigger and then click Schedule a Filter.  💡
  9. Uncheck the Enable Filter box and set the time you want the trigger to be disabled.
  10. Create another trigger schedule to re-enable the filter.
  11. Click the Scheduled Filters button to view the schedules. For more info see CTX211879 How Do I Suppress Command Center Alarm Related Actions For a Particular Time Period?

Use Command Center

See the release notes for new features in Command Center 5.2 build 46.7.  💡

See CTX211875 How Do I Monitor and Manage Changes on NetScaler Using Command Center? for an overview of Audit Templates and Audit Policies.

See docs.citrix.com for information on how to use Command Center to monitor and configure your appliances.