Navigation
Change Log
Citrix Virtual Apps and Desktops (CVAD) Versions
Version Numbering
Citrix Virtual Apps and Desktops (CVAD) is the new name for XenApp and XenDesktop.
The most recent version of Citrix Virtual Apps and Desktops (CVAD) 7 is 2402 LTSR. The version number is based on YYMM (Year Month) format. References to 7.x versions in this article include the YYMM versions.
XenApp and XenDesktop 7.x versions range from 7.0 through 7.18. 7.18 is the last version of XenApp and XenDesktop. Citrix Virtual Apps and Desktops (CVAD) 2402, 2203, and 1912 are newer than XenApp and XenDesktop 7.18.
Release Notifications
Follow my Twitter or EUC Weekly Digests for new release notifications.
Sometimes release notifications are posted to Citrix Blogs, but this is not comprehensive.
Watch Citrix Discussions and Citrix Support Knowledgebase to learn about known issues that are fixed in a later release.
Release Classifications – LTSR, CR
Image from Citrix Blog Post What’s New in XenApp, XenDesktop and XenServer November 2017.
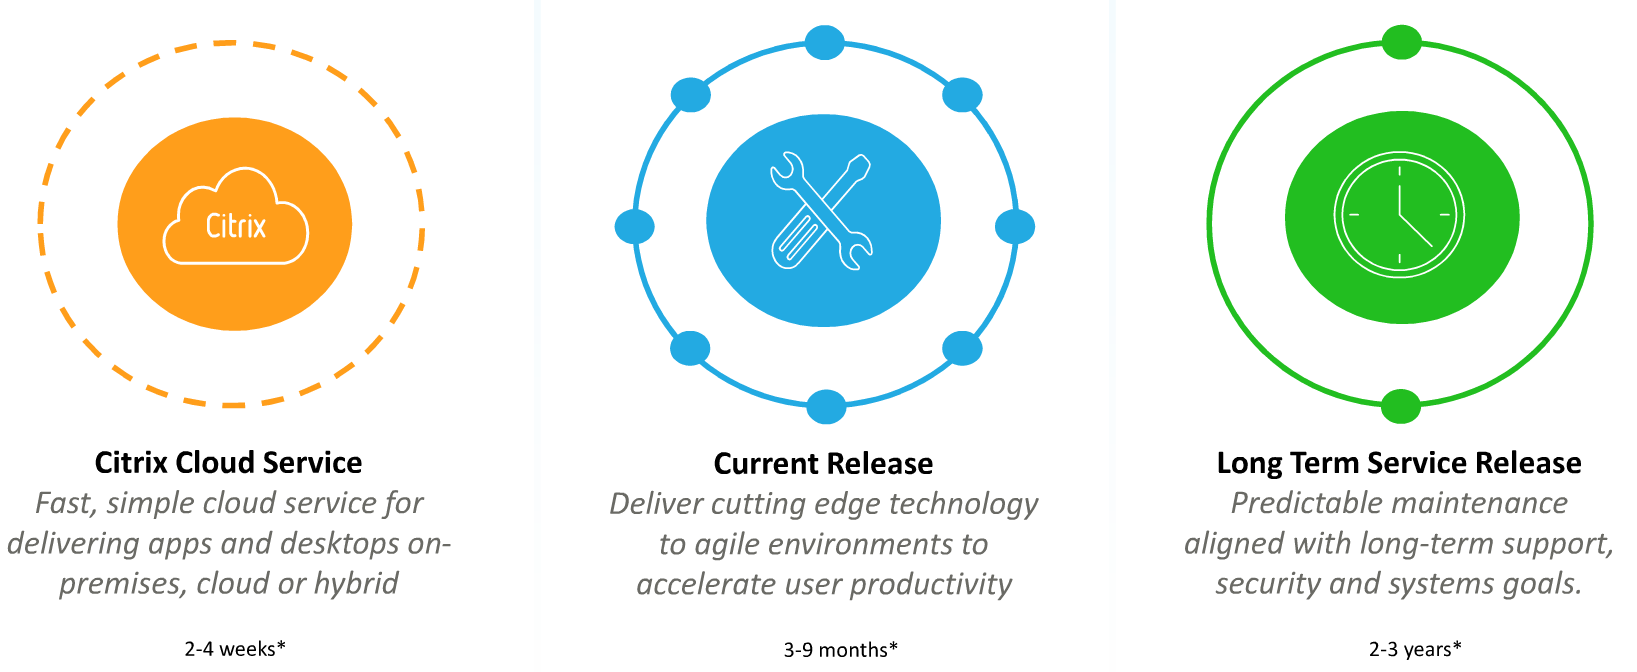
There are three classifications for on-premises releases:
- LTSR (Long Term Service Release) – these releases get 5 years of mainstream support from the release date, plus up to 5 more years of paid extended support
- CR (Current Release) – 6 months support from the release date. Updated quarterly.
- LTSR Compatible Components – non-LTSR components running in a LTSR implementation. This classification provides exceptions to the requirement that all components must be LTSR versions.
Citrix Virtual Apps and Desktops (CVAD) is a bundle of components. Long Term Support requires the components to be specific versions. Any deviation from the required versions results in loss of Long Term Support, and instead is classified and supported as a Current Release. Use Citrix LTSR Assistant tool to confirm LTSR compliance.
LTSR Programs
There are three different LTSR programs:
- Citrix Virtual Apps and Desktops (CVAD) LTSR – includes Delivery Controllers, VDAs, StoreFront, Citrix Provisioning, Session Recording, and Profile Management.
- Citrix Hypervisor LTSR
- Workspace app LTSR
LTSR Licensing requirement
LTSR requires you to be on Customer Success Services Select, formerly known as Software Maintenance.
LTSR vs CR
Support Duration
LTSR is supported for 5 years from the LTSR release date, plus 5 more years of optional, paid extended support.
- LTSR Cumulative Updates (similar to service packs) are released periodically. Cumulative Updates for LTSR are installed exactly like upgrading to a newer Current Release, except you don’t get any new features.
- Cumulative Updates are released only for LTSR versions. To patch a Current Release, upgrade to the newest Current Release.
- Be prepared to install these LTSR Cumulative Updates every 6 months. Workspace app LTSR (or Receiver LTSR) too.
Current Releases are end-of-maintenance after 6 months, and end-of-life after 18 months.
- Be prepared to upgrade to a newer Current Release every 6 months. Workspace app too.
See Lifecycle Milestones for Citrix Virtual Apps & Citrix Virtual Apps and Desktops for an explanation of support durations for each release classification.
In either case, you are expected to perform some sort of upgrade or update approximately twice per year.
Release Frequency
New LTSR versions of CVAD are released every 18-24 months.
There are three supported LTSR releases of Citrix Virtual Apps and Desktops: LTSR 2402, LTSR 2203, and LTSR 1912.
LTSR 7.15 is no longer supported by Citrix.
Cumulative Updates (CU) for LTSR are released every few months. Don’t forget to install these patches. I’ve seen CUs fix LTSR issues.
- Cumulative Updates do not include new features.
- Citrix has not yet released any Cumulative Updates for LTSR 2402.
- Citrix has released three Cumulative Updates for LTSR 2203, bumping up the version to 2203.3000.
- Citrix has released eight Cumulative Updates for LTSR 1912, bumping up the version to 1912.8000.
- Citrix will continue to release Cumulative Updates for all currently supported LTSR versions.
You can upgrade directly to the latest Cumulative Update. It is not necessary to upgrade to the base version before upgrading to the latest Cumulative Update.
New Current Release versions are released every quarter. Sometimes longer for Workspace app.
Some Citrix Virtual Apps and Desktops (CVAD) components are released on a separate schedule from the main LTSR or Current Release releases:
- App Layering
- Workspace Environment Management
Citrix Provisioning version numbers don’t line up with Citrix Virtual Apps and Desktops (CVAD) LTSR Cumulative Update version numbers:
- Citrix Virtual Apps and Desktops (CVAD) 2402 LTSR comes with Citrix Provisioning 2402
- Citrix Virtual Apps and Desktops (CVAD) 2203 LTSR CU5 comes with Citrix Provisioning 2203 CU4
- Citrix Virtual Apps and Desktops (CVAD) 1912 LTSR CU8 comes with Provisioning Services 1912 CU7
Current Release cons
New Current Releases add new features, and new bugs.
No hotfixes will be released for Current Releases. To get hotfixes, upgrade to the newest Current Release.
LTSR cons
Features not in LTSR – Some features are not included in the LTSR program. In other words, these features don’t get 5 years of support, and might not even be included in the LTSR installer.
- Personal vDisk and AppDisks – these are replaced by User Personalization Layers.
- Framehawk
Features in Current Release but not LTSR:
- Upcoming CVAD Current Release Version 2405 will have new features that are not in 2402 LTSR. Will you upgrade to CVAD 2405, which puts you on the Current Release upgrade train? Or will you wait until the next LTSR, probably released sometime in 2026?
- Another option is to remain on 2402 LTSR (with latest cumulative update) until you see a Current Release with new features that are desirable enough to upgrade to. You can then upgrade directly from 2402 LTSR to the latest Current Release (e.g., 2502). There’s no need to upgrade to intermediary versions.
Don’t mix Current Release and LTSR components – As soon as you upgrade one LTSR component to Current Release, upgrade all other LTSR components to Current Release and keep them updated with new Current Releases every 6 months.
- When the next LTSR is released, you can stop upgrading (except for Cumulative Updates).
- Or deploy Current Release in a separate environment.
- Use Citrix LTSR Assistant tool to confirm LTSR compliance.
- Some app vendors require you to remain on LTSR.
LTSR “compatible” components require frequent upgrades – Some components, like App Layering, are LTSR “compatible”, meaning there’s no LTSR version, but it’s OK to use them in an LTSR environment. Since they’re Current Release and not LTSR, you’re expected to update the Current Release components to the latest release every 6 months.
- There’s no LTSR version of Citrix Licensing. Instead, always upgrade Citrix Licensing to the latest Current Release version.
- There’s no LTSR version of App Layering. Instead, always upgrade App Layering to the latest Current Release version.
- There’s no LTSR version of Citrix Workspace Environment Management. Instead, always upgrade Citrix Workspace Environment Management (WEM) to the latest Current Release version.
Windows 11 is supported in CVAD 2109 and newer. Windows 11 is not supported in CVAD 1912 LTSR.
Windows 7 and Windows Server 2008 R2 support: 7.16 VDA and newer, including 1912 LTSR VDA, are not supported on Windows 7 or Windows Server 2008 R2. For these operating system versions, install 7.15 LTSR VDA. The 7.15 LTSR VDA can register with newer Delivery Controllers. However, the 7.15 LTSR VDAs cannot take advantage of the newer features in the newer releases.
Citrix Virtual Apps and Desktops (CVAD) Supported versions
The most recent release of Citrix Virtual Apps and Desktops (CVAD) is version 2402.
There are three supported LTSR versions of Citrix Virtual Apps and Desktops (CVAD): LTSR 2402, LTSR 2203, and LTSR 1912.
- No Cumulative Updates have yet been released for LTSR 2402.
- Cumulative Update 5 has been released for LTSR 2203, resulting in version number 2203.5000.
- Cumulative Update 8 has been released for LTSR 1912, resulting in version number 1912.8000.
You can directly install the latest Cumulative Update of any LTSR version. It is not necessary to install the base version of the LTSR version before you upgrade to the latest Cumulative Update.
Examples of non-supported versions:
- Citrix Virtual Apps and Desktops (CVAD) 1909 is not LTSR, and is more than six months past release date, so Citrix will not provide any code fixes. Once 18 months have elapsed, Citrix will not support it at all.
Workspace app Supported Versions
Starting in August 2018, Receiver have been renamed to Workspace app. Also, versioning has changed from 4.x to a YYMM (year month) format.
The most recent Current Release of Workspace app is version Workspace app 2403.
The latest LTSR version of Workspace app is version 2402 LTSR.
- Browser Content Redirection does not work in LTSR Workspace app because Embedded browser is removed due to infrequent updates of LTSR versus frequent updates of the embedded browser.
Citrix Virtual Apps and Desktops (CVAD) Component Version Dependencies
Citrix Virtual Apps and Desktops (CVAD) is a collection of installable components:
- Citrix Licensing Server
- Delivery Controller
- Citrix Studio
- Virtual Delivery Agent
- Director
- StoreFront
- Federated Authentication Service
- App Layering
- Citrix Provisioning
- Citrix Group Policy Management Plug-in
- Profile Management
- Workspace Environment Management
- Session Recording
- Workspace app for Windows, Linux, Mac, iOS, and Android
- Workspace app for HTML5
- Skype for Business HDX RealTime Optimization Pack
- Citrix ADC (aka NetScaler) Load Balancing
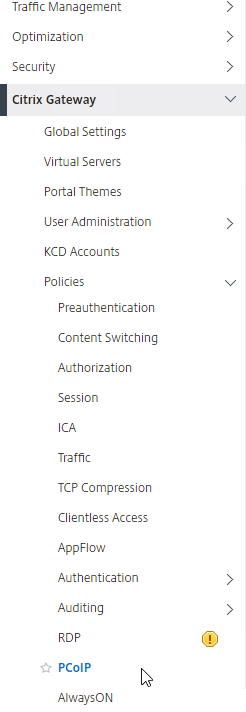
- Citrix Gateway
Component behaviors:
- Each component can be installed separately.
- Some components can be combined onto the same machine.
- Some components are completely standalone with no dependency on other components.
- Some components communicate with other components, and thus are dependent on those other components.
The fewest components that make up a Citrix Virtual Apps and Desktops (CVAD) site/farm are License Server + Delivery Controller + Studio + VDA + SQL Databases.
- A farm/site is a collection of Delivery Controllers that share the same SQL databases.
- The official term is Citrix Virtual Apps and Desktops (CVAD) Site. However, since the word “site” has multiple meanings, this article instead refers to a Citrix Virtual Apps and Desktops (CVAD) Site as a Farm, which is the same terminology used in XenApp 6.5 and older.
Some of the components can be used with multiple sites/farms.
- Citrix Licensing Server can be used by multiple sites/farms.
- StoreFront can pull icons from multiple sites/farms, including XenApp 6.5. This enables multi-farm capabilities for the following components that are dependent on StoreFront:
- Federated Authentication Service can be used by multiple StoreFront servers.
- Workspace app for Windows, Linux, Mac, iOS, and Android can connect to multiple StoreFront stores, which can be on different StoreFront servers.
- Each StoreFront server has its own Workspace app for HTML5
- Citrix Gateway connects to one StoreFront server
- Citrix Studio can connect to multiple sites/farms.
- Virtual Delivery Agent can register with only one site/farm at a time, but the farm registration can be easily changed by modifying the ListOfDDCs registry key.
- Director can display monitoring data from multiple sites/farms.
- App Layering has no relationship to Citrix Virtual Apps and Desktops (CVAD) sites/farms, and thus can be used with any number of them.
- Citrix Provisioning has no relationship to Citrix Virtual Apps and Desktops (CVAD) sites/farms, and thus can be used with any number of them.
- Citrix Group Policy Management Plug-in can be used to create Citrix Policies that can apply to multiple sites/farms.
- Profile Management has no relationship to Citrix Virtual Apps and Desktops (CVAD) sites/farms, and thus can be used with any number of them. The profiles are usually tied to a VDA operating system version.
- Workspace Environment Management has no relationship to Citrix Virtual Apps and Desktops (CVAD) sites/farms, and thus can be used with any number of them.
- Session Recording has no relationship to Citrix Virtual Apps and Desktops (CVAD) sites/farms, and thus can be used with any number of them.
- Skype for Business HDX RealTime Optimization Pack has no relationship to Citrix Virtual Apps and Desktops (CVAD) sites/farms, and thus can be used with any number of them. This component only cares about the RealTime Connector that is installed on the VDA.
The Citrix components that don’t have any relationship to Citrix Virtual Apps and Desktops (CVAD) sites/farms can be used with XenApp 6.5 too.
Some components communicate with other components, and thus are dependent on the versions of those other components.
- Citrix Licensing Server should always be the newest version. Citrix Virtual Apps and Desktops (CVAD) Components will verify the Licensing Server version.
- StoreFront can usually work with any Delivery Controller version, including XenApp 6.5.
- Citrix Studio should be the same version as the Delivery Controllers it is managing.
- Virtual Delivery Agents can be any version, including older or newer than the Delivery Controllers.
- Director uses the Citrix Monitoring Service that is installed on the Delivery Controllers.
- Workspace Environment Management (WEM) – newer WEM can configure newer Profile Management features. Otherwise, WEM is independent from Citrix Virtual Apps and Desktops (CVAD).
- Workspace app – Many newer Citrix Virtual Apps and Desktops (CVAD) features require a specific version of Workspace app.
- The newest Workspace app along with the newest VDA supports the latest Teams optimization (offload) features. LTSR versions of these components might not support the latest Teams optimization features.
- If you are deploying Current Releases, then deploy the newest Current Release Workspace app.
- If you are deploying LTSR, then deploy the latest LTSR Workspace app or LTSR Receiver.
- If you need Browser Content Redirection, then deploy the latest Current Release Workspace app since LTSR Workspace app does not support Browser Content Redirection.
- Citrix Gateway – Some Newer Citrix features require newer Citrix ADC firmware. For example:
- EDT (Enlightened Data Transport) / Adaptive Transport
- Gateway Configuration export/import with StoreFront
- Citrix ADC builds have bug fixes that affect the Citrix Virtual Apps and Desktops (CVAD) experience.
Upgrade Overview
Components
Citrix Virtual Apps and Desktops (CVAD) is composed of multiple Components, each of which is upgraded separately.
Newer versions of Citrix components enable Customer Experience Improvement Program (CEIP) automatically. If you wish to disable CEIP, see https://www.carlstalhood.com/delivery-controller-cr-and-licensing/#ceip.
Component Upgrade Process
In-place upgrades – CVAD components can be upgraded in-place. No need to rebuild like you did in XenApp 6.5 and older.
- For LTSR releases, you can upgrade directly to the latest Cumulative Update. It is not necessary to install the base LTSR version first.
- For Current Releases, you can upgrade directly to the latest Current Release.
Here’s the general, in-place upgrade process for each component. Detailed instructions for each component are detailed later.
- In-place upgrade one (or half) of the component’s servers.
- Upgrade the component’s database. Requires temporary sysadmin permission on SQL Server. Not all components have databases.
- In-place upgrade the remaining component’s servers.
- In-place upgrade the agents.
- Rebuilding of master images might be preferred, assuming you have time to automate it.
Mix and match VDA/Controller versions – You can upgrade VDAs without upgrading Delivery Controllers. Or vice versa.
- Newer VDA features sometimes require Citrix Policy to enable or configure. The newest Citrix Policy settings are included in Delivery Controller / Citrix Studio upgrades. Or, if you haven’t upgraded your Delivery Controllers yet, you can simply upgrade the Citrix Group Policy Management component.
VDA Operating System version Upgrade – Considerations when upgrading the VDA operating system version:
- Operating System Version – VDA 7.16 and newer no longer support Windows Server 2008 R2, Windows 7, or Windows 8/8.1. If you need these older operating system versions, then install VDA 7.15 instead. VDA 7.15 can register with 1912 Delivery Controllers.
- Windows 11 – VDA 1912 LTSR does not support Windows 11, but CVAD 2109 and newer do support Windows 11
- App compatibility – Verify app compatibility with the new OS version. For compatibility with a Server OS version, check compatibility with the equivalent Desktop OS version.
- Windows Server 2012 R2 = 64-bit Windows 8.1
- Windows Server 2016 = 64-bit Windows 10 1607
- Windows Server 2019 = 64-bit Windows 10 1809
- Windows Server 2022 = 64-bit Windows 10 21H2
- Start Menu in published desktop – If you publish desktops, is the Windows 2012 R2 Start Menu acceptable to the users? Windows 2012 R2 Start Menu is the same as Windows 8.1 Start Menu.
- Windows Server 2016 Start Menu is the same as Windows 10 1607 Start Menu.
- Windows Server 2019 Start Menu is the same as Windows 10 1809 Start Menu.
- Windows Server 2022 Start Menu is the same as Windows 10 21H2 Start Menu.
- GPO settings– Newer OSs have newer Microsoft GPO settings.
- Profile version – Newer OS means newer profile version. Older profile versions do not work on newer operating system versions. For example, you can’t use Windows 7 profiles on Windows 10. This means that an OS upgrade results in new profiles for every user.
- Write a script to copy profile settings from the old profiles to the new profiles.
- Remote Desktop Services (RDS) Licensing – if you are building RDSH (Server OS) VDAs, then every user that connects must have an RDS License for the RDSH operating system version. If RDSH is Windows 2016, then every user needs a Windows 2016 RDS License. Windows 2008 R2 RDS Licenses won’t work.
- RDS Licensing Server – RDS Licensing Server is a built-in Windows Server Role. It must be installed on servers with the same or newer operating system version than the RDSH VDAs.
- Windows 10 versions and Windows 11 versions – See CTX224843Windows 10 & 11 Compatibility with Citrix Virtual Desktops.
- Upgrade Windows 10 or Windows 11 version – If you in-place upgrade Windows 10 or Windows 11, first remove the VDA software, upgrade Windows, and then reinstall VDA.
- App Layering – Due to dependencies between App Layers and OS Layer, you might have to in-place upgrade your OS Layer.
- Citrix Virtual Apps and Desktops (CVAD)Component Agents – ensure the Citrix component agents (WEM Agent, Profile Management, Session Recording Agent, App Layering Tools, etc.) are supported on the new OS version.
Considerations for upgrading the operating system version on component servers:
- Do not in-place upgrade the operating system version. Instead, build new VMs, and join them to the existing infrastructure.
- New OS version requires newer component versions. The required component version might be newer than what you’re currently running.
- When adding a server to the existing component farm/site, the new server must be running the same component version as the existing servers. That means you might have to in-place upgrade your existing component servers before you can add new component servers running a newer operating system version.
- For example:
- Existing Delivery Controllers are version 1912 on Windows Server 2019.
- You desire to migrate to new Windows Server 2022 Delivery Controllers.
- Only Delivery Controller 2203 and newer can be installed on Windows 2022. But you can’t add Delivery Controller 2203 to a Delivery Controller 1912 farm/site.
- Upgrade the existing Delivery Controllers to 2203 or newer first.
- Then you can add the new Windows Server 2022 Delivery Controllers VMs to the existing farm/site.
Here are general instructions to upgrade component server OS version. Detailed instructions for each component are detailed later.
- In-place upgrade the existing component servers to a version that supports the new OS. Check the System Requirements documentation for each component to verify OS version compatibility.
- Build new machine(s) with desired OS version.
- On the new machines, install the same component version as the existing component servers.
- The new machines must be the same component version as the existing machines. You can’t add machines with newer component versions.
- Add the new component servers to the existing farm/site/server group.
- Migrate load balancer, VDAs, Targets, etc. from old to new. See below for detailed instructions for each component.
- Decommission old servers.
Upgrade Guidelines
Test farms – Test Citrix infrastructure upgrades in separate test environments (separate test farms):
- Due to forwards and backwards compatibility, VDA upgrades can usually be tested in production.
- Everything else requires global server-side upgrades first, so you can’t test them in production.
- Upgrade procedures for High Availability components (e.g., multiple Delivery Controllers) are different than upgrade procedures for singe, standalone components. The Test environment should look like production, which means HA too.
- The separate Test environments should include multi-datacenter capabilities (StoreFront icon aggregation, GSLB, etc.) so those multi-datacenter features can be tested.
Known upgrade issues – Read Citrix Discussions, or ask your Citrix Support TRM, for known upgrade issues. Don’t upgrade production immediately after a new version is released.
- Read the release notes, especially the known issues.
Smart Check the environment before upgrading. It’s free. Access it at https://smart.cloud.com.
Backup/snapshot – Backup databases, snapshot machines, etc. before starting the in-place upgrade.
- Have a rollback plan, including the databases.
Citrix Licensing Server – Always upgrade the Citrix Licensing Server before upgrading anything else.
- Check Subscription Advantage (SA) date on the installed licenses. Some components require SA expiration date to be later than the component’s release date.
In-place upgrade preparation:
- Make sure other admins are logged off before starting the upgrades.
- Close all consoles and PowerShell.
- Snapshot the machines.
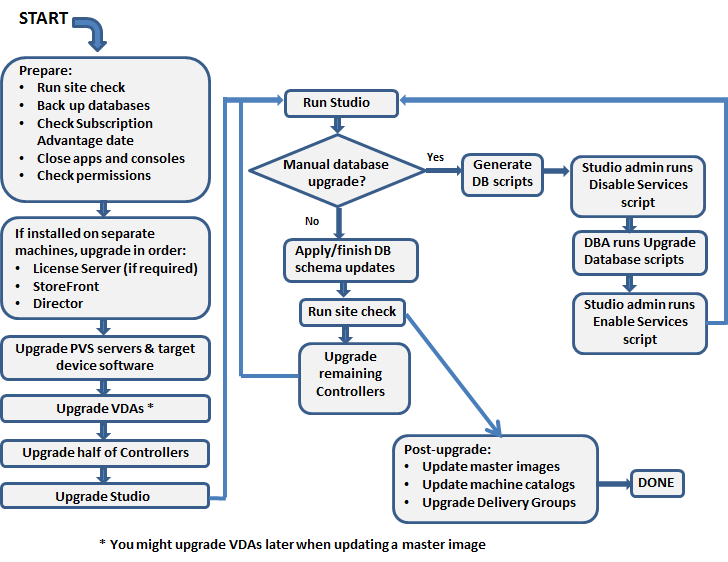
Upgrade Citrix Virtual Apps and Desktops (CVAD)
All CVAD components can be upgraded in-place.
- For the list of versions that you can upgrade directly from, see Citrix Docs. Also see the Citrix Upgrade Guide.
- Current Release upgrades are cumulative. You can skip intermediary versions.
- LTSR Cumulative Updates are also cumulative, hence the name.
- LTSR Cumulative Updates are installed using the same process as Current Release upgrades. The only difference is that you don’t get new features with LTSR updates.
Some components (Delivery Controllers, Citrix Provisioning, Session Recording, WEM, etc.) require the person doing the upgrade to have temporary sysadmin permissions on the SQL server so the database can be upgraded.
Upgrade order – For the most part, upgrade order doesn’t matter. That’s because there are few dependencies between each component, as detailed earlier.
- Before upgrading anything else, upgrade the Citrix Licensing Server.
- Install updated license files with non-expired Subscription Advantage dates.
- VDAs and Delivery Controllers can be different versions.
- VDAs can be upgraded before Controllers, or vice/versa.
- If Zones, upgrade all Delivery Controllers in all zones at the same time.
- For Director, upgrading Director won’t do you much good if the Controllers aren’t upgraded, since Director uses the Monitoring service that’s installed on the Controllers.
- For Citrix Provisioning, the Citrix Provisioning servers must be upgraded before you upgrade the Target Device Software.
- For Session Recording, the Session Recording server(s) must be upgraded before you upgrade the Session Recording agent.
- For WEM, the WEM server(s) must be upgraded before you upgrade the WEM agent.
If you upgrade to a version that has CEIP functionality, decide if you want to disable CEIP, or leave it enabled.
After upgrading, configure new functionality.
Additional general upgrade guidance can be found at Upgrade a deployment at Citrix Docs.
Citrix Licensing Server
It’s a simple in-place upgrade.
- After upgrading, download the latest license files from http://mycitrix.com, and install the license files on the license server. Make sure the Subscription Advantage date hasn’t expired.
To upgrade the Licensing Server Operating System version:
- Build a new VM with desired OS version.
- Install the latest Current Release License Server.
- At http://mycitrix.com, reallocate licenses to the new case-sensitive hostname, and install the license file on the new Licensing Server.
- In Citrix Studio, go to Configuration > Licensing, and change the License Server to the new Licensing Server.
Delivery Controllers
Both of the following types of upgrades/updates use the same upgrade process:
- Install latest LTSR Cumulative Update
- Upgrade to latest Current Release
To in-place upgrade Delivery Controller version:
- Upgrade the Citrix Licensing Server if you haven’t already. Install current licenses if you haven’t already. Make sure CSS date is not expired.
- Ask a DBA for temporary sysadmin permission to the SQL server.
- Prepare: logoff other admins, close consoles.
- If upgrading from 7.15 to 2203 or newer, then 7.15 must be Cumulative Update 5 or newer.
- In-place upgrade one (or half) of the Delivery Controllers. Upgrade to one of the following:
- Delivery Controller LTSR 2402
- Delivery Controller LTSR 2203 CU5
- Delivery Controller LTSR 1912 CU8
- Launch Citrix Studio or Site Manager. Upgrade the database when prompted.
- In-place upgrade the remaining Delivery Controllers.
- Temporary SQL sysadmin permissions can now be removed.
- For Citrix Studio that’s installed on administrator machines other than Delivery Controllers, in-place upgrade Citrix Studio by running AutoSelect.exe from the Current Release or LTSR CVAD ISO.
To upgrade the operating system version of the Delivery Controllers:
- In-place upgrade the existing Delivery Controllers to a version that supports the new operating system version.
- For Windows Server 2016, upgrade Delivery Controller to version 7.15 or newer.
- For Windows Server 2019, upgrade Delivery Controller to version 1912 or newer
- For Windows Server 2022, upgrade Delivery Controller to version 2203 or newer.
- CVAD 1912 does not support Windows Server 2022.
- CVAD 2203 does not support Windows Server 2012 R2. If upgrading from Windows 2012 R2 to Windows 2022, then upgrade to CVAD 1912 first, replace the OS to Windows 2019, upgrade to CVAD 2203, and then replace the OS to Windows 2022.
- Build one or more new virtual machines with the new operating system version.
- Install Delivery Controller software with the same version as the other Delivery Controllers.
- If vSphere, import the vCenter cert into Trusted Root or Trusted People.
- Run Citrix Studio and join the new machines to the existing farm/site.
- Reconfigure VDAs to point to the new Delivery Controllers. Edit the ListOfDDCs registry key.
- Reconfigure Director server > IIS Admin > Default Web Site > Director > Application Settings > Service.AutoDiscoveryAddresses to point to the new Delivery Controllers.
- Reconfigure StoreFront console > MyStore > Manage Delivery Controllers to point to the new Delivery Controllers.
- Secure Ticket Authorities:
- Add the new Delivery Controllers to firewall rules between Citrix ADC SNIP and STAs.
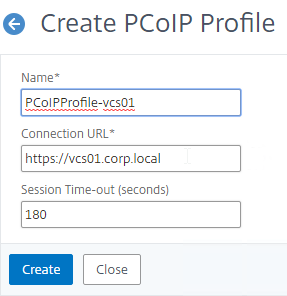
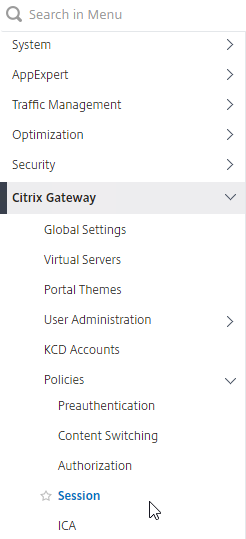
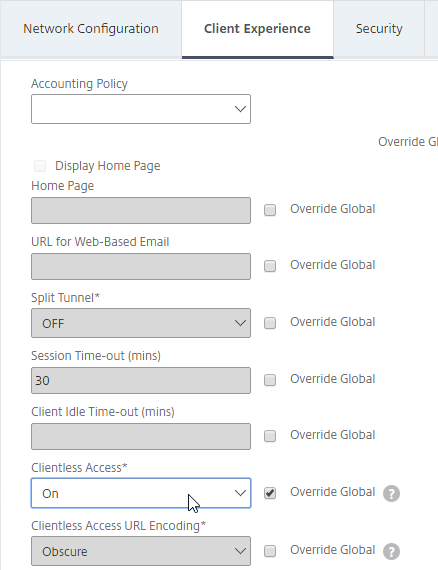
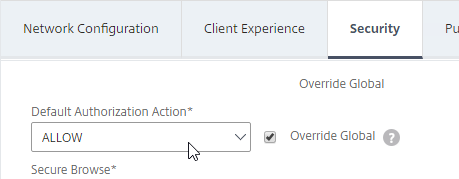
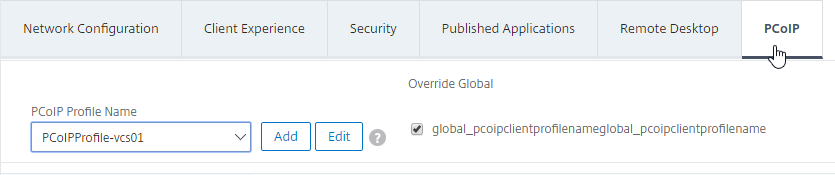
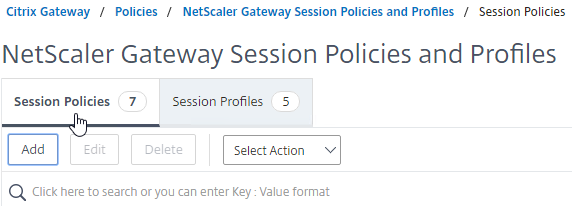
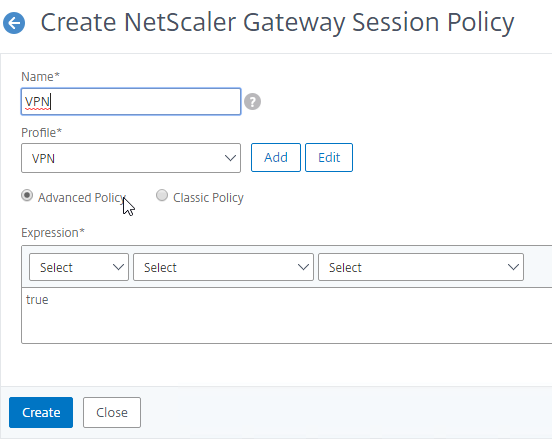
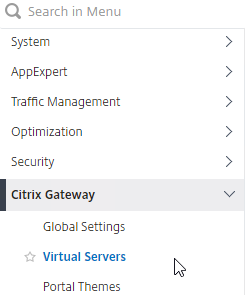
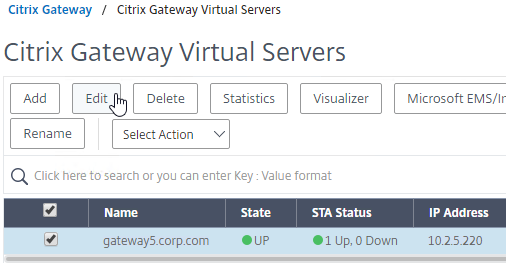
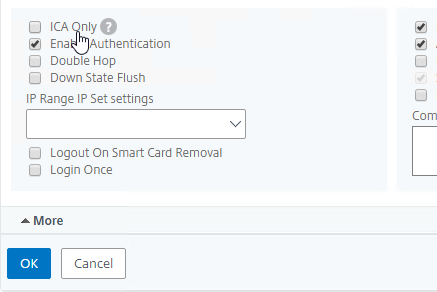
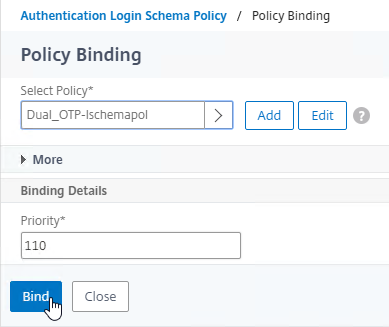
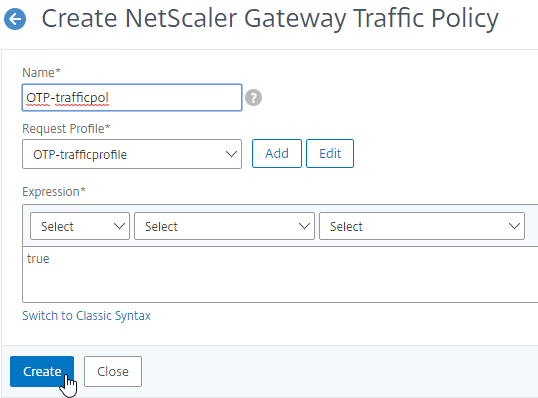
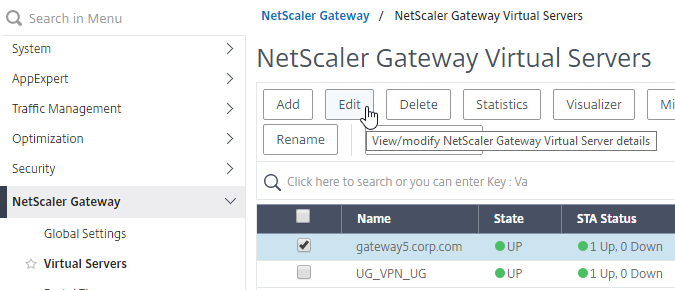
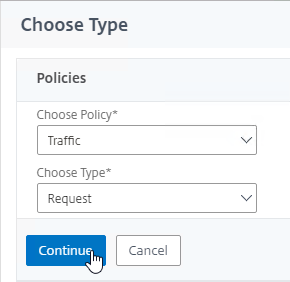
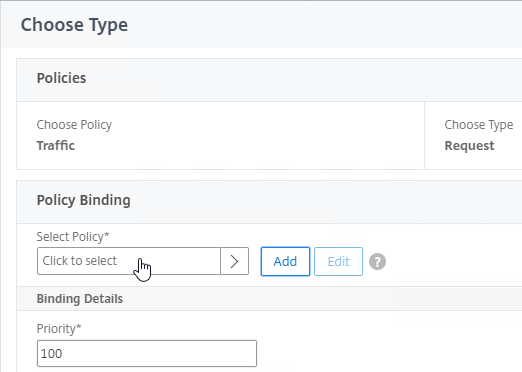
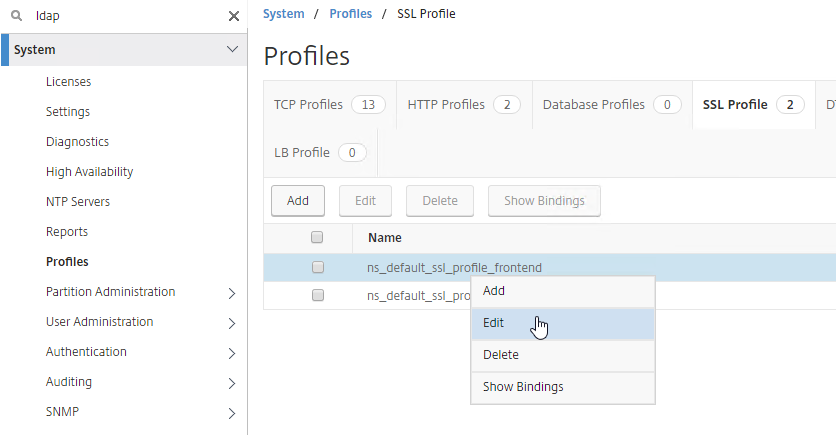
- In Citrix Gateway > Edit Virtual Server > scroll down to the Published Applications section > click the line to edit the Secure Ticket Authorities. Add the new Delivery Controllers as Secure Ticket Authorities. Don’t remove the old ones yet.
- In StoreFront Console, go to Manage Citrix Gateways > edit each Gateway > on the Secure Ticket Authority page, add the new Delivery Controllers as Secure Ticket Authorities, and remove the old ones.
- In Citrix Gateway > Edit Virtual Server > scroll down to the Published Applications section > click the line to edit the Secure Ticket Authorities. Remove the older Controllers as Secure Ticket Authorities.
- In Citrix Studio, at Configuration > Controllers, remove the old Delivery Controllers.
- Note: if this doesn’t work, then you might have to manually evict the old Delivery Controllers from the SQL database.
- Decommission the old Delivery Controllers.
An alternate method of upgrading the operating system on the Delivery Controllers while preserving the machine’s identity:
- The new server will have the same Citrix version as already installed. You might have to in-place upgrade Citrix to get to a version that supports the new operating system version. CVAD 1912 can run on Windows Server 2019, but it cannot run on Windows Server 2022. CVAD 2203 supports Windows Server 2022, but it does not support Windows Server 2012 R2. If upgrading from Windows 2012 R2 to Windows 2022, then upgrade to CVAD 1912 first, replace the OS to Windows 2019, upgrade to CVAD 2203, and then replace the OS to Windows 2022.
- Export any certificates that you want to keep and put them on a different machine.
- Record the IP Address and hostname of the machine you want to replace.
- Record the database connection strings. PowerShell Get-BrokerDBConnection shows the main database connection. Get the Logging and Monitoring database names from Citrix Studio > Configuration.
- Shut down a Delivery Controller and never power it on again. Don’t remove this machine from the domain to avoid accidentally deleting the Active Directory computer object.
- Build a new machine with an operating system version supported by the Citrix version running on the other Delivery Controllers. Give it the same name and IP address. Join it to the domain using the existing Active Directory computer object.
- Install the same version of Delivery Controller as was running previously. Don’t run Citrix Studio.
- If vSphere, import the vCenter cert into Trusted Root or Trusted People.
- Use the PowerShell commands at https://www.carlstalhood.com/delivery-controller-cr-and-licensing/#changedbstrings to connect the new machine to the SQL database.
- Run Citrix Studio. It might ask you to upgrade the database but it’s merely finishing the database connection and not actually upgrading anything.
App Layering
To in-place upgrade Citrix App Layering:
- In-place upgrade the ELM appliance.
- From 4.2 and newer, newer versions should be downloaded automatically. Just click the link to start the upgrade.
- From 4.1 and older, download the upgrade package and upload it to the ELM.
- Upgrade the App Layering Citrix Provisioning Agent by uninstalling the Citrix Provisioning Agent and re-installing it.
- Create a new OS Layer version and install the latest OS Machine Tools.
- When the images are published, the drivers will be updated automatically by the ELM.
Workspace Environment Management (WEM)
There is no LTSR version of Citrix Workspace Environment Management (WEM) so you should always deploy the latest version of WEM.
To in-place upgrade Citrix Workspace Environment Management (WEM):
- In-place upgrade the Citrix Licensing Server if you haven’t already.
- Ensure the installed licenses have a non-expired Subscription Advantage date.
- Ask a DBA for temporary sysadmin permission to the SQL server.
- In-place upgrade the first WEM Server. Consider removing it from load balancing before performing the upgrade.
- Use the Database Maintenance tool to upgrade the WEM database.
- Run the WEM Broker Configuration Tool on the upgraded Broker to point to the upgraded database.
- In-place upgrade the remaining WEM Servers. Consider removing them from load balancing before performing the upgrade.
- Temporary sysadmin permissions can now be removed.
- In-place upgrade the WEM Console on all non-server machines where it is installed.
- In-place upgrade the WEM Agents.
- If you are upgrading from WEM 4.2 and older, in the WEM Console, add the WEM Agents (computer accounts) to Configuration Sets instead of the old WEM Sites.
To upgrade the operating system version of the Workspace Environment Management servers, it’s easier if you have a custom DNS name, or load balanced DNS name for WEM, instead of using a server name:
- In-place upgrade the existing WEM servers to a version that supports the OS you intend for the new WEM servers.
- Build new WEM servers with the same WEM version as the existing WEM servers.
- Configure the new WEM servers to point to the same database as the old WEM servers.
- Cutover options:
- If you have a load balanced DNS name for WEM, reconfigure the load balancer to point to the new WEM servers.
- If you have a custom DNS name for WEM, change it to resolve to the new WEM server’s IP address.
- If you were previously using the actual server name, then you can either change the WEM Agent group policy to point to the new WEM server name, or delete the old WEM server and rename the new WEM server, or delete the old WEM server and reconfigure the old DNS name as a custom DNS name for the new WEM server.
- Decommission the old WEM servers.
Session Recording
To in-place upgrade Session Recording:
- In-place upgrade the Citrix Licensing Server if you haven’t already.
- Ensure the installed licenses have a non-expired Subscription Advantage/CSS date.
- Ask a DBA for temporary sysadmin permission to the SQL server.
- In-place upgrade the first Session Recording server to one of the following.
- Session Recording is on the main Citrix Virtual Apps and Desktops (CVAD) ISO.
- Session Recording LTSR 2402
- Session Recording LTSR 2203 CU5
- Session Recording LTSR 1912 CU8
- The upgrade of the first Session Recording server should automatically upgrade the database.
- In-place upgrade the remaining Session Recording Servers. Consider removing them from load balancing before performing the upgrade.
- Temporary sysadmin permissions can now be removed.
- In-place upgrade the Session Recording Agents.
- In-place upgrade the Session Recording Player on all machines where it is installed.
To upgrade the operating system version of the Session Recording servers, it’s easier if you have a custom DNS name or load balanced DNS name for Session Recording, instead of using a server name:
- In-place upgrade the existing Session Recording servers to a version that supports the OS you intend for the new Session Recording servers.
- Build new Session Recording servers with the same Session Recording version as the existing Session Recording servers.
- Configure the new Session Recording servers to point to the same database as the old Session Recording servers.
- Configure the new Session Recording servers to store recordings on the same UNC path as the old Session Recording servers.
- The certificate on the Session Recording servers or load balancer must match the DNS name used by the Session Recording Agents and Player.
- Cutover:
- If you have a load balanced DNS name for Session Recording, reconfigure the load balancer to point to the new Session Recording servers.
- If you have a custom DNS name for Session Recording, change it to resolve to the new Session Recording server’s IP address.
- If you were previously using the actual server name, then you can either: change the Session Recording Agents and Players to point to the new Session Recording server name, or delete the old Session Recording server and rename the new Session Recording server, or delete the old Session Recording server and reconfigure the old DNS name as a custom DNS name for the new Session Recording server.
- If the Session Recording DNS name changed, reconfigure Director to point to the new Session Recording DNS name.
- Decommission the old Session Recording servers.
Citrix Provisioning
Citrix Provisioning servers must be upgraded before you can upgrade Target Devices.
To in-place upgrade Citrix Provisioning servers:
- Make sure Citrix Provisioning High Availability (HA) is working for target devices. If HA is functional, in-place upgrade can be done during the day.
- In the Citrix Provisioning console, you should see an even distribution of Target Devices across all Citrix Provisioning servers.
- Check the WriteCache folders on Citrix Provisioning servers to make sure they’re empty. If any Target Device is caching on Server, then those Target Devices will not failover to another Citrix Provisioning server.
- Get temporary sysadmin permissions to the SQL Server that hosts the Citrix Provisioning database.
- Get the one of the following installation media:
- Citrix Provisioning LTSR 2402
- Citrix Provisioning LTSR 2203 CU4
- Citrix Provisioning LTSR 1912 CU8
- On the first Citrix Provisioning Server:
- In-place upgrade Citrix Provisioning Console by running the LTSR 2402, LTSR 2203 CU4, or LTSR 1912 CU8, Citrix Provisioning Console installer.
- Re-register the Citrix.PVS.snapin.dll snap-in:
"C:\Windows\Microsoft.NET\Framework64\v4.0.30319\InstallUtil.exe" "c:\program files\citrix\provisioning services console\Citrix.PVS.snapin.dll"
- In-place upgrade Citrix Provisioning Server by running the LTSR 2402, LTSR 2203 CU4, or LTSR 1912 CU8 Citrix Provisioning Server installer
- Run the Citrix Provisioning Configuration Wizard. The farm should already be configured, so just click Next a few times and let it upgrade the database and restart the services.
- In-place upgrade the PVS Console and PVS Server software on the remaining Citrix Provisioning Servers. After installation, run the Citrix Provisioning Configuration Wizard, and click Next until the end.
- Temporary SQL sysadmin permissions can now be removed.
- Target Device Software can now be upgraded.
There are several methods of upgrading the Citrix Provisioning Target Device Software that’s inside a vDisk:
- In-place upgrade the Target Device Software while doing your normal vDisk update process.
- Completely rebuild the vDisk. An automated build process like MDT is recommended.
- Or you can reverse image. To upgrade VMware Tools (or any software that modifies the NIC), you must reverse image.
To in-place upgrade Target Device software:
- Create a new vDisk Maintenance version or put the vDisk in Private Image mode. Then boot an Updater Target Device. This is the normal process for updating a vDisk.
- Run the LTSR 2402, LTSR 2203 CU4, or LTSR 1912 CU8 Target Device software installer to upgrade the software. The Target Device software must be the same version or older than the Citrix Provisioning Servers.
- Shut down the Updater. Promote the Maintenance version to Production or change the vDisk to Standard Image mode. This is the normal process for updating a vDisk.
Reverse image methods:
- Boot from VHD – Build a VM. Copy Citrix Provisioning vDisk VHD/VHDX to VM. Boot from VHD/VHDX.
- Hyper-V can boot from a VHD directly. Copy Citrix Provisioning vDisk VHD/VHDX to Hyper-V host. Create a VM that boots from VHD/VHDX.
- Citrix Image Portability Service can convert PVS VHD to VMware .vmdk.
- Once VHD/VHDX is updated, copy the VHD/VHDX back to Citrix Provisioning, import to a Citrix Provisioning Store, which creates a new vDisk, and assign the new vDisk to target devices. Takes effect at next Target Device reboot.
If using Citrix Provisioning Accelerator, keep XenServer patched.
To upgrade the operating system version of the Citrix Provisioning Servers:
- In-place upgrade the existing Citrix Provisioning Servers to a version that supports the new operating system version.
- Build one or more new virtual machines with the new operating system version.
- Install Citrix Provisioning Server software with the same version as the other Citrix Provisioning Servers.
- Run Citrix Provisioning Configuration Wizard and join the new machines to the existing Citrix Provisioning farm and Citrix Provisioning database.
- Copy the vDisk files from an existing Citrix Provisioning Server to the new Citrix Provisioning Servers. Check Replication Status of each vDisk.
- Install the App Layering Citrix Provisioning Agent.
- In Citrix Provisioning Console, reconfigure Bootstrap to point to the new Citrix Provisioning Servers. Go to Sites > MySite > Servers > right-click each server and click Configure Bootstrap.
- Reconfigure DHCP Options or BDM to point to the new Citrix Provisioning Servers. Do one or more of the following:
- Reconfigure TFTP load balancing to point to the new Citrix Provisioning Servers.
- Change DHCP Scope Options 66/67 to the new Citrix Provisioning Servers.
- Create a new Boot ISO with the new Citrix Provisioning Servers.
- Use the Citrix Provisioning Console to update the BDM Partition on each Target Device.
- Start the PXE Service on the new Citrix Provisioning Servers and stop the PXE Service on the old Citrix Provisioning Servers.
- Reboot some Target Devices to make sure they work.
- In Citrix Provisioning Console, delete the old Citrix Provisioning Servers.
- Decommission the old Citrix Provisioning Servers.
Virtual Delivery Agents (VDA)
To in-place upgrade the Virtual Delivery Agent software:
Instead of in-place upgrading the VDAs, you can also rebuild them with the new software versions. If rebuilding, use an automated method, like MDT.
To upgrade the operating system version of the Virtual Delivery Agents, it’s recommended to rebuild the VDA. But keep in mind the following:
- Windows 11 is not supported by VDA 1912 LTSR, but Windows 11 is supported with VDA 2109 and newer.
- Windows 10 version upgrades should be a rebuild, not an in-place upgrade.
- If you in-place upgrade, uninstall VDA software, upgrade Windows, then reinstall VDA software.
- Citrix App Layering might require in-place upgrade of Windows 10 due to other layers being linked to the OS Layer.
- Newer VDA operating system versions use newer profile versions, which means older profiles will not work.
- Newer RDSH operating system versions require newer RDS Licensing Servers and newer RDS Licenses.
- GPO settings– Newer OSs have newer Microsoft GPO settings.
StoreFront
StoreFront is the most problematic component to upgrade so be prepared to roll back.
- Newer versions of StoreFront installer are adding pre-upgrade checks to prevent known upgrade issues.
Citrix does not support mixing StoreFront versions within a single Server Group, and they instead prefer that you do this: (source = Upgrade StoreFront at Citrix Docs)
- It’s critical that you snapshot the StoreFront machines before beginning the upgrade since there is no rollback from a failed upgrade.
- Remove a StoreFront sever from the Server Group and load balancing.
- Prep: close consoles, close PowerShell, logoff other admins, etc.
- Upgrade the removed server by installing one of the following:
- StoreFront LTSR 2402.
- StoreFront LTSR 2203 CU5.
- StoreFront LTSR 1912 CU8.
- If upgrade fails, review the install logs to determine the cause. Once the cause is determined, revert the VM to prior snapshot, and try the upgrade again.
- Upgrade the HTML5 Workspace app installed on StoreFront. The instructions for all StoreFront versions are the same.
- Swap out the upgraded server on the load balancer so all traffic goes to the new server.
- Uninstall/reinstall StoreFront on the remaining StoreFront servers and join the first server that was already upgraded.
To upgrade the operating system version of the StoreFront Servers:
- Build one or more new virtual machines with the new operating system version.
- Install StoreFront software. Configuration export/import requires the new servers to run the same version of StoreFront as the old servers. After the config is imported, you can in-place upgrade the new StoreFront servers.
- Do one of the following:
- Export the StoreFront configuration from the old servers and import to the new servers.
- Manually configure the new StoreFront Server Group to match the old StoreFront Server Group. This configuration includes: Base URL, entries under Manage Delivery Controllers (case sensitive), SRID (c:\inetpub\wwwroot\Citrix\Roaming\web.config), export/import subscriptions, Beacons, Gateways, Icon Aggregation, etc. Keeping the new configuration identical to old allows Workspace app to failover without any reconfiguration.
- (unsupported): join the new machines to the existing Server Group. This causes configuration and subscriptions to replicate to the new server. Citrix does not support mixing operating system versions in the same StoreFront server group.
- Copy customizations (e.g., default.ica) from old StoreFront to new StoreFront.
- Upgrade the HTML5 Workspace app installed on StoreFront. The instructions for all StoreFront versions are the same.
- Test the new StoreFront by modifying HOSTS file on test workstations. Make sure existing Workspace app can connect to the new StoreFront.
- On cutover night, reconfigure the load balancer to point to the new StoreFront servers instead of the old StoreFront servers.
- Decommission the old StoreFront servers.
Workspace app for HTML5
Workspace app for HTML5 is usually released on a different schedule than StoreFront and is upgraded out-of-band.
- There is no LTSR version of Workspace app for HTML5 so you should upgrade to the latest Workspace app for HTML5, especially for the newer features (e.g. multi-monitor, USB redirection).
To in-place upgrade Workspace app for HTML5:
- Upgrade the HTML5 Workspace app installed on StoreFront. The instructions for all StoreFront versions are the same.
- Upgrade the Chrome File Access software that’s installed on the VDA machines.
Director
To in-place upgrade the Director servers:
- Ensure the Delivery Controllers are already upgraded. There’s no point in upgrading Director if Delivery Controllers aren’t upgraded.
- In-place upgrade to one of the following versions:
- Director LTSR 2402
- Director LTSR 2203 CU5
- Director LTSR 1912 CU8
- Upgrading Director overrides modifications to LogOn.aspx (e.g., default domain name), so you’ll have to reapply them.
- Repeat for the remaining Director servers.
- Upgrade the StoreFront Probes.
To upgrade the operating system version of the Director servers, it’s easier if you have a custom DNS name or load balanced DNS name for Director instead of using a server name:
- Make sure Delivery Controllers are running a version that supports the OS you intend for Director.
- Build new Director servers with the same version or newer than the Delivery Controllers.
- Configure the new Director servers to point to the same Delivery Controllers as the old Director servers.
- Copy the Director data files from the old Director servers to the new Director servers. Or point the new Director servers to the existing UNC path.
- Cutover:
- If you have a load balanced DNS name for Director, reconfigure the load balancer to point to the new Director servers.
- If you have a custom DNS name for Director, change it to resolve to the new Director server’s IP address.
- If you were previously using the actual server name, then you can either inform users of the new Director server name, or delete the old Director server and rename the new Director server, or delete the old Director server and reconfigure the old DNS name as a custom DNS name for the new Director server.
- Also reconfigure the StoreFront probes to point to the new Director name.
- Decommission the old Director servers.
Citrix Group Policy Management Plug-in
On any machine that has Group Policy Management installed, in-place upgrade the Citrix Group Policy Management Plug-in by running the installer from the Citrix Virtual Apps and Desktops (CVAD) LTSR 2402, CVAD LTSR 2203 CU5, or CVAD LTSR 1912 CU8. Or download it from the DaaS download page.
Profile Management Group Policy Templates
Profile Management service is included with Virtual Delivery Agent. Upgrading the VDA also upgrades Profile Management.
New templates don’t break existing functionality – Upgrading the Profile Management group policy templates (.admx files) will not affect existing functionality. The templates do nothing more than expose new settings that can be configured.
To in-place upgrade the Profile Management Group Policy Templates:
- Copy the newer Profile Management Group Policy Templates to the PolicyDefinitions folder: either Sysvol, or C:\Windows on every group policy editing machine.
- Look for older versions of the templates and delete them. Older template files have the version number in their name (e.g., ctxprofile7.19.0.admx).
- Edit the VDA GPOs that have Profile Management settings configured. Review the new settings, and configure them, if desired. Review the Profile Management release notes for the list of new features.
Workspace app Group Policy Templates
New templates don’t break existing functionality – Upgrading the Workspace app group policy templates (.admx files) will not affect existing functionality. The newer templates do nothing more than expose new settings that can be configured.
To in-place upgrade the Workspace app Group Policy Templates:
- Copy the newer Workspace app Group Policy Templates to the PolicyDefinitions folder: either Sysvol, or C:\Windows\PolicyDefinitions on every group policy editing machine. Overwrite existing template files.
- LTSR Workspace app and Current Release Workspace app have different versions of the group policy template files.
- Current Release Workspace app template files include all of the LTSR Workspace app settings, plus new settings that don’t apply to LTSR Workspace app.
- If you are deploying a newer Current Release Workspace app version, edit the GPOs that have Workspace app settings configured, review the new settings, and configure them, if desired. Review the Workspace app release notes for the list of new features.
Workspace app
To in-place upgrade Workspace app:
- Microsoft Configuration Manager – Use Microsoft Configuration Manager or similar to push one of the following versions:
- StoreFront delivery of Workspace app – If Workspace app is offered directly from StoreFront servers, copy the newer Current Release Workspace app to StoreFront 3.12+.
- StoreFront, by default, does not offer Workspace app upgrades to users but it can be enabled. If Workspace app upgrades are not offered, then Workspace app is provided by StoreFront only if there’s no Workspace app installed on the client device.
- In StoreFront 3.5 and newer, enable Upgrade plug-in at logon at the same place you upload the Workspace app files.
- For StoreFront 3.0 and older, edit C:\inetpub\wwwroot\Citrix\StoreWeb\web.config and set upgradeAtLogin to true.
- Auto-update – In Workspace app, if Auto-Update is enabled, then users with permissions will receive an update notification. Users can then manually initiate the Workspace app upgrade.
- You can configure group policy or an install switch to only update to LTSR versions of Workspace app.
- Manual update – Inform remote users to upgrade their Workspace app by downloading the Current Release version from http://workspace.app.
- If Workspace app was initially installed as an administrator, then only an administrator can upgrade it.
- If Workspace app was initially installed without administrator permissions, then each non-admin user on the same machine has a different Workspace app installation, and each user has to upgrade it separately.
Skype for Business HDX RealTime Optimization Pack
The Skype for Business HDX RealTime Optimization Pack is usually released separately from the main Citrix Virtual Apps and Desktops (CVAD) releases.
To in-place upgrade HDX RealTime Optimization Pack:
- On the VDAs, install the HDX RealTime Connector.
- 2.9 is the last version of Skype for Business HDX RealTime Optimization Pack.
- On each Workspace app machine, install the HDX RealTime Media Engine normally.
Federated Authentication Service (FAS)
To in-place upgrade the Federated Authentication Service (FAS) servers:
- On the existing FAS servers, run AutoSelect.exe from the Citrix Virtual Apps and Desktops (CVAD) 2402 LTSR ISO, the LTSR 2203 CU5 ISO, or the LTSR 1912 CU8 ISO, and click the button to install Federated Authentication Service. It’s a simple Next, Next, Next process.
- Newer versions of FAS might have newer group policy templates. If so, copy them to Sysvol, or C:\Windows\PolicyDefinitions on all group policy editing machines.
To upgrade the operating system version of the FAS servers:
- Build one or more new FAS servers.
- Request a Registration Authority certificate for each of the FAS servers.
- Change the group policy object for FAS to point to the new FAS servers. Run gpupdate on StoreFront and VDAs.
- Decommission the old FAS servers.
Customer Experience Improvement Program (CEIP)
Newer versions of Citrix Virtual Apps and Desktops (CVAD) components automatically enable Customer Experience Improvement Program (CEIP). To disable, see the following:
Citrix ADC Firmware
Test appliances – Ideally, Citrix ADC firmware upgrades should be tested on separate test appliances. VIPs on the test appliances should then be tested.
Downtime if no High Availability – If you only have a single Citrix ADC appliance, then upgrading the firmware will cause downtime while the appliance is rebooting.
GSLB and mixed versions – If GSLB Metric Exchange Protocol (MEP) is enabled, then the Citrix ADC appliances on both sides of the MEP connection can run different versions of firmware.
To in-place upgrade Citrix ADC Firmware:
- Save the config. Then download a copy of the ns.conf file, or perform a backup of the appliance and download the backup file.
- On the secondary appliance, install the newer firmware.
- To test the new firmware, perform an HA failover.
- Configuration changes made on the primary appliance will not be synchronized to the secondary appliance until the firmware on the secondary appliance is upgraded.
- You can failover HA again to revert to the older firmware.
- To downgrade, on the appliance you’ve already upgraded, you can perform the firmware upgrade process again, but this time upload the older firmware.
- On the primary appliance, install the newer firmware. A HA failover occurs automatically.